USER MANUAL SBT80 SCHEPPACH

https://www.scheppach.com/de/service


SBT-80
| DE | Mobiles Sandstrahlgerät
Originalbedienungsanleitung | 7 |
| GB | Mobile sandblaster
Translation of original instruction manual | 21 |
| FR | Sableuse mobile
Traduction des instructions d'origine | 32 |
3
4
5
6


Homepage: https://www.scheppach.com/de/service

https://www.scheppach.com/de/service

Explanation of the symbols on the product
Symbols are used in this manual to draw your attention to potential hazards. The safety symbols and the accompanying explanations must be fully understood. The warnings themselves will not rectify a hazard and cannot replace proper accident prevention measures.
| Warning - Read the operating manual to reduce the risk of injury. |
| Wear a dust protection mask. Harmful dust may be generated when sandblasting. |
| Wear safety goggles. Sparks created during work or fragments, chippings and dust ejected by the product can cause sight loss. |
| Wear hearing protection. |
| Wear safety gloves! |
| Wear safety shoes. |
| Make sure that other persons maintain a sufficient safety distance. |
| Attention! Danger of injury due to objects being flung away! Keep other people away. |
| Do not expose the Product to rain. The device may only be stationed, stored and operated in dry ambient conditions. |
| Warning! Never work in enclosed or poorly ventilated spaces. |
| The product complies with the applicable European directives. |
| We have marked points in this operating manual that impact your safety with this symbol. |
Table of contents:
Page:
- Introduction 23
- Description of the product 23
- Scope of delivery 23
- Proper use 24
- General safety instructions 24
- Residual risks 26
- Technical data 26
- Unpacking 26
- Layout 27
- Start up 27
- Cleaning 29
- Storage & transport 29
- Maintenance 29
- Repair & ordering spare parts 30
- Disposal and recycling 30
- Troubleshooting 31
- Declaration of conformity 47
1. Introduction
Manufacturer:
Scheppach GmbH
Günzburgrstere 69
D-89335 Ichenhausen
Dear Customer,
We hope your new product brings you much enjoyment and success.
Note:
In accordance with the applicable product liability laws, the manufacturer of this product assumes no liability for damage to the product or caused by the product arising from:
- Improper handling
Non-compliance with the operating manual,
- Repairs carried out by third parties, unauthorised specialists.
- Installing and replacing non-original spare parts
Application other than specified
Note:
Read through the complete text in the operating manual before installing and commissioning the device.
This operating manual should help you to familiarise yourself with your product and to use it for its intended purpose.
The operating manual includes important instructions for the safe, proper and economic operation of the product, for avoiding danger, for minimising repair costs and downtimes and for increasing the reliability and extending the service life of the product.
In addition to the safety instructions in this operating manual, you must also observe the regulations applicable to the operation of the product in your country.
Keep the operating manual package with the power tool at all times and store it in a plastic cover to protect it from dirt and moisture. They must be read and carefully observed by all operating personnel before starting the work.
The product may only be used by personnel who have been trained to use it and who have been instructed with respect to the associated hazards.
The required minimum age must be observed.
In addition to the safety instructions in this operating manual and the separate regulations of your country, the generally recognised technical rules relating to the operation of identical products must also be observed.
We accept no liability for accidents or damage that occur due to a failure to observe this manual and the safety instructions.
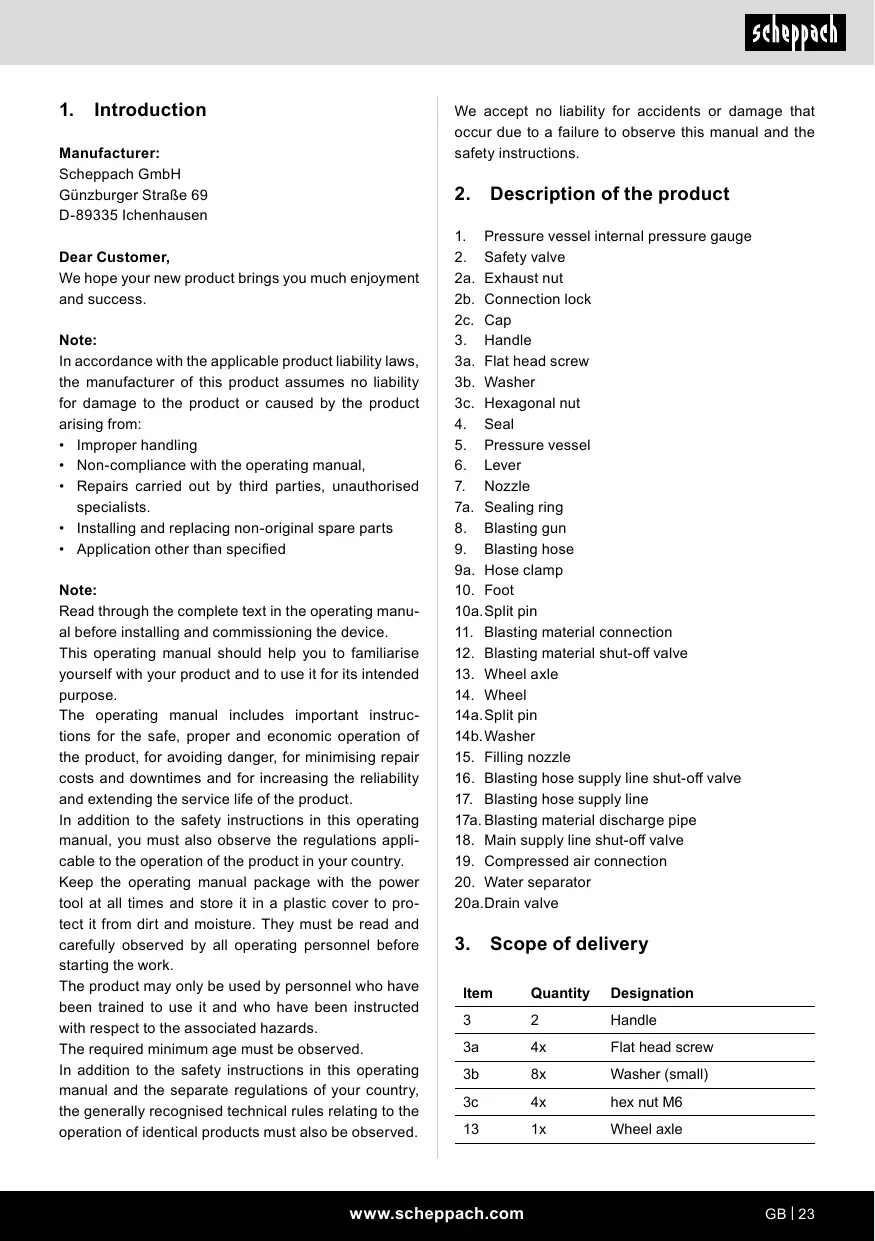
2. Description of the product
- Pressure vessel internal pressure gauge
- Safety valve
2a. Exhaust nut
2b. Connection lock
2c. Cap
- Handle
3a. Flat head screw
3b. Washer
3c. Hexagonal nut
- Seal
- Pressure vessel
- Lever
- Nozzle
7a. Sealing ring
- Blasting gun
- Blasting hose
9a. Hose clamp
- Foot
10a.Split pin
- Blasting material connection
- Blasting material shut-off valve
13.Wheel axle
14.Wheel
14a.Split pin
14b.Washer
- Filling nozzle
- Blasting hose supply line shut-off valve
- Blasting hose supply line
17a. Blasting material discharge pipe
- Main supply line shut-off valve
- Compressed air connection
- Water separator
20a.Drain valve
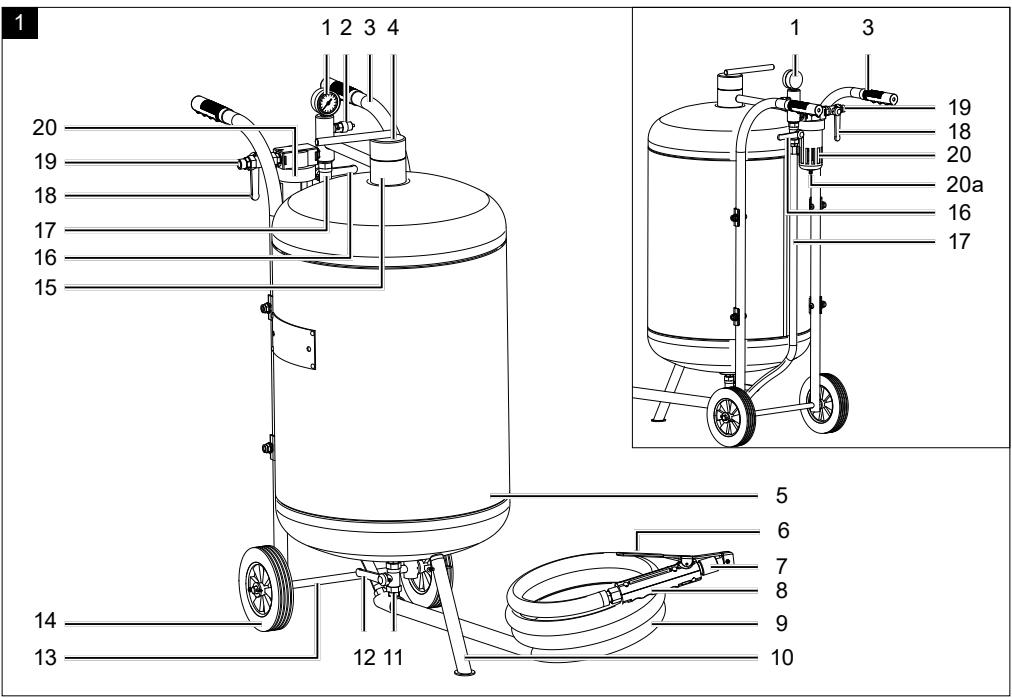
3. Scope of delivery
| Item | Quantity | Designation |
| 3 | 2 | Handle |
| 3a | 4x | Flat head screw |
| 3b | 8x | Washer (small) |
| 3c | 4x | hex nut M6 |
| 13 | 1x | Wheel axle |
| 14 | 2x | Wheel |
| 14a | 2x | Split pin |
| 14b | 4x | Washer (large) |
| 10 | 1x | Foot |
| 10a | 1x | Split pin |
| 5 | 1x | Pressure vessel |
| 9 | 1x | Blasting hose |
| 9a | 2x | Hose clamp |
| 8 | 1x | Blasting gun |
| 7 | 4x | Nozzle |
| A | 1x | Funnel |
| B | 1x | Protective cover |
| C | 1x | Sealing tape |
| 1x | Operating manual |
4. Proper use
The mobile sandblaster is used for cleaning various types of surfaces of rust, impurities, etc. by means of a compressed air stream with abrasive particles.
The product may only be used in the intended manner. Any use beyond this is improper. The user/operator, not the manufacturer, is responsible for damages or injuries of any type resulting from this.
An element of the intended use is also the observance of the safety instructions, as well as the assembly instructions and operating information in the operating manual.
Persons who operate and maintain the product must be familiar with the manual and must be informed about potential dangers.
In addition, the applicable accident prevention regulations must be strictly observed.
Other general occupational health and safety-related rules and regulations must be observed.
The liability of the manufacturer and resulting damages are excluded in the event of modifications of the product.
The product may only be operated with original parts and original accessories from the manufacturer.
The safety, operating and maintenance specifications of the manufacturer, as well as the dimensions specified in the technical data, must be observed.
Please note that our products were not designed with the intention of use for commercial or industrial purposes. We assume no guarantee if the product is used in commercial or industrial applications, or for equivalent work.
The product is intended for use by adults. Children under the age of 16 may only use the product when supervised. The manufacturer is not liable for damage caused by an improper use or incorrect operation of this device.
5. General safety instructions
We have marked points in this operating manual that impact your safety with this symbol.
Furthermore, the operating manual contains other important text sections that are marked with the word "ATTENTION!".
Attention!
When using equipment, several safety warnings must be observed to prevent injuries and damage. For this reason, please carefully read this operating manual / safety instructions. If you hand the device over to another person, please hand over this operating manual / safety instructions as well. We accept no liability for accidents or damage that occur due to a failure to observe this manual and the safety instructions.
DANGER
A failure to observe these instructions poses an extreme danger of death or the risk of life-threatening injuries.
WARNING
A failure to observe these instructions poses a danger of death or the risk of serious injuries.
CAUTION
A failure to observe these instructions poses a minor to moderate danger of injury.
NOTE!
A failure to observe these instructions poses a risk of damage to the engine or other property.
Who is not permitted to use the device:
- Children and other people who do are not familiar with the usage instructions (local stipulations may specify a minimum age for users).
- People under the influence of alcohol, drugs and medication, as well as those who are tired or ill.
Safety at the workplace
- Keep your workplace clean and well-lit. Disorganised or poorly lit work areas can result in accidents. Act with foresight, observe what is being done and use common sense when using the device.
- Keep away from children and unauthorised persons. Carelessness can lead to loss of control over the product.
- Reinforced hoses should be used in areas particularly vulnerable to damage.
- The pressure line must be connected and disconnected with the main supply line shut-off valve closed.
- Do not interrupt the compressed air supply by squeezing or bending the lines.
- Gradually increase the air supply to the product to ensure that it works properly. If the product does not function properly, disconnect it from the compressed air immediately and contact the manufacturer's service department.
- Operate the product outdoors only.
Warning! Also secure the working area from unauthorised access. Only the user is allowed in the area of the sandblaster. Only persons who have the same protective equipment as the user may be at a distance of 2 metres from the device.
Personal safety
Safe use of the product
- Before any work, check for general damage or damage to moving parts (breakage of parts and components or other conditions that could affect the safe operation of the product). In the event of damage, the product must be sent for repair before use.
- Please note that the product's safety systems or equipment must not be tampered with or deactivated. Never remove any safety-related parts.
- Only use accessories from the manufacturer. Use of other accessories may result in injury to the user.
- Always keep the product in good operating condition.
- Make sure that all nuts, screw-fittings and screws are securely tightened so that the product is kept in a safe working condition.
- Do not transport the product by the pressure line or hang it from the pressure line.
- Maintenance and replacement of hoses, nozzles etc. should only be carried out with the compressed air supply switched off and the tank empty.
- Only compressed air shall be used to supply the product. It is prohibited to use other gases.
- Always hold the transport the product in an upright position.
- Only blasting material specially designed for sand-blasting shall be used for the product. It is strictly prohibited to use ordinary sand!
- Use only blasting material that is absolutely dry.
- When the product is transported or not in use, the pressure in the pressure vessel should be reduced. The pressure gauge should show a value of 0.
- The product must always be disconnected from the compressed air supply during any kind of break in work.
-
This product is only suitable for use on firm, level and smooth ground. Therefore, always ensure that you have a firm footing! And that all screw fittings, especially of the hoses, are sufficiently tightened.
-
Operate the product at an air pressure between 4.6 and a maximum of 8 bar! If the pressure is higher, the product may be damaged! This can also put people at risk.
- Before each use, check all hoses and other connections for firm seating and for damage.
Safety instructions for working with the blasting gun
- Ensure there is sufficient distance to the product, at least 2m , and keep the blasting gun away from the product during operation.
- Do not direct the pressure line or the blasting gun towards yourself, other people or animals.
Operation of pressure vessels
- Anyone who operates a pressure vessel must keep this in good working order, operate and monitor it correctly, perform the necessary maintenance and servicing works immediately and implement safety measures as required according to the circumstances.
- The regulatory authority can instruct necessary monitoring measures in individual cases.
- A pressure vessel must not be operated if it exhibits a defect that poses a danger to personnel or third parties.
- Check the pressure vessel for rust and damage each time before use. The pressure vessel shall not be operated if the pressure vessel is damaged or rusty. If you discover damage, please contact the customer service workshop.
6. Residual risks
Neglect of ergonomic principles
Negligent use of personal protective equipment (PPE)
Careless use or omission of personal protective equipment may result in serious injury.
- Wear prescribed protective equipment.
Human behaviour, misconduct
Always concentrate fully on all work.
Residual danger - Can never be excluded.
Behaviour in an emergency
In case of an accident, initiate the necessary first aid measures and seek medical assistance as quickly as possible.
7. Technical data
| Dimensions
(LxWxH mm) | 700x380x840 |
| Tank dimensions
(ØxH mm) | 382x674 |
| Pressure vessel volume (l) | 63 |
| Air consumption min (l/min) | 170 - 240 |
| Operating pressure (bar) | 4.1 - 8.6 |
| Blasting material to be used | Glass beads
Silicon carbide
Aluminium oxide |
| Max. filling quantity of blasting material (l) | 42 |
| Blasting hose length (m) | 2,5 |
| Blasting material diameter | 0.15 - 0.25 mm |
| Weight (kg) | 28,1 |
Subject to technical changes!
8. Unpacking
- Open the packaging and carefully remove the product.
- Remove the packaging material, as well as the packaging and transport safety devices (if present).
- Check whether the scope of delivery is complete.
- Check the product and accessory parts for transport damage. In the event of complaints the carrier must be informed immediately. Later claims will not be recognised.
- If possible, keep the packaging until the expiry of the warranty period.
- Familiarise yourself with the product by means of the operating manual before using for the first time.
- With accessories as well as wearing parts and replacement parts use only original parts. Spare parts can be obtained from your specialist dealer.
- When ordering please provide our article number as well as type and year of manufacture for the product.
WARNING!
The product and the packaging material are not children's toys! Do not let children play with plastic bags, films or small parts! There is a danger of choking or suffocating!
9. Layout
Attention! Always make sure the product is fully assembled before commissioning!
Tools required (not included in the scope of delivery):
- 1x open-ended spanner, size 10 mm
- 1x flat nose pliers
- 1x Phillips screwdriver
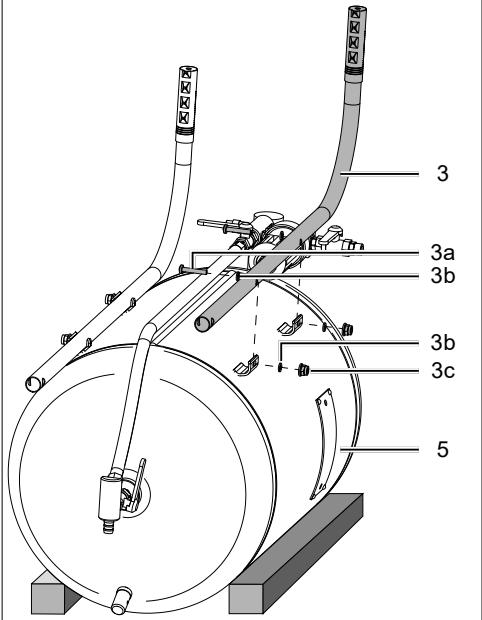
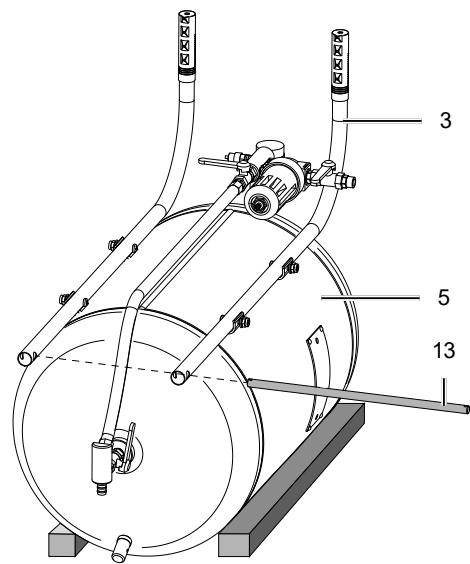
9.1 Installing the handles (Fig. 3)
- Set the pressure vessel down (5) with the front side on a suitable surface.
- Secure the product against slipping and toppling (e.g. with square timbers).
- Fit the handle (3), as shown in Fig. 2.
- Place a washer (3b) on each of two M6x35 flat head screws (3a) and insert them through the mounting holes from the inside. Screw them together with two washers (3b) and M6 hexagon nuts (3c).
Note: Do not fully tighten the screws.
- Repeat this process for the second handle (3).
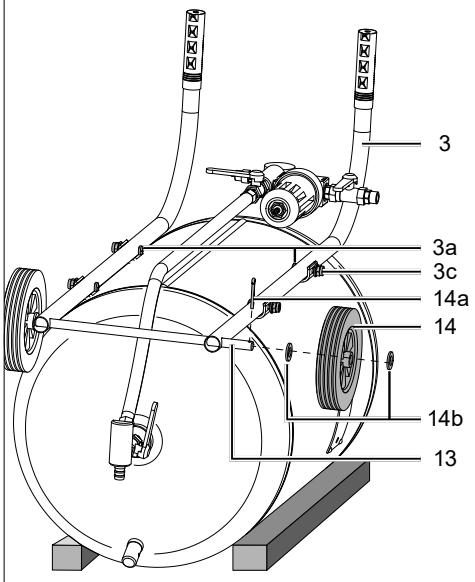
9.2 Fitting the wheels (Fig. 4, 5)
- Insert the wheel axle (13), as shown.
- Fit the wheels (14) provided as shown.
- Slide wheels (14) with the washers (14b) right and left onto the axle and secure with the split pin (14a).
- Now tighten all the M6x35 flat head screws (3a) on the handle (3).
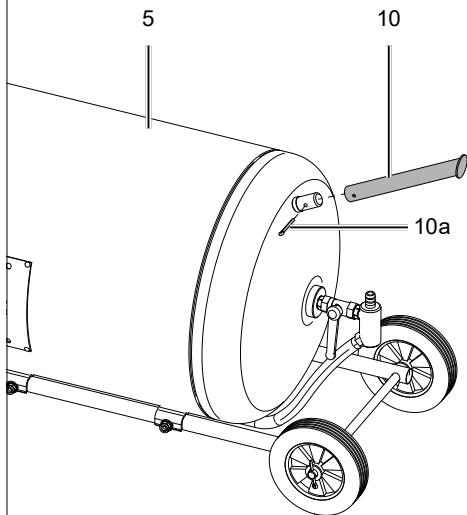
- Turn the pressure vessel (5) so that the front faces upwards.
- Fit the foot (10) provided as shown in.
- Secure the stand with a split pin (10a).
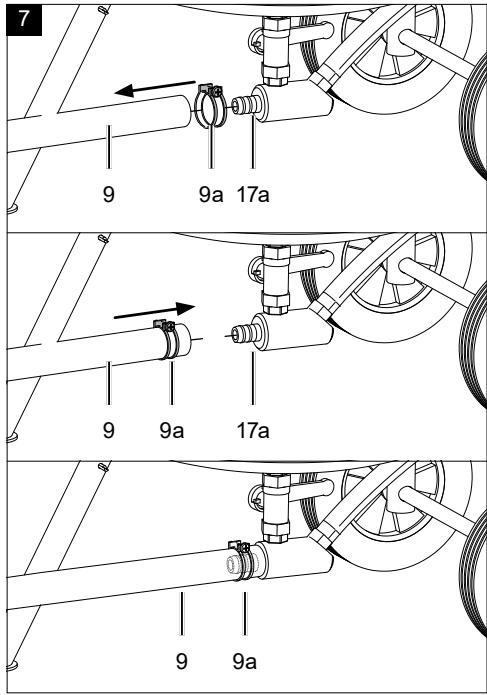
9.4 Mounting the blasting hose (Fig. 7)
- Fit the hose clamp (9a) to the blast hose (9).
- Now push the end of the hose as far as possible onto the blasting material discharge tube (17a).
- Push the hose clamp (9a) over the connection nipple and tighten it with a 10mm open-ended spanner.
Attention! After mounting the blasting hose (9), it is essential to check that it is firmly seated on the connection nipple.
9.5 Installing the nozzle on the blasting gun (Fig. 8)
WARNING!
Health hazard! When mounting the nozzle, there is a risk of crushing fingers and hands.
- To fit the correct nozzle (7), hold down the lever (6) and open the screw fitting by turning it anti-clockwise. Attention! Danger of crushing!
- Remove the sealing ring (7a) and the nozzle (7) and store them safely.
- Select one of the available nozzles (7) as required and insert it with the sealing ring (7a) into the screw connection.
- Hold the lever (6) down again and screw the nozzle (7) onto the blasting gun (8).
10. Start up
Attention!
Always make sure the product is fully assembled before commissioning!
- Systematically check the condition of nozzles, valves and hoses before each use. The abrasive material causes wear on the hose walls.
WARNING!
Health hazard!
Inhalation of vapours and dusts can cause serious damage to health, unconsciousness and in extreme cases death.
- Do not breathe in vapours or dusts.
- Operate the product outdoors only.
10.1 Selecting the right nozzle
Select the appropriate nozzle depending on the size (diameter) of the material.
- To mount the nozzle (7) on the blasting gun (8), proceed as described in 9.6.
Use material with the following grain size in the product: 0.15 - 0.25mm . The following abrasive materials are permissible:
Glass beads
Silicon carbide
Aluminium oxide
- Put on your personal protective equipment, i.e. respirator, safety goggles and gloves.
- Ensure that the blasting media is not damp. Check that the blasting material has the correct grain size of 0.15 - 0.25mm and that the supply lines are not blocked.
- Close the main supply line shut-off valve (18) on the air supply line and make sure that the pressure vessel internal pressure gauge (1) is at 0 bar.
- Close the blasting media shut-off valve (12).
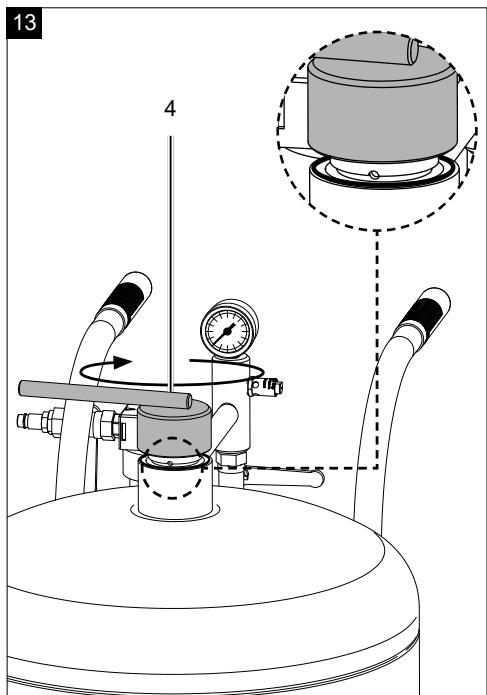
- Slowly open the seal (4) by turning anti-clockwise. NOTE: If you notice air escaping when opening the seal (4), wait until the pressure is completely released before opening the seal (4) completely.
- Fill the pressure vessel (5) with blasting media, with the help of a funnel (A). Note the max. filling capacity of 42 litres.
- Remove the funnel (A) again and close the pressure vessel (5) with the seal (4) by turning it clockwise.
10.4 Compressor requirements
-
The right compressor for sandblasting should meet the following requirements:
-
A pressure vessel of at least 100 litres capacity.
- A delivery rate of at least 170 litres/min.
NOTE!
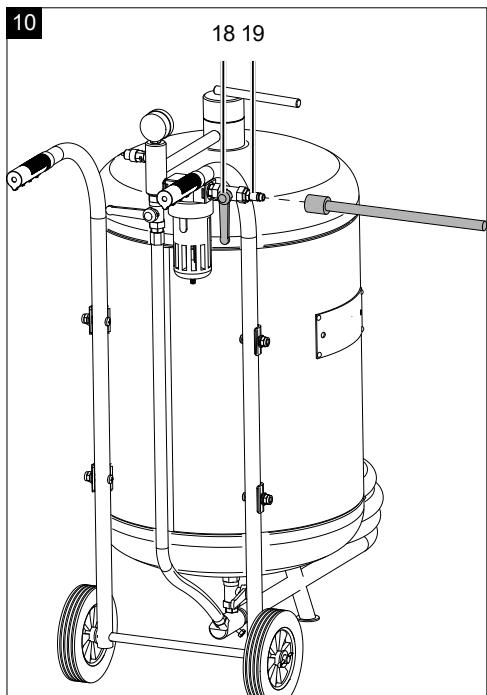
10.5 Connecting to the compressed air (Fig. 10)
- Before connecting the compressed air line, make sure that the main supply line shut-off valve (18) is closed.
- Connect the compressed air hose (not included in the scope of delivery) to the compressed air connection (19).
10.6 Working with the product (Fig. 1, 10, 11) WARNING!
Danger of injury! Make sure that other persons maintain a sufficient safety distance.
- Connect the compressed air hose to the compressed air connection (19) and set the preferred operating pressure on the compressor. It is recommended to use a pressure of 4.1 - 8.6 bar on the sandblaster to achieve the best results.
- Slowly open the main supply line shut-off valve (18).
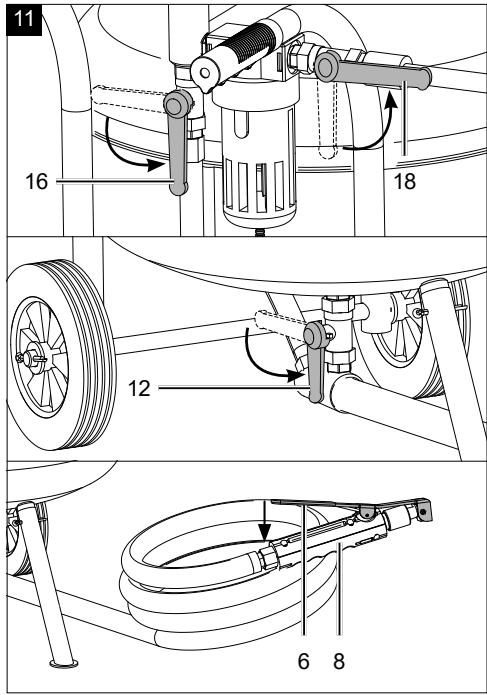
4 Then open the blasting hose supply line shut-off valve (16).
- Now slowly open the blasting material shut-off valve (12) until blasting material comes out of the blasting gun (8). This regulates the amount of sand that reaches the blasting gun (8) from the pressure tank (5). The best sandblasting results are achieved when the blasting material shut-off valve is opened to approx. 1/3.
- Hold the blasting gun (8) firmly, point it at the surface to be worked on and press the lever (6). When you release the lever (6), the supply of blasting material must be completely stopped.
- Clean the surface to be worked on by moving the blasting gun (8) slowly and evenly.
- After the work process, first close the blasting material shut-off valve (12) so that no blasting material remains in the lines.
- Close the main supply line shut-off valve (18).
- Switch the compressor off.
- Keep the lever (6) on the blasting gun (8) pressed until all the air has escaped from the lines.
- Close the blasting hose supply line shut-off valve (16).
- It is recommended to empty all of the blasting material out of the container after work to avoid clumping due to humidity.
10.7 Work hints and tips
When sandblasting, there are some important points that should be considered:
- Always wear protective clothing. Sandblasting can release small sand particles and dust that can irritate the eyes, skin and respiratory organs. It is important to wear protective clothing such as gloves, goggles and a respirator.
-
Prepare the surface: Before sandblasting, the surface should be thoroughly cleaned to remove dirt, grease and rust. This ensures an even blasting force.
-
Pressure and nozzle selection: The blasting pressure and nozzle selection must be matched to the surface to be treated in order to avoid damage and deformation.
- Correct blasting direction: The blasting direction should be perpendicular to the surface to ensure even removal.
- Keep your distance: The distance between the blasting nozzle and the surface should be kept constant to avoid damage.
- Disposal of the blasting material: Sand released during blasting may contain pollutants and should therefore be disposed of properly.
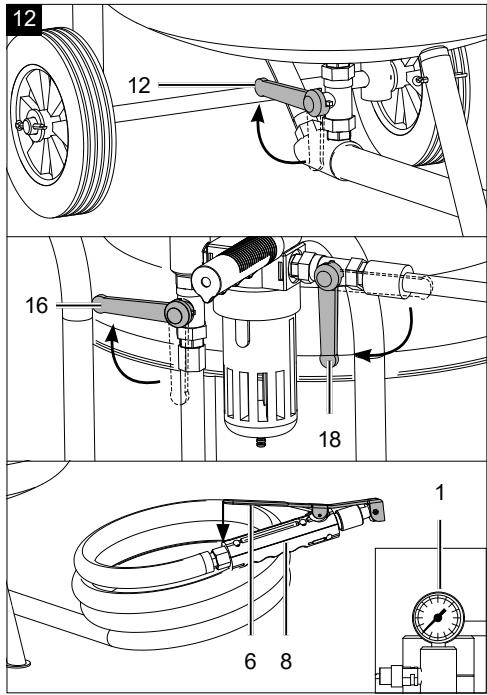
10.8 Releasing the pressure (Fig. 12, 13)
- After the work process, first close the blasting material shut-off valve (12) so that no blasting material remains in the lines.
- Close the main supply line shut-off valve (18).
- Switch the compressor off.
- Keep the lever (6) on the blasting gun (8) pressed until all the air has escaped from the lines.
- Slowly open the seal (4) by turning it anti-clockwise until the pressure relief holes are visible. This allows the remaining pressure to escape from the container.
NOTE! If you notice air escaping when opening the seal (4), wait until the pressure is completely released before opening the seal (4) completely.
10.9 Disconnect compressed air supply (Fig. 1)
- Close the main supply line shut-off valve (18).
- Switch the compressor off.
- Disconnect the compressed air hose from the compressed air connection (19).
11. Cleaning
Attention!
Depressurise the product before carrying out any cleaning or maintenance work! Danger of injury!
- Wipe the product with a clean cloth.
- We recommend that you clean the product directly after every use.
- Clean the product at regular intervals using a damp cloth and a little soft soap. Do not use any cleaning products or solvents; they could attack the plastic parts of the product. Make sure that no water can penetrate the interior of the product. Water penetration increases the risk of rust formation in the product.
12. Storage & transport
12.1 Storage
Attention!
Disconnect the compressed air hose from the compressed air connection.
Attention!
Store the product upright!
Store the product and its accessories in a dark, dry and frost-free place that is inaccessible to children.
The optimum storage temperature lies between 5 and 30^ .
Store the product in its original packaging. Cover the product to protect it from dust or moisture. Store the operating manual with the product.
12.2 Transport
The product can be tilted it up by means of the handle (1) so that it can be transported on the wheels (8).
The product must be secured against tipping and slipping during transport in vehicles in order to prevent damage and injuries.
13. Maintenance
Attention!
Depressurise the product before carrying out any cleaning or maintenance work! Danger of injury!
- The product shall not be operated if the pressure vessel (5) is damaged or rusty. If you discover damage, please contact the customer service workshop.
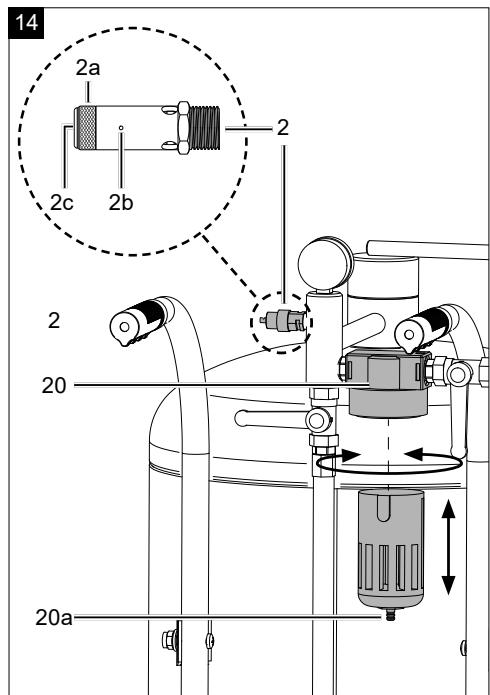
13.1 Safety valve (Fig. 14)
The safety valve (2) is set to the maximum permissible pressure of the pressure vessel (5). It is not permitted to adjust the safety valve (2) or to remove the connection lock (2b) between the drain nut (2a) and its cap (2c).
In order for the safety valve (2) to function properly when needed, it must be actuated every 30 operating hours and at least 3 times a year. Turn the perforated exhaust nut (2a) anti-clockwise to open it and use your hands to pull the valve rod outwards over the perforated exhaust nut (2a) to open the outlet of the safety valve (2). Now, the valve audibly releases air. Then, tighten the exhaust nut (9a) clockwise again.
13.2 Emptying the water separator (Fig. 14)
Emptying the water separator on a sandblaster is an important step to ensure that the device works effectively and damage is avoided.
Check the water separator regularly and empty it if necessary. This will ensure that the blasting device works effectively and will prolong the life of the device.
The device drains itself via the drain valve (20a) when the water separator is disconnected from the pressure.
- Close the main supply line shut-off valve (18).
- Release the pressure as described in 10.8.
- Press the latching switch and turn the water separator (20) until it can be removed. Remove the water separator downwards.
- Empty the water separator (20).
- Reinsert the water separator (20). Turn it in one direction until it clicks into place.
14. Repair & ordering spare parts
After any repair or maintenance work, make sure that all safety-related parts are in place and in perfect condition. All parts which may cause injury must be kept where they are inaccessible to children or others.
Attention: According to the German Product Liability Act, no liability is accepted for damage caused by improper repairs or by not using original spare parts.
Such work should be performed by a customer service centre or an authorised specialist. The same applies to accessory parts.
Spare parts and accessories can be obtained from our Service Centre. To do this, scan the QR code on the front page.
Important note in the case of repairs:
When returning the device for repair, for safety reasons, please ensure that the blasting media is completely removed.
14.1 Ordering spare parts
Please provide the following information when ordering spare parts:
- Model designation
Article number
Type plate data
Spare parts / accessories
Wheels - Article no.: 5914401002
Nozzle - Article no.: 5914401013
Manometer - Article no.: 5914401009
Blasting material discharge tube 5914401006
Spray gun - Article no.: 5914401003
Protective cover - Article no.: 5914401010
With this product, it is necessary to note that the following parts are subject to natural or usage-related wear, or that the following parts are required as consumables.
Wearing parts*: Sealing ring, blasting hose, nozzle, protective hood, blasting material discharge pipe
- may not be included in the scope of delivery!
15. Disposal and recycling
15.1 Notes for packaging


The packaging materials are recyclable. Please dispose of packaging in an environmentally friendly manner.
15.2 Disposal of sandblasting material
The disposal of sandblasting material depends on the type of material used for sandblasting and the local regulations and environmental laws in your region. In general, however, there are some steps you can follow to safely dispose of sandblasting materials:
- Collect the sandblasting material in suitable containers such as plastic or metal drums. Avoid using paper or plastic bags as they can tear and release the material.
- Check the material composition of the sandblasting material. If hazardous materials such as asbestos are involved, you should follow the specific regulations for the disposal of hazardous waste.
- Check local regulations and laws for disposal of sandblasting material. In some areas it may be necessary to have the sandblasting material collected by an approved disposal company.
-
Dispose of the sandblasting material in a way that does not harm the environment. Avoid discarding the sandblasting material in open areas such as fields, forests or bodies of water.
-
If possible, recycle the sandblasting material. Some materials can be recycled to make new products. You can contact local recycling companies to see if they accept the sandblasting material.
16. Troubleshooting
The following table shows fault symptoms and describes remedial measures in the event of your product failing to work properly. If you cannot localise and rectify the problem with this, please contact your service workshop.
| Fault | Possible cause | Remedy |
| Blasting media not delivered | Compressed air not con- nected | Connect the product to the compressor. |
| Too little pressure | Turn up the pressure regulator further / increase the pressure. |
| Compressor has too low a delivery capacity (min. 200 l/ min). Use another source of compressed air. |
| Check the product for leaks |
| Blasting material is too moist | Use dry blasting material. |
| Empty the water separator. |
| Blasting hose supply line shut-off valve closed | Blasting hose supply line shut-off valve open. |
| Too much blasting material discharged by the blasting gun | Blasting hose supply line shut-off valve opened too far | Close the blasting material supply line shut-off valve further. |
| Pressure loss | The safety valve leaks | Contact your local service centre.
Only allow qualified personnel to carry out repairs. |
| The seals are damaged | Check seals and replace if necessary. |
| The hose connections have a leak | Check the compressed air hose and tools and replace if necessary. |
| Seal not closed | Close the seal. |
| Safety valve does not switch off | Safety valve defective | Contact your local service centre.
Only allow qualified personnel to carry out repairs. |
| Safety valve incorrectly adjusted |
Noise: measured L_WA = xx dB; guaranteed L_WA = xx dB
P = xx KW; L/0 = cm
Notified Body:
Notified Body No.:
2016/1628/EU
Emission. No:
Standard references:
EN 12100:2010; EN 1248:2001+A1:2009
This declaration of conformity is issued under the sole responsibility of the manufacturer.
Subject to change without notice

Signature / Andreas Pecher / Head of Project Management
Documents registrar: Matthias Herz
Günzburger Str. 69, D-89335 Ichenhausen
Garantie DE
Apparent defects must be notified within 8 days from the receipt of the goods. Otherwise, the buyer's rights of claim due to such defects are invalidated. We guarantee for our machines in case of proper treatment for the time of the statutory warranty period from delivery in such a way that we replace any machine part free of charge which provably becomes unusable due to faulty material or defects of fabrication within such period of time. With respect to parts not manufactured by us we only warrant insofar as we are entitled to warranty claims against the upstream suppliers. The costs for the installation of the new parts shall be borne by the buyer. The cancellation of sale or the reduction of purchase price as well as any other claims for damages shall be excluded.
Garantie FR