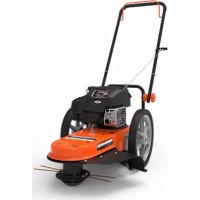
USER MANUAL MB 400 YARDFORCE
General safety warnings 6
Product safety warnings 11
Declaration of Conformity 13
INTENDED USE
The Robotic Mower is exclusively designed for mowing lawns. It is only intended for private use and is not suitable for commercial use.
Any other use that is not specifically approved in these instructions can result in damage to the Robotic Mower and could be a serious danger to the user.
This appliance MUST NOT be used by children and persons with reduced physical, sensory or mental capabilities or lack of experience and knowledge, unless they have been given supervision or instruction concerning use of the appliance by a person responsible for their safety.
Children should be supervised to ensure that they do not play with the appliance.
The owner or operator is responsible for accidents or harm to others people and their property.
The manufacturer cannot be held liable for damage caused by other incorrect operation of the Robotic Mower or if it is not used in line with its intended purpose.
SAFETY SYMBOLS
The purpose of safety symbols is to attract your attention to any possible dangers. The safety symbols and their explanations deserve your careful attention and full understanding. The symbol warnings do not, by themselves, eliminate any danger. The instructions and warnings they give are no substitute for proper accident prevention measures.

WARNING!
Be sure to read and understand all safety instructions within this operator's manual, including all safety alert symbols such as "DANGER", "WARNING", and "CAUTION" before using this tool. Failure to follow all instructions listed below may result in electric shock, fire and/or serious personal injury.
SAFETY ALERT SYMBOLS: Indicate DANGER, WARNING, or CAUTION. May be used in conjunction with other symbols or pictographs.
SYMBOL MEANINGS
This page depicts and describes safety symbols that may appear on this product. Read, fully understand and follow all instructions on the machine before attempting to assemble and operate.

Caution!
These instructions must be read.
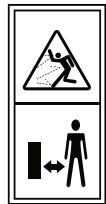
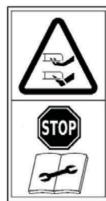
Danger of injury due to flung-out material! Keep bystanders well away from the machine.
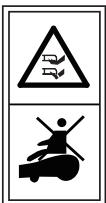
WARNING - Do not ride on the machine. CAUTION - Do not touch rotating blade.
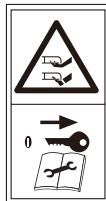
WARNING - Remove the disabling device before working on or lifting the machine.
WARNING – Keep your hands and feet away from the rotating blades. Never place your hands or feet close to or under the body when Robotic Mower is in operation.
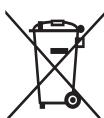

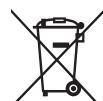
Return any discarded batteries to your local dealer, collector or recycle point. It is not permitted to dispose of this product as normal household waste.
Please recycle where facilities exist. Check with your local authority or retailer for recycling advice.
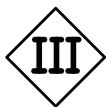
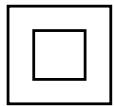
Class III equipment.

A product placed on the United Kingdom market meets the UKCA Marking requirements.
Warning Symbols on the switching power supply

Before use, refer to the corresponding paragraph in the manual.
Double insulation.

Pole orientation.
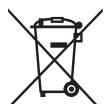

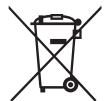
Waste electrical products should not be disposed of with household waste. Recycle where facilities exist. Check your local authority or retailer for recycling advice.

CE conformity mark

SMPS (Switch mode power supply unit) incorporating a short-circuit-proof safety isolating switching power supply.

SMPS (Switch mode power supply unit)
Ta:45 °C Rated maximum ambient temperature 45 °C

Transformer is for indoor use only.

A product placed on the United Kingdom market meets the UKCA Marking requirements.
Warning Symbols on battery pack
Batteries contain Li-Ion and should not be disposed with general household waste. Contact your local authority for disposal advice.
Li-Ion

Do not throw into water.

Do not throw on to fire.
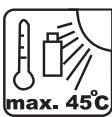
Do not subject the battery to strong sunlight over long periods and do not leave it in high Temperatures (max. 45^ ).
Waste electrical products should not be disposed of with household waste. Recycle where facilities exist. Check your local authority or retailer for
m = 311 ;
recycling advice.
GENERAL SAFETY WARNINGS

WARNING!
This machine can cause serious injuries. Follow instructions below to reduce risk of accident and injury.
IMPORTANT READ CAREFULLY BEFORE USE KEEP FOR FUTURE REFERENCE
PREPARATION
- Read the instructions carefully and make sure you understand them fully. Be familiar with the controls and the proper use of the machine.
- Never allow children, persons with reduced physical, sensory or mental capabilities or lack of experience and knowledge or people unfamiliar with these instructions use the machine.
- Local regulations may restrict the age of the operator. Children should be supervised to ensure that they do not play with the appliance.
- The operator or user is responsible for accidents or hazards occurring to other people or their property.
- Ensure the correct installation of the perimeter boundary system as instructed.
-
Periodically inspect the area where the machine is to be used and remove all stones, sticks, wires, and other debris which could cause damage to the machine or be unsafe.
-
Periodically visually inspect to see that the blades, blade bolts and cutter assembly are not worn or damaged. Replace worn or damaged blades and bolts in sets to preserve balance.
- Never leave the machine to operate unattended, especially while other people such as children and pets are in the area.
- Never use the machine to level out uneven patches.
- If the blades no longer cut correctly or if the motor is overloaded, check all the parts of your equipment and replace the worn parts. If a more extensive repair is required, contact the customer service centre.
USE
- Do not put hands or feet near or under rotating parts.
- Never pick up or carry the machine while the motor is running.
-
Remove the plug from the mains or remove the disabling device:
-
before clearing any blockages,
- before checking, cleaning or maintaining the machine,
- after striking a foreign object to inspect the machine for damage,
-
if the machine starts to vibrate abnormally, and to check for damage before restarting,
-
Start Robotic Mower according to the instructions. When the main power switch is in the ON position, make sure you keep your hands and feet away from the rotating blades.
-
Never lift the Robotic Mower or carry it around with the mains switch is in the ON position.
- Do not let persons use the mower who do not know how it works or behaves.
- Do not put anything on top of the Robotic Mower or its docking station.
- Do not use the Robotic Mower with defective blade discs, body, defective blades, screws, nuts etc.
- Avoid operating the machine in wet grass. Doing so can cause additional wear and tear, and will increase the amount of cleaning required.
WORK INTERRUPTIONS
- After the machine has been turned off, the cutting cylinder will continue to rotate for a few seconds. Keep hands and feet well away.
- Switch off the device. Only remove blockages when the machine is standing completely still.
- Switch off the power when the machine is transported, lifted or tilted.
- Never leave the machine unattended. Children should be supervised to ensure that they do not play with the appliance.
CAUTION!
The following below outlines measures to avoid damage and harm to both the Robotic Mower and people using it.
TAKING CARE OF YOUR MACHINE
-
Switch off the power when the machine is to be carried across uneven surfaces, for example steps.
-
Inspect the machine before each use. Never operate the machine if safety devices (e.g. impact protector, parts of the cutting facility or bolts) are missing, worn out or damaged. Check the power cable for damage. To avoid imbalance, all tools and bolts must be changed as complete sets.
- Only use spare parts and accessories that have been supplied or recommended by the manufacturer. The use of alien parts results in the immediate loss of all guarantee claims.
- Ensure that all nuts, bolts and screws are firmly tightened and that the machine is in a safe working condition.
- Never try to repair the machine yourself, unless you have been trained accordingly. All work that has not been listed in these instructions must only be carried out by authorised servicing agencies.
- Treat the machine with the greatest care. Always keep the tool clean. Follow the maintenance instructions.
- Never overload the machine. Always work within the specified capacity range. Do not use low-power machines for heavy-duty work. Do not operate the machine for purposes for which it is not intended.
ELECTRICAL SAFETY
CAUTION!
The following states how to avoid accidents and injuries due to electric shock:
-
Before each use, carry out a visual inspection of the power and length and type of extension cords to be used (not lighter than required by Clause 25.7) for any signs of damage or ageing. Damaged mains power cables increase the risk of electric shock.
-
Connect the machine to a power socket with a residual-current circuit breaker that has a rated current of no more than 30 ~mA .
- Always keep the extension cable well away from the cutting tools. Should the power cable become damaged during work, instantly disconnect the power cable from the mains. DO NOT TOUCH THE POWER CABLE BEFORE IT HAS BEEN DISCONNECTED FROM THE MAINS! Risk of electric shock.
- The supply cord cannot be replaced. If the cord is damaged the appliance should be scrapped.
- Keep extension cable away from blades and other moving parts. They may damage the cable and result in contact with live parts.
- Check that the mains voltage is the same as indicated on the rating plate.
MAINTENANCE AND STORAGE
- Keep all nuts, bolts and screws tight to be sure the machine is in a safe working condition.
- Replace worn or damaged parts for safety.
- Ensure that only the recommended replacement cutting blades are fitted.
- Ensure that batteries are charged using the charger supplied or recommended by the manufacturer. Incorrect use may result in electric shock, overheating or leakage of corrosive liquid from the battery.
Servicing of the machine should be carried out according to manufacturer's instructions.
-
In the event of leakage of electrolyte, flush with water/ neutralising agent, seek medical help if it comes into contact with the eyes.
-
Store the appliance with battery pack fully charged at room temperature (around 20^ ).
- Every deep discharge cycle decreases the capacity of battery pack. To prolong battery life, it is recommended to charge the battery every 6 months over extended periods of time without use.
TRANSPORT
The original packaging should be used when transporting the Robotic Mower over long distances.
To safely move from or within the working areas:
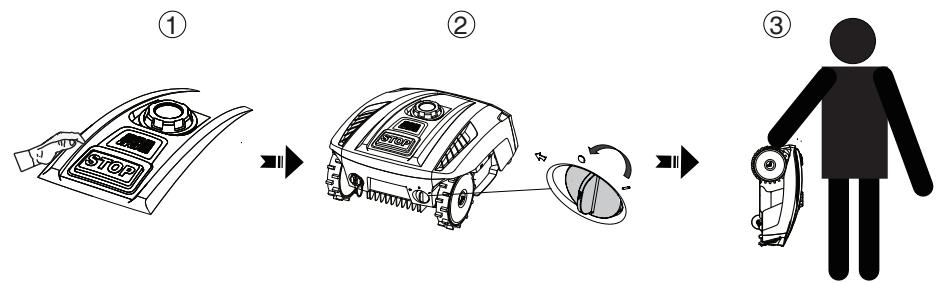
- Press the STOP button to stop the mower.
- Move the main switch button to the OFF position if you intended to carry the mower.
- Carry the Robotic Mower using the handle below at the rear. Carry the mower with the blade disc away from the body.
PRODUCT SAFETY WARNINGS
Not to touch moving hazardous parts before these have come to a complete stop.
Do not store anything heavy on the top of the Robotic Mower or docking station both during storage or when in use.
Never use the device if the main power switch is damaged or does not work properly. Never modify the main power switch. Set the main power switch to OFF for storage or when the device is not in use. Use the original packaging when transporting the Robotic Mower, especially for long distances.
If you need to carry the Robotic Mower from or within the working area, first press the STOP button to stop the device.
Secondly, ensure that the main power switch is switched OFF before you lift up your Robotic Mower.
Thirdly, carry the Robotic Mower by the carrying handle at the rear under the mower, keeping the blade disc away from your body as shown.
LIGHTNING PROTECTION
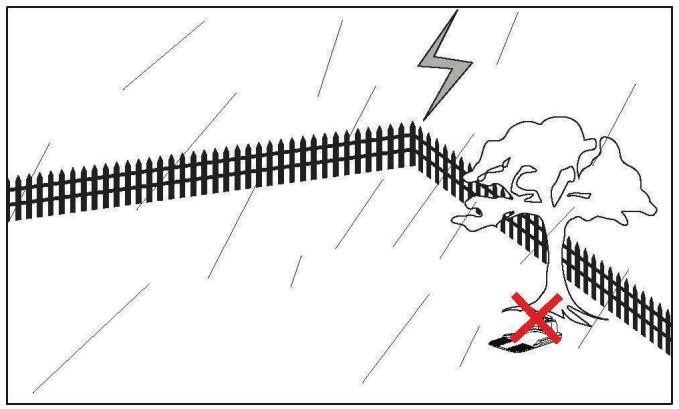
In order to prevent lightning damage to the machine, do not place the docking station under tall trees.
We
SUMEC UK
Unit A&B Escrick Business Park
Escrick, York YO19 6FD
Declare that the product:
Description: 20V Robotic Mower
Model No. MB 400
Function: Cutting grass
Supply of Machinery (Safety) Regulations 2008
EN 60335-1: 2012+A11+A13+A1+A14+A2+A15
EN 50636-2-107:2015+A1+A2+A3
EN 62233:2008
Radio Equipment Regulations 2017
NB0123, TUV SUD Product Service GmbH Ridlerstraße 65.80339 Munich.Germany
EU type examination certificate no.: TPS-RED 500307 i02
EN 55014-1:2017
EN 55014-2:2015
EN 301 489-1 V2.2.3
Draft EN 301 489-3 V3.2.4
Draft EN 303 447 V1.3.0
EN 300 328 V2.2.2
EN 50665:2017
EN IEC 61000-3-2:2019
EN 61000-3-3:2013/A1:2019
RoHS Directive 2011/65/EU
Authorized Signatory
Signature: M. Hall
Place:YORK
Name: Mariana Hall
General Manager
Date: 2022.11.12
SUMEC UK
Unit A&B Escrick Business Park
Escrick, York YO19 6FD

INHALTSVERZEICHNIS
Verwendung 15
Warnsymbolole 16
EU type examination certificate no.: TPS-RED 500307 i02
EN 55014-1:2017
EN 55014-2:2015
EN 301 489-1 V2.2.3
Draft EN 301 489-3 V3.2.4
Draft EN 303 447 V1.3.0
EN 300 328 V2.2.2
EN 50665:2017
EN IEC 61000-3-2:2019
EN 61000-3-3:2013/A1:2019
RoHS Directive 2011/65/EU
Unterschrift:
Ort: Willich
Name: Roland Menken
General Manager
Datum: 2022-11-12
MEROTEC GmbH
EU type examination certificate no.: TPS-RED 500307 i02
EN 55014-1:2017
EN 55014-2:2015
EN301489-1V2.2.3
Draft EN 301 489-3 V3.2.4
Draft EN 303 447 V1.3.0
EN 300 328 V2.2.2
EN 50665:2017
EN IEC 61000-3-2:2019
EN 61000-3-3:2013/A1:2019
RoHS Directive 2011/65/EU
Podpis:
Misto: Willich
type examination certificate no.: TPS-RED 500307 i02
EN 55014-1:2017
EN 55014-2:2015
EN 301 489-1 V2.2.3
Draft EN 301 489-3 V3.2.4
Draft EN 303 447 V1.3.0
EN 300 328 V2.2.2
EN 50665:2017
EN IEC 61000-3-2:2019
EN 61000-3-3:2013/A1:2019
RoHS Directive 2011/65/EU
Signature:
Lieu: Willich
Nom: Roland Menken
Directrice générale
Date: 2022-11-12
MEROTEC GmbH
m = 311
m = 311 ;
47877 Willich / Germany
EU type examination certificate no.: TPS-RED 500307 i02
EN 55014-1:2017
EN 55014-2:2015
EN 301 489-1 V2.2.3
Draft EN 301 489-3 V3.2.4
Draft EN 303 447 V1.3.0
EN 300 328 V2.2.2
EN 50665:2017
EN IEC 61000-3-2:2019
EN 61000-3-3:2013/A1:2019
RoHS Directive 2011/65/EU
Firma:
Luogo: Willich
ALGEMENE VEILIGHEIDSWAARSCHUWINGEN

WAARSCHUWING!
VEILIGHEIDSWAARSCHUWINGEN VOOR HET PRODUCT
BESCHERMING TEGEN BLIKSEM
47877 Willich / Germany
EU type examination certificate no.: TPS-RED 500307 i02
EN 55014-1:2017
EN 55014-2:2015
EN 301 489-1 V2.2.3
Draft EN 301 489-3 V3.2.4
Draft EN 303 447 V1.3.0
EN 300 328 V2.2.2
EN 50665:2017
EN IEC 61000-3-2:2019
EN 61000-3-3:2013/A1:2019
RoHS Directive 2011/65/EU
Handtekening:
Plaats: Willich
Naam: Roland Menken
Algemeen directeur
Datum: 2022-11-12
MEROTEC GmbH
47877 Willich, Germany
CE
ZAWARTOĆ
KONSERWACJA I PZEECHOWYWAIE
type examination certificate no.: TPS-RED 500307 i02
EN 55014-1:2017
EN 55014-2:2015
EN 301 489-1 V2.2.3
Draft EN 301 489-3 V3.2.4
Draft EN 303 447 V1.3.0
EN 300 328 V2.2.2
EN 50665:2017
EN IEC 61000-3-2:2019
EN 61000-3-3:2013/A1:2019
RoHS Directive 2011/65/EU
Poland Hulcm
Podpis:
Miasto: Willich