
GDGS12 - Saw YARDFORCE - Free user manual and instructions
Find the device manual for free GDGS12 YARDFORCE in PDF.
| Product type | Cordless reciprocating saw |
| Brand | YARDFORCE |
| Model | GDGS12 |
| Rated voltage | 12 V |
| No-load speed | 0 ~ 2,500 rpm |
| Stroke | 20 mm |
| Max cutting capacity (without jaw) | 80 mm |
| Max cutting capacity (with jaw) | 65 mm |
| Weight | 1.4 kg |
| Battery type | Li-ion, 1.5 Ah |
| Battery voltage | 12 V DC |
| Charger | JLH201261500G, input 220-240 V~, output 12.6 V / 1,500 mA |
| Charging time | 70 min |
| Sound pressure level (LpA) | 82.2 dB(A) |
| Guaranteed sound power level (LwA) | 97 dB(A) |
| Vibration (declared value) | 9.454 m/s² (K=1.5 m/s²) |
| Blades included | Premium wood blade, flexible metal blade, flexible wood and metal blade |
| Safety equipment | Lock button, front guard, automatic stop |
| Intended use | Cutting wood, plastic, construction materials, and branches |
| Charger protection class | II (double insulation) |
| Recommended charging temperature | 18 °C to 24 °C |
Frequently Asked Questions - GDGS12 YARDFORCE
User questions about GDGS12 YARDFORCE
0 question about this device. Answer the ones you know or ask your own.
Ask a new question about this device
Download the instructions for your Saw in PDF format for free! Find your manual GDGS12 - YARDFORCE and take your electronic device back in hand. On this page are published all the documents necessary for the use of your device. GDGS12 by YARDFORCE.
USER MANUAL GDGS12 YARDFORCE
natural_image
Technical line drawing of a mechanical tool assembly (no text or symbols)
Mail: yardforce-service@service-ses.de
Service address: Sertronics GmbH
Ostring 60, 66740 Saarlouis-Fraulautern, Germany
natural_image
Simple line drawing of a saw blade with no text or symbolsSägeblatt für Holz


natural_image
Simple gray rectangular object with a hole, resembling a blade or tool (no text or symbols)natural_image
Simple illustration of a saw blade with serrated edges and a circular end (no text or symbols)Description of Product Parts.... 31
Technical Specifications....32
Intended use.... 33
Safety Information....33
Assembly....45
Operation....47
Storing and Maintenance....52
Troubleshooting....53
EC Declaration of Conformity.... 54
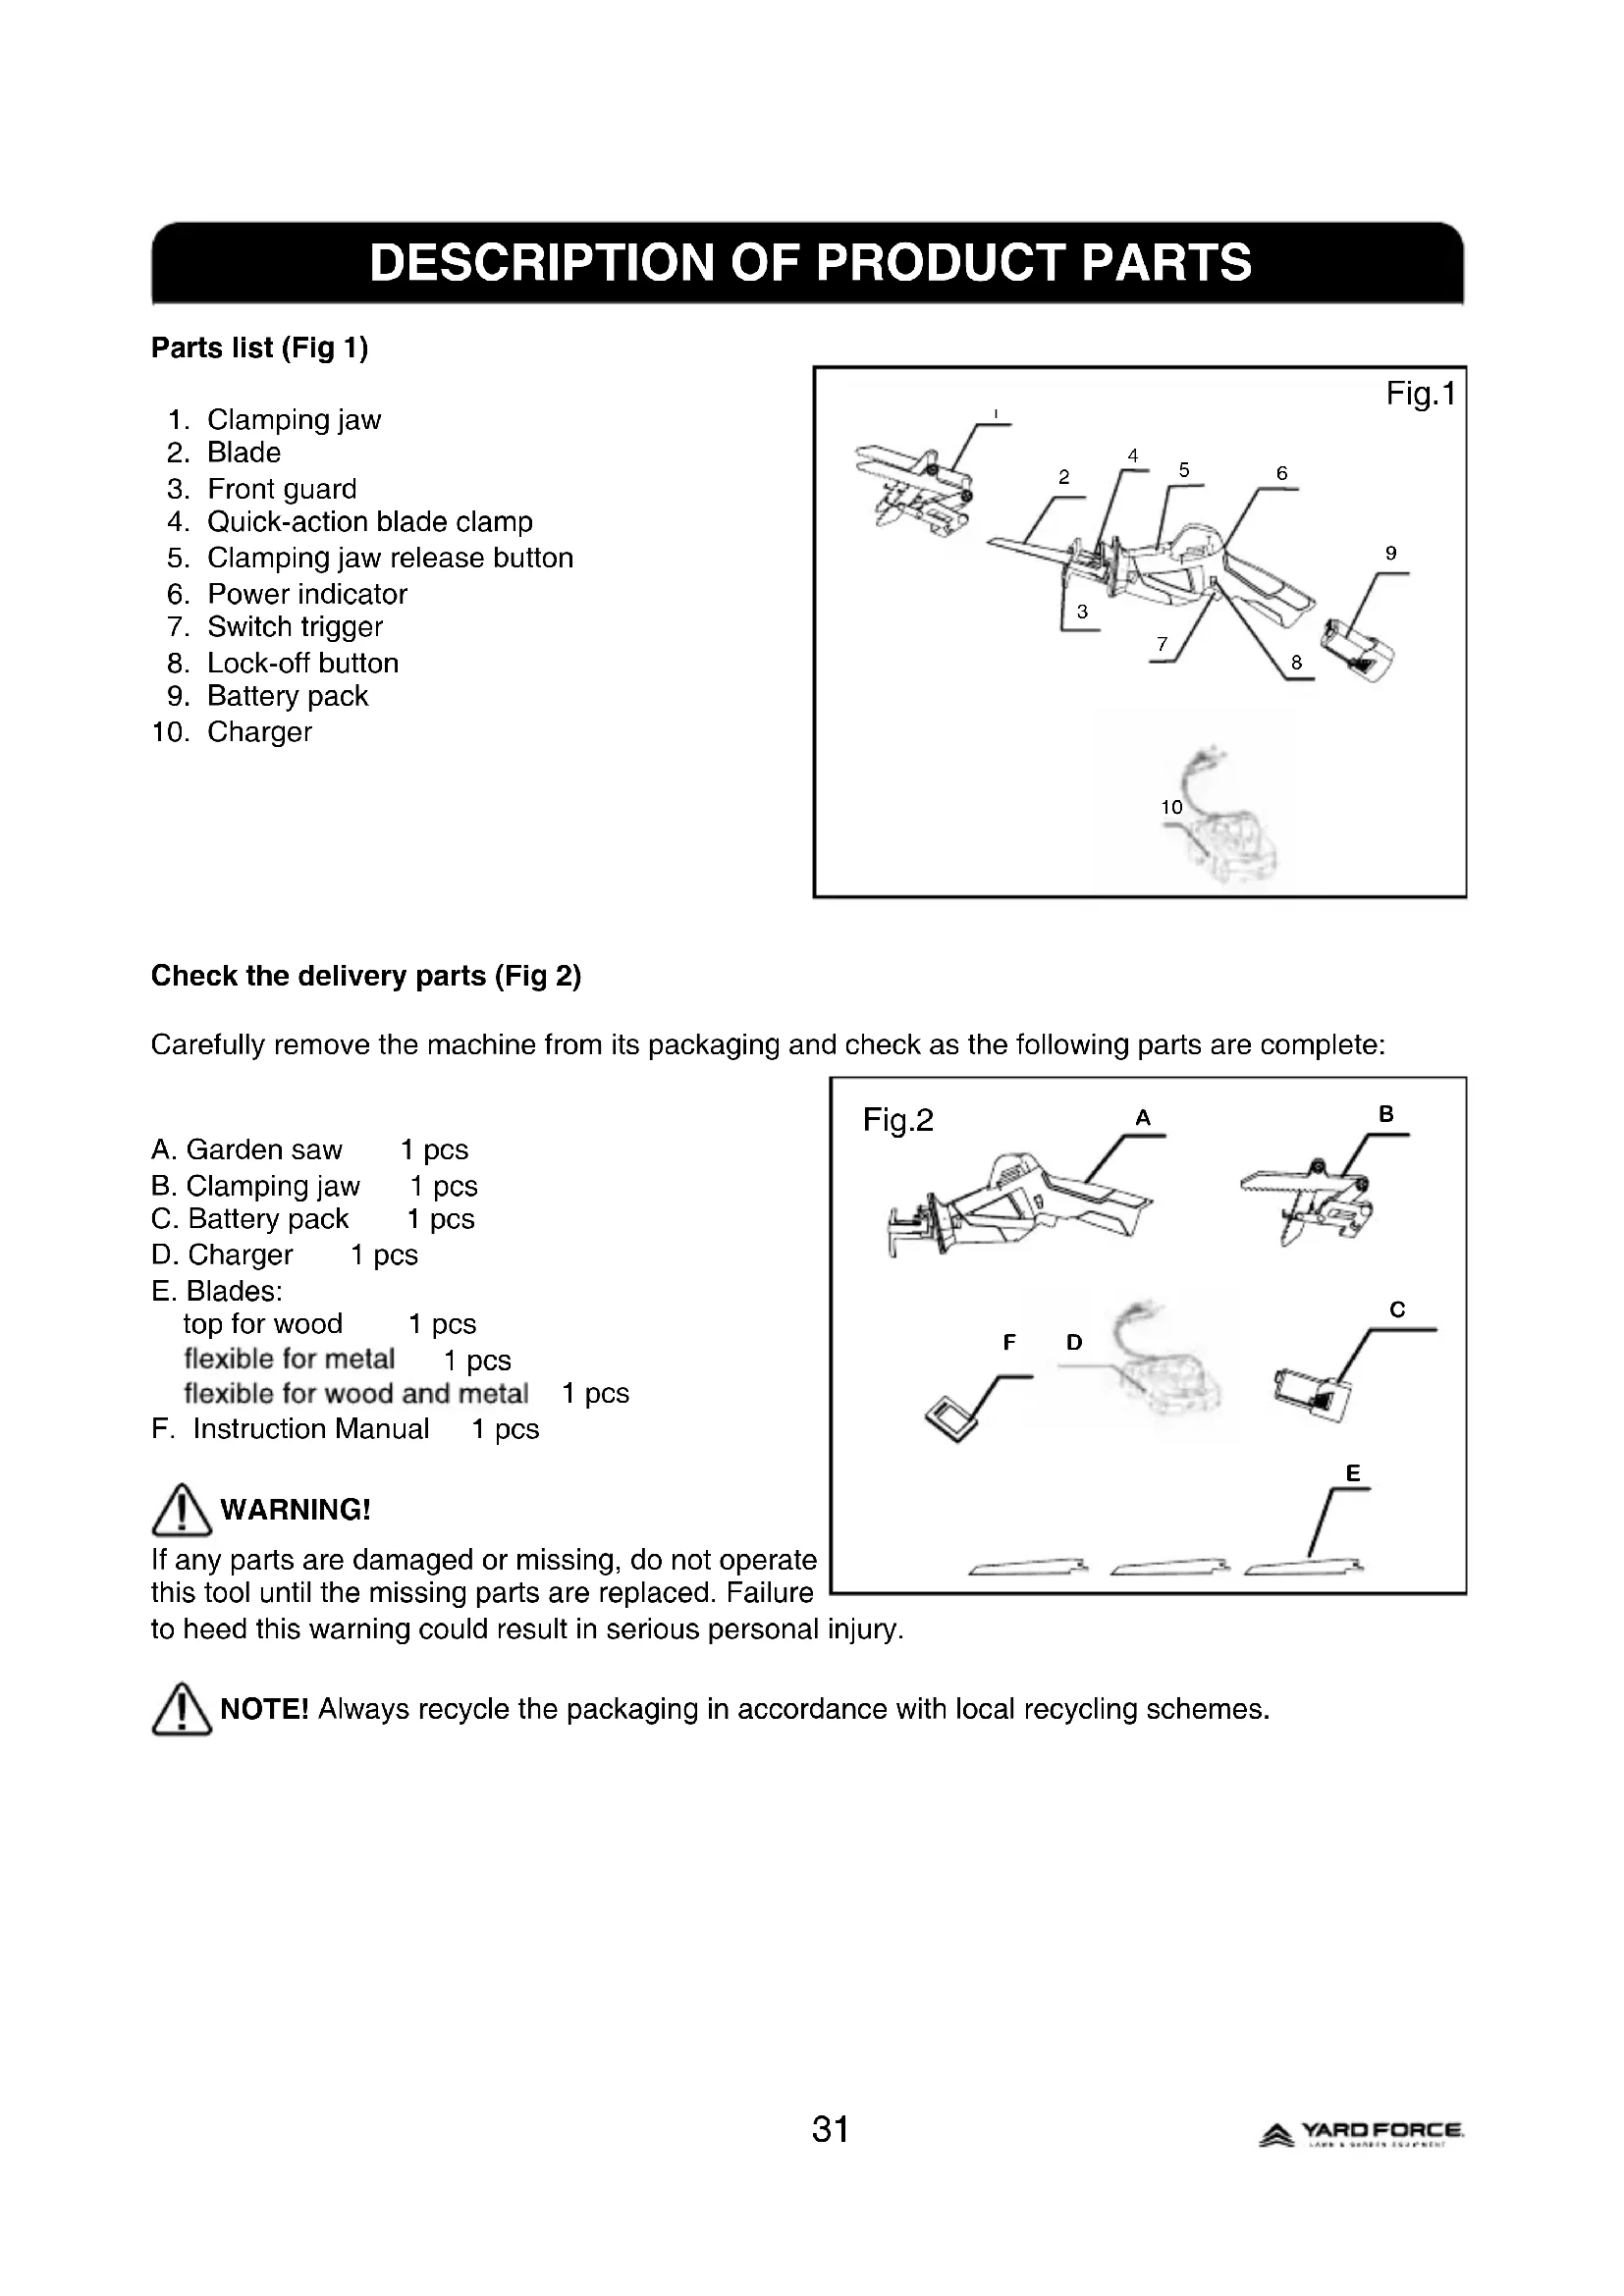
DESCRIPTION OF PRODUCT PARTS
Parts list (Fig 1)
- Clamping jaw
- Blade
- Front guard
- Quick-action blade clamp
- Clamping jaw release button
- Power indicator
- Switch trigger
- Lock-off button
- Battery pack
- Charger

Check the delivery parts (Fig 2)
Carefully remove the machine from its packaging and check as the following parts are complete:
A. Garden saw 1 pcs
B. Clamping jaw 1 pcs
C. Battery pack 1 pcs
D. Charger 1 pcs
E. Blades:
top for wood 1 pcs
flexible for metal 1 pcs
flexible for wood and metal 1 pcs
F. Instruction Manual 1 pcs

WARNING!
If any parts are damaged or missing, do not operate this tool until the missing parts are replaced. Failure to heed this warning could result in serious personal
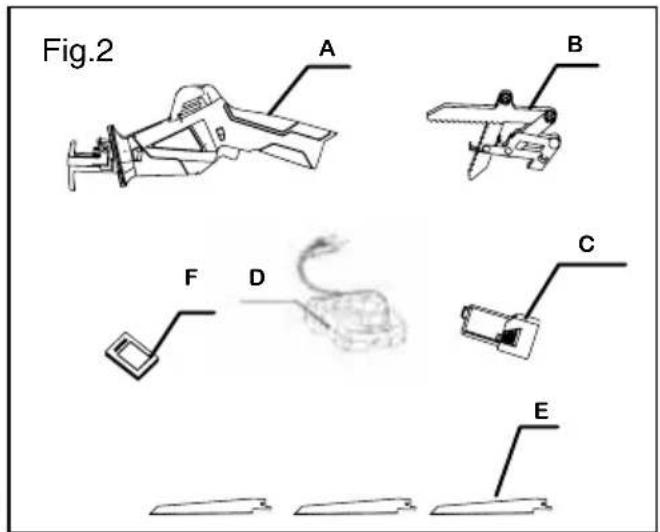

NOTE! Always recycle the packaging in accordance with local recycling schemes.
TECHNICAL SPECIFICATIONS
| Item No. GDGS12 | |
| Nominal voltage of product 12 V | --- |
| No-load speed 0~2500 rpm | |
| Stroke 20 mm | |
| Cutting capacity, max, diameter | |
| Without clamping jaw : 80 mm | |
| With clamping jaw : 65 mm | |
| Measured sound pressure level(LpA) 82.2 dB(A) | |
| Measured sound Power level(L wA) 93.2 dB(A) | |
| Uncertainty K 3 dB(A) | |
| Guaranteed sound power level(L wA) 97 dB(A) | |
| Weight 1.4 kg | |
| Vibrations 9.454 m/s2 K=1.5 m/s2 | |
| Battery Charger | |
| Battery Charger Type: JLH201261500G | |
| Input voltage 220-240 V ~ 50 Hz, 30 W | |
| Output voltage & current DC12.6 V 1500 mA | |
| Protection class | II |
| Charger time | 70 mins |
| Battery | |
| Battery type | ET-D1081 Li-ion |
| Battery capacity | 1.5 Ah |
| Nominal battery voltage | 12 V d.c. |
The sound values have been determined according to noise test code given in EN 60745. The sound intensity level for the operator may exceed 80 dB(A) and ear protection measures are necessary.
The declared vibration value has been measured in accordance with a standard test method (according to EN 60745) and may be used for comparing one product with another. The declared vibration value may also be used in a preliminary assessment of exposure.

WARNING! Depending on the actual use of the product the vibration values can differ from the declared total! Adopt proper measures to protect yourself against vibration exposures. Take the whole work process including times the product is running under no load or switched off into consideration.
Proper measures include among others regular maintenance and care of the product and cutting attachments, keeping hands warm, periodical breaks and proper planning of work processes.
INTENDED USE
The tool is intended for cutting wood, plastic and building materials. The tool is suitable for rough saw cuts, straight or curved cuts, and flush surface cuts. Used with the clamping jaw the tool is suitable for cutting branches
For safety reasons it is essential to read the entire instruction manual before first operation and to observe all the instructions therein.
This product is intended for private domestic use only, not for any commercial trade use. It must not be used for any purposes other than those described.
SAFETY INFORMATION
IMPORTANT
Please read these instructions fully before assembling and operating.
Description Of Symbols
Symbols are used in this manual to attract your attention to possible risks. The safety symbols and the explications which accompany them must be perfectly understood. The warning themselves do not prevent the risks and cannot be a substitute for proper methods of avoiding accidents.
Warning symbols on the machine

Before any use, refer to the corresponding paragraph in the present manual.

This symbol, before a safety comment, indicates a precaution, a warning or a danger. Ignoring this warning can lead to an accident you're yourself or for others.

Wear ear and eye protection when operating the reciprocating saw.

In very dusty work environments, always wear a breathing mask.

Do not expose and operate the tool in rain.

Keep bystanders a safe distance away from the power tool.

Keep away hands from moving parts.

Waste electrical products should not be disposed of with household waste. Please recycle where facilities exist. Check your local Authority or retailer for recycling advice.

The product complies with the applicable European directives and an evaluation method of conformity for these directives was done.
Warning symbols on the charger

Warning!

Read instruction manual.

The charger is for indoor use only.

Double insulation.

Pole orientation

Protective 2A limited

Waste electrical products should not be disposed of with household waste. Please recycle where facilities exist. Check your Local Authority or retailer for recycling advice.
Warning symbols on the battery back

Read instruction manual.

The product complies with the applicable European directives and an evaluation method of conformity for these directives was done.
Batteries contain Li-ion, waste batteries should be sorted for eco-friendly. Do not dispose of waste batteries as unsorted municipal waste.

Do not throw into water.

Do not litter to fire.

Do not subject the batteries to strong sunlight over long periods and do not leave it on a heater(max.45).
Waste electrical products should not be disposed of with household waste. Please recycle where facilities exist. Check your Local Authority or retailer for recycling advice.
SAFETY INSTRUCTIONS
GENERAL POWER TOOL SAFETY

WARNING!
WARNING Read all safety warnings and all instructions.
Failure to follow the warnings and instructions may result in electric shock, fire and/or serious injury.
Save all warnings and instructions for future reference.
The term “power tool” in the warnings refers to your mains-operated (corded) power tool or battery-operated (cordless) power tool.
Work area safety
- Keep work area clean and well lit. Cluttered or dark areas invite accidents.
- Do not operate power tools in explosive atmospheres, such as in the presence of flammable liquids, gases or dust. Power tools create sparks which may ignite the dust or fumes.
- Keep children and bystanders away while operating a power tool. Distractions can cause you to lose control.
Electrical safety
- Power tool plugs must match the outlet. Never modify the plug in any way. Do not use any adapter plugs with earthed (grounded) power tools. Unmodified plugs and matching outlets will reduce risk of electric shock.
-
Avoid body contact with earthed or grounded surfaces, such as pipes, radiators, ranges and refrigerators.
There is an increased risk of electric shock if your body is earthed or grounded. -
Do not expose power tools to rain or wet conditions. Water entering a power tool will increase the risk of electric shock.
-
Do not abuse the cord. Never use the cord for carrying, pulling or unplugging the power tool. Keep cord away from heat, oil, sharp edges or moving parts. Damaged or entangled cords increase the risk of electric shock.
-
When operating a power tool outdoors, use an extension cord suitable for outdoor use. Use of a cord suitable for outdoor use reduces the risk of electric shock.
-
If operating a power tool in a damp location is unavoidable, use a residual current device (RCD) protected supply. Use of an RCD reduces the risk of electric shock.
NOTE: The term “residual current device(RCD)” may be replaced by the term “ground fault circuit interrupter (GFCI)” or “earth leakage circuit breaker(ELCB)”
Personal safety
-
Stay alert, watch what you are doing and use common sense when operating a power tool. Do not use a power tool while you are tired or under the influence of drugs, alcohol or medication. A moment of inattention while operating power tools may result in serious personal injury.
-
Use personal protective equipment. Always wear eye protection. Protective equipment such as dust mask, non-skid safety shoes, hard hat, or hearing protection used for appropriate conditions will reduce personal injuries.
-
Prevent unintentional starting. Ensure the switch is in the off-position before connecting to power source and/or battery pack, picking up or carrying the tool. Carrying power tools with your finger on the switch or energizing power
tools that have the switch on invites accidents.
- Remove any adjusting key or wrench before turning the power tool on. A wrench or a key left attached to a rotating part of the power tool may result in personal injury.
- Do not overreach. Keep proper footing and balance at all times. This enables better control of the power tool in unexpected situations
- Dress properly. Do not wear loose clothing or jewellery. Keep your hair, clothing and gloves away from moving parts. Loose clothes, jewellery or long hair can be caught in moving parts.
- If devices are provided for the connection of dust extraction and collection facilities, ensure these are connected and properly used. Use of dust collection can reduce dust-related hazards.
Power tool use and care
- Do not force the power tool. Use the correct power tool for your application. The correct power tool will do the job better and safer at the rate for which it was designed.
- Do not use the power tool if the switch does not turn it on and off. Any power tool that cannot be controlled with the switch is dangerous and must be repaired.
- Disconnect the plug from the power source and/or the battery pack from the power tool before making any adjustments, changing accessories, or storing power tools. Such preventive safety measures reduce the risk of starting the power tool accidentally.
-
Store idle power tools out of the reach of children and do not allow persons unfamiliar with the power tool or these instructions to operate the power tool. Power tools are dangerous in the hands of untrained users.
-
Maintain power tools. Check for misalignment or binding of moving parts, breakage of parts and any other condition that may affect the power tool's operation. If damaged, have the power tool repaired before use. Many accidents are caused by poorly maintained power tools.
- Keep cutting tools sharp and clean. Properly maintained cutting tools with sharp cutting edges are less likely to bind and are easier to control.
- Use the power tool, accessories and tool bits etc. in accordance with these instructions, taking into account the working conditions and the work to be performed. Use of the power tool for operations different from those intended could result in a hazardous situation
Battery tool use and care
- Recharge only with the charger specified by the manufacturer. A charger that is suitable for one type of battery pack may create a risk of fire when used with another battery pack.
- Use power tools only with specifically designated battery packs. Use of any other battery packs may create a risk of injury and fire.
- When battery pack is not in use, keep it away from other metal objects, like paperclips, coins, keys, nails, screws or other small metal objects, that can make a connection from one terminal to another. Shorting the battery terminals together may cause burns or a fire.
- Under abusive conditions, liquid may be ejected from the battery; avoid contact. If contact accidentally occurs, flush with water. If liquid contacts eyes, additionally seek medical help. Liquid ejected from the battery may cause irritation or burns.
6) Service
a). Have your power tool serviced by a qualified repair person using only identical replacement parts. This will ensure that the safety of the power tool is maintained.
SAFETY WARNINGS FOR BATTERY PACK
- Do not dismantle, open or shred cells or battery pack.
- Do not short-circuit a battery pack. Do not store battery packs haphazardly in a box or drawer where they may short circuit each other or be short-circuited by conductive materials. When battery pack is not in use, keep it away from other metal objects, like paper clips, coins, keys, nails, screws or other small metal objects, that can make a connection from one terminal to another. Shorting the battery terminals together may cause burns or a fire.
- Do not expose battery pack to heat or fire. Avoid storage in direct sunlight.
- Do not subject battery pack to mechanical shock.
- In the event of battery leaking, do not allow the liquid to come into contact with the skin or eyes. If contact has been made, wash the affected area with copious amounts of water and seek medical advice.
- Seek medical advice immediately if a cell or battery pack has been swallowed.
- Keep battery pack clean and dry.
- Wipe the battery pack terminals with a clean dry cloth if they become dirty.
- Battery pack needs to be charged before use. Always refer to this instruction and use the correct charging procedure.
-
Do not maintain battery pack on charge when not in use.
-
After extended periods of storage, it may be necessary to charge and discharge the battery pack several times to obtain maximum performance.
- Battery pack gives its best performance when it is operated at normal room temperature ( 20 ^ ± 5 ^ ).
- When disposing of battery packs, keep battery packs of different electrochemical systems separate from each other.
- Recharge only with the charger specified by manufacturer. Do not use any charger other than that specifically provided for use with the equipment. A charger that is suitable for one type of battery pack may create a risk of fire when used with another battery pack.
- Do not use any battery pack which is not designed for use with the equipment.
- Keep battery pack out of the reach of children.
- Retain the original product literature for future reference.
- Remove the battery from the equipment when not in use.
- Dispose of properly.
GENERAL SAFETY WARNINGS FOR YOUR BATTERY CHARGER

WARNING Read all safety warnings and all instructions.
Failure to follow the warnings and instructions may result in electric shock, fire and/or serious injury.
Save all warnings and instructions for further reference.
- This appliance is not intended for use by persons (including children) with reduced physical, sensory or mental capabilities, or lack of experience and knowledge, unless they have been given supervision or instruction concerning use of the appliance by a person responsible for their
safety.
- Children should be supervised to ensure that they do not play with the appliance.
Additional Safety Instructions For Your Battery Charger
- Before charging, read the instructions.
- After charging, disconnect the battery charger from the supply mains. Then remove the chassis connection and then the battery connection.
- Do not charge a leaking battery.
- Do not use chargers for works other than those for which they are designed.
- Before charging, ensure your charger is matching the local AC supply.
- For indoor use, or do not expose to rain.
- The charging device must be protected from moisture.
- Do not use the charging device in the open.
- Do not short out the contacts of battery or charger.
- Respect the polarity “+/-” when charging.
- Do not open the unit and keep out of the reach of children.
- Do not charge the batteries of other manufactures or ill-suited models.
- Ensure that the connection between the battery charger and battery is correctly positioned and is not obstructed by foreign bodies.
- Keep battery charger's slots are free of foreign objects and protect against dirt and humidity. Store in a dry and frost-free place.
- When charging batteries, ensure that the battery charger is in a well-ventilated area and away from inflammable materials. Batteries can get hot during charging. Do not overcharge any batteries. Ensure that batteries and
chargers are not left unsupervised during charging.
- Do not recharge non-rechargeable batteries, as they can overheat and break.
- Longer life and better performance can be obtained if the battery pack is charged when the air temperature is between 18^ C and 24^ C. Do not charge the battery pack in air temperatures below 0^ C, or above 45^ C. This is important as it can prevent serious damage to the battery pack.
- Charge only battery pack of the same model provided by manufacturer and of models recommended by manufacturer.
Safety Warnings for Reciprocating Saw
- Hold power tool by insulated gripping surfaces, when performing an operation where the cutting accessory may contact hidden wiring. Cutting accessory contacting a “live” wire may make exposed metal parts of the power tool “live” and could give the operator an electric shock.
- Use suitable detectors to search for hidden supply lines, or call the local utility company for assistance. Contact with electric lines can lead to fire and electric shock. Damaging a gas line can lead to explosion. Penetrating a water line causes property damage.
- Keep hands away from the sawing area. Do not grip the underside of the work piece. Contact with the saw blade can lead to injuries.
- Keep hands away from the lifting rod and the quick-action blade clamp. Contact with the saw blade may result in injury.
- Apply the machine to the work piece only when switched on. Otherwise there is danger of kickback when
the cutting tool jams in the work piece.
- When the cut is completed, switch off the machine and then pull the saw blade out of the cut only after it has come to a standstill. In this manner you can avoid kickback and can place down the machine securely.
- Use only undamaged saw blades that are in perfect condition. Bent or dull saw blades can break, negatively influence the cut, or lead to kickback.
- Do not brake the saw blade to a stop by applying side pressure after switching off. The saw blade can be damaged, break or cause kickback.
- Clamp material well. Do not support the work piece with your hand or foot. Do not touch objects or the floor with the saw running. Danger of kickback.
- Secure the work piece. A work piece clamped with clamping devices or in a vice is held more secure than by hand.
- Always wait until the machine has come to a complete stop before placing it down. The tool insert can jam and lead to loss of control over the power tool.
- Before any work on the machine (e.g. maintenance, changing the tool, etc.) as well as during its transport and storage, lock the On/Off switch in the off position. There is danger of injury when the On/Off switch is unintentionally actuated.
- Protect the power tool against heat, e. g., against continuous intense sunlight, fire, water, and moisture. Danger of explosion.
- Wear the dust mask when using the tool.
ASSEMBLY
Installing the clamping jaw (Fig 3)
-
Depress the end of unlock Button with one hand, Use the other hand to tilt the saw head so that the shoe of front guard can enter into the opening of the clamping jaw, at this moment keep two inserts of the clamping jaw line up with corresponding slots on the front guard. Push it in, let it go as far as possible.
-
Release the Unlock Button to lock the clamping jaw. Check the clamping jaw be locked tightly or not.
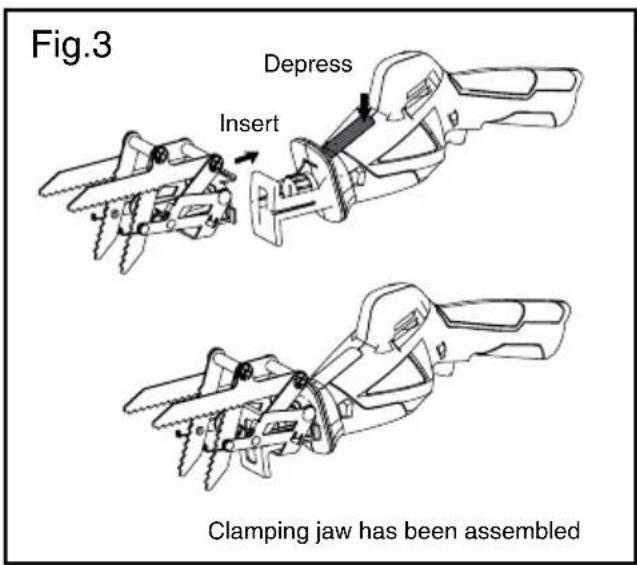

NOTE:
If the blade was assembled in the tool, to remove the clamping saw, it's better to remove the blade firstly.
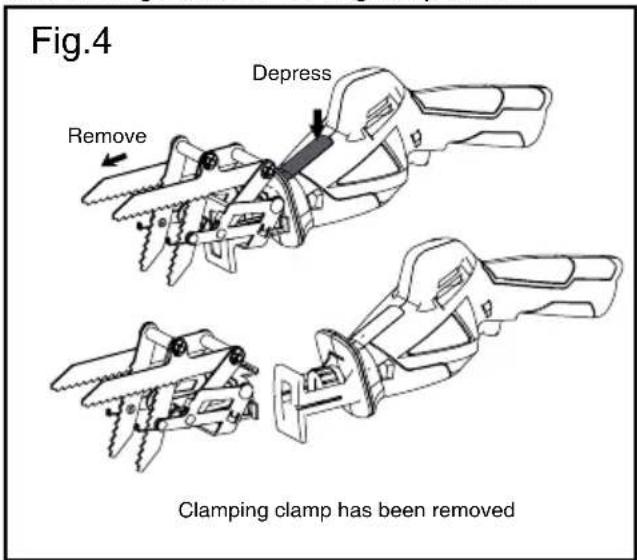
Removing the clamping jaw (Fig.4)
To remove the clamping jaw, Depress the end of Unlock Button with one hand, then Pull clamping jaw out along the slot of the front guard, after the clamping jaw leave out the main housing completely, Release the Unlock Button and it will go back to its original position.
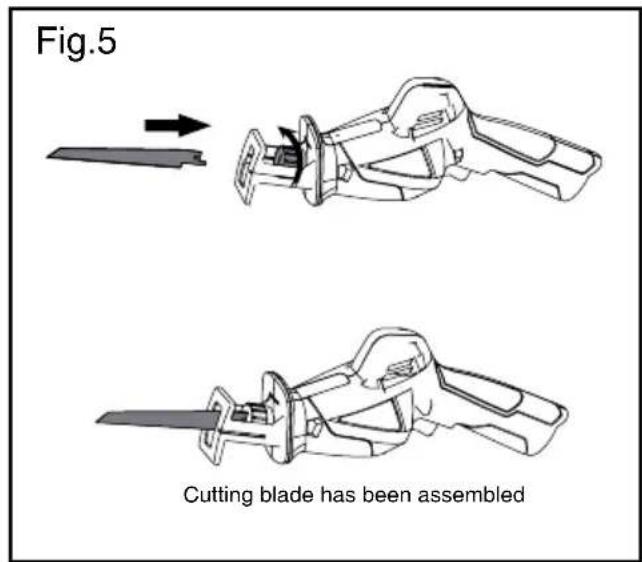
Inserting/Replacing the Saw Blade To install the blade (Fig.5)
Turn the quick-action blade clamp anti-clockwise with one hand, with aligning the saw blade with locating slot, insert the saw blade into corresponding slot with another hand. Release the quick-action action clamp, and it will spring back to hold the saw blade in place securely. Before using it, Double check the tightness of the blade by pulling it.
To remove the blade (Fig. 6)
Turn the blade clamp in anti-clockwise with one hand, then remove the saw blade from the locating slot with the other hand. Release the blade clamp and it will go back to its original position.

CAUTION! Do not handle blades without gloves, as they are sharp and can become hot after using, potentially causing personal injury.
OPERATION
Charging the battery Pack (Fig 7)

NOTE: The battery pack will be fully charged after 70mins. Remove it from the charger after it has been fully charged.

NOTE: This battery pack has been shipped in a low charge condition. It should be fully charged before first use.

NOTE: Make sure the main voltage is the same as rating label which located on the charger.
- Connect the charger to a power supply. The green LED power light comes on, indicating the charger is ready for use.
- Align the raised ribs of the battery pack with the slot in the charger. Insert the battery pack into the charger. The red LED light will come on, and the green LED light will shut off at the same time, indicating the battery is correctly seated and on charge.


NOTE: If the red LED light doesn't comes on, and the green LED light is still on, the battery pack is too hot and cannot be charged.
Remove the battery and allow it to cool for 30 minutes and then re-insert it.
-
The battery pack will normally be fully charged after 70 minutes, when the red LED light will shut off and the green light comes on again. The initial charge may take longer.
-
Remove the battery pack from the charger.
To obtain the best life from the battery
Never allow the battery to completely discharge before recharging. The battery pack should be placed on the charger whenever the battery pack is noticeably running down or the tool no longer performs a task it previously performed.
Avoid conducting short charges. Make sure that the battery is fully charged every time by allowing the
charger to complete its full charging cycle.
Avoid allowing lose items like screws or nails etc. to be stored with battery packs as these or similar items can short battery packs and cause a fire or explosion
Always unplug the charger when not in use and store in a dry secure place.
Avoid charging or storing your battery in temperatures below 0°C and above 45°C.
Cool down hot battery pack from a just-operated tool for approximately 30 minutes before attempting to recharge.
Removing and inserting the battery pack(Fig 8)
To insert the battery pack
Aligning the battery pack with corresponding opening of the device, push it into the device until you heard a sound of "click", it means the battery pack has been locked in place securely.


WARNING: make sure that the tool is "OFF"
To remove the battery pack from the tool (Fig 9)
Depress the battery pack release button located on either side of the battery pack. And pull the battery pack out and remove it from the tool.

Insert the battery to the device, and press the power indicator button. Three situations you will facing, list as below:
Red\Yellow\Green LED lighting--- Power is full
Red\Yellow LED lighting---- 60% Power volume
Only Red LED lighting---- less than 20% Power volume

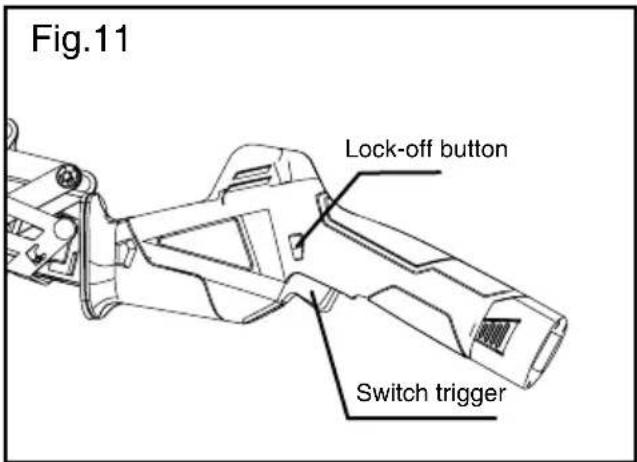
Switching ON/OFF (Fig 11)
The device is equipped with lock-off button to avoid unintentional starting.
To switch on
Depress the lock-off button either from left side or right side and hold it in place, meanwhile squeeze the trigger.
To switch off
Release the trigger.
Operating the reciprocating saw Plunge cutting (Fig 12)
When make a plunge cutting, it no need to using the clamping jaw.
- Place the bottom edge of the front guard onto the work piece.
- Switch on the tool.
- Tip the saw forward and plunge the saw blade into the work piece.
- Tilt the saw gradually, until hold it upright, and cutting along the target line.

CAUTION! RISK OF KICK-BACK!
Only plunge saw soft work piece (wood, etc.).
Fig.12

Cutting with using the clamping jaw(Fig 13)
When cutting the branch, tube etc.
The spring-loaded clamping jaw will provide better control. The jaw can always catch the work piece firmly and keep the blade in the same position to perform the cutting work from the beginning to the end.
- Rest the clamping jaw on the work piece.
- Switch on the device.
- Apply even and slight downward force to finish your cutting work.
Fig.13

Flush cut (Fig 14)
When using flexible saw blades with the Required length you can cut protruding pieces, e.g. pipes, flush with the wall.
- Place the saw blade directly against the protruding piece. With the front guard of saw rest on the side wall.
- Apply sideways pressure to the reciprocating saw.
- Switch on the tool and saw through the work piece, applying consistent pressure.

Selecting Accessories / Spare Parts
Note: This device can be used with different types of blade. Select right blade for your cutting work, if your find the blade which you wanted was not included in packing list, please buy it separately.


STORING AND MAINTENANCE

WARNING
Before performing any repair work, always switch off the device and remove the battery pack.
- Do not spray the unit with water. Ingress of water may destroy the battery pack and the electric motor.
- Clean the unit with a cloth, hand brush, etc.
- Keep all nuts, bolts and screws tight to be sure the equipment is in safe working condition;
- Replace worn or damaged parts for safety.
Battery Maintenance:
Use the following procedures to enable optimum usage of the battery:
- Protect the battery against moisture and water.
- Store the battery only with in a temperature range from 0°C to 45°C. As an example, do not leave the battery in a vehicle or in the reciprocating sawing direct sunlight.
- Clean the ventilation slots of the battery occasionally with a soft, clean and dry brush. A considerably shortened operating time after charging is an indication that the battery is exhausted and must be replaced.
- If you do not use the product for a long time, please charge and discharge the battery pack once every 6 months.
Storage:
Clean the exterior of the machine thoroughly using a soft brush and cloth, Do not use water, solvents or polishes.
Store the machine in a dry place .Do not place other objects on top of the machine.
Transport
Use the original packaging to ship whenever possible.
TROUBLESHOOTING

WARNING
Before performing any repair work, always switch off the device, and remove the battery pack.

Caution!
Improper repairs can result in the product functioning unsafely. This endangers yourself and your environment.
Faults which cannot be rectified with the aid of following table may be rectified by a specialist company only (customer service center).
Please be aware that any improper repairs will also invalidate the warranty and additional costs may be incurred.
Use only genuine spare parts. Only these spare parts are designed and suitable for the product. The use of other spare parts not only voids the warranty, you can also endanger yourself and your environment.
| Question Answer | |
| LED lights do not illuminate on charge Check the pl | plug of charger is securely plugged into the wall outlet. |
| The battery has a short run time | Ensure the battery is properly charged. It will take 4-5 charging cycles before the battery reaches optimum charge and run time. |
| The reciprocating saw fails to operate | If you suspect it is caused by defective battery back, Using another charger (must be good one) to charge the battery pack, and the ambient temperature must within 5°C to 45°C, it still doesn't work.Contact the customer service center. |
| Poor connecting happened in electric contact.- Check if any distortion was spotted on the electric contact.And keep the electric contacts are clean. | |
| The motor or switch is damaged.- Contact the customer service center. | |
| The blade will not insert or remove from the blade holder | Ensure the blade holder is rotated completely clockwise before trying to insert or remove the blade |
| Saw has cut out during use The battery may have | run out of power and requires charging. |
| Sparking visible through the housing air vents | A small amount of sparking may be visible through the housing vents. This is normal and does not indicate a problem. |
EC DECLARATION OF CONFORMITY
We
47877 Willich, Germany
Declare that the product:
Description:12 V Garden Saw Model No: GDGS12
Model: JLH201261500G
Function: Cutting branch
Complies with essential health and safety requirements of the following directives:
Machinery Directive 2006/42/EC
Electromagnetic Compatibility Directive 2014/30/EU
RoHS Directive 2011/65/EU
Noise Emission in the Environment by Equipment for Use Outdoors Directive
2000/14/EC amended by 2005/88/EC
Standards and technical specification referred to:
EN 60745-1:2009+A11
EN 60745-2-11:2010
EN 55014-1:2006+A1+A2
EN 55014-2:1997+A1+A2
EN 61000-3-2:2014
EN 61000-3-3:2013
EN 60335-2-29:2004+A2
EN 60335-1:2012+A11
EN 62233:2008
Authorized Signatory
Date: 21.10.2016
Signature:
Name:
General Manager
Poland Huelan
SUMEC Europe GmbH
Hanns- Martin- Schleyer- Str.18a,
47877 Willich, Germany
CE
TABLE DES MATIÈRES
DÉCLARATION DE CONFORMITÉ CE
Nous, SUMEC Europe GmbH Hanns-Martin-Schleyer-Str.18a 47877 Willich, Allemagne
Directive machine 2006/42/EC
Directive RoHS 2011/65/UE
VEILIGHEIDSWAARSCHUWINGEN VOOR HET ACCUSYSTEEM
ALGEMENE VEILIGHEIDSWAARSCHUWINGEN VOOR UW LADER

WAARSCHUWING Lees alle
Spanningsindicator (Afb. 10)

AVVERTENZA!
natural_image
Technical line drawing of a mechanical device with an arrow indicating assembly or insertion (no text or symbols present)
natural_image
Technical line drawing of a mechanical assembly with cylindrical components and adjustment knobs (no text or symbols)Taglio a filo superficie (Fig. 14)
natural_image
Illustration of a saw blade with serrated edges and a circular hole (no text or symbols)Top per legno


natural_image
Simple gray rectangular object with a hole, resembling a stylized blade or tool (no text or symbols)


- DESCRIPTION OF PRODUCT PARTS
- Parts list (Fig 1)
- Check the delivery parts (Fig 2)
- WARNING!
- TECHNICAL SPECIFICATIONS
- INTENDED USE
- SAFETY INFORMATION
- IMPORTANT
- Description Of Symbols
- Warning symbols on the machine
- Warning symbols on the charger
- Warning symbols on the battery back
- SAFETY INSTRUCTIONS
- GENERAL POWER TOOL SAFETY
- Work area safety
- Electrical safety
- Personal safety
- Power tool use and care
- Battery tool use and care
- 6) Service
- SAFETY WARNINGS FOR BATTERY PACK
- GENERAL SAFETY WARNINGS FOR YOUR BATTERY CHARGER
- WARNING Read all safety warnings and all instructions.
- Save all warnings and instructions for further reference.
- Additional Safety Instructions For Your Battery Charger
- Safety Warnings for Reciprocating Saw
- ASSEMBLY
- Installing the clamping jaw (Fig 3)
- NOTE:
- Removing the clamping jaw (Fig.4)
- Inserting/Replacing the Saw Blade To install the blade (Fig.5)
- To remove the blade (Fig. 6)
- OPERATION
- Charging the battery Pack (Fig 7)
- To obtain the best life from the battery
- Removing and inserting the battery pack(Fig 8)
- To insert the battery pack
- To remove the battery pack from the tool (Fig 9)
- Switching ON/OFF (Fig 11)
- To switch on
- To switch off
- Operating the reciprocating saw Plunge cutting (Fig 12)
- CAUTION! RISK OF KICK-BACK!
- Cutting with using the clamping jaw(Fig 13)
- Flush cut (Fig 14)
- Selecting Accessories / Spare Parts
- STORING AND MAINTENANCE
- WARNING
- Battery Maintenance:
- Storage:
- Transport
- TROUBLESHOOTING
- Caution!
- EC DECLARATION OF CONFORMITY
- TABLE DES MATIÈRES
- DÉCLARATION DE CONFORMITÉ CE
- VEILIGHEIDSWAARSCHUWINGEN VOOR HET ACCUSYSTEEM
- ALGEMENE VEILIGHEIDSWAARSCHUWINGEN VOOR UW LADER
- WAARSCHUWING Lees alle
- Spanningsindicator (Afb. 10)
- AVVERTENZA!
- Taglio a filo superficie (Fig. 14)
Brand : YARDFORCE
Model : GDGS12
Category : Saw