Divali - Radiator ATLANTIC - Free user manual and instructions
Find the device manual for free Divali ATLANTIC in PDF.
User questions about Divali ATLANTIC
0 question about this device. Answer the ones you know or ask your own.
Ask a new question about this device
Download the instructions for your Radiator in PDF format for free! Find your manual Divali - ATLANTIC and take your electronic device back in hand. On this page are published all the documents necessary for the use of your device. Divali by ATLANTIC.
USER MANUAL Divali ATLANTIC
Installation and operating manual
Manual must be kept by end user
Sommaire
(promSH-BD3.3 / promSV-BD3.3 / promSP-BD3.3)
Mise en garde 2
Declaration of Conformity with the RED Directive 2014/53/EU. 35
1-Installation 36
1.1 - Installing the appliance. 36
1.2 - Installation rules 36
1.3 - Installing Horizontal and Skirting board appliances 37
1.4 - Installing Vertical appliances 40
1.5 - Maintenance. 45
2 - Quick start 46
2.1 - Operating principle 46
2.2 - Switching the appliance on/off 46
2.3 - Quick temperature setting 47
2.4 - Operating mode selection 47
2.4.1 - Auto mode 48
2.4.2 - Basic mode 49
2.4.3 -Progmode 49
2.5-Light function 51
3 - Connectivity 53
3.1 - Pairing appliances in the same room. 53
3.2 - Remote connections 55
4 - Advanced settings 56
4.1 - Occupancy detection 56
4.2 - Window open/window closed detection 57
4.3 - Energy consumption and saving 58
4.4 - Command locking 58
4.5-Calibration 58
4.6 - Shedding 58
5 - Expert mode 59
6 - Troubleshooting 61
Technical characteristics 63
Warning
- Attention surface très chaude, caution hot surface. IMPORTANT:
Certain parts of this product may become very hot and cause burns. You must pay close attention if children and vulnerable people are present.
Keep children under 3 years of age away from this appliance, unless they are under constant supervision.
Children aged between 3 and 8 years of age must only switch the appliance on or off if it has been placed or installed in a normal position and these children are supervised or have received instructions as to the safe use of the appliance and understand its potential dangers. Children aged between 3 and 8 years of age must not connect, set or clean the appliance or carry out any user maintenance.
This appliance may be used by children aged 8 years or more and by people with physical, sensual or metal deficits and lacking experience or knowledge of the device provided that they are correctly supervised or have been provided with instructions regarding the safe use of the appliance and provided that the risks present have been fully understood. Children are not permitted to play with the appliance. This appliance must not be cleaned or maintained by children without supervision.

To avoid overheating and for safety reasons, do not cover the heating appliance.
This appliance's user manual is available on the website or by contacting the after sales department.

: The appliances which have this symbol must not be disposed of with household waste but must be collected separately and recycled. The products which have reached the end of their life must be collected and recycled in accordance with local provisions and decrees.
DECLARATION DE CONFORMITE DIRECTIVE RED 2014/53/EU (*)
Thermor hereby declares that the equipment referenced below conforms to the essential requirements in the directive RED 2014/53/EU.
The complete EU declaration of conformity for this equipment is available on request from our after sales department (see address and tel. No. at the end of the manual).
Description: Radiator with BD3.3 radio card
Models: see the model reference in the manual header
Characteristics:
Radio frequency bands used by the Transmitter-Receiver
868MHz to 868.6MHz
868.7MHz to 869.2MHz
869.7MHz to 870MHz
Maximum radio frequency power: <25mW
Class 2 Microwave Radio Equipment: may be marketed and commissioned without restrictions.
Radio range: 100 to 300 metres in free field, variable according to the associated equipment (range may be altered according to the installation and electromagnetic environment conditions).
Conformity with the radio and Electromagnetic compatibility standards has been verified by the notified organisation 0081: LCIE France, Fontenay aux Roses.
1.1 - Installing the appliance
Your appliance is delivered with its wall support. However, the choice of screws and plugs depends on the nature of your wall and you must ensure that you are using screws and plugs which are suitable for the weight of the appliance.
1.2 - Installation rules
This appliance has been designed to be installed in residential premises.
It must be installed in accordance with good practice rules and the standards which apply in the country where the radiator is installed (NFC 15100 for France). Its operating range is -10 °C to 55 °C.
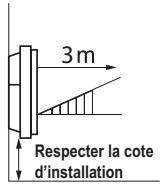
Respect the minimum and maximum distances from furniture when positioning the appliance. It should be installed to ensure maximum detection (e.g.: do not install behind a sofa, a busy area such as a corridor, inside a unit, etc.) (see diagram).
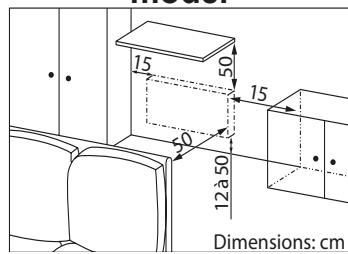
Horizontal and Skirting board model
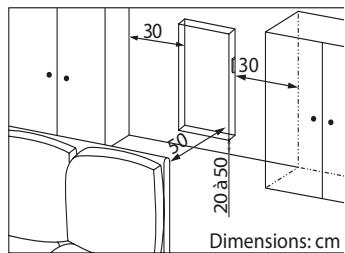
Vertical model
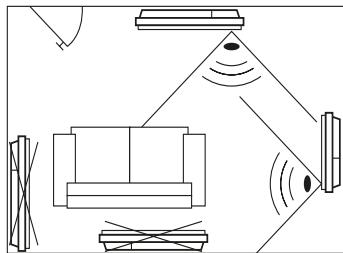
Most optimal location area
We do not recommend using the Open Window function in corridors and rooms located near an entry door which opens to the outside. Choose the best location.
Do not install a shelf above vertical appliances.
If you have foam-mounted wall coverings, you must place a wedge under the appliance support which is as thick as the foam in order to keep a free space behind it and avoid interference with its regulation.
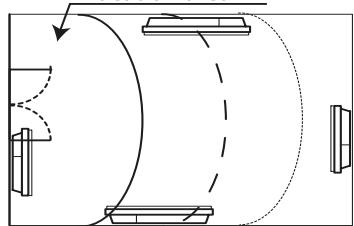
Do not install the appliance in a current of air likely to disturb its regulation (under a Central Mechanical Ventilation, etc).
The appliance should not be placed directly under a power outlet.
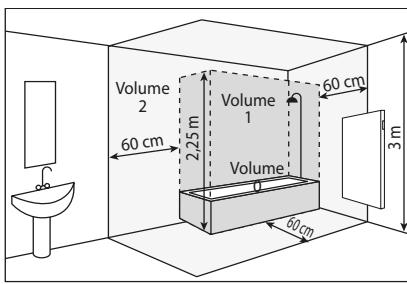
Do not install the appliance in volume 1 of the bathrooms
The appliances which are used in bathrooms must be installed so that the switches and other command mechanisms for the appliance cannot be touched by anyone in the bath or shower.

Installing a vertical appliance at altitude creates an elevation in air output temperature (of around 10^ per 1000m in altitude).
We strongly recommend that you do not fit vertical appliances above an altitude of 1000m (risk of the appliance not working correctly).
It is prohibited to fit a vertical appliance horizontally and vice versa. It is prohibited to use the appliance in mobile configuration, on feet or on wheels.
1.3 - Installing Horizontal and Skirting board appliances
Once you have removed the lid from the cardboard box, you may remove the wall support (Horizontal and Skirting board versions) which you can use as a scale to drill the holes.
Leave the appliance in its cardboard box.
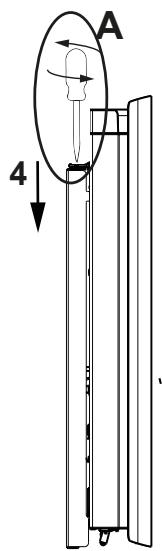
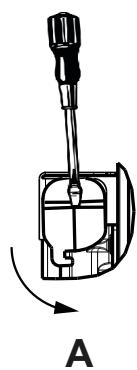
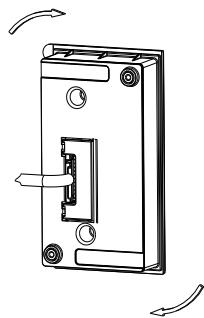
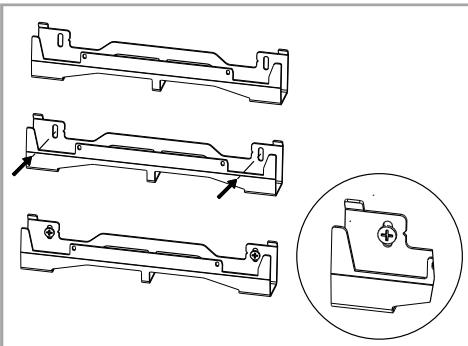
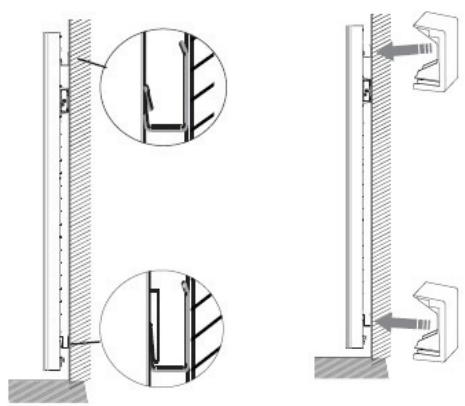
1.3.1 - Unlocking the appliance's mounting lugs
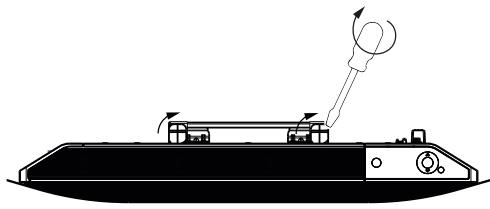
Use a screwdriver to unlock the wall bracket
Unlocked wall mount
1.3.2 - Attaching the wall support to the wall
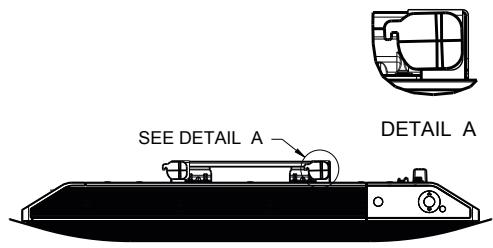
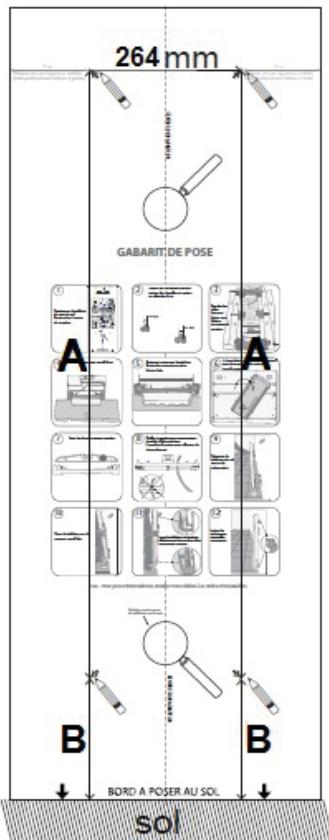
| 1 | VOIR DETAIL A DETAIL A 2 | 2 | |
| Place the wall support on the floor. Mark the drilling points A (cross) with a pen. These provide the position for the lower attachments. | Lift the wall support, lining up the drilling points A with the lower holes on the wall support. Mark the 2 drilling points B with a pen. | ||
| 3 | Drill the 4 holes and insert the plugs which are suitable for your wall (e.g. plasterboard, concrete). Position the wall support and screw in. | ||
1.3.3 - Connecting the appliance
Take the appliance out of its cardboard box and remove the wedges. To facilitate connection, this appliance has been designed to remain upright during connection.
Connection rule
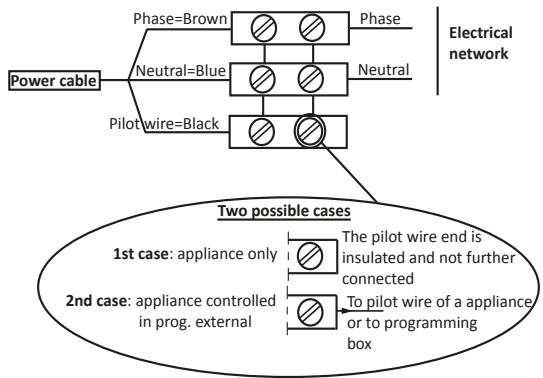
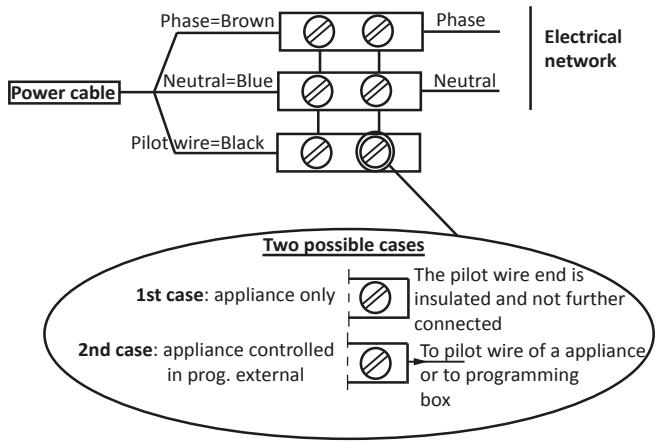
- The appliance must be supplied with 230V 50 Hz.
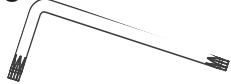
- The radiator's power supply must be connected directly to the network after the single-pole disconnection mechanism, in accordance with the installation rules. The radiator will be connected to the mains with a 3-wire cable (Brown = Live, Blue = Neutral, Black = Pilot wire) via a connection box.
-
In damp rooms such as kitchens and bathrooms, the connection box must be installed at least 25 ~cm from the ground. The installation must be equipped with a 30 ~mA differential circuit breaker-type protection device.
-
Connection to the earth is prohibited. Do not connect the pilot wire (black) to the earth.
-
If the power cable is damaged, it must be replaced by the manufacturer, their after-sales service or any suitably qualified person, in order to avoid any danger.
-
If the pilot or piloted appliance is protected by a 30mA differential (e.g.: bathroom), the pilot wire supply to this differential must be protected.
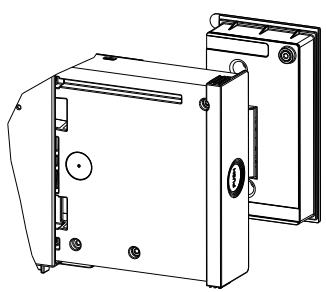
1.3.4 - Attaching the appliance
1.4 - Installing Vertical appliances
Once you have removed the lid from the cardboard box you will find a cardboard scale to drill the holes.
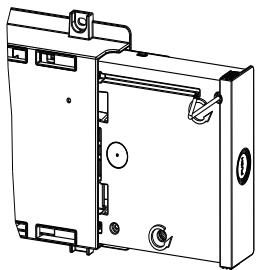
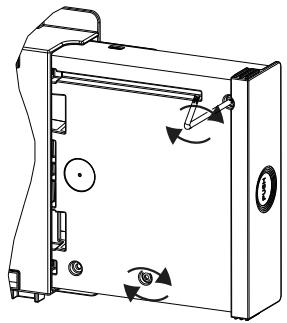
1.4.1 - Modifying the position of the control box
By default, the radiator's control box is positioned on the right hand side (the appliance installed on the wall).
On the VERTICAL model, the box may be placed on the left. To do so, carry out the following operations:
Operations to be carried out with the power off. Leave the appliance in its cardboard box and its wedges.
Use the spanner provided with the radiator.
Rear view
1 Remove and keep the 4 holding screws located at the rear of the control box support.
Rear views
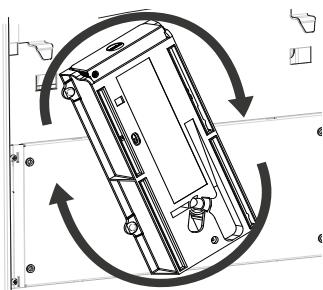
2 Pivot the box's support one half-turn upwards to the right.
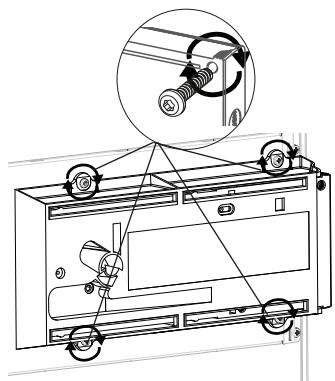
3Attach the box's support with the 4 screws.
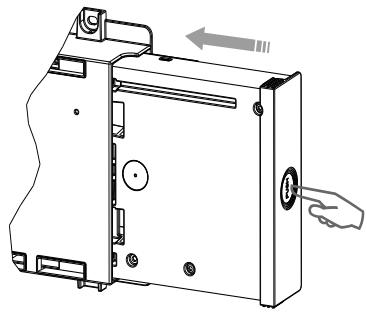
4 Position the radiator in its 2 wedges, on the side opposite the box.

Rear views
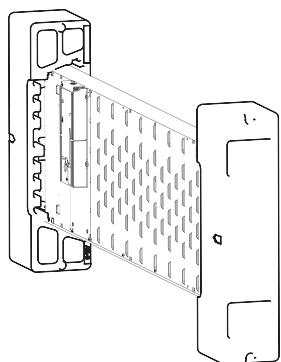
5Press the side of the box to take it out of the support.
Pull the side of the box so that it is fully visible.

- Remove and keep the 2 holding screws for the rear part of the control box.
Front views
Unclip the front part of the control box by pulling gently on it.
Rear views
9Turn over
Pivot and re-position the box's cable.
Rear views
1 Re-position the front part in the rear part of the control box.
Put back the 2 holding screws for the rear part of the control box.
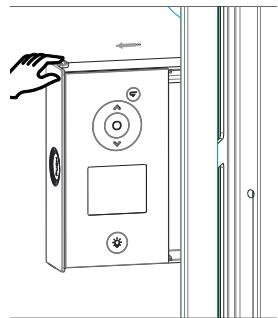
Press the side of the box to push it into the support.
1.4.2 - Unlocking the appliance's mounting lug
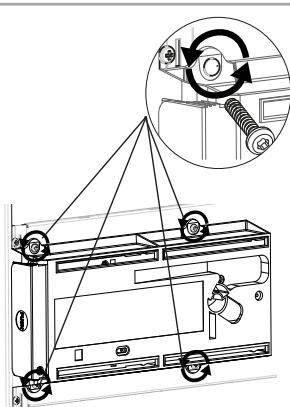
Take the plugs and screws which are suitable for your type of wall according to the appliance's weight (the screws and plugs are not supplied).
Use the installation scale.
Mark the middle of the radiator with a dotted line.
Mark the 4 drilling points to attach the radiator and dot them with a pencil.
| Power | A | B |
| 1000/1500/2000W | 1259 | 391 |
-
Drill the 4 holes to attach the radiator and insert the plugs.
-
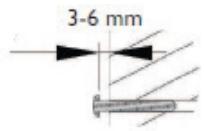
Insert the screws into the plugs (leave the screws out by 6 mm max.).
- Position the supports, running the screw heads through slots.
- Make sure that the supports are level.
- Screw in the supports.

If the electrical connection box is located above the low wall support, run the power cable into the support to connect it. This will prevent you from pinching the cable.
1.4.3 - Connecting the appliance
Take the appliance out of its cardboard box and remove the wedges. To facilitate connection, this appliance has been designed to remain upright during connection.
Connection rule
- The appliance must be supplied with 230V 50 Hz.
- The radiator's power supply must be connected directly to the network after the single-pole disconnection mechanism, in accordance with the installation rules. The radiator will be connected to the mains with a 3-wire cable (Brown = Live, Blue = Neutral, Black = Pilot wire) via a connection box.
- In damp rooms such as kitchens and bathrooms, the connection box must be installed at least 25 ~cm from the ground. The installation must be equipped with a 30 ~mA differential circuit breaker-type protection device.
-
Connection to the earth is prohibited. Do not connect the pilot wire (black) to the earth.
-
If the power cable is damaged, it must be replaced by the manufacturer, their after-sales service or any suitably qualified person, in order to avoid any danger.
-
If the pilot or piloted appliance is protected by a 30mA differential (e.g.: bathroom), the pilot wire supply to this differential must be protected.
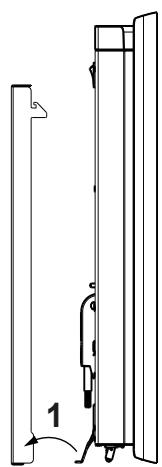
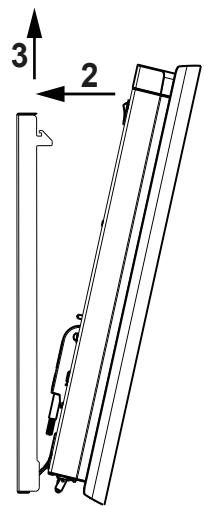
1.4.4 - Attaching the appliance
Your device has been delivered with two grip tabs for you help lift and stand on the wall bracket.
- Once the connection is made, turn off the power on the board electric.
- Place the radiator on the floor in front of the wall supports.
- Insert the tabs into the side grids
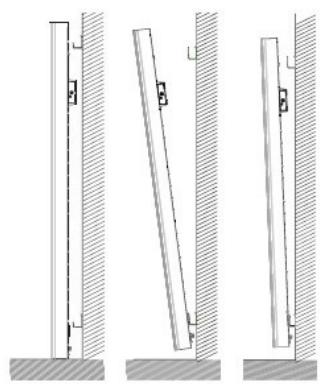
- Lift the radiator to place the radiator's lower hooks on the low wall support.
- Bring the top of the radiator close to the high wall support until it comes into contact.
- Lift the radiator slightly off the wall.
- Bring the top of the radiator close to the wall.
- Lower the radiator slightly.
- Place the upper hooks on the high wall support and the lower hooks on the low wall support.
1.5 - Maintenance
Before you carry out any maintenance, switch your appliance off by turning the On/Off switch to position 0.
To maintain your radiator's performance, around twice a year you must use a vacuum cleaner or brush to remove the dust from the appliance's upper and lower or side grills. The appliance may be cleaned with a damp cloth and liquid soap; never use abrasives or solvents. In a polluted atmosphere, dirt may appear on the appliance's grill. This phenomenon is caused by poor ambient air quality. In this case, we recommend verifying the ventilation in the room (fan, air flow, etc.). This dirt does not justify the appliance's replacement under warranty.
2 - Quick start
2.1 Operating principle
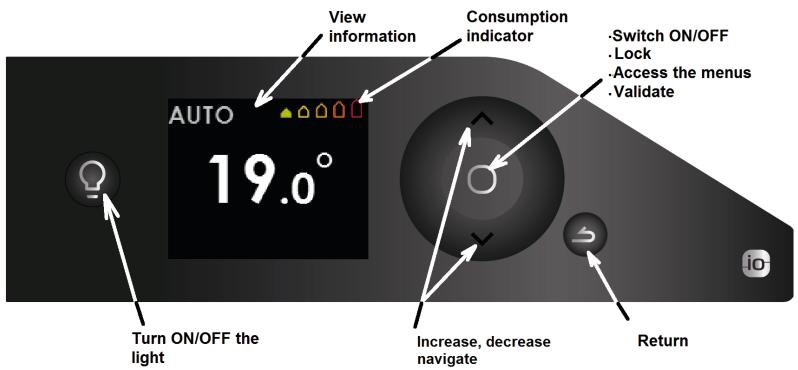
2.2 - Switching the appliance on/off
An On/Off switch is located at the rear of the appliance's unit.
Use the switch only for long shutdown periods (excluding heating periods). Turn the switch at the back of the appliance to I to switch the appliance on. If the switch is set to 0, the appliance is not longer connected and the light is off.
When the appliance is switched off, you may need to set the day and time again.
Whichever menu you are in, you may stop the heating function. The light function remains accessible.
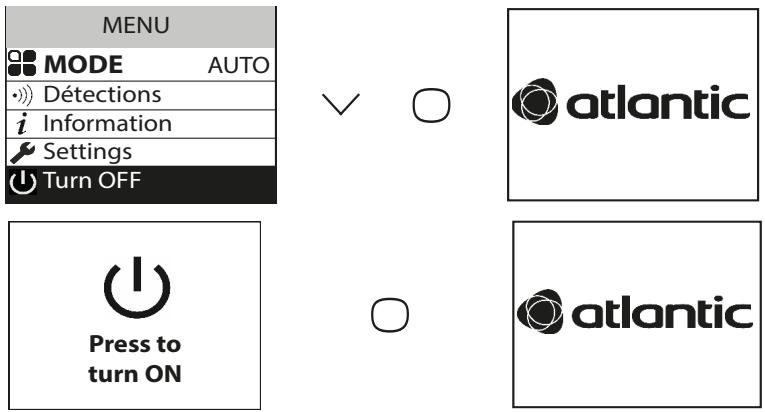
To switch off the heating function, press until you see Off and press to confirm.
To switch the heating function on, press .
2.2.1 - Switching the appliance on / off
2.2.1.1 - Setting the time and date
The first time you switch the radiator on, select the language and enter the date and time.
The first time the radiator is switched on,
- AUTO mode is selected,
- the setpoint temperature is set at 19^ .
2.3 - Quick temperature setting
To modify the setpoint temperature, use or .

Use the consumption indicator to optimise your setting. When the consumption indicator is at the green symbol, you are at a temperature level lower than or equal to the recommended temperature.
It takes at least 6 hours for the temperature to stabilise in the room.

Depending on your installation, you may note a different temperature to the one displayed on your appliance. In this case, refer to the "Calibration" chapter.
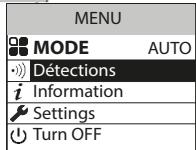
2.4 - Operating mode selection
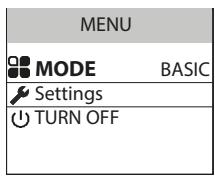
3 operating modes are proposed:
- AUTO: Smart management activation.
- BASIC: Access to temperature setting only.
- PROG: Manual functions programming.
Before you do anything, wake up the screen by pressing the key.
Select the mode which is best suited to your needs.

2.4.1 - AUTO mode
This mode lets you activate smart management. You set the temperature you want when you are in the room and the appliance optimises your comfort while saving energy.
The appliance:
- Remembers your weekly routine and any changes to it to set the optimum programming automatically,
- Anticipates heating so that you have the right temperature when you come back into the room,
- Detects when you are in the room or away from it to adjust the temperature automatically,
- Detects when windows are opened and closed to lower the setpoint temperature to 7^ when you are airing out the room.
2.4.1.1 - Functions accessible in Auto mode

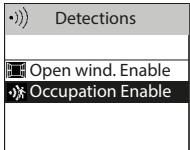
Detection function
The occupancy detection function is always active.
By default, the open window detection function is active and may be deactivated

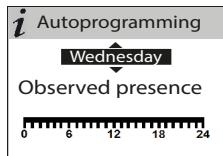
Viewing smart management information Auto-programming
Lets you see the presence periods seen by the appliance for each day of the week. Your appliance learns and permanently remembers your routine to adapt the temperature of your room.
After the appliance is switched on for the first time, it takes a week to define the auto-programming. It is then refined and adapts over time. During this first week the appliance follows the Comfort temperature.
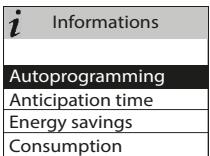


Anticipation time
For optimum anticipation of its heating up before your return, your appliance remembers the temperature rise time according to the characteristics of your room (volume, insulation, external temperature, etc.).

Anticipation time
For your comfort, temperature rise starts
1H30
before arrival
Energy savings
Your appliance informs you of the savings you have made by indicating the percentage of time it lowered the temperature over the last 7 days.
After the appliance is switched on for the first time, it takes a week's operation to be able to see a first result. It will then be updated permanently. During this period, the appliance will be in Comfort mode continuously.
- Accessing the temperature lowering parameters
Enables you to set the maximum temperature reduction you want to make when you are absent (from -2^ to -4^ ). By default, it is set to -3^ .

2.4.2 - BASIC mode
The appliance follows the setpoint temperature adjusted at all times.
All the smart functions are deactivated.
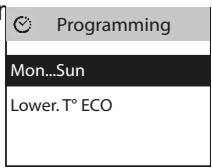
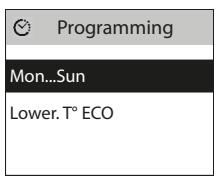
2.4.3 - PROG mode
PROG mode lets you manage your appliance's functions manually.
2.4.3.1 - Detection functions

By default, open window/closed window is active.

By default, occupancy detection is inactive.
2.4.3.2 - Setpoint temperature setting
The following ranges are defined when the appliance is switched on:
Monday to Friday, comfort from 5am to 9am and from 5pm to 11pm
Saturday and Sunday, comfort from 5am to 11pm.
You may modify these ranges and define 3 Comfort temperature ranges per day.
During these Comfort ranges, the temperature setpoint is adjusted using or .
Outside the Comfort ranges, lowering the temperature is set in "Lower Eco T" mode.
The default reduction value of -3.5^ is recommended for better energy performance.
2.4.3.3 - Setting the programming
2.4.3.3.1 - Internal programming
Modifying the programs
You may program up to 3 Comfort temperature ranges for each day of the week. Outside the Comfort ranges, the Eco temperature (by default -3.5^ ) is set. To change this value, see chapter 2.4.3.2.
Select the day with . Confirm .
Select "Modify" with . Confirm .
Select the start time for the 1st Comfort range with or .
Confirm . Select the end time with or . Confirm .
Repeat the same operation for the 2nd Comfort range then for the 3rd Comfort range and confirm
Select then go to the next day with .

- Copying a program
You may copy a day's program to one or more days.
Select the day to be copied with , confirm (e.g.: Monday).
Select "Copy" with . Confirm .
Move between days with
Confirm the day to be copied to with then move onto the next day with .


- Deleting a comfort temperature range
Select the day with . Confirm .
Select "Modify". Confirm .
At the start time, select 0:00 with . Confirm .
At the end time, also select 0:00 with then confirm .
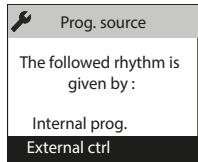
2.4.3.3.2 - External programming
The appliance follows your installation's external command orders by Pilot Wire link.
Select "Programming source" with then confirm .
Select "External control" with then confirm
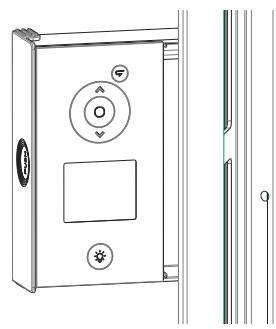
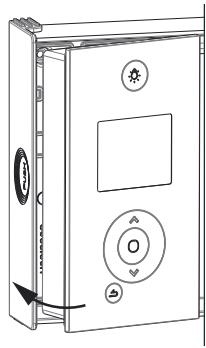
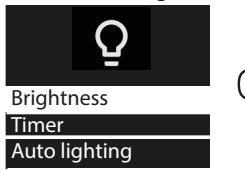
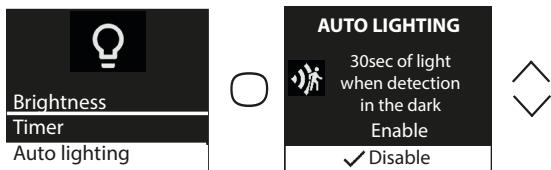
2.5 - Light function
Whether you want to create a cosy atmosphere in your living room, have a night light in your children's bedrooms or make sure you can get up safely during the night, you can choose by integrating a light function into your radiator. This function can be managed from your control box on the product and/or directly from your Cozytouch smartphone/tablet app.
You may then modify the timer (from 20 mins to permanent), the brightness (4 levels possible) and even choose to activate or deactivate the 30-second automatic independent lighting function if anyone is detected in the dark.
The "Auto lighting" function can also be accessed from the Cozytouch app.
2.5.1 Switching the light on/off
Press the Light button to switch the light on or off.
When you are in "light" mode, pressing the light button switches the light off and returns to heating mode.
Pressing the back button returns to heating mode without switching the light off.
The "Auto lighting" function (see below) is independent of the other settings and detection in the dark remains active (or inactive) even if the light is off.
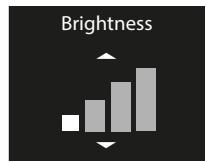
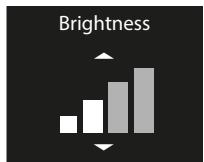
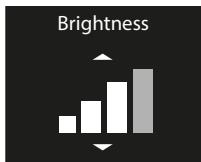
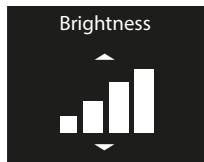
2.5.2 Setting the brightness
The "Brightness" menu lets you select the level of light diffused by the appliance, over
4 levels.

2.5.3 Setting the timer


Optimum lighting
The "Timer" menu lets you set how long the light is switched on for. This time may be set to permanent / 4 hours / 1 hour / 40 minutes / 20 minutes. It is set to "permanent" position by default.
2.5.4 "Auto lighting" function

The "Auto lighting" option detects anyone in the dark and switches the light on at low brightness automatically for 30 seconds.
If the radiator is installed in a bedroom, if the presence detector is facing the bed, the light may come on depending on how you move at night. In this case, we recommend leaving the "Auto lighting" function inactive.
2.5.5 Activating the light from the Cozytouch app
If your appliances are connected via the Cozytouch app, you may switch the radiator light on and off in each room from the app on the radiators that have the light function.
If several of your appliances are twinned in the same room, you may use the app to switch the light on/off on all the room's radiators at the same time.
If you want to switch a room's radiators on independently, activate the light directly on the radiator.
The "Auto lighting" function can be accessed from the Cozytouch app.
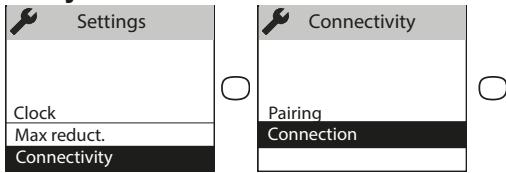
3 - Connectivity
Before you do anything, wake up the screen by pressing a key.
This menu lets you access the Connectivity settings.
Our units are compatible with iO-homecontrol®.
This highly-secure radio communication technology is integrated into a wide range of home equipment from specialist home equipment partner brands.
On our radiators which feature iO-homecontrol® you may do the following from the "connectivity" menu:
- Pair several compatible appliances with each other in the same room.
For optimum operation, only appliances located in the same room must be paired (up to a maximum of 5 appliances in the same room).
- Connect your appliances to the Cozytouch app to manage them by remote (from the app, requires a Cozytouch bridge).
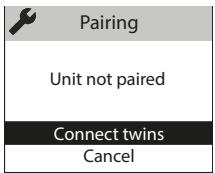
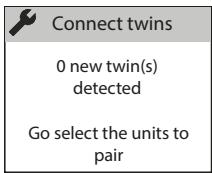
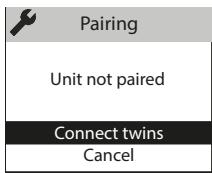
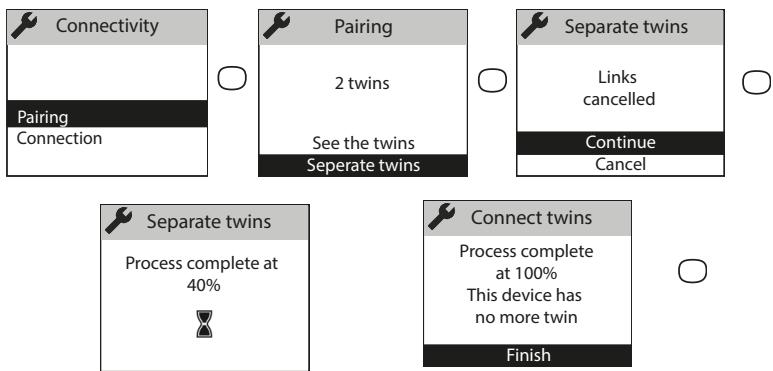
3.1 - Pairing appliances in the same room
The radiators which are located in the same room may be paired to enable them to communicate and share information. For example, when several appliances are paired, a change in setpoint temperature or mode on an appliance is passed on immediately to the other radiators in the room.
In the same way, if one of the radiators in the room detects your presence or a window opening/closing, it will communicate this information to the other radiators.
Accessing PAIRING

Example: pairing 3 appliances in the same room
Appliance 1
Appliance 1

Appliance 2

Appliances 1 2 3
Appliance 1
Appliance 3

Seeing the paired appliances:
You may see the appliances you have paired with each other.

Cancelling the pairing:

This operation removes all the links between appliances
Adding a pairing
You must cancel the existing pairing (see "Cancelling the pairing") and restart the operation to pair all the appliances with each other.
3.2 - Remote connections
This appliance is compatible with our Cozytouch Offer (all the information is available on our website) and with the bridges which use the iO-homecontrol® protocol.
Accessories required:
iOS and Android-compatible Cozytouch app. Free download from the App Store or Google Store
Cozytouch bridge. Sold by our brand's distributors or on our website.
Internet access box


This installation enables you to manage, programme and control your appliance(s) by remote via a smartphone or tablet.
For example, you may modify the setpoint temperature or operating mode, manage your absences by indicating your return date or view your appliances' consumption.
If you want to pair multiple devices in the same room via the app, you need to connect the devices one by one, up to 20 appliances in the same home.

Carry out all the connection or management operations from the app
(follow the instructions displayed on your smartphone or tablet).

Connecting your appliances
Follow the instructions provided in the app.
1 / If devices are already paired with each other, and you want to connect to the app, cancel pairing.
2 / Connect the radiators of the same room, one by one.
Just as you can not pair products locally if they have already been connected in the application in different rooms.
4 - Advanced settings
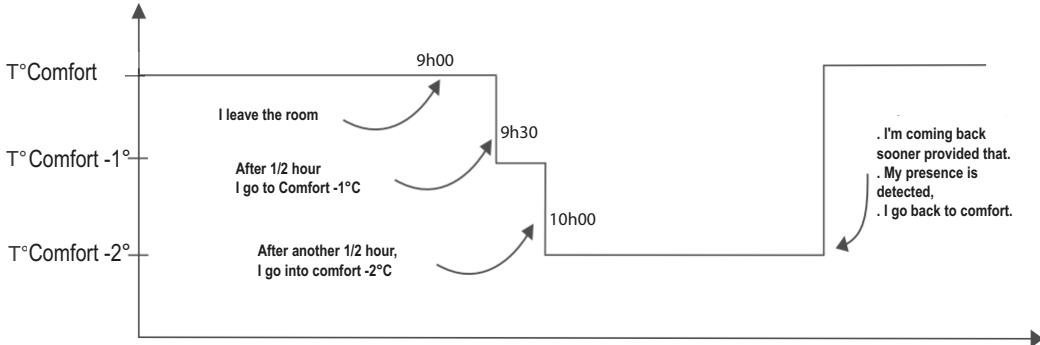
4.1 - Occupancy detection
Lets you heat your room when someone is in it. The appliance will then heat up to Comfort temperature.
Occupancy is detected below the sensor (≥ 40 cm from the ground)
Activating/deactivating the function
Auto mode

Function always active in Auto Mode.
E.g.: Your appliance is set to 19^ C in Comfort.
- 9am, you leave the room;
- 9.30am, the operating temperature changes to 18^ ;
- 10.00am, the operating temperature changes to 17^ C .
Prog mode
By default, occupancy detection is inactive.

Activating the occupancy detection function in Prog Mode lets you manage unexpected presence automatically.
Example: On Monday, you programmed a temperature range from 5pm to 11pm. You come home at 3pm. The appliance detects your presence and automatically switches to the Comfort temperature range.
One-off programming change
Occupancy detection function Inactive
When activated, this function lets you manage your unexpected presences.
Example: On Monday, you programmed a Comfort temperature range from 5pm to 11pm. You come home at 3pm and the appliance displays an Eco temperature.
You may increase the temperature manually.
The one-off change is active until the next Comfort temperature range defined in the program. The appliance then returns to its normal operation.
4.2 - Open window detection
Used to detect variations in temperature related to the opening and closing of your windows. If you forget to switch off your appliance when a window is open for a long time, this function lets you get around this and prevents your appliance from heating up unnecessarily.
The appliance automatically switches to Frost Protection temperature (7^) when it detects an open window and rises to the setpoint temperature when it detects that the window has been closed (the detection time is variable). The appliance reacts to window opening and closing according to several variables, including in particular:
The required temperature in the room
The outdoor temperature
The installation's configuration

In the case of paired appliances, the detection on one of the appliances is passed onto all of the paired appliances. In the same way, if the function is deactivated on one of the appliances, it is deactivated on all of the paired appliances.
Activating/deactivating the function
This function is only accessible in AUTO or PROG modes.

NOTE:
Via the "Expert Menu", you may deactivate the open window detection on a single appliance without deactivating the others in the case of paired appliances (see the "Configurations" chapter in the expert menu on page 58). This same appliance will switch to frost protection if an open window is detected by one of the other paired products.
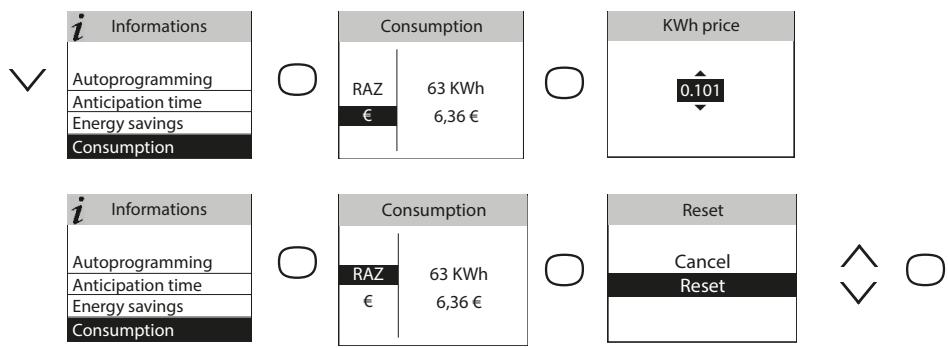
4.3 - Energy consumption and saving
Regardless of the mode, you have access to the energy consumption indicator via the information menu. It will display the consumption in KWh and the price in Euro.
Accessing the information menu.
Energy savings
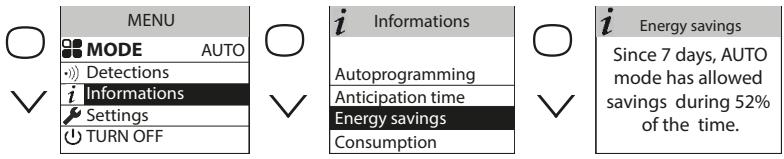
Consumption
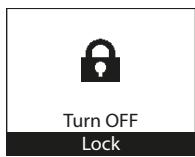
4.4 - Command locking
To avoid the commands being changed by children, you may lock your appliance's commands by pressing and holding
Select "Lock" and validate with
Do the same to unlock the commands by selecting "Unlock"
4.5 - Calibration
You must wait at least 6 hours for the temperature to stabilise.
Depending on your installation, you may note a different temperature to the one displayed on your appliance (a difference of 0.5^ C is normal.). In this case, refer to the "Expert Menu", "Function config." chapter.
4.6 - Shedding
Our appliances are compatible with the different shedding systems via the pilot wire or io-homecontrol radio. However, you must not use mains disconnection shedding as this system is incompatible with our appliances. Sharp unplanned and repeated electricity supply disconnections may cause premature wear and damage to electronic boards which are not covered by the manufacturer's warranty. During shedding periods, the screen displays "priority shedding order".
The appliance then returns to its initial operating mode.
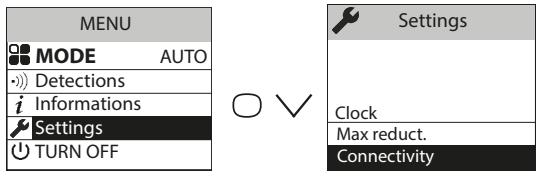
5 - Expert mode
To access the Expert menu, press the and keys at the same time. This menu enables you to access the appliance's advanced functions.
| iinformation | Enables you to get information about the appliance which you may be asked for if you contact the After Sales department. | ||
| Parameters | General | Clock | Automatic Summer/WinterEnables you to activate/deactivate the automatic change from summer time to winter time.By default, this configuration is active. |
| Date and time. | |||
| Language | Lets you select the language: French, English, Spanish, German, Portuguese, Dutch. | ||
| Reset | Lets you return to the basic factory setting (Auto mode active, setpoint at 19°C, lowering to 3.5°C, detection functions active). The pairing between appliances, the connection to the app or the connection to a command point will be removed. | ||
| Function config. | T° calibration | Depending on your installation, you may note a different temperature to the one displayed on your appliance. Before you do anything, leave the temperature to stabilise for at least 6 hours at the required temperature in comfort mode. You may then calibrate your appliance to adjust the setpoint temperature to the temperature recorded in the room. The calibration value is between -3°C and +3°C.Example: the temperature displayed on your radiator is 20°C.The temperature displayed on your thermometer is 22°C => select the calibration value +2°C. | |
| Window detection | In pairing, used to deactivate the open window function on this appliance only. Deactivating the function on this appliance does not deactivate the function on the other paired appliances and enables it to follow the Open window detection function for the other paired appliances. | ||
| Erasure | Reserved for appliances managed by radio | ||
| Parameters | Restrictions | Max. temperature | Used to record a maximum setpoint temperature which may not be exceeded. It is set by default to 28°C and ma be modified (from 19°C to 28°C). |
| Access control | Used to lock the appliance's settings partially or completely. Access Control Authorised settings: All Temperature only None (all locked) | ||
| PIN code | Used to record a personal Expert Menu access code. Once activated, the Expert Menu access is coded. You may write your personal code here. □ □ □ To deactivate it, go back to the Expert Menu, enter your personal code and go back to Parameters --> Restrictions --> PIN code. | ||
| Connectivity | Sending the security key | The security key lets you secure your iO installation so that it doesn't interfere with any neighbouring equipment. The key exchange provides the possibility of associating an iO command point with your installation. Enables the security key to be sent to an iO command point. Use this operation if the appliances are paired. Warning, if you use a ripple control for rolling slat blind, a new key will be sent to iO order point. This last will be returned it to ripple control. | |
| Receiving the security key | Enables the security key to be received from an iO command point. Makes the existing pairing non-operational if the security key is not sent to the other paired appliances. | ||
| Authorise Association | After the key exchange, this operation is required to enable the association with an external iO command point of our brand. | ||
| Reset Connectivity | Removes all the connectivity (appliance pairing, connection to the app, connection to a centralised command point). | ||
| Test | Main body | Start-up of the heating body for 5 minutes to verify operation. | |
| Presence sensor | Activates the sensor to verify correct operation. | ||
| Radio | Test signal transmission | Used to verify the radio communication between two appliances by transmitting a signal to one appliance and receiving a signal on the other. There is a risk of the communication being lost if the signal is weak. Verify the installation (distance and/or obstacles between the appliances). | |
| Test signal reception | |||
To exit the Expert Menu, go back as many times as necessary , select "Abandon" with and confirm with .
6 - Troubleshooting
| Problem encountered | Verifications to carry out | ||
| The control box screen does not switch on. | Check that the switch at the back of the appliance is in position 1. Check that the appliance is supplied with power. | ||
| The room temperature is different from the temperature displayed on the appliance. | You must wait at least 6 hours for the temperature to stabilise. Depending on your installation, you may note a different temperature to the one displayed on your appliance (a difference of 0.5°C is normal). In this case, refer to the "Expert Menu", "T°C Calibration" chapter. | ||
| The appliance does not heat up. | If you are in programming, check that you are in a Comfort time range. Make sure that the installation's circuit breakers are activated or that the shredder (if you have one) has not switched the appliance off. Check the air temperature in the room: if it is too high in relation to the setpoint temperature the appliance will not heat up. | ||
| The appliance heats up all the time | Check that the appliance is not located in a draft (door open nearby, air output through the cable cover at the back of the appliance) or that the temperature setting has not been modified. There may be a problem in the electricity network. If there is a problem (thermostat blocked, etc.), disconnect the appliance's power supply (fuse, circuit breaker) for around 10 minutes, then switch it back on. If the phenomenon reoccurs frequently, have the power supply checked by your energy distributor. | ||
| The appliance does not heat up enough | Increase the temperature by pressing Refer to the "Setting the temperature" chapter. If it is set to maximum, carry out the following checks: - Check whether there is another heating mode in the room. - Check that your appliance only heats up the room (door closed). - Have the appliance's power supply voltage checked. - Check that your appliance's power is suitable for the size of your room (we recommend an average of 100 W/m2 for a ceiling height of 2.50 m or 40W/m3). | ||
| The appliance is very hot on the surface. | If is normal for the appliance to be hot when it is working; the maximum surface temperature is limited according to the NF Electricity standard. If, however, you think that your appliance is too hot, check that the power is suitable for the surface of your room we recommend an average of 100 W/m2 for a ceiling height of 2.50 m or 40W/m3) and that the appliance is not positioned in a draft which would interfere with its regulation. | ||
| Problem encountered | Verifications to carry out | ||
| Traces of dirt appear on the wall around the appliance. | In a polluted atmosphere, dirt may appear on the appliance's air out-lets or on the wall. This phenomenon is caused by poor ambient air quality (cigarette smoke, incense, chimney, etc.). In this case, we recommend verifying the ventilation in the room (fan, air flow, etc.). | ||
| The Expert Menu is not accessible. | You saved a PIN Code. You must enter your code to access the Expert menu (see Expert menu chapter). | ||
| The appliance does not follow the internal programming orders. | Check that the date and time are set. Check that the appliance is in PROG mode and that internal programming is selected. | ||
| The appliance does not follow the external programming orders. | Make sure that the programming unit is used correctly (see unit user manual). Check that the appliance is in PROG mode and and that the "Ext. management" programming source is selected.. | ||
| The appliance does not respond to the pilot wire orders. | Carry out the following checks to verify that the programming orders are being transmitted correctly. | ||
| Orders received | Oscilloscope Ref/Neutral | Mode obtained | |
| 0 volt | —— | COMFORT | |
| 230 V 3 - 5 min | —— | COMFORT - 1°C | |
| 230V 7 - 5 min | —— | COMFORT - 2°C | |
| 230 V | —— | ECO | |
| - 115 V negative | —— | FROST PROTECTION | |
| + 115 V positive | —— | HEATING STOP | |
| In the case of programming by pilot wire or bearer current, the frost protection or shedding orders are priority. The time for the switchover from Comfort mode to Eco mode is around 12 seconds. The time for the switchover from Comfort -1/-2 mode to comfort mode is around 5 minutes. | |||
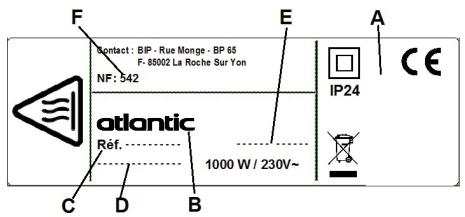
If you did not manage to resolve your problem, contact your distributor/installer; have the appliance's references with you. They are located on the side of the appliance. Measure the temperature in the room.
The Commercial code (C) and the Serial number (E) provide the manufacturer's identification of the appliance you have just bought.
A Standards, quality labels
B Trade mark
C Commercial code
D Manufacturing reference
E Serial No.
F Manufacturer's No.
| Technical characteristics measured and calculated according to REGULATION (EU) 2015/1188. | |||
| Model references | promSH-BD3.3-promSV-BD3.3-promSP-BD3.3 | ||
| Characteristic | Symbol | Value | Unit |
| Heat output | |||
| Rated heat output | P nom | 0.5 to 2.0 | kW |
| Minimum heat output | P min | 0.0 | kW |
| Maximum continuous heat output | P max,c | 2.0 | kW |
| Auxiliary electricity consumption | |||
| At rated heat output | el max | 0.000 | kW |
| At minimum heat output | el min | 0.000 | kW |
| In standby mode | el sb | 0.00095 | kW |
| el sb | 0.95 | W | |
| Type of heat output / room temperature check | |||
| Characteristic | Unit | Additional information | |
| Electronic room temperature check and weekly programmer | yes | ||
| Other inspection options | |||
| Room temperature check, with presence detector. | yes | ||
| Room temperature check, with open window detector. | yes | ||
| Remote control option. | yes | ||
| Adaptive activation control. | yes | ||
| Activation time limiter. | no | ||
| Black globe sensor. | no | ||
| Contact details | Idem last cover page | ||