USER MANUAL MORAN WH/F/60 TURBOAIR
Closely follow the instructions set out in this manual. All responsibility, for any eventual inconveniences, damages or fires caused by not complying with the instructions in this manual, is declined. This appliance is intended to be used in household and similar application such as: - staff kitchen areas in shop, offices and other working environments; - farm houses; - by clients in hotels, motels and other residential type environments; - bed and breakfast type environments.
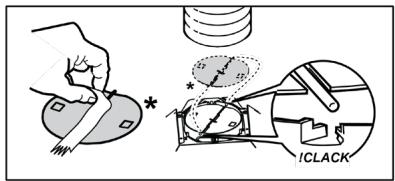
Note: The parts marked with the symbol ( ^ * ) " are optional accessories supplied only with some models or otherwise not supplied, but available for purchase.

Caution
- Before any cleaning or maintenance operation, disconnect hood from the mains by removing the plug or disconnecting the mains electrical supply.
- Always wear work gloves for all installation and maintenance operations.
- This appliance can be used by children aged from 8 years and above and persons with reduced physical, sensory or mental capabilities or lack of experience and knowledge if they have been given supervision or instruction concerning use of the appliance in a safe way and understand the hazards involved.
- Children shall not be allowed to tamper with the controls or play with the appliance.
- Cleaning and user maintenance shall not be made by children without supervision.
- The premises where the appliance is installed must be sufficiently ventilated, when the kitchen hood is used together with other gas combustion devices or other fuels.
- The hood must be regularly cleaned on both the inside and outside (AT LEAST ONCE A MONTH).
- This must be completed in accordance with the maintenance instructions provided. Failure to follow the instructions
provided regarding the cleaning of the hood and filters will lead to the risk of fires.
- Do not flambe under the range hood.
- For lamp replacement use only lamp type indicated in the Maintenance/Replacing lamps section of this manual.
The use of exposed flames is detrimental to the filters and may cause a fire risk, and must therefore be avoided in all circumstances.
Any frying must be done with care in order to make sure that the oil does not overheat and ignite.
CAUTION: Accessible parts of the hood may become hot when used with cooking appliances.
- Do not connect the appliance to the mains until the installation is fully complete.
- With regards to the technical and safety measures to be adopted for fume discharging it is important to closely follow the regulations provided by the local authorities.
- The air must not be discharged into a flue that is used for exhausting fumes from appliance burning gas or other fuels.
- Do not use or leave the hood without the lamp correctly mounted due to the possible risk of electric shocks.
- Never use the hood without effectively mounted grids.
- The hood must NEVER be used as a support surface unless specifically indicated.
- Use only the fixing screws supplied with the product for installation or, if not supplied, purchase the correct screws type.
- Use the correct length for the screws which are identified in the Installation Guide.
- In case of doubt, consult an authorized service assistance center or similar qualified person.

WARNING!
- Failure to install the screws or fixing device in accordance with these instructions may result in electrical hazards.
-
Do not use with a programmer, timer, separate remote control system or any other device that switches on automatically.
-
This appliance is marked according to the European directive 2012/19/EC on Waste Electrical and Electronic Equipment (WEEE).
-
By ensuring this product is disposed of correctly, you will help prevent potential negative consequences for the environment and human health, which could otherwise be caused by inappropriate waste handling of this product.

- The symbol on the product, or on the documents accompanying the product, indicates that this appliance may not be treated as household waste. Instead it should be taken to the appropriate collection point for the recycling of electrical and electronic equipment. Disposal must be carried out in accordance with local environmental regulations for waste disposal.
- For further detailed information regarding the process, collection and recycling of this product, please contact the appropriate department of your local authorities or the local department for household waste or the shop where you purchased this product.
Appliance designed, tested and manufactured according to:
- Safety: EN/IEC 60335-1; EN/IEC 60335-2-31, EN/IEC 62233.
Performance: EN/IEC 61591; ISO 5167-1; ISO 5167-3; ISO 5168; EN/IEC 60704-1; EN/IEC 60704-2-13; EN/IEC 60704-3; ISO 3741; EN 50564; IEC 62301.
- EMC: EN 55014-1; CISPR 14-1; EN 55014-2; CISPR 14-2; EN/IEC 61000-3-2; EN/IEC 61000-3-3. Suggestions for a correct use in order to reduce the environmental impact: Switch ON the hood at minimum speed when you start cooking and kept it running for few minutes after cooking is finished. Increase the speed only in case of large amount of smoke and vapor and use boost speed(s) only in extreme situations. Replace the charcoal filter(s) when necessary to maintain a good odor reduction efficiency. Clean the grease filter(s) when necessary to maintain a good grease filter efficiency. Use the maximum diameter of the ducting system indicated in this manual to optimize efficiency and minimize noise.
Use
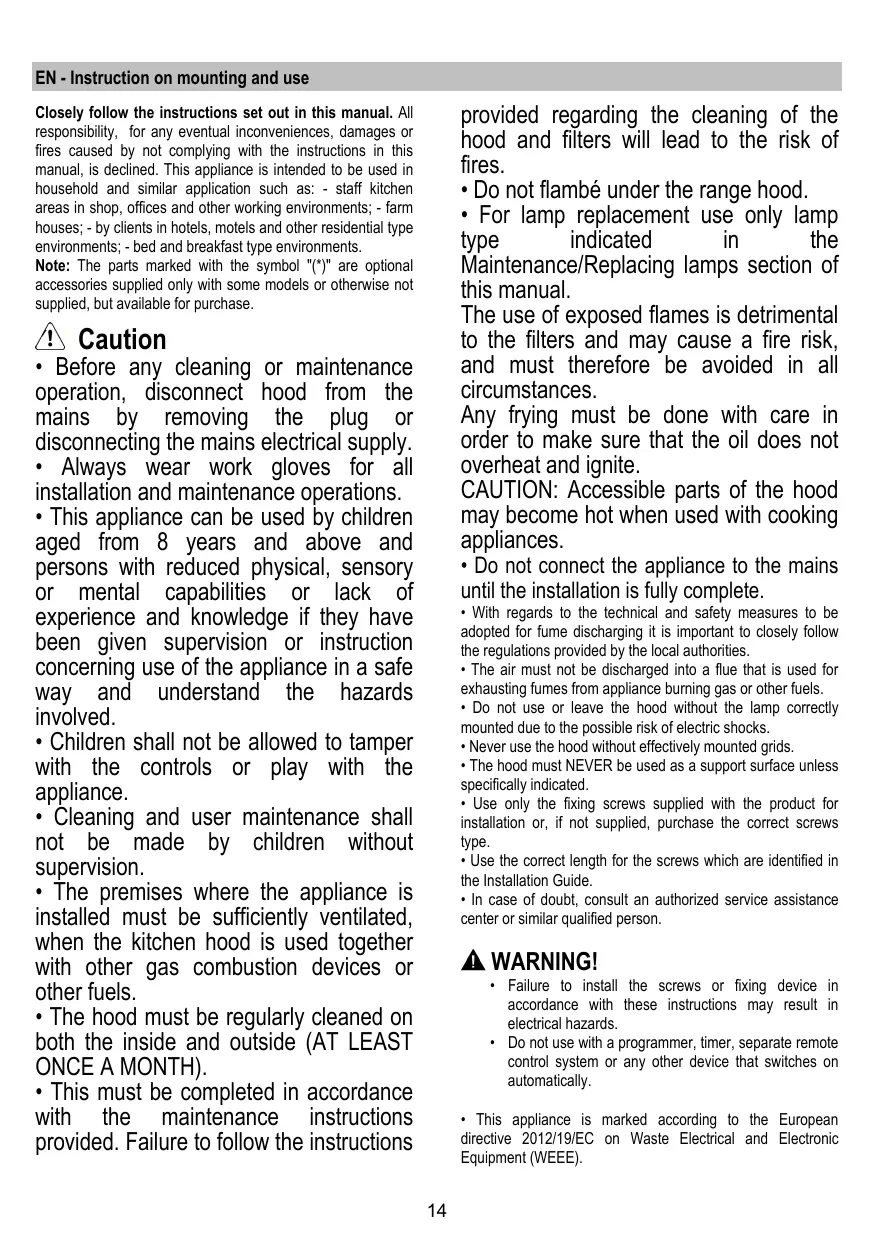
The hood is designed to be used either for exhausting

or filter version
Installation
The minimum distance between the supporting surface for the cooking equipment on the hob and the lowest part of the range hood must be not less than 60cm from electric cookers and 65cm from gas or mixed cookers.
If the instructions for installation for the gas hob specify a greater distance, this must be adhered to.

Electrical connection
The mains power supply must correspond to the rating indicated on the plate situated inside the hood. If provided with a plug connect the hood to a socket in compliance with current regulations and positioned in an accessible area, after
installation. If it not fitted with a plug (direct mains connection) or if the plug is not located in an accessible area, after installation, apply a double pole switch in accordance with standards which assures the complete disconnection of the mains under conditions relating to over-current category III, in accordance with installation instructions.
WARNING!
Before re-connecting the hood circuit to the mains supply and checking the efficient function, always check that the mains cable is correctly assembled.
Warning! If the supply cord is damaged, it must be replaced by the manufacturer, its service agent or similarly qualified persons in order to avoid hazard.
Mounting
It is important to conserve this booklet for consultation at any moment. In the case of sale, cession or move, make sure it is together with the product.
- Read the instructions carefully: there is important information about installation, use and safety.
- Do not carry out electrical or mechanical variations on the product or on the discharge conduits.
- Before proceeding with the installation of the appliance verify that there are no damaged all components. Otherwise contact your dealer and do not proceed with the installation.
Operation
The hood is fitted with a control panel with aspiration speed selection control and a light switch to control cooking area lights.
Maintenance
Cleaning
Clean using ONLY a cloth dampened with neutral liquid detergent. DO NOT CLEAN WITH TOOLS OR INSTRUMENTS. Do not use abrasive products. DO NOT USE ALCOHOL!
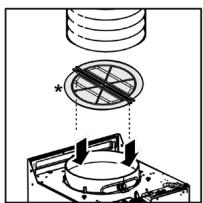
Grease filter
Fig. 5-13-14
Traps cooking grease particles.
If situated inside the support grill, it may be one of the following types:
Paper filter must be replaced once a month or if colouring appears on upper side, in such cases the colouring is evident through the grill openings.
Metallic filter must be cleaned once a month, with non abrasive detergents, by hand or in dishwasher on low temperature and short cycle.
When washed in a dishwasher, the grease filter may discolour slightly, but this does not affect its filtering capacity.
Charcoal filter (filter version only)
Fig. 13
It absorbs unpleasant odors caused by cooking.
The saturation of the charcoal filter occurs after more or less prolonged use, depending on the type of cooking and the regularity of cleaning of the grease filter.
In any case it is necessary to replace the cartridge at least every four months.
The charcoal filter may NOT be washed or regenerated.
It may be one of the following types:
Rectangular S1 or S2 or S3:
Mounting (S1 or S2): insert the rear side T and hook further to the front (U).
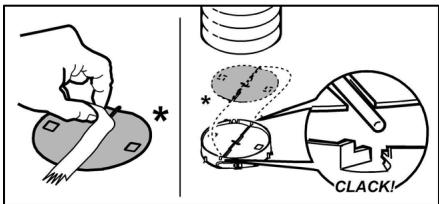
Mounting (S3): Remove the cover W by rotating the O knobs to 90^ , fit the filter inside and lock in place with the central knob O, then close the cover.
Proceed in the inverse for dismounting.
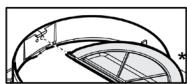
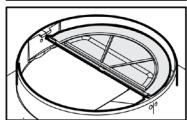
Circular (V1-V2-V3-variouss models):
Bayonet mount position the filter in the middle of the motor protection grill covering ensuring that the reference to X1 or X2 or X3 on the carbon filter match the Y1 or Y2 references on the conveyor, then turn clockwise; in case of dismounting turn anticlockwise, if provided with a Z tape remember to gently lift first.
Replacing lamps
Disconnect the appliance from the electricity.
Warning! Prior to touching the light bulbs ensure they are cooled down.
Replace the damaged lamp.
Use E14 3W max LED lamps only. For more details, check enclosed leaflet "ILCOS D" (alfanumeric position "1d").
If the lights do not work, make sure that the lamps are fitted properly into their housings before you call for technical assistance.
On some models ONLY:
A Non Return Backdraft Damper is included in the supply, as optional accessory to be installed under certain installation conditions (i.e. if there is no protection against accidental backdraft of air from the outside). The damper must be installed inside the dedicated housing, inside of the Air Outlet Fitting, before installing the flue.

Circular (V1-V2-V3- various models):
Montagem (S3): Remove a tampa W girando as manoplas O de 90^ .
Circular(V1-V2-V3-varios models):
Inlocui becul defect.
UcTpoIcTBpa3pa6oTaHO,MCbItaHOuN3roTOBneHO B COOTBETCTBmC:
- Be30anachocTB: EN/IEC 60335-1; EN/IEC 60335-2-31, EN/IEC 62233.
- 3KcπIpyaúnoHbIe xapakTepeNtki: EN/IEC 61591; ISO 5167-1; ISO 5167-3; ISO 5168; EN/IEC 60704-1; EN/IEC 60704-2-13; EN/IEC 60704-3; ISO 3741; EN 50564; IEC 62301.
EMC:EN55014-1; CISPR 14-1; EN55014-2; CISPR 14-2; EN/IEC61000-3-2; EN/IEC61000-3-3.。「peplnojhenia nprabnblhorncnoIbnbOAHnB B cIeJX CHNKeHnBO3dEChTBAHaOKpyKaIOUoCpEdu: BkIIOUte BbITKHOKOLnA HA MNHMnALbHOKn CKOpCTN, KOrDa HauHnaete TOTOBHT, N OCTaBte erO pa6Otatb B TeueHne HeCKoJIbHXMNHyT NOcNE TOR, KAc ZAKOHnTe rOToBHT. YBeINuBaHTeCKOpCTb ToLbKO B Cnyae BoJbUoro KOINcEcbTa Dbima nnapa, n Pnp6eRanKe KNoCNlZbOAnHn NOBbUWeHNbIXCKOpCTe ToLbKO B 3KcTpEmalnbHbX CNtuaqnx.3AmHeYrToBnHnФIpIbTp(b), KOrDa 3TO Heo6xOIMO, dIy NoDnepKAnHn XPOoSei 3ΦΦeKTHBnOCTnymEnbSeHn3anaXob.OounaTe XInpoBoVBie FInbTp(b), KOrDa 3TO Heo6xOIMO, dIy NoDnepKAnHn XPOoSei 3ΦΦeKTHBnOCTnXinpoBOrO FInbTp.a. McOnb3yIte MAKCMaJIbHbI dIaMeTp
CNTEmbl BO3dyXOB0OB, Yka3aHHbI B DaHHOM pyKOBOCTBE,ДЯ ONTINMn3aun 3ΦΦeKTHBHOCTIn MmHmN3aun ypOBHnyMa.
Пльзоваиме
BbItjXka BbIOnHeHa IJI npIMeHnB INCNoJIHeHH C

OTBODOM HApUxu IINN B NcPOnIHeHn C BHyTpEnHe npUrkyJIaCneB 03dyxa
YctaHOBka
PacctoHHe HxKHe rpaH BbITxKn HaOnpHoi pIIOCKOCTbIO NOcOcybl Ha KxOHHO pIITe DOJNHO 6bITb He Mehee 60cm -ДЯ 3NeKtpuYeCKHX pIIT, n He Mehee 65 cm dIra3ObBix INI KOM6HnHPoBaHHbx pIIT.
EcnB INHCTpyKUxRn NO yCTaHOBe Ra3OBoI PJIITbI OROBOpeHO 6oJIbuee paCCTOARHe, To yHTnte 3TO.

3Jektpueckoe coeHHeHne
HapraKeHne cTeI DOJIKHO COOTBeTCTBOBaTb HapraKeHIO, Yka3aHHOMy Ha Ta5nUe TeXnUeCKnx DaHHbIX, KOtOpaR pa3MeUeHa BHTpy npi6opA. EcnB bITkKa Ch6KeHa BINKO, NOkIHOuTE BbITkKky K WtENCeNBHOmy Pa3bEmy. OH D0JIKeH OTBeaTb DeNCTByUOUM nPaBnAm M 6bITb paCNOxH BJeKoDOCTyHOM MeTe. BkIOuHTB P03eTKy MOxHO Nocye yCTaOBKn. Ecn Ze BITkKa He Ch6KeHa BINKO (PpAoe NOkIIOUeHN K CTei), INI WtENCeNBHy PA3bEM He paCNOxH B DoCTyHOM MeTe, TAKKe I NoCte YCTaOBKn, To nCNoJb3yTe NaDNeJAaUcMn DByXnOHOchbl BIKIOuATenB, ObecneHBAIOUm NOHoe paMbKahne cTei pN B03NKHOBEHM YcOBN nepenapraKeHn 3-e KATEROpIM, B COOTBeTCTBm C INHCTpyKUaMn NO yCTaOBKe.
BHIMAHHE!
npexdyeemPOKJIIOUHTbKcETNNTAHNY3JNEKTPUeCKyHO CNTEmy BblTAKKIN PNOBepNTB NCPaPBHOe FHKNUHINPOBaHHe ee ybeDntecB TOM, YTO KaBeJIb NITAHNAI PPABINBJHO CMOHTPOBAH.
BhImaHHe!Bo n36eXahHe BC8KHX pNCKOB, onepaunno 3ameHe Ka6eI NITAHIN DOJIkHa 6bIT npOn3BeDeHa nepcoHaIOM KOMTeHTHO CnyKbI TexO6CJyXBaHnra.
YctaHObKa
OueHb BaxHo COxpaHtB 3Ty INHCTpyKlIIO, YTO6bMoXHO bIIO 6bpaTb8c K HeB IIO6oB MoMeHT. EcIn n3dJIne npOaETc, nepedaetc nnpehenocITcBOEcecneHT, YTO6bI INHCTpyKUra BCERda 6bIa C HIM.
BHNMaTeIbHo npOHTaTe HNCTpyKUH. B Hei haxoDITcBaxHna HnΦOpMauaNo yCTaHOBe, 3KcPJIyatauMn I630nacHOCTn.
3anpeaaetcBbIOnHtBImMeHnB3JKeTpueckoNIMm MexaHuecko qactn N3dEInn B Tpybax paccenBaHH.
- Ipeed hauaIOM yctaHOBK OobpyoDaBHn y6eINTecb VceIOCTHO CTn COxpaHHOCTN BCEx KOMTOHeTOB. PIn HAIINH NIObIx NOBpeXdEHn O6paNTeCb K
IOCTaBmKU H N B KOeM Cnyae He HaunHaTe MOHTaK 0bOpyOboHnI.
Функуноваиме
BbIyKa OcHaSeHa NaHEnbIy UynpaBHeHn Ia KOnTpOJa CKoPoCTN BbITXHO BoHTnJIrTopa N BkIOUeHn CBeta DnA OcBeSeHn pa6oey NoBepxHOCTn PInTbI.
yxoI
OuInCTka
Дя OунстКИ ИСользУТЕ TOЛьКО сецmaлььHyTOprNK, CMOчEHNY HeIrypaIbHbIM JxNdKIM MHOUIM CpeDCTBOM. HE ICSIOBL3YITE HNUKAKNE NHCTPMETHbIДЯ OUYCHNTe. He npImeHЯгte cpeDCTBa, coedржашп eba4a3NbIbe MATEpHaJI. HE IPUMEHNITe CnPT!
He BCTaHOBIbAHnB BiIDNObiDnHex TBnHTi pIncTpoIB dIy fikCyBaHHy BiIDNObiHOCTi 3 cIMM IHCTpyKcIaMM MoKe npINBeCTn Do pN3NKe eNEKTpUHOro noXOJKeHH.
He cnid BnKOpNCtOByBaTn 3 npOrpaMaTOpom, TaHMePOM, OKpemIM Nyltom KepyBaHHa 6o3 6yDjaKM iHsIM nPCTPOeM, kNn npNbOBNtbcraB diHO ABTomATNo.
Danm Bvpi6 npomapKobAHn BiNObiDn do EbponecBkoI
DnpeKtNBn 2012/19/EC, ytni3auiy enektpnuHoro i
eneKtpOnHoro obnaHann (WEEE). 3a6e3neuyOu biPyH
ytinl3auio zuo BPO6y, Bu donOMoxTe nonepedTn
toNEHui HeRaTbHi HacniDk nIra OTOUYOHO cerEdoBua
i 3dopOB'JIIOHNu, KOTPI MOrn6 MaTN MiCue B
npotIneXhOMy BnAaKy.

Cnmbon ha camomy Bnpobi a6o Ha cynpobodkyohomy Ioro Dokymenti Bk3ye, 10 npn ytniiauii 2b0r O Bnpoby 3 Hm He moKha nOBODTNCRA k3 i3BnuayHMMN no6byTOBIMn BiXdoAMn. BIn Mae 3daBaTNCa y BiNIOBIDHN pnyKT npnOmy eektpuHoro i enektpoHoro o5bnadHaNN dIra NoaIbwoi ytniiaaii. 3dabAHNa HA 3nAm NobINHO BVKOHyBATNCs 3idHO 3 MicueBMn npabINAMn NO tniiaaiii BiXdoH. dIra 6blwe DetanbHOI HOpmaui npno papBna NOBODxehnn 3 TakHMn Bnpoam, ix ytniiaaii i nepeop6kn 3eptaiTeB b MiccEbi OpraHH Bnadi, B cnKy6by no ytniiaaii BiXdoH, a6o B Mara3HN, B kOMy Bn npnd6an daHn Bpi6.
Пилад спpoeKTObaHo, ВирpoБуBaHo i ВИROTOВено 3riДно 3:
- Be3neka: EN/IEC 60335-1; EN/IEC 60335-2-31, EN/IEC 62233.
- Eknnyatauihi kocti: EN/IEC 61591; ISO 5167-1; ISO 5167-3; ISO 5168; EN/IEC 60704-1; EN/IEC 60704-2-13; EN/IEC 60704-3; ISO 3741; EN 50564; IEC 62301.
EMC:EN 55014-1; CISPR 14-1; EN 55014-2; CISPR 14-2; EN/IEC 61000-3-2; EN/IEC 61000-3-3. Iopadn nnpabinbhoi ekcnnyatau ta dna 3HmKHeHHBnNBy Ha cepeboiue: Bmikai Te BnTkky Ha mHimaIbHy WbMdkCTb nepeod nowatkOM nprirotyBaHH iki, i 3aIIuMaIte ii npauOBATn Ha deKilbKa XBInn HCnla 3akHueHH nprirotyBaHH. 36InbUyTe WBnKCTb TlBKn y paXi BEINKOI kInbKoCT dmMy i npay Ta BnKOpNCBOyTe HADyB TlBKn y KpaHix BnAkaX. DnI niTpImaHH BcOKoi eEeKTNBHOCTi BnDaneHHZanAix, 3a HeOeXidHOCTi BHKOnyTe 3amiHy ByrInbHorO(-x) fiptpy(-i). DnI niTpImaHH BcOKoi eEeKTNBHOCTi fiptpy XkpIB, 3a HeOeXidHOCTi BHKOnyTe YnCTKy fiptpy(-i) XkpIB. BnkOpNCBOyTe MAKcmalbHni diAMetp cncTeMH NOBtPOBoID, 1IO BkA3AHN y IHCTpykii dIra ONTmisaqui eEeKTNBOHcOT ta Mihimisaqui wmy.
BnKOpncTahna
BntxKnn KOBnak cnpoeKTobAHn DnB BnKOpncTahn B
peximi BiDBoy Ha3OBHI 甲Bpexmi BHyTpiiHbOi
Inctanlaia
BicTaHb HnKbOi BiDuaCTHH BNTaXKn Do nocyDu Ha kXoHmPiMae 6ytN He MeHsE 60cm, y BnApky eKeTpuHnx PInT, ta 65 cm, y BnApKy rAzOBx Ta KOM6IHOBAHX PInT.
Heo6xioH npimatn do ybarn BiCTaHI, kki Bka3yHTbcB B iHcTpykii 3 iHCTaIaJI rai3OBOI pINTN.

aalall aajgll jnull caiy gill jnojol
.("1d" 一 _ 一 ) "ILCOS D"
ii 1
i 1
jui jiu
y j 1 1 1 1 1 1 1 1 1 1 1 1 1 1 1 1 1 1 1 1 1 1 1 1 1 1 1 1 1 1 1 1 1 1 1 1 1 1
a15 2b g jj 6
J 1 J 1 J 1 J 1 J 1 J 1 J 1 J 1 J 1 J 1 J 1 J 1 J 1 J 1 J 1 J 1 J 1 J 1 J 1 J 1 J 1 J 1 J 1 J 1 J 1 J 1 J 1 J 1 J 1
aillalilal galllll al
A
1 11111111111111111111111111111
m - 1 0 ;
1.
y j 11 11 11 11 11 11 11 11 11 11 11 11 11 11 11 11 11 11 11 11 11 11 11 11 11 11 11
Jlll llll (WEEE) 111111111111111111111111111111111111
1 1 1 1 1 1 1 1 1 1 1 1 1 1 1 1 1 1 1 1 1 1 1 1 1 1 1 1 1 1 1 1 1 1 1 1 1 1 1 1 1 1 1 1
12 = 1 : 12
:EN/IEC EN/IEC 60335-1
.EN/IEC 62233,60335-2-31
EN/IEC 61591; ISO :
sio a bla 1 j 1
Jc) jll n o Jd 1
LjUg j jll (y y
p c ilal l al a
blai i j g j g j g j
Sj wall j j j w
.
12
J 1
Jlll l 1111111111111111111111111111
1
jll jll jll jll jll jll jll jll jll jll jll jll jll jll jll jll jll jll jll jll jll jll jll jll jll jll jll jll jll jll jll jll jll jll jll jll jll jll jll
aI 1
1 1 1 1 1 1 1 1 1 1 1 1 1 1 1 1 1 1 1 1 1 1 1 1 1 1 1 1 1 1 1 1 1 1 1 1 1 1 1 1 1
1g jyj 1 yj 1y j 1y j 1y j 1y j 1y j 1y j 1y j 1y j 1y j 1y j 1y j 1y j 1y j 1y j 1y j 1y j 1y j 1y j 1y j 1y j 1y j 1y j 1y j 1y j 1y j 1y
aal jbi jil 5 15j 15
a 1
1 1 1 1 1 1 1 1 1 1 1 1 1 1 1 1 1 1 1 1 1 1 1 1 1 1 1 1 1 1 1 1 1 1 1 1 1 1 1 1 1 1 1 1 1 1 1 1 1 1 1
jll jll lil 111 111 111 111 111 111 111 111 111 111 111 111 111 111 111 1
J 1 J 1 J 1 J 1 J 1 J 1 J 1 J 1 J 1 J 1 J 1 J 1 J 1 J 1 J 1 J 1 J 1 J 1 J 1 J 1 J 1 J 1 J 1 J 1 J 1 J 1 J 1 J 1 J 1 J 1 J 1 J 1 J 1 J 1 J
JLAC JIJI 1111111111111111111111111111111111111111111111111111
aai jbl 1gjy Jlabla a jy . JgJl4
JnJnJnJnJnJnJnJnJnJnJnJnJn
J 1
.