Nankin - Electric towel warmer ACOVA - Free user manual and instructions
Find the device manual for free Nankin ACOVA in PDF.
| Product type | Electric towel warmer (also usable in mixed mode with central heating) |
| Brand | ACOVA |
| Model | Nankin |
| Power supply | 230 V ~ 50 Hz, pilot wire (class II) |
| Power | See rating label (not specified in manual) |
| Heat transfer fluid | High-performance thermal mineral oil (factory-filled) |
| Operating modes | Frost protection, Eco, Comfort, Programs P1 and P2, Manual and programmed Boost |
| Programming | Weekly, 2 customizable programs (P1 and P2) up to 10 changes per day |
| Control | Wireless radio-frequency remote control (range < 10 m), backlit display |
| Open window detection | Yes (enable/disable, automatically switches to Frost protection) |
| Pilot wire function | Yes (compatible with central programmer) |
| Safety | Child lock, overheat protection, thermal cut-out, minimum distance 600 mm from floor for bottom bar |
| Protection rating | Protected against water splashes (installable in bathroom zone 2) |
| Remote control power | 2 alkaline LR03/AAA 1.5 V batteries (non-rechargeable) |
| Standby consumption | < 0.5 W |
| Maintenance | Clean surfaces with warm soapy water; unit and remote control with a dry cloth; do not use abrasive products |
| Warranty | 2 years against manufacturing defects (excluding transport, removal, installation) |
| Repairability | Contact installer or after-sales service; oil repair reserved for manufacturer |
| Weight and dimensions | Not specified in manual (standard wall-mounted model) |
Frequently Asked Questions - Nankin ACOVA
User questions about Nankin ACOVA
0 question about this device. Answer the ones you know or ask your own.
Ask a new question about this device
Download the instructions for your Electric towel warmer in PDF format for free! Find your manual Nankin - ACOVA and take your electronic device back in hand. On this page are published all the documents necessary for the use of your device. Nankin by ACOVA.
USER MANUAL Nankin ACOVA

PASSAGE MANUEL AU JOUR SUIVANT
1.1 Introduction 44
1.2Warnings 44
1.3 Overview of your appliance 45
2 Installing your appliance
2.1Warnings 47
2.2 Connecting the appliance 49
3 Using your dual-energy towel radiator
3.1 Use as central heating 51
3.2 Use as electrical heating 51
4 Putting the remote control into service
4.1 Fitting batteries 53
4.2 Initial pairing 53
4.3 Status of LED 55
4.4 Displays 55
4.5 Time and date setting 57
5 Use of remote control
5.1 Operating remote control 58
5.2 Operating mode selection 59
5.3 Advanced parameter setting for remote control 64
5.4 Selection of temperature sensor 66
5.5 Calibration of temperature setting 67
5.6 Window open/close detected 68
6 Heating boost 69
7 Setting a P1 and/or P2 programme 74
8 Maintenance and troubleshooting
8.1 Routine maintenance operations 7B
8.2 Troubleshooting 78
8.3 Complete reset 81
8.4 Replacing batteries 82
9 Services and guarantee 83
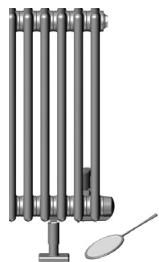
1. Overview
1.1 Introduction
Dear customer,
Thank you for choosing this appliance.
This product has been manufactured in accordance with our stringent quality requirements to give you total satisfaction. To get the most out of your radiator, we advise you to read these instructions carefully and keep them to hand.
Thank you for your purchase.
1.2Warnings
CAUTION (TOWEL DRYER): To avoid any danger to very young children, you are advised to install this appliance so that the lowest heating bar is at least 600 ~mm off the floor.

CAUTION (RADIATOR): To avoid overheating, do not cover the heating appliance.
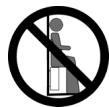
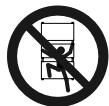
Do not sit on the heating appliance.
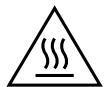
Caution, hot surface.
CAUTION - Some parts of this product can become very hot and cause burns. Particular attention has to be given where children and vulnerable people are present.
Children of less than 3 years should be kept away unless continuously supervised.
Children aged from 3 years and less than 8 years shall only switch on/off the appliance provided that it has been placed or installed in its intended normal operating position and they have been given supervision or instruction concerning use of the appliance in a safe way and understand the hazards involved. Children aged from 3 years and less than 8 years shall not plug in, regulate and clean the appliance or perform user maintenance.
This appliance can be used by children aged from 8 years and above and persons with reduced physical, sensory or mental capabilities or lack of experience and knowledge if they have been given
supervision or instruction concerning use of the appliance in a safe way and understand the hazards involved. Children shall not play with the appliance. Cleaning and user maintenance shall not be made by children without supervision.
A towel radiator must be used for the purpose for which it is intended and not as a table, chair, toy, ladder, etc.
This appliance should be plugged or connected, according to rules and standards in application, only by an authorized person.
It is protected from splashes of water, and can be installed within volume 2 (see section 2.1) as long as the electrical controls are out of reach of anyone using the bath or shower.
The electricity supply must be protected by a residual current device with a maximum of 30mA , especially when installed in a room containing a bathtub or shower.
Before carrying out any maintenance operation on your appliance, ensure that it is switched off (see section 5.1).
IMPORTANT If the power cable is damaged, for safety reasons it must be replaced by the manufacturer, the manufacturer's after-sales service department or a similarly qualified person.
IMPORTANT The heating appliance must not be placed underneath a power outlet.
IMPORTANT This appliance is not intended for use at altitudes exceeding 2000m .
1.3 Overview of your appliance
ELECTRICAL APPLIANCE (TOWEL DRYER AND RADIATOR)
This heating appliance is filled with a precise quantity of specific oil. Any repair work requiring the oil tank to be opened should only be carried out by the manufacturer or their after-sales service department, which should also be contacted in the event of an oil leak.
When disposing of the heating appliance, comply with the regulations in force on the disposal of oil.
This electrical appliance with circulating fluid is delivered ready to use.
It is plugged and filled with a high-performance thermal mineral oil before leaving the factory.
This fluid was specially designed for this use and requires no special maintenance.
As soon as the appliance is switched on, you will notice certain differences compared to a standard electric heating system:
- the electric heating element heats the fluid, which gradually and naturally starts circulating in your appliance;
- the properties of the fluid are such that it takes approximately ten minutes for the radiator to reach its optimum surface temperature, depending on the model and the room temperature when the appliance is switched on;
- this principle also ensures consistent and sustained heating even when the element is no longer powered.
DUAL-ENERGY TOWEL DRYER:
This appliance is designed for connection to the central heating system and comes unplugged.
PROGRAMMING:
You can set two separate weekly programmes, P1 and P2 with the remote control.
2. Installing your appliance
2.1Warnings
The flexible cable supplied with your appliance is designed to be connected to the mains via a junction box that must be placed behind the appliance, with no need for a plug.
In a kitchen or bathroom, the junction box must be positioned at least 25 cm from the floor.
The appliance must be installed as described in this document and in accordance with the applicable European and French standards, including CEI 60364.7.701 and NF C15-100, as well as the rules of good professional practice.
For other countries (apart from France), the appliance must be installed in accordance with standards in force and with rules of good professional practice in the country of use.
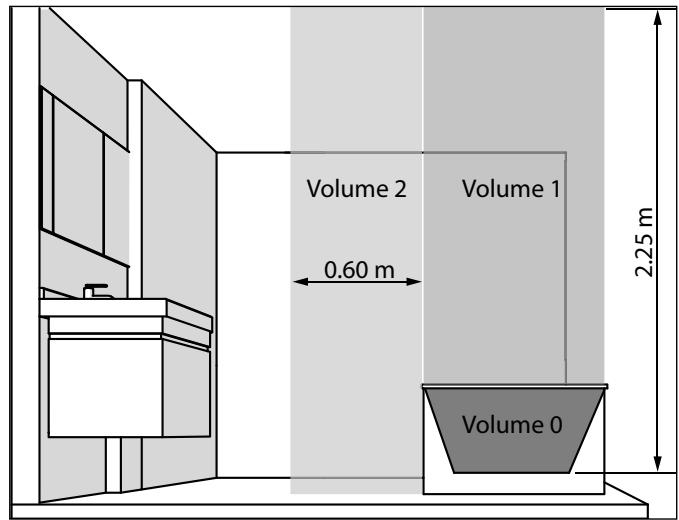
IMPORTANT The example shown only concerns a bathtub. For other bathroom fixtures, please consult your installer.
IMPORTANT The system must be fitted with an omnipolar circuit-breaker with a minimum contact opening of 3mm.
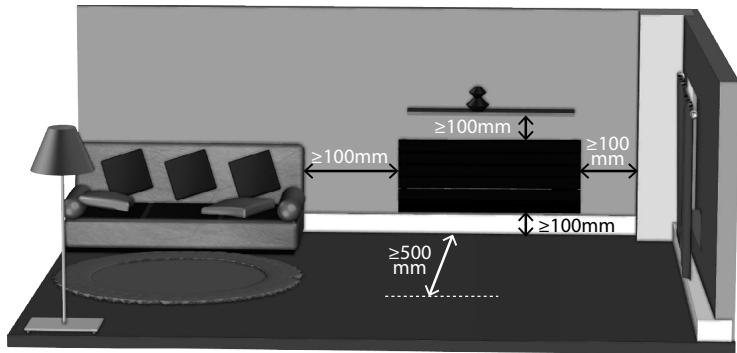
To ensure your system is safe:
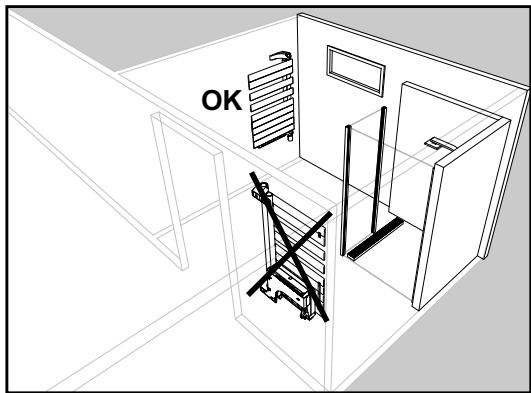
- ensure that an area of at least 50~cm in front of the appliance is clear of objects which might hinder air circulation (furniture, chairs, etc.);
- position a shelf at least 10 cm above the top of your radiator;
- use mounting screws suitable for your wall;
- do not expose the radiator to infense or prolonged humidity.
This appliance should never be installed with the electrical connection box positioned topside.
To get the most out of your appliance and enjoy the highest standards of comfort, we recommend that you install the appliance near places with high heat loss (windows, doors, etc.) wherever possible.
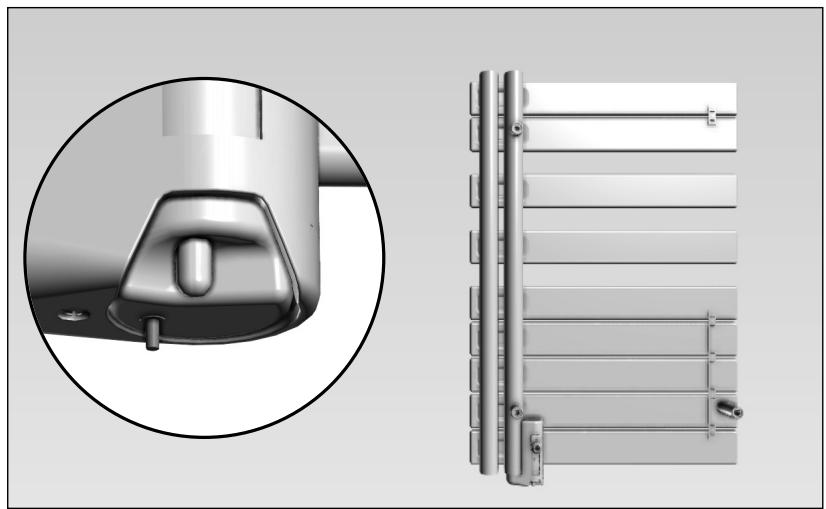
You will find a complete set of assembly instructions in your appliance's box.
Always turn off the electricity supply (circuit-breaker + pilot wire) before making any connections.
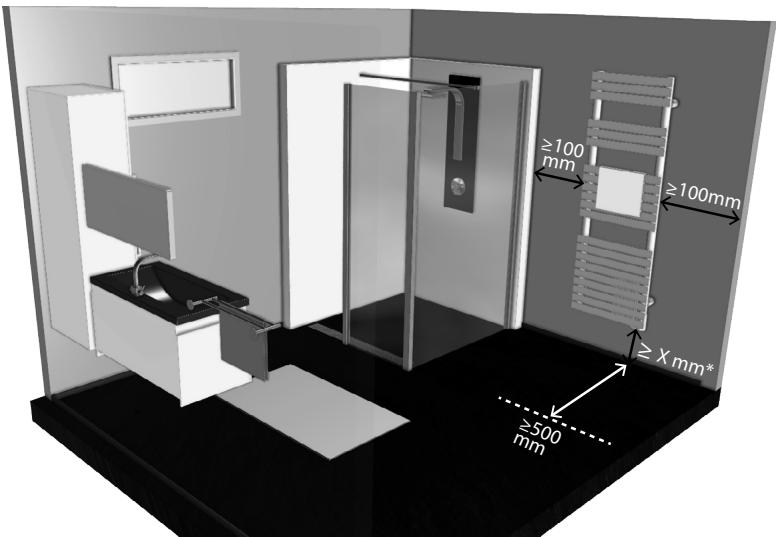
* See installation manual for value of X
NOTE: Electric towel radiators are designed to be covered safely. However, to ensure that your appliance works efficiently, you are advised not to cover it completely. Doing so will increase the temperature and cause the internal cutout to turn off the appliance.

RECOMMENDATIONS FOR THE OPEN WINDOW DETECTION FUNCTION (SEE CHAPTER 5.6)
The position of your device affects the way the open window detection function works. It should be placed as close as possible to the opening part, but should not be installed near a door. In addition to the arrangement of your installation in the room, its function is also affected by the temperature setting on the device, and the outdoor temperature.
2.2 Connecting the appliance
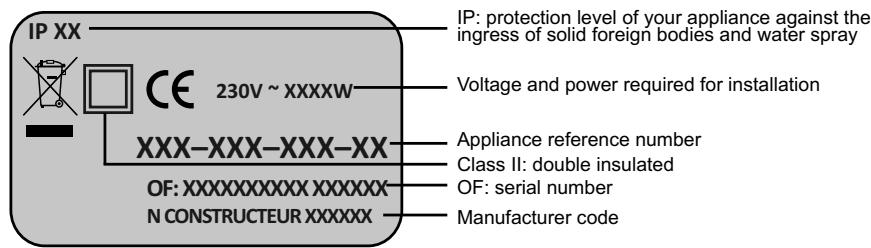
The technical specifications of your radiator are shown on its nameplate.
Please note these down before installing it and before requesting any after-sales assistance.
When connecting the appliance to the mains, you must observe:
- the voltage indicated on the nameplate;
-
conventional colour coding:
-
blue or grey: neutral
- brown: live
- black: pilot wire
CONNECTING PRINCIPLE WITH PILOT WIRE (CLASS 2 - FRENCH MARKET):
Your appliance is equipped with a pilot wire for connection to a pilot wire programming base unit (not supplied with the appliance).

NOTE:
Your appliance is equipped with an integrated electronic control system so we cannot accept any liability should the appliance be used with pilot wire programming base units that function by disconnecting the supply voltage (refer to the instructions supplied with your control unit).
CONNECTING PRINCIPLE WITHOUT PILOT WIRE (CLASS 2 - FRENCH MARKET):
If the pilot wire is not connected, it must be insulated for safety reasons. Under no circumstances must it be connected to earth.

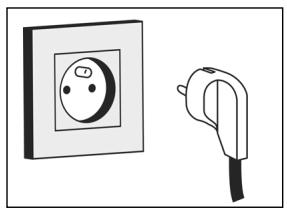
CONNECTION SYSTEM WITH MAINS PLUG READY-FITTED (CLASS I):
The flexible cable supplied with the appliance is designed to be connected to the mains via a plug.
3. Using your dual-energy towel radiator
IMPORTANT This appliance has been designed to be used either in central heating mode or electric mode. Each application requires special, detailed procedures to be followed. Inappropriate use may damage the resistance as a result of excessive fluid temperatures, particularly in the event of simultaneous use in electric and central heating modes.
Any inappropriate use will render the contractual guarantee null and void.
3.1 Use as central heating
Ensure that the control unit is off.
The supply valve must be open to let water from the central heating system circulate.
3.2 Use as electrical heating
A. When using the dual-energy, towel-drying radiator in "electric mode", close the supply valve only and NEVER CLOSE THE HEATING UNIT'S OUTLET since this enables the fluid to expand towards the installation.

CAUTION
Closing it may cause excessive pressure to build up with consequential damage to the heating unit.
B. Ensure that the appliance is sufficiently full by opening the bleed tap at the top. Close it again if there is a steady flow of water. A sponge and small container should be used for this operation.
If the pressure is inadequate for bleeding the heating unit:
- fill the central heating system with water up to the level indicated on your gauge,
- contact your heating specialist,
- inform the operating company (where heating is collective).
C. To start the appliance, follow the same procedure as for an electric towel-dryer.
If the central heating system is equipped with a circulation pump which is independent of the boiler, it must in all circumstances be turned off (risk of siphoning the heating unit in the event that connections are not perfectly watertight).
IMPORTANT: The appliance should only be turned on when properly filled with water (failure to comply may invalidate the guarantee).
IMPORTANT This radiator is equipped with a resistance which has an integrated power shut-off and fuse. Using the radiator without water will permanently damage the fuse as well as the resistance. In this case it must be changed though "not under the manufacturer's guarantee". Using the radiator only partially filled with water causes the heating function to shut off automatically. Alternate function will continue as long as the main heating section is not properly filled.
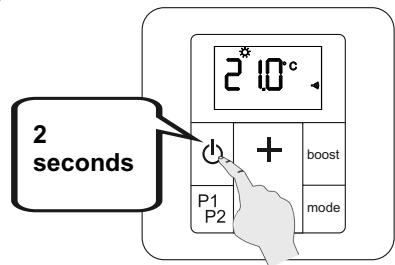
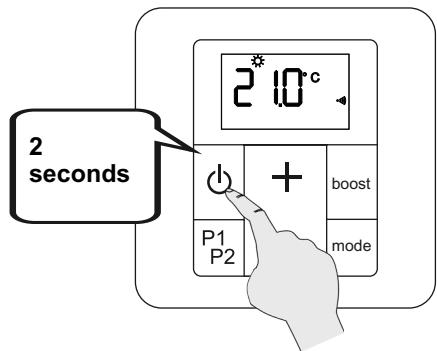
If you notice that the electrical part of your towel dryer is activated, but that it fails to heat up inspite of thermostat demand or positive working operation, carry out the following operations:
1) Ascertain that your radiator is full of water (see paragraph B).
2) Press on the key of the remote control for 2 seconds (see chapter 5.1) to stop the electrical operation of the appliance for 30 to 60 minutes. This operation is necessary to cut off the thermal safety device.
3) Press the key again for 2 seconds: the radiator is ready to heat up properly.
4. Putting the remote control into service
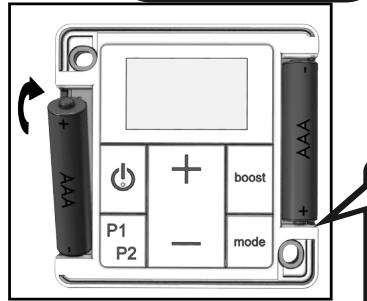
4.1 Fitting batteries
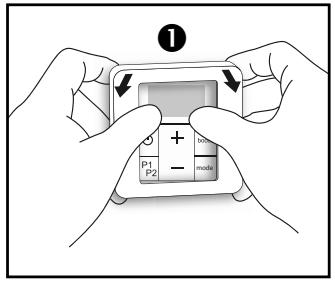
4.2 Initial pairing
| Essential pro-cEDURE when you first turn the appliance on! | Make sure you only pair one appliance and one remote control at a time. | When pairing an appliance fitted with a radio-frequency remote control, all the other radiators in the facility must be turned on. |
LED:
To ensure the LED can be seen properly, you can pair your appliance before fitting it on the wall, or else use a small mirror (like that supplied with this manual).

The first time the appliance is turned on, the LED turns on as a steady pink light, to show that pairing has not yet been done (see chapter 4.3).
WARNING
The appearance of the LED may vary according to the appliance model (see cover page 3).
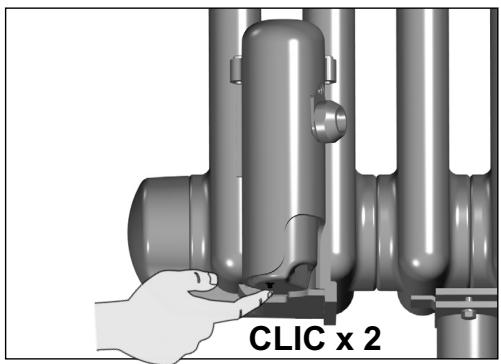
A) Procedure using the receiver unit on your appliance:
Press twice on the LED on your appliance (4 seconds max for the 2 presses).
The LED is flashing pink.
You then have one minute to pair your appliance with the remote control.
NOTE:
Operations A and B can be done in any order.
B) Procedure using the remote control:
(if the remote control screen is off, turn it on by pressing a key)
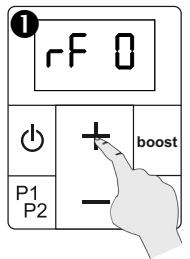
Press for 5 seconds on the ^+ key.
Appliance search takes about one minute.

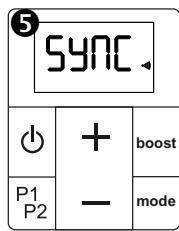
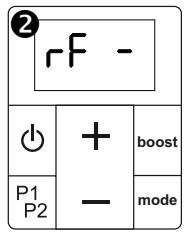
Synchronisation
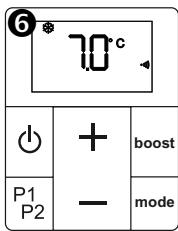
Pairing complete. The remote control goes to Frost-free mode.
The clock icon
will flash until the date and time are set.
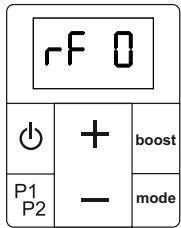
If pairing fails, the display on the control goes back to RF 0. Start the pairing procedure again by pressing the + key for 5 seconds. Check beforehand that the receiver unit is still ready for pairing: the LED should flash pink. If the radiator is still not paired to the remote control after three attempts, the remote control and receiver need to be reset (see chapter 5.3 parameter 9).
A remote control which has already been paired cannot be paired again. If an attempt to do so is made, the receiver flashes white 3 times.

If the remote control is too far away from the heating appliance, the latter will continue to operate in the last mode sent by the controller. Changes of mode relating to the operation of a programme or manual boosts will however continue as normal.
The appliance will resume normal operations within a few seconds when the remote control is within range again (within 10 metres).
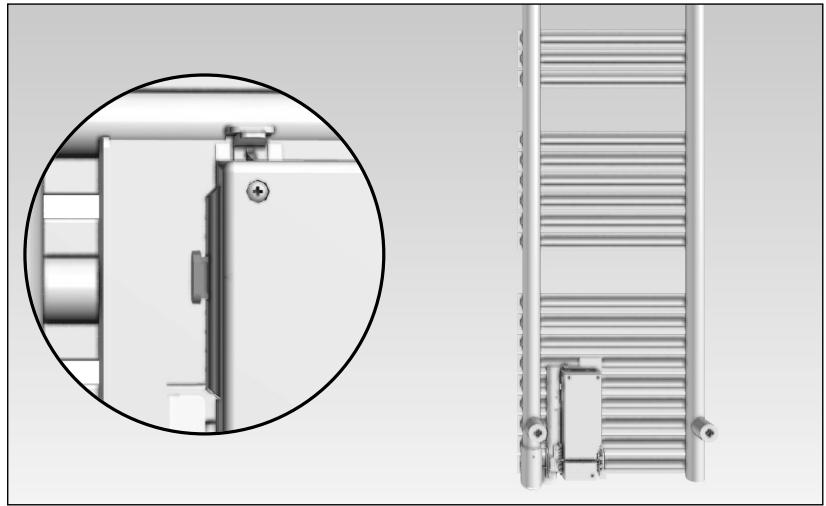
4.3 Status of LED (on radiator or towel dryer)
| STATUS COLOUR | Fixed | Flashing | Off |
| Green | Eco mode | • Standby • Powered down • Stop (pilot wire) • Stop load shedding (pilot wire) | |
| Red | Comfort mode | Boost | |
| Blue | Frost-free mode / Load shedding (pilot wire) | Open window detected | |
| Yellow | T° override° | (+ colour sequence) Error: contact after-sales service | |
| Pink | Pairing error / Appliance not paired | Pairing underway |
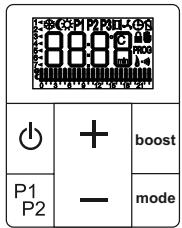
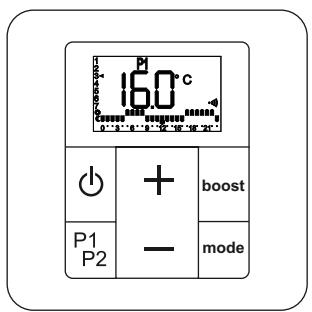
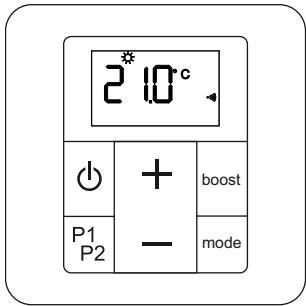
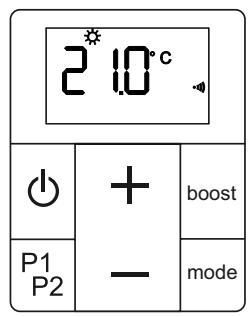
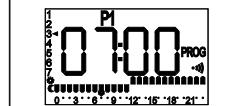
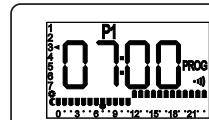
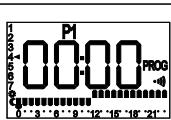
4.4 Remote control displays

NOTE:
Screen lighting turns off automatically if no key has been pressed for the past 5 seconds.
The screen goes to standby after 1 minute.
The standby mode does not affect the functioning of the radiator, and pressing any key will make the screen light up again.
The screen must be on for the pressing of a key to have an effect
(e.g. temperature setting, changing a parameter, etc.).
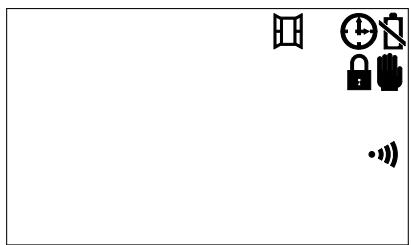
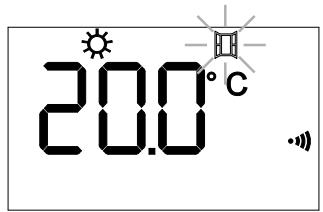
| ICON | EXPLANATION |
| ※ | Frost-free mode operation |
| ( | Eco mode operation |
| ) | Comfort mode operation |
| P1 | Programmed mode operation |
| Manual or programmed boost | |
| Window open detected (icon flashes) | |
| Time setting required | |
| Battery usage indicator | |
| Interface lock | |
| Override indicator | |
| PROG | Programming on-going |
| ·() | Connection indicator between remote control and receiver unit |
| U | Programme in Comfort mode Programme in Eco mode |
| Current time (programme) |
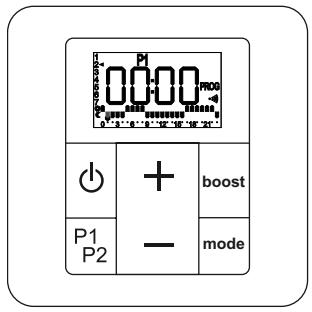
| KEY COMBINATION | FUNCTION |
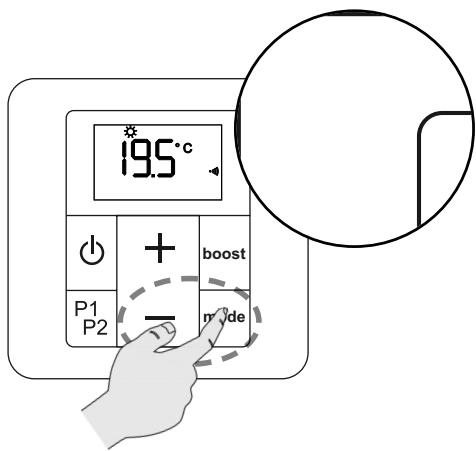
| - & mode | Locking keys (see chapter 5.1) |
| P1P2 & boost | Setting programmed boost (see chapter 6) |
| P1P2 & + | Setting programme P1 (see chapter 7) |
| P1P2 & - | Setting programme P2 (see chapter 7) |
| P1P2 & mode (with remote control off) | Access to advanced parameter setting (see chapter 5.3) |
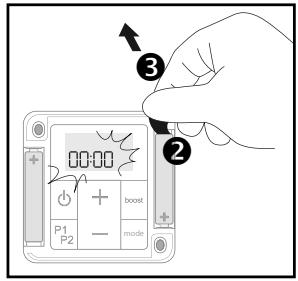
4.5 Time and date setting

The time 00:00 is displayed. Press and hold the + or - keys, to set the time quickly.
During the setting phase, pressing P1P2 takes you back to the previous screen.
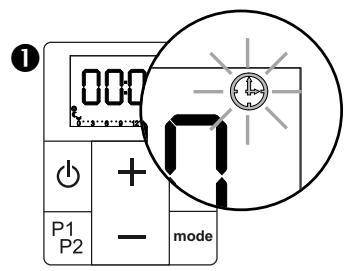
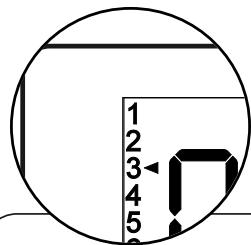
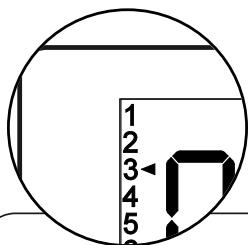
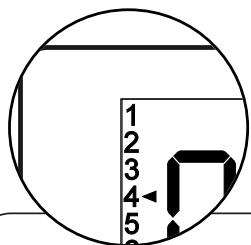
Then proceed to set the day of the week:
| 1 Monday | 5 Friday |
| 2 Tuesday | 6 Saturday |
| 3 Wednesday | 7 Sunday |
| 4 Thursday | (for example) |
Time and date are now saved.
NOTE:
The time on the remote control can be updated at any moment.
5. Use of remote control
5.1 Operating remote control
ON/OFF
- The remote control is turned on: the controller emits an audible signal.
- The remote control is turned off: the controller emits two audible signals. The oFF screen appears.

Turning off the remote control also turns off the radiator or towel dryer.


Your remote control can only operate one appliance.
LOCKING INTERFACE (child lock)
It is then impossible to change the operating mode or the temperature.
It is also impossible to trigger a manual boost.
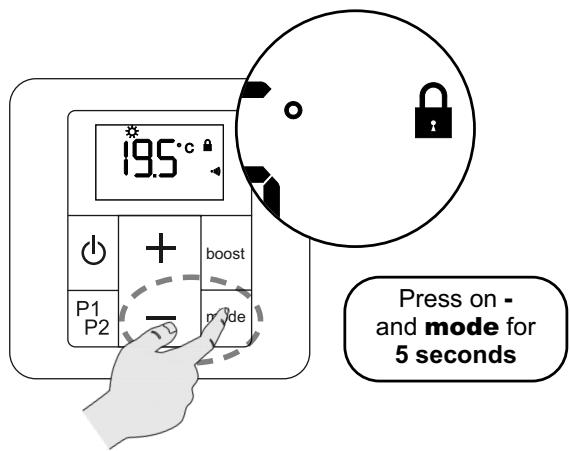
COMMENT:
Changes of mode ordered by a pilot wire controller (not supplied with your appliance) will not be disabled by this function.
5.2 Operating mode selection
5 basic operating modes: Frost-free, Eco, Comfort, programmes P1 & P2
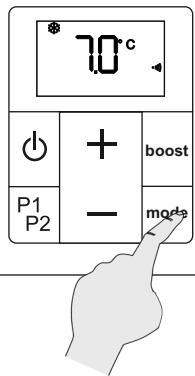
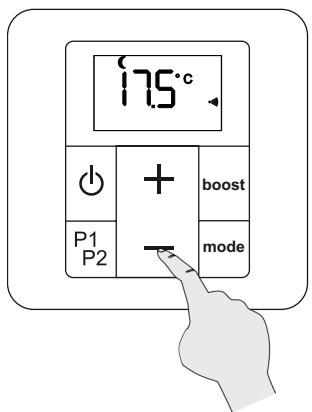
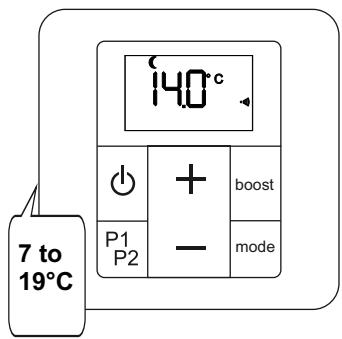
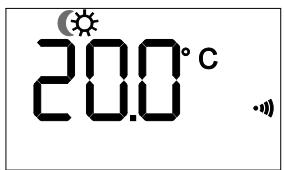
FROST-FREE MODE
(recommended if premises unoccupied for more than 24 hours)
Your appliance is set to ensure a minimum temperature of 7^ in your room, to avoid any risk of freezing.
The user cannot change this temperature setting.
The LED on your receiver unit is on, showing blue.
ECO MODE
(recommended if the room is unoccupied for more than 2 hours)
The economy mode can operate in 2 different ways:
- either the eco temperature is linked to the Comfort temperature;
- or the eco temperature is unlinked (independent).
See the next page for details of how each one works.
See chapter 5.3 Advanced parameters for how to link or unlink Eco temperature and Comfort temperature.


WARNING:
Your appliance operates in eco linked mode by default.
The LED on your receiver unit is on, showing green.
A) Linked Eco operation
The linked eco (economy) mode allows the temperature to be reduced by 3.5^ compared to the desired temperature level for the Comfort setting.

The user cannot change this temperature setting. It cannot be higher than 19^ or lower than 7^ .
B) Unlinked Eco operation
You can choose to unlink the Eco mode temperature from that of the Comfort mode (see chapter 5.3 parameter 2). You can then choose the room temperature when the appliance is running in Eco mode.
Your chosen unlinked eco temperature must have at least 1^ of difference from the temperature set for Comfort mode (e.g.: your Eco temperature cannot be higher than 18^ if your Comfort temperature is set at 19^ ).
If you don't enter a setting, the unlinked Eco temperature will have a default value of 15.5^ .
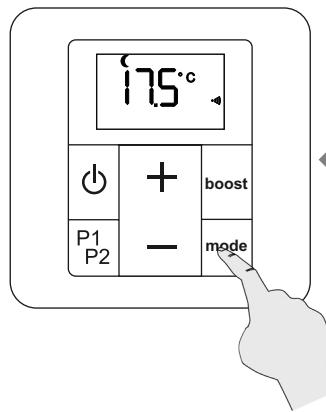
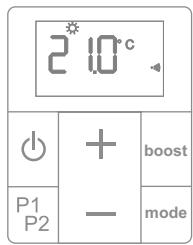
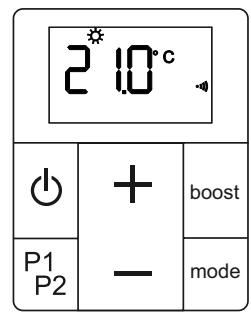
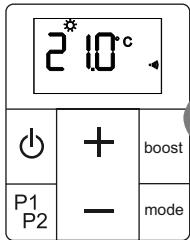
COMFORT MODE
(recommended if the room is occupied)
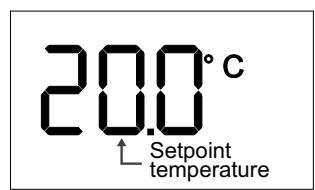
The setpoint temperature can be adjusted from 7 to 28^ in 0.5^ steps.
The LED on your receiver unit is on, showing red.

PROGRAMMES P1 AND P2
(Pre-set programmes)
Your appliance's remote control includes two daily programmes, P1 and P2. These are based on various room usage scenarios (your appliance changes from Comfort mode to Eco mode, depending on the time).
The LED on your receiver unit will light up with the colour corresponding to the current operating mode (see chapter 4.2).
P1 is to heat your room between 5 and 9am, then from 5 to 11pm (e.g. working day).
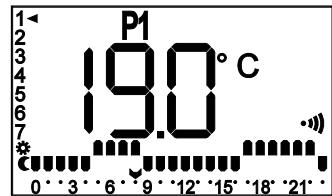
Default content for
programme P1
P2 is to heat your room between 5 and 9am, from 12 to 2pm and then from 5 to 11pm (e.g. working day, returning home at midday).
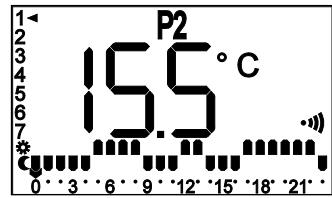
Default content for
programme P2

NOTE:
You can also customise the operation of these programmes P1 and P2 yourself (see chapter 7).
TEMPERATURE OVERRIDE
In the programmed operating modes for your appliance (P1 or P2) you can override the operation of your appliance temporarily, by changing the preferred temperature level.

The LED on your receiver unit is on, showing yellow fixed.
This override is cancelled when there is a change of status on the programme (eco/comfort), or by pressing the mode key again.
PILOT WIRE CONTROL
Your appliance is fitted with a pilot wire, so you can manage this from your main control unit (see connection in chapter 2.2).

WARNING:
Your appliance is configured in pilot wire mode by default.
The pilot wire controller takes over control of your appliance only when it is in Comfort mode.
See chapter 5.3 Advanced parameter setting (parameter 3) to disable or enable the pilot wire mode.
See the control unit user manual for instructions on how to operate it.
The LED on your receiver unit will light up with the colour corresponding to the operating mode specified by the control unit (see chapter 4.2).
The remote control will cause the icon for the operating mode specified by the control unit to flash.
Example: the control unit sends an Eco mode command
PILOT WIRE CONTROL (continued)

When your installation is fitted with a load shedding system connected at the pilot wire input, this can send your appliance a priority command to turn off (the appliance LED goes off) or for Frost-free mode (the appliance LED shows blue).
In both cases, the frost-free icon will be displayed on the remote control screen.
Load shedding will take over the operating of your appliance, even if the pilot wire function is disabled in the advanced parameter setting.
PILOT WIRE OPERATION
| Icons (remote control) | LED colour (receiver unit) | Command sent (control unit) | Boost function |
| Red | Comfort | Available | |
| Green | Comfort -1° | Available | |
| Green | Comfort -2° | Available | |
| Green | Eco | Available | |
| Blue | Frost-free (in all operating modes on the appliance) | Available | |
| P1 | |||
| P2 | |||
| Off | Stop (in all operating modes on the appliance) | Not available | |
| P1 | |||
| P2 |
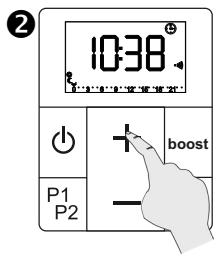
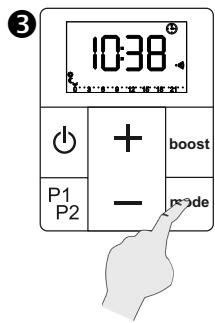
5.3 Advanced parameter setting for remote control

WARNING!
Access to parameter setting is possible only when the remote control is off.
Some parameters on your remote control can be adjusted according to how you use it.
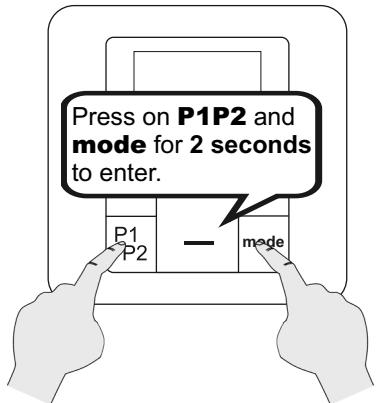
WARNING!
It is essential to get to the final "End" screen, to confirm your parameter changes.
| No | Parameter | Description | Default setting | Setting | ||
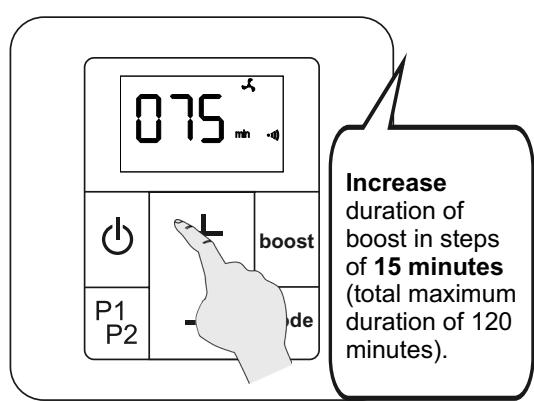
| 0 | Duration of Boost operation | Adjustable from 15 to 120 minutes in 15 minute steps | 60 | Press the + or - key | ||
| 1 | Window open detection | Value 0 (function disabled) or 1 (function enabled) | 1 | Press the + or - key | ||
| 2 | Eco temperature | Value 0 (eco temperature unlinked) or 1 (linked eco-temperature setting: comfort T° minus 3.5°) | 1 | Press the + or - key | ||
| No | Parameter | Description | Default setting | Setting | ||
| 3 | Pilot wire | Value 0 (pilot wire disabled) or 1 (pilot wire enabled) | 1 | Press the + or - key | ||
| 3 P1 | P1 O | P1 I | ||||
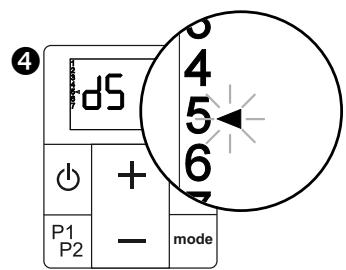
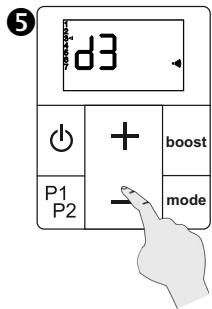
| 4 | Ambient temperature calibration | Adjustable from -5.0°C to 5.0°C in 0.5°C steps | 0.0 | Press the + or - key | ||
| 4 CA | 00° | |||||
| 5 | Selection of temperature sensor | Value 1 (receiver unit) or 2 (remote control)See chapter 5.4 | 1 or 2 | Press the + or - key | ||
| 5 SE. | SE 1 | SE 2 | ||||
| 6 | None | 6 -- | - | |||
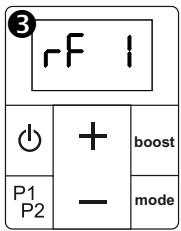
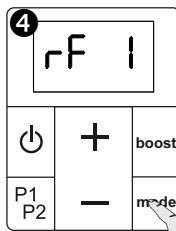
| 7 | Re-pairing radio-frequency | Value 0 (unpaired command) or 1 (paired command) | rF0 or rF1 | Press on + or - key to* re-pair an appliance which was previously paired but has lost the link. | ||
| 7 rF. | rF O. | rF I. | ||||
| 8 | Default display | Value 0 (time) or 1 (temperature setting) | 1 | Press the + or - key | ||
| 8 d1. | d1 O | d1 I | ||||
| 9 | Display version number and reset (unpairing). | Back to factory settingsWarning!All your settings as well as the pairing, will be deleted. If the remote control was paired before the reset, the receiver unit will also be reset. | x.xx | Press on + key for 10 seconds to reset. | ||
| 9 S0 | 100 | 8888888888888888888888888888888888888888888888888888888888888888888888888888888888888888888888888888 | ||||
| End | Display parameter setting output | Quit the settings menu | Short press on mode or for 2 seconds on | |||

After no key has been pressed for one minute, the remote control will automatically quit the advanced parameters and turn off.
5.4 Selection of temperature sensor
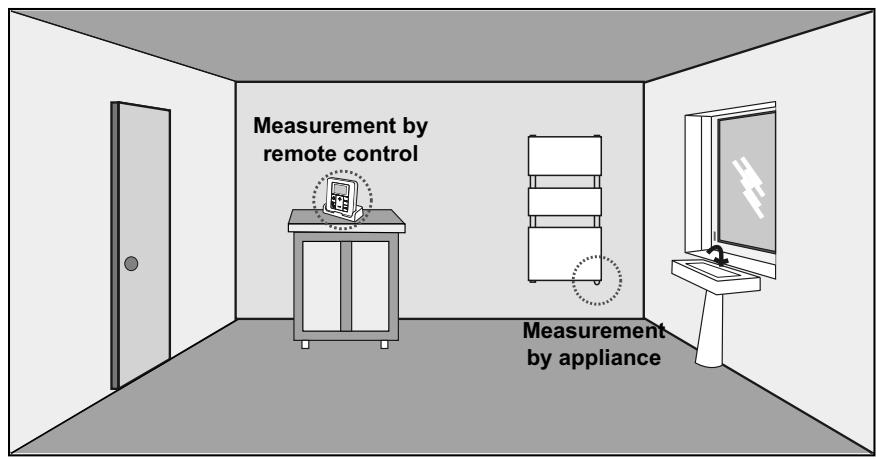
The temperature of your room can be measured either by the receiver unit under your appliance or by the remote control.
The default sensor will depend on the type of appliance you have bought.

Appliances labelled NF Électricité Performance use the sensor under the receiver unit as the default. You are strongly recommended not to alter this setting, which ensures optimal performance, in accordance with the label for your appliance.
In any case, measuring the ambient temperature from the remote control will provide a better evaluation of the actual temperature of your room. For effective temperature measurement, avoid window frames (or any other place where heat loss is likely), and proximity to doors and radiators.
You can choose your preferred ambient temperature measurement option from parameter 5 of Advanced parameters (see chapter 5.3).
If you observe a difference between the temperature you have programmed on your remote control and the temperature measured in your room, this will provide a useful alternative means to calibrate the temperature measurement (see chapter 5.5).

If you choose to measure the temperature from the remote control, and the latter should become faulty (electronic fault or spent batteries), your appliance will show a sensor fault (yellow LED, see chapter 8.3).
Besides, the battery life will be reduced by using the remote control sensor.

If you have a radiator fitted with a storage drawer for the remote control, NEVER put the control into the drawer if it is being used to measure the temperature of your room. Similarly, a wall-mounted remote control will not measure the room temperature correctly.

If the remote control is reset (see chapter 5.3, parameter 9), the default active sensor will revert to the factory settings.
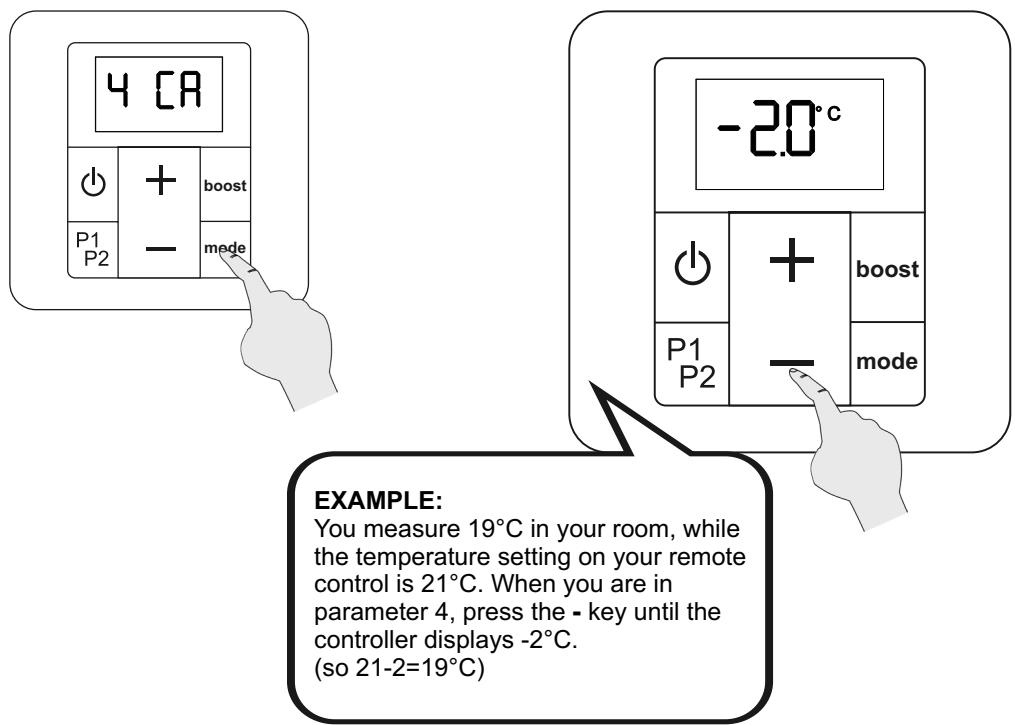
5.5 Calibration of temperature setting
Once your appliance has been working for several days, if you notice a difference between the temperature detected in your room and the temperature programmed on your appliance, you can calibrate your appliance in 0.5^ steps.
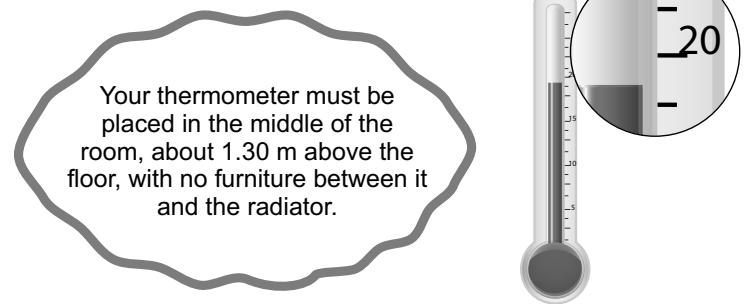
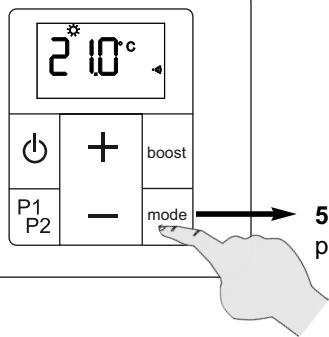
Access advanced settings (see chapter 5.3). Press the mode key several times to find parameter 4.
If the ambient temperature measurement is different from your appliance's temperature setting, press the - or + keys until they match.
You can calibrate your temperature measurement to +/- 5^ .
To quit advanced parameter setting, press several times on the mode key, until the remote control stops.

Calibration relates to the two temperature sensors (see chapter 5.4). If the active sensor changes, the calibration set on the remote control still applies.
5.6 Window open/close detected
Your appliance may detect a significant drop in temperature, caused for instance by a window standing open in winter. It will automatically adapt and operate to save energy.
By default, the window open/close detection function is enabled on your remote control. To disable this function, change the corresponding advanced parameter (see chapter 5.3, parameter 1).
IMPORTANT To make the best use of this function, your appliance must be placed close to the opening with no furniture or other object nearby.
The quality of the window open/closed function depends on a number of factors, such as the position of the appliance, how fast the temperature in the room rises/falls, the type of window, etc.
IMPORTANT The room temperature is measured near the appliance.
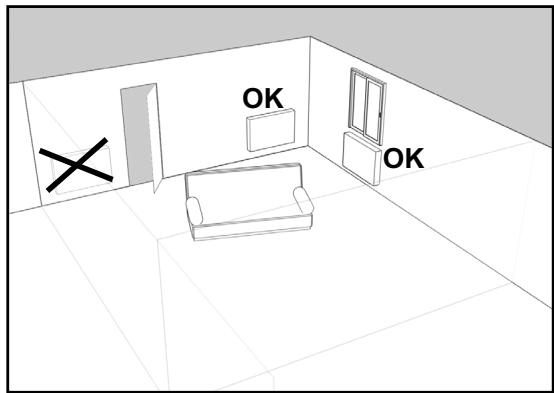
After opening a window, your appliance should detect the associated temperature drop within a reasonable period. It will then adapt its operating mode by automatically switching to the frost-free temperature (7^) .
When an open window is detected, your appliance causes the function icon to flash.
When your room temperature rises after the window is closed, the appliance should resume its operating mode (Comfort mode for instance), before detection was initiated, within a reasonable length of time.

Starting or stopping a boost (manual or programmed), as well as a change in operating mode, suspends the window opening/closing function for 60 minutes, the required time for the room temperature to stabilise.
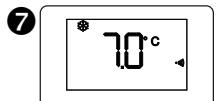
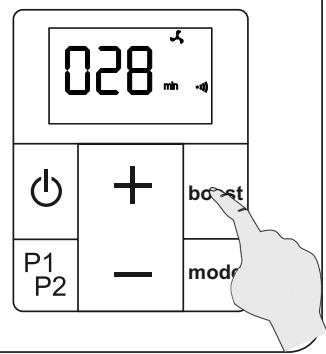
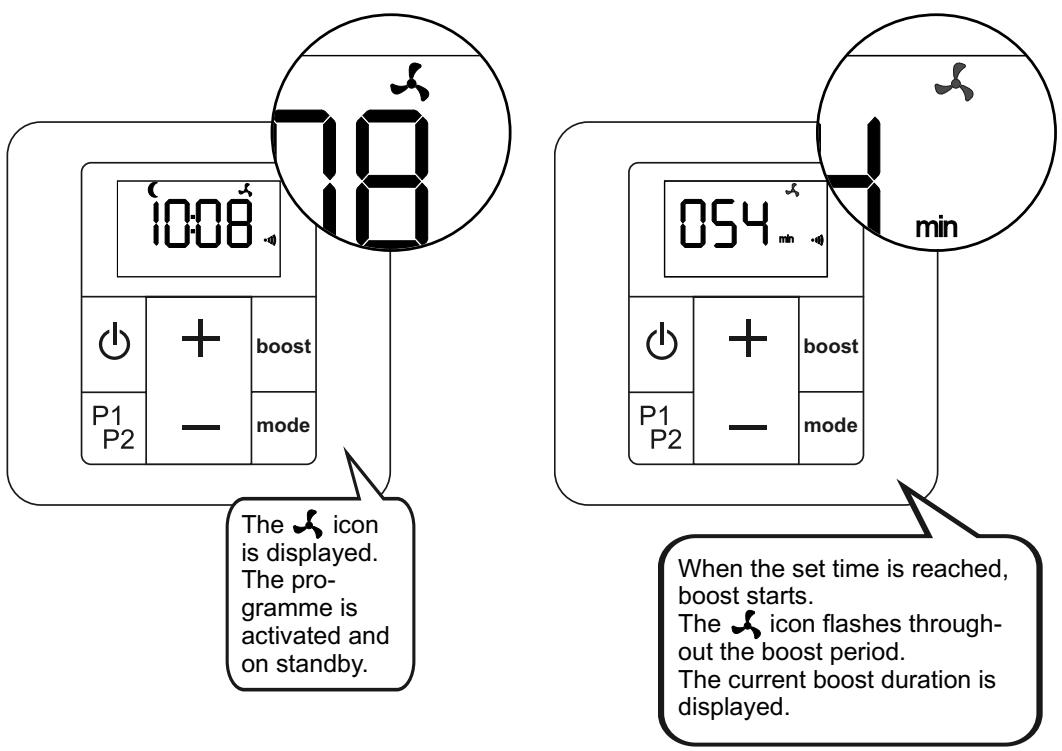
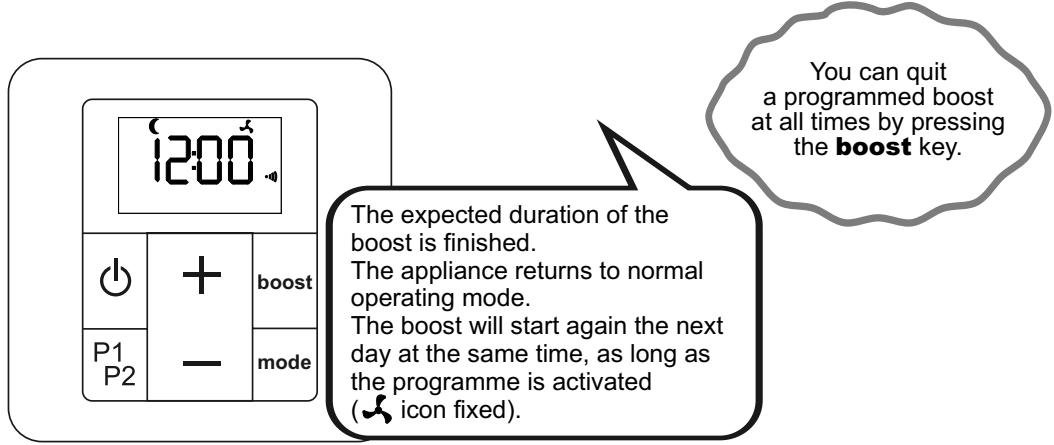
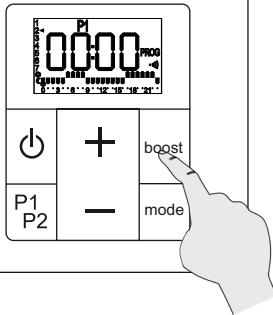
6. Heating boost
This function provides extra heat when required. When it is activated, the appliance operates at full power, no matter what the temperature set from the remote control.
The operating time is 2 hours maximum; it can be interrupted at any time.
The LED on your receiver unit flashes red during a boost.
Boost operation can be activated 2 ways:
manual boost
programmed boost
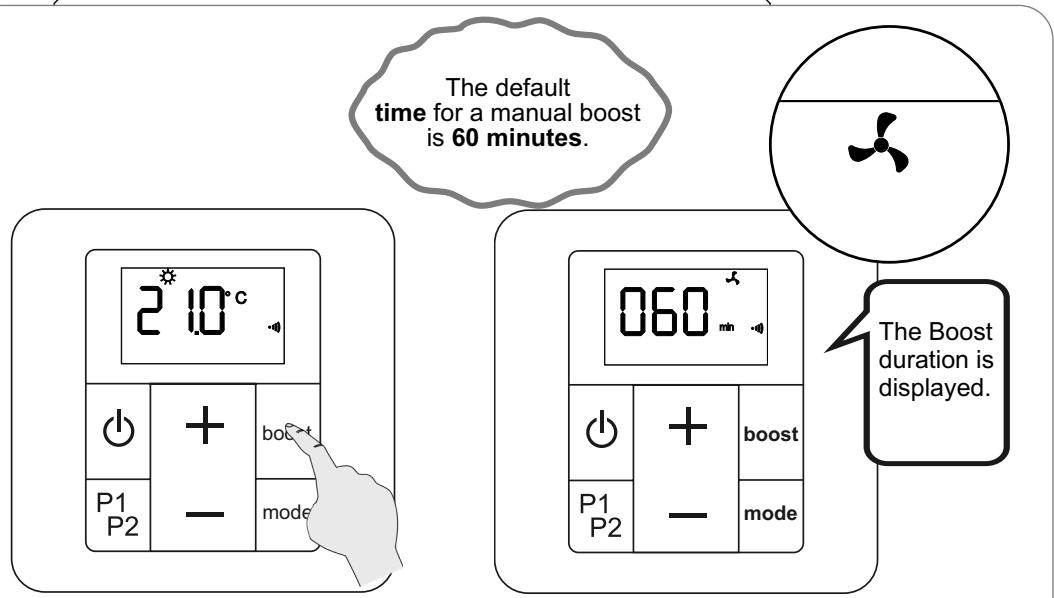
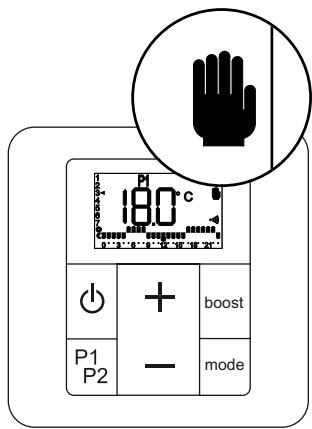
USE OF MANUAL BOOST
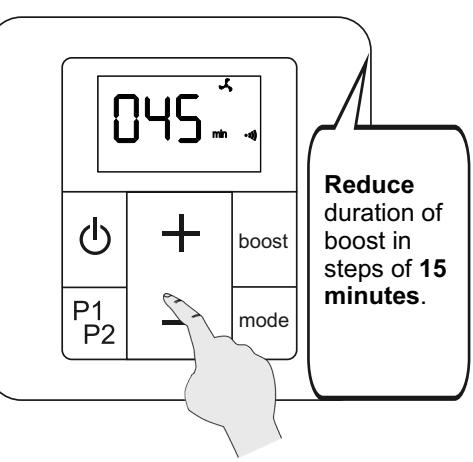
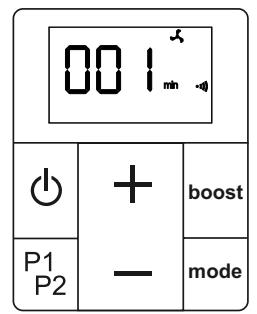
The expected duration of the boost is finished. The appliance returns to normal operating mode.
Early exi from manual boost.
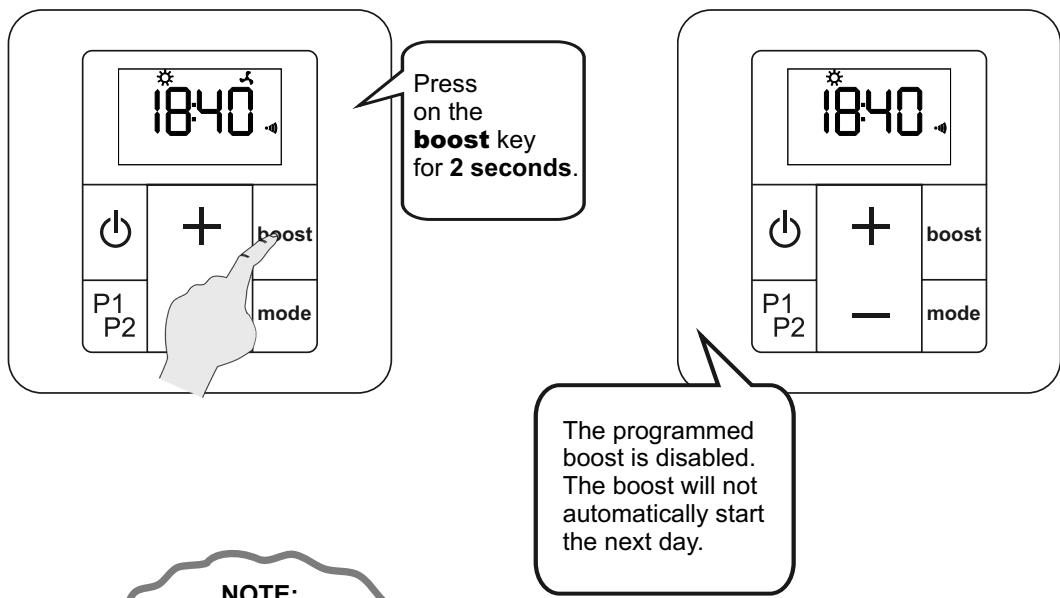
USE OF PROGRAMMED BOOST
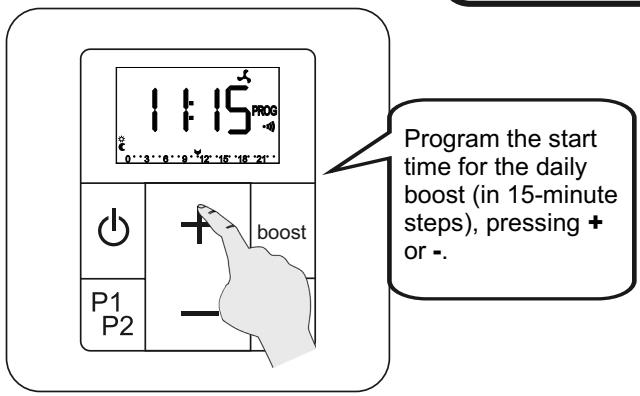
This function is used to set the start time for the boost, to be triggered automatically every day at the same time (if the programme is activated).
This boost will operate during the period set in the advanced parameters (see chapter 5.3 parameter 0).
Boost will be triggered in Eco, Comfort, P1 or P2 modes, and will take over the normal operating of your appliance.
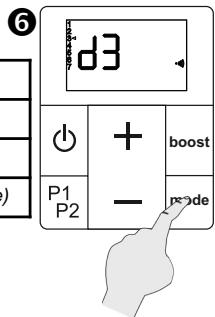
SETTING A PROGRAMMED BOOST
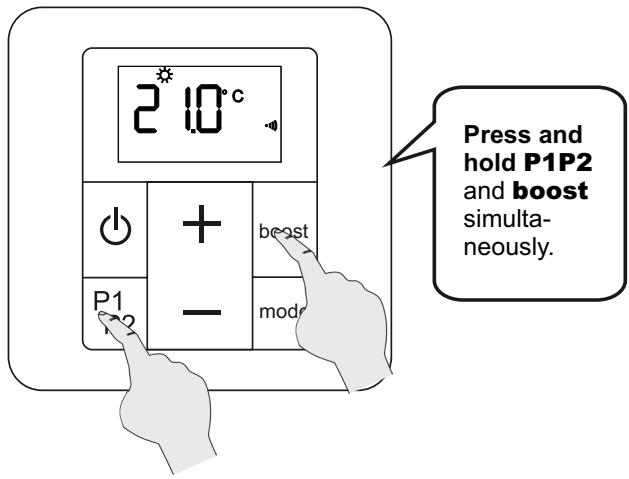
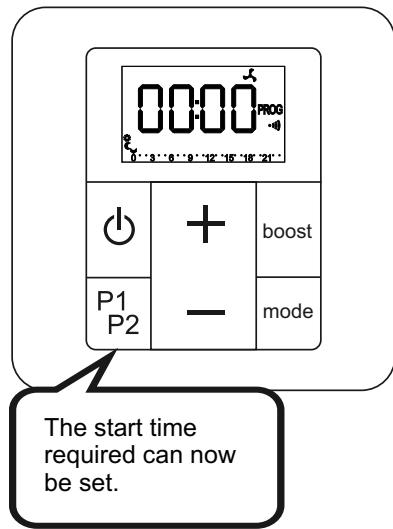
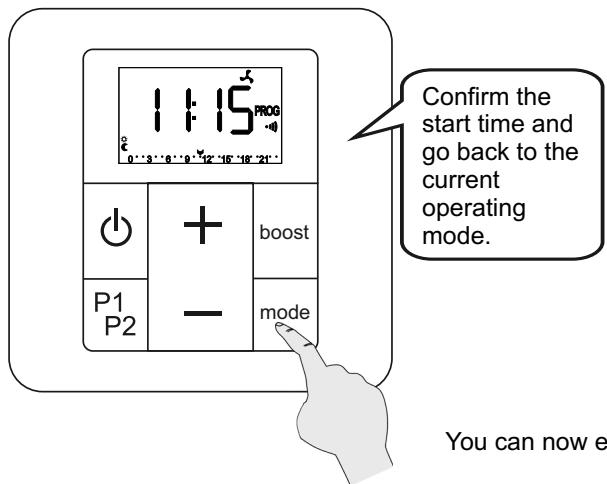
You can now enable your programmed boost.
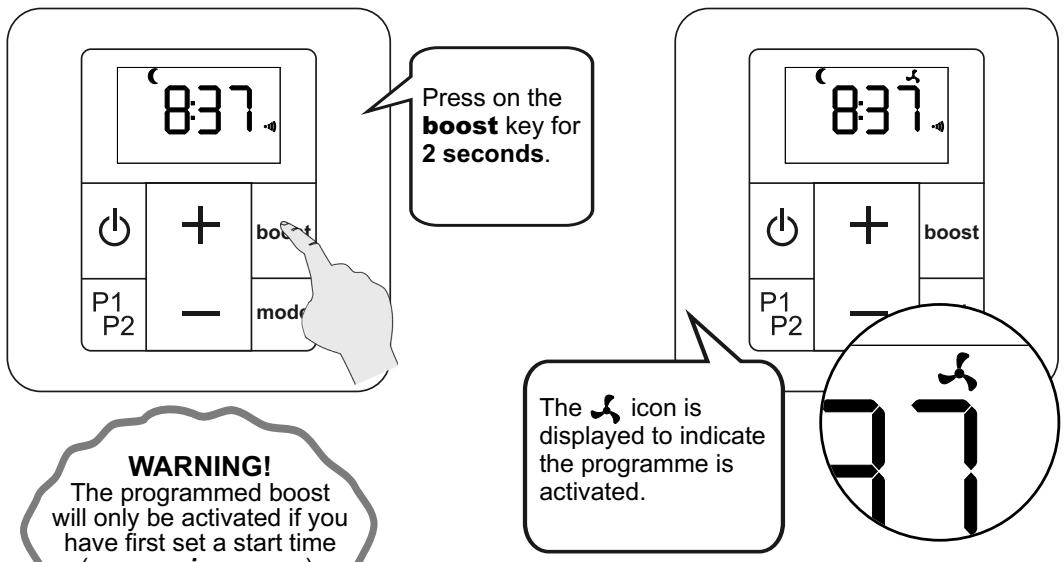
ACTIVATION AND RUNNING PROGRAMMED BOOST (continued)
7. Setting a P1 and/or P2 programme
Your appliance's remote control includes two daily programmes, P1 and P2, which you can adapt to suit your needs.
There are two modes possible for each hour of the day: COMFORT or ECO. The temperatures previously set for these modes (see chapter 5.2) will be applied.

WARNING!
The programmes P1 and P2 can have a maximum of 10 changes of mode per day (from Comfort to Eco or Eco to Comfort).
ACCESS TO PROGRAMMING
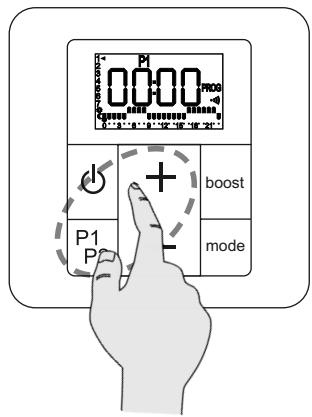
Long press (P1P2
and +) open settings
for programme P1.
Long press (P1P2
and -) open settings
for programme P2.
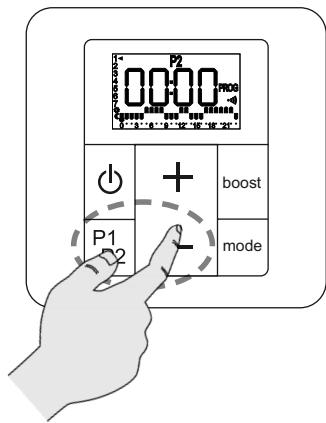

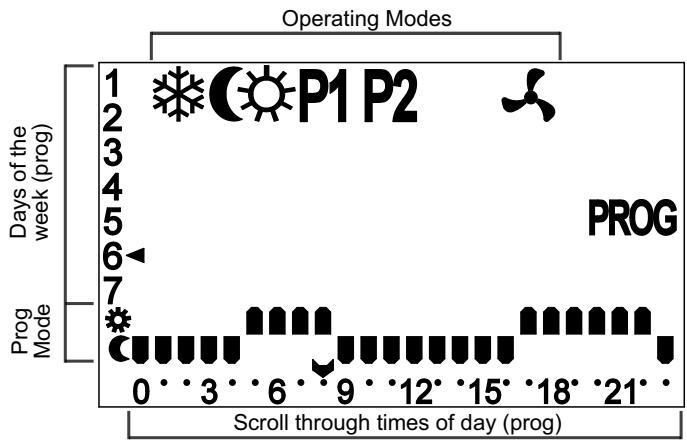
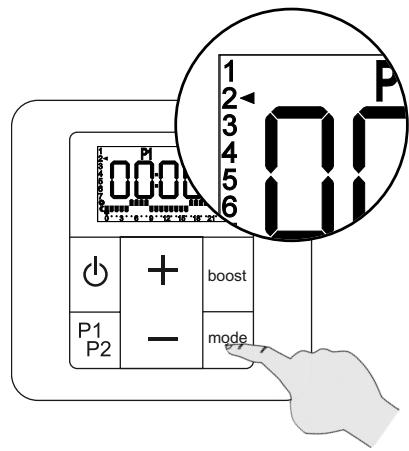
Indicator of day to program
| + | boost | |
| P1 | - | mode |

Indicator of time to program
Starting position: day 1, time 0
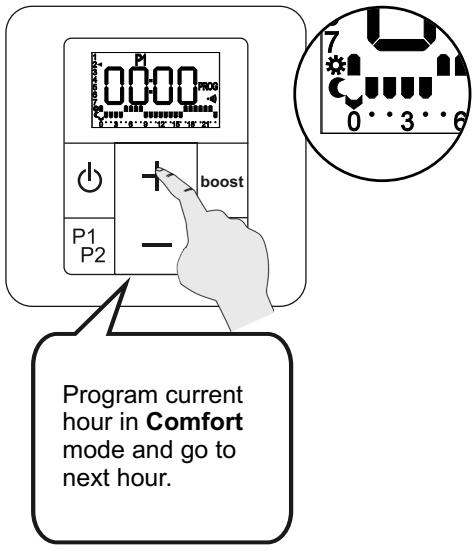
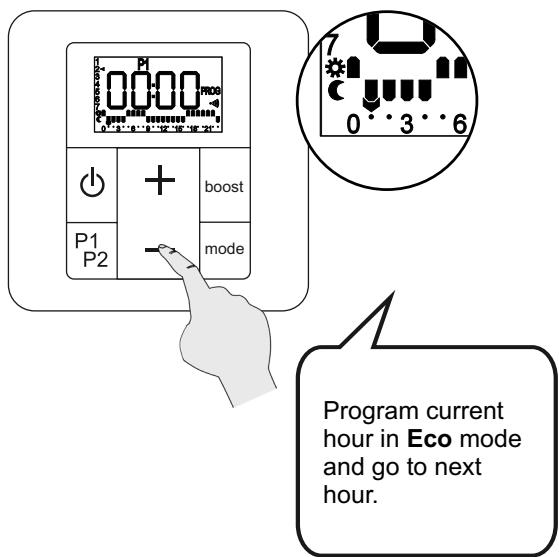
After selecting the operating mode for the final hour of the day, the programming function automatically moves on to the first hour of the next day.
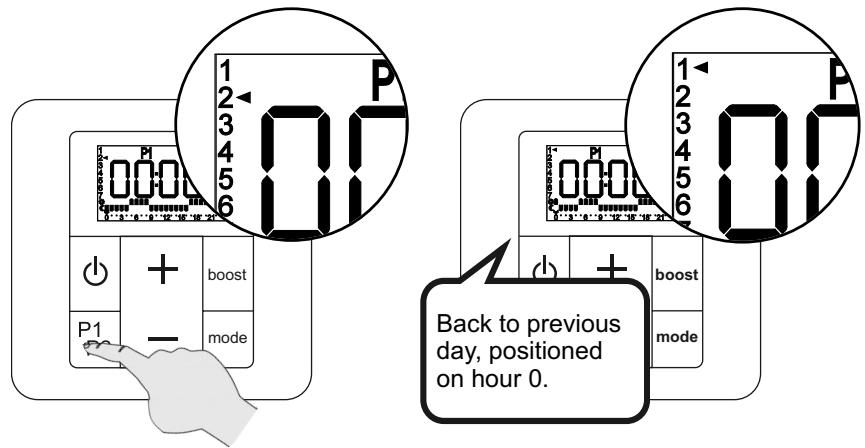
MANUAL MOVE TO NEXT DAY
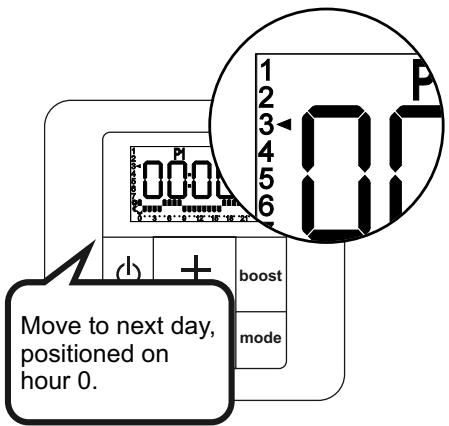
QUIT PROGRAMMING (at any time)
The remote control stores the programming entered, even if you quit while programming.
| + | boost |
| - | mode |
Long press on
P1P2: back to previous day, copies the current daily programme.


| + | boost | |
| P1 | - | mode |
| + | boost | |
| P1 | - | made |
| P2 |
Long press on mode: move to next day, copies the current daily programme.
| + | boost | |
| P1 | — | mode |
8. Maintenance and troubleshooting tips
8.1 Routine maintenance operations
High-quality materials and surface treatment protect your appliance against corrosion and impacts.
To maximise the service life of your appliance, we recommend you take the following precautions:
- Never use abrasive or corrosive products on the outer surfaces of the appliance (except the electrical parts); use warm, soapy water.
- For the casing of the receiver unit and the remote control, use a dry (solvent-free) cloth.
8.2 Troubleshooting
Despite all our efforts in manufacturing our products, you may encounter some easy-to-solve operating failures. In this case, please consult the table below to find our suggested solution.
Nonetheless, should you fail to solve the problem encountered, please contact your supplier's after-sales service for assistance.
| Problem | Diagnosis | Procedure |
| The appliance is not heating. | The temperature setting on the remote control is incorrect. | Check the remote control is set to ask the appliance to start heating (see chapter 5.2). |
| The mixed appliance has not filled with water properly. | Check the filling of the appliance (see chapter 3.2). | |
| The appliance is operated by a programming unit. | See the programming unit manufacturer's manual. | |
| The load shedder is enabled and has shut down heating on the appliance. | Wait for load shedding to finish. | |
| The appliance has not be paired with the remote control (the •icon is not displayed on the remote control screen). | Remove the batteries from the remote control, wait a few seconds, then replace the batteries and proceed with pairing (see chapter 4.1). | |
| An open window detected ( ☑icon flashes) | Turn off the window opening detection function (see chapter 5.3, parameter 1). | |
| The LED is flashing yellow + other colours: fault. | Contact your installer or after-sales service. |
| Problem | Diagnosis | Procedure |
| The appliance is not working. | Your appliance is not powered up. | Check your appliance is properly connected and powered (see chapter 2.2). |
| Your appliance is not turned on. | Check the remote control is properly turned on (see chapter 5.1). | |
| Check the pilot wire unit is not sending a load shedding stop order. | ||
| The appliance continues to heat, even though a window is open. | The “Window detection” function is not activated. | Activate the function (see chapter 5.3, parameter 1). |
| The correct operating conditions for the window opening/closure detection function have not been met. | See chapter 5.6 | |
| The appliance does not start to heat again, although a window has been closed. | The correct operating conditions for the window opening/closure detection function have not been met. | See chapter 5.6 |
| The remote control does not allow operations. | The remote control is locked. | Disable key locking (see chapter 5.1). |
| Communication problems between remote control and appliance. | Remote control and/or radio frequency communication problem. | Check the •1) icon is present (paired appliance). |
| Check that the LED changes colour according to the commands sent. | ||
| Check your appliance is not controlled by a pilot wire unit. | ||
| If checks are positive: remove the control batteries for 10 minutes then replace the batteries. | ||
| Pairing has been lost following a power failure. | The remote control and the appliance have to be reset. | See chapter 8.3 |
| Following a powercut of less than one hour, the appliance appears to have lost its settings. | The appliance will automatically recover its settings in less than an hour. | - |
| The screen of the remote control (stored in the drawer behind the radiator) appears black. | The blackening is caused by excess heat. It has no effect on the operation of your remote control. | Remove the remote control from the drawer and leave it at room temperature, until the screen returns to normal. |
| The battery level indicator\(\mathbf{\eta}\)on your remote control is displayed. | Batteries drained. | Change batteries (see chapter 8.4). |
| No display. | The remote control is off. | Long press on Ⓞ. |
| The back-lighting on the remote control screen is off. | Press a key to turn it on again. | |
| The remote control screen is on standby. | Press a key to turn it on again. | |
| The time flashes. | Time and date setting not done. | Set time and date (see chapter 4.1). |
| The screen on the remote control displays the E2 error message. | Indicates a problem with the temperature sensor on the appliance. | Contact your installer. |
| The temperature setting does not match the temperature observed in the room. | There is a discrepancy in the measurement made by the temperature probe. | Calibrate your remote control (see chapter 5.5) to align the temperature measured in the room by the appliance, and that measured by your thermometer. |
| Remote control broken. | Your appliance remains on the last command received. | Reset the appliance by pressing 10 seconds on the LED. The LED flashes pink quickly to confirm the reset. • Your appliance is waiting to be paired and to start heating again. |
PILOT WIRE
| Problem | Diagnosis | Procedure |
| The appliance no longer replies to commands from the pilot wire. | The pilot wire is not connected correctly. | Check the pilot wire connection (see chapter 2.2). |
| Check the remote control is in Comfort mode. | ||
| Your remote control is no longer set to accept pilot wire operation. | Activate the pilot wire function on your remote control (see chapter 5.3, parameter 3). | |
| The room temperature does not match the setpoint temperature on the remote control. | The pilot wire may be connected to a programming control unit which takes over from the remote control (e.g.: sending an Eco mode order from the control unit, while the control is set on Comfort). | Deactivate the pilot ware in advanced parameters (see chapter 5.3 parame-ter 3) so that the remote control continues to operate your appliance. |
8.3 Complete reset
If your appliance freezes completely, or cannot be paired, the whole system has to be reset, then pairing started again from the beginning (see chapter 4.1).
Reset remote control:
Reset the remote control from the advanced parameters (see chapter 5.3 parameter 9).
Reset radiator / towel dryer:
1) Reset the appliance by pressing on the LED for 10 seconds.
The LED flashes pink quickly to confirm the reset. Release immediately as soon as the fast flashing starts.
2) After releasing the LED, it returns to a steady pink.
3) Switch on the reset remote control and perform the pairing process (see chapter 4.1).

WARNING!
If the LED returns to the steady pink state, after the quick flashing stage, while you are still pressing on it, the reset has not taken place. Repeat the procedure from step 1.
If you still fail to pair your appliance, please contact your after sales service.
8.4 Replacing batteries
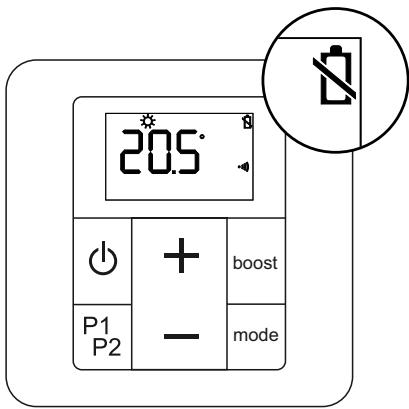
When the low battery indicator light is displayed, you have a few days to replace them (2x 1.5V alkaline batteries, type LR03 or AAA; we advise against using rechargeable batteries).
The screen's backlighting also stops turning on to indicate the need to change batteries.
When batteries are replaced, the remote control parameters are stored (e.g.: P1 and P2 programming), except for time and date settings.
You should take the following precautions:
- ensure correct + / - polarity;
- take care when disposing of used batteries: protect the environment by disposing of them at an approved collection point.


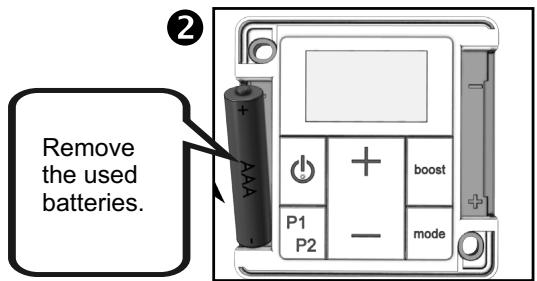
Insert the new batteries.
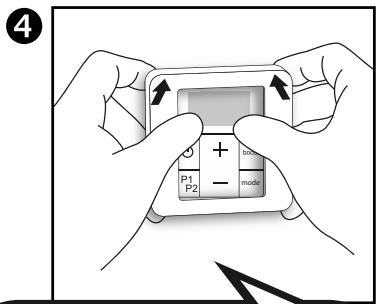
Replace the control frame. See chapter 4.1 to reset the remote control.
Re-pairing takes place automatically when batteries are changed.
If the screen is still showing RF , and the icon flashes, this means the remote control is looking for the receiver. If it has still not found the receiver after several minutes, carry out a complete reset (see chapter 8.3).
9. Services and guarantee
After-sales service
If your appliance stops working or you require spare parts, contact your installer or dealer.
Prior to making contact and to ensure your problem is dealt with quickly and effectively, please make a note of:
- the details shown on the appliance nameplate (see chapter 2.2),
- the sales reference for your appliance shown on your dated purchase invoice,
- the remote control version number (see chapter 5.3, parameter 9).
Guarantee
(See general conditions of sale for your country)
The heating body of your electric radiator is guaranteed against manufacturing defects for five (5) years from the date of purchase, while the other components are guaranteed for two (2) years.
Dated proof of purchase must be presented to activate the guarantee. The guarantee does not cover radiator transport, removal and installation costs.
The guarantee shall not apply if the appliance is installed, used or maintained in a way that does not comply with standards in force in the relevant country, good professional practice, or the manufacturer's instructions.
Guarantee specific to dual-energy, towel-drying radiators
The guarantee for your dual-energy towel dryer is subject to the following reservations:
- water used in the heating circuit is neither aggressive nor corrosive.
- there are no traces of dissolved gases (0_2 - CO_2) , notably where gas-permeable materials are used (heating floor).
In such a case, thorough degasification must be performed upstream from the circulator and the bleed tap on the upper section of the appliance.
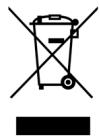
Disposal of end-of-life electrical and electronic appliances. This symbol indicates that this product should not be disposed of with household waste. It must be taken to a suitable collection point to be recycled. By disposing of this product correctly, you will help prevent potential negative consequences for the environment and human health.
Standby consumption for the appliance < 0.5 W