USER MANUAL MADRAS ACOVA
1.1 Introduction 26
1.2 Overview of your towel radiator 27
1.3 Overview of the blower 27
1.4 Overview of the remote control 28
1.5 Starting the radiator, the blower and the remote control 28
2 Installing your towel radiator and its remote control
2.1 Choosing the position of your towel radiator 29
2.2 Choosing the position of the remote control 30
2.3 Connecting the appliance 30
3 Use
3.1 Using the remote control 33
3.2 Using your towel radiator and blower 38
3.3 Advanced remote control settings 39
4 Maintenance and troubleshooting tips
4.1 Routine maintenance operations 41
4.2 Cleaning the filter 41
4.3 Troubleshooting 42
5 Services and guarantee 45
1. Overview
1.1 Overview
Dear customer
Thank you for choosing this towel radiator.
This product has been manufactured in accordance with our stringent quality requirements to give you total satisfaction. To get the most out of your radiator, we advise you to read these instructions carefully and keep them to hand.
Thank you for your purchase.
Cautions
This appliance is not intended for use by persons (including children) with impaired physical, sensory or mental capacities, or by persons lacking in experience or knowledge, unless they are supervised by, or have received prior instruction in using the appliance from, a person responsible for their safety. Children must be supervised to ensure that they do not play with the appliance.
Towel radiators must be used for the purpose for which they are intended and not as a table, chair, toy, ladder, etc.

CAUTION To avoid any danger to very young children, you are advised to install this appliance so that the lowest heating bar is at least 600~mm off the floor.
RECOMMENDATIONS FOR USING APPLIANCES WITH A SPECIAL FINISH Of the various towel radiator surface finishes, chrome plating, stainless steel and aluminium feel hottest to the touch. To avoid any risk of burns, you are advised not to lean against the appliance when it is switched on.
IMPORTANT:
The remote control delivered with your appliance is designed for use with an electric towel radiator, whether fitted with a blower or not.
When used with an electrical appliance without a blower, the manual boost function (see chapter 3.1.2) is not enabled; pressing the BOOST key will have no effect on the operation of your towel radiator.
1.2 Overview of your towel radiator
Your towel radiator contains a circulating fluid that heats thanks to a heating element that is completely independent from the blower. This appliance is delivered ready for use.
It is plugged and filled with a high-performance thermal mineral oil before leaving the factory.
This fluid was specially designed for this use and requires no special maintenance.
As soon as the appliance is switched on, you will notice certain differences compared to a standard electric heating system:
- the electric heating element heats the fluid, which gradually and naturally starts circulating in your appliance;
- the properties of the fluid are such that it takes approximately ten minutes for the radiator to reach its optimum surface temperature, depending on the model and the room temperature when the appliance is switched on;
- this principle also ensures consistent and sustained heating even when the element is no longer powered.
This electric heating element is regulated by an infra-red receiver which also ensures the room remains at the desired temperature. This receiver is operated by the remote control supplied with your radiator.
However, to ensure that your appliance works efficiently, you are advised not to cover it completely. Doing so will increase the temperature and cause the internal circuit breaker to turn off the appliance.
1.3 Overview of the blower
Depending on the model, your towel radiator is fitted with a fan and heating element assembly which is referred to as a blower. The boost of additional heat allows you to raise the temperature in the room quickly.
You will be able to set two daily programmes P1 and/or P2 via the remote control. These programmes automatically switch on your radiator and/or blower boost every day at a set time and for a set amount of time (see chapter 3.1).
CAUTION To avoid overheating, do not cover the heating appliance.
NOTE It is important to keep the blower air inlet and outlet clear.
IMPORTANT The blower on your towel radiator is fitted with a filter detector.
If the filter is missing or positioned incorrectly, the blower cannot function (see chapter 3.2.2).

1.4 Overview of the remote control
1.5 Starting the radiator, the blower and the remote control
Turn on the radiator and the remote control by pressing and holding the respective ON/OFF switches. Turn on the blower by pressing its ON/OFF switch.
The towel radiator and the blower, where present, are now ready to receive instructions from the remote control (see chapter 3.1).
2. Installing your towel radiator and its remote control
2.1 Choosing the position of your towel radiator
To get the most out of your appliance and enjoy the highest standards of comfort, we recommend that you:
- install the appliance near places of high heat loss (windows, doors, etc., see figure ①) wherever possible,
- ensure that an area of at least 50~cm in front of the appliance is clear of objects which might hinder air circulation (furniture, chairs, etc.)
- ensure that the bottom of the appliance is positioned at least 15cm above the floor, see figure ①,
- leave at least 10cm between the top of the appliance and any shelf,
- use mounting screws suitable for your wall,
- do not expose the radiator to intense or prolonged humidity.
IMPORTANT The heating appliance must not be placed underneath a power outlet.
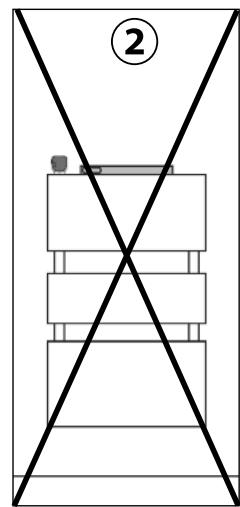
IMPORTANT This radiator must never be installed with its blower at the top, see figure ②.


NOTE:
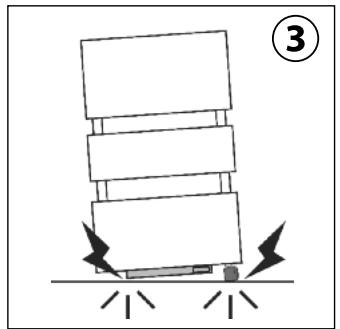
When installing your towel radiator, make sure it is not resting on the blower or on its infra-red receiver (see figure ③).
2.2 Choosing the position of the remote control
The remote control must under all circumstances be situated in the same room as your towel radiator, with a maximum distance of 8m . You should preferably position the remote control in direct line of sight, uninterrupted by any obstacle (wall, furniture, etc.) to ensure that the infra-red signal is received correctly.
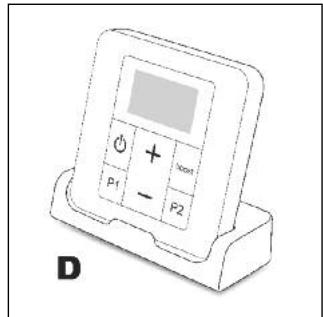
It can be secured to the wall or placed on the base provided (see chapter 3.1.1).
Before securing it in place, and after making the electrical connection of your towel radiator, run an operating test. Make sure there are no objects likely to disrupt signals between the remote control and the infra-red receiver on the towel radiator.
2.3 Connecting the appliance
INTRODUCTION:
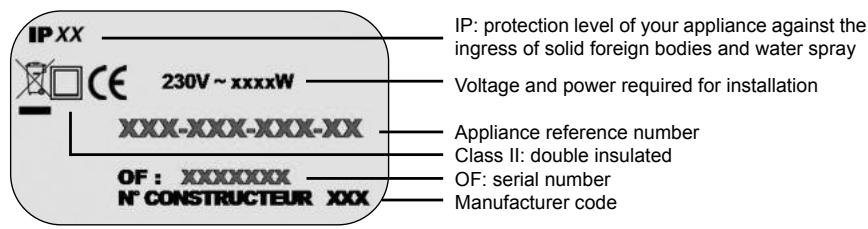
The technical specifications of your radiator are shown on its nameplate.
Please note these down before installing it and before requesting any after-sales assistance.
The electricity supply must be protected by a residual current device with a maximum of 30mA , especially when installed in a room containing a bathtub or shower.
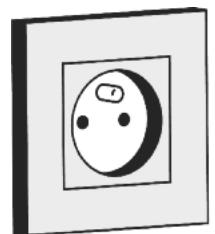
CLASS II CONNECTION (FRENCH MARKET):
The appliance must be installed as described in this document and in accordance with the applicable European and French standards, including CEI 60364.7.701 and NF C15-100, as well as the rules of good professional practice.
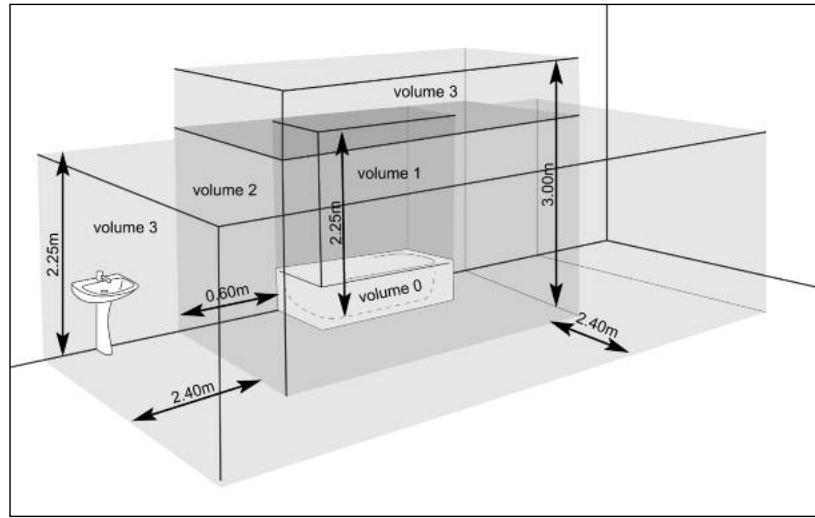
IMPORTANT The example shown only concerns a bathtub. For other bathroom fixtures, please consult your installer.
The flexible cable supplied with the appliance is designed to be connected to the mains via a junction box.

NOTE:
The addition of a plug is strictly forbidden.
IMPORTANT The system must be fitted with an omnipolar circuit-breaker with a minimum contact opening of 3mm .
When connecting the appliance to the mains, you must observe:
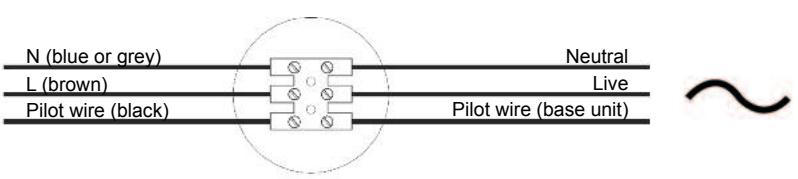
CONNECTING PRINCIPLE WITH PILOT WIRE:
Your appliance is equipped with a pilot wire for connection to a pilot wire programming base unit (not supplied with the appliance).
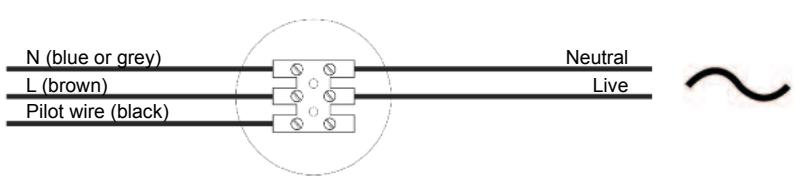
CONNECTING PRINCIPLE WITHOUT PILOT WIRE:
If the pilot wire is not connected, it must be insulated for safety reasons. Under no circumstances must it be connected to earth.
CLASSI CONNECTION:
For other countries (apart from France), the appliance must be installed in accordance with standards in force and with rules of good professional practice in the country of use.
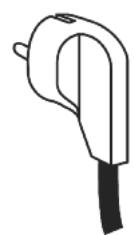
The flexible cable supplied with the appliance is designed to be connected to the mains via a plug.
3.Use
3.1 Using the remote control
3.1.1 Commissioning
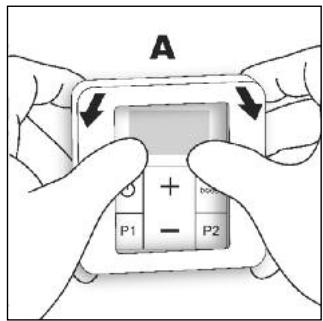
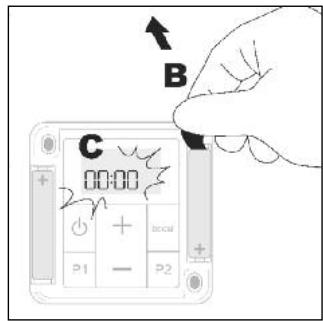
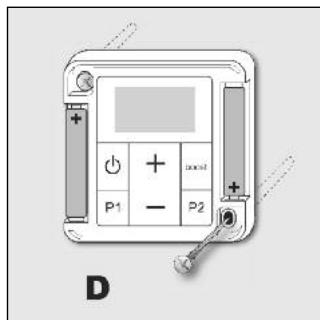
- Pry off the frame (A). Remove the battery insulation tab and reposition the frame.
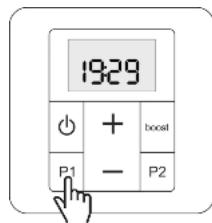
- After the start-up phase, the set time LED ① is displayed and 00:00 blinks.
- Liately press the + or - key to set the time on your remote control.
Press and hold the + or - key to speed up the process.
Once the time is set, wait approximately 10 seconds (or press the P1 or P2 key). The is no longer displayed and the time has been set.
Please follow the instructions below in the event of an incorrect time setting.
SETTING THE TIME
The time can be set by following the procedure below:
o Make sure the remote control is switched on.
o Access the setting function by pressing and holding the P1 and P2 keys together.
o The set time LED is displayed and 00:00 blinks.
o Set the time by pressing + or - . Press and hold the + or - key to speed up the process.
o Once the time is set, wait approximately 10 seconds (or press the P1 or P2 key).
o The is no longer displayed and the time has been set.
REPLACING THE BATTERIES
When the low battery indicator light is displayed, you have a few days to replace them (2x 1.5V alkaline batteries, type LR03 or AAA; we advise against using rechargeable batteries).
When the batteries are replaced, all the remote control parameters are saved (for instance: P1 and P2 programming) except for the time setting.
You should take the following precautions:
- ensure correct + / - polarity;
- take care when disposing of used batteries: protect the environment by disposing of them at an approved collection point.
3.1.2 Function description
SWITCHING THE REMOTE CONTROL ON AND OFF:
You can switch the remote control on or off by pressing and holding the key.

NOTE:
Switching off the remote control will put the blower on stand-by.
SWITCHING THE MANUAL BOOST ON AND OFF
Press the BOOST key to start the blower for a set amount of time (see chapter 3.3, parameter 0 to modify it).
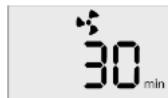
Once the boost has started, you can adjust its operating time from between 15 to 120 minutes by pressing the + or - key repeatedly. You can stop it at any time simply by pressing the BOOST key.
The symbol is displayed throughout the uration of the manual boost. The time remaining will scroll across the display until the end of the preset period.

NOTE:
The total continuous blower operating time cannot exceed 2 hours (i.e. 120 minutes). An automatic 30-minute pause is programmed after 2 hours of continuous operation. After this pause, the blower restarts. This automatic stopping does not modify the programme end time.
DESIRED TEMPERATURE ADJUSTMENT
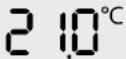
You can adjust the desired setpoint temperature by pressing the + or - key on your remote control within a range of between 7 and 28^ .
The desired temperature adjustment is impossible when a manual boost is in progress. If you wish to modify the temperature, stop the manual boost by pressing the BOOST key. Then set the desired temperature and restart the manual boost by pressing the BOOST key again.
DAILY PROGRAMMES P1 AND P2
When activated, functions P1 and P2 allow you to run one or two automatic programmes every day at the same time. The settings for P1 and P2 are independent.
Access the advanced settings of your remote control to decide whether to instruct the appliance to perform:
- a boost of the radiator alone (default setting),
- or a blower boost,
- or a radiator boost + blower boost.
The selected parameter will affect programmes P1 and P2 (see chapter 3.3, parameter 3).
The blower boost time and the radiator boost time can be modified (see chapter 3.3, parameters 1 and 2).
IMPORTANT Starting a manual boost while P1 and/or P2 are activated will not cancel the existing programming, which will take place as scheduled.
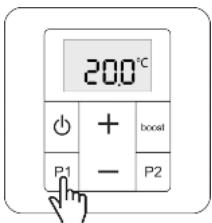
3.1.3 Setting a daily programme
Press and hold P1 or P2 to access the start time setting of the selected programme.
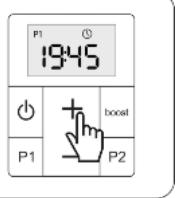
Symbols P1 or P2 and start to blink, and the start time of programme P1 or P2 is displayed.
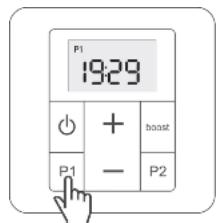
The start time of programme P1 or P2 can be adjusted in 15-minute increments by pressing the + and - keys.
Press P1 or P2 briefly, or do not press any keys for 10 seconds to quit setting mode. The start time is saved and P1 or P2 is activated.


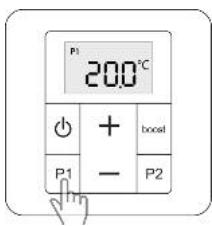
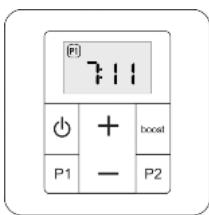
Press P1 or P2 briefly to activate/deactivate programme P1 or P2. Symbol P1 or P2 is displayed on the screen to indicate it has been activated.
P1 activated
P1 non activated
A frame appears around symbol P1 or P2 when the programme start time is reached and it continues to be displayed throughout the duration of the programme.
To suspend the programme while it is in progress, press P1 or P2 briefly. The frame around symbol P1 or P2 will disappear. The programme will continue to be repeated as usual over the following days.

3.2 Using your towel radiator and blower
3.2.1 Name of the various LEDs on your towel radiator
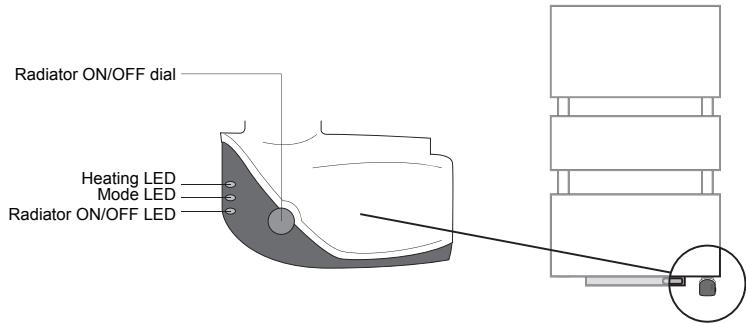
The heating LED indicates:
- that the radiator heating element is powered, when it is on;
- that a temperature sensor fault has been detected, when it is blinking.
If this occurs, refer to chapter 4 to solve the problem.
When the remote control is switched on, the mode LED indicates that a setpoint temperature has indeed been registered by the radiator.
In the case of a pilot wire, the LED is on when the programming base unit is in Comfort mode. This LED will remain off in any other operating mode.
When turned on, the radiator ON/OFF LED indicates that the radiator is ready to receive instructions from the remote control to start (see chapter 3.1).
NOTE The blower operation and that of the electric radiator are independent. Your blower can therefore operate when your radiator is switched off and vice-versa.
3.2.2 Name of the various LEDs on your blower
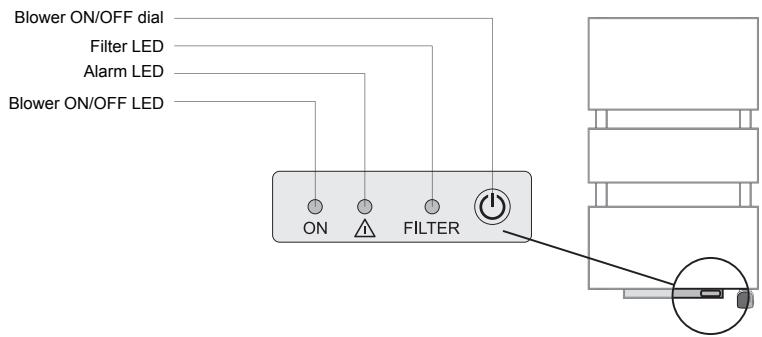
When the blower is powered, the ON/OFF LED indicates that the blower function can be activated by the remote control.
The alarm LED indicates a blower failure. Refer to chapter 4 to identify the cause of this alarm.
The filter LED indicates when it is time to clean the filter (see chapter 4.2).
This LED also informs you of the absence or incorrect positioning of the filter on the blower. If this is the case, the alarm and filter LEDs will blink simultaneously.
3.3 Advanced remote control settings (for advanced users)
Some of the remote control parameters can be adjusted. The following information will allow you to access these parameters and modify them according to your intended use.
Access to the parameter settings is made with the remote control switched off. If necessary, press and hold to switch it off.
Once the remote control has been switched off, press and hold keys P1 and P2 together to access the settings menu. The following information will then be displayed on the remote control screen:

Press P2 to access the next parameter. (0 1 2)
Press P1 to access the previous parameter. (2 1 0)
| No | Parameter | Description | Default setting | Setting |
| 0 | Boost time | Adjustable from 15 to 120 minutes in 15-minute increments | 30 minutes | Press the + or - key |
| 1 | Programme P1 time | Adjustable from 15 to 120 minutes in 15-minute increments | - If parameter 3 = 0 or 2: 30 minutes | Press the + or - key |
| - If parameter 3 = 1: 60 minutes |
| 2 | Programme P2 time | Adjustable from 15 to 120 minutes in 15-minute increments | - If parameter 3 = 0 or 2: 30 minutes | Press the + or - key |
| - If parameter 3 = 1: 60 minutes |
| 3 | Type of programme | Value 0 (blower only), 1 (radiator on boost) or 2 (radiator on boost + blower) | 1 | Press the + or - key |
| 4 | Setpoint temperature calibration | Adjustable between -5.0°C to 5.0°C in 0.5°C increments | 0,0°C | Press the + or - key |
| 5 | Room temperature calibration | Not available on this model | -- | |
| 6 | Type of energy source | NEVER modify! * | 1 | |
| 7 | Default display | Value 0 (time) or 1 (setpoint temperature) | 1 | Press the + or - key |
| 8 | Version number display and reset | Reset to factory settings. | | Press the + key for 10 seconds |
| The time will have to be re-set. |
| End | Quitting parameter settings display | Quit parameter setting menu | | Press P2 |
- The remote control parameters are set according to the power supply of your towel radiator (hot water or electricity). We advise against modifying the default value.
4. Maintenance and troubleshooting tips
4.1 Routine maintenance operations
Before you perform any maintenance work, make sure you switch the blower off by pressing until the ON LED goes out.
High-quality materials and surface treatment protect your appliance against corrosion and impacts.
To maximise the service life of your radiator, we recommend you take the following precautions:
- Never use abrasive or corrosive products on the outer surfaces of the appliance (except the electrical parts); use warm, soapy water.
- Use a soft, dry cloth without any solvents to clean the blower and the remote control.
IMPORTANT If the power cable is damaged, for safety reasons it must be replaced by the manufacturer, the manufacturer's after-sales service department or a similarly qualified person.
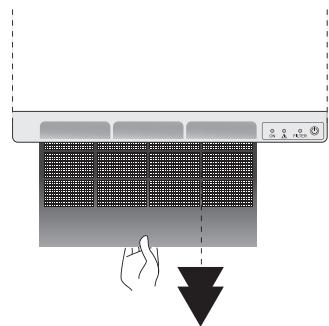
4.2 Cleaning the filter
With time, the dust build-up may cause the filter situated at the rear of the blower to clog. After approximately 200 hours of blower operation, the FILTER alarm LED lights up to indicate the need to clean the filter.
Regular filter cleaning is therefore necessary for the blower to function correctly and efficiently.
Pull out the filter situated at the rear of the blower and wash it in warm water (then leave to dry) or clean it with a vacuum cleaner. During this process, and in order to protect your appliance, the alarm LED lights up, thereby preventing the blower from functioning.
After cleaning the filter, reposition it in its seat and secure it in its original position.
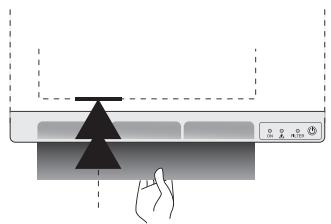
Press the blower key for 5 seconds; the FILTER and LEDs go out.
4.3 Troubleshooting
Despite all our efforts in manufacturing our products, you may encounter some easy-to-solve operating failures. In this case, please consult the table below to find our suggested solution.
Nonetheless, should you fail to solve the problem encountered, please contact your supplier's after-sales service for assistance.
TOWEL RADIATOR
| Problem | Diagnosis | Steps to take | Restarting |
| The radiator does not heat. | The ON/OFF LED is off. | • Press the按钮 or
• Check the electricity supply. | See chapter 2.3 |
| The heating LED is on. | Check the electric heating element of the appliance. | Contact your installer. |
| The heating LED is blinking. | Check the temperature sensor. | Contact your installer. |
| The heating LED is off. | Check the remote control signal:
• move the remote control
• or check the batteries
• or check if the remote control is working. | See chapters 2.2 and 3.1.1 |
| Press the + key to raise the desired temperature. | See chapter 3.1.2 |
BLOWER
| Problem | Diagnosis | Steps to take | Restarting |
| The LED is blinking. | The blower is overheating. | • Switch the blower off at the button, make sure the ON LED is off.
• Make sure there is no towel or other item blocking the air circulation in the blower.
• Check the condition of the filter and clean it if necessary.
• Reposition the filter correctly in its housing. | • Wait a few minutes then press and hold the button for 5 seconds to reset the blower.
• Switch the blower back on and make sure the LED is off. The blower is now ready to receive instructions from the remote control to restart (see chapter 3.1). |
| The blower stops and does not restart. | Timeout period. | Allow the blower to cool down. | See chapter 3.1.2 |
| The blower does not start. | Loss of signal from the remote control. | Move the remote control. | Test the reception. |
| The blower is switched off. | Press the button on the blower. | |
| Electricity supply problem. | Check the electrical installation. | |
| The FILTER and LEDs are blinking. | There is no filter or it is positioned incorrectly. | • Reposition the cleaned filter correctly in its seat, the FILTER LED will then be turned off.
• Hold down the button for 5 seconds to reset it and check that the LED is off. | The blower is now ready to receive instructions from the remote control to start (see chapter 3.1). |
| The FILTER LED lights up. | After approximately 200 hours of use, the FILTER LED lights up to indicate the filter requires cleaning. | • Turn off the blower at the button.
• Pull out the filter situated at the rear of the blower (see above) and wash it in warm water or clean it with a vacuum cleaner.
• Reposition the filter, making sure the grille is facing up. | After cleaning, you will have to reset the blower by holding the button down for 5 seconds. |
REMOTE CONTROL
| Problem | Diagnosis | Steps to take | Restarting |
| No display. | Battery problem. | Replace the batteries. | See chapter 3.1.1 |
| The remote control is switched off. | Press and hold ON. | |
| The time is blinking. | Time not set. | Set the time. | See chapter 3.1.1 |
| The setpoint temperature does not match the temperature measured in the room. | There is an offset in the measurement taken by the temperature sensor. | Calibrate the remote control. | See chapter 3.3, parameter 4. |
PILOT WIRE
| Problem | Diagnosis | Steps to take | Restarting |
| The radiator no longer responds to the pilot wire commands. | The pilot wire may not be connected properly. | Check the connection of the pilot wire. | See chapter 2.3 |
| The temperature in the room does not match the desired temperature level shown on the remote control. | The pilot wire may be connected to a program-ming base unit that takes precedence over the remote control. | Set the programming base unit to Comfort mode so that the desired temperature level of the remote control is taken into account. | See chapter 3.1.2 |
5. Services and guarantee
After-sales service
If your towel radiator stops working or you require spare parts, contact your installer or dealer.
Prior to making contact and to ensure your problem is dealt with quickly and effectively, please make a note of:
- the details shown on the appliance nameplate (see chapter 2.3),
- the sales reference for your appliance shown on your dated purchase invoice,
- the remote control version number (see chapter 3.3, parameter 8).
Guarantee
(See general conditions of sale for your country)
The heating body of your electric radiator is guaranteed against manufacturing defects for five (5) years from the date of purchase, while the other components are guaranteed for two (2) years.
It complies with the EMC Directive: 2004/108/EC regarding electromagnetic compatibility of equipment, with Low Voltage directive: 2006/95/EC regarding electrical equipment designed for use within certain voltage limits, and with European standards EN 60.335.1 - 2003, EN 60.335.2.30 and EN 60335.2.43 - 2005, and subsequent amendments.
Guarantee exclusions
The guarantee shall not apply if the appliance is installed, used or maintained in a way that does not comply with standards in force in the relevant country, good professional practice, or the manufacturer's instructions.
For all other questions regarding the guarantee, please contact your installer or dealer.
Environmental regulations
RoHS: complies with Directive 2011/65/EU
WEEE: complies with Directive 2002/96/EC
Disposal of end-of-life electrical and electronic appliances.
This symbol indicates that this product should not be disposed of with household waste. It must be taken to a suitable collection point to be recycled. By disposing of this product correctly, you will help prevent potential negative consequences for the environment and human health.
When disposing of the heating appliance, comply with the regulations in force on the disposal of oil.
This heating appliance is filled with a precise quantity of special oil. Any repair work requiring the oil tank to be opened should only be carried out by the manufacturer or their after-sales service department, which should also be contacted in the event of an oil leak.
NL
1 Uitleg