
MICUS1800MECWA - Electric fan heater MILL - Free user manual and instructions
Find the device manual for free MICUS1800MECWA MILL in PDF.

| Product type | Electric fan heater |
| Brand | MILL |
| Model | MICUS1800MECWA |
| Maximum power | 1800 W |
| Power supply | 220-240 V ~ 50 Hz |
| Thermostat | Mechanical |
| Color | White |
| Base (feet) | Aluminum included |
| Heat levels | 1200 W, 1800 W, fan only |
| Overheat protection | Yes (automatic shut-off) |
| Tip-over protection | Yes |
| Control | Rotary switch + thermostat knob |
| Usage | Indoor, supplementary heating |
| Maintenance | Damp cloth, do not immerse |
| Warranty | 2 years |
Frequently Asked Questions - MICUS1800MECWA MILL
User questions about MICUS1800MECWA MILL
0 question about this device. Answer the ones you know or ask your own.
Ask a new question about this device
Download the instructions for your Electric fan heater in PDF format for free! Find your manual MICUS1800MECWA - MILL and take your electronic device back in hand. On this page are published all the documents necessary for the use of your device. MICUS1800MECWA by MILL.
USER MANUAL MICUS1800MECWA MILL
This product is only suitable for well insulated spaces or occasional use.
NL
Please read the instructions carefully before use.
Take good care of this manual for later use.
Scandinavian home comfort
Mill is a Norwegian brand that develops heating and indoor air quality products tailored for your modern home. Inspired by Scandinavian nature, our products are designed to sustain the toughest of climates to ensure safe, efficient and comfortable temperatures, as well as good air quality.
Mill products are praised for their minimalistic and elegant features as they blend in naturally with any modern interior. Our advanced and user-friendly technology will support a relaxing and healthy home space with reliable temperatures and air quality. Mill's vision is to develop products that create an enjoyable and harmonic household atmosphere, enhancing both comfort and style; the ultimate Scandinavian home comfort.
We hope you enjoy your Mill product.
Follow us on social media:

fb.com/millnorway

@millnorway

millnorway.com
Content
P.2-4 Important safety information
P.5 Specifications
P.5 Before first use
P.5 | First use
P.5 Description of heater
P.5 Parts
P.6 Assembly
P.6 Instructions
P.6 Usage mechanical thermostat
P.7 Maintenance
P.7 Warranty
P.7 Waste disposal
Please read the instructions carefully before use. Take good care of this manual for later use.
STORE THIS INSTRUCTION MANUAL FOR FUTURE USE!
NEVER TOUCH YOUR HEATER OR ITS CASING WITH WET HANDS!
Important safety information
You must obey common safety guidelines when using electrical products, especially in the presence of children.

WARNING! To avoid electric shock or damage due to the heat, always make sure the plug is pulled out before the heater is moved or cleaned.
READ THE INSTRUCTIONS CAREFULLY
- The product is intended for home use only.
- Make sure the heater is connected to the house's regular mains as indicated on the heater.
- New heaters will produce a specific odor when used the first time. This will stop after a short time and is completely harmless.
- Check for any pieces of packing foam or cardboard that may have fallen into the heating elements of the heater. These pieces must be removed to avoid unpleasant odors.
- Prevent the heater from overheating — do not cover.
- Always turn off the heater and unplug it when not used for a long period of time.
- Pay special attention if the heater is used in rooms where children, the handicapped or elderly reside.
- The heater should not be set up directly beneath an electrical socket outlet.
- The cord must not be laid under any kind of carpet.
Make sure the cord is laid in such a way that nobody can trip on it. - The heater must not be used if either the cord or plug is damaged. The heater must not be used if it has been
dropped on the floor is damaged in any other way causing it to malfunction.
- The cord must be repaired by the manufacturer or by an expert if it has been damaged, to avoid dangerous situations.
- Avoid using extension cords, which may overheat and could possibly start a fire.
- Never cover the air vents on the heater. Avoid potential fire hazards by making sure the air intakes are not blocked or covered. The heater should be used in rooms with normal flat floors.
- The heater should not be installed in close proximity to flammable materials of any kind because there can always be a risk of fire.
- The heater must never be used in rooms where gasoline, paint or other flammable liquids are stored, such as in a garage.
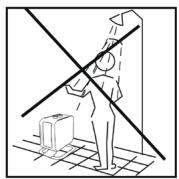
- Never touch an electric heater with wet hands. The heater should be installed so a person showering or taking a bath cannot come into direct contact with it.
- Some parts of this product can become very hot and cause burns. Particular attention has to be given where children and vulnerable people are present.
- The heater must be switched off, the plug removed and the heater must cool down before it is moved.
- Avoid overloading the mains (the circuit) where the heater is connected. The heater may overload the electrical circuit if other electrical devices are plugged into the same socket outlet.
-
Do not use this heater in small rooms when they are occupied by persons not capable to leaving the room on their own, unless constant supervision is provided.
-
The product cannot be used by children under 8 years of age and persons with reduced physical or mental abilities or lack of experience and knowledge unless they have been given supervision or instruction in the safe use of the product and understand the hazards involved.
- Children should not play with the product. Cleaning and maintenance should not be done by unsupervised children.
- Children under the age of 3 should be kept away from the product, unless they are under constant supervision. Children aged 3 to 8 years are only permitted to turn the product ON/OFF, assuming the heater is mounted according to the assembly instructions and the children have received instruction or supervision in the safe use of the product and understand the hazards involved.
- Do not use this heater in the immediate surroundings of a bath, a shower or a swimming pool.
ATTENTION! This heater is only meant to be used as a supplementary heating source, and must not be used without supervision
Specifications
| Model | Thermostat | Color | Aluminium foot | Amperage | Power (W) |
| CUS1800MECWA | Mechanical | White | Yes | 220-240V~,50Hz | 1800 |
| CUS1800MECW | Mechanical | White | No | 220-240V~,50Hz | 1800 |
| CUS1800MECBA | Mechanical | Black | Yes | 220-240V~,50Hz | 1800 |
Before first use
After unpacking the heater, check to make sure the product was not damaged during transport. Contact the retailer or importer if you discover any visible damages to the product.
Keep the outer packaging to transport the heater in the future. If you want to dispose the packaging, make sure it is done properly. Keep plastic bags away from children.
First use
After turning on the heater for the first time or after an extended period without use, the heater can produce a burnt odor for a short time. This is normal.
Please read all the instructions carefully before use. Save the instruction manual for future use.
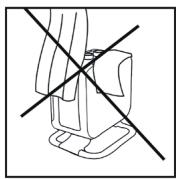
Attention! The heater is equipped with a tip-over switch which turns the heater off when tipped over. When moving and/or tilting the heater you would hear a sound that may sound like a loose part inside — this is the tip-over switch and it is completely normal.
Description of heater
See figure 1 on separate illustration sheet
A With aluminium foot
- Heat emission
- Thermostat
- Output selector
- Legs (aluminium)
B Without aluminium foot
- Heat emission
- Thermostat
- Output selector
Parts for models with aluminium foot
See figure 2 on separate illustration sheet
- 8 screws (4 pre-mounted)
- 2 foot brackets
2 rails for the feet
Assembly
See figure 3 on separate illustration sheet
- Remove the pre-mounted screws on both legs before you insert them into the brackets, so that you get a stable foot.
- Attach the legs to the brackets by tightening 2 screws into each bracket. Do not tighten completely in order to fit the foot into the square tracks of the heater.
- Place the heater gently on its head and use the supplied screws to mount the feet.
- Place the foot in the square tracks and fasten each foot bracket with two screws. Wait to tighten the screws until all four screws have been fastened. You can now tighten the screws attaching the legs and brackets.
5. NEVER USE THE HEATER BEFORE THE LEGS HAVE BEEN TIGHTLY SCREWED.
Instructions
Control Panel
See figure 4 on separate illustration sheet
- Thermostat: Adjust the desired heat setting
- Output selector:
O: OFF
Fan (only fan, no heating)
I:1200W
II:1800W
WARNING! BE SURE THE FOOT IS FITTED CORRECTLY AND ACCORDING TO THE INSTRUCTIONS BEFORE USING THE HEATER!
ATTENTION! This heater is only meant to be used as a supplementary heating source, and must not be used without supervision
Usage
- Set the output selector to the OFF position (O) and the thermostat to minimum. Plug the heater into a grounded outlet.
- Set the output selector to position for fan only (no heating).
- Set the output selector to position I or II. Turn the thermostat up to the maximum position. When the desired room temperature has been reached, turn the thermostat slowly down until you hear a click. The thermostat can now remain in this position until a different room temperature is desired. As soon as the room temperature falls below this level, the heater will automatically switch on again. When the room has again reached the desired temperature, the heater will switch off again.
- If you wish to change the room temperature, repeat the instructions in step 3.
- The heater has on overheat protection that turns the device off if any parts become extremely hot.
- To switch the heater off, turn the output selector to the O position. If the heater will be left unused for a longer period of time, pull the plug.
Maintenance
- For cleaning, always unplug the heater and leave it to cool.
- Wipe the heater regularly with a damp cloth and dry the surface before turning on the heater again.
- The heater must be cleaned at least once a month during the heating season.
CAUTION! The heater should never be immersed in water.
Avoid using detergents to clean the heater.
Never let any water get inside the heater; this can be hazardous.
- Dust etc. should be removed with a soft cloth.
- The heater can be stored in a dry and clean place.
- If the heater stops working, do not attempt to repair it yourself because it can cause a fire hazard and/or electric shock.
Warranty
The warranty is valid for 2 years. The heater will be repaired or replaced during this time should any malfunction occur. The warranty applies if the heater is used according to these instructions and the customer can present a purchase receipt. If the heater malfunctions in any way, please contact the store where it was purchased or the importer.
Waste disposal
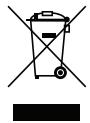
The symbol indicates that this product is not to be disposed of together with household waste. This product must be delivered to a recycling service or container for electrical appliances and electronic equipment. This is done to avoid health risks and prevent harm to the environment. Local businesses (or the environmental station in your neighborhood) are required by law to accept and recycle such products, as a means of environmentally sound disposal.
mill
Mill International B.V.
De Giesel 5
6081 PG Haelen
The Netherlands
www.millnorway.com
Inhoud
ATTENTION! This heater is only meant to be used as a supplementary heating source, and must not be used without supervision.
Utilisation
LUGEGE JUHENDIT HOOLIKALT.
- Heat emission
- Thermostat
- Output selector
- Legs (aluminium)
B Bez aluminija kaju
- Heat emission
- Thermostat
- Output selector
Daças modelim ar alumini ja kaju
- Remove the pre-mounted screws on both legs before you insert them into the brackets, so that you get a stable foot.
- Attach the legs to the brackets by tightening 2 screws into each bracket. Do not tighten completely in order to fit the the foot into the square tacks of the heater.
- Place the heater gently on its head and use the supplied screws to mount the feet.
-
Place the foot in the square tracks and fasten each foot bracket with two screws. Wait to tighten the screws until all four screws have been fastened. You can now tighten the screws attaching the legs and brackets.
-
AIZLIEGTS LIETOT SILDIT JU, PIRMS TAM IR CIESI PIEKSRUVETAS K JAS.
Instrukcija
Vadibas panelis
Wentylator (tylko wentylator, bez grzania)
I:1200W
II:1800W
UWAGA! PRZED UŽYCIEM GRZEJNIKA UPEWNIJ SIE, ŽE NOŽKI SA USTAWIONE POPRAWNIE I ZGODNIE Z INSTRUKCJA!
Bez hlinikovych nozek
- Emise tepla
- Termostat
- Volicystupu
NEVER TOUCH YOUR HEATER OR ITS CASING WITH WET HANDS!
Vázne sigurnosne informacije
Upute mehanički termostat
Upravljacka ploča
Pogledajte sliku 4 na zasebnom ilustracijskom listu
- Termostat: Namjestite Željenu toplinu
- Odabir nivoa:
O: OFF
Fan (samo ventilator, bez grijanja)
I:1200W
II:1800W
UPOZORENJE! UVJERITE SE DA SU NOZICE PRICVRSCENE NA GRIJALICU, SUKLADNO UPUTAMA, PRIJE UPOTREBE! POZOR! Ovaj grijač namijenjen je sam kao dodatni izvor grijanja i ne smije se koristiti bez nadzora.
Koristenje mehanički termostat
- Namjestite glavnu tipku u poziciju OFF (0) i termostat na minimum. Prikljucite grijalicu na uticnicu.
- Namjestite tipku za odabir nivoa na ventilator (bez grijanja).
- Namjestite tipku za odabir nivoa na poziciju I li II. Namjestite termostat na najvecu poziciju. Kada je postignuta zejlena temperatura u prostoriji, polako smanjujte jačinu na termostatu dok ne Čujete klik. Termostat moze ostati u toj poziciji dok ne poželite drugaciju temperaturu. Kada temperatura u prostoriji padne ispod zadane, grijac se automatski ponovo uklučuje. Kada setemperaturea prostorije digne do zadane, grijac ce se opet automatskiugasiti.
- Ukoliko Želite promjeniti temperaturu, ponovite postupak pod brojem 3.
- Urej ima zastitu od pregrijavanja koja automatski gasi urejukoliko bilo koji dio urejada postigne iznimno visoku temperaturu.
- Za iskligivanje grijaca, okrenite glavnu tipku u poziciju 0. Ukoliko se urejad nece duze vrijeme koristiti, iskligite ga iz uticnice.
Održavanje
Seasonal energy efficiency
Information requirement for the electric local space heaters
Model identifier(s): CUS1800MECWA, CUS1800MECW, CUS1800MECBA
| Item | Symbol | Value | Unit | Item | Unit |
| Head Output | Type of heat input, for electric storage local space heaters only (select one) | ||||
| Nominal heat output | Pnom | 1,8 | kW | manual heat charge control, with integrated thermostat | No |
| Minimum heat output (indicative) | Pmin | 0,0 | kW | manual heat charge control with room and/or outdoor temperature feedback | No |
| Maximum continuous heat output | Pmax,c | 1,8 | kW | electronic heat charge control with room and/or outdoor temperature feedback | No |
| Auxiliary electricity consumption | fan assisted heat output | No | |||
| At nominal heat output | elmax | 1,800 | kW | Type of heat output/room temperature control (select one) | No |
| At minimum heat output | elmin | 0,025 | kW | single stage heat output and no room temperature control | No |
| In standby mode | eISB | 0,000 | kW | Two or more manual stages, no room temperature control | No |
| with mechanic thermostat room temperature control | Yes | ||||
| Seasonal space heating energy efficiency | ηs | 36 % | with electronic room temperature control | No | |
| electronic room temperature control plus day timer | No | ||||
| electronic room temperature control plus week timer | No | ||||
| Other control options (multiple selections possible) | |||||
| room temperature control, with presence detection | No | ||||
| room temperature control, with open window detection | No | ||||
| with distance control option | No | ||||
| with adaptive start control | No | ||||
| with working time limitation | No | ||||
| with black bulb sensor | No | ||||
| Contact details | Mill International ASGrini Næringspark 10, 1361 Østerås, Norway | ||||
mill
Mill International B.V.
De Giesel 5
6081 PG Haelen
The Netherlands
www.millnorway.com


- NL
- Scandinavian home comfort
- Follow us on social media:
- Content
- Important safety information
- READ THE INSTRUCTIONS CAREFULLY
- ATTENTION! This heater is only meant to be used as a supplementary heating source, and must not be used without supervision
- Before first use
- First use
- Description of heater
- A With aluminium foot
- B Without aluminium foot
- Parts for models with aluminium foot
- See figure 2 on separate illustration sheet
- Assembly
- See figure 3 on separate illustration sheet
- NEVER USE THE HEATER BEFORE THE LEGS HAVE BEEN TIGHTLY SCREWED.
- Instructions
- Control Panel
- See figure 4 on separate illustration sheet
- WARNING! BE SURE THE FOOT IS FITTED CORRECTLY AND ACCORDING TO THE INSTRUCTIONS BEFORE USING THE HEATER!
- Usage
- Maintenance
- Warranty
- Waste disposal
- mill
- Inhoud
- Utilisation
- LUGEGE JUHENDIT HOOLIKALT.
- B Bez aluminija kaju
- Daças modelim ar alumini ja kaju
- Instrukcija
- Vadibas panelis
- Bez hlinikovych nozek
- Vázne sigurnosne informacije
- Upute mehanički termostat
- Upravljacka ploča
- Koristenje mehanički termostat
- Održavanje
- Seasonal energy efficiency
Brand : MILL
Model : MICUS1800MECWA
Category : Electric fan heater