Fan Heater FH1500BLACK - Heating MILL - Free user manual and instructions
Find the device manual for free Fan Heater FH1500BLACK MILL in PDF.


| Product type | Fan heater |
| Brand | Mill |
| Model | FH1500BLACK |
| Power | 1500 W |
| Voltage | 220-240 V ~ 50 Hz |
| Dimensions (approx.) | 20 x 15 x 25 cm |
| Net weight | 1.5 kg |
| Housing material | Heat-resistant plastic |
| Color | Black |
| Power levels | 750 W / 1500 W (2 levels) |
| Adjustable thermostat | Yes, adjustment knob |
| Cold blow | Yes, ventilation mode without heating |
| Overheat protection | Yes, automatic shutdown |
| Tilt switch | Yes, safety switch |
| Carrying handle | Yes, integrated |
| Power cord | Length 1.5 m |
| Noise level | Approximately 45 dB |
| Heating area | Up to 20 m² (estimate) |
| Maintenance | Dust the air intake grille regularly |
| Spare parts available | Yes, contact Mill customer service |
| Reparability | Average (disassembly possible by a professional) |
| Warranty | 2 years |
Frequently Asked Questions - Fan Heater FH1500BLACK MILL
User questions about Fan Heater FH1500BLACK MILL
0 question about this device. Answer the ones you know or ask your own.
Ask a new question about this device
Download the instructions for your Heating in PDF format for free! Find your manual Fan Heater FH1500BLACK - MILL and take your electronic device back in hand. On this page are published all the documents necessary for the use of your device. Fan Heater FH1500BLACK by MILL.
USER MANUAL Fan Heater FH1500BLACK MILL
This product is only suitable for well insulated spaces or occasional use.
NL
Please read the instructions carefully before use. Take good care of this manual for later use.
Scandinavian home comfort
Mill is a Norwegian brand that develops heating and indoor air quality products tailored for your modern home. Inspired by Scandinavian nature, our products are designed to sustain the toughest of climates to ensure safe, efficient and comfortable temperatures, as well as good air quality.
Mill products are praised for their minimalistic and elegant features as they blend in naturally with any modern interior. Our advanced and user-friendly technology will support a relaxing and healthy home space with reliable temperatures and air quality. Mill's vision is to develop products that create an enjoyable and harmonic household atmosphere, enhancing both comfort and style; the ultimate Scandinavian home comfort.
We hope you enjoy your Mill product.
ErP energy efficiency data
Our products strictly comply with ErP relevant regulation and directive.
You can find energy efficiency data for each model on the final pages of this booklet.
Follow us on social media:

fb.com/millnorway

@millnorway

millnorway.com
Content
2-5 | Important safety information
6 Specifications
6 | Before first use
6 | First use
6 | Description of heater
6 Instructions control panel and remote
7 | Usage
8 | Other functions
8 | Problem solving
9 | Maintenance
9 Warranty
10 | Waste disposal
Please read the instructions carefully before use. Take good care of this manual for later use.

STORE THIS INSTRUCTION MANUAL FOR FUTURE USE!
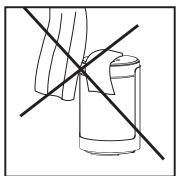
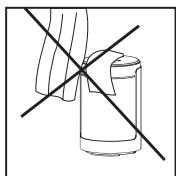
NEVER TOUCH YOUR HEATER OR ITS CASING WITH WET HANDS!

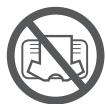
WARNING: In order to avoid overheating, do not cover the heater.
Important safety information
You must obey common safety guidelines when using electrical products, especially in the presence of children.

WARNING! To avoid electric shock or damage due to the heat, always make sure the plug is pulled out before the heater is moved or cleaned.
READ THE INSTRUCTIONS CAREFULLY
- The product is intended for home use only.
- Make sure the heater is connected to the house's regular mains as indicated on the heater.
- New heaters will produce a specific odor when used the first time. This will stop after a short time and is completely harmless.
- Check for any pieces of packing foam or cardboard that may have fallen into the heating elements of the heater. These pieces must be removed to avoid unpleasant odors.
- Prevent the heater from overheating — do not cover.
- Always turn off the heater and unplug it when not used for a long period of time.
- Pay special attention if the heater is used in rooms where children, the handicapped or elderly reside.
- The heater should not be set up directly beneath an electrical socket outlet.
- The cord must not be laid under any kind of carpet. Make sure the cord is laid in such a way that nobody can trip on it.
-
The heater must not be used if either the cord or plug is damaged. Do not use this heater if it has been dropped.
-
The cord must be repaired by the manufacturer or by an expert if it has been damaged, to avoid dangerous situations.
- Avoid using extension cords, which may overheat and could possibly start a fire.
- Never cover the air vents on the heater. Avoid potential fire hazards by making sure the air intakes are not blocked or covered. The heater should be used in rooms with normal flat floors.
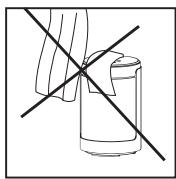
- The heater should not be installed in close proximity to flammable materials of any kind because there can always be a risk of fire.
- Use the heater on a horizontal and stable surface.
- The heater must never be used in rooms where gasoline, paint or other flammable liquids are stored, such as in a garage.
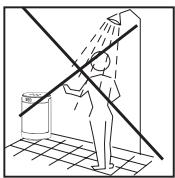
- Never touch an electric heater with wet hands. The heater should be installed so a person showering or taking a bath cannot come into direct contact with it.
- Some parts of this product can become very hot and cause burns. Particular attention has to be given where children and vulnerable people are present.
- The heater must be switched off, the plug removed and the heater must cool down before it is moved.
- Avoid overloading the mains (the circuit) where the heater is connected. The heater may overload the electrical circuit if other electrical devices are plugged into the same socket outlet.
- WARNING: Do not use this heater in small rooms when they are occupied by persons not capable of leaving the room on their own, unless constant supervision is provided.
- The product cannot be used by children under 8 years of age and persons with reduced physical or mental abilities
or lack of experience and knowledge unless they have been given supervision or instruction in the safe use of the product and understand the hazards involved.
- Children shall not play with the appliance. Cleaning and user maintenance shall not be made by children without supervision.
- Children of less than 3 years should be kept away unless continuously supervised.
- Children aged from 3 years and less than 8 years shall only switch on/off the appliance provided that it has been placed or installed in its intended normal operating position and they have been given supervision or instruction concerning use of the appliance in a safe way and understand the hazards involved.
- Children aged from 3 years and less than 8 years shall not plug in, regulate and clean the appliance or perform user maintenance.
- This appliance is not intended for use by persons (including children) with reduced physical, sensory or mental capabilities, or lack of experience and knowledge, unless they have been given supervision or instruction concerning use of the appliance by a person responsible for their safety.
- Do not use this heater in the immediate surroundings of a bath, a shower or a swimming pool.
- Do not use if there are visible signs of damage to the heater.
- WARNING: To reduce the risk of fire, keep textiles, curtains, or any other flammable material a minimum distance of 1 m from the air outlet.
- WARNING: To reduce the risk of fire, keep the air outlet at least 1m from wall or any barriers.
ATTENTION! This heater is only meant to be used as a supplementary heating source, and must not be used without supervision.
BATTERY REPLACEMENT INFORMATION
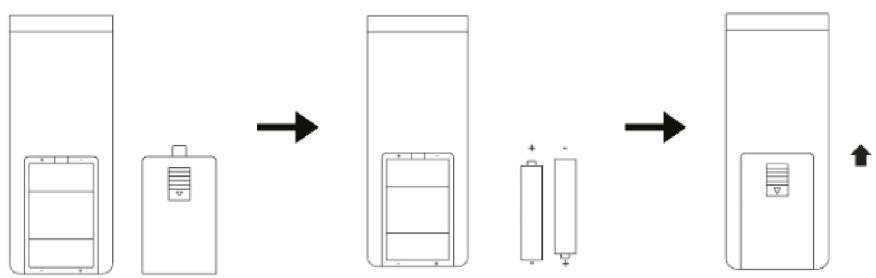
This appliance comes with 2 AAA (1.5V) batteries which are to be fitted into the remote.

CAUTION: Batteries are a chemical burn and choking hazard. Keep batteries away from children.
- Ensure that the battery compartment is always completely secure. If the battery compartment does not close securely, stop using the remote, remove the batteries, and keep it away from children.
- If you think batteries might have been swallowed or placed inside any part of the body, seek immediate medical attention. Dispose of cells properly and keep away from children. Even used cells may cause injury.
- Please dispose of or recycle the remote control batteries according to municipal or provincial laws.
To place the batteries into the remote/replace the batteries please follow the instructions below:
Specification
| Model | Thermostat | Color | Amperage | Power (W) |
| FH1500BLACK | Electronic | Black | 220-240V~, 50/60Hz~ | 1500 |
Before first use
After unpacking the heater, check to make sure the product was not damaged during transport. Contact the retailer or importer if you discover any visible damages to the product. Keep the outer packaging to transport the heater in the future. If you want to dispose the packaging, make sure it is done properly. Keep plastic bags away from children.
First use
After turning on the heater for the first time or after an extended period without use, the heater can produce a burnt odor for a short time. This is normal. Please read all the instructions carefully before use. Save the instruction manual for future use.
Attention! The heater is equipped with a tip-over switch which turns the heater off when tipped over. When moving and/or tilting the heater you would hear a sound that may sound like a loose part inside — this is the tip-over switch, and it is completely normal.
Description of heater
-
Control panel
-
Front panel (air outlet)
-
Handle
-
Power cord
-
LED display
-
Base
-
Rear Panel cover

WARNING: In order to avoid overheating, do not cover the heater

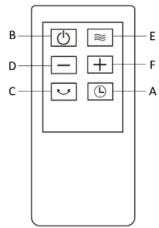
Instructions Control Panel and remote
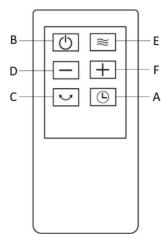
A. Auto ON/OFF timer button
B. Power ON/OFF button
C. Oscillation button
D. Temperature/timer decrease button
E. Mode/heat level button
F. Temperature/timer increase button
G. Mode/fan level display light
H. Digit display light
I. Timer display light
J. Oscillation display light
K. "Fan Only" mode display light

ATTENTION! This heater is only meant to be used as a supplementary heating source, and must not be used without supervision.
Usage
Before connecting your appliance to the mains socket, position the appliance upright on the floor, at least 90cm away from the wall, curtains, furniture or wall coverings. Insert the mains plug into a suitable wall mains socket. The unit will then enter standby mode, as shown with a beep. Your heater is now ready for use.

Power On/Off Button
- Press the “Power On/Off” button on the appliance/remote control once to turn the heater on with default settings: High mode and a temperature setting of 35 °C.
- Press the "Power On/Off" button again to turn off the heater. It will take 30 seconds for the heater to shut off, with the countdown time shown on the display.

Mode/Heat Level + Child Lock (5 second press) Button
- When the unit is on, repeatedly press the “Mode/Heat Level” button on the appliance/remote control to cycle through the modes: High (HI) → Low (LO) → ECO (ECO) → Fan Only ( ✿ ).
- When “ECO” mode is turned on, the heater will adjust between the “High” and “Low” modes automatically based on the ambient temperature.
- The temperature can be set and adjusted on “High”, “Low”, and “ECO” mode, but not on “Fan Only” mode.
- When the set temperature is reached, the display will flash, and the heater will stop working. When the ambient temperature is lower than the set temperature, the heater will start working again.
- Hold the “Mode/Heat Level” button for 5 seconds to turn the Child Lock function on/off. The appliance will beep twice to confirm that the Child Lock function is enabled or disabled. When the Child Lock function is on, “LC” will show on the display.

Adjustment Buttons
- When the unit is on, press the “+” or “-” buttons on the appliance/remote control to adjust the temperature from 5 to 36 °C in 1 °C increments. If you rapidly press or hold down the “+” or “-” buttons on the appliance, the temperature will change rapidly.
- The adjustment buttons can also be used to adjust the timer, as described below.


Auto ON/OFF Timer Button
- To set the timer for the appliance to automatically turn off, follow the below: When the unit powered on, first press the “Auto ON/OFF Timer” button, and then use the “+” or “-” buttons on the appliance/remote control to adjust the hours on the timer. The timer will cycle through 00, 01, 02... up to 24 hours. If you rapidly press or hold down the “+” or “-” buttons on the appliance, the time will change rapidly. Once the time has been selected, it will confirm this automatically.
- When the time is up, the appliance will automatically stop running.
- The timer can also be set to turn the appliance on by following the instructions below: plug the appliance in and while it is in stand-by mode, follow the same instructions as above on how to set the timer.
- When the time is up, the appliance will automatically turn on.
- To cancel the timer setting, press the “Auto ON/OFF Timer” button on the appliance/remote control and the timer indicator light will flash.
- Then press the “Auto ON/OFF Timer” button again or press the “+” or “-” button to adjust the timer setting to “00” hours.

Oscillation Button
- When the appliance is turned on press the “Oscillation” button on the appliance/remote control once to start the oscillating.
Remote Control Buttons
The buttons on the remote control work the same as the ones on the appliance, except for the child-lock function.
Other Functions
Memory Function
If the heater is turned off then on again, it will resume operation in the mode it was in before it was turned off. If the heater is unplugged then plugged back in again, it will default to the original settings.
Tip-Over Protection
When tipped over, the heater will automatically shut off. To restart the heater, turn it off and unplug the appliance. Place the heater on a flat, level, and stable surface and plug the appliance back into the mains and turn the heater on again.
Overheat Protection
When the inner temperature of the heater is abnormally high, such as when the heater is covered in operation, the heater will cut-out and stop heating to avoid fire risk.
Problem solving
| Problem | Potential reason | Potential solution |
| Malfunction Codes on the LED Display | E1 -Temperature sensor open circuit | Unplug it from the power source and contact Customer Services. |
| E2 -Temperature sensor short circuit | Unplug it from the power source and contact Customer Services. | |
| Heater does not start | Power cord is not properly plugged in | Connect the plug to a powered electrical outlet. |
| Overheat protection has been activated | 1) Turn the heater OFF, unplug it and allow it to cool 2) Check and remove any objects on or adjacent to the heater 3) Wait 5-10 minutes before plugging the appliance back in. | |
| No power is passing through the appliance | 1) Ensure that your circuit breaker or fuse is working properly 2) Ensure your heater is placed on a flat and even surface. | |
| The set temperature is lower than the ambient temperature | Make sure the thermostat is set at a higher temperature than the ambient temperature. | |
| The heater suddenly stops working | The heater is not working | Turn off the appliance and unplug it from the power outlet; Allow it to cool, and then plug it into the power outlet again. |
| The heater is tipped over | Place the appliance on a flat, level, and stable surface. | |
| The heater suddenly stops working | The appliance is dirty | Inspect your appliance. Clean the air inlet and air outlet with a vacuum cleaner if necessary. If there are any signs of physical damage (e.g. melting, or burning of the case), do not attempt to use the appliance. Please leave all maintenance work to qualified personnel. |
Maintenance
1) For cleaning, always unplug the heater and leave it to cool.
2) Wipe the heater regularly with a damp cloth and dry the surface before turning on the heater again.
3) The heater must be cleaned at least once a month during the heating season.
CAUTION! The heater should never be immersed in water. Avoid using detergents to clean the heater. Never let any water get inside the heater; this can be hazardous.
4) Dust etc. should be removed with a soft cloth.
5) The heater can be stored in a dry and clean place.
6) If the heater stops working, do not attempt to repair it yourself because it can cause a fire hazard and/or electric shock.
Warranty
Mill offers consumers 5 years warranty for any Mill product from date of purchase by a consumer. For business customers, a warranty period of 2 years will apply (applicable in case the end-users are businesses).
This warranty provides the customer with a right to, at Mill's reasonable discretion, either repair, replacement of a defected product, or alternatively a refund.
The warranty only covers defects that originates from Mill. The customer will therefore not have a valid warranty claim if the defect is a result of circumstances such as the following:
- Negligent use, misuse, neglect, or careless operation of the product not in accordance with the Mill user manual.
- Defects caused by transport incurred outside Mill's responsibility.
- Normal wear and tear, including parts that might wear out over time as for example batteries for remote controls (if applicable), filters, tubes, and lamps for outdoor heating etc.
- Damage because of use not in accordance with the rated power and Hz.
- Damage caused by inadequate product maintenance.
- Damage from electrical outages, power surges and/or weather.
- Damage as the result of not installing or assembling the product in accordance with the Mill user manual.
- Use of parts and accessories, i.e., filter, which are not official Mill certified components.
• Repairs or alterations carried out by parties other than Mill or its authorized agents. - Minor deviations from the stated quality that are insignificant for the value and soundness of the product or deviations that the customer could reasonably expect.
• Devices used with third-party software or equipment. - Software and connectivity issues due to local restrictions in accessing our cloud services.
- Software and connectivity issues due to non-supported third-party devices.
- App or cloud/online service downtime does not fall under warranty.
Mill must provide evidence that the product's damage has not existed when the product was sold to the customer within the first year after the purchase.
For the avoidance of doubt, this warranty does not provide the customer or any third party with any right to damages, compensation nor price reduction of any kind. Mill will not have any obligation under this warranty to cover any losses incurred by the customer or any third party.
These warranty terms are only valid for customers, who purchase products through authorized Mill resellers.
The customer's rights and remedies pursuant to applicable mandatory law will not be limited nor affected by this warranty.
The seller will handle the warranty claim on behalf of Mill. To make a claim under this warranty, an end-consumer has to follow the steps described below.
Claims Process / Required Documentation
- Contact the Mill Authorised Reseller where you purchased the product. Bring your original receipt for the purchase, serial number of the product, and the faulty product.
- The Mill Authorised Reseller tests the product and evaluates if the claim is covered by the end-consumer warranty.
- If the claim is covered by the warranty, the Mill Authorised Reseller, in accordance with instructions from Mill and based on consumer law, decides whether to repair, replace or refund the product.

Waste disposal
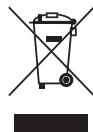
The symbol 📄 indicates that this product is not to be disposed of together with household waste. This product must be delivered to a recycling service or container for electrical appliances and electronic equipment. This is done to avoid health risks and prevent harm to the environment. Local businesses (or the environmental station in your neighborhood) are required by law to accept and recycle such products, as a means of environmentally sound disposal.
mill
Mill International B.V.
Hofplein 20
3032 AC Rotterdam
The Netherlands
www.millnorway.com
Inhoud

Specifications
| Model | Thermostaat | Kleur | Stroomsterkte | Voeding (W) |
| FH1500BLACK | Elektronisch | Zwart | 220-240V~, 50/60Hz~ | 1500 |

CONSERVER CE MANUEL D'INSTRUCTIONS POUR UNE UTILISATION ULTÉRIEURE!
NE JAMAIS TOUCHER VOTRE CHAUFFAGE OU SON BOÎTIER AVEC DES MAINS MOUILLÉES!

INFORMATIONS POUR LE REMPLACEMENT DES PILES
Caractéristiques
G. Voyant mode/niveau de ventilation
SÄILITAGE KASUTUSJUHEND HILISEMAKS KASUTAMISEKS!
ÄRGE PUUDUTAGE SEADET JA SELLE KORPUST MÄRGADE KÄTEGA

LUGEGE JUHENDIT HOOLIKALT
Tehnilised andmed
| Mudel | Termostaat | Värv | Voolutugevus | Võimsus (W) |
| FH1500BLACK | Elektrooniline | Must | 220-240V~, 50/60Hz~ | 1500 |


SAGLABAJIET INSTRUKCIJAS TÄLÄKAI LIETOŠANAI!
NEPIESKARIETIES SILRĪTĀJAM VAITO DALĀM AR MITRĀM ROKĀM!
Specifikācijas
| Modelis | Termostats | Krāsa | Strāvas stiprums | Jauda (W) |
| FH1500BLACK | Elektronisks | Melna | 220-240V~, 50/60Hz~ | 1500 |

K. Režima "Tikai ventilators" indikatora gaisma
SAUGOKITE ŠIĄ NAUDOJIMO INSTRUKCIJA ATEIĆIAI!
ŠILDYTUVO AR JO KORPUSO NIEKADA NELIESKITE DRĚGNOMIS RANKOMIS!

Specifikacijos
| Modelis | Termostatas | Spalva | Amperažas | Galia (W) |
| FH1500BLACK | Elektroninis | Juoda | 220-240V~, 50/60Hz~ | 1500 |

ZACHOWAJ TĘ INSTRUKCJĘ DO PÓŻNIEJSZEGO WYKORZYSTANIA
NIE DOTYKAJ GRZEJNIKA ANI JEGO OBUDOWY MOKRYMI DŁOŃMI!

Dane techniczne

Seasonal energy efficiency
Information requirement for the electric local space heaters
| Contact details | Mill International AS Grini Næringspark 10, 1361 ∅sterås, Norway | ||||
| Model identifier(s): | FH1500BLACK | ||||
| Item | Symbol | Value | Unit | Item | Unit |
| Head Output | Type of heat input, for electric storage local space heaters only (select one) | ||||
| Nominal heat output | P_nom | 1.500 | kW | single stage heat output and no room temperature control | No |
| Minimum heat output (indicative) | P_min | 0.750 | kW | two or more manual stages, no room temperature control | No |
| Maximum continuous heat output | P_max,c | 1.500 | kW | with mechanic thermostat room temperature control | No |
| Power consumption | with electronic room temperature control | Yes | |||
| In off mode | P_o | 0.00 | W | electronic room temperature control plus day timer | No |
| In standby mode | P_sm | 0.41 | W | electronic room temperature control plus week timer | No |
| In idle mode | P_idle | 0.52 | W | Other control options (multiple selections possible) | |
| In network standby | P_nsm | 0.00 | W | room temperature control, with presence detection | No |
| Standby mode with display information or status | No | room temperature control, with open window detection | No | ||
| Seasonal space heating energy efficiency in active mode | _S,on | 91.5 | % | distance control option | No |
| Seasonal space heating energy efficiency _s for electric local space heaters | _s=_S,on/CC | 48.2 | % | adaptive start control | No |
| working time limitation | Yes | ||||
| black bulb sensor | No | ||||
| self-learning functionality | No | ||||
| control accuracy | No | ||||
Notes
Notes
mill
Mill International B.V.
Hofplein 20
3032 AC Rotterdam
The Netherlands
www.millnorway.com



- NL
- Scandinavian home comfort
- ErP energy efficiency data
- Follow us on social media:
- Content
- STORE THIS INSTRUCTION MANUAL FOR FUTURE USE!
- Important safety information
- READ THE INSTRUCTIONS CAREFULLY
- BATTERY REPLACEMENT INFORMATION
- This appliance comes with 2 AAA (1.5V) batteries which are to be fitted into the remote.
- To place the batteries into the remote/replace the batteries please follow the instructions below:
- Specification
- Before first use
- First use
- Description of heater
- Instructions Control Panel and remote
- Usage
- Power On/Off Button
- Mode/Heat Level + Child Lock (5 second press) Button
- Adjustment Buttons
- Auto ON/OFF Timer Button
- Oscillation Button
- Remote Control Buttons
- Other Functions
- Memory Function
- Tip-Over Protection
- Overheat Protection
- Maintenance
- Warranty
- Claims Process / Required Documentation
- Waste disposal
- mill
- Mill International B.V.
- Inhoud
- Specifications
- INFORMATIONS POUR LE REMPLACEMENT DES PILES
- Caractéristiques
- LUGEGE JUHENDIT HOOLIKALT
- Specifikācijas
- Specifikacijos
- Dane techniczne
- Seasonal energy efficiency
- Notes
Brand : MILL
Model : Fan Heater FH1500BLACK
Category : Heating