MONZA WIFI - Electric heater DELTACALOR - Free user manual and instructions
Find the device manual for free MONZA WIFI DELTACALOR in PDF.
User questions about MONZA WIFI DELTACALOR
0 question about this device. Answer the ones you know or ask your own.
Ask a new question about this device
Download the instructions for your Electric heater in PDF format for free! Find your manual MONZA WIFI - DELTACALOR and take your electronic device back in hand. On this page are published all the documents necessary for the use of your device. MONZA WIFI by DELTACALOR.
USER MANUAL MONZA WIFI DELTACALOR
These instructions must be read carefully to ensure the product operates safely. We would therefore strongly recommend reading them before starting on installation and keep them for future reference. Call a qualified technician for help if you have any doubts about installing the product.
[IT]-[65]
PRECAUTIONS POUR THERMOSTAT WIFI

ITCS - Intelligent Temperature Control System (adaptive start heating in AUTO mode)
| Thermostat current mode | Pilote wire order | Applied mode |
| AUTO mode (comfort) | Comfort | Comfort |
| Comfort -1° | Comfort -1° | |
| Comfort -2° | Comfort -2° | |
| Comfort -3.5°/reduced | Lower between Comfort -3.5° and 19°C | |
| Antifreeze | Antifreeze | |
| Stop | Stop | |
| AUTO mode (reduced) | Comfort | Reduced setpoint temperature |
| Comfort -1° | ||
| Comfort -2° | ||
| Comfort -3.5°/reduced | Lower between Reduced set point temperature and "Comfort -3.5" | |
| Antifreeze | Antifreeze | |
| Stop | Stop | |
| AUTO mode (derogation) | Comfort | Derogation setpoint temperature |
| Comfort -1° | ||
| Comfort -2° | ||
| Comfort -3.5°/reduced | ||
| Antifreeze | ||
| Stop |
APPLICATIONPOUR MOBILE(SMARTPHONE)
Généralités
Available on the App Store

Get it on Google play
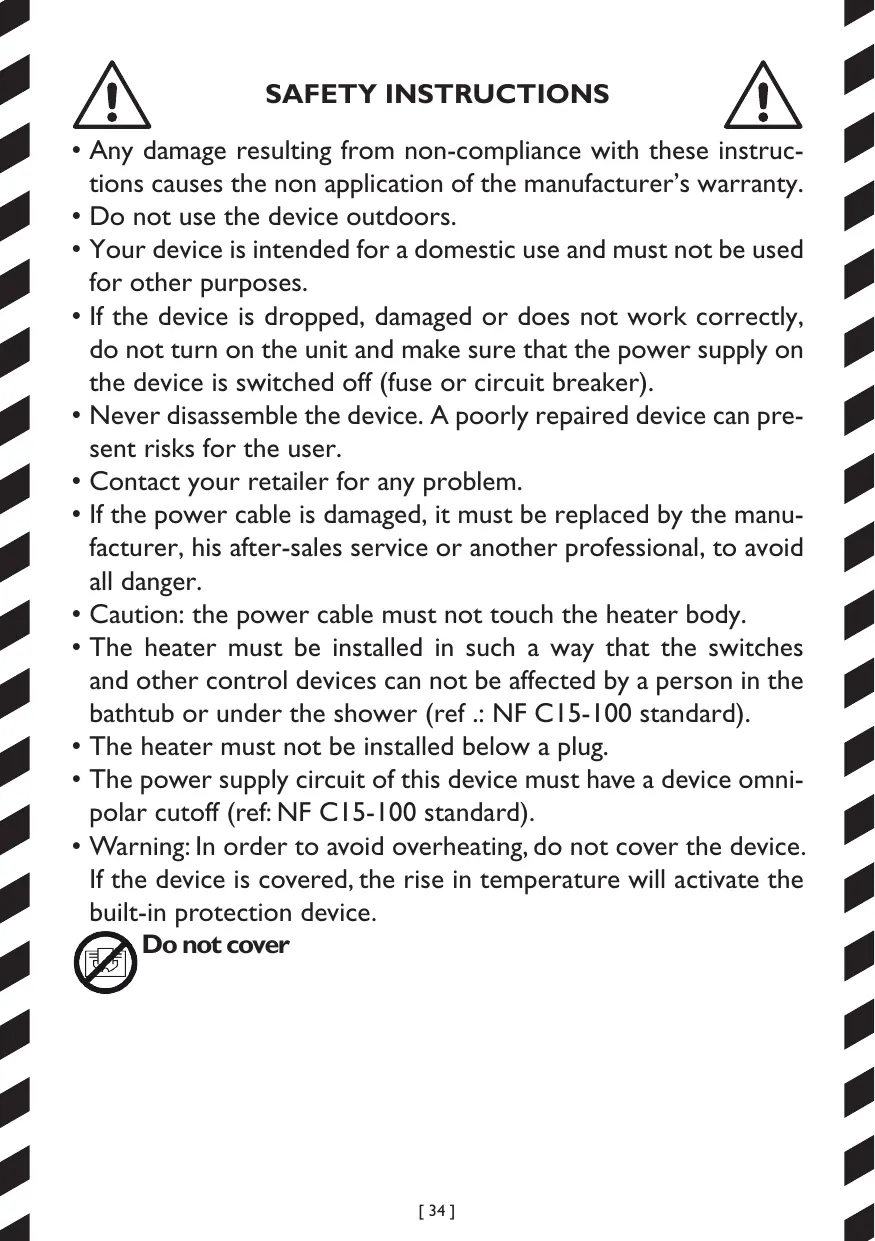
- Any damage resulting from non-compliance with these instructions causes the non application of the manufacturer's warranty.
- Do not use the device outdoors.
- Your device is intended for a domestic use and must not be used for other purposes.
- If the device is dropped, damaged or does not work correctly, do not turn on the unit and make sure that the power supply on the device is switched off (fuse or circuit breaker).
- Never disassemble the device. A poorly repaired device can present risks for the user.
- Contact your retailer for any problem.
- If the power cable is damaged, it must be replaced by the manufacturer, his after-sales service or another professional, to avoid all danger.
- Caution: the power cable must not touch the heater body.
- The heater must be installed in such a way that the switches and other control devices can not be affected by a person in the bathtub or under the shower (ref .. NF C15-100 standard).
- The heater must not be installed below a plug.
- The power supply circuit of this device must have a device omnipolar cutoff (ref: NF C15-100 standard).
- Warning: In order to avoid overheating, do not cover the device. If the device is covered, the rise in temperature will activate the built-in protection device.

Do not cover

WARNING FOR PEOPLE WITH DISABILITIES AND CHILDREN

- This equipment may not be used by people with reduced physical, sensory, or mental capacity, those without any knowledge of the equipment, or children over 8 years of age, unless supervised and instructed on safe use of the equipment, and aware of all the risks.
Children must not play with the equipment. - Cleaning and maintenance tasks must not be done by children without supervision.
- We recommend keeping the device out of reach of children below 3 years of age, unless under constant adult supervision.
- Children between 3 and 8 may only switch the device on and off, providing it is installed regularly in the stipulated position, that the children are under constant adult supervision or have been instructed in the safe use of the equipment, and that they fully understand potential dangers.
- Children between 3 and 8 must not set up, regulate or clean the device, nor undertake maintenance on it.
WARNING
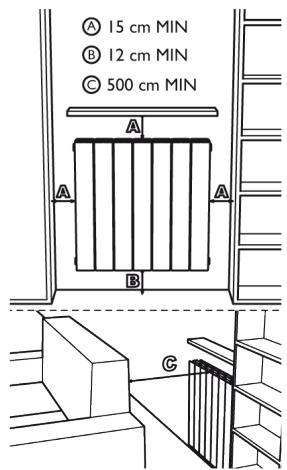
In order to avoid any hazard to young children, it is recommended to install the unit so that the lower radiant bar is at least 600~mm above the floor.
The device allows remote control through a WI-Fl connection
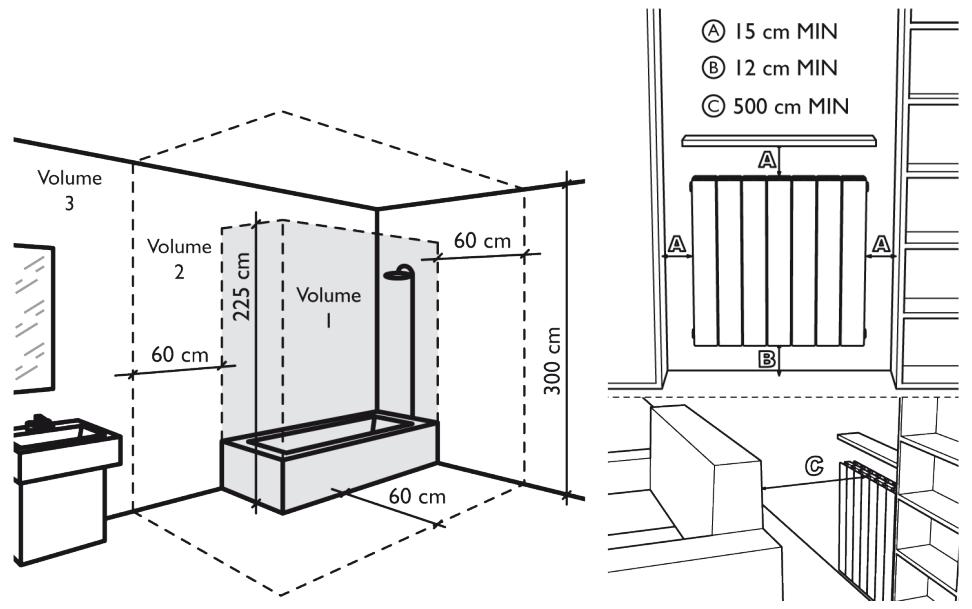
It is mandatory to respect a minimum distance of at least 20~cm from the habitable area for humans.
To lock or unlock the keypad, simultaneously push keys and for 5s.
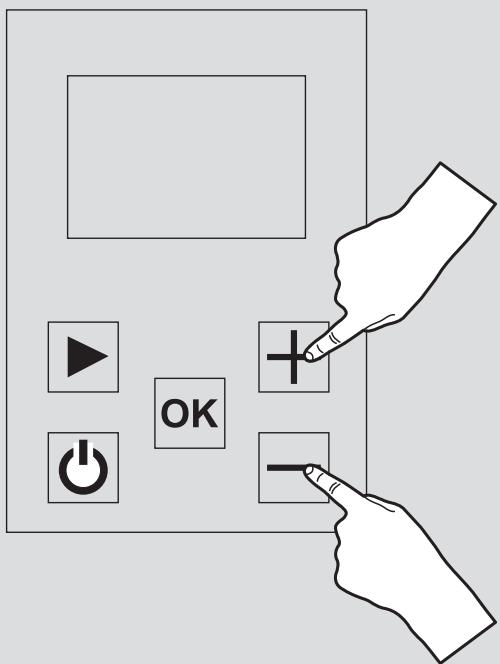
This function is used to lock the keypad, excepting for the On/Off key.
In this mode it is not possible to change the program configuration, the temperature or activate the other functions.
INSTALLING THE DEVICE
Before connecting the heater, turn off the electricity at the general circuit breaker.
- The heater is a class II appliance, so it can be installed in all rooms of the house including in volumes protection 2 and 3 of a bathroom (IP24).
- The heater must be installed 15 ~cm minimum of any obstacle (shelves, curtains, furniture etc.).
POWER SUPPLY AND ELECTRICAL CONNECTIONS
- The power supply to the heater must be protected, according to the standards in force, by a 30mA differential switch and a protection device against overcurrents adapted to the characteristics of the connecting line.
- Before the first use, check that the voltage used corresponds to the one indicated on the device.
- This heater is a Class II appliance (double electrical insulation).
The connection to earth is prohibited. - The three wires must be connected in one electrical connection box complies with the standards in force.
- You must isolate the pilot wire if it is not used.
- Single phase power supply 230 ~V ± 10% 50 Hz.
- Blue / gray thread: Neutral
- Brown Wire: Phase
- Black wire: Pilot wire
POWER SUPPLY AND ELECTRICAL CONNECTIONS
Use the product as shown in Figure 1. Do not ever put towels or clothing on the outer frame (figure 2). Incorrect use may cause dangerous overheating and compromise the operation of the device.
To clean the unit, do not use any chemicals, but use a damp, nonabrasive cloth.
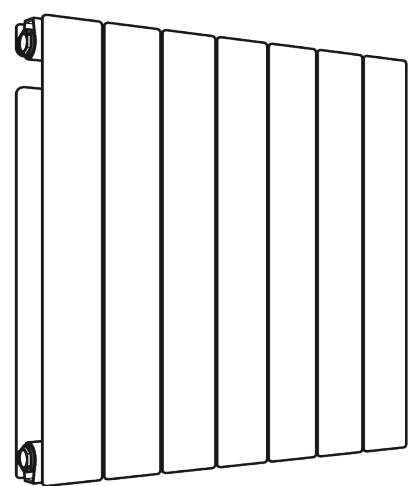
1
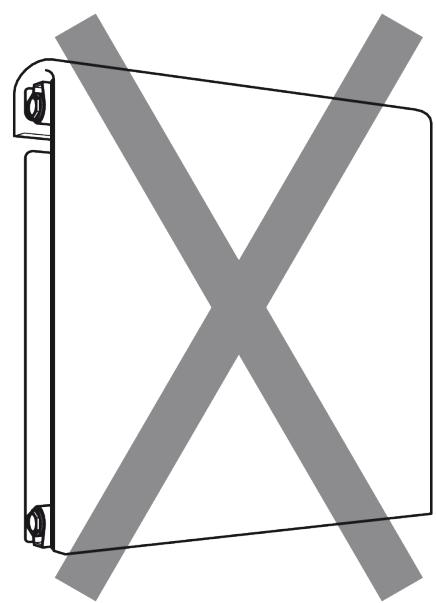
2
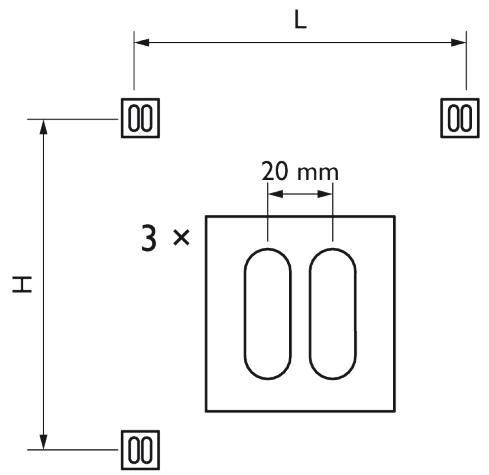
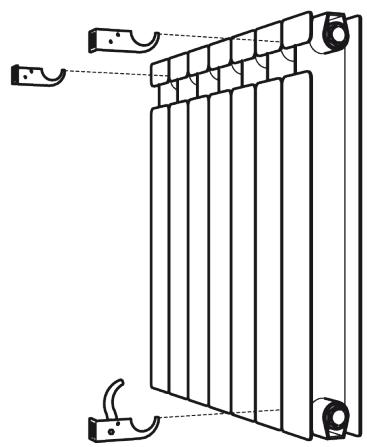
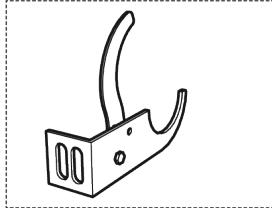
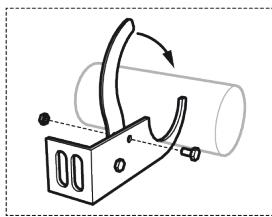
FIXINGS THE WALL BRACKETS
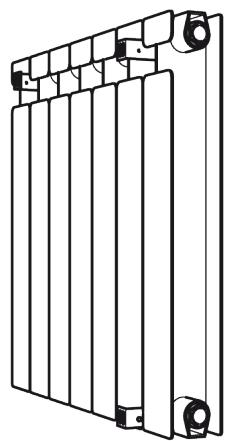
- Before mounting the radiator to the wall, check that the distances shown in the drawings "INSTALLING THE DEVICE" are respected (see p.5).
- Determine by looking at the table here below your radiator model and respect the heights and width indicated to mount the wall brackets For help with installation, refer to drawings I and 2 (see next page).
| Potenza | H | L | Fixing |
| 900 W | 500 mm | 260 mm | 3 |
| 1500 W | 500 mm | 500 mm | 3 |
| 1800 W | 500 mm | 660 mm | 3 |
| H = Height fixing holes L = Width fixing holes | |||
- Secure the brackets to the wall using cleats (not supplied) adapted to the wall structure on which the radiator is positioned.
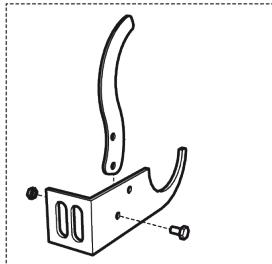
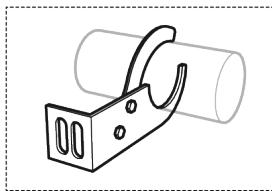
- Once fixed, close the security system with the screws as indicated on drawing 3 (see next page)..
NOTE
Screws and tiles are not supplied
1
2
3
USER INTERFACE FEATURES
Display
The display is backlit.
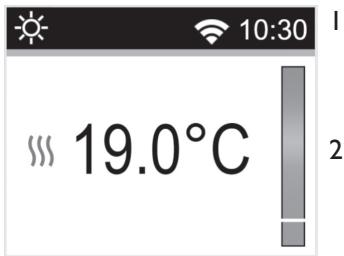
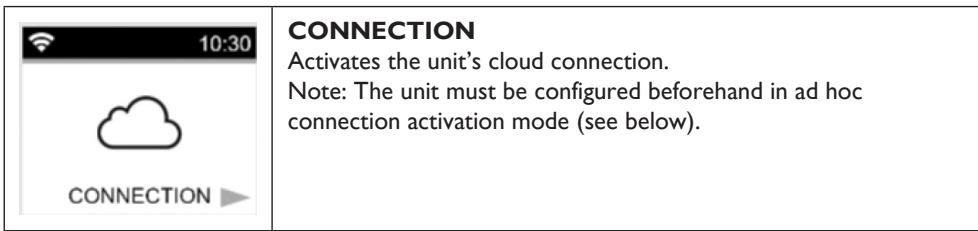
I - Information on the operating mode/thermostat menu, time and WiFi connection.
2 - Information on:
- Thermostat operating mode: temperature setting, behaviour indicator, measured temperature, radiator heating indicator.
- Parameter setting: Display of the actual value of the settings made.
-Programme selection for mode AUTO.
The keypad has 5 keys:
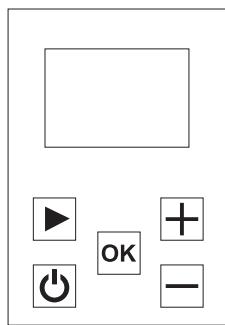
| ON / OFF button (Heating on / off) | |
| minus key | |
| Validation button | |
| Plus key | |
| Navigation key |
FIRST SWITCHING ON AND INSTALLATION
When the thermostat is switched on or after the unit has been reset/reset, this first screen is displayed.
The number corresponds to the software version of the unit.
The second screen depends on the status of the thermostat:
- The first time the unit is started, the user will be able to directly configure the WIFI connection, the date and time of day.
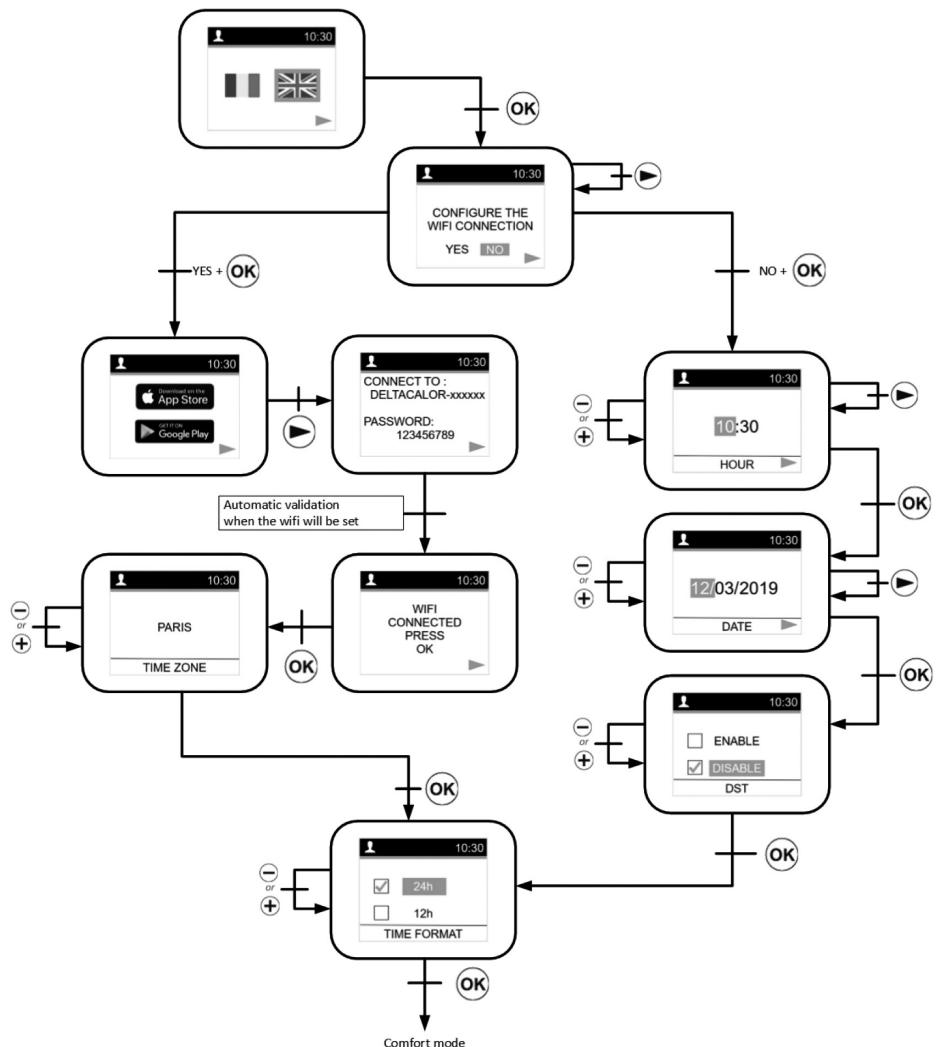
To configure a radiator and associate it to your WIFI network with the "DELTACALOR CONFORT" application go to page 60.
After a power cut, this will be the screen page of the current mode.
After a unit reset or a very long power cut, the screen page of the modification time will be displayed.
MODE SELECTION MENU
To change the current mode of the thermostat, the user must press the right navigation key to access the menu selection.
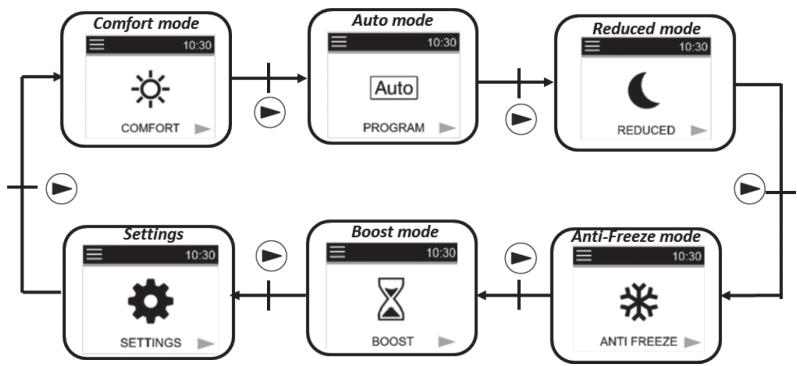
The user moves the frame cursor to select a working mode.
To select a mode, press OK.
Confirm the selected mode by pressing the key otherewise the thermostat will automatically return to the last selected mode ,Auto.
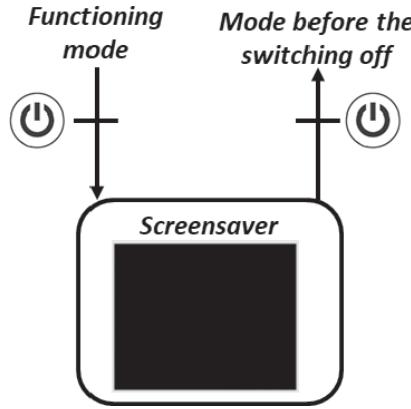
By touching , users can access the heating on/off mode immediately:

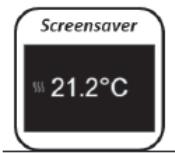
If there is no activity on the keypad for 5 to 10 seconds, a screen saver is displayed
This screen saver could be the value of the measured or zero temperature:

Definition of operating modes
Comfort mode
In this mode, temperature of the comfort setting will be followed all the time. On the screen saver (backlighting on), if you press the key + or + , keys, the set temperature for comfort starts flashing and you can change it. If you press the 0 key or wait 15 seconds without taking any action, the value of the setting is confirmed. This setting will be used in Auto mode during the high phase of the selected programme. From the screen saver (backlight on) if you press OK
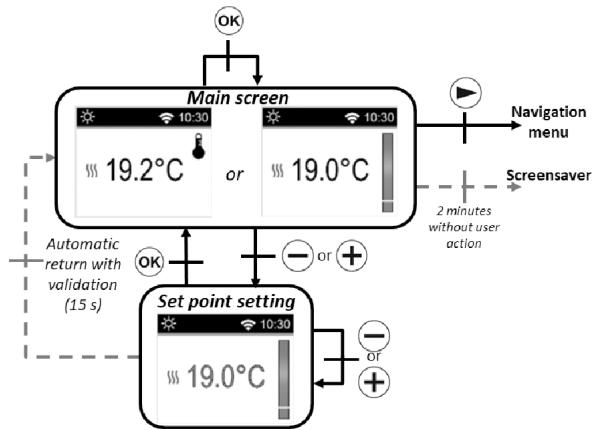
you can switch the display from the measured temperature to the set temperature
If you press the , key, the navigation menu will be displayed.
If you press the , key, the thermostat is deactivated.
Preset value: 19^
Interval: 10^ to 30^ . (the maximum value can be changed in the settings menu).
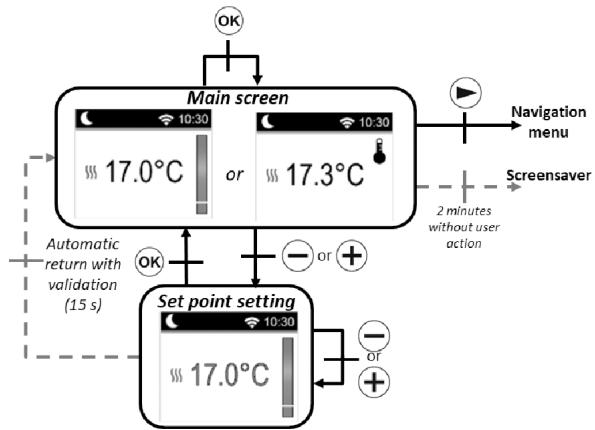
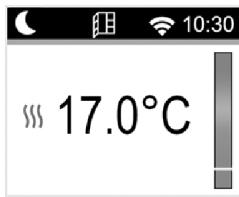
Eco mode C
In this mode, the unit operates at a reduced configured temperature. On the screen saver (backlighting activated), if you press on key or + , the reduced configuration temperature starts flashing and you can change it.
If you press the OK key or wait 15 seconds without taking any action, the value of the setting is activated.
This setting will be used in mode Auto during the high phase of the selected programme C.
On the screen saver (backlight on),
the key allows you to switch the display to from the measured temperature to the set temperature
If you press the , key, the navigation menu will be displayed.
If you press the , key, the thermostat is deactivated.
Preset value: 17^
Range: 5.0^ to 19^ (or 0.5^ lower set temperature if lower).
Automatic mode Auto
In this mode, the thermostat will follow the chosen programme (from P1 to P9 integrated or from UI to U2 customised) according to the real time and the Comfort and reduced set temperature.
On the main screen, the key OK enables you to switch from the display of the measured temperature to the set temperature.
If the user presses the keys and , they can ignore the temperature of the current programme for up to 2 hours by changing the value. The value starts flashing and can be changed.
If you press the key or wait 15 seconds without taking any action, the value of the setting is confirmed. The symbol of a hand is displayed when the
override function is activated. This override continues until the next
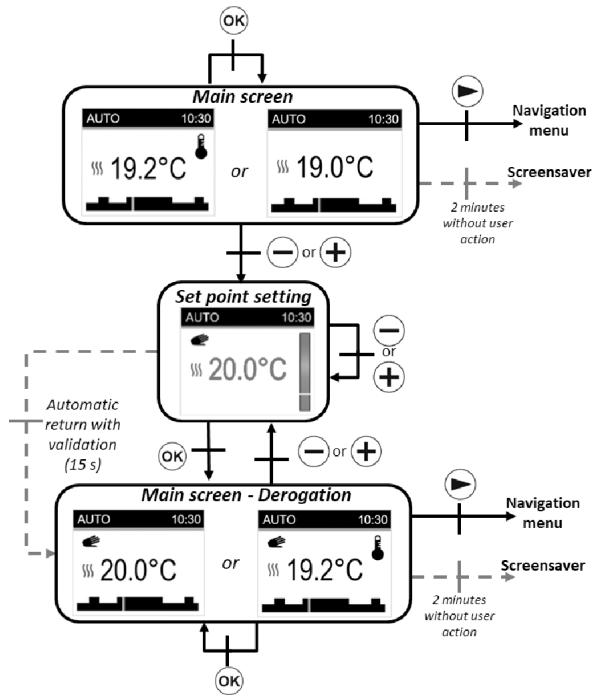
phase (the programme switches to another temperature setpoint) or for a maximum of 2 hours.
If you press the , key, the navigation menu will be displayed.
If you press the , key, the thermostat will switch off.
Frost protection mode
In this mode, frost protection, the temperature setting will be monitored all the time. On the main screen, if you press the and , keys, the frost protection temperature setting will start to flash and can be changed. If you press the OK key or wait 15 seconds without taking any action, the setting point of the value is confirmed. On the screen saver (backlighting activated), OK you can change the measured temperature display to the set temperature.
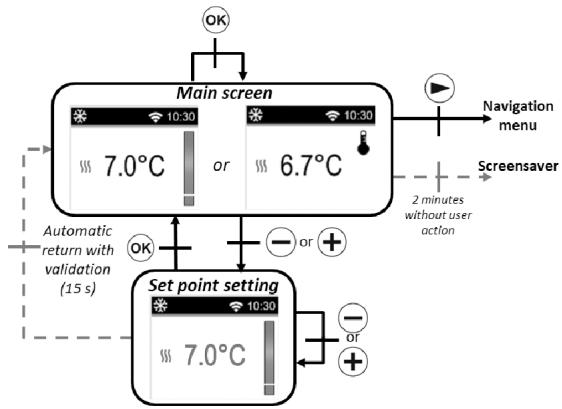
If you press the key, the navigation menu is displayed. If you press the ikey, the thermostat is turned off.
Preset value: 7^ Interval: from 0.5^ to 10^ .
Heating Off mode
In Heating Off mode, the symbol is displayed in OFF mode
After pressing one of the 4 key (o o - o + o), the measured temperature is displayed.
After a few seconds, this information is no longer displayed.
This mode applies a zero reference temperature.
If you press the , key, the thermostat reactivates in the last selected mode.
Boost mode
This mode allows users to increase the heating with the set maximum temperature for a preset time interval.
Time configuration:
The time value is set using the and ^+ keys. The key is used to confirm the time value and the period for which the temperature increases rapidly
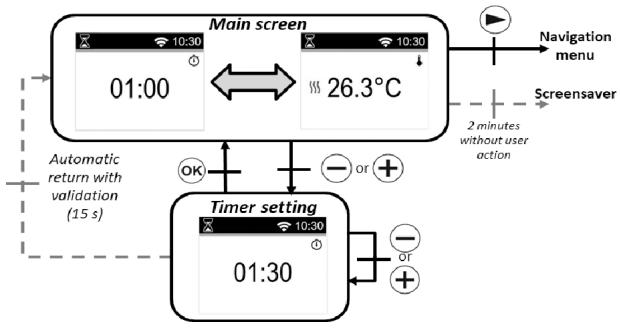
Preset value: I hour
Interval of values: 30 minutes, from 1 hour to 24 hours, 1 hour intervals.
When the boost is activated, the remaining time and the measured temperature are displayed. If you press or + you can change the settings.
If you press for one second you will access the menu for selecting the mode.
If you press ⑥ you stop the unit and reset the timer.
Definition of the "CONFIGURATION" menu
When the user accesses the "CONFIGURATION" menu, they can choose between different groups of settings or actions:
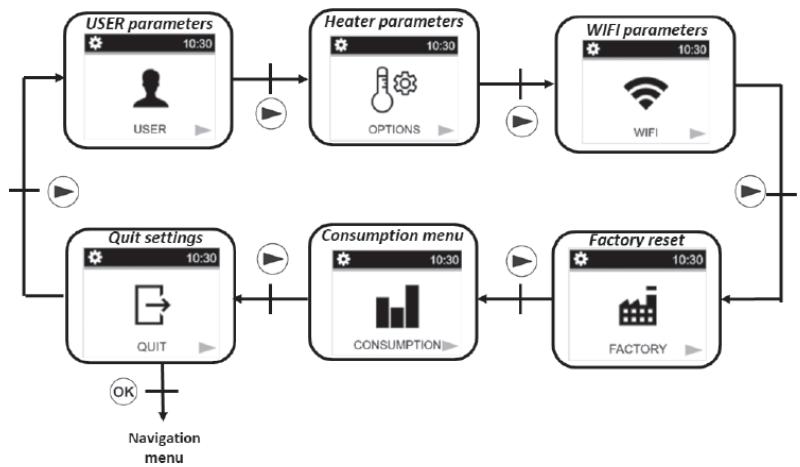
To select a menu, the user must press the OK. key. Navigation is performed via the . key. To exit the settings menu, the user must choose the "EXIT" setting and press the OK key.
Another way to exit the settings menu is to press without releasing the key for a few seconds.
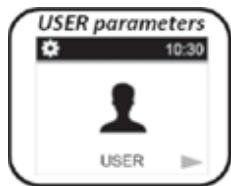
User settings
The setting configuration menu is selected by pressing the key. The configuration is done by pressing the OK key. To exit the settings menu, select the "EXIT" setting and press the OK key.
Another way to exit the settings menu is to press and hold the key for a few seconds.
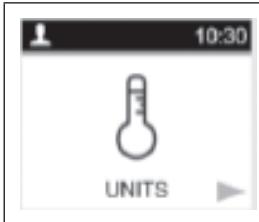
Degrees measurements units «UNITS»
Preset value: ^ C (Celsius) Other choice: ^ F (Fahrenheit)
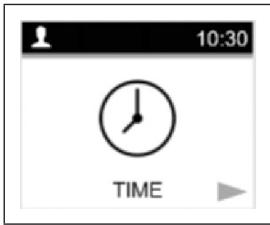
Menu «DATE AND TIME» to configure the time and date.
There are two ways to configure the time and date of the thermostat depending on the WIFI status (activated or not):
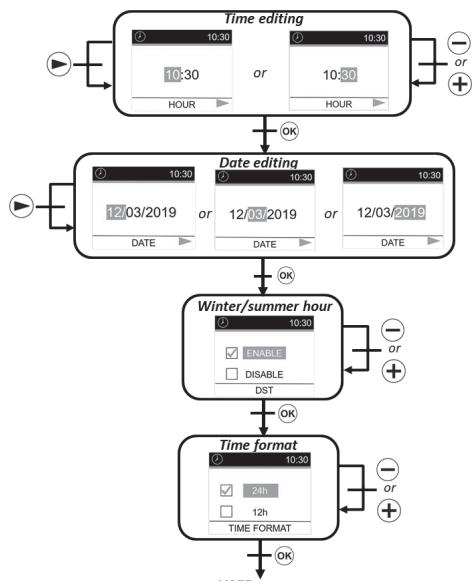
FIRST METHOD: WIFI OFF
Changing the time:
Select the hours and minutes with . Change the number of the values with keys and + Confirm your settings with the key.
Time format:
Select the 24H or AM / PM format with the and ^+ keys. Confirm your configurations with key.
Automatic time change:
Select whether the time change (summer/ winter time) will take place automatically or not using and ^+ .keys. Confirm your settings with the key OK.
Changing the date:
Select the day or month or year with Change the values with keys and ^+ keys. Confirm your settings with the key OK.
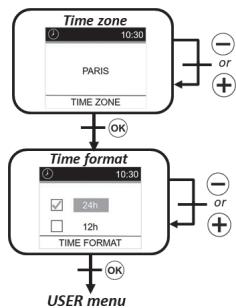
SECOND METHOD: WIFI ON
Time zone:
Select the world time zone with the and . keys. Confirm your settings with the key OK
Time format:
Select the 24H or AM/PM format with the and ^+ keys. Confirm your settings with the key OK
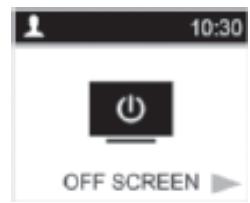
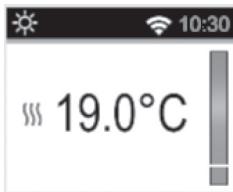
VIDEO SCREEN OFF
When no mode is active, the screen appears as below:

Default value: none
Other choice: Measured temperature (7h00 to 23h00)

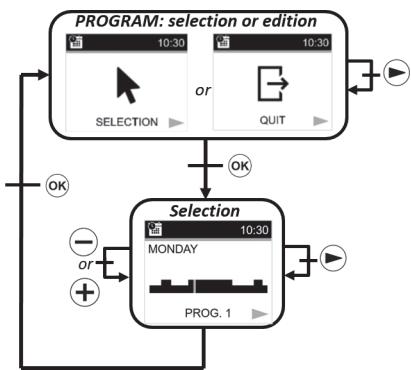
Program
this menu allows you to select the programming to be applied in auto mode AUTO.
Program:
Select "Selection" with the . Confirm your settings with the key OK
Selection:
Select the programme number with the key SSelect the day with the keys and keys. Confirm your settings with the key OK

Language selection
Default value: English
Other choice: French, Italian, German and Spanish
Heater options and settings
To select the setting configuration menu, press the . Lkey. The configuration is done by pressing the OK key.
To exit the settings menu, the user must choose the setting
"EXIT" and press the OK. key. Another way to exit the settings menu is to press and hold the OK key for a few seconds.
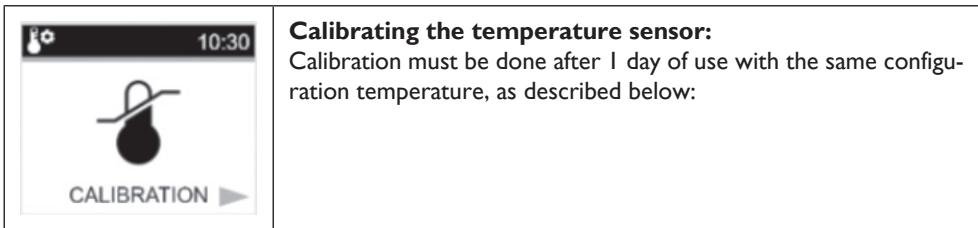
I. Place a thermometer in the room, at the same distance from the floor as the thermostat. Check the actual room temperature after 1 hour.
2. Enter this value in the calibration settings menu using the keys and ^+ to enter the actual value.
3. Press OK to confirm the calibration.
| 10:30 POWER | Heating power This setting corresponds to the power of the heater. This setting must be configured to calculate the energy consumption and to select the setting parameters. Preset value: 900 Other options: 1000, 1500, 1800, 2000 |
| 10:30 POWER LIMIT | Power limit This setting allows the radiator power to be reduced manually. Preset value: NO (100%) Other options: NO (100%)/75%/50% |
| 10:30 SETPOINT BOOST | Boost temperature programming Temperature setting when the boost control is active. Preset value: 30°C Other options: 20°C to 30°C |
| 10:30 ROOM LIMIT | Room temperature limitation Limitation of the maximum room temperature that can be set remotely. Preset value: 30°C Other options: 20°C to 30°C |
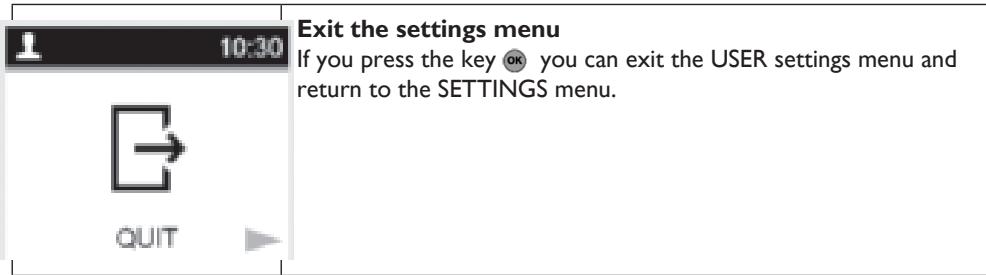
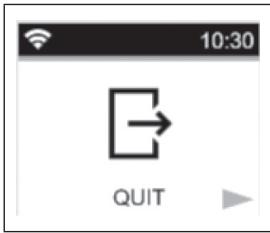
| 10:30 QUIT | Exit the Settings menu If you press the OK key you can exit the settings menu and return to normal operation |
WIFI settingd
To select the setting configuration menu, press the .key. The configuration is done by pressing the OK key.
To exit the settings menu, the user must choose the setting "EXIT" and press the key. Another way to exit the settings menu is to press and hold the key for a few seconds.

EXIT THE MENU
Press the button OK to exit the WIFI menu.
Reset to factory settings
All thermostat settings will be loaded with the factory settings.
If you press the , key, the thermostat resets the settings to the factory default settings.
The thermostat is reset to the predefined factory settings:
Nominal temperatures;
- SETTINGS;
- Reset the time;
Energy consumption;
WIFI settings.
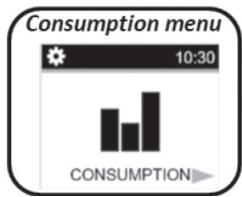
Consumption recording menu
This mode is only available if the radiator power has been configured by the user.
Press to change the time interval for the power consumption display (last 24 hours, last 7 days and lasts 30 days).
If you do not press any key, the thermostat will return
automatically to the previously selected mode.
Press OK to return to the Menu CONFIGURATIONS.
If you press or + for a few seconds, the power consumption values are restored.
Another way to exit the settings menu is to press and hold the key for a few seconds. If you press you stop the unit.
The estimated values are saved in the memory every 4 hours and every time the user displays this menu.
If POWER OFF is active, the values are maintained for the next 12 hours.

Description of the integrated program
- P1: morning (7h-9h), evening (17h-23h), and weekend (8h-23h)
P2: morning (7h-9h), noon (12h-14h), evening (18h-23h) and weekend (8h-23h)
P3: day (6h-23h), Saturday (7h-24h) and Sunday (night (0h-1h), day (7h-23h))
P4: evening (15h-23h) and Saturday (7h-24h) and Sunday (night (0h-1h), day (7h-23h)) - P5: morning (6h-8h), evening (21h-23h) and Saturday (morning 7h-9h), evening 18h-24h) and Sunday (morning (7h-9h), evening (18h-23h))
P6: morning (6h-8h), noon (14h-21h) and weekend (7h-21h)
P7: office from Monday to Friday (7h-19h) and weekend (off)
P8: Warehouse: from Monday to Friday (8h - 19h) and Saturday (8h - 18h) and Sunday (off)
P9: Second house: from Friday (1pm) to Monday (7am)
Backup of settings
This thermostat automatically saves its data (set point values, user programme and settings) when:
I. The user confirms the changes made to the settings by pressing the confirmation button.
2. The unit's backlighting is switched off.
It also saves the estimated values of its energy consumption:
I. Every 4 hours
2. When the user enters the consumption mode
Special functions
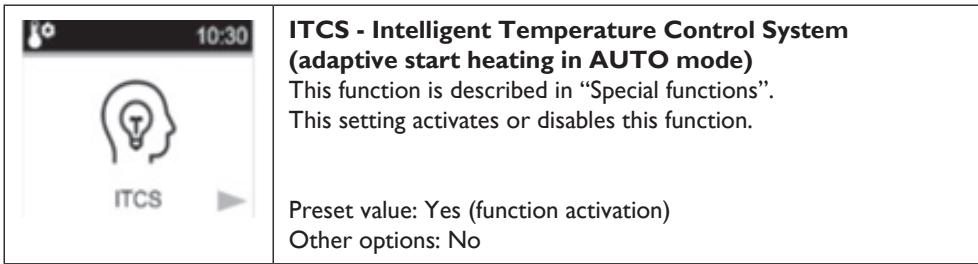
ITCS: Intelligent temperature control system
This function can be activated using the "ITCS setting" in the settings menu (see chapter menu setting "Settings menu").
This function allows you to activate your system in advance (2 hours maximum) when your thermostat is in Auto mode. This function ensures the required temperature at the scheduled time according to your weekly programme.
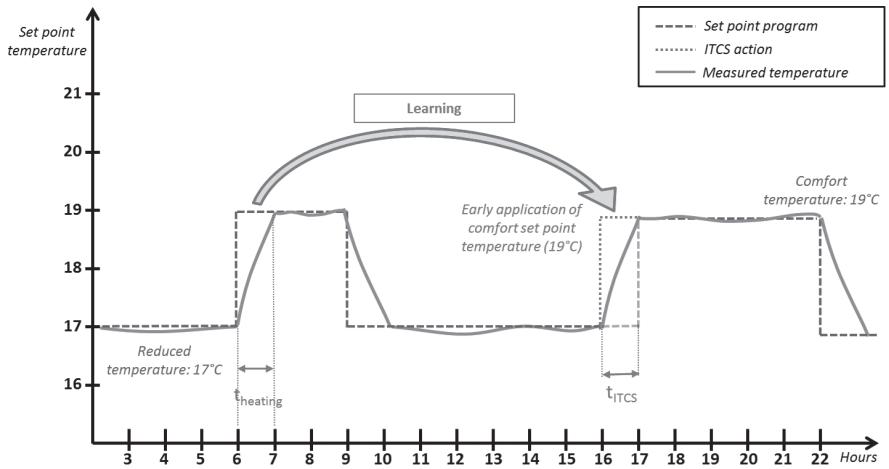
To operate, the ITCS system automatically performs several time and temperature measurements. The objective is to estimate a heating rate for the system. With this value, the system can calculate the heating activation time in advance.
When the thermostat is switched on for the first time, a default time for reaching the set temperature is applied. This value will be adjusted by new measurements each time the programme is changed to compensate for changes in the outdoor temperature. Afterwards, the thermostat can be programmed without adjustment because it will do so automatically.
When the system performs an adaptive start, a hand logo is displayed on the screen.
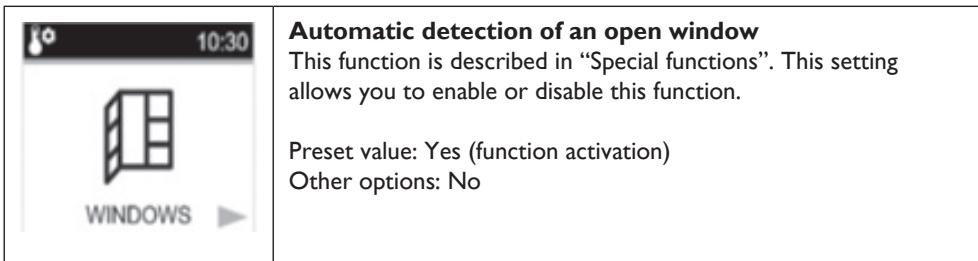
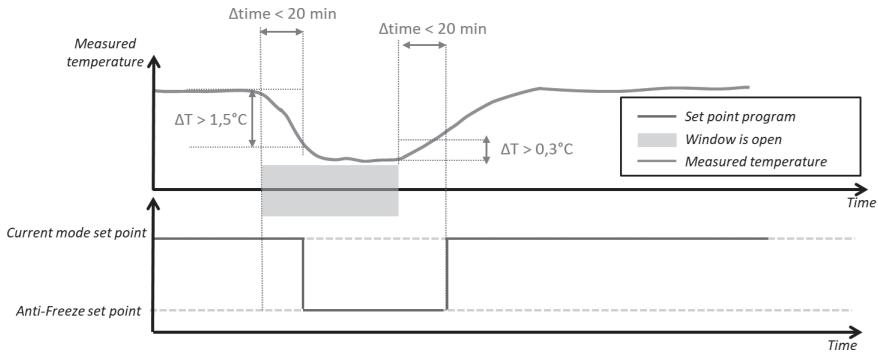
Open window detection
This function can be activated with the "window setting" in the menu setting.
This function is performed by measuring and recording the temperature development over the last 20 minutes:
- First step - Window open activated: the thermostat switches to the "Window open" (status (and the temperature value flashes) when the temperature has dropped
- by more than 1.5^ C in the last 20 minutes, when the unit was switched on and is heating.
Second step: for 20 minutes, if the temperature exceeds 0.3^ , the window opening status is cancelled and the remote control automatically returns to the current mode setting
Saving data in the event of prolonged power failure
This unit can maintain the time countdown for up to 12 hours after a power failure.
If the power failure lasts too long, the time and date will be reset to the factory settings. You will need to reset these value
Keyboard lock
To activate this function, you must press the or keys simultaneously for 5 seconds. All the keys are locked except the heating On / Off key.
This function is accessible in any mode. The icon is displayed on the screen:
To unlock the keypad, you must repeat the same procedure. NOTE: In the event of a power cut, the configuration is maintained.
Pilot wire control mode
| Pilot wire command | Screen | Pilot wire command | Screen | |
| Comfort | AUTO 10:30 19.0°C 0 6 12 18 24 | ECO | AUTO 10:30 19.0°C 0 6 12 18 24 | |
| Comfort-1° | AUTO 10:30 19.0°C 0 6 12 18 24 | Frost protection mode | AUTO 10:30 19.0°C 0 6 12 18 24 | |
| Comfort -2° | AUTO 10:30 19.0°C 0 6 12 18 24 | Stand-by | AUTO 10:30 19.0°C 0 6 12 18 24 |
Priority in pilot wire sequences
| Mode set on the thermostat | Pilot wire control mode | Actual mode set |
| MODE AUTO (comfort) | Comfort | Comfort |
| Comfort -1°C | Comfort -1°C | |
| Comfort -2°C | Comfort -2°C | |
| Comfort -3.5°C / eco | Lower value between Comfort -3.5°C and 19°C | |
| Antifreeze | Antifreeze | |
| Stop | Stop | |
| MODEAUTO (eco) | Comfort | Temperature set in ECO mode |
| Comfort -1°C | ||
| Comfort -2°C | ||
| Comfort -3.5°C / eco | Lower value between the temperature set in ECO mode and "Comfort -3.5 °C" | |
| Antifreeze | Antifreeze | |
| Stop | Stop | |
| MODE AUTO (manual) | Comfort | Manually set temperature |
| Comfort -1°C | ||
| Comfort -2°C | ||
| Comfort -3.5°C / eco | ||
| Antifreeze | ||
| Stop |
If the open window detection is activated and this function detects the opening, the thermostat follows the rules described in the paragraph "Open window detection". The thermostat displays the value of the set temperature applied to the heater. It takes into consideration the order of priority shown above.
Description of errors
If the sensor is turned off or disconnected, an error message will appear on the thermostat display.
| Sensor problem | 10:30 XXX -°C | the message «-» is accompanied by the icon flashing and the logo on the display. |
| WIFI connection problem | 10:30 XXX 6.0°C | The WIFI logo is red |
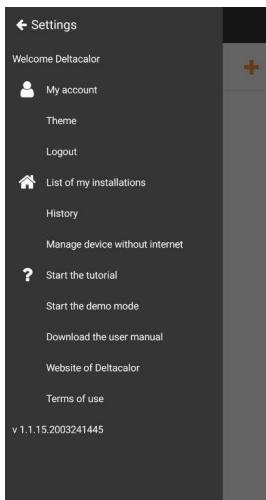
SMARTPHONE APPLICATION
General information
The application is only available for the iOS and Android platforms.

Available on the App Store

Get it on Google play
The application allows you to configure the WIFI component and remotely control the radiator. First of all download the free application
"DELTACALOR COMFORT"

on your mobile (smartphone).
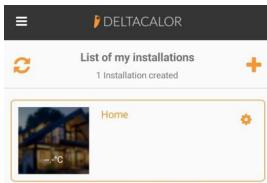
With the application the user can add a device to the application and configure the WIFI network.
- Click on "list of my installations" to show the existing installation or add a new installation.
- Click "more" to add a new device
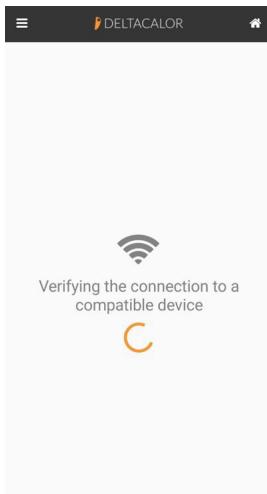
- Wait for the WIFI to connect.
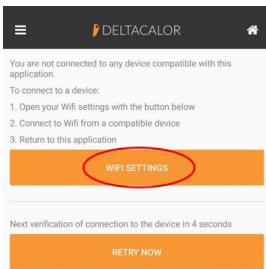
- If the smartphone is not connected to the unit, access the phone's WIFI settings by clicking WIFI setting. Then return to the application.
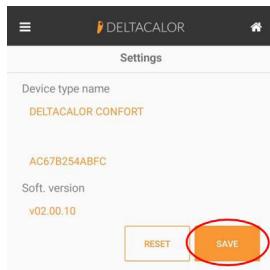
- Save the configuration
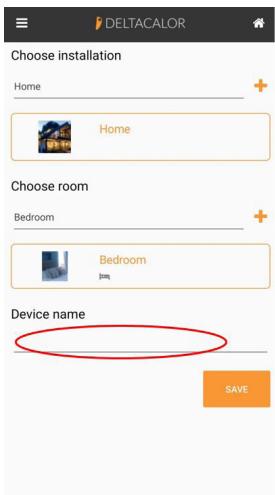
- Create the installation, the new room and add the name of the device.
- Connect the unit to the Internet, select the network and enter the password.
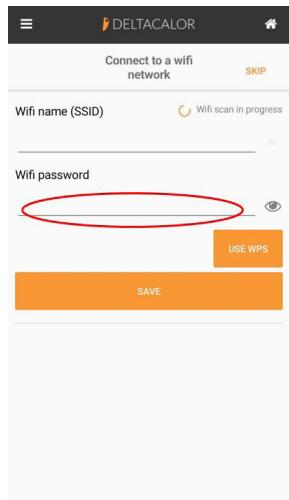
- Press the key until the device network configuration is complete.

- You can be in Eco mode, Frost protection mode, or Auto mode with a reduction imposed by the power manager. Switch to Permanent Comfort mode or increase the setting.
- Check that your appliance is not near an air intake.
- Check that the set temperature has not been changed
TROUBLESHOOTING
The device does not heat enough
- The device could be set in ECO MODE or ANTI FREEZE. You should set the COMFORT mode or increase the setting temperature
The device heats continuously
- Check the position where the heater is installed: it should be far from any air flow.
- Check to be set the proper temperature.
If the problem persists you should interrupt the power supply to the heater and wait for one minute at least before turning it back on. If the problem persists again, please contact the technical assistance.
VIDEO TUTORIAL

Follow the instruction manual for pairing the Wi-Fi thermostat or watch the video tutorial linked to the QR code here at the side.
TECHNICAL FEATURES
| Product | Electric radiator |
| Application | Domestic use |
| Insulation class | CLASS II |
| IP Class | IP24 |
| Plastic color | White |
| Power cable color | White |
| Temperature selection | Numeric |
| Adjustment mode | Numeric with 5 buttons |
| Operating mode | Comfort, Night, Antifreeze, ECO, Chrono, Vacation, Open window detection, Child protection, Adaptive start control, Key lock |
| Temperature range | 0.5 + 30°C |
| Maximum power | 1800W |
| Frequency band | 2400MHz to 2484MHz |
| Supply voltage | 230Vac 50Hz |
| Electric connections | 3 cables: neutral (gray), phase (brown), Pilot wire (Black) |
| Warranty | 2 anni |
| Standard | EN 60335-1 EN 60335-2-30EN 61000-3-2 EN61 000-3-3EN 62233EN 55014-1 EN 55014-2NFC 15-100 |
Manufacturer: DELTACALOR s.r.l
Instruction manual available on the site:
https://www.deltacalor.com/en/download/
The symbol placed on the device indicates the obligation to dispose of the device by entrusting to a specialized selective collection center, in accordance with Directive 2012/19 / EU. If the device needs to be replaced, it can be returned to the dealer. This device does not belong to the category of ordinary household waste. By eliminating it correctly you participate in protecting the environment and limiting the exploitation of natural resources.
Declaration of conformity: The manufacturer declares, under his exclusive responsibility,
that the product concerned by this manual conforms to the prescriptions of the
Low Voltage Directives 2014/35 / EU, EMC 2014/30 / EU and RoHS 2011/65 / EU.

Model reference (s): MONZA
| mode 1000W | |||
| Features | Symbol | Value | Unit |
| Thermal power | |||
| Nominal heat output | Pnom | 0.9 | kW |
| Minimum heat output (indicative) | Pmin | n.d. | kW |
| Maximum continuous heat output | Pmax,c | 0.9 | kW |
| Auxiliary electricity consumption | |||
| At nominal heat output | elmax | 0.9 | kW |
| At minimum heat output | elmin | n.d. | kW |
| In economy mode | elsb | <0,0005 | kW |
| mode 1500W | |||
| Features | Symbol | Value | Unit |
| Thermal power | |||
| Nominal heat output | Pnom | 1.5 | kW |
| Minimum heat output (indicative) | Pmin | n.d. | kW |
| Maximum continuous heat output | Pmax,c | 1.5 | kW |
| Auxiliary electricity consumption | |||
| At nominal heat output | elmax | 1.5 | kW |
| At minimum heat output | elmin | n.d. | kW |
| In economy mode | elsb | <0,0005 | kW |
| mode 2000 W | |||
| Features | Symbol | Value | Unit |
| Thermal power | |||
| Nominal heat output | Pnom | 1.8 | kW |
| Minimum heat output (indicative) | Pmin | n.d. | kW |
| Maximum continuous heat output | Pmax,c | 1.8 | kW |
| Auxiliary electricity consumption | |||
| At nominal heat output | elmax | 1.8 | kW |
| At minimum heat output | elmin | n.d. | kW |
| In economy mode | elsb | <0,0005 | kW |

APPLICAZIONE PER DISPOSITIVI MOBILI (SMARTPHONE)
Available on the AppStore

Get it on Google play
https://www.deltacelor.com/customer-care/downloads/
Available on the App Store

Get it on Google play