BORNEO - Fan DOMAIR - Free user manual and instructions
Find the device manual for free BORNEO DOMAIR in PDF.
User questions about BORNEO DOMAIR
0 question about this device. Answer the ones you know or ask your own.
Ask a new question about this device
Download the instructions for your Fan in PDF format for free! Find your manual BORNEO - DOMAIR and take your electronic device back in hand. On this page are published all the documents necessary for the use of your device. BORNEO by DOMAIR.
USER MANUAL BORNEO DOMAIR
MANUEL D'UTILISATION
Read all the instructions carefully before using the product.
CONTENTS
| Safety Instructions | 18 | Oscillation | 22 |
| Assembly | 20 | Maintenance | 22 |
| Operation | 21 | Technical data | 23 |
| Tilt | 22 | Warranty card | 24 |
SAFETY INSTRUCTIONS
- Read the instructions in this manual carefully as they provide important safety information regarding installation, use and maintenance. Carefully STORE THIS MANUAL FOR FUTURE USE.
- Remove the packaging and make sure that the appliance is not damaged. When in doubt, do not use the product and contact your dealer.
- Do not turn this fan on if it is damaged or defective.
- Do not let your children play with the packaging items (such as plastic bags).
- Before connecting the product, make sure that the data on the identifying plate (grey sticker on the appliance) corresponds to that of your domestic electrical network.
- Only use the fan in the conditions described in this manual. Any other use is not recommended and may result in fire, injury or electrocution.
- This appliance may be used by
children 8 years of age or older and by persons with reduced physical, sensory or mental abilities, or lack of experience or knowledge, if they are properly supervised or given instructions on the safe use of the appliance and the risks involved have been addressed. Children should not play with this appliance. Cleaning and maintenance must not be carried out by children without supervision.
- Before handling or moving the appliance, be sure that it is unplugged.
- Take the plug and remove it to disconnect it from the power supply. DO NOT PULL ON THE CORD.
- Do not insert objects of any kind into the grille while the appliance is running, THIS COULD CAUSE SERIOUS INJURY.
-
The operation of any electrical appliance must be monitored continuously if in the presence of children. This appliance is not a toy.
-
Do not use the appliance in humid areas, in areas where the temperature exceeds 40^ or in dusty areas.
- Do not allow a baby or an unwell person to be exposed to the front of the appliance for a long period of time without interruption.
- Make sure the location of the appliance is stable.
- This appliance is intended for household use only. Any maintenance, other than cleaning or routine maintenance performed by the user, must be carried out by a qualified electrician.
- If the front grille is removed for cleaning operations, make sure the fan is disconnected from the mains before removing this protector.
- The use of any electrical appliance involves observing some basic rules: DO NOT TOUCH THE APPLIANCE WITH DAMP OR WET HANDS OR FEET - DO NOT USE THE APPLIANCE OUTSIDE - DO NOT PULL ON THE POWER CABLE OR THE APPLIANCE ITSELF TO DISCONNECT THE PLUG FROM THE POWER SOCKET.
- Do not use the appliance in the immediate vicinity of bathtubs, washbasins, showers, swimming pools, etc.
-
The use of this appliance in volume 0, 1 or 2 of a bathroom is strictly prohibited.
-
Do not immerse the appliance in water.
- To reduce the risk of fire or electric shock, do not disassemble the appliance.
- There is no reason to open this appliance to find anything that you believe maybe useful because it does not contain anything like that.
- Only authorised personnel may perform the repair work.
- This appliance is strictly reserved for domestic use.
If the power cable is damaged, it must be changed by the manufacturer, its maintenance department or a similarly qualified person to avoid a potentially hazardous situation.
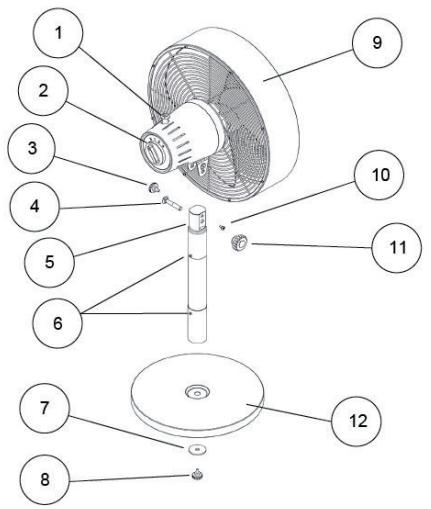
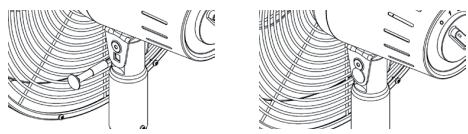
- Control of oscillation
- On/Off button + speed selector
- Tilt lock button
- Tilt adjustment bolt
- Top of the foot
- Leg of the foot
- Washer
- Base mounting screw
- Assembled head
- Tilt lock screw
- Tilt adjustment button
- Base
INSTALLING THE FOOT
1- Remove the tilt adjustment bolt 4 by unscrewing the knurled knob 11.
2- Remove the screw and washer from the bottom of the foot's leg.
Note: The screw 7
and the washer 8 may be delivered separately in a plastic bag.
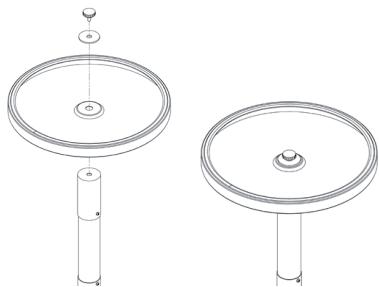
3- Assemble the foot's leg on the base. Do not forget to position the washer 7 as shown in the drawing.
4- Secure the base by firmly tightening the screw 8 by hand.
5- Flip the foot over and place it on its base on a flat, stable surface.
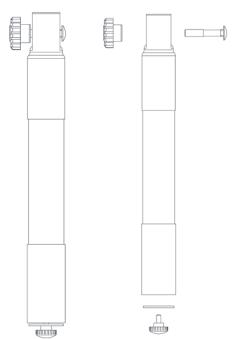
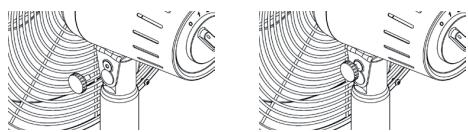
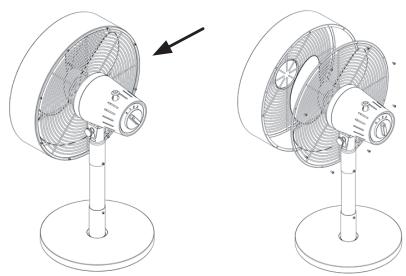
INSTALLING THE HEAD ON THE FOOT
Using a Phillips screwdriver, remove the small locking screw 10. Then remove the lock button 3.
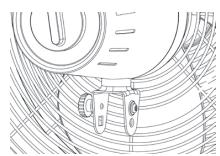

NOTE: It is important to correctly orient the leg of the foot and the fan head during assembly.
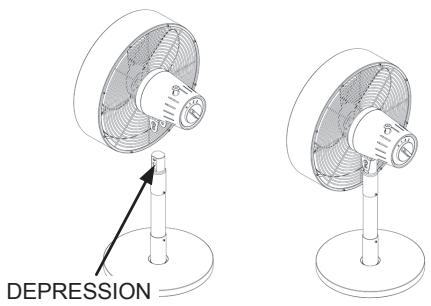
On the upper part of the leg of the foot, on one side there is a small horizontal depression. And on the other side a small horizontal opening too.
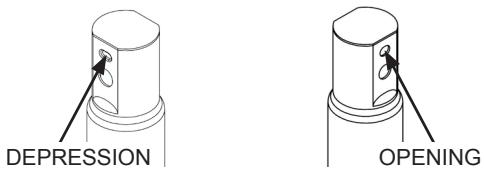
The side with the opening makes it possible to screw the small locking screw 10.
The side with the depression allows the tightening of the locking button 3.
Snap the head support onto the top of the foot, matching the holes to receive the screw and the lock button.
IMPORTANT!
Observe the following assembly order:
- Pass the tilt adjustment bolt 4 through the head and foot support. The head of the tilt adjustment bolt has a square: it must be embedded in the support.
- Screw the tilt lock knob 3.
- Using a Phillips screwdriver, tighten the small locking screw 10.
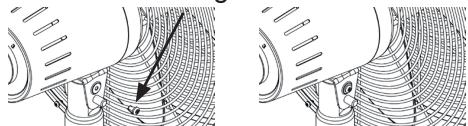
- Screw in the tilt adjustment knob 11.
NOTE: The 2 knurled knobs (3 and 11) must be hand tightened.
OPERATION
- Before using this appliance, place it on a stable, dry surface.
- Insert the power plug into a wall outlet.
- Turn the On/Off button to select the desired speed.
The air control speeds are as follows:
7-Low Speed
8- Medium Speed
9-High Speed
4. Set the button to 0 to stop the device
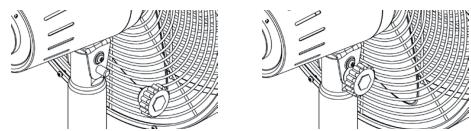
TILT
- For your safety, make sure the fan is in the off position before tilting the grille.
-
Slightly loosen the two knurled knobs 3 and 11 (see paragraph «ASSEMBLING THE HEAD ON THE FOOT»)
-
Gently pull the head up or down at the desired angle.
- Fix the unit back in place by tightening the 2 knurled knobs by hand.
OSCILLATION
Oscillation is started by the oscillation button located on the top of the power unit. Press the control knob to engage the oscillation. Make sure that the grilles
do not touch anything during the oscillation.
Pull on the control knob to stop the oscillation.
MAINTENANCE
- The appliance must be cleaned and checked regularly. No disassembly is normally necessary. However, the front guard and strapping can be easily removed if the blades need to be cleaned (see below)
BEFORE SERVICING, ALWAYS UNPLUG THE POWER CORD! - Take care that water or other liquids do not come in contact with the motor or any other electrical parts during cleaning.
- Use a soft, slightly damp cloth to clean your fan, and then dry it.
- Do not use THINNERS, ALCOHOL or OTHER CHEMICALS.
-
Protective guards must be cleaned with a vacuum cleaner or soft brush.
-
If necessary, unscrew the small screws on the perimeter of the rear guard. Remove the front guard and the strapping. Clean the blades with a vacuum cleaner.
- Reassemble the front guard and the strapping after cleaning. Make sure all screws are in place and properly tightened before use.
NEVER USE THE FAN WITHOUT ITS PROTECTIVE GUARDS.
| FT-30ME2 | symbol | value | unit |
| Maximum airflow | F | 37.61 | m3/min |
| Absorbed power | P | 33.40 | W |
| Service value | SV | 1.13 | (m3/min)/W |
| Power consumption in ‘standby’ mode | PSB | — | W |
| Acoustic power level | LWA | 59.14 | dB(A) |
| Maximum air velocity | C | 2.64 | m/s |
| Seasonal consumption | Q | 10.69 | kWh/a |
| Measurement standard for the service value | IEC 60879 :1986 +cor1 :1992 | ||
WARNING FOR THE CORRECT DISPOSAL OF THE PRODUCT UNDER EUROPEAN DIRECTIVE 2012/19/EU
Under the terms of its use, the product should not be disposed of with municipal waste. The product must be handed over to one of the waste collection centers provided by the municipal administration or to the dealers providing this service. Sorting a household appliance avoids the negative environmental and health consequences deriving from incorrect disposal, and allows the recovery of the materials that compose it in order to save a significant amount of energy and resources. As a reminder of the requirement to dispose of electronics separately, the product bears the symbol of a barred rubbish bin.
Made in China
EUREM 5 RUE MONTGOLFIER 79230 PRAHECQ FRANCE
Direct service line: (33) 05 49 32 69 76
WARRANTY CARD
DEALER'S STAMP
DATE:
CLIENT'S NAME:
GUARANTEE
This appliance is guaranteed for 2 years, including parts and labour. The guarantee does not cover the damage caused by: incorrect usage, deterioration by shock, fall or atmospheric phenomenon. In case of malfunction, the product in its entirety (packaging, product, accessories) must be returned by the user (In postage paid if sent by mail. 'Postage due' packages will not be accepted.) At the point of sale where the product sold, accompanied by a photocopy of the dated proof of purchase bearing the vendor's stamp. The appliance will be returned to you free of charge during the warranty period and upon reimbursement of costs after this period.
BENUTZERHANDBUCH
Tischventilator
Ref: BORNEO
Mod:FT-30ME2