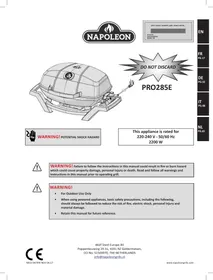
TRAVEL Q - PRO285E - Electric barbecue NAPOLEON GRILLS - Free user manual and instructions
Find the device manual for free TRAVEL Q - PRO285E NAPOLEON GRILLS in PDF.



| Product Type | Electric Barbecue |
| Brand | NAPOLEON GRILLS |
| Model | TRAVEL Q - PRO285E |
| Grill Dimensions | 37 cm × 54 cm (cooking surface 1840 cm² / 285 sq in) |
| Power Supply | 220-240 V, 50/60 Hz, 2200 W |
| Usage | Outdoor only, domestic use |
| Materials | Aluminum casting, stainless steel, porcelain enamel |
| Cooking Grates | Porcelain-enameled cast iron (2 pieces) |
| Thermostat | With temperature regulator, removable |
| Limited Warranty | Aluminum casting/stainless steel base: 10 years, grease shield and grates: 5 years full + 5 years 50%, heating element and regulator: 2 years |
| Maximum Temperature | Not specified, high setting for searing |
| Main Functions | Direct cooking, preheating, keep warm |
| Safety | 30 mA residual current device recommended, automatic shutoff not specified, do not use under a canopy |
| Maintenance and Cleaning | Hand washable grates, removable drip tray, do not immerse thermostat |
| Spare Parts Available | Yes, via Napoleon Grills (see parts list) |
| Optional Accessories | Shelf, stand (PRO285-STAND) |
| Weight | Not specified |
Frequently Asked Questions - TRAVEL Q - PRO285E NAPOLEON GRILLS
User questions about TRAVEL Q - PRO285E NAPOLEON GRILLS
0 question about this device. Answer the ones you know or ask your own.
Ask a new question about this device
Download the instructions for your Electric barbecue in PDF format for free! Find your manual TRAVEL Q - PRO285E - NAPOLEON GRILLS and take your electronic device back in hand. On this page are published all the documents necessary for the use of your device. TRAVEL Q - PRO285E by NAPOLEON GRILLS.
USER MANUAL TRAVEL Q - PRO285E NAPOLEON GRILLS
WARNING! POTENTIAL SHOCK HAZARD
This appliance is rated for
220-240 V - 50/60 Hz
2200 W

WARNING! Failure to follow the instructions in this manual could result in fire or burn hazard which could cause property damage, personal injury or death. Read and follow all warnings and instructions in this manual prior to operating grill.

WARNING!
For Outdoor Use Only
- When using powered appliances, basic safety precautions, including the following, should always be followed to reduce the risk of fire, electric shock, personal injury and material damage.
- Retain this manual for future reference.
Napoleon President's 10 Year Limited Warranty
NAPOLEON products are designed with superior components and materials, and are assembled by trained craftsmen who take great pride in their work. This grill has been thoroughly inspected by a qualified technician before packaging and shipping to ensure that you, the customer, receive the quality product you expect from NAPOLEON.

NAPOLEON warrants that components in your new NAPOLEON product will be free from defects in material and workmanship from the date of purchase, for the following period:
Aluminum castings / stainless steel base 10 years
Porcelain-enameled grease shield 5 years full coverage, plus 50% off until the 10th year
Porcelain-enamed cast iron cooking grids 5 years full coverage, plus 50% off until the 10th year
Heating element and temperature controller 2 years
All other parts 2 years
*Conditions and Limitations
This Limited Warranty creates a warranty period as specified in the aforementioned table, for any product purchased through an authorized NAPOLEON dealer, and entitles the original purchaser to the specified coverage in respect of any component replaced within the warranty period, either by NAPOLEON or an authorized NAPOLEON dealer, to replace a component of such product that has failed in normal private use as a result of a manufacturing defect. The "50% off" indicated in the table means the component is made available to the purchaser at a 50% discount off the regular retail price of the component for the period indicated. This Limited Warranty does not cover accessories or bonus items.
For greater certainty, "normal private use" of a product means that the product has been installed by a licensed, authorized service technician or contractor, in accordance with the installation instructions included with the product and all local and national building and fire codes; has been properly maintained; and has not been used as a communal amenity or in a commercial application.
Similarly, "failure" does not include: over-firing, blow outs caused by environmental conditions such as strong winds or inadequate ventilation, scratches, dents, corrosion, deterioration of painted and plated finishes, discoloration caused by heat, abrasive or chemical cleaners or UV exposure, chipping of porcelain enameled parts, or damages caused by misuse, accident, hail, grease fires, lack of maintenance, hostile environments such as salt or chlorine, alterations, abuse, neglect or parts installed from other manufacturers.
Should deterioration of parts occur to the degree of non-performance (rusted through or burnt through) within the duration of the warranted coverage, a replacement part will be provided. The replacement component is the sole responsibility of NAPOLEON defined by this Limited Warranty; in no event will NAPOLEON be responsible for installation, labor or any other costs or expenses related to the re-installation of a warranted part, for any incidental, consequential, or indirect damages or for any transportation charges, labor costs or export duties.
This Limited Warranty is provided in addition to any rights afforded to you by local laws. Accordingly, this Limited Warranty imposes no obligation upon NAPOLEON to keep parts in stock. Based on the availability of parts, NAPOLEON may at its discretion discharge all obligations by providing a customer a prorated credit towards a new product. After the first year, with respect to this Limited Warranty NAPOLEON may, at its discretion, fully discharge all obligations with respect to this warranty by refunding to the original warranted purchaser the wholesale price of any warranted but defective part(s).
The bill of sale or copy will be required together with a serial number and a model number when making any warranty claims from NAPOLEON.
NAPOLEON reserves the right to have its representative inspect any product or part prior to honoring any warranty claim. You must contact NAPOLEON Customer Service or an authorized NAPOLEON dealer to obtain the benefit of the warranty coverage.

WARNING! Read all instructions prior to operating.
Safe Operating Practices
- Use this grill only as described in this manual. Any other use not recommended in this manual may cause fire, electric shock, or injury to persons.
This grill is intended for outdoor household use only. Do not use indoors or for commercial cooking. - Do not in any way alter this product or its use.
- Do not use charcoal or other combustible fuels in this grill. This grill is not designed for charcoal use and a fire could result. The fire could create an unsafe condition and damage to the grill.
- Do not build this model of grill in any built-in or slide-in construction. Ignoring this warning could cause a fire or an explosion that may damage property or cause serious bodily injury or death.
Electrical Safeguards:
This appliance conforms to technical standards and the safety requirements for electrical devices.
Always ensure that the electrical outlet being used has the correct voltage according to the input power of the appliance. Outlets must also be suitable for equipment with a power consumption of 2200 Watts.
- Make sure no other high wattage appliances are plugged into the same circuit when using grill.
The appliance should be connected to an outlet having an earthing contact.
- The electricity supply should be provided through a residual current device (RCD) having a rated residual operating current not exceeding 30mA .
- Do not operate unit if plug receptacle is damaged.
- The power cord should be regularly examined for signs of damage, and the appliance is not to be used if the cord is damaged.
- Do not operate the grill with a temperature controller that has a damaged cord or plug. If the supply cord is damaged, it must be replaced by a special assembly available from Napoleon or a Napoleon authorized dealer.
If using an extension cord, it must be designed for outdoor use and rated for the input power required by the appliance.
- Do not connect two or more extension cords together.
Safe Operation:
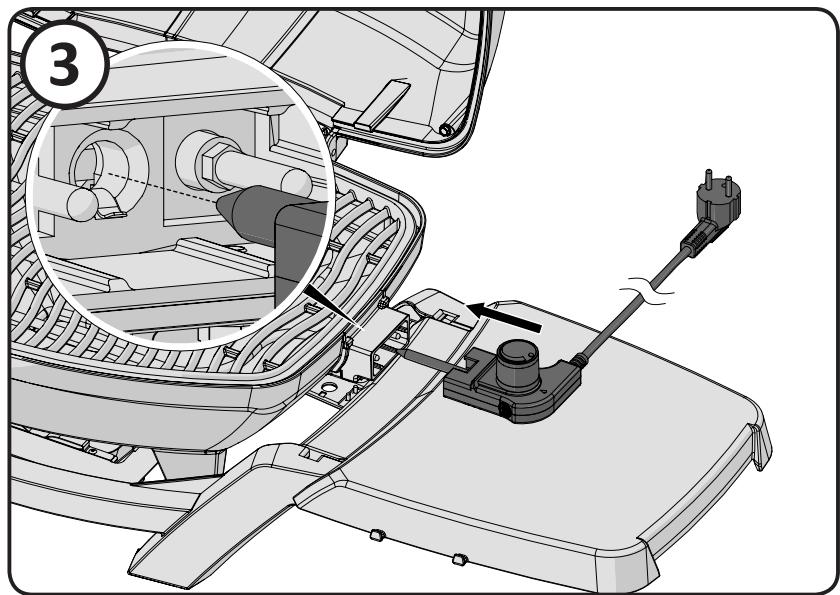
Always plug the temperature controller into the grill before plugging the power cord into the outlet. When removing the temperature controller from the grill, unplug it from the outlet first.
Pulling controller by the knob could cause it to come off. Remove temperature controller by gripping on its side.
- If a flare up occurs, do not use water to put out fire. Turn the grill to OFF. Unplug the power cord and wait for the grill to cool.
- Keep the plug and cord dry when in use. Do not use the electric grill in the rain.
- Operate grill only on a level, stable surface.
- Do not allow cord to touch grill when it is hot.
The grease tray must be in place at all times during grill operation.
- Do not move the grill while it is in use.
- Do not leave grill unattended whenever in use.
- Keep young children, elderly and pets away while the grill is in use. Children must not play with the appliance.
- This appliance can be used by children aged from 8 years and above and persons with reduced physical, sensory or mental capabilities or lack of experience and knowledge if they have been given supervision or instruction concerning use of the appliance in a safe way and understand the hazards involved.
Children should be supervised if cleaning and maintaining the grill.
- Do not use grill near combustible materials such as wood, dry grass, shrubs, etc.
- Do not allow grill to come into contact with flammable materials such as paper, walls, draperies, towels, chemicals, etc.
- Do not use the grill in high traffic areas. Locate power cord away from traffic areas.
To protect the barbecue, do not use the grill within 3m / 10 feet of pool, pond or other body of water.
- Do not use as a heater.
- Allow the appliance to cool before moving or storing it.
Cleaning:
Clean the drip pan regularly.
- Do not immerse electrical components in water when cleaning.
- To protect against electrical shock, do not immerse plug, cord or temperature controller in water or any liquid.
Storage:
Unplug the grill when not in use and keep the plug and cord dry.
- Do not leave temperature controller in the ON position during periods of non-use.
Always store the temperature controller indoors when not in use.
During long periods of non-use, remove the temperature controller from grill.
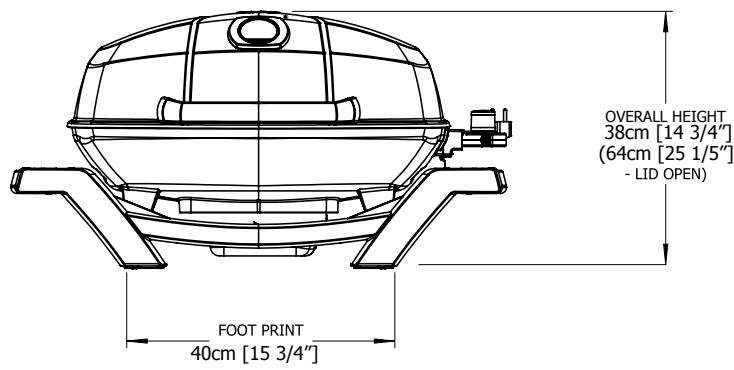
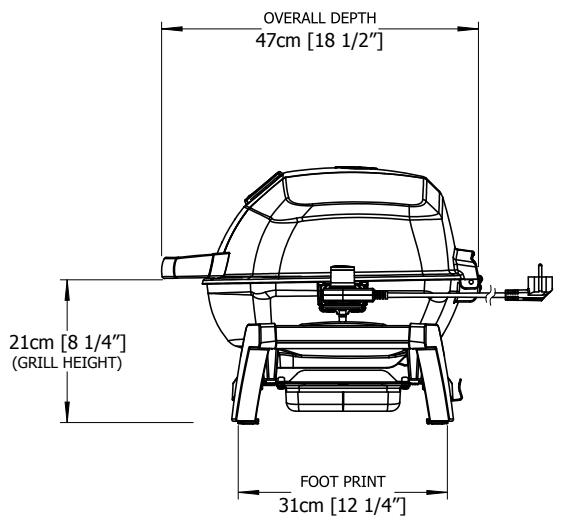
DIMENSIONS
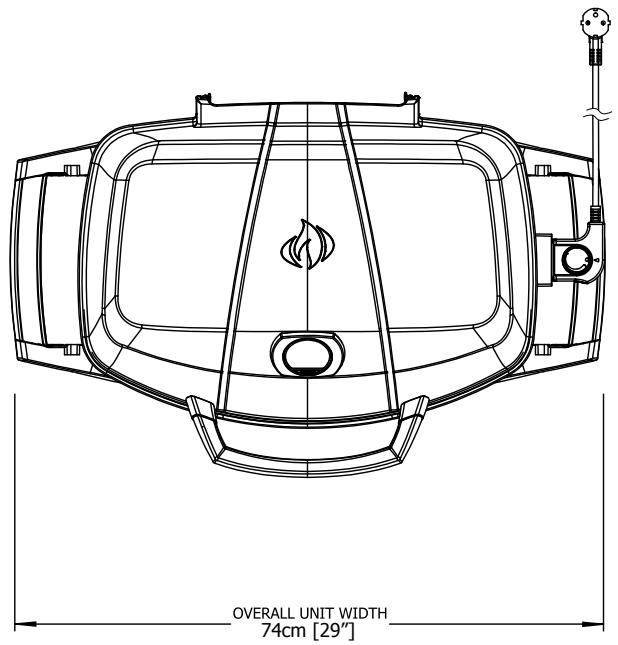
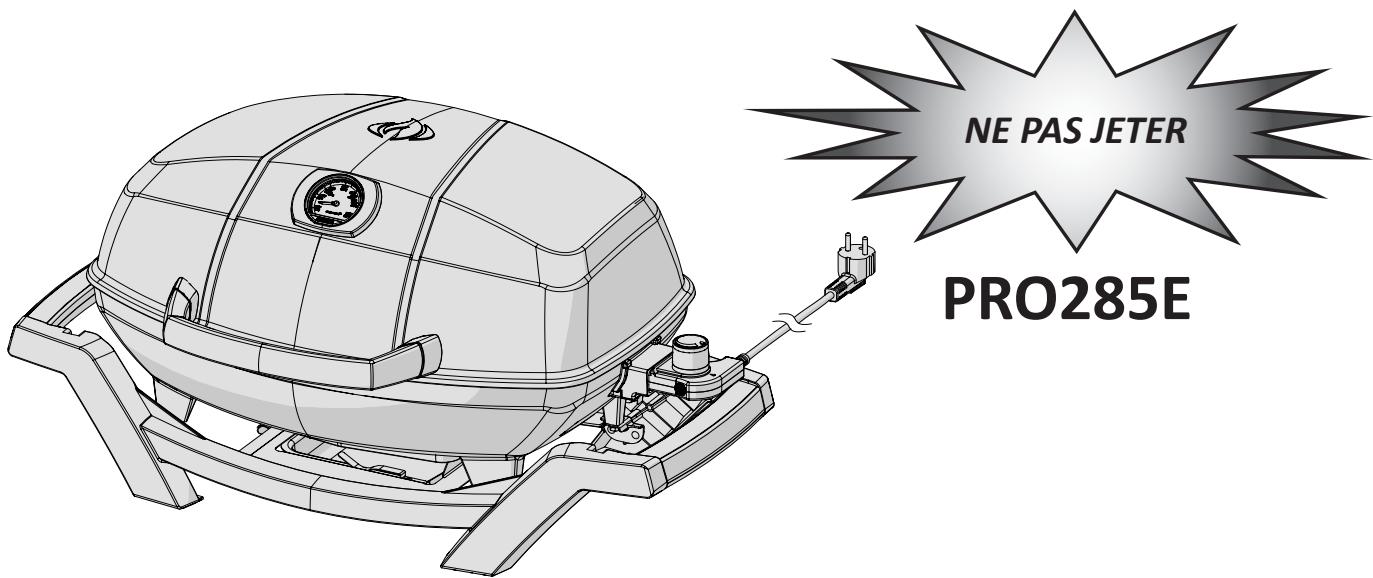
PRO285E GRILL
GRILL SIZE: 37cm × 54cm (IRREGULAR) = 1840 cm2 (14 1/2" × 21 1/4" (IRREGULAR) = 285 in²)
ALL DIMENSIONS ARE APPROXIMATE
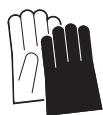

CAUTION! During unpacking and assembly we recommended you wear work gloves and safety glasses for your protection. Although we make every effort to make the assembly process as problem free and safe as possible, it is characteristic of fabricated steel parts that the edges and corners might be sharp and could cause cuts if handled incorrectly.
Cooking Instructions

WARNING! Do not use this grill under extended awnings. Failure to follow these instructions could result in a fire or personal injury.

DANGER! Allow the grill to cool to the touch before moving or storing. Failure to do so could result in a fire resulting in property damage, personal injury or death.
When lit for the first time, the grill will emit a slight odour. This is a normal temporary condition caused by the burning of internal paints and lubricants used in the manufacturing process and will not occur again. Simply run the temperature probe on high with the lid open for approximately 12 hour. When cooking very lean meats, such as chicken breasts, or lean pork, the grids can be oiled before pre-heating to reduce sticking. Cooking meat with a high degree of fat content may create flare-ups. Either trim some fat or reduce temperatures to prevent this.
Grilling Chart
Preheat on HIGH for 15-20 minutes with a closed lid, then set to desired temperature. This is a guideline for cooking in outdoor temperature of 22ircC .
To add a trademark taste to your cooking, try the Napoleon woodchip smoker as an optional accessory with mesquite- or hickory-flavoured woodchips.
| Food | Control Setting | Cooking Time | Helpful Suggestions |
| Steak 2.54 cm (1 in.) thick | High setting, 2 min. each side | 4 min. – Rare | When selecting meat for grilling, ask for marbled fat distribution. The fat acts as a natural tenderizer while cooking and keeps it moist and juicy. |
| High setting, 2 min. each side then Medium setting | 6 min. – Medium | ||
| High setting, 2 min. each side then Medium setting | 8 min. – Well done | ||
| Hamburger 1.27 cm (1/2 in.) thick | High setting, 2 min. each side | 4 min. – Rare | Preparing hamburgers to order is made easier by varying the thickness of your patties. |
| High setting, 2 1/2 min. each side | 5 min. – Medium | ||
| High setting, 3 min. each side | 6 min. – Well done | ||
| Chicken pieces | High setting, 2 min. each side then Medium-Low to Low setting | 20-25 min. | The joint connecting the thigh and the leg from the skinless side should be sliced 3/4 of the way though for the meat to lay flatter on the grill. This helps it to cook faster and more evenly. |
| Pork chops | Medium | 6 min. per side | Trim off the excess fat before grilling. Choose thicker chops for more tender results. |
| Spare ribs | High setting for 5 minutes Low to finish | 20 min. per side turn often | Choose ribs that are lean and meaty. Grill until meat easily pulls away from the bone. |
| Lamb chops | High setting for 5 minutes Medium to finish | 15 min. per side | Trim off the excess fat before grilling. Choose extra thick chops for more tender results. |
| Hot dogs | Medium - Low | 4-6 min. | Select the larger size wieners. Slit the skin lengthwise before grilling. |
Troubleshooting
| Problem | Possible Causes | Solution |
| No heat | Temperature probe turned off. No power. | Turn temperature probe to maximum setting. Ensure temperature probe is fully seated in grill plate and properly plugged into outlet. Try another outlet. Check for tripped circuit breaker. Reset. Turn temperature probe to maximum setting. Pre-heat grill with lid closed for 15-20 minutes. |
| Faulty temperature probe or grill plate. | Replace temperature probe or grill plate. | |
| Low heat. | Improper preheating | Preheat 15-20 minutes. Increase probe setting. |
| Excessive buildup in base of grill. | Clean out excessive debris in base. | |
| Excessive flare-ups/uneven heat. | Excessive fat in meat. Excessive cooking temperature. Grease buildup. | Trim fat from meat before grilling. Adjust temperature as needed. Clean grill. |
| Circuit breaker trips or fuse blows. | Power surge Another appliance plugged into same circuit as grill. Moisture or water in temperature probe or electrical connections. | Turn controller to OFF position before plugging into electrical outlet. Do not use other electrical appliances on same circuit. Keep probe and electrical components dry. |
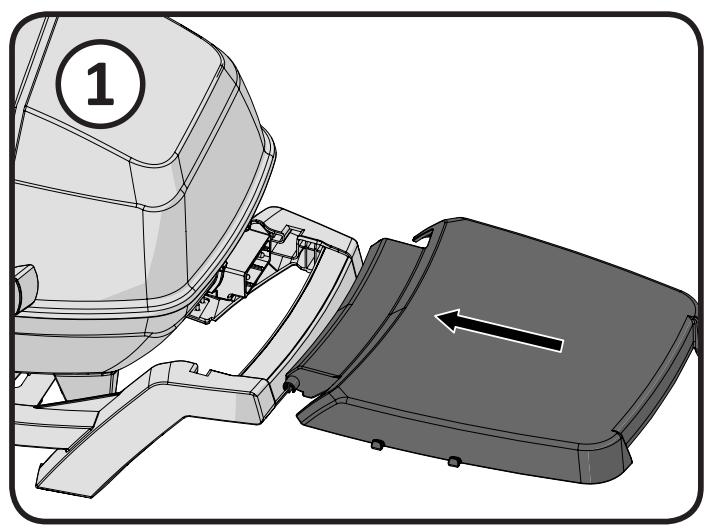
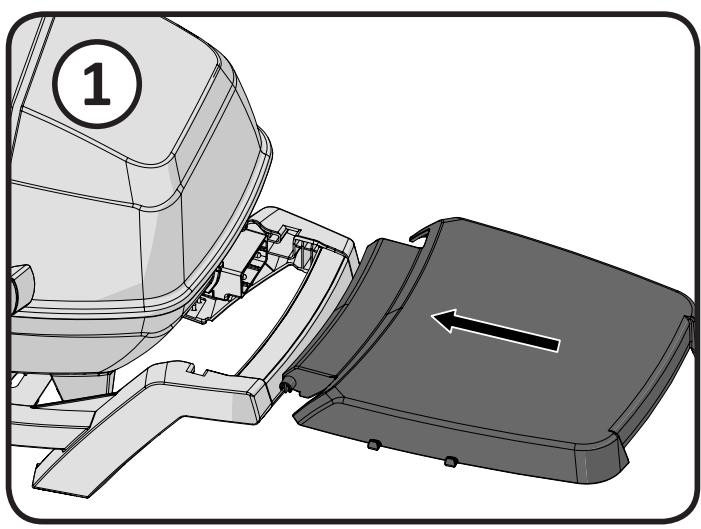
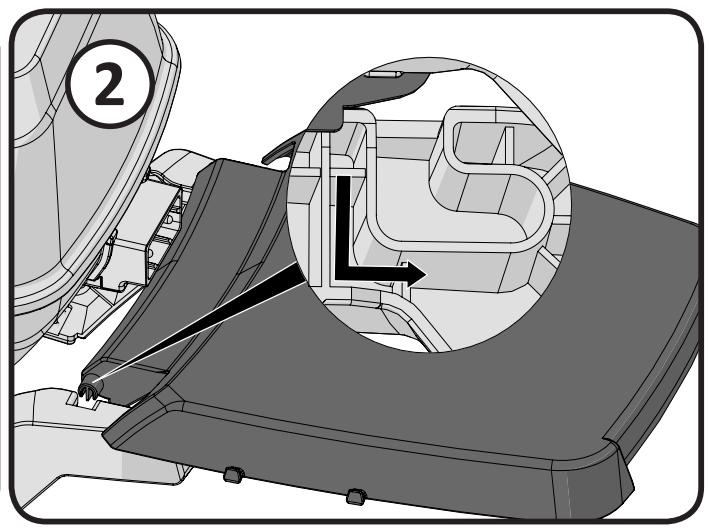
OPTIONAL SHELF
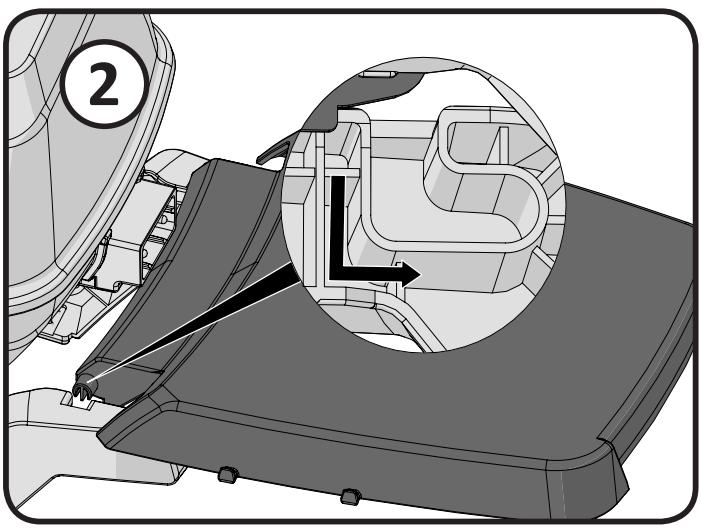
EN
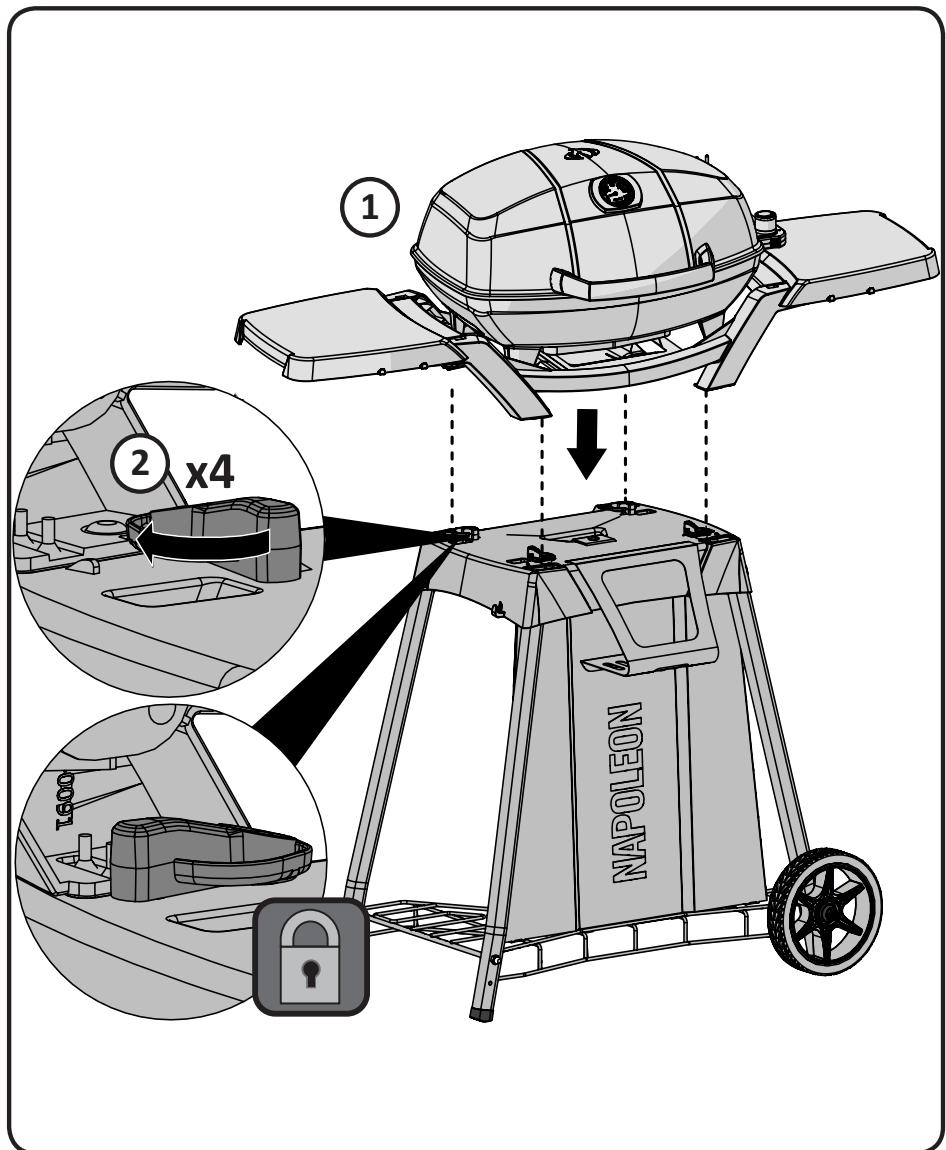
OPTIONAL STAND
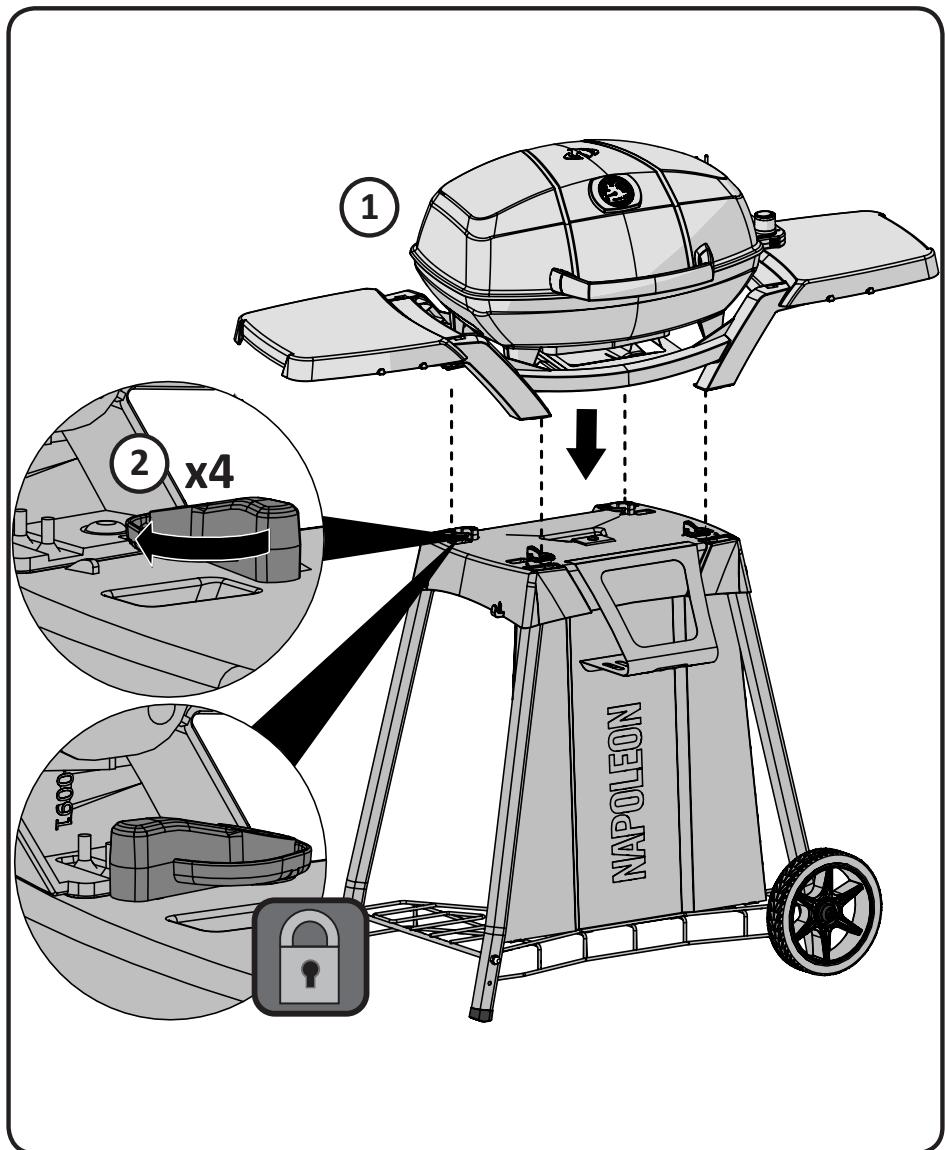
Cleaning Instructions
WARNING! Always wear protective gloves and safety glasses when servicing your grill.
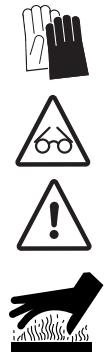
WARNING! To avoid the possibility of burns, maintenance should be done only when the grill is cool. Avoid unprotected contact with hot surfaces. Ensure grill is turned off. Clean grill in an area where cleaning solutions will not harm decks, lawns, or patios. Do not use oven cleaner to clean any part of this grill. Do not use a self-cleaning oven to clean cooking grids or any other parts of the grill. Barbecue sauce and salt can be corrosive and will cause rapid deterioration of the grill components unless cleaned regularly.
Cast Iron Cooking Grids: The cast iron cooking grids supplied with your new grill offer superior heat retention and distribution. By regularly seasoning your grids you are adding a protective coating, which will aid in resisting corrosion and increase your grids non-stick capabilities.
First Time Use: Wash the cast iron grids by hand with mild dish soap and water to remove any residue from the manufacturing process (never wash in a dish washer). Rinse thoroughly with hot water and dry completely with a soft cloth. This is important to avoid moisture from entering the cast iron. When lit for the first time, the grill will emit a slight odour.
Seasoning: Using a soft cloth, spread VEGETABLE SHORTENING over the entire grid surface ensuring all grooves and corners are covered. Do not use salted fats such as butter or margarine. Pre-heat your grill for 15 minutes, then place the seasoned cooking grids in the grill. Turn the burner control knobs to medium with the lid closed. Allow the cooking grids to heat for approximately one-half hour. Turn the controller to OFF and let the cooking grids stand until cool. This procedure should be repeated several times throughout the season, although it is not required for daily use (follow daily usage procedure below).
Daily Usage: Before pre-heating and cleaning with a brass wire grill brush, coat the entire top surface of the cooking grids with vegetable shortening. Pre-heat the grill and then brush away any unwanted residue with a brass wire brush.
Cleaning Inside The Grill: Remove the cooking grids. Use a soft brass wire brush to clean loose debris from the insides of the lid. Brush all debris from inside the grill into the removable drip pan. Remove the base liner (drip pan grease catcher). Do not use abrasive cleaners to clean the porcelain base liner. To remove stubborn stains, soak in soapy water to loosen dirt. Clean with a non-abrasive cleaner and buff dry with a clean cloth. Ensure that the grill plate is placed properly when reinstalled.
Drip Pan: Slide the drip pan out for easy cleaning. It should be cleaned frequently (every 4-5 uses) to avoid grease buildup. Grease and excess drippings accumulate in the drip pan located under the grill. Accumulated grease can cause a fire hazard. Do not line the drip pan with aluminum foil, as it can prevent the proper amount of air needed for burner to operate. The pan should be scraped out with a putty knife or scraper.
Cleaning the Outside of the Grill: Do not use any abrasive cleaners to clean painted parts. To protect the enamel finish, use a mild detergent with soft cloth or brush to wipe away and remove any acidic residue. Buff dry with a clean cloth.
Cleaning Steps
Disassembly:
- Unplug the cord from wall and remove the thermostat.
- Remove cooking grids.
- Depress spring clip and lift heating element out of grill.
- Remove the base liner.
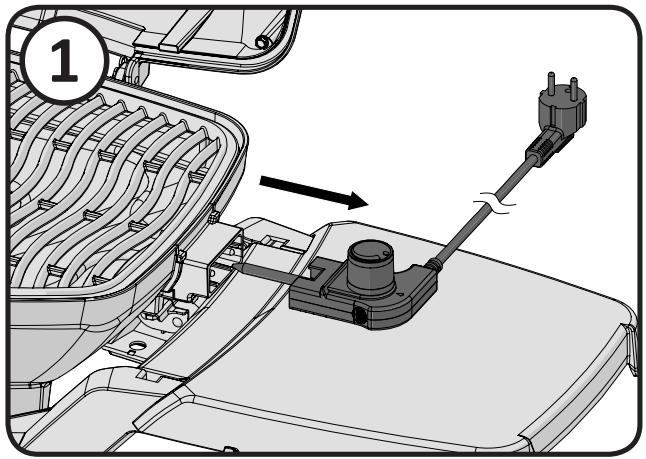
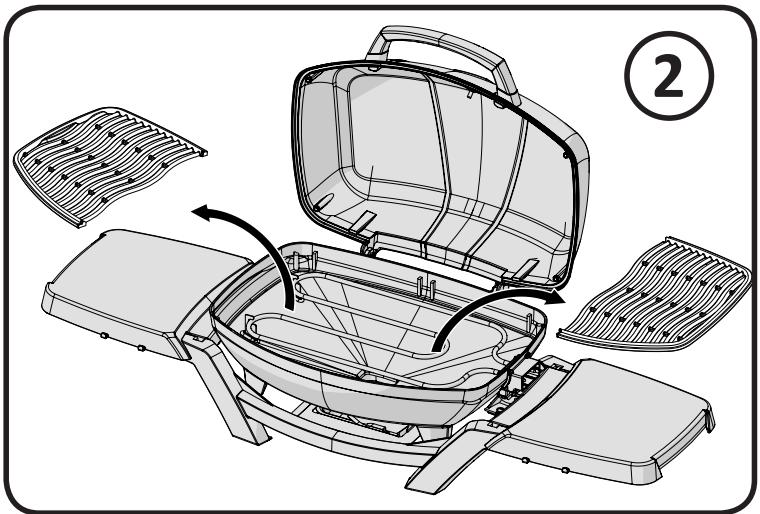

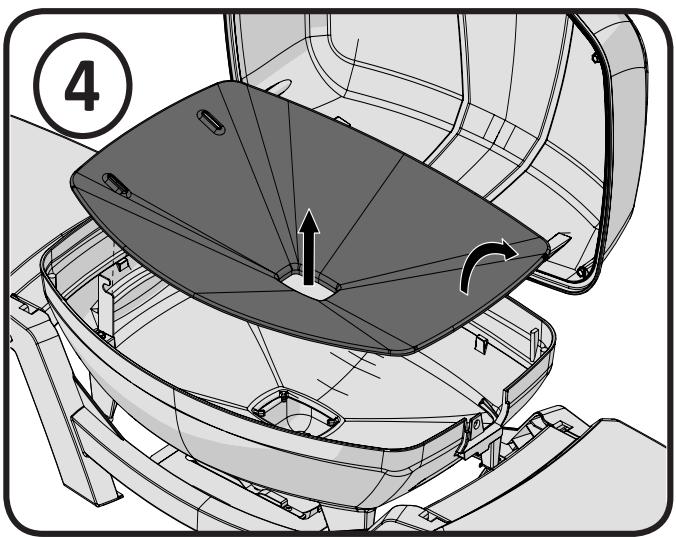
Reassembly:
- Reinsert the base liner.
- Place the curved ends of the heating element back into its support clips. Clip the heating element into place.
- Reinsert the thermostat and cooking grids.
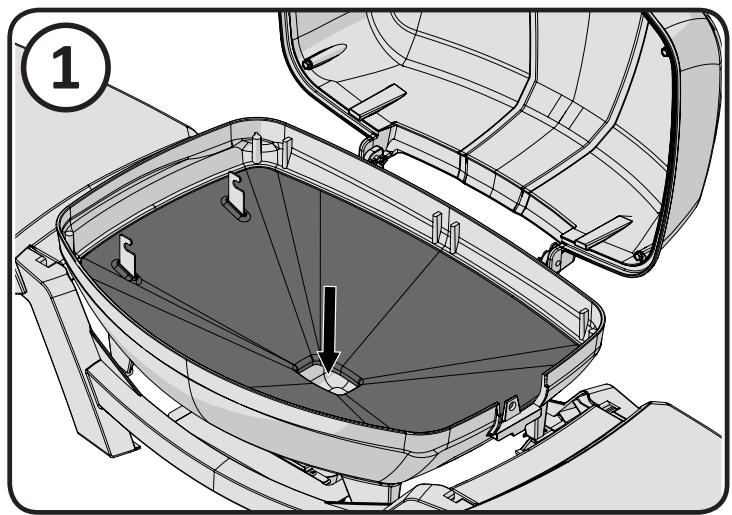
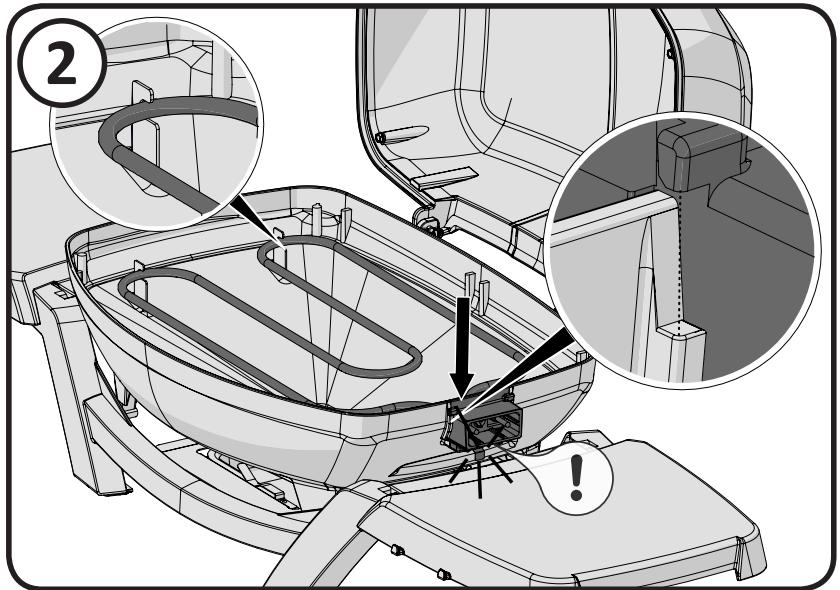
KEEP YOUR RECEIPT AS PROOF OF PURCHASE TO VALIDATE YOUR WARRANTY.
Ordering Replacement Parts
Warranty Information
MODEL:
DATE OF PURCHASE:
SERIAL NUMBER:
(Record information here for easy reference)
For replacement parts and warranty claims, contact the Napoleon dealer where the product was purchased.
Before contacting the dealer, check the Napoleon Grills Website for more extensive cleaning, maintenance, troubleshooting and parts replacement instructions at www.napoleongrills.com.
To process a claim, the following information is required:
- Model and serial number of the unit.
- Part number and description.
- A concise description of the problem ('broken' is not sufficient).
- Proof of purchase (photocopy of the invoice).
In some cases, Napoleon could request to have the parts returned to the factory for inspection before providing replacement parts.
Before contacting Napoleon dealer, please note that the following items are not covered by the warranty:
Costs for transportation, brokerage or export duties.
Labour costs for removal and reinstallation.
Costs for service calls to diagnose problems.
- Discolouration of stainless steel parts.
- Part failure due to lack of cleaning and maintenance, or use of improper cleaners (oven cleaner or other harsh chemicals).
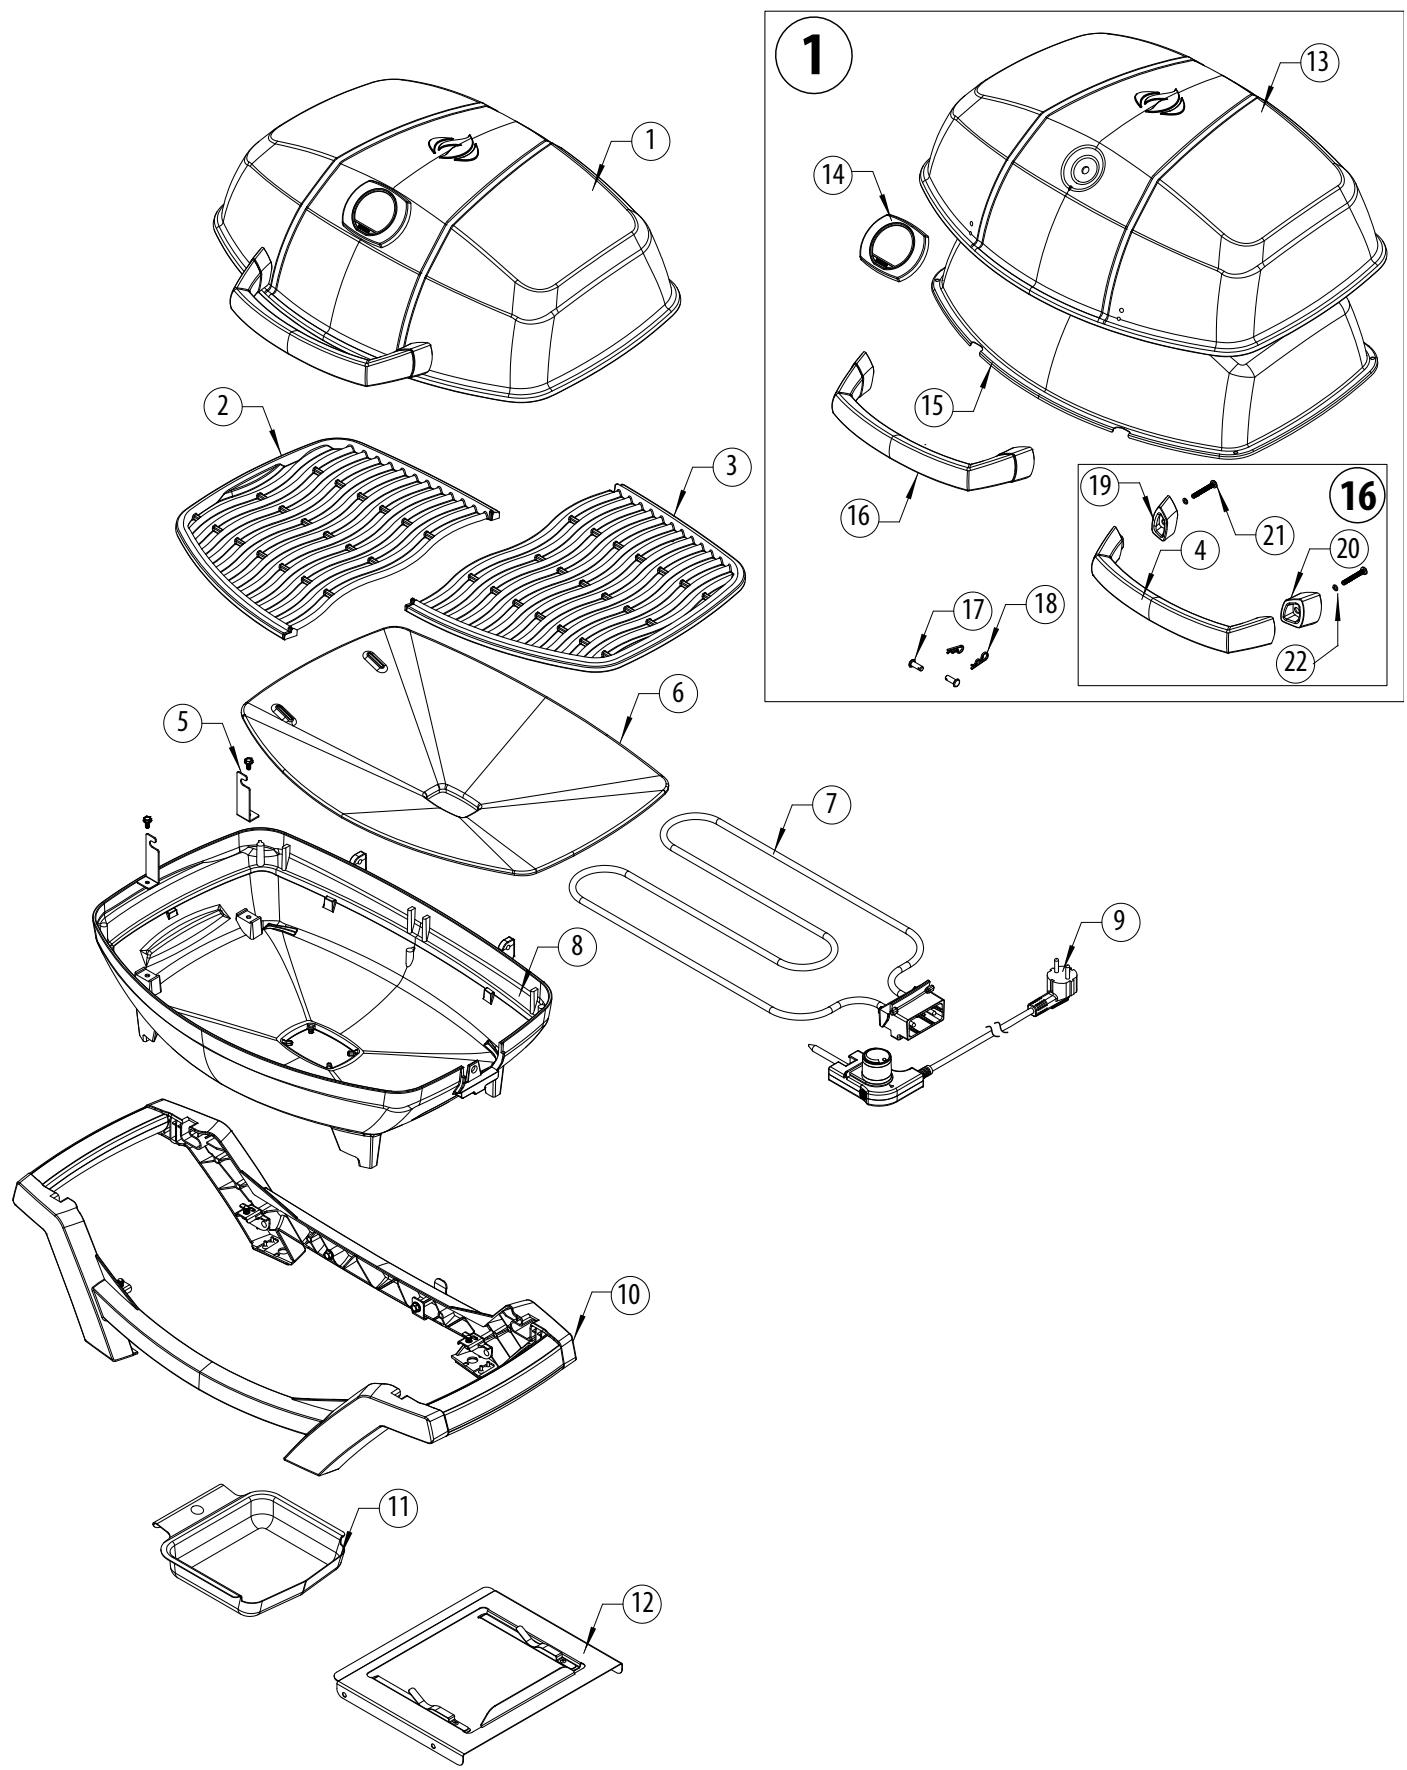
Parts List
| ITEM | PART NUMBER | DESCRIPTION | |
| 1 | N010-1008-SER | PRO285-LID ASSY | x |
| 2 | Z305-0012 | NGZ GRID, COOKING CAST LEFT (285) | x |
| 3 | Z305-0013 | NGZ GRID, COOKING CAST RIGHT (285) | x |
| 4 | N325-0083 | NGZ, HANDLE LID (PRO285) | x |
| 5 | N370-0861-SER | KIT, BRACKET FRONT/REAR ELEMENT | x |
| 6 | Z585-0015 | NGZ, BASE LINER, PORCELAIN COATING (PRO285E) | x |
| 7 | Z010-0048 | NGZ, ELEMENT (PRO285E) | x |
| 8 | Z135-0003 | NGZ, CASTING BASE BLACK (PRO285E) | x |
| 9 | Z690-0001 | NGZ, THERMOSTAT ASSY (PRO285E) | x |
| Z690-0002 | THERMOSTAT, PRO285E GB | x | |
| 10 | N010-1009-SER | ASSY, CRADLE (PRO285E) | x |
| N075-0091 | NGZ, LEG CRADLE FRONT/BACK (PRO285) | x | |
| N075-0091-EQ | NGZ, LEG CRADLE FRONT WITH EQ ARTWORK | x | |
| 11 | N710-0079 | NGZ, PAN DRIP (285/285X) | x |
| 12 | N010-0830 | ASSY,DRIP PAN PLATE (PRO285) | x |
| 13 | N135-0048 | CASTING, LID PRO285 | x |
| 14 | N685-0023 | TEMP GAUGE, PRO285 | x |
| 15 | Z585-0014 | NGZ, LID HEAT SHIELD (PRO285E) | x |
| 16 | N010-1010-SER | ASSY, LID HANDLE (PRO285E) | x |
| 17 | N485-0023 | NGZ PIN, CLEVIS 6MM X16MM (PRO285) | x |
| 18 | N485-0021 | NGZ PIN, HAIRPIN COTTER 2MM X 28MM (285) | x |
| 19 | N655-0179 | NGZ, SUPPORT, LID HANDLE LEFT | x |
| 20 | N655-0180 | NGZ, SUPPORT, LID HANDLE RIGHT | x |
| 21 | Z570-0029 | SCREW, 10-24 35 MM STN STL PAN HEAD | x |
| 22 | Z735-0009 | NGZ,WASHER, LOCK-SPLIT STN STL M5 | x |
| PRO285-STAND | OPTIONAL CART AND SHELVES FOR PRO285 | ac |
Parts Diagram
EN

Notes
Notes


Correct Disposal Of This Product
This marking indicates that this product should not be disposed with other household wastes throughout the EU. To prevent possible harm to the environment or human health from uncontrolled waste disposal, recycle it responsibly to promote the sustainable reuse of material resources. To return your used device, please use the return and collection systems or contact the retailer where the product was purchased.
They can take this product for environmental safe recycling.

FR

AVERTISSEMENT! RISQUE DE CHOC POTENT
Napoleon President's 10 Year Limited Warranty
| Problem | Possible Causes | Solution |
| No heat | Temperature probe turned off. No power. | Turn temperature probe to maximum setting. Ensure temperature probe is fully seated in grill plate and properly plugged into outlet. Try another outlet. Check for tripped circuit breaker. Reset. Turn temperature probe to maximum setting. Pre-heat grill with lid closed for 15-20 minutes. Replace temperature probe or grill plate. |
| Faulty temperature probe or grill plate. | ||
| Low heat. | Improper preheating | Preheat 15-20 minutes. Increase probe setting. |
| Excessive buildup in base of grill. | Clean out excessive debris in base. | |
| Excessive flare-ups/uneven heat. | Excessive fat in meat. Excessive cooking temperature. Grease buildup. | Trim fat from meat before grilling. Adjust temperature as needed. Clean grill. |
| Circuit breaker trips or fuse blows. | Power surge Another appliance plugged into same circuit as grill. Moisture or water in temperature probe or electrical connections. | Turn controller to OFF position before plugging into electrical outlet. Do not use other electrical appliances on same circuit. Keep probe and electrical components dry. |
PINAO OPZIONALE
CARRELLO OPZIONALE


- WARNING!
- Napoleon President's 10 Year Limited Warranty
- WARNING! Read all instructions prior to operating.
- Safe Operating Practices
- Electrical Safeguards:
- Safe Operation:
- Cleaning:
- Storage:
- DIMENSIONS
- Cooking Instructions
- Grilling Chart
- Troubleshooting
- OPTIONAL SHELF
- OPTIONAL STAND
- Cleaning Instructions
- Cleaning Steps
- Disassembly:
- Reassembly:
- KEEP YOUR RECEIPT AS PROOF OF PURCHASE TO VALIDATE YOUR WARRANTY.
- Ordering Replacement Parts
- (Record information here for easy reference)
- Parts Diagram
- Notes
- Correct Disposal Of This Product
- PINAO OPZIONALE
- CARRELLO OPZIONALE
Brand : NAPOLEON GRILLS
Model : TRAVEL Q - PRO285E
Category : Electric barbecue