PRMPP080/17 - Semi-automatic water pump RIBIMEX - Free user manual and instructions
Find the device manual for free PRMPP080/17 RIBIMEX in PDF.
| Product type | Semi-automatic motor pump |
| Brand | RIBIMEX |
| Model | PRMPP080/17 |
| Engine type | 4-stroke, 97 cm³ |
| Fuel | Unleaded gasoline 95 or 98 |
| Engine oil | SAE 10W-30 (4-stroke) |
| Pump type | Centrifugal single-suction for clean water |
| Priming | Manual: fill the pump body with water before use |
| Starting | Manual starter (pull) |
| Hose connection | Hoses not supplied – use reinforced hose for suction |
| Working temperature | +5 °C to +60 °C |
| Use | Outdoor, clean water only |
| Safety | Emergency stop, overheat protection, detailed instructions in the manual |
| Routine maintenance | Oil change, air filter cleaning, spark plug check, sediment bowl cleaning |
| Recommended spark plug | E5T or equivalent, gap 0.70-0.80 mm |
| Air filter | Foam element washable with gasoline or non-flammable solvent |
| Winter storage | Drain water from pump and fuel tank |
Frequently Asked Questions - PRMPP080/17 RIBIMEX
User questions about PRMPP080/17 RIBIMEX
0 question about this device. Answer the ones you know or ask your own.
Ask a new question about this device
Download the instructions for your Semi-automatic water pump in PDF format for free! Find your manual PRMPP080/17 - RIBIMEX and take your electronic device back in hand. On this page are published all the documents necessary for the use of your device. PRMPP080/17 by RIBIMEX.
USER MANUAL PRMPP080/17 RIBIMEX
Carefully read this instruction manual before operating this product.
Incorrect operation may cause injury and/or damages.
Please keep this manual for future reference.

AVVERTENZA :
b) Raccordement (Fig.6)
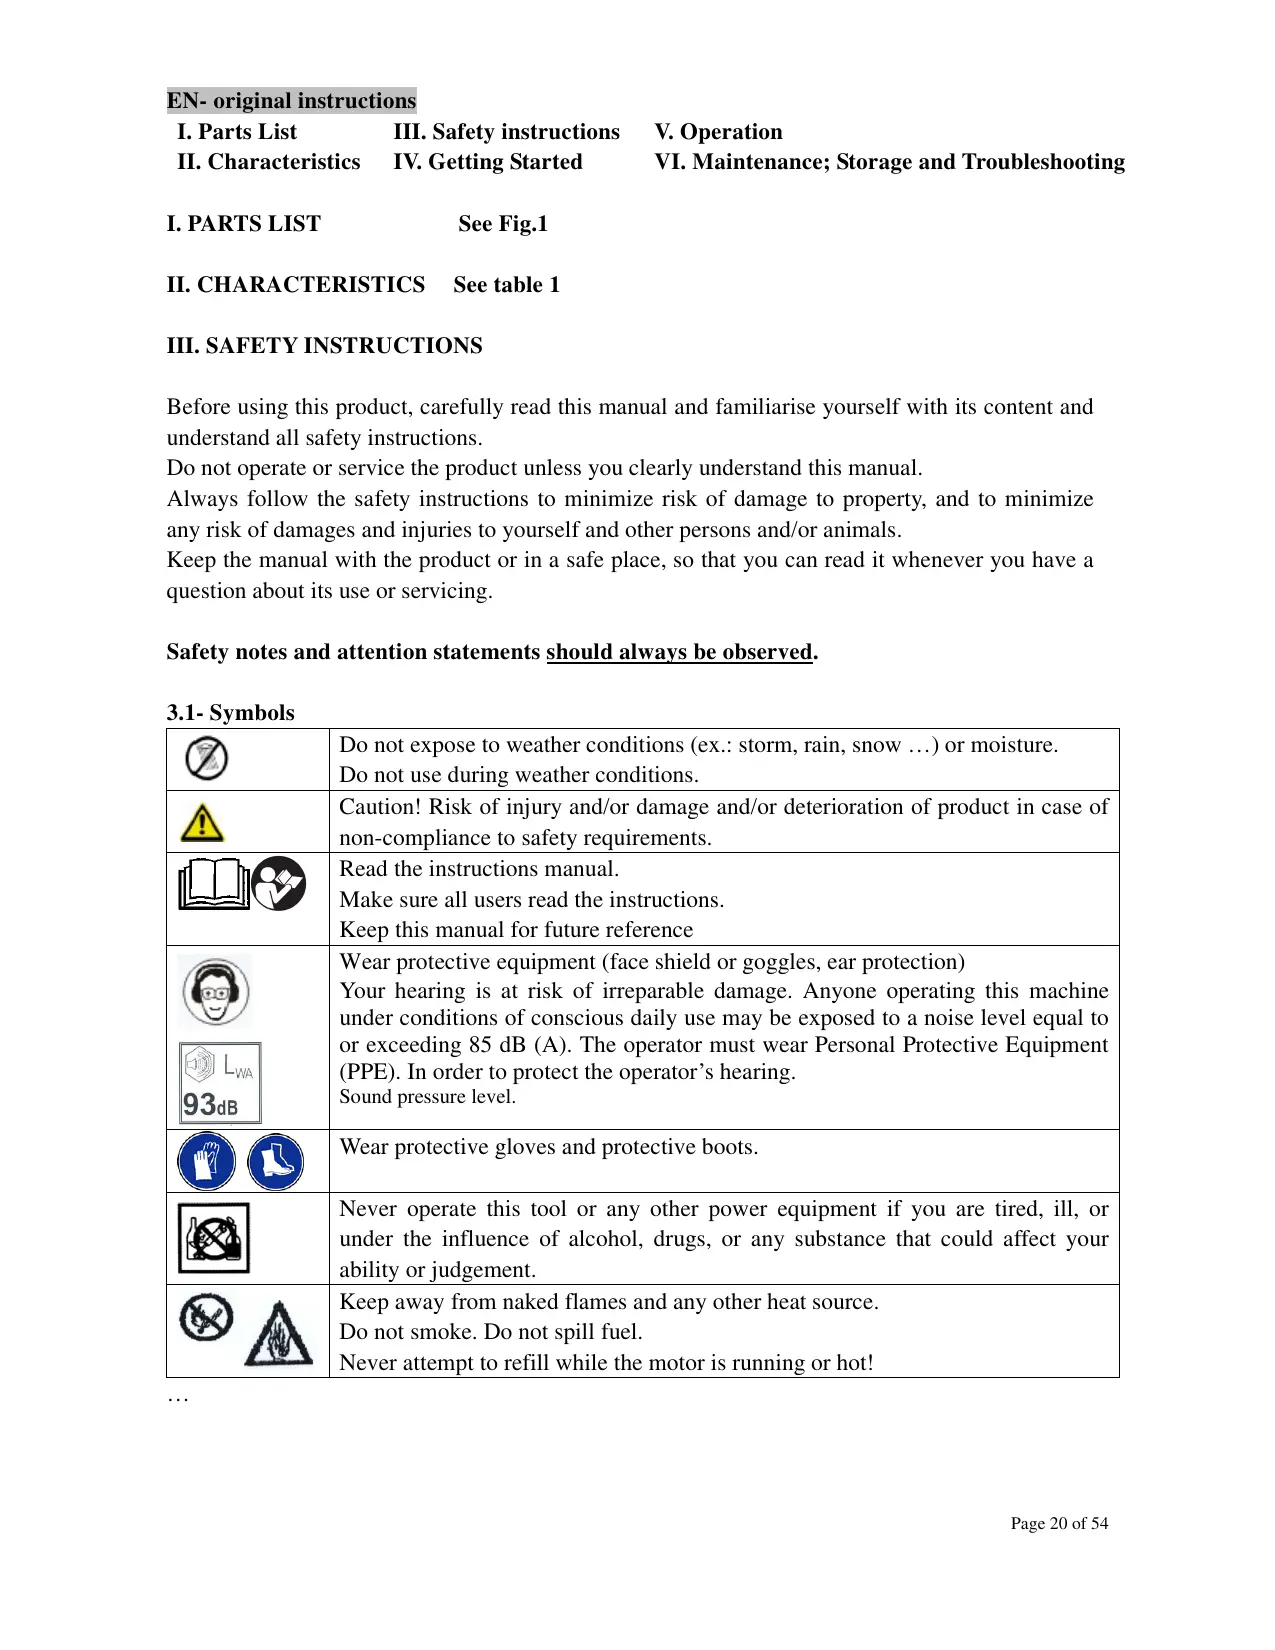
VI. Maintenance; Storage and Troubleshooting
I. PARTS LIST
See Fig.1
II. CHARACTERISTICS
See table 1
III. SAFETY INSTRUCTIONS
Before using this product, carefully read this manual and familiarise yourself with its content and understand all safety instructions.
Do not operate or service the product unless you clearly understand this manual.
Always follow the safety instructions to minimize risk of damage to property, and to minimize any risk of damages and injuries to yourself and other persons and/or animals.
Keep the manual with the product or in a safe place, so that you can read it whenever you have a question about its use or servicing.
Safety notes and attention statements should always be observed.
3.1- Symbols
| Do not expose to weather conditions (ex.: storm, rain, snow ...) or moisture. Do not use during weather conditions. | |
| Caution! Risk of injury and/or damage and/or deterioration of product in case of non-compliance to safety requirements. | |
| Read the instructions manual. Make sure all users read the instructions. Keep this manual for future reference | |
| 93dB | Wear protective equipment (face shield or goggles, ear protection) Your hearing is at risk of irreparable damage. Anyone operating this machine under conditions of conscious daily use may be exposed to a noise level equal to or exceeding 85 dB (A). The operator must wear Personal Protective Equipment (PPE). In order to protect the operator's hearing. Sound pressure level. |
| Wear protective gloves and protective boots. | |
| Never operate this tool or any other power equipment if you are tired, ill, or under the influence of alcohol, drugs, or any substance that could affect your ability or judgement. | |
| Keep away from naked flames and any other heat source. Do not smoke. Do not spill fuel. Never attempt to refill while the motor is running or hot! | |
| Warning! Hot surfaces! Do NOT touch, burn hazard. During operation and for a certain time after the machine has been switched off, cylinder, motor casing etc. will be hot. Do not touch them until they have cooled down. You risk getting burnt. | |
| Speed adjustment: from Slow (right) to Fast (left) | |
| Warning: Read the information on the manual. Use 4-stroke automotive lubricating oil. SAE 10W-30 is recommended for general, all-temperature use. | |
| Never run the engine indoors. Make sure there is always good ventilation when operating the product. Fumes from engine exhaust contain carbon monoxide, which can cause serious injury or death. | |
| Pump rotation direction | |
3.2- General safety information
- Keep work area clean
Cluttered areas invite accidents and injuries.
- Consider work area environment
Do not expose product to rain or to humidity.
Do not use product in damp or wet locations, during weather conditions.
Keep work area well lit (natural light or sufficient artificial lighting).
Do not use product indoors.
- Guard against electric shock
Avoid contact with electrical parts.
- Keep children away
Do not let bystanders touch the product.
All bystanders (esp. children) should be kept away from product and work area.
Keep the product away from children or from their environment. Never allow children to operate the appliance. Children should be supervised to ensure that they do not play with the product.
- Store idle product
When not in use, product should be stored in a dry, high or locked up place, out of reach of children.
- Do not force the product
It will do the job better and safer at the rate speed for which it is intended.
Do not use the product for purposes other than those for which it is intended. The product will do a better and safer job if it is used only for the purposes it was designed for.
- Use the right product
Do not force small products or attachments to do the job of heavy duty tools.
- Dress properly
Do not wear loose clothing or jewellery; they can be caught in moving parts.
Wear protecting hair covering to contain long hair.
- Use protective equipment
Wear protective equipment appropriate to working conditions and work environment
Wear protective helmet, safety goggles, ear mufflers, face or dust mask or breathing mask with proper filter, rubber gloves and non-skid footwear to reduce the risk of personal injury during products use or manipulation.
- Do not overreach
Keep proper footing and balance at all times.
Do not work on unsecured scaffolding, ladders...
- Maintain product with care
Keep product clean for better and safer performance.
Follow instructions for lubrication and changing accessories.
Keep handles dry, clean and free from oil and grease.
Ensure that ventilation slots are kept clean and free from dust at all times (to avoid product from overheating)
-
Switch off product when not in use, before servicing and when changing accessories.
-
Always be sure to include this manual when selling, lending or otherwise transferring the ownership of the product
-
Always keep the warning labels clean and nice at any time without any scratches or damages. If warning seals peel off or become soiled and impossible to read, you should contact the dealer from which you purchased the product to order new seals and affix the new seals.
Please tear down the original soiled warning label before affixing a new one. Let the surface dry thoroughly and then affix the new label on the original position.
- Stay alert
Watch what you are doing. Use common sense.
Never operate this machine or other power equipment if you are tired, ill, or under the influence of alcohol, drugs, or any other substance that could affect your ability of judgment.
- Check damaged parts
Before further use or reuse of the product, it should be carefully checked to determine that it will operate properly and perform its intended function.
- Defective switches or other part that is damaged should be properly repaired or replaced by an authorized service centre.
Do not use the product if the switch does not turn it on and off.
- Warning
The use of any accessory or attachment, other than those recommended in this instruction manual, may present a risk of injury to persons or animals and may cause damages.
The user and/or operator are responsible for any damages or injury caused to properties and/or persons.
- Have your product repaired by qualified personnel
Unless otherwise indicated in this instruction manual, repairs or replacement of any damaged part in an authorised service centre is recommended.
This product is in accordance with the relevant safety requirements. Repairs should only be carried out by qualified persons using original spare parts; otherwise this may result in considerable danger to the user.
- Remarks:
The safety precautions and instructions given in this manual are unable to cover in detail all the conditions and situations that may arise.
The operator and/or user must use common sense and caution when operating the product
especially for any matters that are not referred in the above
-
Note: For specific maintenance and safety information about this product, consult the user's manual provided with it. If it has been lost or misplaced, contact your local retailer for a replacement.
-
Important: The information contained in this instructions manual describes components available at the time of publication. We reserve the right to make changes without prior notice and without obligation to make alterations to components previously manufactured.
3.3- WARNING! Specific safety precautions
-
Never permit a person without training or instruction to operate this machine.
-
Make sure there is always good ventilation when operating the product. Fumes from engine exhaust can cause serious injury or death.
-
Never run the engine indoors!
-
Please avoid running the engine in areas without good ventilation such as indoors, plastic green houses, tunnels, underground caves etc.
-
Make sure there are no missing or loose fasteners, and that the stop switch is working properly.
-
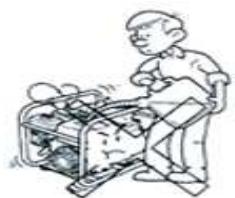
Stop the motor immediately if the product suddenly begins to vibrate or shake. Inspect for broken, missing or improperly installed parts or attachments.
-
Never smoke or light fires near the hedge trimmer. Keep the trimmer away from excessive heat. Engine fuel is very flammable and fire could lead to serious personal injury or property damage.
-
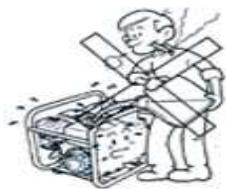
Make sure of no fuel leaking from Fuel tank, Fuel cap, Fuel pipe and Carburetor and other parts which fuel may leak. Repair the machine if fuel leaking, make sure no leaking again.
-
Don't get product close to inflammable materials such as ropes, dead leaves, waste paper and oilcloth etc.
-
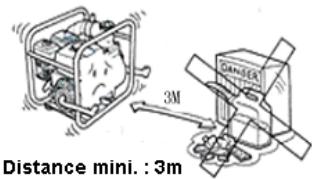
After refueling, screw the fuel cap back tightly onto the fuel tank and then carry the product to a spot 3m or more away from where it was refueled before turning on the engine.
- Refuelling
Never store cans of fuel or refill the fuel tank in any place where is a boiler stove, wood fire, electrical sparks, welding sparks or any other source of heat or fire which might ignite the fuel.
Don't smoke when handling the fuel.
When refilling the tank, always turn off the engine first and take a careful look around to make sure that there are no sparks or open flames anywhere nearby before refuelling.
When refueling:
STOP ENGINE!
NO SMOKING!
DO NOT SPILL!
-
If any fuel spillage occurs during refuelling, use a dry rag to wipe up spills before turning the engine back on again.
-
Do not transport this unit on an uneven surface of the road for a long time when the fuel tank is full. This may cause fuel spillage after the tank cap is loosened as a result of bumping and impacting.
- Before starting engine, keep children and animals out of the working area.
- Never touch the muffler, spark plug and plug wire while the engine is in operation or immediately after stopping the engine. Doing so could result in electric shock and/or serious burns because of high temperature.
- For safe operation, use caution and keep the children away from the spot where the engine is in operation.
- The ambient working temperature should be within +5^ and +60^ . Otherwise; the pump is easy to get damage.
- Never use the pump without water in it. Doing so could result in serious damage of the pump.
- Be sure to use a suction hose (not included).
Please use hose buckles and hose tape (not included) when connecting the suction hose (not included) and the drain hose (not included) with the water pump,
- Do not move the water pump until the engine is turned off and the pump has stopped rotating.
3.4-Fuel
3.4.1- Fuel level check

ATTENTION: always check the fuel level before
each use and startup.
Check the fuel level with engine switched off and with pump on flat ground.
- Remove the fuel tank cap (3) and check fuel level.
- Refill as deemed necessary
3.4.2-Fuel recommendations
- Use unleaded gasoline with rating of 95 or 98.
- These engines are certified to operate on unleaded gasoline.
- Unleaded gasoline produces fewer engine and spark plug deposits and extends exhaust system life.
- Never use stale or contaminated gasoline or an oil/gasoline mixture.
- Avoid getting dirt or water in the fuel tank.
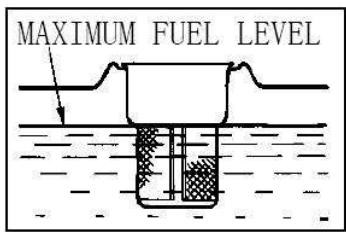
Fig.2
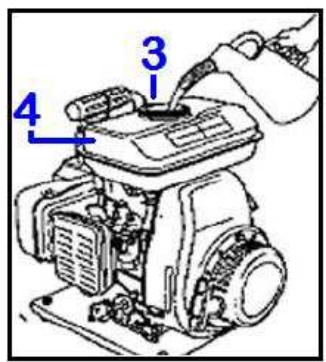
Fig.3
DANGER:
- Fuel catches fire easily. So be careful with your operation to avoid fire.
- Smoking is extremely dangerous: always be sure to keep lit cigarettes away when mixing fuel or refilling fuel tank.
- When refilling the tank in operation, always turn off the engine first. Don't refill the tank until the engine is cooled.
- Never put any inflammables material near the engine when it is running.
- After refueling and before starting engine, clean any fuel drops or spills with a dry cloth. If
any fuel spillage occurs during refueling, use a dry rag to wipe up spills before turning the engine back on again.

ATTENTION: Gasoline is a flammable and explosive product.
You can get burn or be seriously injured during handling.
- Stay away from any spark or flame
- Handle only in outdoors
- Clean if overflows
3.5-Oil
3.5.1- Oil level check

ATTENTION: always check the oil level before each use and startup
Running the engine with a low oil level can cause engine damage
Check the engine oil level with engine switched off and with pump on flat ground.
- Remove the filler cap/dipstick [9] and wipe it clean.
- Insert and remove the dipstick without screwing it into the filler neck. Check the oil level shown on the dipstick.
- If the oil level is low, fill to the edge of the oil filler hole with the recommended oil.
- Screw in the filler cap/dipstick securely.
3.5.2- Engine oil recommendations
Oil is a major factor affecting performance and service life.
Use 4-stroke automotive lubricating oil.
SAE 10W-30 is recommended for general, all-temperature use.
Other viscosities shown in the chart may be used when the average temperature in your area is within the recommended range.
The SAE oil viscosity and service classification appear on the label on the oil container.
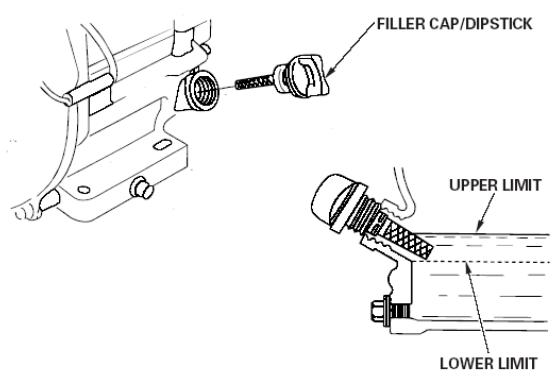
Fig. 4
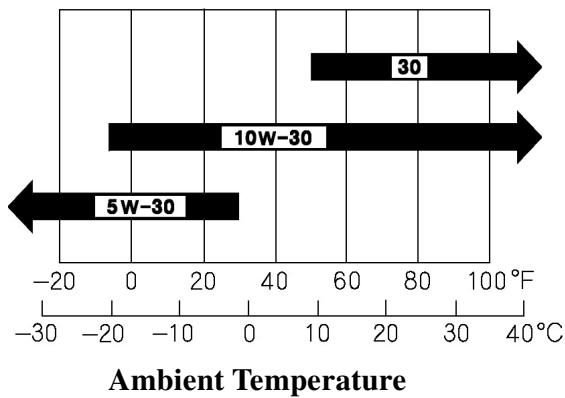
Fig.5
IV. GETTING STARTED
4.1- Unpacking
- Remove product from its packaging.
- Check that product and accessories are not damage
- Place the pump on a flat, firm surface.
4.2- Carrying handle
Insert and screw the carrying handle (2) in its location (see fig.1)
4.3- Hoses assembly
Important: Hoses are not included
Use only PVC suction ringed hoses or other hoses with similar quality.
4.3.1- Suction hose
a) Preliminary notes:
Use a commercially available hose, hose connector, and hose clamp.
The suction hose must be of reinforced, non-collapsible wall or wire braided hose to prevent suction collapse.
The suction hose length should not be longer than necessary, as the pump performance is best when the pump is not far above the water level.
Self-priming time is also proportional to the suction hose length.
Using a longer suction hose will increase the self-priming time.
The strainer is provided with the pump and should be attached to the end of the suction hose with a clamp as shown (fig.6)
b) Assembly (Fig.6)
- Insert the coupling into the suction hose.
- Use the clamps and tape (not supplied) and tighten firmly. Then screw the hose coupling to the pump suction inlet [11].
- Insert strainer in suction hose.
- Use the clamps and tape (not supplied) and tighten firmly Remark: always install the strainer on the end of the suction hose before pumping. The strainer will prevent debris from entering the pump that can cause slogging or pump damage.
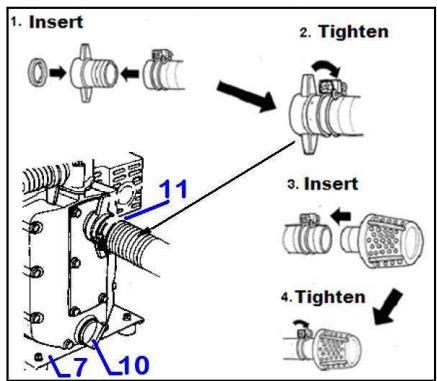
Fig.6
Note: Make sure the washer is properly fitted on the intake hose coupling.
If the washer of the suction hose is loosened, or the hose buckle is lost or damaged, the water will not be pumped properly due to air leakage
4.3.2- Discharge hose
a) Preliminary notes:
Use a commercially available hose, hose connector, and hose clamp. A short, large-diameter hose is most efficient.
A long or small-diameter hose increases fluid friction and reduces pump output.
Tighten the hose band securely to prevent the hose from disconnecting under high pressure
b) Assembly (Fig.7)
- Insert the coupling into the discharge hose.
- Use the clamp and tape (not supplied) and tighten firmly.
Then screw the hose coupling to the pump discharge port [12].
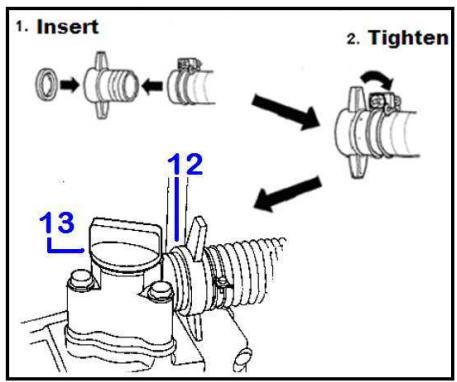
Fig.7
4.4- Before starting engine
4.4.1- Check that both suction hose and discharge hose are properly assembled.
4.4.2- Before starting engine and before each use, ensure that both fuel tank and oil tank are fully filled in. Refill if necessary. (See 3.4 and 3.5 for level check and refill instructions)
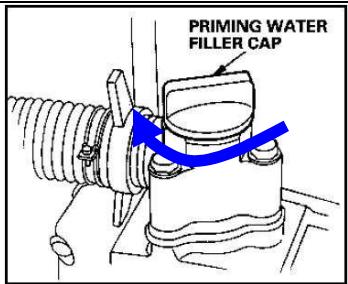
4.4.3- Priming the pump
The pump chamber should be completely filled before operating.
Note: Do not operate the pump without priming water or the pump will overheat. Operating the pump dry will destroy the pump seal. If the unit has been operated dry, stop the engine immediately and allow the pump to cool before adding priming water.
Fill water into the self-priming port [13] to make the suction hose and the water pump full of water.
Proceed as follows:
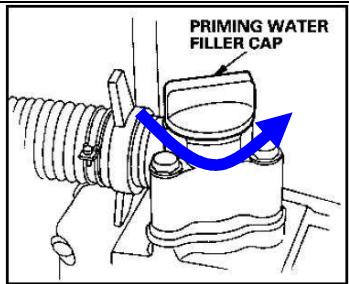
1. Remove cap
Fig.8
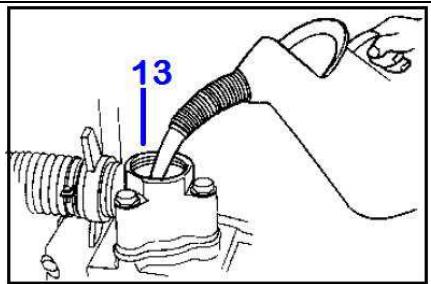
2. Fill in with water
Fig.9
3. Replace cap
Fig.10
IMPORTANT: A continual idling or operation without water in the pump will lead to its damage.
So before starting the engine, please make sure that the pump has been refilled water.
If the suction hose strainer appears above the water in the course of operation, stop the engine as soon as possible.
- Make sure that the joint of the suction hose is tightened. Otherwise the air leakage will lead to no suction or have effect on the power of the pump.
- Do not install a valve or tap on the discharge hose.
If you proceed with such installation in order to control the water flow, then never turn off the valve or tap during operation
- Water will not be pumped if the discharged hose is obstructed, the sudden great pressure created inside the pump may damage the pump.
- If the pump is installed in a location where the discharge hose is likely to be stepped on or pressed, please ensure to cover it with suitable protective covering.
- Be sure to install the attached filter (strainer) at the head of the suction hose when it is in use.
- Set the suction hose filter (strainer) under the water, but never allow it to touch the mud or sand.
- Before use, please check whether each part is loosened or there is any petrol dripping in the fuel tank.
- Before starting the engine, make sure that there is no object that can get wet near the pump. Remind all bystanders around it that the machine will start working
4.5- Starting the engine
- Turn the fuel valve (a) ON

Fig.11
- Completely close the choke lever (14) to OFF position.
Remark: do not use the choke if the engine is warm or the ambient temperature is high
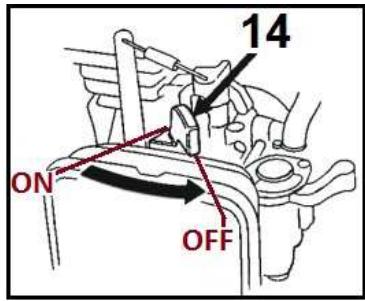
Fig.12
- Turn the engine switch (5) to ON position.
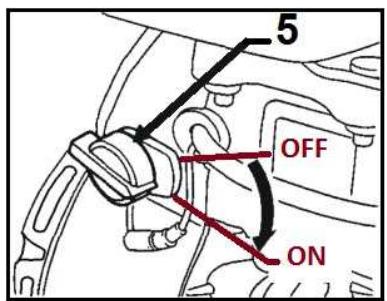
Fig.13
- Move the throttle lever downward slightly, just past the idle position.

Fig.14
- Operate the recoil starter (6).
Pull the starter grip rope lightly until you feel a resistance, then pull briskly until engine starts.
Return the starter rope gently.
Repeat operation if necessary, and until engine starts.
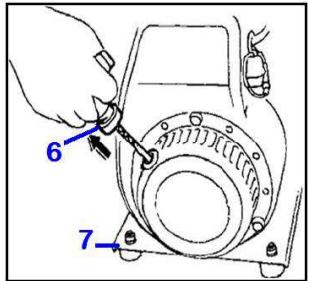
Fig.15
Tips: Hold pump (one hand on handle and one foot on base)
Do not pull starter grip rope over its full length.
Return starter rope gently so as not to damage the recoil starter.
- As the engine warms up, gradually open the choke (14)
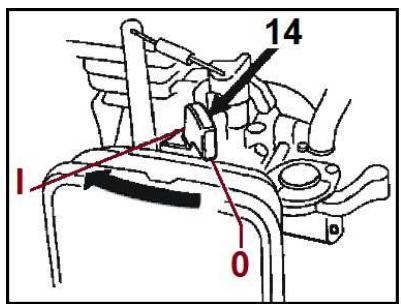
Fig.16
- Set the throttle lever (16) at the desired speed.
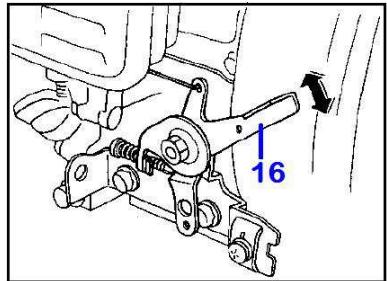
Fig.17
Remarks:
- Hold the engine firmly with your left hand, then pull out the starter handle with your right hand, gently in the beginning until you feel the resistance, and then pull it out rapidly.
- Please do not pull out all the starting rope and do not release it rapidly. Doing so will damage and/or breakdown the starter.
- If you restart the engine after it is stopped, please set the throttle to the "OFF" position.
Troubleshooting
- If after three or four attempts, the engine still does not start, excessive fuel may have drowned the spark plug. You can try to start without the choke, or disassemble the spark plug to dry the electrode which may be submerged in fuel.
- If the electrode is dry upon dismantling (lack of gasoline), close the fuel cock, and then check the sediment cup located under the carburetor.
Remove impurities and then check the gasoline flow by opening the fuel cock and assemble the cup, paying attention to the condition of the seal
After the engine is started, turn on the choke throttle gradually and withdraw the throttle switch.
Leave the engine running for 1-2 minutes at low speed to heat the engine.
4.6- Stopping the engine
4.6.1-In normal use
Please withdraw the throttle switch and leave the engine running for 1~2 minutes at low speed to cool the engine.
- Move the throttle lever (16) all the way up.
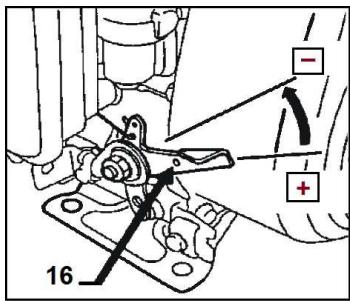
Fig.18
- Turn the engine switch (5) to OFF position.
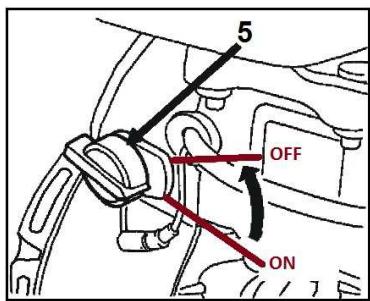
Fig.19
- Turn the fuel valve (a) to OFF position.
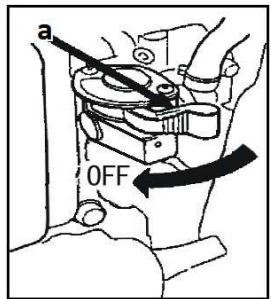
Fig.20
4.6.2- In an emergency
In case of emergency: Please stop the engine immediately
To stop the engine in an emergency, turn the engine switch (5) to the OFF position.
4.7- Adjusting the idle speed of the engine
The idle speed of the engine was adjusted in the factory
The user should not attempt to adjust it to avoid any danger.
After the throttle lead is completely released, if the idling speed of the engine is too low or too high, please contact the qualified service person to adjust it.
4.8- After use
Remove the hoses, drain off the water inside the pump and remove the water and impurity substances inside the hoses. Store it in the specified place.
Important! In cold winter, please be sure to drain off the water inside the pump after use. As the temperature outdoors is below zero centigrade, the water inside the pump will be frozen, which may damage the pump.
4.9- High altitude operation
At high altitude, the standard carburetor air-fuel mixture will be too rich.
Performance will decrease, and fuel consumption will increase.
A very rich mixture will also foul the spark plug and cause hard starting.
High altitude performance can be improved by specific modifications to the carburetor.
If you always operate your pump at altitudes above 6,000 feet (1,800 meters) have an authorized water pump dealer perform this carburetor modification.
In any case, engine horsepower will decrease about 3 to 5% for each 1,000 feet (300m) increase in altitude.
Note: When the carburetor has been modified for high altitude operation, the air-fuel mixture will be too lean for low altitude use. Operation at altitudes below 6,000 feet (1,800 meters) with a modified carburetor may cause the engine to overheat and result in serious engine damage.
For use at low altitudes, have an authorized water pump dealer return the carburetor to original factory specifications.
V. OPERATION
This product is a clean water centrifugal pump of single-step single-suction cantilever. Never use it in the areas where the water is too deep or too shallow or rich in solid impurity substances.
Use this pump only for the clean water and farming water. Never use it for any other water or liquid such as drinking water, muddy water, sea water, flammable liquid (petrol, kerosene, fuel oil, heavy oil etc.) chemicals, acid / alkali liquid etc.
This product is for outdoor used only!

Before any intervention on product, ensure that motor is off. And cooled off.
Ensure that pump is kept away from fire.
6.1- General Product Maintenance
Clean plastic parts with a soft clean cloth.
Do not use aggressive cleansers (solvents or abrasive cleansers), abrasive sponge or sharp objects.
Do not put or immerse product in water or any other liquid.
Use only genuine parts or their equivalent for maintenance or repair. Replacement parts which are not of equivalent quality may damage the pump.
NOTE: 1. Service more frequently when used in dusty areas.
- The pump should only be serviced by an authorized dealer.
6.2- Specific Maintenance
6.2.1- Changing the oil
Tip: drain the oil while the engine is still warm to assure rapid and complete draining.
- Remove the oil filler cap/dipstick (9) and the oil drain screw (8) to drain the oil.
Tip: tilt slightly the pump to thoroughly drain the oil
- Reinstall the oil drain screw (8) and tighten securely.
Ensure that washer (b) is properly fitted on the screw (8).
- Refill with the recommended oil to the specified level (see 3.5.1 and 3.5.2)
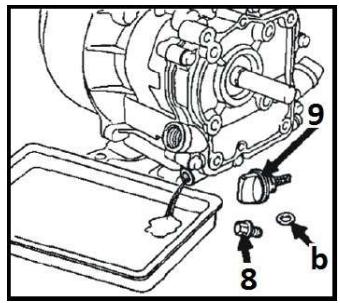
Fig.21
Remark: Please dispose of used motor oil in a manner that is compatible with the environment.
We suggest you take it in a sealed container to your local recycling centre or service station for recycling. Do not throw it in the rubbish, or pour it in the gutter or in the environment.
6.2.2- Air filter
A dirty air cleaner will restrict air flow to the carburettor. To prevent carburettor malfunction, service the air cleaner regularly. Service more frequently when operating the pump in extremely dusty areas.
WARNING! Never use gasoline or low flash point solvents for cleaning the air cleaner element. A fire or explosion could result.
NOTICE: Never run the engine without the air cleaner. Rapid engine wear will result from
contaminants, such as dust and dirt being drawn into the engine.
- Unscrew the wing nut (c), remove the air filter cover (e) and remove the foam element (d).
- Wash the foam element (d) in gasoline or wash in non-flammable or high flash point solvent. Allow the element to dry thoroughly.
- Soak the foam element (d) in clean engine oil and squeeze out the excess oil.
Note: The engine will smoke during initial start-up if too much oil is left in the element.
- Clean air filter compartment by tapping it or blowing with
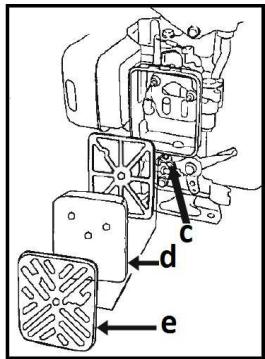
Fig.22
air compressed air.
To ensure proper engine operation, the spark plug must be properly gapped and free of deposits.
- Remove the spark plug.
WARNING! The muffler becomes very hot during operation and remains hot for a while after stopping the engine. Be careful not to touch the muffler while it is hot.
ATTENTION: never touch the spark plug immediately after the engine is stopped to avoid getting burnt by the high temperature.
Remark: Too much suction of the fuel or using wasted or regenerated oil can pollute the spark plug electrode and make it hard to start the engine.
- Visually inspect the spark plug. Discard it if the insulator is cracked or chipped.
Clean the spark plug with a wire brush if it is to be reused or fit a new one.
- Measure the plug gap with a feeler gauge.
Correct as necessary by bending the side electrode.
The gap should be: 0.70-0.80mm (0.028-0.031 in)
- Check that the spark plug washer is in good condition, and thread the spark plug in by hand to prevent cross-threading.
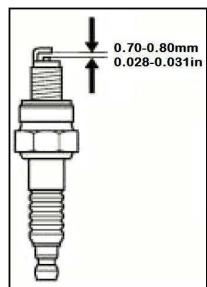
Fig.23
-
After the spark plug is seated, tighten with a spark plug wrench to compress the washer.
-
If installing a new spark plug, tighten 1/2 turn after spark plug seats to compress the washer.
-
If reinstalling a used spark plug, tighten 1/8-1/2 turn after the spark plug seats to compress the washer.
NOTICE:
-
The spark plug must be securely tightened. An improperly tightened spark plug can become very hot and may cause engine damage.
-
Use only the recommended spark plug or equivalent. A spark plug which has an improper heat range may cause engine damage.
6.2.4- Fuel system cleaning
a) Sediment cup cleaning
-
Move the fuel valve to the OFF position and then remove the fuel sediment cup and O-ring.
-
Wash the sediment cup and O-ring in nonflammable solvent and dry them thoroughly.
-
Place the O-ring in the sediment cup and then install and tighten the sediment cup securely.
-
Move the fuel valve to the ON position, and check for leaks. Replace the O-ring if there is any leakage.
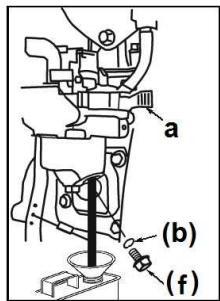
Fig.24
b) Fuel tank cap & filter
- Remove the fuel tank cap and filter.
- Wash the filter in nonflammable solvent and dry it thoroughly.
- Replace filter and cap
6.3- Long Term Storage
When it is not in use for a long time and needs storing, please drain off the fuel in the fuel tank and the cylinder. The long-term storage with fuel in them will cause the block inside the cylinder and the failure of the engine (hard to start or lower output of the power).
- Please leave the tank cap a bit open in storage. Being tightened may lead to the deformation of the cap. If the pump is not in use for more than a mouth, store it at the places where there is less dust and lower humidity after it is repaired as follows:
- Drain off the fuel from the fuel tank.
- Refill the pump with water and start the engine. Keep it running at low speed until the fuel is used up.
- Remove the spark plug and refuel 1-2cc of motor oil into the cylinder. Pull out the hand starter 2-3 times.
- Replace the spark plug as it was and pull the starter. Release the starter grip at the position where you feel it hard to pull.
- Drain off the water in the pump thoroughly and wipe out the water with a rag
- Before storing the machine, repair or replace any worn or damaged parts.
- Remove the air cleaner element and clean with gasoline.
Rinse (to remove any gasoline excess) and dry thoroughly, then add a few drops of oil. Reassemble.
- Store the machine in a clean, dust-free area.
Product must be stored in a dry location. Always lock up product and keep out of reach of children
6.4-Transportation
When transporting the water pump, turn off the engine switch and the fuel valve.
Keep the water pump levelled to prevent fuel spillage.
Fuel vapour or spilled fuel may ignite.
WARNING! Contact with a hot engine or exhaust system can cause serious burns or fires.
Let the engine cool before transporting or storing the water pump.
Latch or secure pump when transporting in a truck, van...to avoid any damage or injury.
6.5- Disposal
When disposing of your machine, remove oil and fuel from the machine, and be sure to follow the local regulations. Do not dispose of in/with household rubbish.
6.6- Troubleshooting
| Phenomena | Cause | Handling method |
| The starter lead cannot be pulled out. | The wheel of the starter lead is struck or blocked by other things. | Disassemble and repair (Competent servicing dealer) |
| The crankshaft is not running. | The engine is burnt or blocked by other things. | Disassemble the engine and replace the damaged parts (Competent servicing dealer) |
| The engine cannot be started. | The fuel is inferior. (Impurity, regenerated) | Replace it. |
| The fuel is sucked too much. | Turn on the throttle fully and pull the starter continuously. | |
| The muffler exhaust | Clean it. | |
| The damage, short circuit, and breakage if the spark plug electrode | Clean the electrode or replace the spark plug. Check and replace the circuit. | |
| The blockage of the carburetor | Disassemble and repair the carburetor. (Competent servicing dealer) | |
| The damage of the piston and the cylinder | Disassemble and repair the engine. (Competent servicing dealer) | |
| The breakage and short circuit of the coil | Replace. (Competent servicing dealer) | |
| No suction | Lack of water in the pump | Supply water. |
| Looseness of the joint of the suction hose | Don’t let air in when installing. | |
| Inferior buckles at the joint of the suction hose | Replace a quality-proven one. (Competent servicing dealer) | |
| Cracking and damage of the suction | Replace a quality-proven one. (Competent servicing dealer) | |
| Bent drainpipe, the valve is locked. | Straighten the bent part and turn on the valve. | |
| Small amount of delivery | Blockage of the suction filter screen | Clean the suction filter screen. |
| Higher place than that of the water source pump | Get the pump close to the water source. | |
| Too far away or too high from the water supply | Get the pump close to the water supply spot, as close as possible. | |
| Blockage inside the pump | Disassemble and repair the pump. (Competent servicing dealer) | |
| Wear-out of the turbine | Replace the turbine. (Competent servicing dealer) | |
| Too low speed of the engine | Throttle up. | |
| Low output power of the engine | Inferior fuel--replace and check. | |
| Check whether the air filter is blocked--clean. | ||
| Check whether the fuel filter is blocked -clean. | ||
| Adjust and repair the carburetor. (Competent servicing dealer) | ||
| Disassemble and repair the engine. (Competent servicing dealer) | ||
| Water is leaked out from the pump. | Looseness of the assembled screw bolt | Increase the torsional force. |
| Damage or cracking of the buckle | Replace the buckle. (Competent servicing dealer) | |
| Wear-out or damage of the mechanical seal | Replace the mechanical seal. (Competent servicing dealer) |