USER MANUAL PARTY 250 EDENWOOD
Thank you for choosing this EDENWOOD product. EDENWOOD products are chosen, tested, and recommended by ELECTRO DEPOT, so you can be sure you are getting a top-quality, easy-to-use product that won't let you down.
We're confident your new device will be a pleasure to use every day!
Welcome to ELECTRO DEPOT.
Table of Contents

Parts
Product overview
Intended use
Specifications
Declaration of conformity

Before using the product Connections Operation

Cleaning and maintenance Troubleshooting Storage
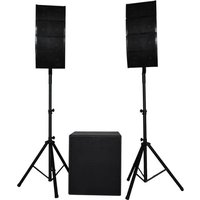
Parts
| Button | Description |
| A | | Speaker front panel - emits sound and coloured lights |
| B | | Control panel |
| 1 | MASTER +/- | Turn the knob to decrease or increase the volume |
| 2 | 1-2 | Microphone input socket 1 and 2 (microphone not provided) |
| 3 | -- IN | Socket to connect a line (AUX) input cable (not provided) with 3.5mm jack |
| 4 | | Slot for a TransFlash (TF) card |
| 5 | | Socket for USB memory stick (USB memory stick not provided) |
| 6 | | USB Type-C socket for charging with charging indicator light |
| 7 | -/+ | Turn the knob to decrease or increase the microphone volume |
| 8 | | • Press and hold to turn the power on or off
• Press to turn the LED dynamic lights on or off |
| 9 | TWS | In BT mode:
• Press and hold to connect/disconnect TWS mode |
| | In BT/USB/TF mode:
• Press to play or pause music
In LINE (AUX) mode:
• Press to mute or unmute the sound |
| 10 | II | In BT mode:
• Press twice quickly to disconnect the Bluetooth
In FM mode:
• Press to scan all stations (channels) and automatically store them |
| | In BT/USB/TF mode:
• Press to skip to next track or file
In FM mode:
• Press to skip to the next station (channel) |
| 11 | | |
| 12 | In BT/USB/TF mode:
Press to skip to previous track or file
In FM mode:
Press to skip to the previous station (channel)
Press to select mode: BLUE (BT)/FM/LINE (AUX)/USB or TF
Handle
USB type-C charging cable (provided) |
| 13 |
| C |
| D |
Product overview
- Unpack and remove all labels from the unit except the nameplate. Please check that all parts are included and intact. If the unit is damaged or faulty, do not use it and take it to your retailer or after-sales service centre.
- Keep all packaging out of the reach of children. There is a risk of accidents if children play with packaging materials.
Intended use
This product is for household use only. It is not designed for industrial or professional use.
Any other use may damage the product or cause injury.
Specifications
| Model: | 991922 - EDENWOOD PARTY 250 SPEAKER |
| Company name or registered trademark, business registration number and manufacturer's address: | ELECTRO DEPOT / R.C.S. 433 744 539 1 route de vendeville, 59155 Faches Thumesnil, FRANCE |
| Power input: | DC 5V, 2A |
| Speaker output power: | 40 W (20 W x 2) RMS 250W MAX |
| Speaker size / impedance: | 6.5" / 4Ω x 2 |
| Signal to noise ratio: | ≥80dB |
| Operating voltage: | Type-C 5V/2A |
| Operating frequency: | 90Hz to 20kHz |
| Rechargeable Li-ion battery: | 7.4V, 3600mAh |
| Charging time: | 4 hours |
| Playback time: | 7 hours at half volume |
| Bluetooth®version: | V5.3 |
| Bluetooth (BT) name: | EDENWOOD PARTY 250 V2 |
| BT range: | 10 metres |
| BT frequency: | 2402MHz to 2480MHz |
| Maximum power transmitted by BT: | 1.95 dBm |
| AUX (RCA jack) input: | 3.5mm jack |
| Microphone input: | 6.35mm jack |
| USB /TF card compatibility: | Up to 128GB |
| Compatible file format: | MP3 |
| Size (W x D x H): | 250 x 240 x 550cm |
| Weight: | 4.8kg |
| Working temperature range: | -10°C to 40°C |
| Protection class: | Class III |
Due to constant developments and improvements in the design of our products, changes to the specifications below are likely to occur without notice.
Compatibility disclaimer
Wireless performance is dependent on your device's Bluetooth wireless technology. Please check with the manufacturer. ELECTRO DEPOT cannot be held responsible for any data loss or leaks resulting from the use of these devices.

Bluetooth®
In this document, ELECTRO DEPOT declares that this unit complies with the essential requirements and other relevant provisions of Directive 2014/53/EU. The declaration of conformity can be viewed on the following website: http://www.electrodepot.fr/sav/ notices/
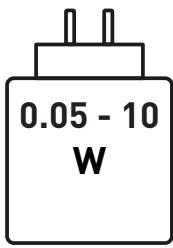
- The power supplied by the charger must be between, at least 0.05 Watts by the radio equipment and, at most, 10 Watts to achieve the maximum charging speed.
- If the charger is abnormally hot during charging, this may indicate that it is not powerful enough. If this is the case, opt for a charger with a higher maximum power.
Before using the product

IMPORTANT!
This speaker contains a non-replaceable battery.
- Before plugging in and starting the unit, make sure that all controls are turned off or set to a low level.
- If the speaker is not performing correctly, this may be because the battery is too low and needs recharging.
Charging the speaker
- Connect the USB connector on the charging cable to a USB socket on a computer, laptop, or USB charger plug (with a rated output of DC5V/2A and above).

NOTE: If charging via a computer or laptop, the charging time will be much longer.
- Insert the USB Type-C connector into the charging socket.
The charging indicator light turns on to confirm charging.
- When you first charge the battery, charge it until it is full (approx. 4 hours).
- When the battery is full, the charging indicator light turns off.
- A full battery provides approximately 7 hours of operation when the volume is set at 50% of the maximum level.
If the battery is low, a low battery warning will sound. Charge the battery immediately.
- To preserve the battery's lifespan, we recommend charging the speaker at least once every 2 months.

WARNING!
Unplug the charging cable once the speaker is fully charged.
- To preserve the battery life, please charge it at least once a month, even if you are not using it.
Connections
Connect your device to the speaker using the cables and sockets/slots detailed below:
| Device | Connection | Speaker Socket/Slot |
| Microphone | Use a microphone cable with a 6.35mm plug (not provided). | 12 |
| Phone, iPad or tablet MP3 player | Use a LINE (AUX) input cable with 3.5mm plug (not provided). The other end of the cable must fit your audio device. | --- IN |
| USB memory stick | Plug in your USB memory stick (not provided) to play MP3 files. | → |
| TF card | Put your TF card (not provided) in the speaker TF slot to play MP3 files. | → |

NOTE:
- For best playback, make sure only compatible MP3 audio files are stored on the USB and TF card.
- When the USB memory stick or TF card are inserted, the stored files will immediately start playing.
Pairing a Bluetooth (BT) device
To connect this speaker to a Bluetooth device, you must first pair the speaker with the device.
-
Turn on the Bluetooth device (such as your phone or tablet):
-
Go to settings on your device.
- Select Bluetooth and turn it on.

NOTE: Before attempting to connect with the speaker, check and remove any connections such as the LINE (AUX) input cable or Trans Flash card. Also, if your Bluetooth device was previously connected to another device, remove that connection.
- To turn on the speaker, press and hold the 念 button. A sound prompt will play, and the blue indicator lights on the buttons will flash to show the speaker is searching for a Bluetooth device. (If the speaker is already turned on and/or it is in another mode, press the 念 button, to select the Bluetooth mode).
- When the Bluetooth device displays the speaker's Bluetooth name, EDENWOOD PARTY 250 V2, select the name and confirm the connection. A sound will play to confirm that the devices have paired, and the blue indicator lights will become constant.
B Product usage

NOTE:
- If the speaker's Bluetooth name does not appear on your Bluetooth device, move the devices closer together. If that does not work, turn the devices off and then on again before starting the pairing process again.
- When pairing the units, make sure they are not more than 10 metres apart and there are no physical obstructions between the units.
- Once you have paired a device, the devices should remember the connection and you will not need to pair them again.
Disconnecting a Bluetooth connection
To disconnect the Bluetooth connection
Press the button twice quickly.
- Go to the connected Bluetooth audio device (such as your mobile phone) and disconnect.
Connecting two speakers (TWS)
You can connect two EDENWOOD PARTY 250 speakers to an external audio device. Once it is set up, this function works in BT mode only.
- Place the speakers within 10 metres (with no obstructions) of each other.
- Turn on both speakers and a sound prompt will play and the LED lights will flash.
- Make sure that both speakers are not connected to any other Bluetooth devices.
- Press and hold the TWS button on the second speaker for 3 seconds. A sound prompt will play and the blue indicator lights on the buttons of the speaker flash to confirm it is searching for another speaker. The blue indicator lights on the buttons of one speaker stop flashing while on the other speaker they continue to flash when the two speakers are successfully connected.
- Connect the external Bluetooth device through its Bluetooth settings to one of the speakers (this will be the main speaker). A sound prompt will play to confirm the connection and the speaker blue indicator lights will stop flashing.
- Now you can start playing music through both speakers.
To disconnect TWS, press and hold the TWS button on either speaker.

NOTE:
You can only connect the two speakers when you are in Bluetooth mode.
If you turn the speakers off, the TWS connection will be removed. When you turn the unit back on, you will need to pair the speakers again for TWS function.
- You can only connect an EDENWOOD PARTY 250 speaker with another EDENWOOD PARTY 250 speaker. You cannot pair the EDENWOOD PARTY 250 speaker with other models or brands of speakers that have TWS capability.
If you want to make a TWS connection with a different speaker, remove previous connections before attempting to connect with the new speaker.
If you cannot successfully connect two speakers, turn off both speakers and start the connection process again.
Operation

WARNING!
Before plugging in and starting the speaker system, make sure that all controls are turned off or set to a low level.

NOTE:
- You can use the speaker while it is charging but if the battery is too low, the speaker performance might be poor. Using a low volume setting will help to improve the sound.
- To ensure excellent sound quality, we recommend that you disconnect the charging cable from the speaker once charging is complete.
Playing music
- Press and hold the _条 button to turn on the speaker. A sound prompt will play and the LED lights will turn on.
- Setup your connection (as detailed above).

NOTE: If the unit is not used for 15 minutes, it will go into standby mode and the LED lights will turn off. Press and hold the switch on the speaker to turn the unit on again.
- Connect to your audio source as described in the Connections section.
- To select the playback source, press the button repeatedly: BT, FM, TF, USB or LINE (AUX). A melody will play each time you enter a new mode.

NOTE:
- When you connect a USB memory stick or TF card, the speaker will immediately enter this mode and start to play the music.
-
Make sure the volume is turned up on both the speaker and the external device it is connected to.
-
To control playback of the audio, you can either use your external device's controls (if available), or you can use the following buttons on the speaker:
| Button | Mode | Action |
| II | Bluetooth/TF/USB | Press to play or pause the track or file. |
| LINE (AUX) | Press to mute the sound. Press again to unmute the sound. |
| ↓ | Bluetooth/TF/USB/FM | Press to go to the previous track, file or station (channel). |
| ▶ | Bluetooth/TF/USB/FM | Press to go to the next track, file or station (channel). |
| MASTER +/- | All modes | Turn the knob to decrease or increase the volume. |
| -/+ | All modes | Turn the knob to decrease or increase the microphone volume. |

NOTE: LINE (AUX) playback can only be controlled by the external device such as your mobile phone or tablet unless the function is specified in the table above.
- To turn off the speaker, press and hold the 柴 button.
FM Radio
- Press the button repeatedly to select the FM radio mode. The frequency will display on the screen, for example XX.XXMHZ.
- Press the button to automatically scan.
- Once the stations (channels) have been saved, in FM radio mode, press the or button to skip to the next or previous station (channel).
Using the microphone
You can connect a microphone to sing karaoke or create a loudspeaker system to communicate with a large audience.
- Connect the microphone (not provided) to the speaker using a microphone cable (not provided).
- Turn the speaker on.
- Turn the 12 -14 knob clockwise to increase the microphone's volume and anticlockwise to decrease the volume.
- Turn the MASTER +/- knob clockwise to increase the music's volume and anticlockwise to decrease the volume.
- When you have finished using the microphone, unplug the cable from the speaker.

NOTE: You can use the microphone in all modes.
LED dynamic lights
- To turn the LED dynamic lights on, press the 品 button.
- To deactivate the LED dynamic light function, press the 柴 button.
Cleaning and maintenance

WARNING!
- Always turn off and unplug the unit from the power supply before cleaning.
- Never immerse the unit in water or any other liquid.
-
When cleaning the unit, never use abrasive products, metal brushes, scouring or metal foams, or sharp utensils.
-
Regularly clean your unit and keep it dust free to reduce the need for repairs and ensure product longevity.
- Clean the unit with a dry, soft cloth. Make sure that no liquid enters the inside of the unit.
- If you do not plan to use the unit for a long time, we recommend that you store it in its original packaging in a cool, dry place, away from direct sunlight, excessive dirt and dust.
Troubleshooting
| Problem | Possible Cause | Solution |
| The unit does not work. | ·The unit is not charged. | ·Fully charge the battery.
·Make sure the external device you are charging from is connected to the mains power supply and/or turned on.
·Check the speaker is turned on.
·If the unit still does not work, take it to a qualified service provider. |
| The usage time is too short after charging. | ·The charging time is insufficient. | ·Charge the battery fully as shown in the charging section. |
| There is no sound. | ·The volume is too low.
·The devices are incorrectly connected. | ·Turn the volume up (on your external device or speaker).
·In LINE (AUX) mode, check the cable is connected and the external device is working properly.
·When using the microphone, check the cable, make sure the microphone is switched on and the microphone volume is turned up on the speaker.
·In USB or TF mode, check the compatible files are on the USB memory stick or TF card and that they are not corrupted. Try reloading the files or use another USB memory stick or TF card. |
Storage
- Always unplug the unit before storing it.
- Store the unit in a fresh, dry and dust-free place, out of the reach of children and pets.
- Please retain the packaging and use it to store your unit when it is not in use for an extended period of time.

Merci!
This product is guaranteed against faults caused by defects in manufacturing or the materials used for a period of two years, starting from the date of purchase.* This warranty does not cover defects or damage caused by failure to install the device correctly, incorrect use of the product, or excessive wear and tear.
*proof of purchase required.
FR
CONDITION DE GARANTIE