USER MANUAL 1500 WATTS VALBERG
Heater Radiateur Kachel Calefactor
991620_991651_991652
INSTRUCTIONS FOR USE 02
CONSIGNES D'UTILISATION 18
Thank you for choosing this VALBERG product. VALBERG products are chosen, tested, and recommended by ELECTRO DEPOT, so you can be sure you are getting a top-quality, easy-to-use product that won't let you down. We're confident your new device will be a pleasure to use every day!
Welcome to ELECTRO DEPOT.
Table of Contents

Specifications

Installation LCD display Control panel Operation

Cleaning and maintenance
Specifications
| Model: | 991620 | 991651 | 991652 |
| Voltage: | 230 V ~ | 230 V ~ | 230 V ~ |
| Frequency: | 50 Hz | 50 Hz | 50 Hz |
| Rated power: | 1000 W | 1500 W | 2000W |
| Protection class: | II | II | II |
| IP protection: | IP24 | IP24 | IP24 |
| Pilot wire: | 6 orders | 6 orders | 6 orders |
P
Model identifier(s): 991620
| Item | Symbol | Value | Unit |
| Thermal power |
| Nominal thermal power | Pnom | 1.0 | kW |
| Minimum thermal power (indicative) | Pmin | N/A | kW |
| Maximum continuous thermal power | Pmax, c | 1.0 | kW |
| Auxiliary power consumption |
| At nominal thermal power | eI max | 0.0 | kW |
| At minimum thermal power | eI min | 0.0 | kW |
| In standby mode | eI SB | 0.00016 | kW |
| Manual thermal load control with a built-in thermostat | No |
| Manual thermal load control that receives information on the room and/or outside temperature | No |
| Electronic thermal load control that receives information on the room and/or outside temperature | No |
| Fan-adjustable thermal power | No |
| Type of thermal power/room temperature control |
| Single-level thermal power control - no room temperature control | No |
| Manual thermal control at two or more levels - no room temperature control | No |
A Product overview
| Room temperature control with a mechanical thermostat | No |
| Electronic room temperature control | No |
| Electronic room temperature control and daily programmer | No |
| Electronic room temperature control and weekly programmer | Yes |
| Other control options (select one or more options) |
| Room temperature control with a presence detector | No |
| Room temperature control with an open-window sensor | Yes |
| Remote control option | No |
| Adaptive activation control | No |
| On time limitation | No |
| Black globe sensor | No |
| Contact details: | ELECTRO DEPOT1 route de Vendeville59155 FACHES-THUMESNIL- FRANCE |
| Information requirements for electric local space heaters | P |
| Model identifier(s): 991651 |
| Item | Symbol | Value | Unit |
| Thermal power |
| Nominal thermal power | Pnom | 1.5 | kW |
| Minimum thermal power (indicative) | Pmin | N/A | kW |
| Maximum continuous thermal power | Pmax, c | 1.5 | kW |
| Auxiliary power consumption |
| At nominal thermal power | elmax | 0.0 | kW |
| At minimum thermal power | elmin | 0.0 | kW |
| In standby mode | elsB | 0.00016 | kW |
| Type of heat input for decentralised electric storage heaters only |
| Manual thermal load control with a built-in thermostat | No |
| Manual thermal load control that receives information on the room and/or outside temperature | No |
Electronic thermal load control that receives information on the room and/or outside temperature No
Fan-adjustable thermal power No
Type of thermal power/room temperature control
Single-level thermal power control - no room temperature control No
Manual thermal control at two or more levels - no room temperature control No
Room temperature control with a mechanical thermostat No
Electronic room temperature control No
Electronic room temperature control and daily programmer No
Electronic room temperature control and weekly programmer Yes
Other control options (select one or more options)
Room temperature control with a presence detector No
Room temperature control with an open-window sensor Yes
Remote control option No
Adaptive activation control No
On time limitation No
Black globe sensor No
ELECTRO DEPOT
1 route de Vendeville
59155 FACHES-THUMESNIL-FRANCE
Model identifier(s): 991652
| Item | Symbol | Value | Unit |
| Thermal power | | | |
| Nominal thermal power | Pnom | 2.0 | kW |
| Minimum thermal power (indicative) | Pmin | N/A | kW |
| Maximum continuous thermal power | Pmax, c | 2.0 | kW |
| Auxiliary power consumption | | | |
| At nominal thermal power | elmax | 0.0 | kW |
| At minimum thermal power | elmin | 0.0 | kW |
| In standby mode | elsB | 0.00016 | kW |
| Type of heat input for decentralised electric storage heaters only |
| Manual thermal load control with a built-in thermostat | No |
| Manual thermal load control that receives information on the room and/or outside temperature | No |
| Electronic thermal load control that receives information on the room and/or outside temperature | No |
| Fan-adjustable thermal power | No |
| Type of thermal power/room temperature control |
| Single-level thermal power control - no room temperature control | No |
| Manual thermal control at two or more levels - no room temperature control | No |
| Room temperature control with a mechanical thermostat | No |
| Electronic room temperature control | No |
| Electronic room temperature control and daily programmer | No |
| Electronic room temperature control and weekly programmer | Yes |
| Other control options (select one or more options) |
| Room temperature control with a presence detector | No |
| Room temperature control with an open-window sensor | Yes |
| Remote control option | No |
| Adaptive activation control | No |
| On time limitation | No |
| Black globe sensor | No |
| Contact details: | ELECTRO DEPOT1 route de Vendeville59155 FACHES-THUMESNIL-FRANCE |
B Product usage
Installation

IMPORTANT RECOMMENDATIONS TO READ BEFORE INSTALLATION.
- Do not install the unit directly below a socket.
- Do not install the unit in a damp room or near a water source.
- Do not use the appliance outdoors.
- Do not install the unit in an air current that could disrupt its regulation.
- Do not place the unit near a barrier limiting the airflow around it.
- Attach the heater vertically to the wall as described below.
- Choose screws and plugs suitable for the wall material and weight of the unit.
To hang the heater on the wall:
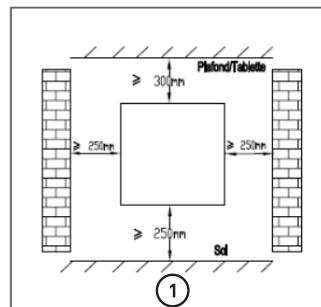
- Choose a suitable installation location for the heater. ①
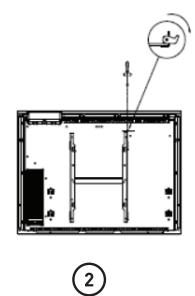
- Disassemble the wall bracket by loosening the screw (do not remove, only loosen) and slide the metal plate out of the hole. Take out the bracket by pulling down. ②
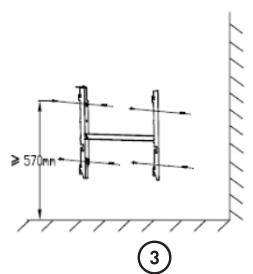
- Verify that the bracket is horizontal with a spirit level and mark the location of 4 holes on the wall. Drill 4 holes in the wall using a drill adapted to the diameter of wall plug. Insert the wall plug into the holes, then screw securely wall mount bracket onto the wall. ③
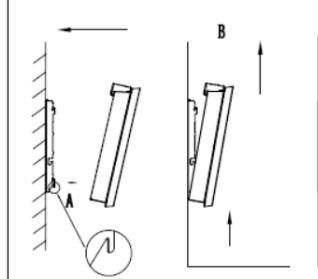
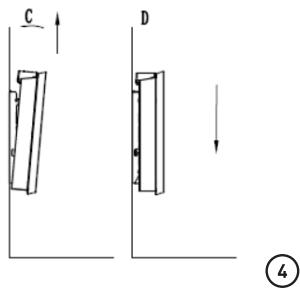
- Place the heater against bracket ④:
B
Product usage
- A: Align the heater on the 2 lower hooks that are downwards.
-
B: Pull the heater upwards whilst retaining it in the 2 lower hooks.
C: Align the heater on the 2 upper hooks that are upwards.
D: Pull the heater down.
-
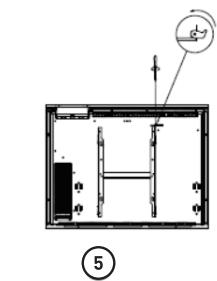
Slide the metal plate into the hole, and fasten the screw to lock the wall mount bracket. ⑤
Installation in the bathroom

Warning: This appliance must be only installed in the volume 2 or out of volume of the bathroom, as stated in the French standard NF C 15-100 for electrical installation inside the house.

NOTE:
The drawing is for reference only.
We suggest that you to contact a professional electrician for assistance.
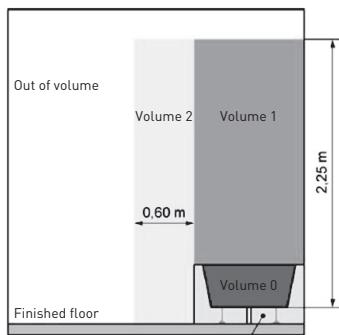
Hidden volume
Electrical Connection

CAUTION: Before any intervention, turn off the electricity at the main circuit breaker.
- The installation must be carried out according to the requirements and meet the standards enforced in the country (NF C 15-100 in France).
The unit must be connected to a standard wall box placed at least 25~cm from the floor.
The appliance must not be connected to an outlet with a power plug.
- The appliance must be supplied through a residual current device (RCD) having a rated residual operating current not exceeding 30mA .
- The appliance must not be connected to the earth wire (yellow and green wire).
- Blue or light gray wire connect to Neutral (230V).
- Brown or red wire connect to Phase (230V).
B Product usage
- Black wire connect to pilot wire. (Optional function to use in case of control by pilot wire box)

WARNING! Do not connect the black wire to the earth connection.
- In the absence of pilot wire, insulate the bare end of the black wire to prevent electrical contact with the other wires or earth.
LCD display
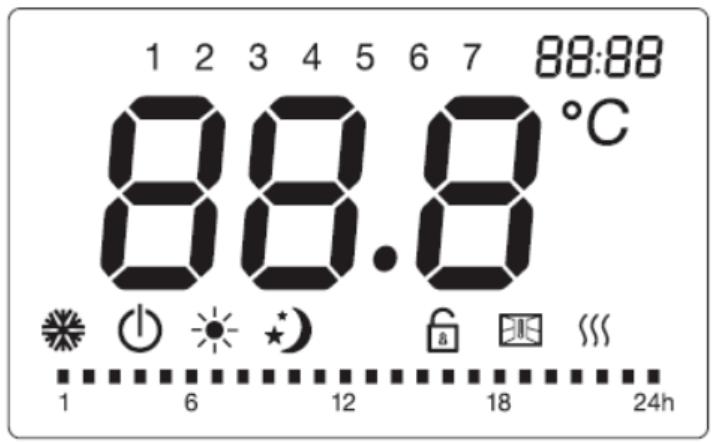
| Symbol | Function |
| ① | Stand-by mode (the appliance will not work but will receive power) |
| Anti-freeze mode (the appliance maintains a temperature of around 7°C) |
| Comfort mode (desired set temperature) |
| Eco mode (ECO maintains a temperature 3.5°C lower than the selected Comfort temperature.) |
| P | Pilot wire mode (to set the programs via pilot wire programmer) |
| Window detector function |
| Child lock |
| Heating indicator (When appliance is heating up, this icon will be displayed at the screen. The icon will disappear when the room temperature reaches the selected temperature) |
| Temperature (centigrade) |
| Weekly personalized modes: |
| Comfort mode enabled |
| Eco mode enabled |
Control panel
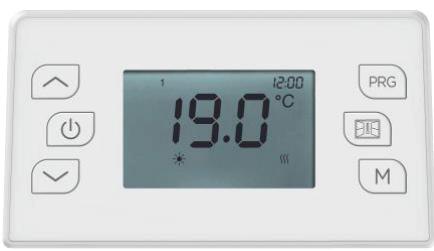
| Symbol | Function |
| ① | Stand-by |
| PRG | Personalized programs |
| Window detector function |
| M | Comfort mode
Economy mode
Anti-freeze mode
P1/P2/P3/P |
| Touch | Set the time, day of the week, the temperature; or under weekly personalized programs, to choose between comfort mode, or eco mode. |
Operation
When you first use the appliance, there might be some slight smell which is normal. Allow the appliance to work for one hour to make it disappear.
1. Setting the time and turning on the device
- To be able to use the preset programs (P1 / P2 / P3 / Personalized programs), the date and time must have been set on the device.
- For more details on the content of the preset programs (P1 / P2 / P3) refer to the following point.
Two different methods to set the time:
- If the appliance was not connected to the power supply, after connection the time will appear on the screen for setting. Press to toggle between hours / minutes / day of the week [1-7]. Press the button to set the hours / minutes / day of the week. Press the button to complete the setting and return to Stand-by mode, otherwise after 10 seconds without action the device will automatically return to stand-by mode as if it was the first time you use the device.
- If the appliance is in operation and you want to change the time setting, press the and at the same time to enter the time setting. Press to toggle between hours / minutes / day of the week (1-7). Press the button to set the hours / minutes / day of the week. Press any button other than or to save the setting, otherwise after 10 seconds without the setting will be saved automatically.
2. Press M
- Press M button to toggle among the modes: Comfort mode, Economy mode, Anti-freeze mode, the 3 pre-set programs (P1 / P2 / P3), and Pilot wire mode P.
- In Pilot wire mode P, set the heating using the external timer. When the external programmer is set to another mode, the display shows:
| External Mode Setting | Icon Displayed |
| Comfort mode | P |
| Comfort mode -1 | P-1 |
| Comfort mode -2 | P-2 |
| Economy mode | P |
| Anti-freeze mode | P |
Stand-by mode

The 3 Preset programs are detailed below:
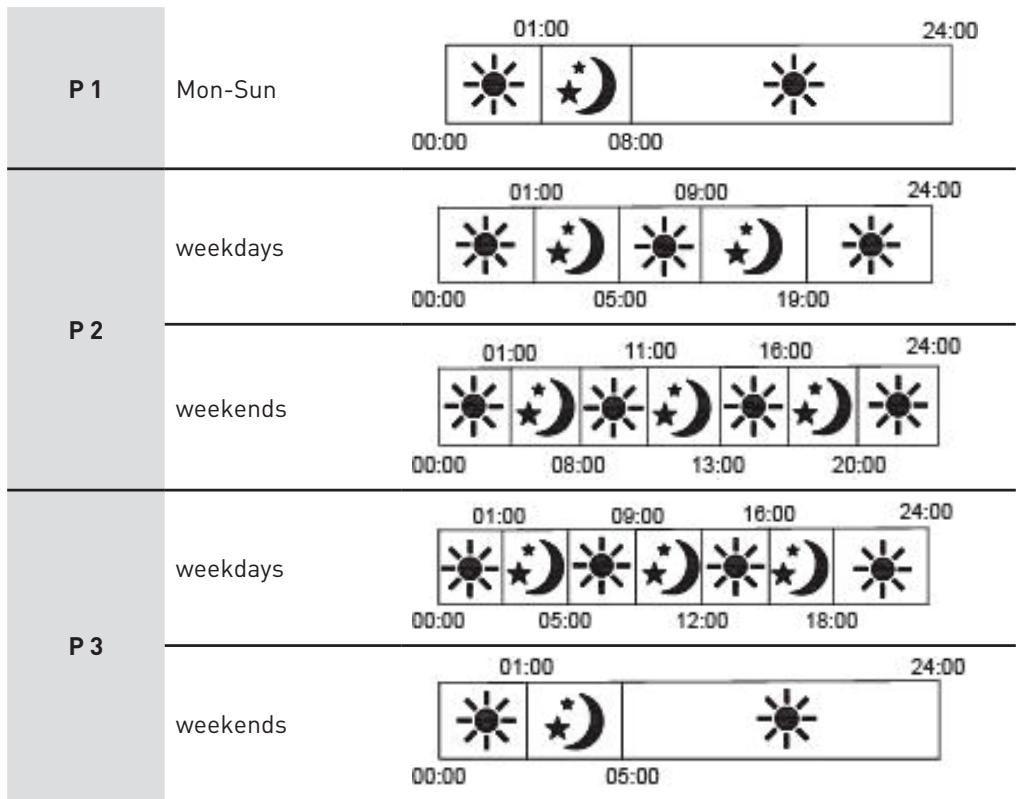
3. Press PRG
- Press the PRG button to choose one of the programs.
- In PRG mode, Press PRG button to select between "day (1 for Monday -7 for Sunday)" and "heating mode of different periods (00:00-24:00)".
- Select the desired day (1-7) by pressing / buttons.
- Press the PRG button to set the "heating mode of different period (00:00-24:00)".
- When you set the "heating mode of different period [00:00-24:00]", press button to choose hours, and to choose among function: comfort , or economy mode . After 30 seconds it will automatically save.
For example: to select the day 1, temperature of 19^ C , comfort mode for 24 hours:
- Press PRG, then / buttons to choose day 1.
B Product usage

- Press the PRG button again, press to choose the hour, to choose comfort mode and then repeat for the entire 24 hours.
- After 30 seconds without action, the setting is saved.
4. Temperature setting
- In comfort mode, or Pilot wire mode or Eco mode (excluding anti-freeze mode), press or to select the desired set temperature. The temperature range for comfort mode and Pilot wire mode is between 5^ and 29^ and for Eco mode is between 1.5^ and 25.5^ . The temperature difference between the ECO mode and the COMFORT mode must be at least 3.5^ . Each time you press the buttons to adjust the temperature, you increase or decrease the temperature by 0.5^ . Press any other button except / to finish the setting, otherwise after 5 seconds without action the setting is automatically saved. When the room temperature is the same or higher than the selected temperature, the heater will stop heating.
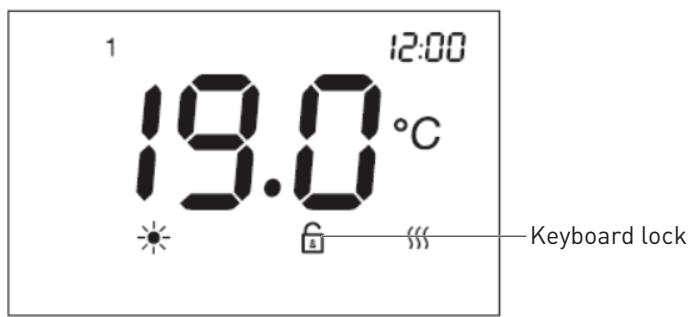
5. Keyboard lock
Press M button for three seconds to activate the keyboard lock function 8 , to unlock, press M again for three seconds.
B Product usage

NOTE:
- The keyboard lock function does not lock the standby (D) button.
-
The keyboard lock function will automatically be deactivated under the below circumstances.
-
the appliance is put into standby mode by pressing standby (1) button.
the appliance suffers power disconnection.
-
If you want this option to be activated again you will need to press the M button for 3 seconds.
6. Window detector function
- Press to enter window detector function. Then press “/” to choose “ON” or “OFF”. If “ON” is selected, the window detection function is activated and icon will show on the screen. When temperature drop is detected, the appliance will automatically enter anti-freeze mode with icon flashing. If temperature rises up, the appliance will go back to previous mode with icon on. You can choose “OFF” to disable the window detection function.

NOTE:
The window detector function is not available under anti-freeze mode.
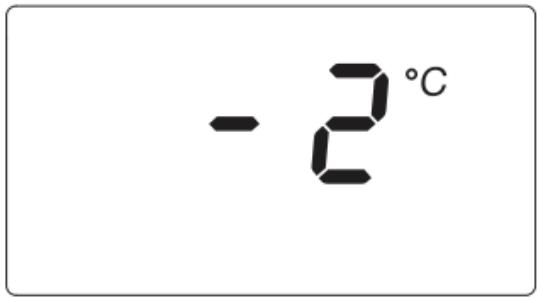
7. Temperature calibration function
- In standby mode, press PRG and at the same time for 5 seconds to enter the temperature calibration setting. The default temperature is 0^ , press or to set compensated temperature range from minus 5^ to 5^ . If there is no action after 10 seconds, setting will be saved automatically and go back to previous interface.
- For example, the temperature displayed on your radiator is 20^ . The one displayed on your thermometer is 18^ , choose the calibration value -2^ .
8. In case of power failure
- All of the above settings for temperature, time, date of the week, and programs remain valid until the power is removed.
After a power failure, when power is restored, the device will go back to the mode and temperature selected before the power failure.
B Product usage
- In the event of a power failure, the device only saves the following parameters: temperature and operating mode. When the power is restored, the date and time must be set in order to make the various programs work correctly.
Cleaning and maintenance
- Before cleaning the appliance, switch off the appliance from the power supply and wait until it is completely cold.
- Use a damp cloth to clean the casing of the device.
- Clean grill and air outlet regularly. Never immerse the appliance in water or allow water to enter the appliance.
Merci!
Modelidentificatie(s): 991620
Modelidentificatie(s): 991652
This product is guaranteed against faults caused by defects in manufacturing or the materials used for a period of two years, starting from the date of purchase.* This warranty does not cover defects or damage caused by failure to install the device correctly, incorrect use of the product, or excessive wear and tear.
*proof of purchase required.
FR
CONDITION DE GARANTIE