BI 1D NF 304 D W625C - Fridge VALBERG - Free user manual and instructions
Find the device manual for free BI 1D NF 304 D W625C VALBERG in PDF.
User questions about BI 1D NF 304 D W625C VALBERG
0 question about this device. Answer the ones you know or ask your own.
Ask a new question about this device
Download the instructions for your Fridge in PDF format for free! Find your manual BI 1D NF 304 D W625C - VALBERG and take your electronic device back in hand. On this page are published all the documents necessary for the use of your device. BI 1D NF 304 D W625C by VALBERG.
USER MANUAL BI 1D NF 304 D W625C VALBERG
Thank you for choosing this VALBERG product. VALBERG products are chosen, tested, and recommended by ELECTRO DEPOT, so you can be sure you are getting a top-quality, easy-to-use product that won't let you down. We're confident your new device will be a pleasure to use every day!
Welcome to ELECTRO DEPOT.
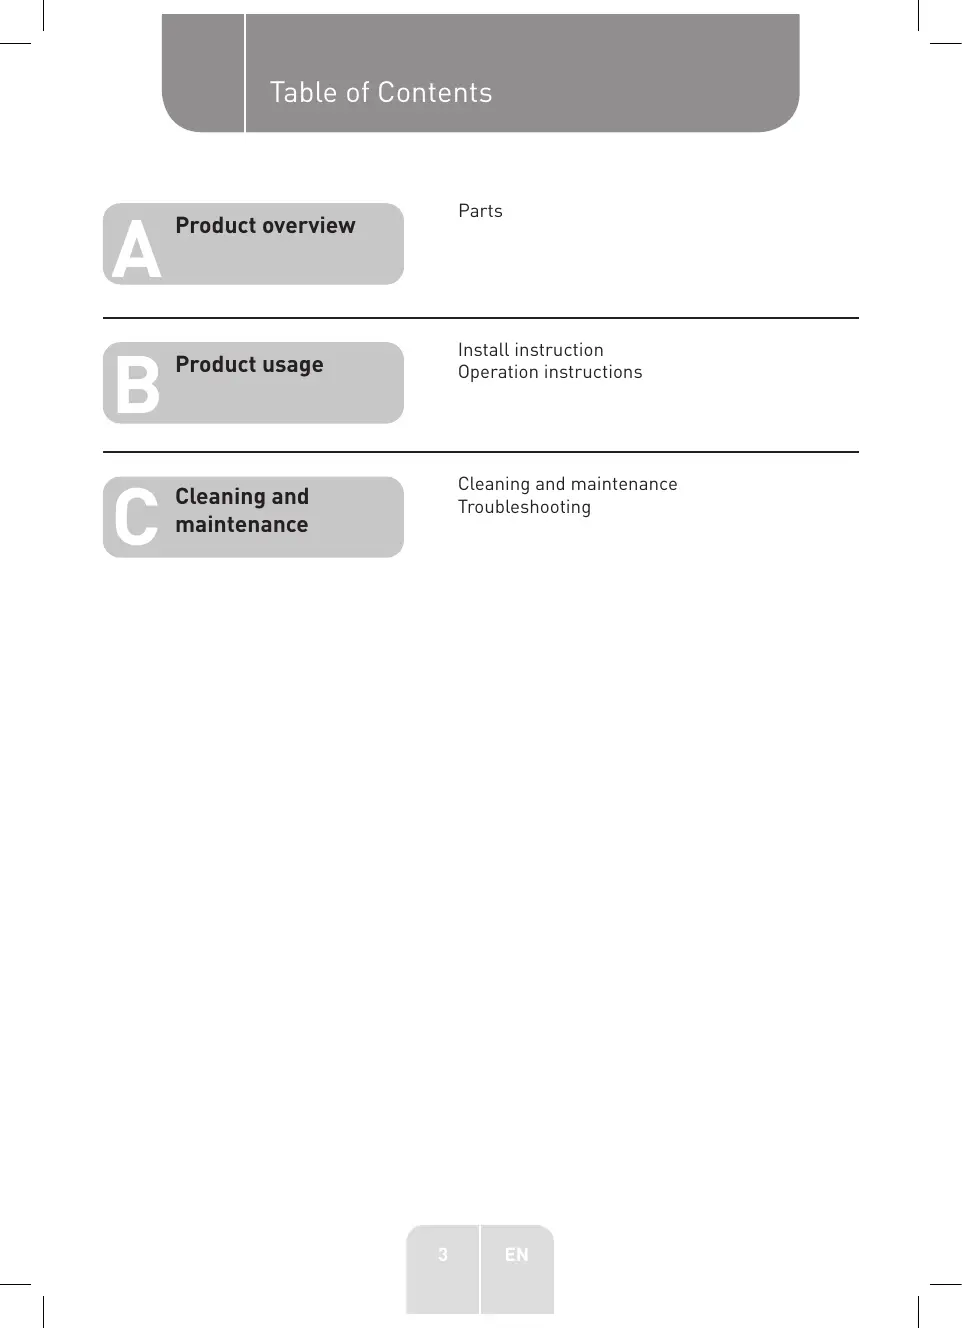
Table of Contents
A Product overview
Parts
B Product usage
Install instruction Operation instructions
Cleaning and maintenance
Cleaning and maintenance Troubleshooting
A Product overview
Parts
A Temperature control panel
LED lighting
C Shelf
D Fruit and vegetable box cover
E Drawer
Door tray
For the most efficient use of energy, please keep the all internal items such as trays, drawers, shelves and ice cube box on the position supplied by manufacturer.

ATTENTION
Differences: Due to technical changes and different models, some of the illustrations in this manual may differ from your model.
Install instruction
Before first use
- Remove the exterior and interior packing, wipe the outside thoroughly with a soft dry cloth and the inside with a wet, lukewarm cloth.
- Avoid placing the cabinet in a narrow recess or near any heat source, direct sunlight, or moisture.
- Before connecting your refrigerator to the power supply, check that the voltage stated on the rating label of your appliance corresponds to the voltage in your home. A different voltage could damage the appliance.
- The appliance must be grounded. The manufacturer is not responsible for damages that may occur as a result of usage without grounding.
Connecting the appliance
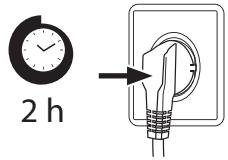
After installing the product, please let it stay for more than 2 hours before turning on the power, otherwise it will lead to a decrease in cooling capacity or a damage to the product.
- Allow the appliance to run empty for 24 hours so the compartment can cool to the appropriate temperature.
CAUTION!
The refrigerator should always be plugged into its own individual electrical outlet which has a voltage rating that matches the rating plate. When positioning the appliance, ensure the supply cord is not trapped ordamaged.
Ambient Temperature
- Depending on the climate class, this refrigerator is intended to be used at an ambient temperature range as specified in the following table.
The product may not operate properly at temperatures outside of the specific range. - You can find the climate class on the product label.
| Climate Class | Ambient Temperature |
| SN | +10 °C to +32 °C |
| N | +16 °C to +32 °C |
| ST | +16 °C to +38 °C |
| T | +16 °C to +43 °C |
If you have any doubts regarding installation, please turn to the vendor, to our customer service or to the nearest Authorised Service Centre.

ATTENTION
The cooling performance and power consumption of the refrigerator may be affected by the ambient temperature, the door-opening frequency, and the location of the refrigerator. We recommend adjusting the temperature settings as appropriate.
Door right-left change
| List of tools to be provided by the user | |
| Cross screwdriver | |
| Putty knife / Thin-blade screwdriver | |
| Masking tape | |
| 5/16" socket spanner | |
- Power off the refrigerator, and remove all objects from the door trays.
- Remove the upper hinge and hole caps of refrigerator door.
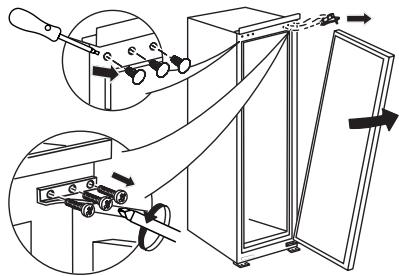
- Remove the refrigerator door, the bottom hinge and the hole cover.
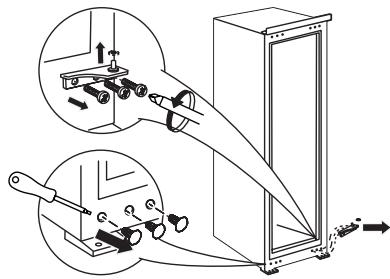
- Exchange the bottom hinge and upper hinge, then install them according to below steps, and install the top hole caps.
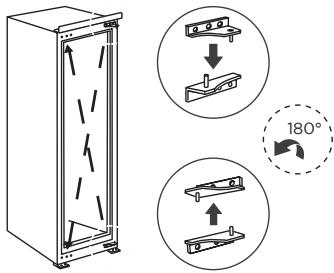
- Remove the fixed blocks of refrigerator door and rotate them for 180^ , and install them on other side of refrigerator door.

ATTENTION
Differences: Due to technical changes and different models, some of the illustrations in this manual may differ from your model.
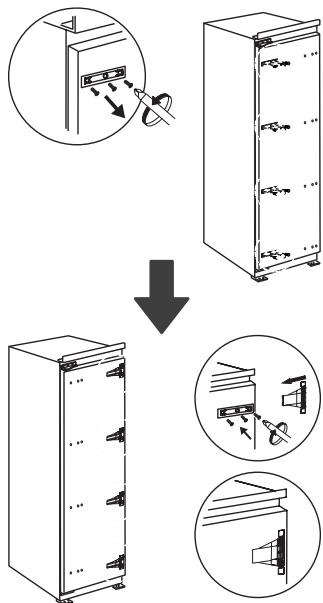
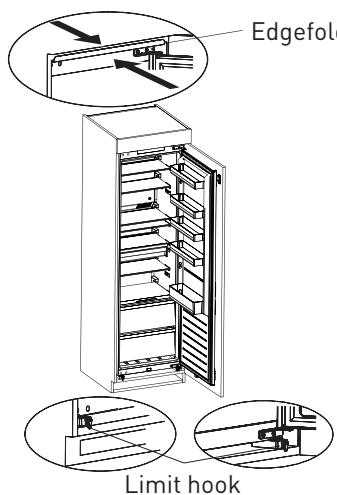
Installation in cabinet
- Cabinet size requirement. (The skirting board and back of the cabinet shall be provided with a through heat dissipation channel)
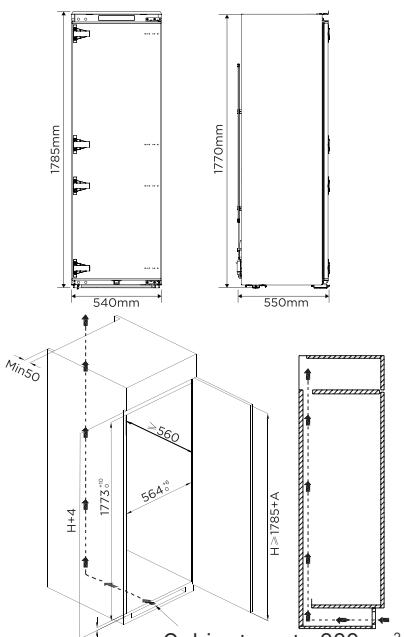
A - Thinckness of cabinet plank
- Push the refrigerator into the cabinet and adjust it to make sure the edge fold of top baffle completely touch the top edge of the cabinet, and the limit hook of supporting leg completely touch the bottom edge of the cabinet.
B Product usage
- Fix the top baffle to the top of the cabinet inner with screws, then install the screw caps. Fix the supporting leg with screws, then install the screw caps.

- Open the door of cabinet the maximum angle, and open the door of the refrigerator to the corresponding position. Sliding the block to make sure inner edge align with the door edge of refrigerator, then fix the block to the door of cabinet with screw and install screw caps.

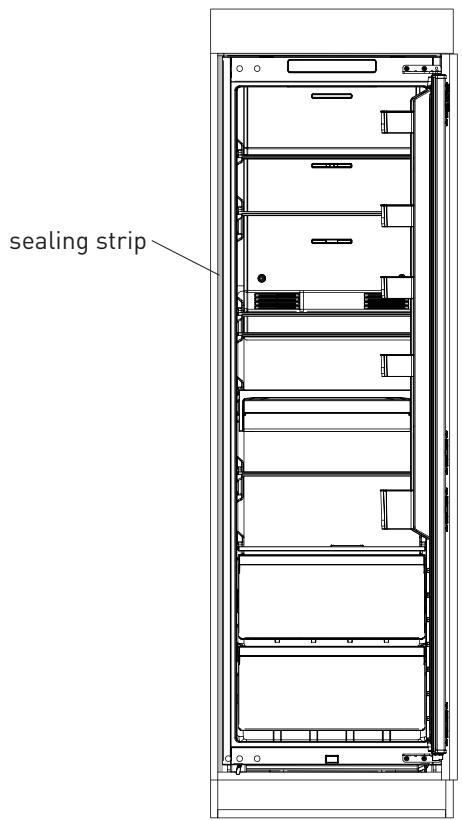
B Product usage
- Take out the sealing strip from accessory bag, and press it in the gap between the cabinet and the refrigerator. Installation is completed.

ATTENTION
Precautions before installation: Information in the Instruction Manual is only for reference. The physical product may differ. Before installation and adjusting of accessories, it shall be ensured that the refrigerator is disconnected from power.
Changing the light
Any replacement or maintenance of the LED lamps is intended to be made by the manufacturer, its service agent or similar qualified person.
This product contains a light source of energy efficiency class (F).
Light source in this product can only be replaced by qualified professionals.
- Please contact after-sales service if the light source fails.
- The light source shall be removed at the end of the product's useful life, with sorting and recycling done separately.


After connecting the power supply cord (or plug) to the outlet, wait 2 or 3 hours before you put food into the appliance. If you add food before the appliance has cooled completely, your food may spoil.
Moving the appliance
- Remove all items from the appliance.
- Pull the power plug out, insert and fix it into the power plug hook at the rear or on top of the appliance.
- Tape parts such as shelves and the door to prevent from falling off while moving the appliance.
- Move the appliance with more than two people carefully. When transporting the appliance over a long distance, keep the appliance upright.
Tips for energy saving
- Do not place the appliance near cookers, radiators or other heat sources. If the ambient temperature is high, the compressor will run more frequently and for longer, resulting in increased energy consumption. Ensure that there is sufficient ventilation at the base of the appliance, on the sides of the appliance and at the back of the appliance. Please also observe the spacing dimensions in the chapter "Installation".
- The arrangement of drawers, shelves and trays as shown in the product overview offers the most efficient use of energy and should be retained as far as possible.
- To obtain a larger storage space (e.g. for large refrigerated/frozen goods), the middle drawers and shelves can be removed. The top and bottom drawers and shelves should be removed last if necessary.
- An evenly filled refrigerator/freezer compartment contributes to optimal energy use.
- Allow warm food to cool before placing it in the refrigerator/freezer compartment. Food that has already cooled down increases energy efficiency.
- Allow frozen food to defrost in the refrigeration compartment. The coldness of the frozen food reduces the energy consumption in the refrigerator compartment and thus increases the energy efficiency.
- Open the door only as briefly as necessary to minimise cold loss. Opening the door briefly and closing it properly reduces energy consumption.
- Setting the temperature no colder than necessary contributes to optimal energy use. The door gaskets of your appliance must be perfectly intact so that the doors close properly and energy consumption is not increased unnecessarily.
Operation instructions
Use and functions
Feature panel
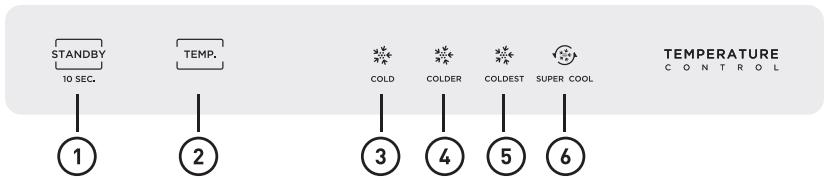
Button

Standby button

Temperature setting button
Display screen

Setting 1: the setting temperature is 8^ C

Setting 3: the setting temperature is 2^ C

Setting 2: the setting temperature is 4^ C

Setting 4: Super cool
Display
- When powering on for the first time, the display will be displayed for 3 seconds, while the startup bell will ring, and then the display will enter normal operation; (The temperature of the refrigerator is set at 2 gear which mean 4^ C when it is powered on for the first time).
- Display the fault code when there is a fault (cyclic display); Display the set temperature of the refrigeration room when there is no trouble.
- When the refrigerated door is closed to open, the display board is bright, and it will be extinguished within 30 seconds after the door is closed; Display board off state, press any key, display board light, and then can be adjusted operation.
| Fault Code | Fault Description |
| The LED “1” and LED “2” lit | Refrigerator temperature sensor circuit |
| The LED “1” and LED “3” lit | Refrigerator defrost sensor |
| The LED “2” and LED “4” lit | Commandfault |
| The LED “1” and LED “4” lit | Ambient temperature sensor |
B Product usage
Lock and unlock
No lock or unlock function.
- The setting takes effect 15 seconds after no operation.

ATTENTION
The actual control panel may differ from model to model.
Gear setting
Every time you press the button, the gear will change once. After setting the gear for 15 seconds, the refrigerator will run according to the set value.
Recommended setting temperature: refrigerator room 4^

Operation of door opening prompt and alarm control
When the refrigerator door is opened and the door is open for 120 seconds, the buzzer will alarm until the refrigerator door is closed. Or press any key to cancel the buzzer alarm.
Standby mode
Hold down the standby button for 10 seconds to enter the standby mode. All electrical components are off and the display goes off. In standby mode, hold down the standby button for 10 seconds to restore normal control.
Super cool mode
Mode entry: Under refrigerator mode, press the button "TEMP." until the icon "⑤" lighten. Mode exit: During Super cool mode, it will exit this mode automatically after running for 360 minutes or temperature setting or mode setting.
Storing food
Cooling compartment
- To reduce moisture and subsequent ice build-up, never put liquid into the fridge compartment in unsealed containers. Frost tends to concentrate in the coolest parts of the evaporator. Storing uncovered liquids results in a more frequent need for defrosting.
- Never put warm foods in the fridge compartment. These should first cool down at room temperature and then be placed so as to ensure adequate air circulation in the fridge compartment.
- Foods or food containers should not touch the back wall of the fridge because they could freeze to the wall. Do not keep regularly opening the door of the refrigerator.
- Meat and clean fish (packed in a package or plastic foil) can be placed in the fridge compartment, which can be used in 1-2 days.
- Fruit and vegetables without packaging can be placed in the part designated for fresh fruit and vegetables.
Coldest zone in the refrigerator
OPTIONAL: OK-temperature indicator
- The OK-temperature indicator can be used to determine temperatures below +4^ . Gradually reduce the temperature if the sign does not indicate "OK".
- To ensure the temperature in this area, do not change the positioning of the shelf. Inforced air refrigerators (equipped with a fan or No Frost models), the symbol of the coldest zone is not represented because the temperature inside is homogeneous.
Thermostat setting for ambient T^ : NORMAL ≈ +24^ (± 4^) Colder
Thermostat setting for ambient T^ : COLD ≈ +16^ (± 4^) Colder
Thermostat setting for ambient T^ : HOT≈ +32^ (± 4^) Colder
Temperature indicator setting
- To help you set your refrigerator well, it is equipped with a temperature indicator that will monitor the average temperature in the coldest zone.

ATTENTION
This indicator is intended to work only with your refrigerator, do not use it in another refrigerator (in fact, the coldest zone is not the same), or for any other use.
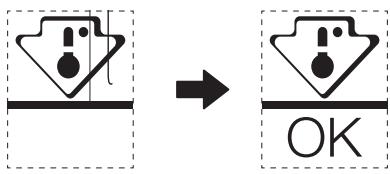
Checking the temperature in the coldest zone
- With the temperature indicator, you can check regularly that the temperature of the coldest zone is correct. Indeed, the internal temperature of the refrigerator depends on several factors such as the ambient temperature of the room, the amount of food stored and the frequency of door opening. Take these factors into consideration when setting the device.
- When the indicator shows « OK», this means that your thermostat is well adjusted and the internal temperature correct.
- If the indicator of temperature turns WHITE, this means that the temperature is too high; in this case, increase the refrigerator temperature control setting and wait for 12 hours before performing a new visual inspection of the indicator. When fresh food has been introduced or the door has been left open, it is possible for the indicator of temperature to turn WHITE after a while.
Cleaning and maintenance

CAUTION!
Do not rinse directly with water or other liquids during cleaning to avoid short circuits or affect electrical insulation after immersion.

ATTENTION
The appliance shall run continuously once it is started. Generally, the operation of the appliance shall not be interrupted; otherwise the service life may be impaired
- Disconnect the appliance from the electrical supply before undertaking any routine maintenance. Allow at least 5 minutes before restarting the appliance, as frequent starting may damage the compressor.
- Do not use mechanical devices or other means to accelerate the defrosting process, other than those recommended by the manufacturer.
- Do not try to repair, disassemble or modify the appliance by yourself. In case of repair please contact our customer service.
- Eliminate the dust on the back of the unit at least once in the year to avoid hazard by fire, as well as increased energy consumption.
- Check the door gasket regularly to make sure there are no debris. Clean the door gasket with a soft cloth dampened with soapy water or diluted detergent.
- The interior of the product should be cleaned regularly to avoid odor.
C | Cleaning and maintenance
- Use a soft cloth or sponge to clean the inside of the product, with two tablespoons of baking soda and a quart of warm water. Then rinse with water and wipe clean. After cleaning, open the door and let it dry naturally before turning on the power.
- For areas that are difficult to clean in the product (such as narrow sandwiches, gaps or corners), it is recommended to wipe them regularly with a soft rag, soft brush, etc. and when necessary, combined with some auxiliary tools (such as thin sticks) to ensure no contaminants or bacterials accumulation in these areas.
- Wipe the outer surface of the product with a soft cloth dampened with soapy water, detergent, etc., and then wipe dry.
- Do not use hard brushes, clean steel balls, wire brushes, abrasives (such as toothpastes), organic solvents (such as alcohol, acetone, Isoamyl acetate, etc.), boiling water, acid or alkaline items, which may damage the fridge surface and interior. Boiling water and organic solvents such as benzene may deform or damage plastic parts.
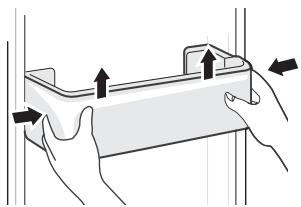
Cleaning of door tray
- According to the direction arrow in the figure below, use both hands to squeeze the tray, and push it upward, then you can take it out.
- After washing the tray having been taken out, you can adjust its installing height in accordance with your requirement.
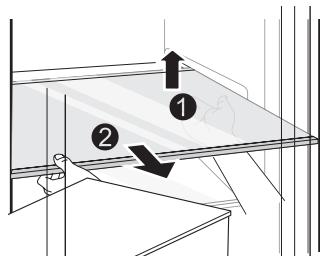
Cleaning of glass shelf
-
As the innermost part of the refrigerator liner where contacting the shelves has a backstop, you shall raise the shelves upward, then you can be able to take it out.
-
Adjust or clean the shelves according to your requirement.
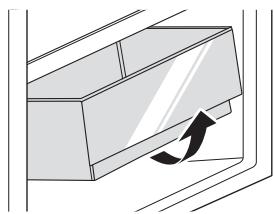
Cleaning the vegetable drawer
- Remove the contents of the drawer. Hold the handle of the vegetable drawer and pull it out completely until it stops.
- Lift the vegetable drawer up and remove it by pulling it out.

ATTENTION
Differences: Due to technical changes and different models, some of the illustrations in this manual may differ from your model.
Troubleshooting
The following simple issues can be handled by the user. Please call the after-sale service department if the issues are not solved.
| Problem | Possible Causes | Solution |
| Not operate | ·The power supply is not turned on and the plug is not firmly inserted. ·Low voltage, power failure or part of the circuit tripped. | ·Insert the power cord plug firmly. ·Check the power supply at home. |
| Light not on | ·The appliance is not powered on. ·The light is broken. | ·Unplug and re-plug the power cord. ·Replace the light with a new one. |
| Fruits or vegetables are frozen | ·Has the food been placed at the back of the fridge? The area near the back wall is where the temperatures are coldest. ·Fruits or vegetables are stored in the Fresh/Chill zone. | ·Not placing food which may freeze easily at the back of the fridge compartment. ·The Fresh/Chill zone is only for meat/fish. |
| Fridge/freezer is overcooling | ·Temperature control is not set correctly. | ·Set the temperature higher. |
| Compressor working for a long time | ·High ambient temperature causing long working time. ·Putting too much food in at one time. ·Food is put in before it has cooled down. ·Opening the door too often. ·The frost layer inside is too thick. | ·This is normal. ·Do not put too much food in at one time. ·Wait until the food has cooled down before putting it in. ·Do not open the door too often. ·Need to defrost. |
| Door does not close properly | ·Door is stuck with objects. ·Too much food in. ·Door gasket deformed. | ·Do not put in too much food. ·Place the appliance stably. ·Heat the door gasket, then cool it for restoration (with an electrical drier or hot water for heating). |
| Outer wall is hot | ·When the appliance is operating, heat is dissipated to the outside through the metal tubes inside the cabinet. ·Higher ambient temperatures in the summer cause the temperature of the outer wall to rise. | ·Higher temperature on the outer wall is normal. ·Increase the heat dissipation space, or put the appliance in a ventilated and cool place. |
| Cross or vertical beams are hot | ·There are metal tubes inside the beams, and the heat released from the tubes prevents condensation. | ·This is normal. |
| Odors | ·Spoiled food ·Food with strong odors ·The interior compartment is dirty. | ·Clean and remove any spoiled food. ·Make sure strong smelling food is wrapped airtight. ·Clean the interior compartment. |
| Condensation forms on the outside | ·Condensation may form when the humidity in the room is high. | ·This is normal. Wipe off the condensation using a dry cloth. |
| Condensation forms inside the fridge and drawers | ·The fridge maintains a high humidity to keep vegetables and other food items fresh. ·Humidity is too high in the room and doors have been opened frequently. ·The door gasket are not tight. | ·Wipe off the condensation using a dry cloth. ·Do not open doors as frequently or do not keep them open too long. ·Check the door gasket, clean or correct position. |
Certain sounds can be heard during normal use of the refrigerator, which do not affect its correct operation.
Sounds, which can be easily prevented:
- Noise caused by the appliance which is not level - adjust the position with the adjustable turn-in front feet. Alternatively, place pads made of soft material under the rear rollers, especially when the appliance is placed on tiles.
- Touching the adjacent piece of furniture - move the refrigerator away.
- Creaking of the drawers or shelves - take out and put back the drawer or shelf.
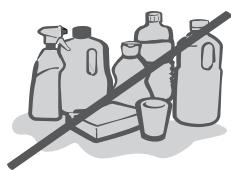
- Sounds of clinking bottles - move bottles apart.
Sounds heard during normal use are mainly due to operation of the compressor (switching on) and cooling, system (thermal expansion and contraction of the radiator caused by flow of the cooling agent).

Merci!
This product is guaranteed against faults caused by defects in manufacturing or the materials used for a period of two years, starting from the date of purchase.* This warranty does not cover defects or damage caused by failure to install the device correctly, incorrect use of the product, or excessive wear and tear.
*proof of purchase required.