USER MANUAL HI3222HD-MM HIGH ONE
RISQUE D'ÉLECTROCUTION NE PAS OUVRIR
ATTENTION: POUR ÉVITER TOUT RISQUE D'ÉLECTROCUTION, NE RETIREZ PAS LE COUVERCLE (NI LE PANNEAU ARRIÈRE).
AUCUNE PIECE N'EST
REEMPLACING PAR L'UTILISATEUR.
CONTACTEZ UN PERSONNEL
QUALIFIÉ EN CAS DE PANNE.

The warning sign showing a lightning bolt in a triangle indicates that this product contains "dangerous electrical voltages".
CAUTION
RISK OF ELECTRIC SHOCK
DO NOT OPEN
CAUTION: TO AVOID THE RISK OF ELECTROCUTION, DO NOT REMOVE THE COVER (OR THE BACK OF THE DEVICE).
NO PARTS ARE REPLACEABLE BY THE USER. PLEASE CONTACT QUALIFIED PERSONNEL IN CASE OF FAILURE.

The warning sign showing an exclamation point in a triangle indicates that this point of the manual requires special attention.

CAUTION: - TO REDUCE THE RISK OF FIRE, ELECTRIC SHOCK OR SERIOUS INJURY:
Read these safety instructions before using your device and store them for possible future reference.
- This device must only be connected to a mains network whose characteristics are identical to those shown on the device identification plate.
- The mains plug must always be easily accessible. It serves as a mains disconnecting switch of the device.
- To disconnect the device from the mains, the plug must be disconnected. Hold the mains cable by its plug. Do not pull on the mains cable to disconnect the plug.
- The mains cables must be routed so that they are not trampled upon or pinched by objects placed on or against them.
- If the mains cable of the device is damaged, it must be replaced by the manufacturer, its after-sales service or a similarly qualified person to avoid any danger.
- The device must not be exposed to dripping or splashing water, moisture or liquids.
- Do not place the device near water, for example in a bathroom or near a sink.
- No objects filled with liquids such as vases should be placed on or above the device.
- Never touch the mains cable with wet hands, this could cause a short circuit or electric shock.
-
To avoid the risk of fire, do not place sources of open flames, such as lighted candles, or heat sources such as radiators, on or near the device.
-
The device is intended for use only in a temperate climate.
- If smoke, an unusual odour or strange noise is emitted by the device: unplug the mains cable from the electrical outlet and consult the after-sales service or repair center. Never attempt to make repairs yourself, this could be potentially dangerous.
- Do not attempt to open or disassemble the device. This would expose you to dangerous voltages.
- The slots and openings of the device are intended for ventilation and to ensure its operation. To prevent overheating, these openings must not be obstructed or covered in any way, such as by newspapers, tablecloths or curtains.
- Always leave a minimum distance of 10cm around the device for sufficient ventilation.
- Never push any object into the device through one of its openings, as it may come into contact with electrical components, which can cause an electric shock or fire.
- In case of thunderstorm or lightning, immediately unplug the mains cable from the wall outlet.
- Always turn off the device when not in use. Unplug the mains cable from the electrical outlet when the device will not be used for a long period of time.
- Unplug the device from the electrical outlet before cleaning. Do not use liquid or aerosol cleaners. Use a dry, soft cloth for cleaning.
- If the product does not bear the logo, it is a Class I device. It must then be connected to a mains socket with a protective earth connection.
- If it is a class I appliance, the user's protection is grounded. The appliance must be connected to a power supply base with a connection to the protective earth.

CAUTION --: TO AVOID RISK OF INJURY OR DAMAGE TO THE PRODUCT OR OTHER EQUIPMENT:

CAUTION: TO AVOID EYE HAZARDS:
- It is best to have soft indirect lighting to watch TV. Avoid completely dark environments and any reflection on the screen, as these can cause eyestrain.

USE AND HANDLING OF BATTERIES:
- CAUTION: danger of explosion if the batteries are not inserted correctly or if they are replaced by a non-similar or incompatible model.
- Replace the batteries only with batteries of the same type or equivalent type.
- Batteries must not be exposed to excessive heat such as that from the sun, fire or similar origin.
- Never throw batteries into fire and never expose them to heat sources.
- Do not mix different types of batteries, or new and used batteries.
- The batteries must be inserted according to the polarities indicated on the battery and in the battery case of the remote control.
- Used batteries must be removed from the remote control.
- The batteries must be disposed of safely at the assigned specific collection points to preserve the environment. Follow the disposal instructions indicated on the batteries and at the collection points.
- Keep batteries out of the reach of children and animals. Only adults are capable of handling the batteries.
- This device bears the logo, it is a class II electrical device in which the protection against electric shock is not based solely on main insulation but on double insulation. It does not have protective grounding.
For installation, handling, cleaning and disposal of the device, refer to the following chapters of the user manual.
General Description 5
Specifications and Accessories 7
Overview 11
Remote Control. 12
Turn on first time 14
Menu Operation 17
USB 22
External connection 23
Reference 24
Picture defects and the reason 26
Warranty conditions 27
Feature:
- Auto tuning and fine tuning
One mini YPbPr input socket
- Two HDMI inputs socket (HDMI 1.4)
One mini AV input socket
Support USB
- One Coaxial output
- Wide range voltage input
Note:
- In case of any design change, a notice will not be released.
The buttons on the lower-left panel control your TV's basic features, including the on-screen menu. To use the more advanced features, you must use the remote control.
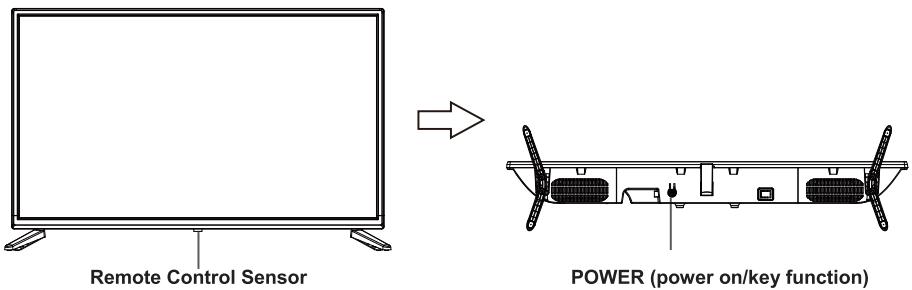
Red light indicates the TV is in standby mode.
- No light indicates the TV is on.
Key Function Description
Note: The key instructions are subject to below.

Display/Hide key icon: When there is no button icon popping up, press the key, the key icon will pop up like the picture shows above, the key icon will automatically turn off after 5 seconds of inactivity.
Icon selection: Short press the button, move the loop to the right, select the icon.
Icon function selection: Long press the key to achieve the function of the selected icon.
Icon Description:

Power off Icon: Corresponding to the "POWER" button of remote.

Menu Icon: Corresponding to the "MENU" button of remote.

Source Icon: Corresponding to the "SOURCE" button of remote.

Volume+ Icon: Corresponding to the "VOL+" button of remote.

Volume-Icon: Corresponding to the "VOL-" button of remote.

CH+ Icon: Corresponding to the "CH+" button of remote.

CH-Icon: Corresponding to the "CH-" button of remote.
When the main menu or source menu is OPEN.
Specifications and Accessories
| Reference | HI3222HD-MM |
| Model | KDE32ML314EATS-1 |
| Display | TV LED HD 32" |
| Resolution | 1366x768 pixels |
| Colour display | 16.7M |
| Contrast | 1200:1 |
| Ratio | 16:9 |
| Service life | 25.000 hours |
| Tuner | HD DTV (receives digital channels, satellite, TV guide, teletext display, multi-language display) |
| TV power supply | AC 100-240V ~ 50/60Hz 1.5A |
| Consumption | 65W |
| Dimensions | 738.0mm (L)x192mm (D)x472mm (H) |
| Weight | 3,5kg |
| Base | Removable, in 2 parts |
| Operating temperature | 0°C to 40°C |
| Remote control power supply | 3V = (2 x LR03/AAA 1.5 V batteries, not supplied) |
| USB ports with voltage and current | 5V = 0.5A |
| Hotel lock | Yes |
| Speaker | Built-in 2x8W |
| Inputs | Antennas (T2 and S2), 2xHDMI, Mini YPbPr, Mini AV, 2xUSB, Cl+ |
| Outputs | Coaxial , Headphone |
| Functions via USB | PVR (digital video recorder) |
| Multimedia playback formats via USB | Video: MPG, AVI, TS, MOV, MKV, DAT, MP4, VOB |
| Music: MP3 |
| Photos: JPEG, BMP, PNG |
| Text: TXT |
These characteristics are subject to change without notice.
After Sales Service
If you have a problem using your device, please complete the steps first following:
-
Make sure that the operating instructions are followed, including the chapters relating to cleaning, maintenance and maintenance.
-
Consult the diagnostic tool to help resolve problems via the website:
If, despite these steps, the problem is not resolved:
Device under warranty
The warranty set at a minimum of 2 years * after the new purchase of the device covers travel costs to your home, intervention and spare parts.
- Excluding the peace of mind guarantee or extended guarantee.
WARNING: Defects and their consequences resulting from interventions and/ or repairs to the product carried out by the user or a non-professional third party cannot give rise to the application of the legal guarantee or commercial.
Device out of warranty
- Coverage of costs is no longer covered, but intervention at home remains possible.
- If you wish to work on the device by your own means, the spare parts are accessible via the site web: www.electrodepot.fr/sav/piècesdétachées
CAUTION: Any intervention and/ or repair of the product by the user or a third party not professional can jeopardize the safety of people and pro pert y.
- For individuals and professional repairers, these parts are available at least 7 years after the
date purchase of the new device and according to the specificities of the device:
ACCESSIONS:
Stand 2 pieces
Remote control 1 piece
User Guide 1piece
The pictures provided in this manual are for illustrative purposes only, refer to the actual product for confirmation.
| PRODUCT DATA SHEET RELATING TO ENERGY |
| Brand | HIGH ONE |
| Reference | HI3222HD-MM
(Model: KDE32ML314EATS-1) |
| Energy efficiency class | F |
| Visible screen diagonal | 80 cm; 32 inches |
| Energy consumption (kWh per year), based on the power consumption of a TV operating four hours a day for three hundred and sixty-five days. The actual consumption depends on the conditions of use of the TV. | 32 kWh/1000h |
| Power consumption in Standby mode (W) | <0.5W |
| Power consumption in Off mode (W) | 0W |
| Screen resolution (pixels) | 1366 x 768 |
For more information on the energy labeling of the appliance, please refer to the product information sheet on the leaflet attached to the instructions and also present in the EPREL product database (European Product Database for Energy Labeling) from the European Commission available via the QR code of the energy label version 2019/2016 supplied with the device or by entering the 6-digit product code separated by a space by the device reference under the website: https://eprel.ec.europa.eu/
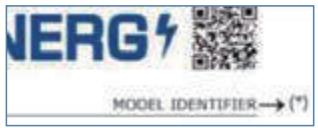
*: 6 digits Code_reference


TV Terminal Connections
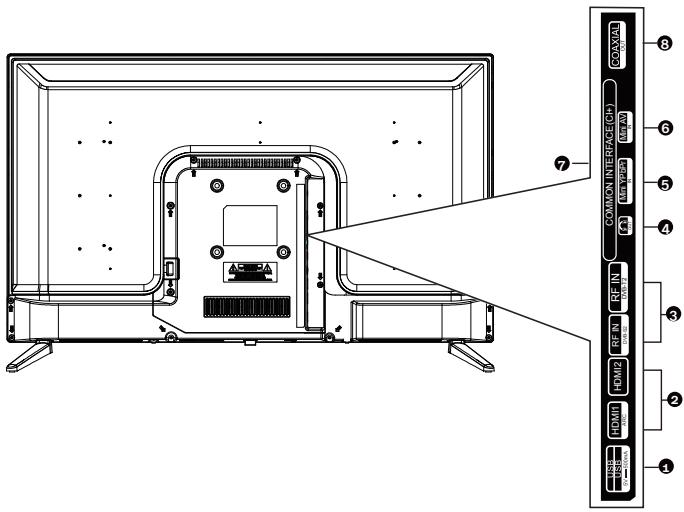
USB: Connect to USB flash driver to play supported multimedia content.
HDMI1/HDMI2: Connect to the HDMI jack of a device with an HDMI output.
RF IN: Connect to an antenna or cable TV system.
HEADPHONE: Connect a set of external headphones for private listening.
5 YPbPr: Connect Component video
6 AV IN:AV Input
CI: CI Input.
3 COAX: Connect Coaxial out.
REMOTE CONTROL OUTLOOK & FUNCTION KEY DEFINITION
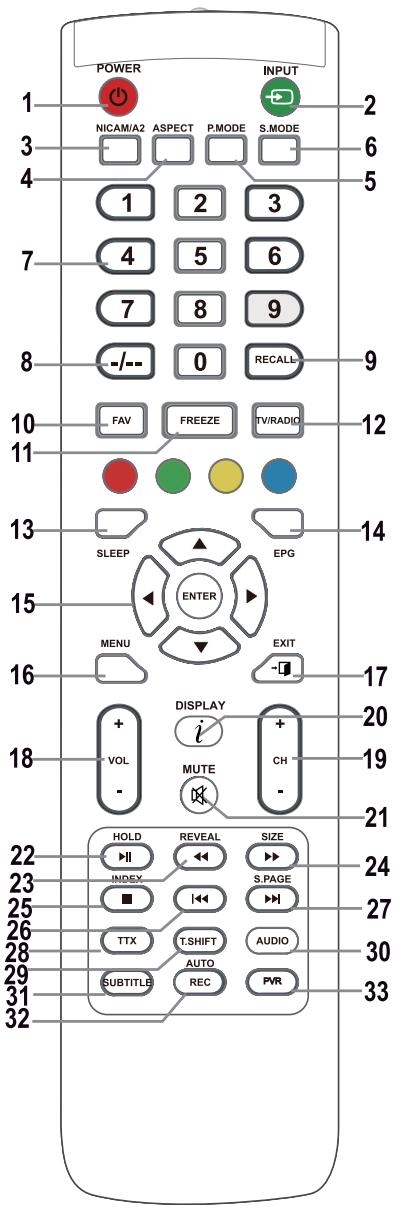
1. POWER按钮
Turns the television on from the stand-by mode.
Press to select the desired input.
NICAM/A2 input or output.
Page aspect ratio selection, e.g. 16:9, Zoom, Auto, 4:3
Repeatedly press to select a picture mode.
- S.MODE: To change the sound setting.
Press 0-9 to directly select a TV channel while watching the TV. In teletext mode enter the page number, etc.
It is used to enter channel numbers with various digit counts, e.g. for 1 - 11 - 111.
Button for switching to the previously watched channel.
Press in the TV mode to enter/exit the favourites menu.
Freeze the picture
Switching between the television and radio modes.
Set the automatic shut off time for the television.
Press to show/hide the electronic program guide.
Used for navigating in a menu on the screen and for setting up the television according to your preferences.
It is used to enter/exit the Channel list menu. (Only DTV/ATV)
In TV mode, it displays the LCD television's main menu.
Function for exiting a menu or a screen.
Press to increase/decrease the volume.
Press to switch between individual channels.
Button of displaying the source and information about channels.
Press to mute the sound. Press it again to renew the sound or press VOL+.
HOLD button: hold the current display in the MEDIA mode: Playback/pause or start a time shift recording.
REVEAL button: Press REVEAL to display or hide hidden teletext information (depends on the broadcast).
button: fast rewind
SIZE button: Press SIZE to change the size of the screen in the MEDIA mode.
button: fast forward.
INDEX button: call up a teletext content page.
■ button: Stop recording/playback.
In the MEDIA mode: skip to the previous track
27. S.PAGE/▶ button
S.PAGE button: Press S.PAGE to enter a teletext subpage.
▶按钮: skip to the next track.
Turn teletext on or off.
Note: The teletext function is optional and the availability of buttons depends on the model. Teletext information fully depends on the operator of the channel.
It is used to start recording with a time shift (i.e. time shift). Function is only available in the DTV mode.
DTV/MEDIA mode: select a background sound, if available.
ATV mode: select a sound mode: Stereo/Dual I/II/Mono.
Other sources: select the left/right channel
Button for showing/hibing subtitles in the bottom part of the screen, if they are available.
AUTO button: Used for automatic configuration in the PC mode.
REC button: Press to start recording. (only in the DTV mode.)
It is used to enter/exit the PVR setting menu.
Note:
Remove battery during storage or when you are not using the device for a long time.
To control the device using the remote control, point the remote control at the device and then press the button with the required function. The maximum range of the remote control is about 5 meters with a deviation of up to +/-30^ from the perpendicular direction to the reception sensor of the remote control on the front side of the device. The falling capacity of the batteries gradually reduces the remote control range.
There must be no solid obstacles in the area between the remote control and the device when the remote control is being used.
During standard use the lifetime of batteries in the remote control is about 1 year.
When the effective range of the remote control is substantially reduced, or when there are problems with its use, change both the batteries in the remote control.
If you will not be using the remote control for a longer period of time, take out both batteries from it - in this way you will prevent potential damage caused by their leakage.
Avoid strong impact of light (e.g. sunlight or light from strong fluorescent/saving sources) which can reduce the effectiveness and reliability of IR remote control.
Turn on first time
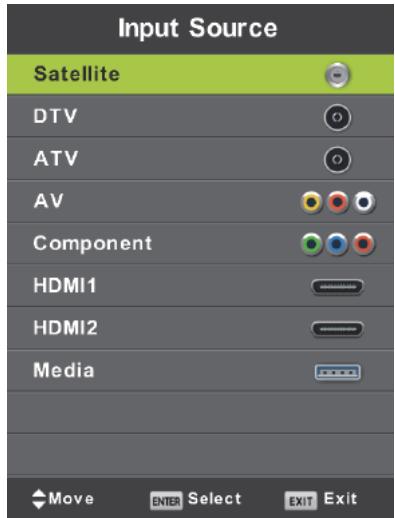
Press SOURCE to display the list of input sources.
Press / or SOURCE to select the required input source.
Press OK to switch to the appropriate input source.
Press EXIT to exit menu.
To watch television connect the antenna cable with functional reception (antenna, common antenna, cable...) to TV input marked as "RF-In".
Language selection
Using buttons / select the language used in menus and news.
Country selection
Using buttons / select the country menu.
Using buttons / select the required country.
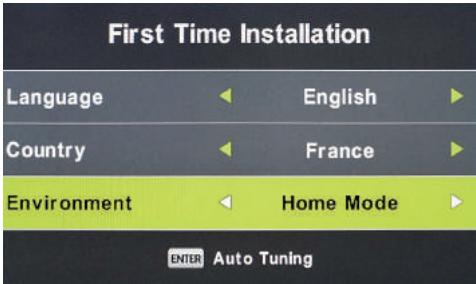
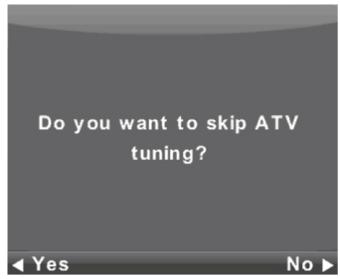
Automatic tuning
Select between the Analogue (ATV) or digital (DTV) reception or keep both receptions ATV + DTV . First will be processed the tuning of the analogue television channels (ATV). If you want to skip the ATV tuning, press the Menu button and the button with left arrow.
Afterwards, the tuning of the digital television channels will be done (DTV). If you want to skip the DTV tuning, press the Menu button and the button with left arrow
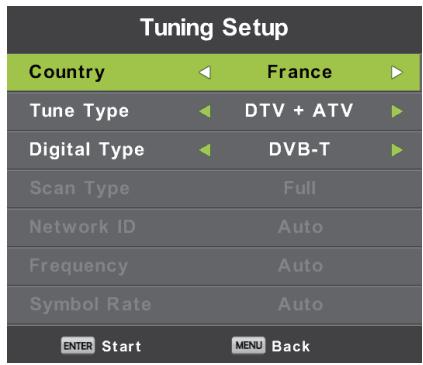

Note:
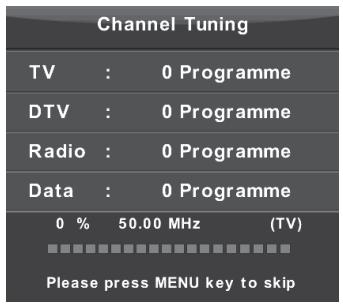
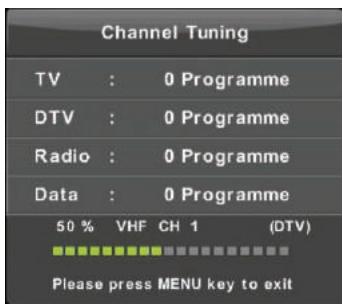
When the automatic tuning does not find any receivable channel (e.g. due to poor antenna) or you interrupted the tuning manually, you can still tune channels manually, one by one, in the device menu described below. For this you will need some technical information about the broadcast that you want to receive, e.g. the method of transmission, of the channels frequency, sound modes, the transmission speed etc.
A successful completion of the automatic tuning results in saving of the list of the available TV programs and radio stations, which you can receive immediately. In the case of multiple occurrences of the same or similar programs (e.g. due to local variations of the same central program or a remote reception with interference or local reception "clean" reception) verify, which station works best for you or modify the list.
Automatic satellite tuning is adapted to tune one satellite antenna with a single LNB and corresponds to the setting DiSEqC = None/None. If your antenna is complicated, specify the antenna parameters (especially control LNB DiSEqC commands) by setting that the installer of your antenna system tells you. Enter these data in the Satellite setting/Dish Setup, described in the next section.
Channel Menu - satellite

WARNING:
We strongly recommend that the antenna system is installed by an expert. A good quality installation will reward you with a stable and trouble-free reception.
Press MENU to display the main menu.
Use the buttons to select the item CHANNEL in the main menu.
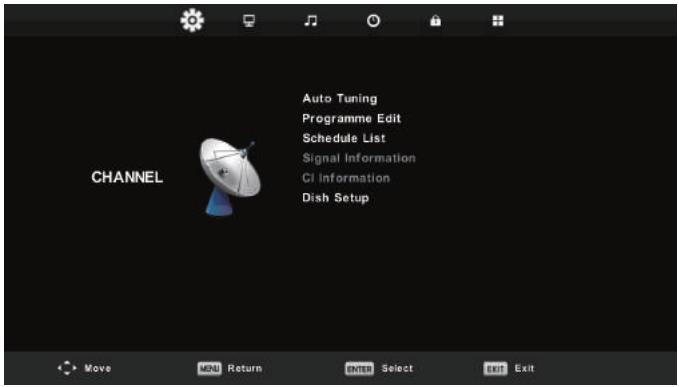
- Using the buttons / select the item, which you want to modify in the menu CHANNEL.
- Press OK and perform the modification.
- When you finish the modification, press MENU, save the changes and return to the previous menu.
Acting on the information from your installer of the antenna system, specify all parameters for each of the satellites for which your system is ready and which you intend to receive. If a parameter is wrong or your antenna system will not accept any values Auto or None/None, it will not be possible to receive the satellite or under the name of a particular satellite will be accepted another satellite.
When setting a satellite follow the description of the buttons for individual functions on the screen.
Select a satellite from the list, use the Right arrow to move in the parameter settings and set them correctly. Return to the list using the button EXIT. When the parameters are properly set and if it is active the first of the transponders on the list of the given satellite (still hidden) broadcasts the horizontal indicator Quality (bottom of the window) changes from empty to a nonzero value, e.g. it will be in the middle of the range. If you want to display the list of transponders of a given satellite, press the button EPG. Each transponder is mainly characterized by a frequency (and also by H/V polarization and symbol rate, e.g. 27500 kSym/s) and carries several TV programs and if you want to receive them, when selected, the indicator Quality must again show non-zero value, e.g. the middle of the range.
Press MENU to display the main menu.
Use the buttons to select the item CHANNEL in the main menu.
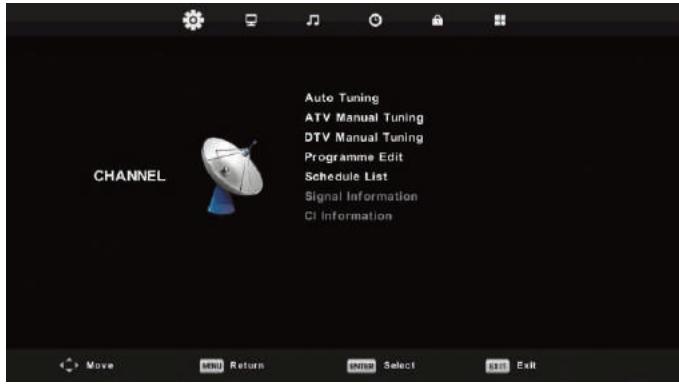
- Using the buttons / select the item, which you want to modify in the menu CHANNEL.
- Press OK and perform the modification.
- When you finish the modification, press MENU, save the changes and return to the previous menu.
Press MENU to display the main menu.
Use the buttons / to select the item PICTURE in the main menu.
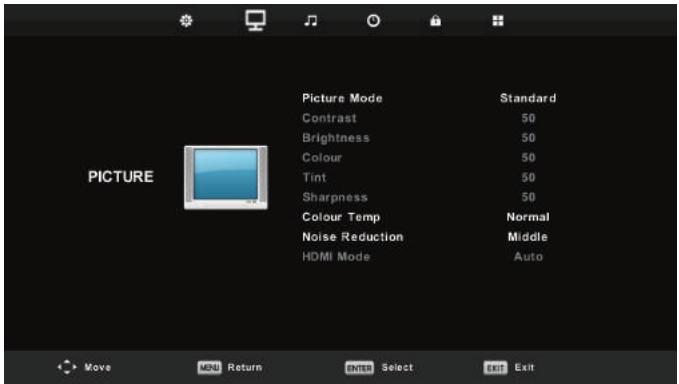
- Using the buttons / select the item, which you want to set in the menu PICTURE.
- Press OK and set.
Press MENU to display the main menu.
Press to select in the main menu the item SOUND
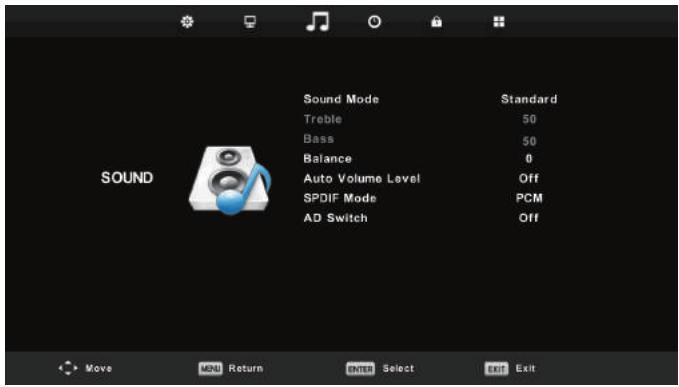
- Using the buttons / select the item, which you want to set in the menu SOUND.
- Press OK and set.
- After you finish the setting, save it by pressing the button MENU and return to the previous menu.
Press MENU to display the main menu.
Use the buttons / to select the item TIME in the main menu.
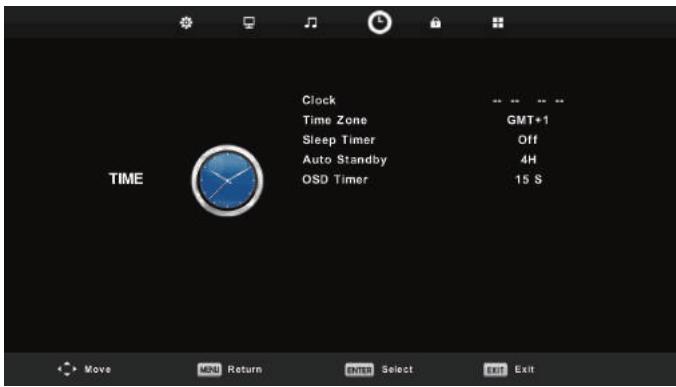
- Using the buttons / select the item, which you want to set in the menu TIME.
- Press OK and set.
- After you finish the setting, save it by pressing the button OK and return to the previous menu.
Press MENU to display the main menu.
Use the buttons / to select in the main menu the item Lock. You have to enter a valid password.
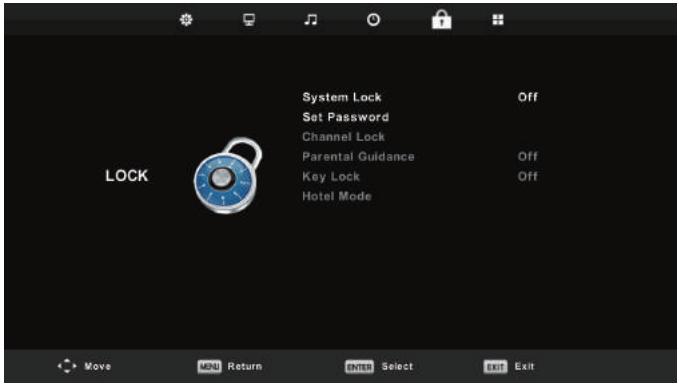
- Using the buttons / select the item, which you want to set in the menu LOCK.
- Press / and enter the setting.
- After you complete the setting, save it by pressing MENU and return to the previous menu.
The default factory password is 0000, and if you forget what you have set, contact a service centre.
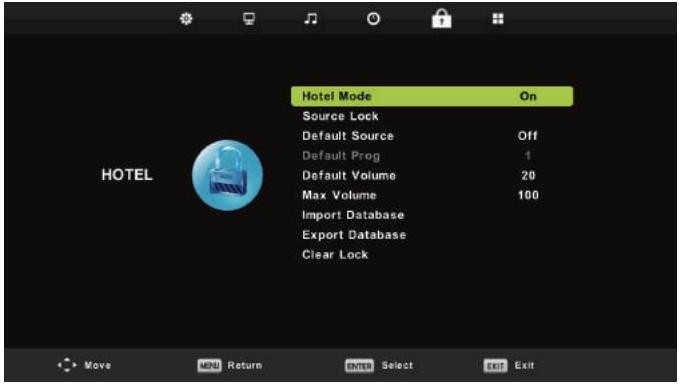
Hotel mode
Hotel Mode is used to restrict certain TV functions, to make it easy to operate in places where should be e.g. limited maximum volume or to prevent tuning TV.
- Use the buttons / on the remote control to select the hotel mode in the menu Lock.
- Press OK on the remote controller to enter the submenu.
- After you finish the setting, save it by pressing the button MENU and return to the previous menu.
Hotel mode
Using the buttons / select the item Hotel Mode and then use the buttons / to select the option On or Off.
Source Lock
Use the buttons / to select the item Source Lock and then press OK to enter the submenu and to select.
Default Source
Use the buttons / to select the item Default Source and then press OK to enter the submenu and to select.
Default Program
Use the buttons / to select the item Default Prog and then use the buttons / to select.
Maximum Volume
Use the buttons / to select the item Max Volume and then use the buttons / to select.
Clear Lock
Use the buttons / to select the item Clear Lock and then press OK to delete the previous settings.
Press MENU to display the main menu.
Use the buttons / to select the item SETUP in the main menu.

- Using the buttons / select the item, which you want to set in the menu SETUP.
- Press / and enter the setting.
- After you finish the setting, save it by pressing the button MENU and return to the previous menu.
USB
Note:
Before you use the Media menu, connect the USB device and then press SOURCE and set the input source to Media. The TV set detects the majority of the USB devices and shortly offers you to switch to playback. When you will not respond, the offer disappears and the TV remains in the original mode.
Use the buttons / to select the item Media in the menu Source and press Enter to enter the settings.

Use the buttons to select in the main menu the item Media, which you want to set and press Enter to enter the settings.
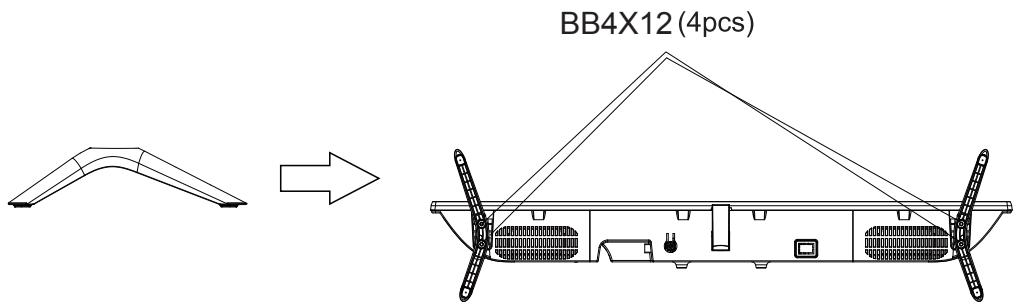
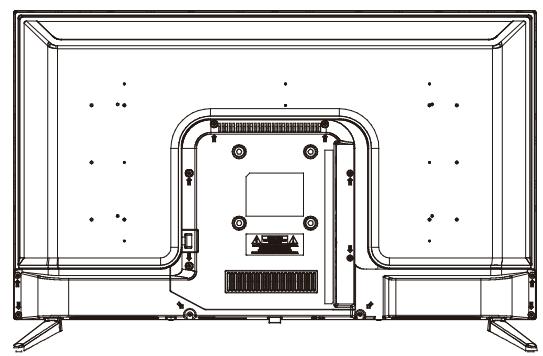
1. Assemble the stand
Before attaching/detaching the stand, make sure to turn off the TV.
Before performing work spread cushioning over the base area to lay the LED TV on. This will prevent it from being damaged.
Stand installation instruction
Troubleshooting
If you have any problem, check the couter measures for each symptom listed below. The following symptoms may have been caused by inappropriate adjustment rather than actual malfunction of the unit. If the trouble persists, contact the Customer Care Centre, see back page for contact details.
| Symptoms | Possible solutions |
| No power | Please check the power cord plugged in and that the power outlet works.
Unplug the power cord and plug it in after 60 seconds and restart the TV. |
| No picture | Please check antenna connection.
Station may be experiencing problems, please tune to another station.
Please adjust the settings of contrast and brightness. |
| Good picture but no sound | Please increase the volume.
Please check TV is under mute mode, press MUTE button on the remote control.
Please check sound settings
If external devices are being used, check their volumes are not set too low or turned off.
If using AVI or Component inputs, please make sure cables are connected properly and not loose.
If using DVI to HDMI cable, a separate audio cable is required. Make sure a headphone jack is not connected. |
| Good sound but abnormal color or no picture | Please check antenna connection and antenna condition. If using Component input, please check Component connections, incorrect or loose connections may cause colour problems or cause the screen to be blank. |
| No response to remote control | Batteries of remote control may have exhausted, if necessary, please change the batteries. Clean the remote control lens. The distance between LED TV and remote control should be within 8m, within recommended operating angle and path is free of obstructions. |
| Colored dots may be present on the screen | Although the LED screen is made with high-precision technology and 99.99% or more of the pixels are effective, black dots may appear or bright points of light (red, blue, or green) may appear constantly on the LED screen. This is a structural property of the LED screen and not a malfunction. |
| Picture is breaking up | Keep the TV away from noisy electrical sources such as cars, hair dryers, welders, and all optional equipment.
Electrical atmospheric interference such as local or distant lightning storms may cause picture to break up.
When installing optional equipment, leave some space between the optional equipment and the TV.
Check the antenna and connection.
Keep the antenna away from any power or input/output cables. |
| After Auto Tuning only some channels are available | Check your area is covered by Digital Video Broadcasts. Try re-tuning or manually tuning missing channels.
Check that you are using the correct antenna type - please see pg. 16 'Antenna connection'. |
| Channel cannot be selected | Check if the channel has been blocked in the main menu settings. |
| USB not playing | Please check connecting USB cable and power supply is connected. Hard drive has not been formatted. Please make sure USB disk is compatible and the multimedia data formats are supported. |
| Picture is distorted, macroblock, small block, dots, pixelization, etc | Compression of video contents may cause distortion especially on fast moving pictures such as sports and action movies. |
| Noise from speaker | Check cable connections, make sure a video cable is not connected to an audio input. Low signal level may cause sound distortion. |
| TV turns off automatically | Check if the Off Timer or Sleep timer is turned on. |
| TV turns on automatically | Check if the On Timer is set to On in the Setup menu. |
| Picture is not shown in full screen | First check if it is caused by the input signal. Then try to adjust Zoom in Function menu. |
Picture defects and the reason
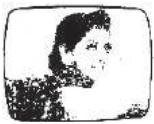
Snowy Picture
Snowy picture is usually due to weak signal. Adjust antenna or install an antenna amplifier.

Double Image or Ghosts
Double images are usually caused by reflections from tall buildings. Adjust the direction of the antenna or raise it.
Ghosting may also occur when still pictures are displayed continuously. It may disappear after a few moments.
Radio Wave Interference
Wave patterns are moving on the screen, which are usually caused by nearby radio transmitters or short-wave receiving equipment.

High Temperature Electrothermal Interference
Diagonal or herringbone patterns appear on the screen or part of picture is missing. This is probably caused by high temperature electrothermal equipment in a nearby hospital.
OPERATING MANAGEMENT:
Your product is guaranteed 2 years.
To request support, contact the customer service at 0811 382 272 Client François, +34952179479 CLIENTE Espanol. You will then be asked the defective part and the original invoice stating the product regulation. We may ask you for photos of your appliance.
FAILURE TO PACKING:
If it appeared, after unpacking the product or device, a vice preventing the use of the product in its expected configuration, contact the customer service within 72 hours worked.
DISCLAIMER OF WARRANTY
The guarantee does not apply in case of accidental physical damage, it does not cover such damage and failures that resulted:
- improper installation (of a bad installation) or a misuse or poor maintenance of the product.
- improper use of the material or not complying with the instructions in the user manual.
- lightning, flood, fire, power surge, shock, poor ventilation, a fall, discoloration due to the action of light, burning, humidity, excessive heating without humidifier, or irregular ground or insects.
- repairs made and/or working on the hardware and/or opening of it by an unauthorized person by the manufacturer.
- maintenance, repair or replacement of parts due to normal usury or failure to maintain.
- modification of the construction and original features of the guaranteed product.
corrosion, oxidation, a bad connection nor an external power supply problem.
EXCLUSION OF WARRANTY RELATING TO THE NATURE OF DAMAGES (INDIRECTS DAMAGES)
The guarantee covers only the right to repair or replace the guaranteed product. Consequently, the indirect damage resulting from the failure or damage not covered by warranty, including:
Commissioning costs, adjusting, cleaning;
- Damage of any kind resulting from the unavailability of the product guaranteed during the period between deterioration and failure and repair or the replacement of the product guaranteed.
OTHER EXCLUSIONS
- Damage and faults under specific exclusions in the warranty manufacture guaranteed product, as mentioned in the product instructions for use;
The aesthetic damage;
The products guarantee that the customer is not able to return or those who returned without their accessories.
PIXELPOLICY
- In accordance with the ISO 13406-2 norm, a product is considered defective when the number of dead or lit pixels is over 3.
Market Maker Brand Licensing, hereby declares that this equipment, conforms to the essential requirements and other relevant provisions of Directive 2014/53/UE.
The declaration of Conformity can be viewed at the following address:
http://www.mms-support.net/OTA/ECD_MMBL_HI3222HD-MM.pdf
THE DISPOSAL OF ELECTRICAL AND ELECTRONIC EQUIPMENT WASTE PRODUCTS ON THE PART OF FINAL USERS IN THE EUROPEAN UNION
This symbol on the product or on the container indicates that this product cannot be eliminated with the general waste. The user is responsible for eliminating this kind of waste by throwing them away at a "recycling point" specifically for electrical and electronic waste. Selective collection and electrical equipment recycling contribute to preserve natural resources and warrant waste recycling to protect environment and health. In order to receive further information about electrical and electronic waste collecting and recycling, contact your Local Council, the service of household waste or the establishment where the product was acquired.


The CE marking indicates that the product meets the main requirements of the European Directives 2014/35/EU (Low Voltage), 2014/30/EU (Electromagnetic Compatibility), 2014/53/EU (Radio Equipment), 2011/65/EU (Restriction of the use of certain hazardous substances in electronic equipment).

To avoid possible hearing damage, do not listen at high audio volume for long periods of time.

Cadmium free ; concentration values of Cadmium (Cd) by weight in any homogeneous material he display do not exceed 0,01 % as defined in Directive 2011/65/EU.


This symbol indicate direct current (DC).
This symbol indicate alternative current (AC).
This symbol indicate "Indoor use only".
Televiseur Television Televisie Televisión
975452-HI3222HD-MM
GUIDE D'UTILISATION 01(03)
USER MANUAL 01(34)
HANDLEIDING 01(64)
This product is guaranteed, for a period of 2 years from the date of purchase*, against any failure resulting from a defect in workmanship or material. This warranty does not cover any defects or damage resulting from improper use installation. incorrect use or abnormal wear of the product.
*on presentation of the receipt.
FR
CONDITION DE GARANTIE
Hereby, ELECTRO DEPOT declares that this device conforms to the essential requirements and EN other relevant provisions of Directive 2014/53 / EU. The declaration of conformity can be consulted on the site: http://www.electrodepot.fr/sav/ notices