USER MANUAL HI2422HD-MM HIGH ONE
RISQUE D'ÉLECTROCUTION NE PAS OUVRIR
ATTENTION:POUR EVITER TOUT RISQUE D'ÉLECTROCUTION,NE RETIREZ PAS LE COUVERCLE (NI LE PANNEAU ARRIÈRE). AUCUNE PIECE N'EST REMPLAÇABLE PAR L'UTILISATEUR.CONTACTEZ UN PERSONNEL QUALIFIÉ EN CAS DE PANNE.

Jamais/5 secondes/10 seconds/15 seconds/20 seconds/25 seconds/30 seconds.
5.2 PC Setup
This product is guaranteed against faults caused by defects in manufacturing or the materials used for a period of 2 years, starting from the date of purchase. This warranty does not cover defects or damage caused by failure to install the device correctly, incorrect use of the product, or excessive wear and tear.
on presentation of the receipt.
CONDITION DE GARANTIE
FR
EN Hereby, ELECTRO DEPOT declares that this device is in compliance with the essential requirements and other relevant provisions of Directive 2014/53 / EU. The declaration of conformity can be consulted on the site: http://www.electrodepot.fr/sav/ notices
Thank you for choosing this HIGHONE product .
HIGHONE products are chosen, tested, and recommended by the ELECTRONIC DEPOT, so you can be sure you are getting a top-quality, easy-to-use product that won't let you down.
We're confident your new device will be a pleasure to use every day.
Welcome to ELECTRO DEPOT.

ELECTRO DEPOT
| A GETTING STARTED | IMPORTANT INSTRUCTIONS
ACCESSORIES
FEATURES
GENERAL PARTS
REMOTE CONTROL
REMOTE CONTROL PREPARATION
BASIC CONNECTION |
| B OPERATIONS | BASIC OPERATIONS
FIRST TIME INSTALLATION
MEDIA PLAYBACK
MAIN MENU
ATV AND OTHER MODES |
| C FOR REFERENCE | MAINTENANCE
WALL MOUNTING
STAND INSTALLATION
SPECIFICATIONS
TROUBLESHOOTING |
SAFETY PRECAUTIONS

The warning sign showing a lightning bolt in a triangle indicates that this product contains "dangerous electrical voltages".
CAUTION
RISK OF ELECTRIC SHOCK DO NOT OPEN
CAUTION: TO AVOID THE RISK OF ELECTROCUTION, DO NOT REMOVE THE COVER (OR THE BACK OF THE DEVICE). NO PARTS ARE REPLACEABLE BY THE USER. PLEASE CONTACT QUALIFIED PERSONNEL IN CASE OF FAILURE.

The warning sign showing an exclamation point in a triangle indicates that this point of the manual requires special attention.

CAUTION: - TO REDUCE THE RISK OF FIRE, ELECTRIC SHOCK OR SERIOUS INJURY:
Read these safety instructions before using your device and store them for possible future reference.
- This device must only be connected to a mains network whose characteristics are identical to those shown on the device identification plate.
- The mains plug must always be easily accessible. It serves as a mains disconnecting switch of the device.
- To disconnect the device from the mains, the plug must be disconnected. Hold the mains cable by its plug. Do not pull on the mains cable to disconnect the plug.
- The mains cables must be routed so that they are not trampled upon or pinched by objects placed on or against them.
- If the mains cable of the device is damaged, it must be replaced by the manufacturer, its after-sales service or a similarly qualified person to avoid any danger.
- The device must not be exposed to dripping or splashing water, moisture or liquids.
- Do not place the device near water, for example in a bathroom or near a sink.
- No objects filled with liquids such as vases should be placed on or above the device.
- Never touch the mains cable with wet hands, this could cause a short circuit or electric shock.
-
To avoid the risk of fire, do not place sources of open flames, such as lighted candles, or heat sources such as radiators, on or near the device.
-
The device is intended for use only in a temperate climate.
- If smoke, an unusual odour or strange noise is emitted by the device: unplug the mains cable from the electrical outlet and consult the after-sales service or repair centre. Never attempt to make repairs yourself, this could be potentially dangerous.
- Do not attempt to open or disassemble the device. This would expose you to dangerous voltages.
- The slots and openings of the device are intended for ventilation and to ensure its operation. To prevent overheating, these openings must not be obstructed or covered in any way, such as by newspapers, tablecloths or curtains.
Always leave a minimum distance of 10cm around the device for sufficient ventilation.
- Never push any object into the device through one of its openings, as it may come into contact with electrical components, which can cause an electric shock or fire.
- In case of thunderstorm or lightning, immediately unplug the mains cable from the wall outlet.
- Always turn off the device when not in use. Unplug the mains cable from the electrical outlet when the device will not be used for a long period of time.
-
Unplug the device from the electrical outlet before cleaning. Do not use liquid or aerosol cleaners. Use a dry, soft cloth for cleaning.
-
If the product does not bear the logo, it is a Class I device. It must then be connected to a mains socket with a protective earth connection.

CAUTION --: TO AVOID RISK OF INJURY OR DAMAGE TO THE PRODUCT OR OTHER EQUIPMENT:
- This product is intended for household and personal use only. Do not use this product for commercial, industrial or other purposes.
- Do not subject the product to strong shocks, extreme temperatures or direct sunlight for prolonged periods.
- Keep the product away from magnetic objects, motors and transformers.
- Do not use the product outdoors, regardless of weather conditions.
- Install the device only on a stand (furniture, wall...) that can support its weight safely. (Danger of instability: The TV may fall and cause serious bodily injury or death)
DISPOSAL OF OLD ELECTRICAL APPLIANCES
The European directive 2012/19/EU on Waste Electrical and Electronic Equipment (WEEE), requires that old household electrical appliances must not be disposed of in the normal unsorted municipal waste stream. Old appliances must be collected separately in order to optimize the recovery and recycling of the materials they contain, and reduce the impact on human health and the environment. The crossed out "wheeled bin" symbol on the product reminds you of your obligation, when you dispose of the appliance, it must be separately collected.

For equipment covered by the Radio Equipment Directive:
Renaissance Public Service SRL hereby declares that the type of radio equipment (the TV) is in compliance with Directive 2014/53 /EU.
The full text of the EU declaration of conformity is available at the following internet address:
www.rserv.ro
To avoid possible hearing damage, do not listen at high audio volume for long periods of time.
Occasionally, a few non-active pixels may appear on the screen as a fixed black, blue, green or red point. Please note that this does not affect the performance of your product. Take care not to scratch the screen with fingernails or other hard objects.
ACCESSIONS
User Manual. 1
Remote Control. 1
Stand. 2
All the pictures in this manual are just for your reference, appearance and display should subject to the final product.
FEATURES
23.6" LED Display
This unit has a built-in LED display window to provide clear vision and low radiation.
With Hotel Lock
Support Auto TV Scanning
Support Digital Broadcasting Reception
Support TV Guide Function
Support TELETEXT (Europe) Function
Support USB MultimediaPlayback
Support Multi-languages On Screen Display
Support Full Function Remote Control
Support HDMI, AV, VGA, PC AUDIO and CI Input
Support EARPHONE and COAXIAL Output
Support PVR Function
Support TIME SHIFT Function
With Detachable Stand Holder
With External Antenna Jack
With Built-in Speakers
GENERAL PARTS
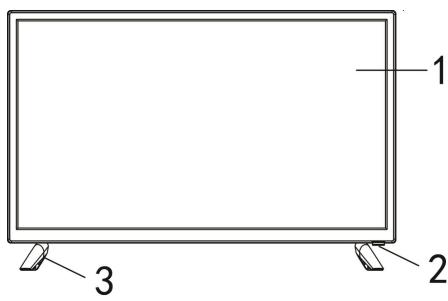
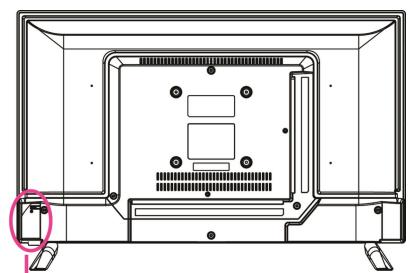
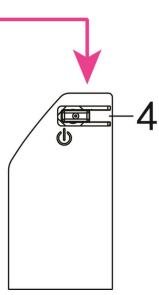
MAIN UNIT
- LED display screen
- Remote control sensor / Power indicator- In standby mode the indicator light will display red color; when switching on the unit the indicator light will display blue color.
- Stand holder
- STANDBY button- To turn ON/OFF the TV.
GENERAL PARTS
Back View
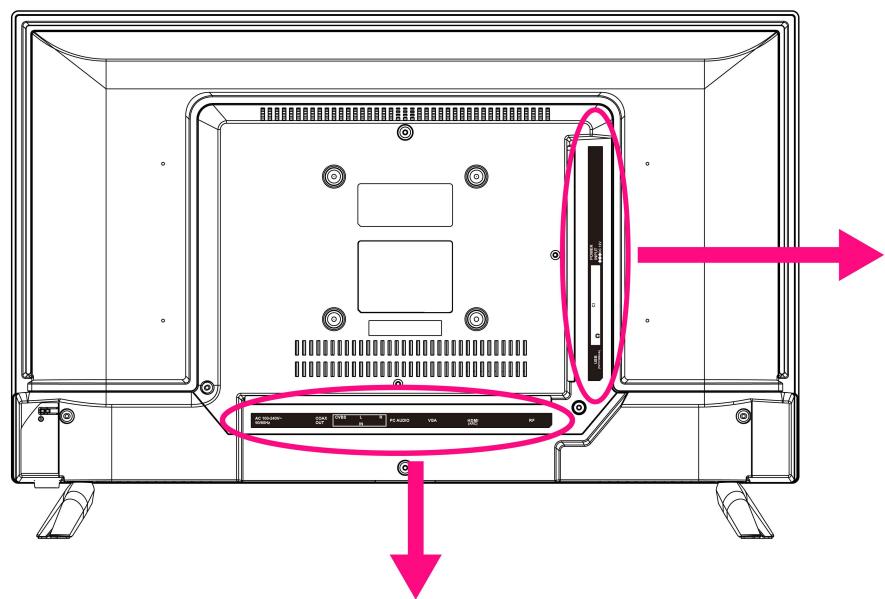

| AC 100-240V~50/60Hz | COAX OUT | CVBS IN | L R | PC AUDIO | VGA | HDMI (ARC) | RF |
| | | | | | | | | | | | | | | | |
| 1 | 2 | 3 | 4 | 5 | 6 | 7 | 7 |
- AC Power cord
- COAXIAL output terminal
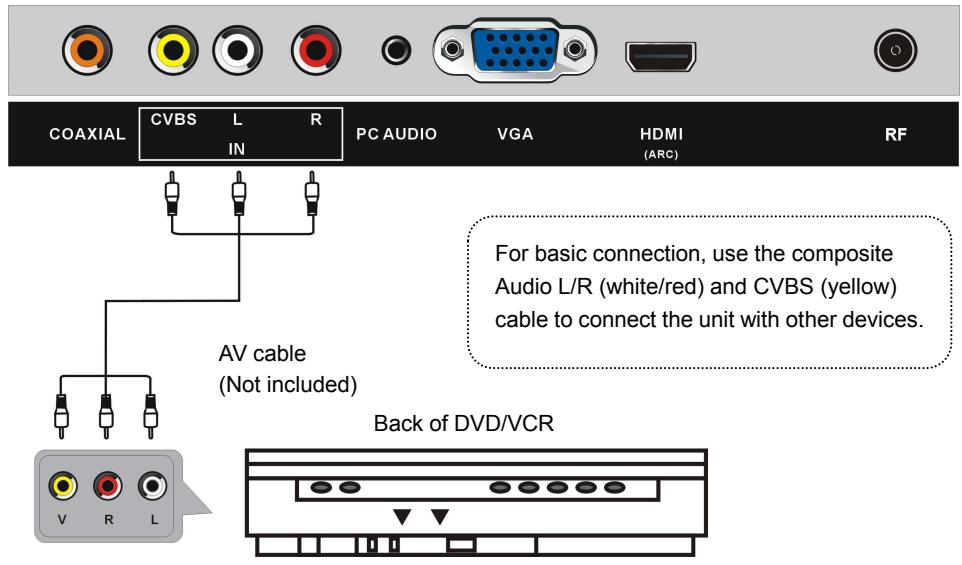
- CVBS & Audio L/R input terminal
- PC AUDIO input terminal
- VGA input terminal
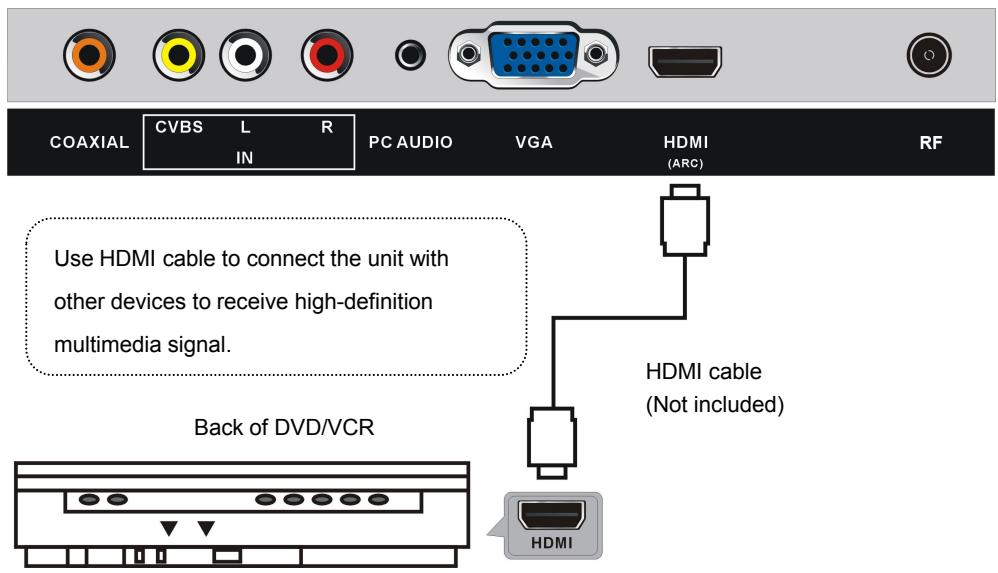
- HDMI input terminal
- RF input terminal- To connect the external antenna.
- DC Power cord
- Cl+ input terminal
- EARPHONE output terminal
- USB input terminal
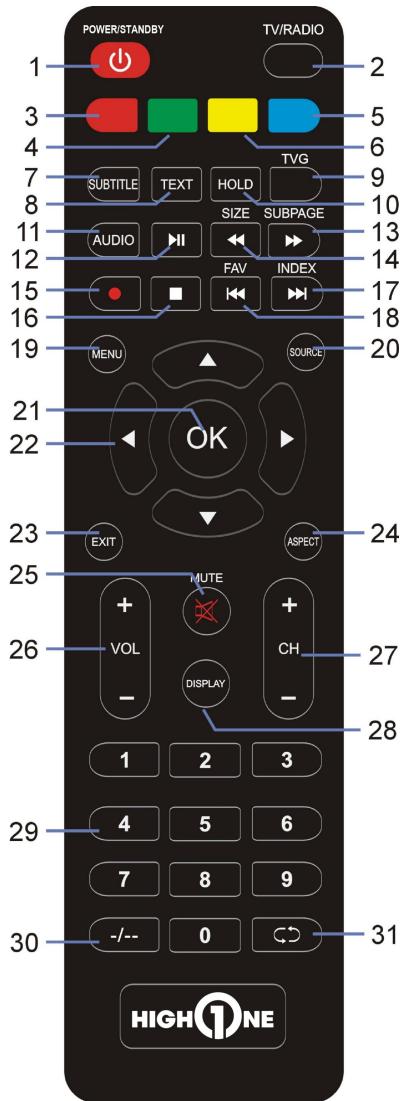
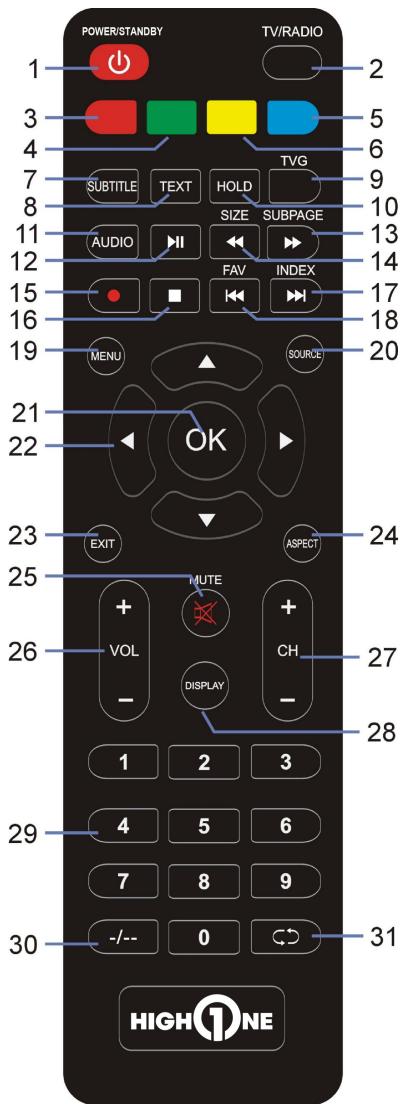
REMOTE CONTROL
1 STANDBY
Set the unit in standby mode; press it again to switch it on.
2 TV/RADIO
Switch the unit between TV and Radio.
7 SUBTITLE
Enable/disable subtitles.
8 TEXT
Display the available Teletext.
9 TVG
Display electronic program guide.
10 HOLD
Hold the Teletext.
11 AUDIO
Switch the available sound-track.
12
Start/pause playing.
13 SUBPAGE
Enter Teletext sub-page.

Move fast forward.
14 SIZE
Switch Teletext size.

Move fast backward.
15 DTV
Start RECORDING when watching available digital programs.
16
Stop playing.
17
Play the next file.
INDEX
Display the record list or Teletext index.
REMOTE CONTROL
18
Play the previous file.
FAV
Display the favorite channels list.
19 MENU
Call out the main menu or return to previous menu.
20 SOURCE
Select desired input source.
21 OK
Confirm selection.
22 ▲/▼/▲/
Navigation buttons
23 EXIT
Exit the menu page.
24 ASPECT
Press it repeatedly to select desired screen size.
25 MUTE
Mute the sound.
26 VOL +/-
Increase/decrease the volume level.
27 CH+/-
Play the next/previous program.
28 DISPLAY
Display the available program information.
29 Number buttons (0-9)
Input the number information, such as channel number and so on.
30 ---
Switch the digit when watching TV programs.
31 CD
Return to previous channel.
REMOTE CONTROL PREPARATION
BATTERY INSTALLATION
Install the batteries as the following pictures. Be sure + and - terminals are positioned as indicated in the battery compartment (Fig1).
SERVICE LIFE OF BATTERIES
- The batteries normally last for one year although this depends on how often the remote control is used.
- If the remote control fails to work even when it is operated near the player, replace the batteries.
- Use two size AAA dry batteries.
NOTE:
- Do not drop, step on or otherwise impact the remote control. This may damage the parts or lead to malfunction.
- If the remote control is not going to be used for a long time, remove the batteries.
REMOTE CONTROL
OPERATION
Point the remote control from no more than about 6m from the remote control sensor and within about 60^ of the front of the player (Fig2).
NOTES:
- The operating distance may vary according to the brightness of the room.
- Do not point bright light at remote control sensor.
- Do not place objects between the remote control and the remote control sensor.
- Do not use this remote control while simultaneously operating the remote control of any other equipments.
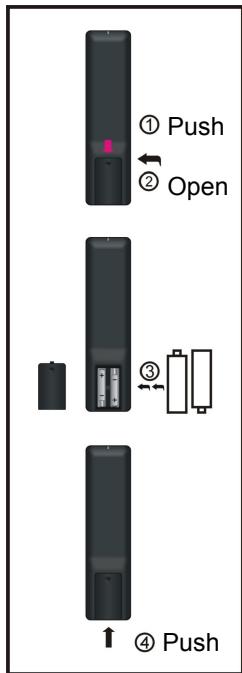
Fig1
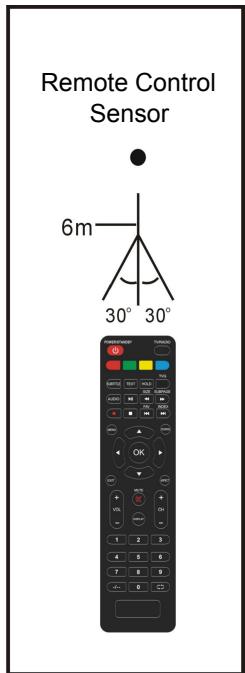
Fig2
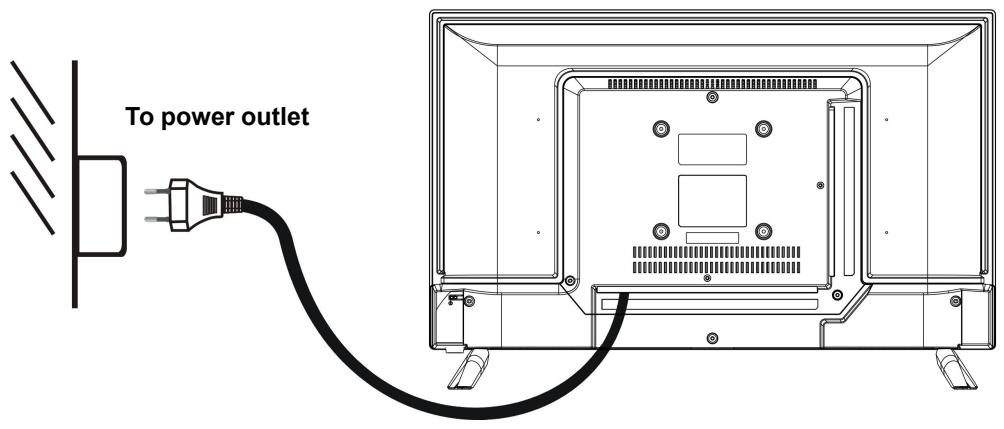
BASIC CONNECTION
- Ensure all the cables are disconnected from the main unit before connecting to AC power source.
- Read through the instructions before connecting other equipment.
CONNECTING TO AC POWER SOURCE
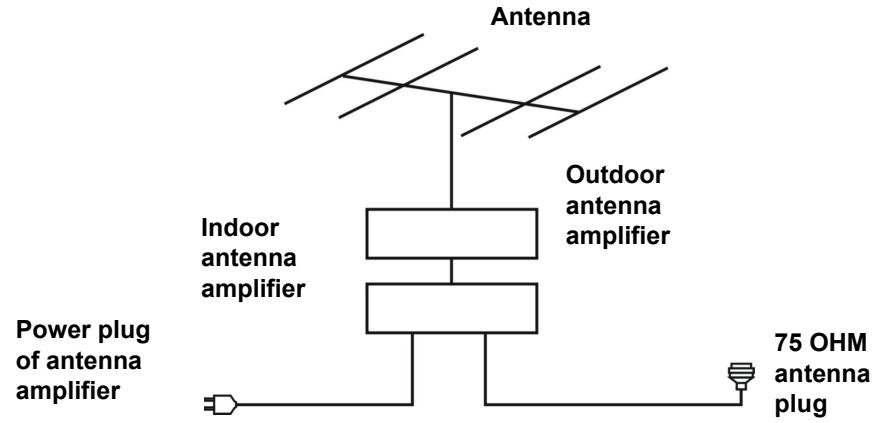
CONNECT EXTERNAL ANTENNA TO UNIT
Install external antenna into antenna jack for best picture.
HDMI CONNECTION
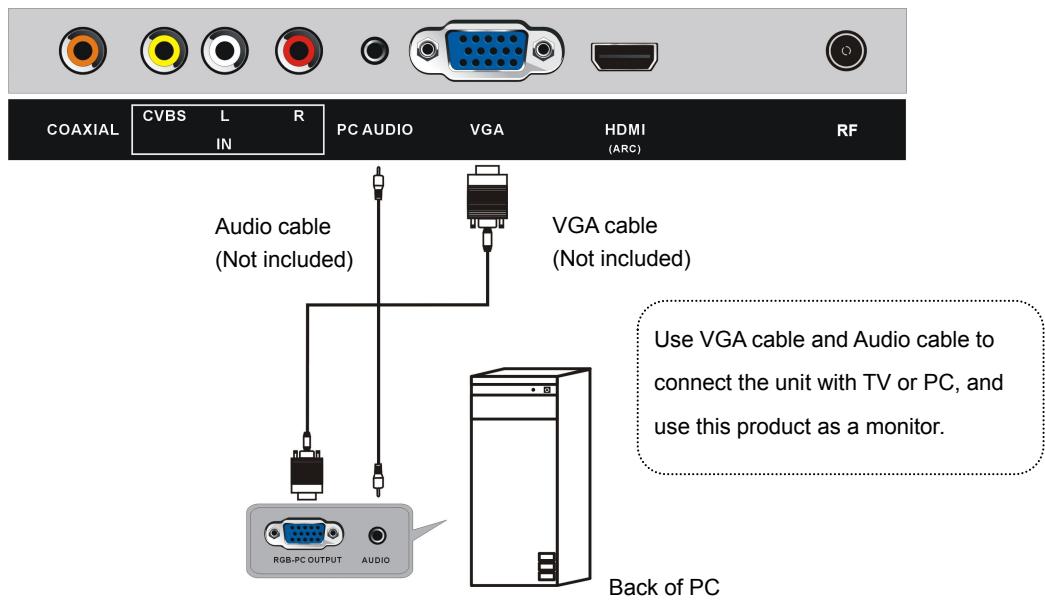
PC/VGA CONNECTION
AV (COMPOSITE VIDEO) CONNECTION
COAXIAL CONNECTION

Use coaxial cable (not included) to connect the unit with amplifier or other audio decoding devices for coaxial audio signal output.

USB CONNECTION
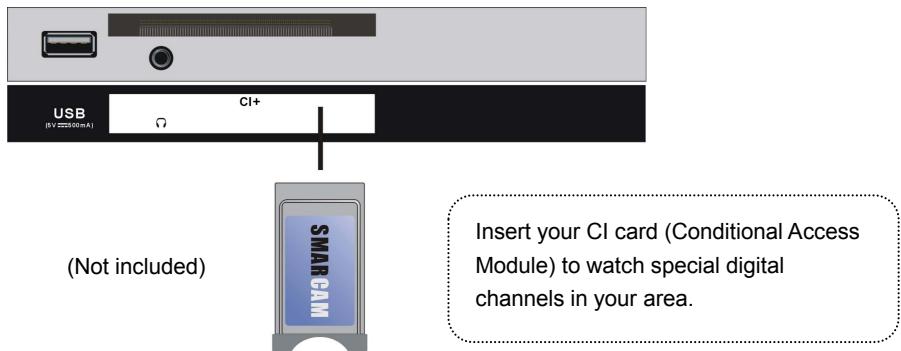
INSERT A C I CARD

EARPHONE CONNECTION
MAKE SURE ALL THE EQUIPMENTS AND POWER PLUG ARE CONNECTED PROPERLY AND THE UNIT IS SET IN CORRECT MODE BEFORE KINDS OF OPERATIONS.
BASIC OPERATIONS
- Press STANDBY button on the unit or remote control to power ON the unit (indicator will glow blue); press it again to power OFF (standby mode) the unit (indicator will glow red).
SELECT DESIRED PROGRAM
- Press CH+ button to play next channel.
- Press CH- button to play previous channel.
- Press number buttons on remote control directly to select desired program.
NOTE: Press -/-- button repeatedly to switch the digit.
VOLUME CONTROL
- Press VOL+ or VOL- to adjust the level of current volume.
Available range: 0-100.
MUTE CONTROL
- Press MUTE button to mute the sound, press it again to turn on the sound.
SOURCE SETTING
- Press SOURCE button on the remote control to display the sources list.
- Press UP or DOWN navigation button to select desired input source, and then press OK button to confirm selection.
VIDEO SIZE SETTING
- Press the ASPECT button on the remote control repeatedly to select the VIDEO SIZE directly.
Available options: Auto, 4:3, 16:9, Zoom1, Zoom2.
NOTE: The available video size may be different for different input sources.
MULTIAUDIO SETTING
- Press the AUDIO button on the remote control repeatedly to select the desired audio language.
NOTE: To enable this function, make sure that the channel you are viewing supports multi-audio languages.
- Press the DISPLAY button on the remote control to display information of current programs.
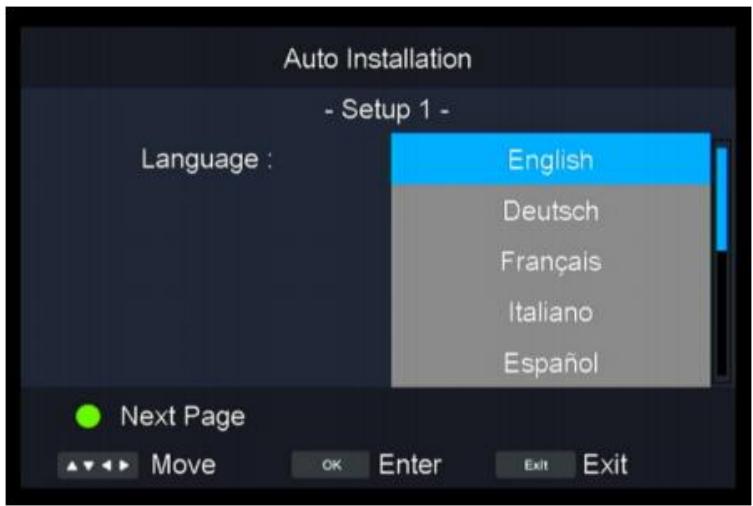
First-time installation
Tuning Setup
- Connect to power source and turn on this TV, logo page will display on the screen.
- Press UP/DOWN navigation buttons on remote control to select the language to be used for menus and message.
- Press OK button on remote control to confirm selection.
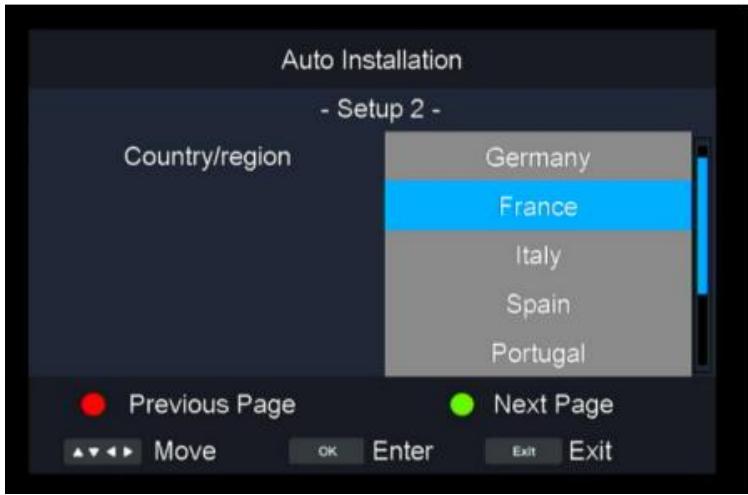
Country/region
- Press UP/DOWN navigation buttons on remote control to select the country/region you want to.
- Press OK button on remote control to confirm selection.
(Note: When select France and Germany, we need to input a password, the initial password is 1111.)
Antenna Type
- Press UP/DOWN navigation buttons on remote control to select Air/Cable.
- Press OK button on remote control to confirm selection.

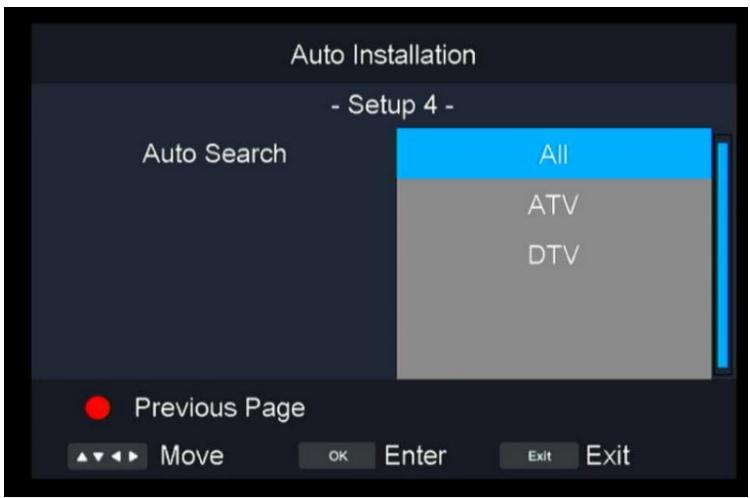
Auto Search
- Press UP/DOWN navigation buttons on remote control to select All, ATV, DTV.
- Press OK button on remote control to confirm selection.
TV GUIDE (FOR DTV MODE ONLY)
- Press the TVG button on the remote control to display the program guide.
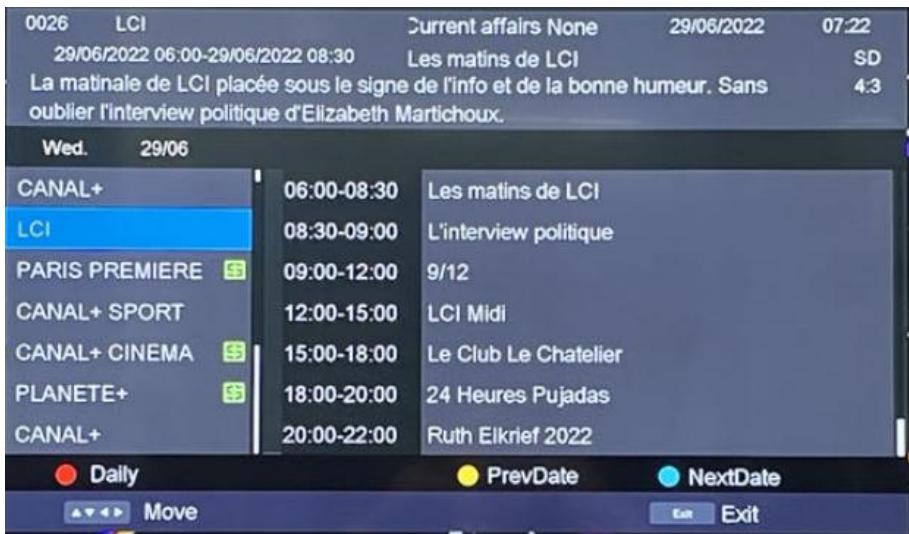
- Press the UP/DOWN navigation button to select a preferred program.
- Press the LEFT/RIGHT navigation button to switch between the left column and right column.
- Press RED button on remote control to switch between Daily and Weekly programme.
- Press GREEN button on remote control to select desired Remind mode, when the cursor is on the right column.
- Press YELLOW button on remote control to display program guide of previous day.
- Press BLUE button on remote control to display program guide of next day.
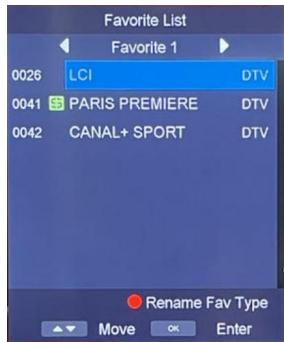
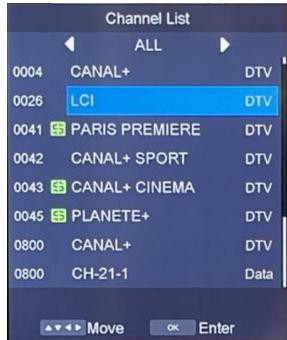
FAVORITE LIST
- When viewing an available channel, press FAV button on remote control to enter Favorite List menu page.
- Press UP or DOWN navigation button to select preferred channel.
- Press OK button to confirm selection.
QUICK SELECT
- Press OK button on remote control to enter Channel List page directly.
- Press UP or DOWN navigation button to select desired channel.
- Press OK button to confirm selection.
TELETEXT
- Press the TEXT button on the remote control to display the available teletext information and press it repeatedly to stop playing the teletext.
TV/RADIO (FOR DTV MODE ONLY)
- Press the TV/RADIO button on the remote control to switch the unit between TV and radio mode.
SUBTITLE
- Press the SUBTITLE button on the remote control to select a desired subtitle.
(NOTE: To enable this function, make sure that the channel you are viewing supports multi-subtitles.)
RECORDER (FOR DTV MODE ONLY)
- Insert your USB memory device into USB slot first.
- When watching digital programs, press (REC) button on remote control to call out a reminding message; select “Yes” and press OK button to start recording.
- Press button on remote control to call out a reminding message; select "Yes" and press OK button to stop recording.


Set the Recording Duration Time
- Press (REC) button on remote control to call out a reminding message; select "Yes" and press OK button on to start recording.
- Press (REC) button again to call out Rec Duration Time, and set your desired recording time by pressing number buttons on remote control.

TIMESHIFT (FOR DTV MODE ONLY)
- Insert your USB memory device into USB slot first.
- When watching digital programs, press button to call out reminding message; select "Yes" and press OK button to enable timeshift function.
- Press button on remote control to call out a reminding message; select "Yes" and press OK button to stop timeshift.
- Insert a USB memory device into USB slot.
- Press SOURCE button on the unit or remote control to switch this unit to USB mode.
- Press the LEFT/RIGHT navigation button to move the cursor.
- Press EXIT button on remote control to return to previous menu page.

Photo

Music

Movie

E-Book
PHOTO
- Press the LEFT/RIGHT navigation button to select "Photo" in the main menu and press the OK button to enter it.
- Use the navigation buttons to select the desired folder or file.
-
To delete files, press the RED button on remote control to call out reminding message and select "Yes" to delete files.
-
Press navigation button to select a file that you want and press the button to start playback.
- Press button to stop playback.
- Press the OK button to call out the tool bar below. Use the navigation buttons to select a desired option and press OK to confirm it.
- Press the EXIT button to dismiss the tool bar.


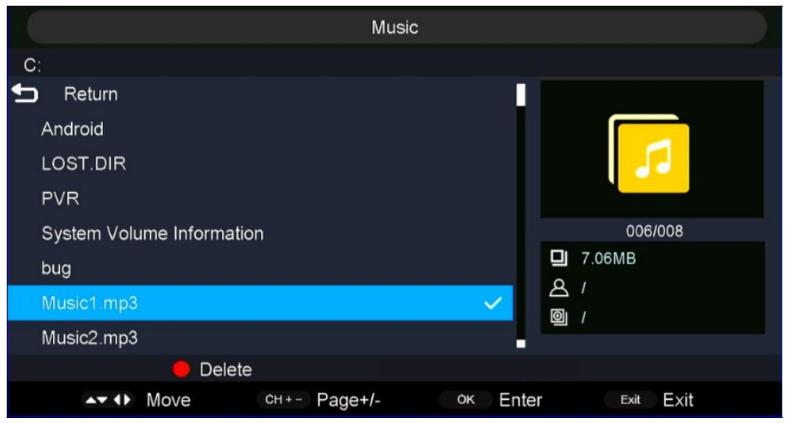
MUSIC
- Press the LEFT/RIGHT navigation button to select "Music" in the main menu and press the OK button to enter it.
- Use navigation buttons to select a desired folder or file.
- To delete files, press the RED button on remote control to call out reminding message and select "Yes" to delete files.
- Press navigation button to select a file that you want.
- Press the button to start playback.
- Press the EXIT button to return.
MOVIE
- Press the LEFT/RIGHT navigation button to select "Movie" in the main menu and press the OK button to enter the selection.
- Use the navigation buttons to select a desired folder or file.
- To delete files, press the RED button on remote control to call out reminding message and select "Yes" to delete files.
- Press navigation button to select a file that you want and press the button to start playback.
- Press the OK button to call out the tool bar below. Use the navigation buttons to select a desired option and press OK to confirm it.
- Press the EXIT button to return.

E-Book
- Press the LEFT/RIGHT navigation button to select "E-Book" in the main menu and press the OK button to enter the selection.
- Use navigation buttons to select a desired folder or file.
- To delete files, press the RED button on remote control to call out reminding message and select "Yes" to delete files.
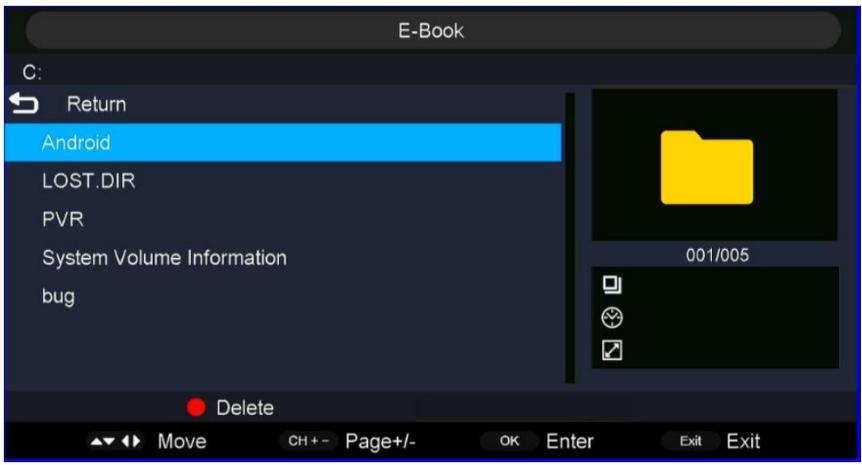
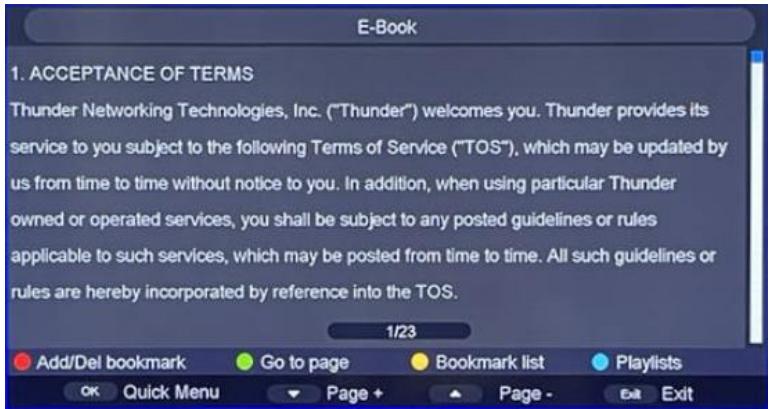
- Press navigation button to select a file that you want and press the button to start playback.
- Press Red button to Add/delete the bookmark.
- Press Green button to enter the desired page directly.
- Press Yellow button to list the pages with bookmark.
- Press Blue button to show the playlist.
- Press the EXIT button to return.
- Press the button on the remote control to play or pause playing.
- Press the button on the remote control to stop playing.
- Press the button on the remote control to move fast backward.
- Press the button on the remote control to move fast forward.
- Press the button on the remote control to play the previous file.
- Press the button on the remote control to play the next file.
NOTE: To play your multimedia files, make sure you have selected the correct icon in the main menu of MEDIA PLAYBACK. That is to say, you can only play Photo files in PHOTO mode, Music files in MUSIC mode, and so on.
Settings
1. Picture
- Press MENU button on remote control to display the main menu.
- Press LEFT/RIGHT button to select PICTURE in the main menu, then press OK button to enter.
- Press UP/DOWN button to select the option that you want to adjust in the PICTURE menu.
- Press LEFT/RIGHT button to adjust.
- After finishing your adjustment, press MENU button to return back to the previous menu.
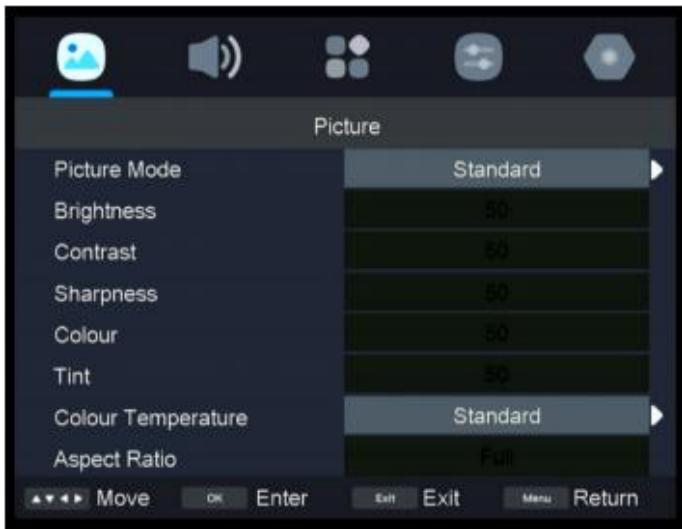
1.1 Picture Mode
- Press UP/DOWN button to select Picture Mode, then press OK button to select. (Options: Standard/Dynamic/Movie/User)
1.2 Brightness/Contrast/Sharpness/Colour/Tint
- Press UP/DOWN button to select option, then press LEFT/RIGHT button to adjust.
Brightness: Adjust the visual perception output of the entire picture, it will effect the luminousness of the picture.
Contrast: Adjust the highlight intensity of the picture, but the shadow of the picture is invariable.
Sharpness: Adjust the peaking in the details of the picture.
Colour: Color adjustment of picture.
(NOTE: Brightness, Contrast, Sharpness and Colour are adjustable only when Picture Mode is "User". Tint is adjustable only for NTSC system.)
1.3 Colour Temperature
- Press UP/DOWN button to select Colour Temperature. This item is to change the overall color cast of the picture.
(Options: Standard/Cool/Warm)
Standard: Produces a vivid image.
Cool: Produces a gentle blue-hued image.
Warm: Produces a red-hued image.
1.4 Aspect Ratio
- Press UP/DOWN button to select Aspect Ratio. This item is used to adjust the video size.
- Press RIGHT button to select Auto, 4:3, 16:9, Zoom1, Zoom2.
1.5 Noise Reduction
- Press UP/DOWN button to select Noise Reduction. This item is used to improve the quality of the picture.
- Press RIGHT button to select High/Middle/Low/Off.
1.6 Backlight
- Press UP/DOWN button to select Backlight. This item is to adjust image backlight.
1.7 HDMI Mode
Screen Mode(It only available on HDMI source.)
- Press MENU button to display the main menu.
- Press LEFT/RIGHT button select SOUND in the main menu, then press OK button to enter.
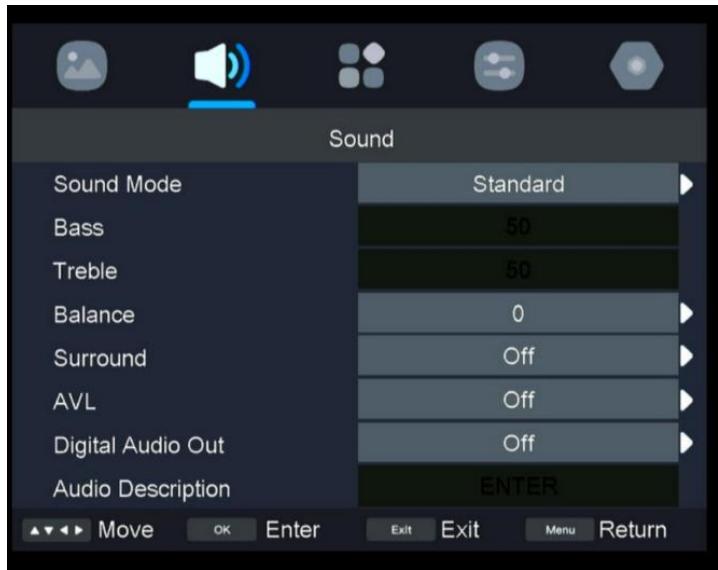
2.1 Sound Mode
- Press the UP/DOWN button to select Sound Mode, then press OK button to select.
(Options: Standard, Movie, Music, Speech, User.)
Standard: Produces a balanced sound in all environment.
Movie: Enhance treble and bass for a rich sound experience.
Music: Increase bass again for better bass.
Speech: Reduce treble and bass gain to accentuate vocal effects.
User: Select to customize sound settings.
2.2 Bass/Treble
- Press UP/DOWN button to select option, then press LEFT/RIGHT button to adjust.
Bass: Adjust the bass effect. Increased or decreases lower-pitched sounds.
Treble: Adjust the treble effect. Increases or decreases high-pitched sounds.
(NOTE: Bass and Treble are adjustable only when Sound Mode is "User".)
2.3 Balance
- Press UP/DOWN button to select Balance.
- Press LEFT/DOWN button to adjust the value.
2.4 Surround
- Press UP/DOWN button to select Surround.
- Press LEFT/DOWN button to select On or Off.
2.5 AVL
- Press UP/DOWN button to select AVL, and press RIGHT to select On/Off. This item is used to reduce sudden volume changes automatically.
2.6 Digital Audio Out
- Press UP/DOWN button to select Digital Audio Out, then press RIGHT button to select Off/Auto/PCM.
2.7 Audio Description
- Press UP/DOWN button to select Audio Description, then press RIGHT button to enter sub-page.
- For Visual Impaired users, this function can assist them to know a certain scene or action through the narration.
NOTE: Audio Description function works only when you are viewing programs that contain related narration information.
- Press MENU button to display the main menu.
- Press LEFT/RIGHT button select Channel in the main menu, then press OK button to enter.
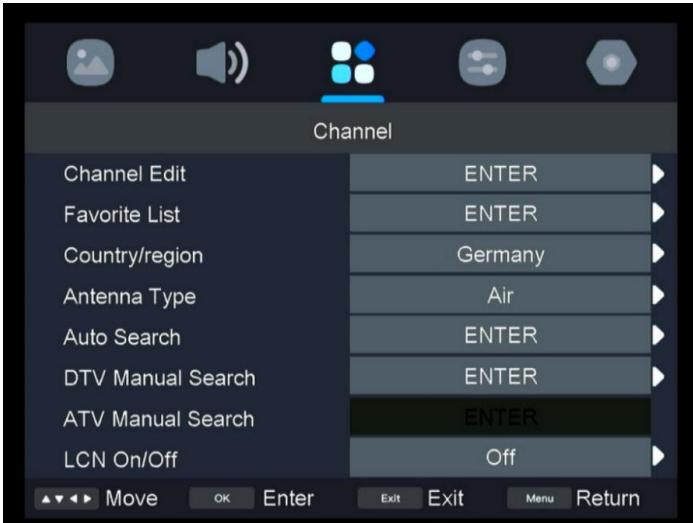
3.1 Channel Edit
- Press UP/DOWN button to select Channel Edit, then press RIGHT button to enter sub-menu.
3.2 Favorite List
- Press UP/DOWN button to select Favorite List, then press RIGHT button to enter sub-menu.
3.3 Country/region
- Press UP/DOWN button to select Country/region, then press RIGHT button to select.
3.4 Antenna Type
- Press UP/DOWN button to select Antenna Type, then press RIGHT button to select. (Options: Air/Cable).
3.5 Auto Search
- Press UP/DOWN button to select Auto Search, then press RIGHT button to enter sub-menu.
3.6 DTV Manual Search
- Press UP/RIGHT button to select DTV Manual Search, then press RIGHT button to enter sub-menu.
3.7 ATV Manual Search
- Press UP/DOWN button to select ATV Manual Search, then press RIGHT button to enter sub-menu.
3.8 LCN
- Press UP/DOWN button to select LCN, then Press RIGHT button to select LCN: On/Off.
- Turn on the LCN for sorting and grouping programs.
- Press UP/DOWN button to select Signal Information, then Press RIGHT button to enter sub-page.
- Press MENU button to display the main menu.
- Press LEFT/RIGHT button select Feature in the main menu, then press OK button to enter.
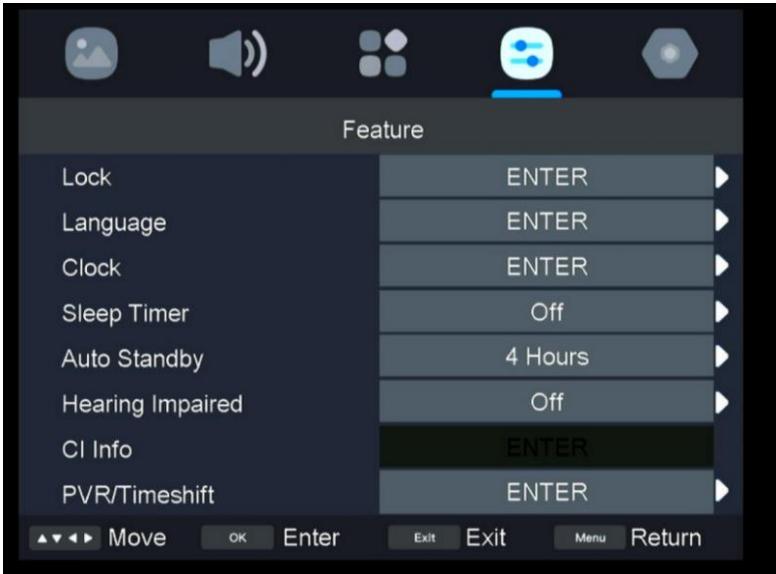
4.1 Lock
- Press UP/DOWN button to select Lock, then press RIGHT button to enter sub-page.
(The initial password is 1111. The universal password is 4711 if you forget the password you set.)
4.2 Language
- Press UP/DOWN button to select Language, then press RIGHT button to enter sub-page to select preferred OSD language.
4.3Clock
- Press UP/DOWN button to select Clock, then press RIGHT button to enter sub-page.
4.4 Sleep Timer
- Press UP/DOWN button to select Sleep Timer, then press RIGHT button to enter to select Off/10mins/20mins/30mins/60mins/90mins/120mins/180mins/240mins.
4.5 Auto Standby
- Press UP/DOWN button to select Auto Standby, then press RIGHT button to enter to select Off/4 Hours/6 Hours/8 Hours.
4.6 Hearing Impaired
- Press UP/DOWN button to select Hearing Impaired, then press RIGHT button to enter to select On or Off.
4.7 CI Info
- Press UP/DOWN button to select CI Info, then press RIGHT button to enter to display the CI information.
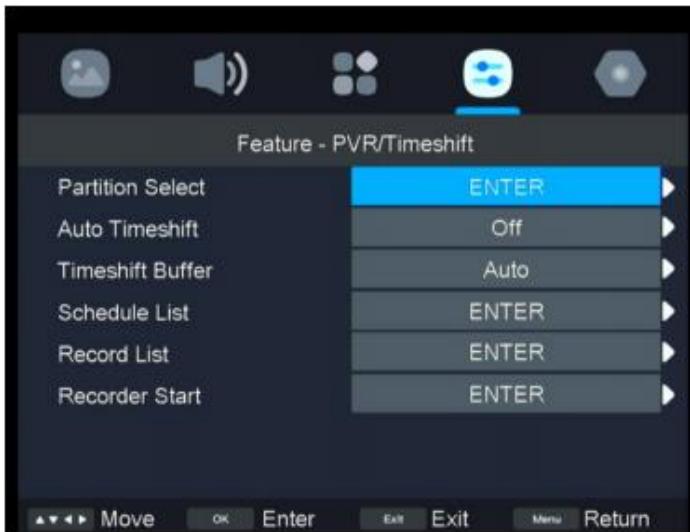
4.8 PVR/Timeshift
- Press UP/DOWN button to select PVR/Timeshift, then press RIGHT button to enter to enter sub-menu.
(Parition Select/Auto Timeshift/Timeshift Buffer/Schedule List/Record List/Recorder Start)
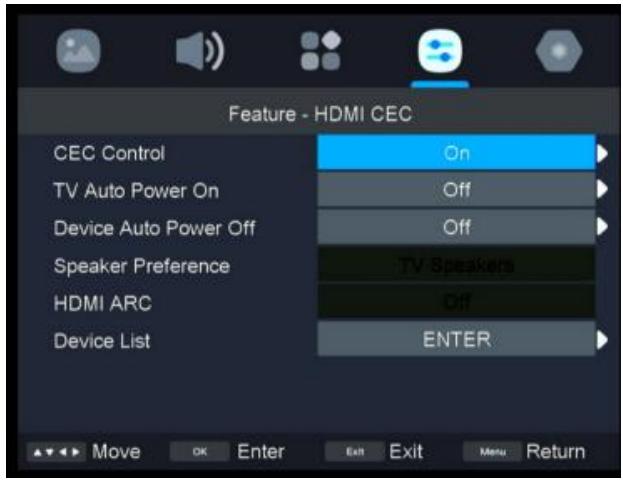
4.9 HDMI CEC
- Press UP/DOWN button to select HDMI CEC, then press RIGHT button to enter to enter sub-menu.
(CEC Control/TV Auto Power ON/Device Auto Power Off/Speaker Preference/HDMI ARC/Device List)
- Press MENU button to display the main menu.
- Press LEFT/RIGHT button select Setup in the main menu, then press OK button to enter.
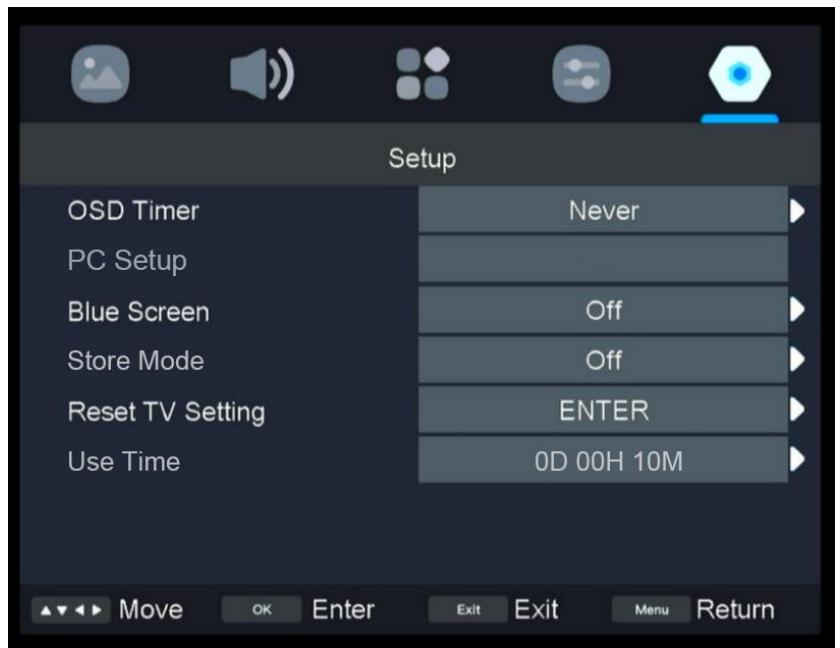
5.1 OSD Timer
- Press UP/DOWN button to select OSD Timer, then press RIGHT button to enter to select Never/5 Seconds/10 Seconds/15 Seconds/20 Seconds/25 Seconds/30 Seconds.
5.2 PC Setup
- Press UP/DOWN button to select PC Setup, then press OK button to enter to sub-page.
5.3 Blue Screen
- Press UP/DOWN button to select Blue Screen, then press RIGHT button to enter to select On or Off.
- The screen background will turn blue at very weak or no signal condition, if Blue Screen in On.
5.4 Store Mode
- Press UP/DOWN button to select Store Mode, then press RIGHT button to enter to select On or Off.
5.5 Reset TV Setting
- Press UP/DOWN button to select Reset TV Setting, then press RIGHT button to enter sub-menu.
- This item is used to reset to factory default settings.
5.6 Use Time
- Press UP/DOWN button to select Use Time.
- This item is used to display the usage time.
ATV AND OTHER MODES
- Press the SOURCE button on the remote control to select a desired input source.
- For these modes, please refer to the menu operations of DTV mode.
MAINTENANCE
- Be sure to press POWER button to set the player to the standby mode and disconnect the power plug before maintaining the player.
- If the surface is extremely dirty, wipe clean with a cloth which has been dipped in a weak soap-water solution and wrung out thoroughly, and then wipe again with a dry cloth.
- Never use alcohol, benzene, thinner, cleaning fluid or other chemicals. And do not use compressed air to remove dust.
- Wipe the player with a dry, soft cloth IN CASE there are scratches on the display panel the warranty is void.
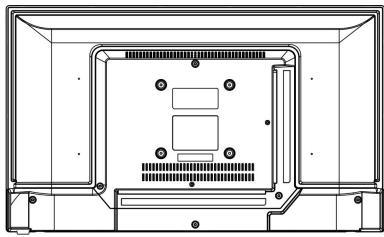
WALL MOUNTING
- Contact a professional for assistance when wall mounting your TV. We are not responsible for any damage to the product or injury to yourself, if you mount the TV on your own.
- Do not wall mount the TV while TV is turned on. It may cause personal injury due to electric shock.
- Use standard M4*10mm screws (4 pieces) to mount this TV.
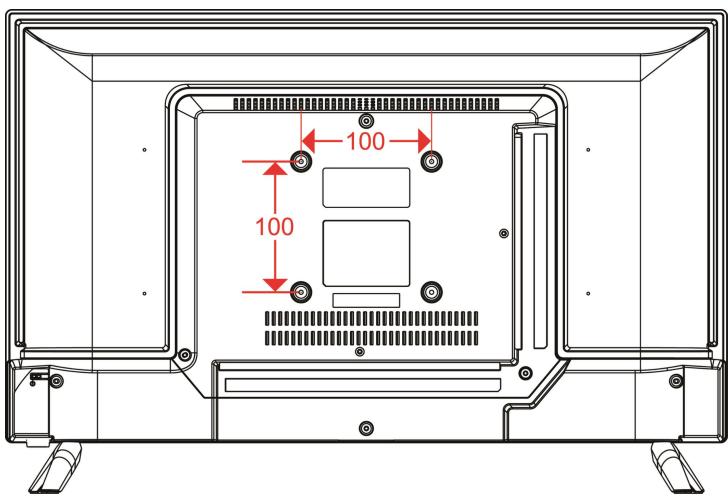
Back of your TV
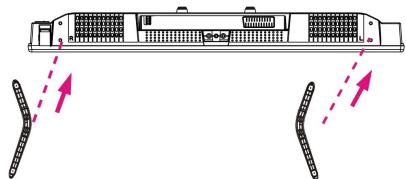
STAND INSTALLATION
Your TV may be packaged with the Stand and the Cabinet separated. Before enjoying this TV, please carry out the Stand Installation according to the instructions below.
Step 1
Place the TV faced down on a soft cloth or cushion to prevent the panel from being damaged.
Step 2
Align the Stand with TV bottom and then force the end of stand until the TV is fully seated on the stand.
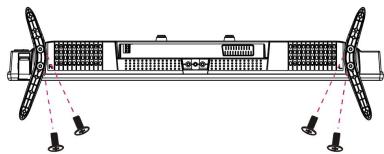
Step 3
Tighten the included screws with a screw driver.
NOTES:
1) Unplug the power plug first when installing or removing the TV Stand.
2) To avoid any damage to this TV, contact one or more partner for assistance when installing or removing the TV stand.
①
②
③
SPECIFICATIONS
| Reference. | 989702 - HI2422HD-MM |
| Model | DVB-PU1236212HCAT |
| Display Device | 23.6" LED |
| Resolution | 1366×768 |
| Display Colors | 16.7M |
| Contrast Ratio | 1200 :1 |
| Aspect Ratio | 16 :9 |
| Life Time | 30,000 Heures |
| Tuner | DVB-T / DVB-C |
| Power Source | AC 100-240V~50/60Hz, DC 12V |
| Power Consumption | Max.42W |
| Measurement | 553(L)×166 (P)×370(H) mm |
| Weight | Approx.2.2 Kg |
| Stands | 2 pcs, removable |
| Operation Temperature | -5°C to 35°C |
| Power of Remote Control | DC 1.5V×2 (2 piles LR03/AAA non fournies) |
| Speaker | 2×3W |
| Hotel Lock | YES |
| Input | RF, HDMI, VGA, PC AUDIO, CI+, AV, USB |
| Output | EARPHONE,COAXIAL |
| USB Functions | PVR, Timeshift, Multimedia play |
| USB MultimediaPlayback Format | Film : AVI, MPEG 1/2 |
| Music : MP3 |
| Photos : JPG / JPEG |
| Text : TXT |
| Supported VGA formats | Max. XGA |
English
| FICHE PRODUIT RELATIVE A L'ENERGIE |
| Brand | HIGHONE |
| Refrence | HI2422HD-MM
(Model:DVB-PU1236212HCAT) |
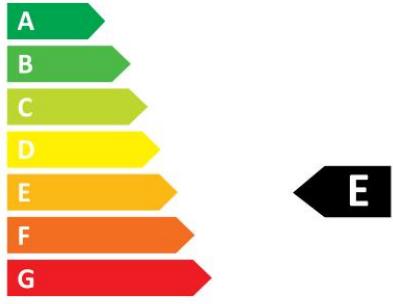
| Energy Efficiency Grade | E |
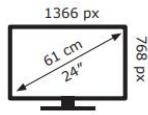
| Visual Screen Diagonal | 61 cm |
| Power consumption in Operation mode (kWh/1000h) | 17 kWh/1000h |
| Power consumption in Standby mode (W) | <0.5W |
| Power consumption in Shutdown mode (W) | 0W |
| Screen resolution (pixels) | 1366×768 |

ENERG

HIGH ONE
989702_HI2422HD-MM
17
kWh/1000h
€102/6102
Specifications are subject to change without notice.

HOMI®
HIGH DEFINITION MULTIMEDIA INTERFACE
The terms HDMI and HDMI High-Definition Multimedia Interface, and the HDMI logo are trademarks or registered trademarks of HDMI.
| —— | This symbol indicates DC Voltage (for USB only). |
| ~ | This symbol indicates AC Voltage. |
| This symbol indicates “Indoor use only”. |
CE
The CE marking indicates that the product meets the main requirements of the European Directives 2014/35/EU (Low Voltage), 2014/30/EU (Electromagnetic Compatibility), 2014/53/EU (Radio Equipment), 2011/65/EU (Restriction of the use of certain hazardous substances in electronic equipment).
To avoid possible hearing damage, do not listen at high audio volume for long periods of time.

Cadmium free; concentration values of Cadmium (Cd) by weight in any homogeneous material part of the display do not exceed 0.01% as defined in Directive 2011/65/EU.
For more information on the energy labeling of the appliance, please refer to the product information sheet on the leaflet attached to the instructions and also present in the EPREL product database (European Product Database for Energy Labeling) from the European Commission available via the QR code of the energy label version 2019/2016 supplied with the device or by entering the 6-digit product code separated by a space by the device reference under the website: https://eprel.ec.europa.eu/

* : 6 digits Code_reference
GENERAL TROUBLESHOOTING
Check the following points before assuming malfunctions of this unit:
| Symptom | Remedy |
| No power. | Insert the power plug securely into the power outlet. |
| No picture. | Ensure that the equipment is connected properly. |
| ● No sound.
● Distorted sound. | ● Ensure that the equipment is connected properly.
● Ensure that the input setting for the TV and stereo system are correct.
● Adjust the master volume to a suitable volume by pressing VOL+/VOL- button. |
| No operations can be performed with the remote control unit. | ● Check the batteries are installed with the correct polarities.
● The batteries are exhausted: Replace them with new ones.
● Point remote control at the remote control sensor and operate it again.
● Operate the remote control unit at a distance of no more than 6m from the remote control sensor.
● Remove the obstacles between the remote control and remote control sensor. |
| No key operation (by the main unit and/or the remote control unit) is effective. | Disconnect the power plug and then reconnect it. (The player may not be operating properly due to lightning, static electricity or some other factors.) |
| Symptom(TV) | Remedy |
| No or poor picture. | ● Adjust antenna or use an external antenna.
● Relocate the unit near a window (if inside a building).
● Move units away from this product that causes interference.
● Do Auto Tuning again.
● Try another channel. |
| No sound or poor sound. | ● Check the audio settings.
● Press MUTE button on remote control to cancel mute function.
● Unplug the headphone. |
| Noise or other interface. | Electronic equipment near the unit is causing interface. Relocate the unit or move the equipment. |
After Sales Service
If you have a problem using your device, please complete the steps first following:
- Make sure that the operating instructions are followed, including the chapters relating to cleaning, maintenance and maintenance.
- Consult the diagnostic tool to help resolve problems via the website:
If, despite these steps, the problem is not resolved:
Device under warranty
- Request support for your device through the website above.
- Call the service via the telephone number specified on your receipt / invoice.
The warranty set at a minimum of 2 years * after the new purchase of the device covers travel costs to your home, intervention and spare parts.
- Excluding the peace of mind guarantee or extended guarantee.
WARNING: Defects and their consequences resulting from interventions and/ or repairs to the product carried out by the user or a non-professional third party cannot give rise to the application of the legal guarantee or commercial.
Device out of warranty
- Coverage of costs is no longer covered, but intervention at home remains possible.
- If you wish to work on the device by your own means, the spare parts are accessible via the site web: www .elect rodepot.fr / sav/piècesdétachées
CAUT ION: Any intervention and/ or repair of the product by the user or a third party not professional can jeopardize the safety of people and property.
WARRANTY CONDITION
EN
This product is guaranteed against faults caused by defects in manufacturing or the
materials used for a period of 2 years, starting from the date of purchase". This warranty does not cover defects or damage caused by failure to install the device correctly, incorrect use of the product, or excessive wear and tear.
*on presentation of the receipt.
CONDITION DE GARANTIE
FR
EN Hereby, ELECTRO DEPOT declares that this device is in compliance with the essential requirements and other relevant provisions of Directive 2014/53 / EU. The declaration of conformity can be consulted on the site: http://www.electrodepot.fr/sav/ notices