USER MANUAL IXO-732 CARE FITNESS
Important: Read these instructions before using the equipment!
Safety
-Read this user manual and keep it in a safe place. Use this product exclusively in the manner indicated.
-This equipment must be assembled and used by adults.
- The equipment complies with the EN-957 standard, classification HB for use in the home. It must not be used in a sports center or any other public, associative or rented space.
- For totally safe use, a stable, level surface is required. Protect your floor covering with a mat. Do not use the equipment in damp areas (swimming pool, sauna, etc.).
- Do not allow children to play with this equipment. Declines all responsibility for any injuries they may incur. Do not allow children close to this equipment when you are training.
-declines all responsibility if technical modifications are made to any of its products by the user.
-Maximum weight of user: 100.0kg
- Before you start training, it is essential that you consult your doctor to determine the intensity level of the program you use.
-Excessive or badly programmed training can damage your health.
-Keep your back straight when exercising.
-It is strongly recommended that your wear suitable clothing and footwear.
-For adjustable parts, bear the maximum positions in mind.
Maintenance
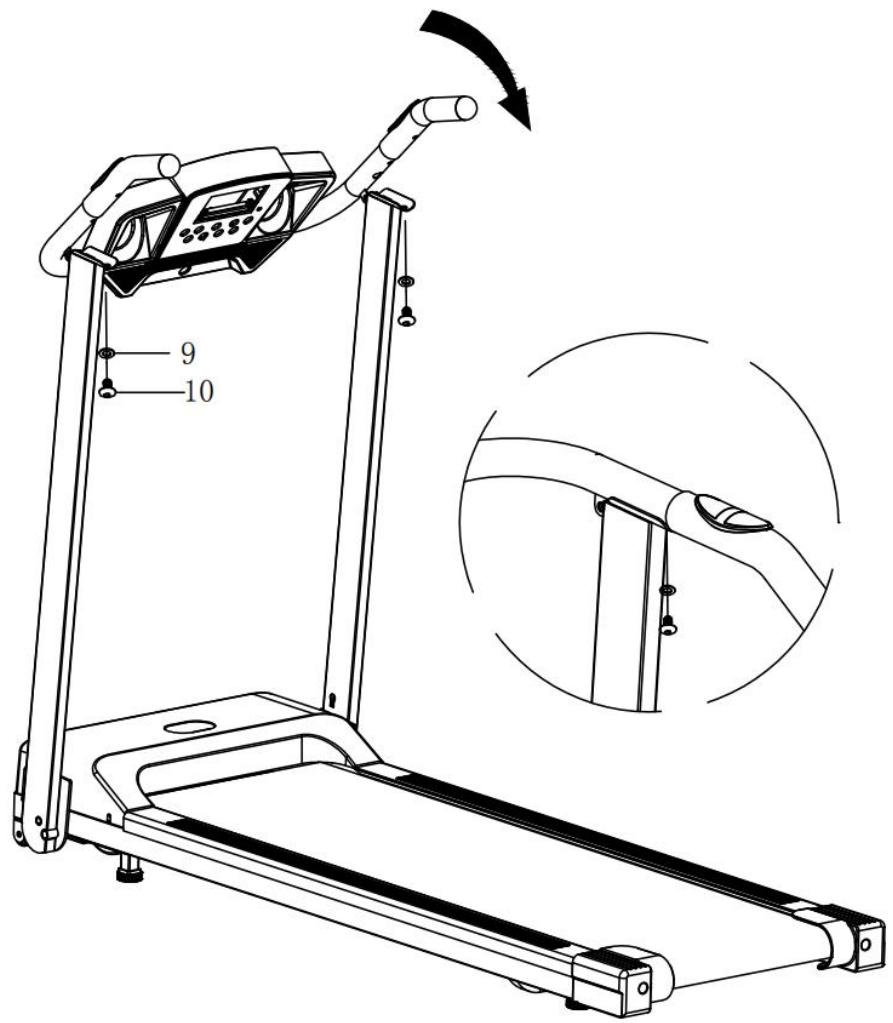
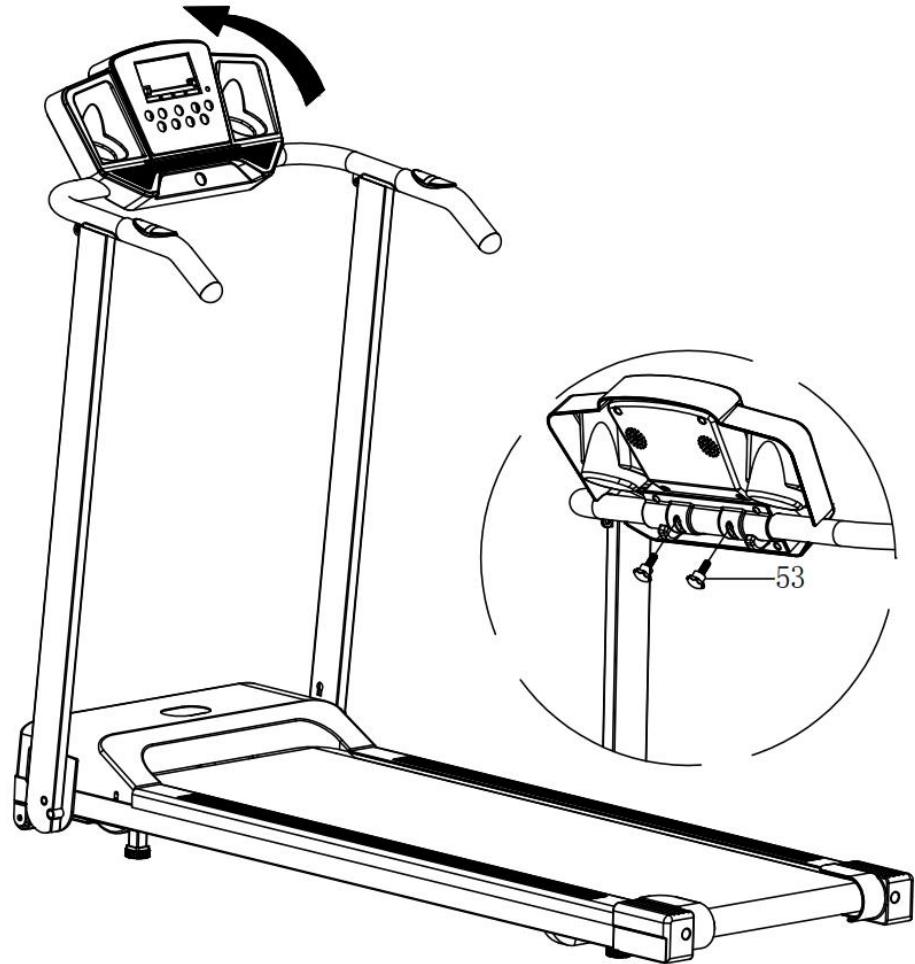
-Regularly check that elements fastened with nuts and bolts are correctly tightened.
-
To maintain the level of safety, the equipment must be regularly checked. It is vital that any faulty parts are replaced and that it is not used until completely repaired. Remember regularly to grease moving parts.
-
As sweat is very corrosive, do not allow it to come into contact with the enameled or chromed parts of the equipment, particularly the computer. Immediately wipe the equipment after training. The enameled parts can be cleaned using a damp sponge. All aggressive or corrosive products should be avoided.
Guarantee:
The chassis is guaranteed for 5 years. Moving parts are guaranteed for 2 years. The guarantee applies to normal use by a private individual in his home. Validate your product warranty on line www.carefitness.com
Recycling :
The « crossed out dustbin » sign means that this product and its batteries cannot be thrown out whit domestic waste. They should be treated apart. When you have finished with them, drop them at an authorised collection point so they can be recycled. This gesture will go towards protecting the environment and your health.
| TOOLING |
| Description | Qte
(PCS) | Description | Qte
(PCS) |
| Bolt
M8x12 mm. | 4 | Knob
M8 | 2 |
| Bolt
M8x30 mm. | 2 | SAFETY KEY | 1 |
| Silicoin oil | 1 | ALLEN WRENCH | 1 |
| Flat washer
φ8.2-φ9*T1.6 | 6 | | |


https://www.carefitness.com/sav
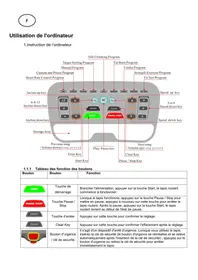
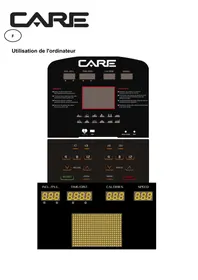
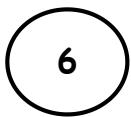
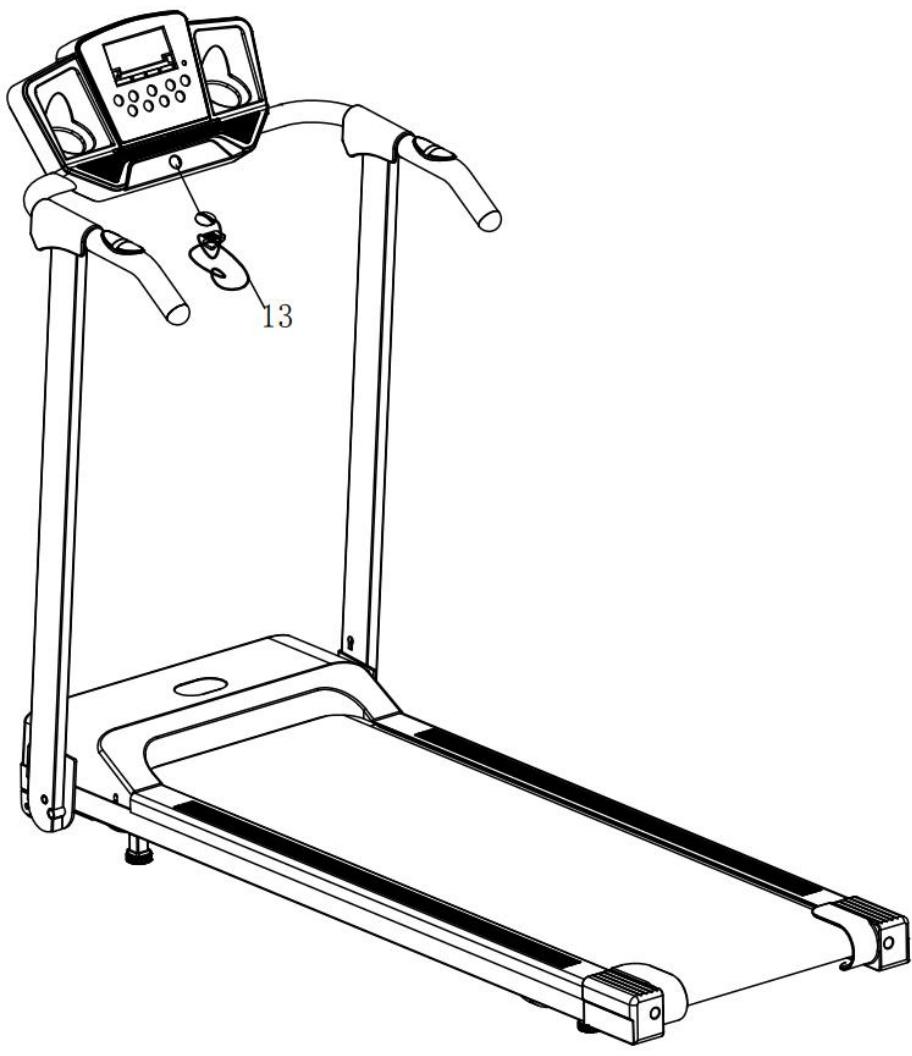
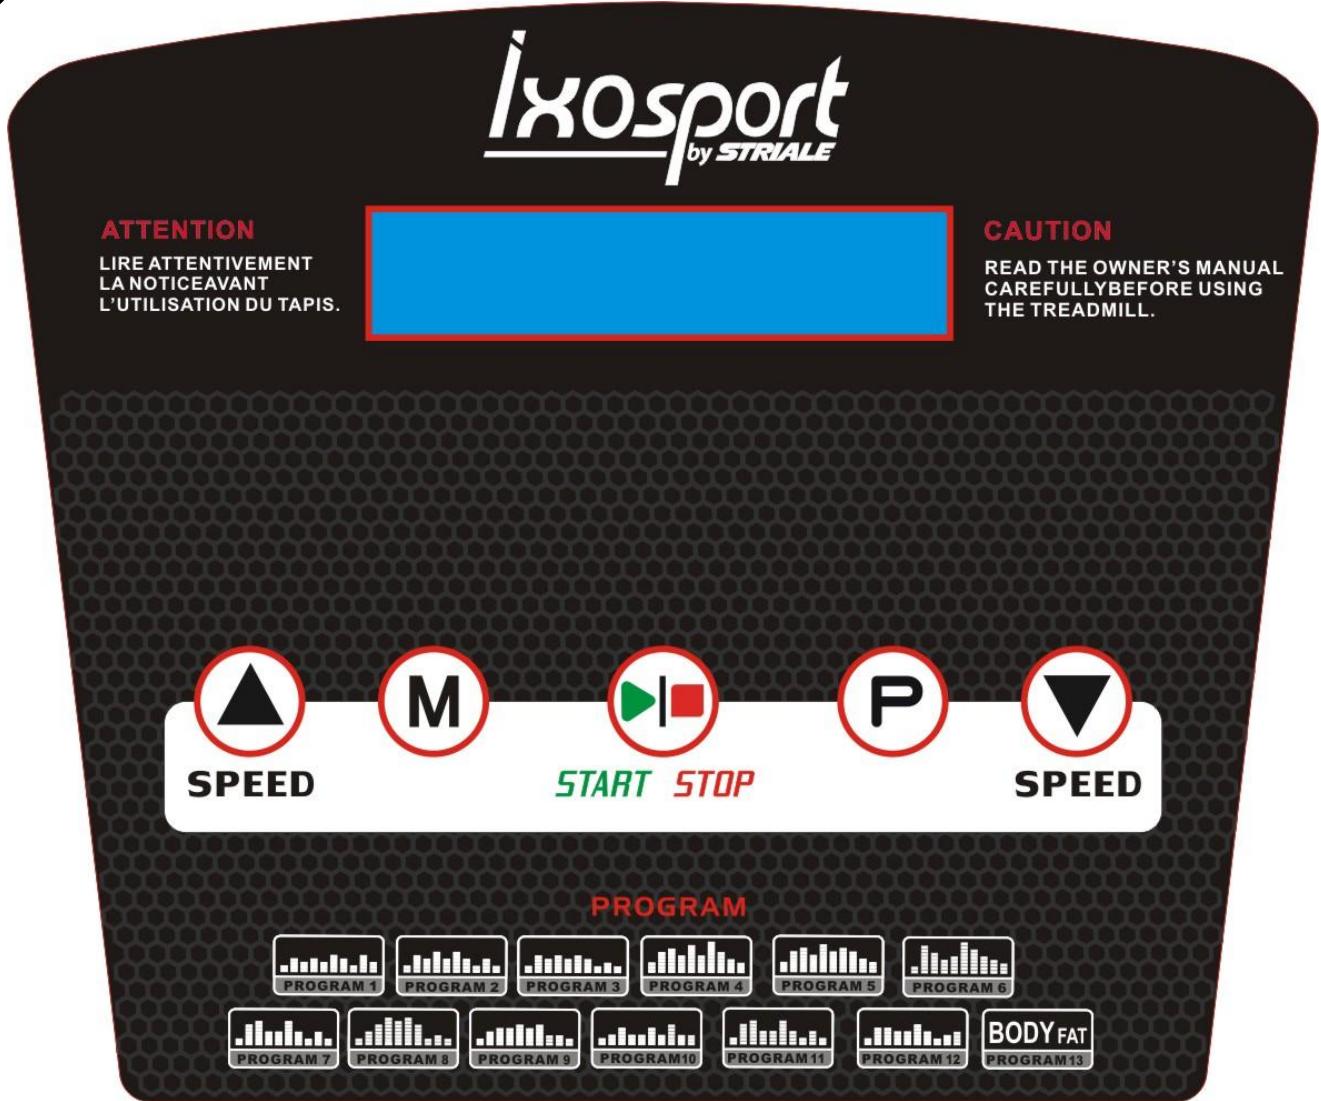
1. CONSOLE PANEL
2. KEY FUNCTION
2.1"START"-Start the treadmill ;"STOP"-Stop the treadmill.
2.2 "P": Program button, at the stopping state, select loop ( P1, P2, P3, P12 ) as you want:
2.3 "M": mode button at the setting state, select the countdown time, countdown distance and countdown calories circularly. when you choose the mode, you can use speed' ^+ /- " setting the countdown data, when you have finished setting, press the "START" you can running the machine.
2.4 SPEED" + / - ": At the running state, press it will be increase / decrease 0.1 km/h every time ,press it for a long time ,it will increase / decrease the speed constantly;
3. PROGRAM
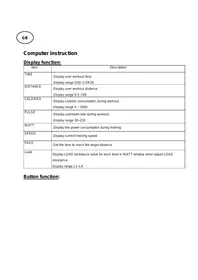
3.1 Speed display ; at the setting state ,it will show p1-P12 program, at the running state, it will show speed range; 0.8-12.0 km/h
3.2 Countdown time training mode :at the stopping state ,press “MODE” button ,enter setting state ,the time window
display flash, default display 30:00, press SPEED+,- button amend the setting value .The setting range:5—99 minutes .Press “START” button and start up the treadmill. when the countdown time is 00:00 ,the treadmill stop running automatically .
3.3 Countdown distance training mode: at the stopping state, press “MODE” button, enter setting state, the distance window flash display, default display 5.0KM, press SPEED+, -button and amend setting value, setting range: 0.5—99.0KM. Press “START” button to start up treadmill, as the speed 1KM/H to start to run, press SPEED+, -to adjust the speed. When countdown distance is 0.0, treadmill stop running automatically.
3.4 Countdown calories training mode: at the stopping state, press “MODE” button for three times, enter the setting state, the calories window display flash, default display 100CAL, press SPEED+, -button to amend setting value, setting range:20—990CAL. Press “START/STOP” button to start up treadmill, as the speed 1KM/H to start to run, press the SPEED+, - to adjust speed. When Countdown calories is 0, treadmill will stop running automatically.
3.5 “PUL”: it will test the heart rate when your both hands hold the rate sensor. and it will show the data on the display, heart rate range:50-250 per minute.(the data just for reference not medical data)
3.6 Now input program mode, the program mode have P1-P12 in all, please press program key separately you can choose you desired and the time window will flash.
enter setting state, the time window display flash, default display 30:00, press The setting range:5—99 minutes SPEED+, - button amend the setting the time. Press "START" button and start up the treadmill. when the countdown time is 00:00, the treadmill stop running automatically. Press speed +,- can change the program data during running.
3.7 Program list
| Program list |
| program minutes | Set minutes/ 10 = the time of each level |
| 1 | 2 | 3 | 4 | 5 | 6 | 7 | 8 | 9 | 10 |
| P1 | SPEED | 2 | 4 | 3 | 4 | 3 | 5 | 4 | 2 | 5 | 3 |
| P2 | SPEED | 2 | 5 | 4 | 6 | 4 | 6 | 4 | 2 | 4 | 2 |
| P3 | SPEED | 2 | 5 | 4 | 5 | 4 | 5 | 4 | 2 | 3 | 2 |
| P4 | SPEED | 3 | 6 | 7 | 5 | 8 | 5 | 9 | 6 | 4 | 3 |
| P5 | SPEED | 3 | 6 | 7 | 5 | 8 | 6 | 7 | 6 | 4 | 3 |
| P6 | SPEED | 2 | 8 | 6 | 4 | 5 | 9 | 7 | 5 | 4 | 3 |
| P7 | SPEED | 2 | 6 | 7 | 4 | 4 | 7 | 4 | 2 | 4 | 2 |
| P8 | SPEED | 2 | 4 | 6 | 8 | 7 | 8 | 6 | 2 | 3 | 2 |
| P9 | SPEED | 2 | 4 | 5 | 5 | 6 | 5 | 6 | 3 | 3 | 2 |
| P10 | SPEED | 2 | 3 | 5 | 3 | 3 | 5 | 3 | 6 | 3 | 3 |
| P11 | SPEED | 2 | 6 | 7 | 4 | 4 | 7 | 4 | 2 | 4 | 2 |
| P12 | SPEED | 2 | 5 | 5 | 4 | 4 | 6 | 4 | 2 | 3 | 4 |
4. Quick start (manual mode)
4.1. press power switch ,put the safe key to correct place.
4.2 press "START" button, the system into 3 seconds countdown time, the buzzer sounds, the time display will show countdown time at the same time .3 seconds later the machine will start to running with 1km/h .
4.3 at the running state, press "SPEED+""SPEED- " adjust the speed according to your request.
5. Manual mode
5.1 at the alert state, press "START" button, the machine start to running with 1km/h,other display window start to count data, Press "SPEED +", "SPEED- change the speed.
5.2 at the alert state Press "MODE" button into countdown time, The "TIME" display "30:00" and flash, press "SPEED+""SPEED- setting running time, time setting range:5:00-99:00.
5.3 at the countdown time mode, press "MODE" into countdown distance mode, The "DISTANCE" display "5.0" and flash, Press "SPEED+""SPEED- set running distance, distance setting range:0.5-99.
5.4 at the countdown distance mode, press "MODE" into countdown calorie mode, "CAL" display "100" and flash, press "SPEED+""SPEED- setting calorie, Calorie setting range:20-990.
5.5 Choose one mode of above three modes to setting, then press "START", 3 seconds later, the machine will start to running, Press "SPEED+""SPEED-“adjust speed, Press “STOP”, the machine stop running.
6. Build-in Program
There are 12 build-in program(P1-P12),at the ready state, Press "PROGRAM" button, "SPEED " display "P1- P24",After you choose one program mode, the "TIME" display flash at the same time; display preset time 30:00,Press "SPEED+""SPEED- setting running time, then press "START" start up build-in program, there are 10 levels of build-in program, each program level = setting time/16. The system will sound "Bi-Bi-Bi" to remind you into next program level mode ,the speed will change when the program level mode change, at the running state you can press "SPEED+""SPEED- change speed, but this program level speed will recovered when into next program level mode. after finish the program level mode, the system will sound "Bi-Bi-Bi" to remind, the the machine speed down smoothly and stop working, display "END".5 seconds later the machine into alert state.
7. BODY FAT TEST
7.1 At the setting state, Continuous press "program" into body fat text (FAT), then press "mode" button, Windows will show "F-1, F-2, F-3, F-4, F-5".
(F-1---Gender, F-2---Age, F-3---Height, F-4---weight, F-5, Fat test)
Press "Speed+" "Speed-" button to setting "F-1 to F-4" (please reference below list),
After finished setting, press "mode" button, windows will show into "F-5", keep both hands on the hand pulse for 2-3 seconds, windows will show your Fat data, please check whether your height and weight correspond. FAT text is just measure the inner relationship between height and weight not for body proportion.
FAT text is a suit for all the female and male, it is same as other health indicator providing help people to adjust weight . The best FAT data is between 20 to 25 range, if FAT data less than 19 means too slim, if FAT data between 25 to 29 means over weight, if the data more than 30 means too fat. (This data just for reference not for medical data.)
| F-1 | Gender | 01male | 02female |
| F-2 | Age | 10-----99 |
| F-3 | Height | 100----200 |
| F-4 | Weight | 20-----150 |
| F-5 | FAT | ≤19 | Underweight |
| FAT | =(20---25) | Normal weight |
| FAT | =(26---29) | Overweight |
| FAT | ≥30 | Obesity |
Error code and significance
| Code | Problem | Possible Reason | Solution |
| E01 | Display did not receive the signal | Cable connection | Check or replace the Cables |
| display default | replace the display |
| controller default | replace the controller |
| E02 | The problem between controller and motor | motor connect wires did not connect well | Check that the motor wires are connected correctly |
| No voltage output or abnormal voltage output of controller board | replace the controller |
| motor default | replace the motor |
| E03 | The speed is abnormal | The photoelectric sensor is not properly assembled on the motor | reassemble the sensor |
| Poor photoelectric sensor | replace the sensor |
| Failure of controller board | replace the controller |
| E04 | over voltage | Input voltage too high | adjust the voltage |
| motor default | replace the motor |
| Failure of controller board | replace the controller |
| E05 | over power current | power current too high | adjust the power current |
| Problems with the assembly structure of the treadmill and the motor cause motor resistance or blockage | check the structure if it is well |
| controller default | replace the controller |
| E06 | over voltage | Input voltage too low | Please check whether the power supply line is normal |
| Failure of controller board | replace the controller |
| E07 | safety key did not put well | safety key fail off the treadmill | put the safety key well |
| the safety system default | replace the console |
1.1 Plug in the power cord and press the power key at the down front part of the machine. If the machine is not operated or moved for a long time, please turn off the power.
1.2 Nip the safe key on the clothes and put the switch of magnet into the computer. If the safety magnet is not put into the assigned location, then the machine will not work.
2. START
2.1 Press START/STOP, the machine begins to work with starting speed 1.0KM/h
2.2 Press SPEED can control the speed, with one press 0.1 KM/h will be increased or decreased. Press the key without stop can get to the speed you want.
3. TWO WAYS TO STOP THE MACHINE
3.1 Pulling the safe key will put a quick stop to the machine which will beep. Before restart, please put the yellow magnet to the original place.
3.2 Press START/STOP, the machine will stop working
IMPORTANT SAFETY INSTRUCTION
- The machine is for home use
- The voltage for the machine is 220V .
- Before operating the machine, please do 10-minute warm-up and wear clothes and shoes that are suitable for sports
- Do not stand on the motorized treadmill when you adjust, test or start the motorized treadmill.
- Be careful when you get on or off the machine. Before starting the machine, please grab the handlebars and place your feet on the side rails (not the running belt). After starting the machine, stand on the belt with the machine operating at the lowest speed. Then increase the speed gradually. Before getting off the machine, please decrease the speed to the lowest level in case of any danger.
- When operating, press the safety at any time, the motor will stop working and the controller will give warnings.
- Children should be supervised by adults when they play on or beside the machine.
- The motorized treadmill should be protected from sunshine, damp and dirt. All the parts shall be cleaned often.
When the machine is free from using for a long time, please don't place any objects or stand on the machine.
CARE AND MAINTENANCE
1 Care
For cleaning the running belt use a vacuum cleaner. If the belt is really dirty, please use a wet cloth. Do not use any cleanser. When cleaning, use only a moist cloth and avoid harsh cleaning agents. Ensure that no moisture comes into the computer. Components that come into contact with perspiration,
need cleaning only with a damp cloth
2 Lubrication
The treadmills have already been spread with "Silicone Oil" in advance before leaving the manufacturing plant. Silicone oil is without volatility and has gradually permeated through the running belt. There will be no need to respread the oil in normal circumstances.
To maintain the running belt, we have included a small bottle of "Silicone Oil". "Silicone
Oil" may be re-spread once the resistance has been increased and the running belt starts rubbing against the running deck. To hold open the running belt from two sides, apply the silicone oil with an even motion on the center of the running deck. Allow the silicone oil to 'set' for one minute before using the treadmill.
Attention: Only use "Silicone Oil" lubricants for this equipment. In addition, do not add any other oil ingredient; otherwise the treadmill will be damaged. Do not over-lubricate the walking board. Excess lubricant should be wiped off with a clean towel.
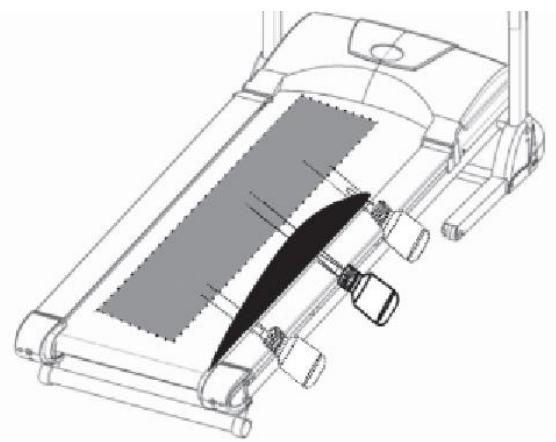
3 Centering the running belt
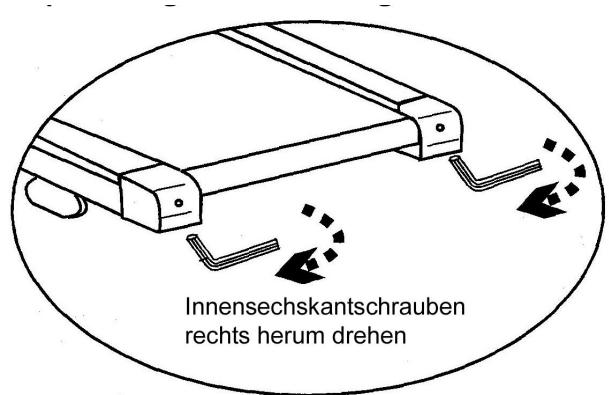
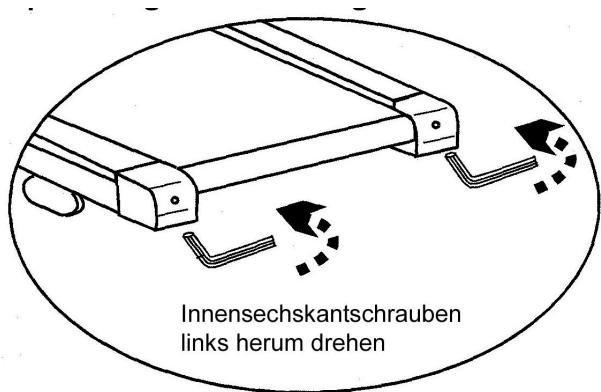
During the exercise, one foot is pushing the running belt stronger than the other. According to that, the belt will be moved out of the centre. Normally the belt will be centered automatically, but during longer exercise, it can be, that the belt is off the centre. In this case, please follow up the following instruction. At the rear end of the running deck, there are 2pcs of Allen screws, which will be used for centering the belt. Don't use any loose clothes during centering.
- Please turn the Allen screw not more than 14 turn for each step.
- Stretch one side and release the other side.
- the speed of the belt has to be 6km/h , but make sure, that nobody is running on the belt.
If you finish the centering, walk on the treadmill for about 5 minutes, with the speed of 6km/h . If the running belt is still not in centre, please centre the belt again. Pay attention, that you don't force the belt too much, a shorter life will be caused. If the gap on the left side is too big, please
- turn the left screw a 14 turn clockwise (tighten it)
- turn the right screw a 14 turn anticlockwise (loose it)
If the gap on the right side is too big, please
- turn the left screw a 14 turn anticlockwise (loose it)
- turn the right screw a 14 turn clockwise (tighten it)
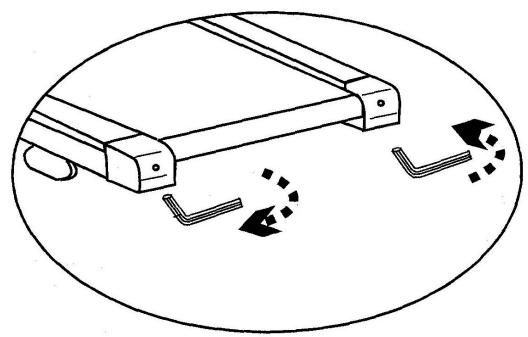
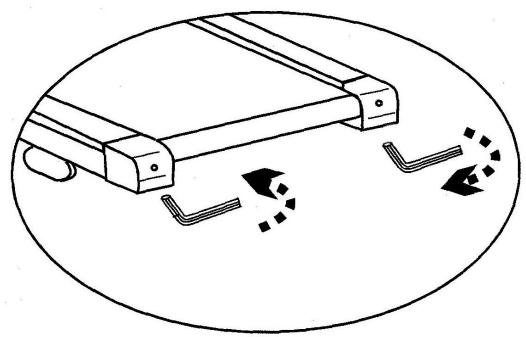
4 Tighten the belt
after longer exercise, the tension of the belt will decrease. It can be checked if you put one foot on the belt and belt will stop. To solve this problem, please turn both screws clockwise for 14
turns. Please do not turn them more. If the belt is running out of the centre, please adjust it like described under above center the belt.
Turn screw clockwise
Turn screw anticlockwise
To order spare parts
To guarantee an efficient service, make sure you have the following items before you contact our After Sales Service:
The name or reference of the product.
The manufacturing number shown on the main chassis and on the packing box.
After Sales Service
Email: service-uk@carefitness.com