USER MANUAL SND 3600 D2 SILVERCREST
NEGATIV-DIGITALISIERER / NEGATIVE DIGITISER SCANNER DE DIAPOSTIVES ET NÉGATIFS SND 3600 D2
DE AT CH
NEGATIV-DIGITALISIERER
Bedienungsanleitung
FR BE
Operating instructions
NL BE
DIASCANNER
Gebruiksaanwijzing
ES
Before reading, unfold both pages containing illustrations and familiarise yourself with all functions of the device.
FR BE
KOMPERNASS HANDELS GMBH
BURGSTRASSE 21
DE-44867 BOCHUM
DEUTSCHLAND
www.kompernass.com
Contents
Introduction 27
Information about these operating instructions. 27
Notes on trademarks 27
Proper use 27
Warning notices. 28
Initial operation. 30
Check package contents 30
Disposal of the packaging 30
Connecting to a computer 31
Installing the software. 31
Operating elements 33
Handling and use 33
Inserting negatives 33
Inserting slides 34
Digitizing negatives/slides 35
After use. 40
Troubleshooting 41
Cleaning. 42
Storage/disposal 43
Storage when not in use. 43
Disposal of the device 43
Appendix. 44
Technical data 44
Notes on the EU Declaration of Conformity. 45
Kompernass Handels GmbH warranty 45
Service 48
Importer 48
Introduction
Congratulations on the purchase of your new device.
You have selected a high-quality product. The operating instructions are part of this product. They contain important information about safety, use and disposal. Before using the product, please familiarise yourself with all operating and safety instructions. Use the product only as described and for the range of applications specified. Keep these operating instructions as a reference and store them near the product. Please pass on all documentation incl. these operating instructions to any future owner(s) if you sell this product or give it away.
Notes on trademarks
- USB® is a registered trademark of USB Implementers Forum, Inc.
- Microsoft®, Windows®, Windows® XP, Windows Vista®, Windows 7®, Windows 8® and Windows 10® are registered trademarks of the Microsoft Corporation in the United States of America and/or other countries.
- Mac OS X® is a registered trademark of Apple Inc. in the USA and other countries.
- The SilverCrest trademark and the retail name are the property of their respective owner.
All other names and products may be trademarks or registered trademarks of their respective owner.
Proper use
This device is a consumer electronics device intended exclusively for the non-commercial scanning and digitizing of film negatives and slides. The device is not intended for any other purpose, nor for use beyond the scope described. No claims of any kind will be accepted for damage arising as a result of incorrect use. The risk is borne solely by the user.
Warning notices
The following warning notices are used in these operating instructions:

DANGER
A warning notice of this hazard level indicates an imminently hazardous situation.
Failure to avoid this hazardous situation could result in serious injuries or even death.
Follow the instructions in this warning notice to avoid the risk of serious injuries or death.

CAUTION!
A warning notice of this hazard level indicates a risk of property damage.
Failure to avoid this situation could result in property damage.
Follow the instructions in this warning notice to prevent material damage.
NOTE
A note provides additional information which will assist you in using the device.
Check the device for visible external damage before use. Do not operate a device that has been damaged or dropped.
If the cables or connections are damaged, have them replaced by authorised specialists or Customer Service.
This device may be used by children aged 8 years and above and by persons with limited physical, sensory or mental capabilities, or lack of experience and knowledge, provided that they are under supervision or have been told how to use the device safely and are aware of the potential risks. Children must not play with the device. Cleaning and user maintenance tasks may not be carried out by children unless they are supervised.
All repairs must be carried out by authorised specialist companies or by the Customer Service department. Improper repairs can pose significant risks to the user. It will also invalidate any warranty claims.
- Do not make any unauthorised modifications or alterations to the device.
- Protect the device from penetration by moisture and liquids. Do not place any liquid-filled vessels (such as flower vases) next to the device.
- Keep the device away from naked flames, and do not place candles on or next to the device. This will help to prevent the spread of fires.
If you move the device quickly from a warm to a cold room or vice versa, allow the device 30 minutes to acclimatise.
DANGER! Do not allow children to play with the packaging material! Keep all packaging materials away from children. There is a risk of suffocation!
Initial operation
Check package contents
(For illustrations see fold-out pages)
The product includes the following components:
- Scanner
1 x slide magazine
- 2 × holders for negatives
- Program CD
- Cleaning brush
USB cable
- Operating instructions
Unpack all parts of the device from the packaging and remove all packaging materials.
NOTE
- Check the package for completeness and signs of visible damage.
If the delivery is incomplete or damage has occurred as a result of defective packaging or during transport, contact the service hotline (see section Service).
Disposal of the packaging
The packaging materials have been selected for aspects of environmental friendliness and disposal, and they are therefore recyclable.

Dispose of packaging materials which are no longer needed in accordance with applicable local regulations.
Connecting to a computer
System requirements
Operating system: Windows XP/Vista/7/8/10, Mac OS 10.6- 10.12
Slot: USB connection (USB 2.0)
Connect the micro-USB plug on the USB cable 8 to the micro-USB port 3 on the scanner.
Connect the USB plug on the USB cable ⑧ to a powered-on PC. The computer recognises the new hardware and starts installing the drivers automatically. This process can take a around a minute. The PWR LED ① lights up as soon as the scanner is properly connected.
Installing the software
Installation on Windows

CAUTION!
Important files may be changed or overwritten during the installation of the software! Before installing the installing the software, make a backup of your original files to ensure that you will be able to access them later if problems occur during installation.
Insert the supplied program CD into your CD drive of your computer. The installation menu starts automatically.
Click on the "Installation" button to start the installation.
Install the software as described in the on-screen instructions.
NOTE
If the autostart function is deactivated and the installation does not start automatically, you can start the installation with a double-click on the "WinSetup.exe" file in the main directory of the CD.
After successful installation you can leave the menu by clicking on the "Exit" button.
Installation on Mac OS

CAUTION!
Important files may be changed or overwritten during the installation of the software! Before installing the installing the software, make a backup of your original files to ensure that you will be able to access them later if problems occur during installation.
Insert the supplied program CD into your CD drive of your Mac computer.
Open the main directory of the program CD.
Switch to the "Mac" directory.
Start the installation by double-clicking on the "ImageScan.dmg" file.
Install the software as described in the on-screen instructions.
Operating elements
(For illustrations see fold-out pages)
1 PWR LED
2 SCAN button
3 Micro-USB socket
Slot for the negative holder or slide magazine
Negative holder
Slide magazine
7 Cleaning brush
USB cable (USB to micro-USB)
Handling and use
Inserting negatives
Unlock the catch on the front of the negative holder 5 and open the holder.
Lay the negative in the holder the right way up. Ensure that holes of the negative strip are placed on the corresponding retaining tabs on the holder, so that the negative strip can not move.
Close the holder until the lid clicks into place.
Now insert the negative holder ⑤ with the triangle marking at the front and visible into the slot ④ on the right (see figure 1).
Push the negative holder 5 into the slot 4 until it audibly clicks into the first position. For additional negatives, push the negative holder 5 further in until it audibly clicks into the next position.
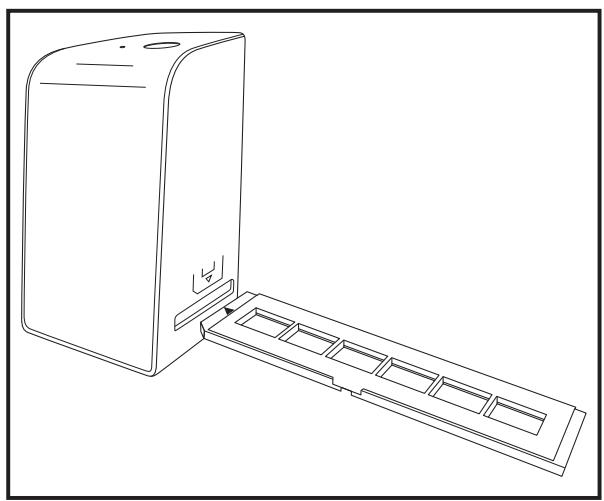
Figure 1
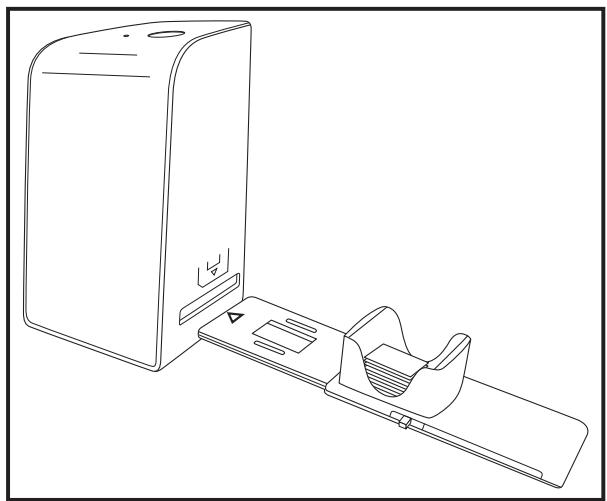
Figure 2
Inserting slides
Insert slides the right way round into the shaft provided on the slide magazine ⑥ . Around 10- 12 slides (depending on size) can be added to the magazine.
Push the slide magazine ⑥ into the slot ④ on the right with the viewing window at the front. Ensure that the triangle marking is at the front and visible (see figure 2).
Use the pusher on the side of the slide magazine ⑥ to push the slides in the shaft individually into the scanner.
To do this, first slide the pusher away from the scanner as far as the stop. Afterwards, move the pusher carefully towards the scanner.
NOTE
This pushes any slide that is in the scanner out of the device and a new slide is pushed into the viewing range of the scanner.
Make sure that you push the new slide into the scanner slowly. If you push too quickly, the slide could slip past the viewing range of the scanner.
When you have finished scanning slides, remove the slide magazine from the slot.
Remove the last slide from below from out of the slide magazine viewing window
Digitizing negatives/slides
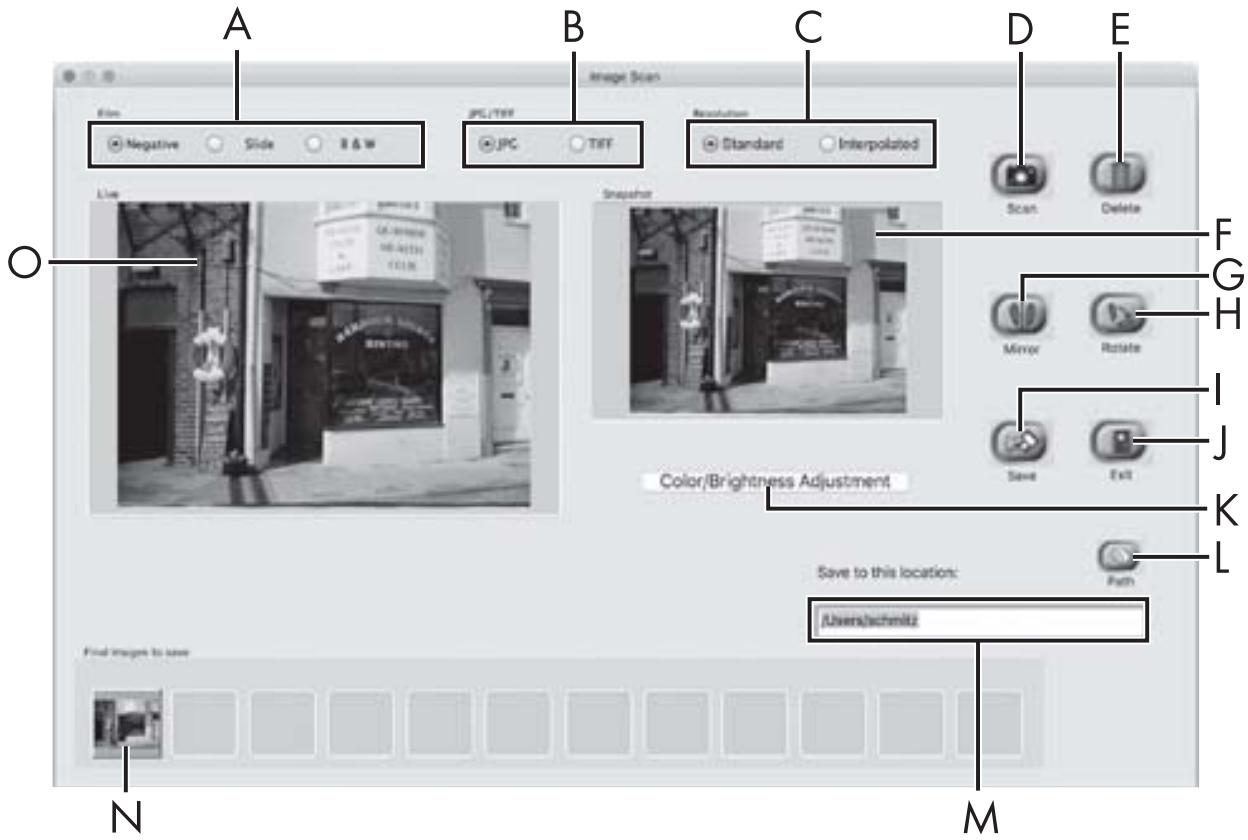
Windows software
Start the "Image Scan Tool" program by double-clicking on program icon on the desktop or select the corresponding entry from the start menu. The program opens directly in the main window.
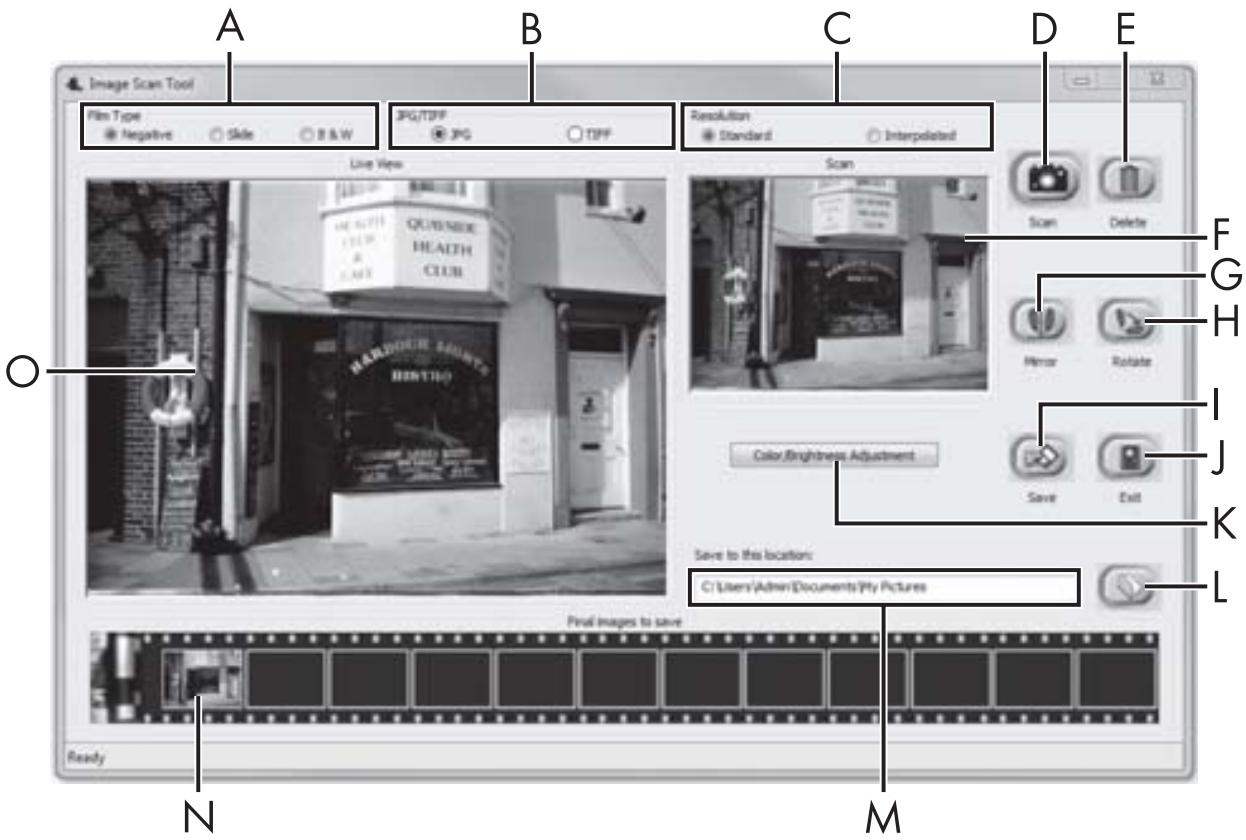
| A | Select the type here (negative, slide or colour/black & white) you want to use. |
| B | Select here the format (JPG or TIFF) you want to use for saving images. |
| C | Select the resolution here: standard: 2592 x 1680 pixels; interpolated: 5184 x 3360 pixels |
| D | Click on this button or press the SCAN button ② directly to scan an image. |
| E | Click this button to delete the currently selected image. |
| F | The currently selected image is shown here. |
| G | Click this button to flip the currently selected image. |
| H | Click this button to rotate the currently selected image clockwise. |
| I | Click this button to save the scanned images. If the path entered is invalid, a warning will appear. |
| J | Click this button to close the program. |
| K | Click this button to make colour or brightness settings before scanning the image. The adjustments will be shown in the live view. |
| L | Click this button to select a folder as a save location for the scanned images. |
| M | Here you will see the folder where the scanned images have been saved. |
| N | Here you can see scanned images which have not yet been saved. The currently selected image is shown with a green frame and displayed in the window (F). |
| O | Here you will see a live view of the inserted negative/slide. |
Colour and brightness settings
Adjust the colours and brightness as required by clicking on the "Color/Brightness adjustment" button (K). A settings window appears.
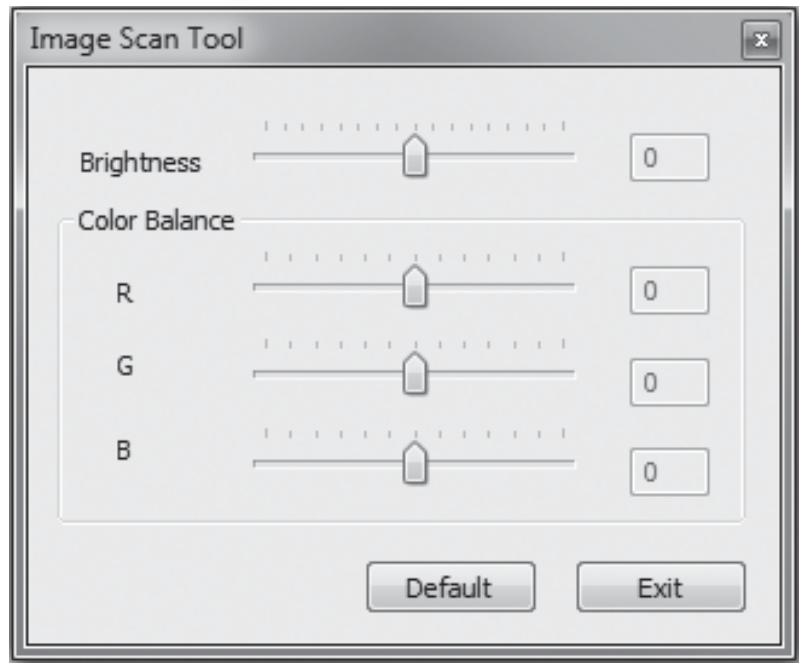
Move the "Brightness" slider to set the brightness between -64 and 64.
Move the three "Color Balance" sliders to set the RGB values between -6 and 6.
To reset to the default values, click on the "Default" button.
To accept the new values and close the settings window, click on the "Exit" button.
Mac software
Start the program "ImageScan" by double-clicking the icon. The program opens directly in the main window.
| A | Select the type here (negative, slide or colour/black & white) you want to use. |
| B | Select here the format (JPG or TIFF) you want to use for saving images. |
| C | Select the resolution here:
Standard: 2592 x 1680 pixels
Interpolated: 5184 x 3360 pixels |
| D | Click on this button or press the SCAN button ② directly to scan an image. |
| E | Click this button to delete the currently selected image. |
| F | The currently selected image is shown here. |
| G | Click this button to flip the currently selected image. |
| H | Click this button to rotate the currently selected image clockwise. |
| I | Click this button to save the scanned images. If the path entered is invalid, a warning will appear. |
| J | Click this button to close the program. |
| K | Click this button to make colour or brightness settings before scanning the image. The adjustments will be shown in the live view. |
| L | Click this button to select a folder as a save location for the scanned images. |
| M | Here you will see the folder where the scanned images have been saved. |
| N | Here you can see scanned images which have not yet been saved. The currently selected image is shown with a green frame and displayed in the window (F). |
| O | Here you will see a live view of the inserted negative/slide. |
Colour and brightness settings
Adjust the colours and brightness as required by clicking on the "Color/Brightness adjustment" button (K). A settings window appears.
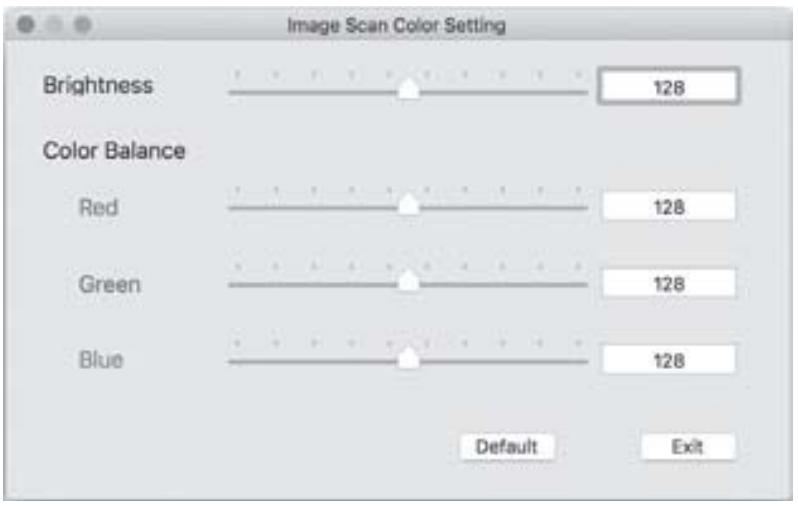
Move the "Brightness" slider to set the brightness between 0 and 255.
Move the three "Color Balance" sliders to set the RGB values between 0 and 255.
To reset to the default values, click on the "Default" button.
To accept the new values and close the settings window, click on the "Exit" button.
After use
Remove the negative holder 5 by pushing it all the way through the device.
Remove the slide magazine ⑥ by pulling it back out of the slot 4 on the right.
Remove the USB cable 8 from the USB port on your computer and the scanner.
Troubleshooting
The following table will help you to identify and rectify minor malfunctions:
| Fault | Possible cause | Remedy |
| PWR LED 1 does not light up. | The device is not correctly connected. | Connect the device. |
| Poor image quality. | Dust on the scanner's background lighting. | Clean the back-ground lighting (see section "Cleaning"). |
| Dust on the film/slide. | Clean the film/slide. |
| The scanned images are blurred. | The lens of the scanner has fogged up due to temperature differences. | Wait until the device has acclimatised to room temperature. |
NOTE
If the above-mentioned solutions do not resolve the problem, please contact Customer Service (see section Service).
Cleaning

CAUTION!
- To avoid irreparable damage to the device, ensure that no moisture penetrates it during cleaning.
Clean the housing only with a soft damp cloth and a mild detergent.
Clean the surfaces of the background lighting inside the device with the cleaning brush ⑦. To do this, push the cleaning brush with the cleaning surface facing downwards into the slot ④ on the right (see figure 3).
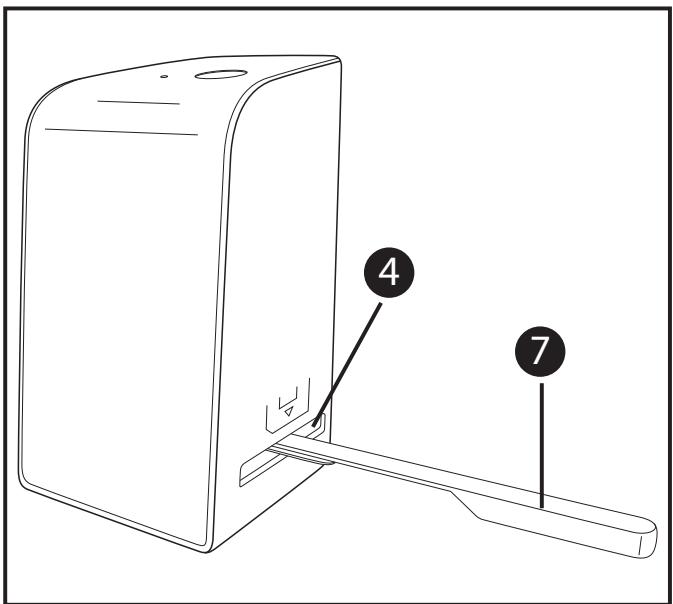
Figure 3
Storage/disposal
Storage when not in use
Store the device in a dry and dust-free environment away from direct sunlight.
Disposal of the device

The symbol on the left showing a crossed-out dustbin means that this device is subject to Directive 2012/19/EU. This directive states that this device may not be disposed of in normal household waste at the end of its useful life, but must be brought to a specially set-up collection point, recycling depot or disposal company.
This disposal is free of charge for the user. Protect the environment and dispose of this device properly.
You can obtain further information from your local disposal company or the city or local authority.
Appendix
Technical data
| Operating voltage/current | 5 V = 100 mA
(via USB port) |
| Interface | USB 2.0 |
| Operating temperature | +5 to +40°C |
| Humidity (no condensation) | ≤ 75% |
| Dimensions (W x H x D) | approx. 9.4 x 16.9 x 10.4 cm |
| Weight (without accessories) | approx. 450 g |
| Image sensor | 5 megapixel CMOS sensor |
| Focus range | Fixed focus |
| Brightness control | Automatic |
| Colour adjustment | Automatic |
| Resolution | Standard: 2592 x 1680 pixels
Interpolated: 5184 x 3360 pixels |
| Scanning method | Single pass |
| Light source | Backlight (3 white LEDs) |
This device complies with the basic requirements and other relevant provisions of the Electromagnetic Compatibility Directive 2014/30/EU and the RoHS Directive 2011/65/EU.
The complete EU Declaration of Conformity is available from the importer.
CE
This appliance has a 3-year warranty valid from the date of purchase. If this product has any faults, you, the buyer, have certain statutory rights. Your statutory rights are not restricted in any way by the warranty described below.
Warranty conditions
The validity period of the warranty starts from the date of purchase. Please keep your original receipt in a safe place. This document will be required as proof of purchase.
If any material or production fault occurs within three years of the date of purchase of the product, we will either repair or replace the product for you at our discretion. This warranty service is dependent on you presenting the defective appliance and the proof of purchase (receipt) and a short written description of the fault and its time of occurrence.
If the defect is covered by the warranty, your product will either be repaired or replaced by us. The repair or replacement of a product does not signify the beginning of a new warranty period.
Warranty period and statutory claims for defects
The warranty period is not prolonged by repairs effected under the warranty. This also applies to replaced and repaired components. Any damage and defects present at the time of purchase must be reported immediately after unpacking. Repairs carried out after expiry of the warranty period shall be subject to a fee.
Scope of the warranty
This appliance has been manufactured in accordance with strict quality guidelines and inspected meticulously prior to delivery.
The warranty covers material faults or production faults. The warranty does not extend to product parts subject to normal wear and tear or fragile parts such as switches, batteries, baking moulds or parts made of glass.
The warranty does not apply if the product has been damaged, improperly used or improperly maintained. The directions in the operating instructions for the product regarding proper use of the product are to be strictly followed. Uses and actions that are discouraged in the operating instructions or which are warned against must be avoided.
This product is intended solely for private use and not for commercial purposes. The warranty shall be deemed void in cases of misuse or improper handling, use of force and modifications/ repairs which have not been carried out by one of our authorised Service centres.
Warranty claim procedure
To ensure quick processing of your case, please observe the following instructions:
Please have the till receipt and the item number (e.g. IAN 12345) available as proof of purchase.
- You will find the item number on the type plate, an engraving on the front page of the instructions (bottom left), or as a sticker on the rear or bottom of the appliance.
If functional or other defects occur, please contact the service department listed either by telephone or by e-mail.
- You can return a defective product to us free of charge to the service address that will be provided to you. Ensure that you enclose the proof of purchase (till receipt) and information about what the defect is and when it occurred.

You can download these instructions along with many other manuals, product videos and software on www.lidl-service.com.
Service

Service Great Britain
Tel.: 0871 5000 720 (£ 0.10/Min.)
E-Mail: kompernass@lidl.co.uk

Service Ireland
Tel.: 1890 930 034
(0,08 EUR/Min., (peak))
(0,06 EUR/Min., (off peak))
E-Mail: kompernass@lidl.ie
IAN 289910
Importer
Please note that the following address is not the service address.
Please use the service address provided in the operating instructions.
KOMPERNASS HANDELS GMBH
BURGSTRASSE 21
DE-44867 BOCHUM
GERMANY
www.kompernass.com
Table des matieres
Introduction. 51
Chere cliente, cher client,
KOMPERNASS HANDELS GMBH
BURGSTRASSE 21
DE-44867 BOCHUM
ALLEMAGNE
www.kompernass.com
Inhoud
Inleiding. 75
KOMPERNASS HANDELS GMBH
BURGSTRASSE 21
DE-44867 BOCHUM
DUITSLAND
www.kompernass.com
Obsah
Uvod. 99
KOMPERNASS HANDELS GMBH
BURGSTRASSE 21
DE-44867 BOCHUM
NÉMECKO
www.kompernass.com
Indice
Introduccion. 123
KOMPERNASS HANDELS GMBH
BURGSTRASSE 21
DE-44867 BOCHUM
ALEMANIA
www.kompernass.com
Indice
Introducao 147
KOMPERNASS HANDELS GMBH
BURGSTRASSE 21
DE-44867 BOCHUM
ALEMANHA
www.kompernass.com
KOMPERNASS HANDELS GMBH
BURGSTRASSE 21
DE-44867BOCHUM
GERMANY
www.kompernass.com