
EC950 - Coffee machine DELONGHI - Free user manual and instructions
Find the device manual for free EC950 DELONGHI in PDF.
| Product type | Espresso coffee machine with steam wand |
| Brand | De'Longhi |
| Model | EC950 |
| Dimensions (L x D x H) | 207 x 346 x 328 mm |
| Weight | 5 kg |
| Power supply | 220-240 V ~ 50-60 Hz, 1450 W |
| Water tank capacity | 1.6 L |
| Adjustable brewing temperature | 3 levels: ~92°C, ~94°C, ~96°C |
| Milk preparation | Automatic and manual steam, adjustable temperature (60°C, 65°C, 70°C), adjustable foam level |
| Coffee quantity programming | Espresso (20-90 ml), 2x Espresso (40-180 ml) |
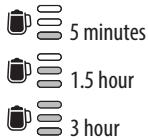
| Settings menus | Pre-infusion time, water hardness, auto-off (5 min, 1.5 h, 3 h), default values |
| Maintenance and cleaning | Manual cleaning of filters, drip tray, water tank, steam wand; descaling with De'Longhi descaler; automatic rinsing of steam wand |
| Safety | Water level detector, automatic shut-off, unplug before cleaning |
| Supplied accessories | Filter holder, 1 and 2 cup filters, milk jug, dosing/tamping tool, brush, cleaning needle, water hardness test strip, descaler (depending on model) |
| Repairability | Spare parts available from De'Longhi customer service; certain parts like the coffee spout gasket can be replaced |
Frequently Asked Questions - EC950 DELONGHI
User questions about EC950 DELONGHI
0 question about this device. Answer the ones you know or ask your own.
Ask a new question about this device
Download the instructions for your Coffee machine in PDF format for free! Find your manual EC950 - DELONGHI and take your electronic device back in hand. On this page are published all the documents necessary for the use of your device. EC950 by DELONGHI.
USER MANUAL EC950 DELONGHI
For more details please check out the
De'Longhi How to videos

More languages available here

DeLonghi

page 4

pag. 11

page 19

Seite 27

pag.35

2
Before using the appliance, always read the safety warnings.
1.DESCRIPTION OF APPLIANCE
A1. Water tank lid
A2. Water tank
A3. Accessory door
A4. Steam lever
A5. Steam wand
A6. On/Off switch
A7. Coffee spout
A8. Drip tray
A9. Brush
A10. Cleaning needle
A11. Tamper
A12. Descaler (some models only)
A13. Small cup tray
A14. Filter holder
A15.2 cups filter
A16. 1 cup filter
A17. Milk jug
A18. Measuring scoop
A19. Water hardness test indicator paper
1.1 Control panel
B1. Infusion temperature button
B2. Water tank indicator light
B3. Descale indicator light
B4. Milk temperature button
B5. 2 × Espresso button
B6. Espresso button
B7. Froth level button
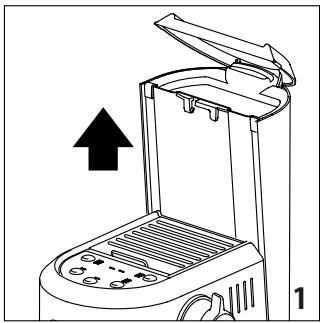
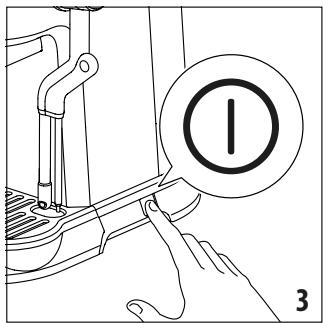
2. FIRST USE
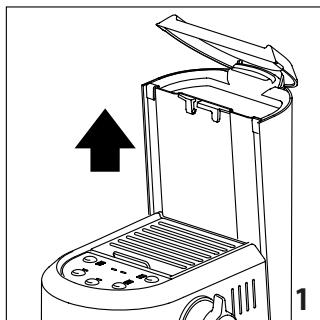
- Wash and dry all accessories, including water tank (A2) with warm water and soap. None of the components or accessories is dishwasher safe.
- Extract the water tank by pulling it upwards (fig 1).
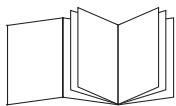
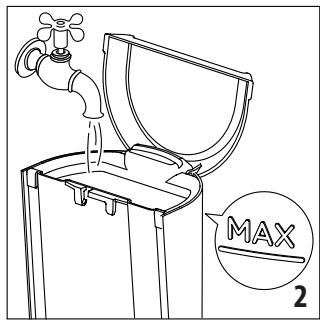
- Open the water tank lid (A1) and fill the water tank (A2)
with fresh clean water, taking care not to exceed the MAX level (fig 2).
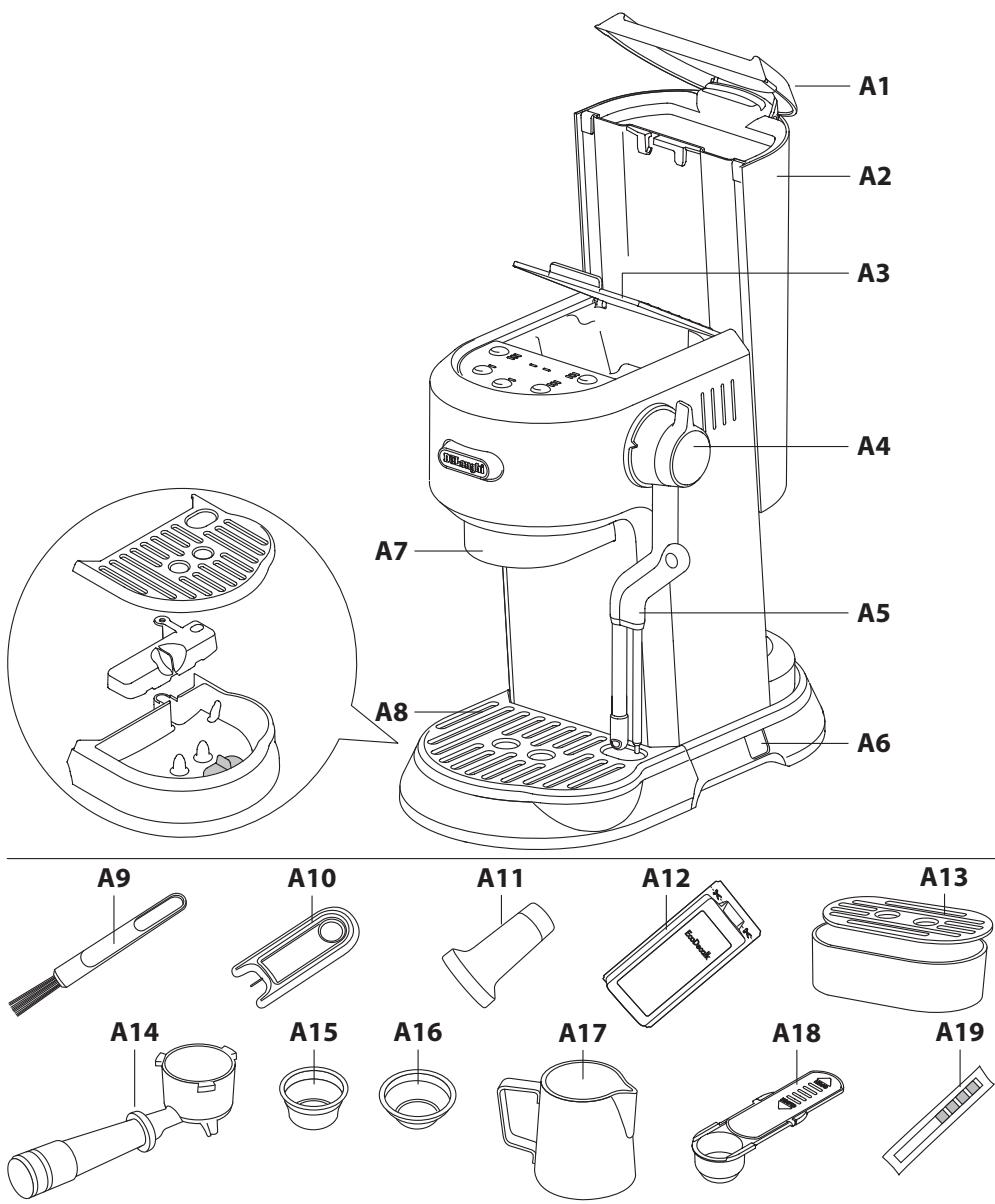
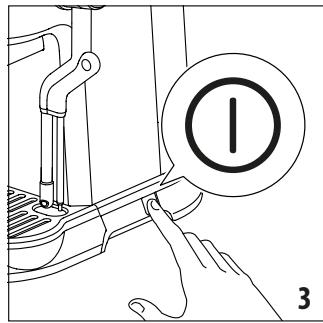
- Put the water tank back in the machine, pressing lightly to open the valves located on the bottom of the tank.
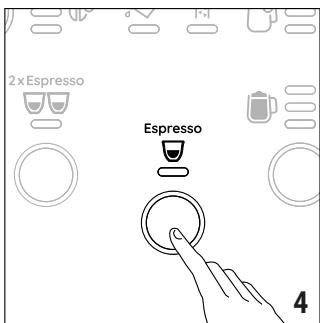
- Connect the appliance to a mains socket. Turn the machine on by pressing the On/Off switch (A6) (fig. 3).
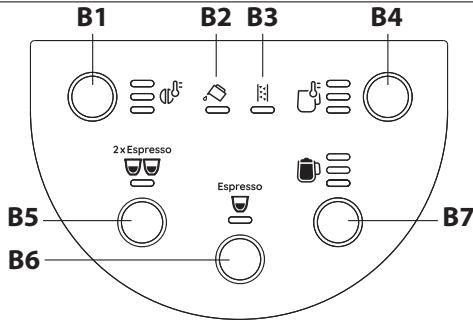
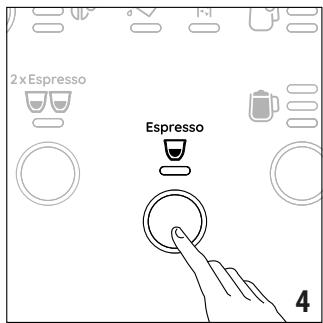
- Press the (B6) button (fig. 4). Delivery begins and stops automatically. Empty the drip tray.
Before using the coffee maker, the internal circuits of the machine must be rinsed. Proceed as follows:
- Place the cups filter (A15) or (A16) in the filter holder (A14).
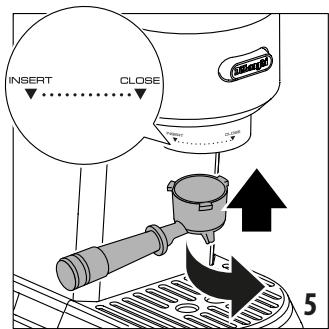
- Attach the filter holder to the machine aligning the filter holder handle with "INSERT", then turning the handle to the right until it is aligned in the "CLOSE" position (fig. 5).
- Place a container under the filter holder.
- Press the (B6) button. The appliance delivers water from the filter holder. Repeat this operation 5 times.
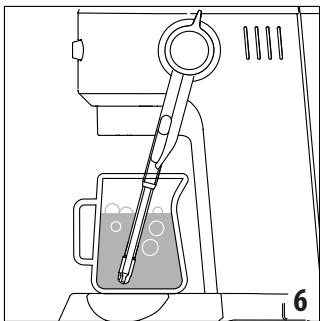
Put a jug with cold water under the steam wand (A5) and do an 'autostaming' (fig. 6) (see the Autosteaming paragraph).
Please note: Never operate the machine without water in the water tank or without the tank.
The appliance has a water levels sensor.
If while brewing the selected beverage, the (B2) indicator light blinks, the water in the water tank is running out. It is possible to complete the delivery of the selected beverage.
The (B2) indicator turns on when the water tank is empty. Fill the water tank with fresh water.
It is normal for there to be water in the space under the tank. This should therefore be dried regularly with a clean sponge.
3. MAKING ESPRESSO COFFEE
Espresso

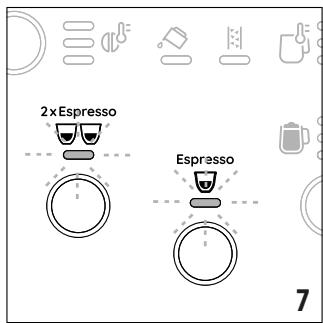
The and 2x Esecco indicator lights blinks to indicate the machine is heating up (fig. 7).
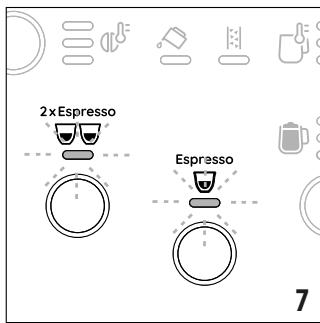
When the lights stop blinking and all the indicator lights on the control panel remain on steadily, the machine is ready for use.
- Place the cup filter (A15) or (A16) in the filter holder (A14) (fig. 8).
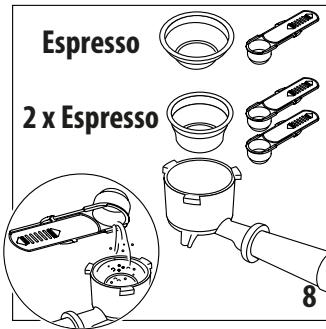
- Fill the cup filter with ground coffee using the measuring scoop (A18). Make sure that you are using a fine grind, specific for espresso.
Before filling the coffee filter with ground coffee, make sure there are no coffee residues left in the filter from the last time you made coffee. - Tap the filter holder several times to distribute the coffee evenly in the cup filter.
- Distribute the ground coffee evenly and press down firmly with the tamper (A11). Make sure the coffee is at the recommended dose level after tamping (fig. 9).
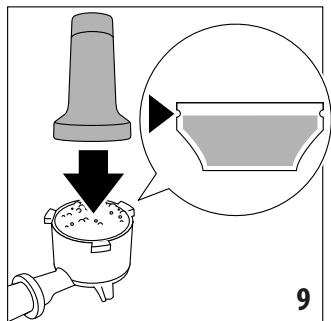
You may need to add some coffee. Tamping correctly the ground coffee is essential to obtain a good espresso. If you press too firmly, the coffee will be delivered slowly and will be strong. If you press too lightly, the coffee will be delivered quickly and will be weak.
Barista Tips: Before placing the filter holder into the machine, run a short flow of water through the coffee spout (A7). This will stabilise the temperature before the extraction.
- Remove any excess coffee from the rim of the filter holder and attach the filter holder to the machine (fig. 5).
- Place one cup or two cups on the drip tray (A8) under the filter holder spouts. Use small cup tray (A13) for smaller cups.
3.1 Coffee preparation temperature
The water temperature is controlled during the entire preparation process to ensure its stability during the extraction step. The machine has 3 infusion temperatures.
The temperature effectively utilized will depend typically on the variety of beans and the roast: Robusta beans require a lower temperature, and Arabica beans a higher temperature. The same applies for dark roasted beans or for light roasted beans, respectively.
Press ^B (B1) button to set the desired level of infusion temperature:
| Temperature level | Corresponding indicator light | Roast level |
| Min (~92°C) | ΦΦΦ | Dark |
| Med (~94°C) | ΦΦΦ | Medium-dark |
| Max (~96°C) | ΦΦΦ | Light - medium |
- Press (B6) or (B5) button. The machine proceeds to make the coffee and delivery is interrupted automatically. While the machine is making coffee, delivery can be interrupted at any moment by pressing the button pressed previously.
- To remove the filter holder, turn the handle from right to left. To avoid splashes, never remove the filter holder while the machine is delivering coffee. Always wait for a few seconds after delivery.
Please note: You are recommended to warm the cups before making coffee:
Rinsing them with a little hot water or attach the filter holder (A14) to the machine with the cup filter (A15 or A16) in place but without adding coffee, using the same cup as will later be used to make the coffee, press the (B6) button and deliver hot water into the cup to heat it.
3.2 Programming the quantities of coffee in the cup
The machine is set by default to automatically deliver standard quantities. To change these quantities, proceed as follows:
Press and hold the ⑦ or ⑧ button you want to programme.
- The coffee maker starts delivering coffee and the indicator light blinks fast to indicate that the machine is in programming mode.
- Once the required quantity of coffee has been delivered into the cup, release the button. Delivery stops and the coffee maker is ready to use.
| Default quantity | Programmablequantity | |
| Espresso | 35ml | from ≈20 to ≈90 ml |
| 2xEspresso | 70ml | from ≈40 to ≈180 ml |
To return to the quantities of default see instructions in section 5.4.
4. MAKING MILK BEVERAGES

4.1 Automatic steaming
- Fill a milk jug (A17) with fresh cold milk (between the min and max positionl). Milk will up to triple in volume. For a denser more even froth, you must use milk at refrigerator temperature (about 5^ ).
Press (B4) button to set the desired milk temperature:
Min temperature (60^)
Med temperature (65^)
High temperature (70^)
- Press the (B7) button to set the desired type of milk texture:
LatteArt - Microfoam texture
Fine texture
Dense texture
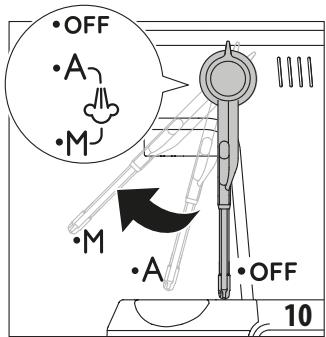
- Lift the steam wand (A5) in "M" position (fig. 10) in order to facilitate the milk jug (A17) positioning under the steam wand.
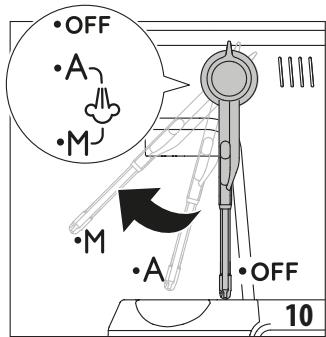
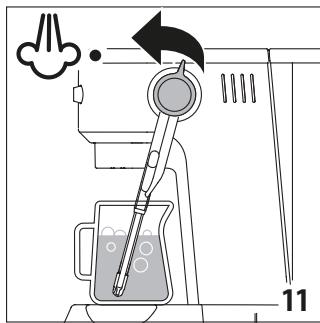
Position the steam wand in "A" (autosteaming) position. Turn the steam lever (A4) in position (fig. 11).
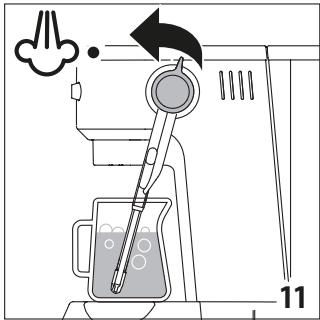
The indicator light blinks. The machine proceeds to make the froth and delivery is interrupted automatically. Remove with a soft damp cloth any milk residues from the steam wand. Put the steam wand to "OFF" position after each use.
4.2 Manual steaming:
- Fill a milk jug (A17) with fresh cold milk (between the min and max positionl). Milk will up to triple in volume. For a denser more even froth, you must use milk at refrigerator temperature (about 5^ ).
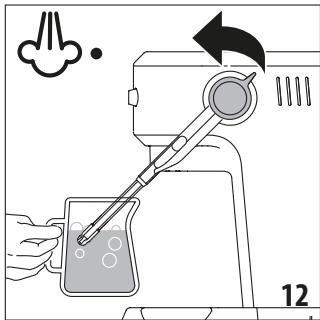
To make the froth manually, place the steam wand in "M" (manual steaming) position, place the milk jug under the steam wand and turn the steam lever in position (fig. 12).
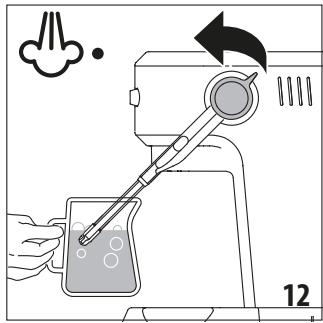
To froth the milk, rest the steam wand on the surface of the liquid. This mixes air with the milk and steam.
Keep the steam wand in contact with the surface, taking care not to let in too much air and create excessively large bubbles.
Immerse the steam wand below the surface of the milk, this creates a vortex in the liquid.
Once the milk is heated to the desired temperature, turn again the steam lever in position.
- Wait until steam stops completely before removing the milk jug.
Put the steam wand to "OFF" position after each use to start the automatic rinsing.
Barista tips: Fresh milk is best. Always use fresh milk straight from the fridge.
For best results, always replace the milk jug in the fridge when not in use.
Whole milk ensures optimum results. The appearance and texture of froth depending on the nature of the dairy milk or vegetable beverages utilized.
After frothing the milk, eliminate unwanted bubbles by swirling the jug gently.
Please note: During normal operation of the machine, some water is discharged in the drip tray to ensure optimal performance.
After every use, remove with a soft damp cloth any milk residues from the steam wand and place it in "OFF" (auto clean) position. The appliance delivers water from the steam wand.
A rinse is performed automatically when the appliance switches off if the steam wand remains in "A" (autosteaming) position.
5. MENU SETTINGS
Press and hold the B^E (B1) and B^F (B4) buttons for 3 seconds to enter the menu settings. After few seconds of inactivity, the machine automatically exits the menu.
The (B2) and (B3) indicator lights blinks.
The following settings will be saved after few seconds, when appliance exit automatically by menu setting.
5.1 Delay time between pre-infusion and infusion
To set the delay time, press ^空 (B1) button:
$$ \begin{array}{l} \begin{array}{l l} \stackrel {{\circ}} {{\circ}} & \mathbb {C} ^ {\mathcal {E}} \ \hline \end{array} \text {N o p r e i n f u s i o n d e l a y} \ \begin{array}{c} \text {二 二} \ \text {二 二} \ \text {二 二} \ \text {二 二} \ \text {二 二} \ \text {二 二} \ \text {二 二} \ \text {二 二} \ \text {二 二} \ \text {二 二} \ \text {二 二} \ \text {二 二} \ \text {二 二} \ \text {一 s e c o n d} \end{array} \ \begin{array}{c} \equiv \ \equiv \ 2 \end{array} _ {2 s e c o n d s} ^ {\mathbb {C} ^ {\mathbb {G}}} \ \end{array} $$
5.2 Descale
To set descale function, press (B6) button; the (B3) indicator light blinks and the indicator light turns on. Press
and hold the (B6) button for 3 seconds to start descending (see instructions in section Descaling). If you accidentally activate descaling, you can stop it by pressing and holding the (B6) button for at least 10 seconds.
5.3 Auto-off
To set the Auto-off time press (B7) button:
5.4 Default values
To reset the default values press 2xEspresso (B5) button; the indicator light blinks. Press and hold the 2xEspresso (B5) button for 3 seconds to resets all menu settings.
5.5 Water hardness
To set the one of the 3 levels of water hardness, press ^B (B4) button:
| Water Hardness Test Result | Corresponding indicator light | Level |
| ■ | ☐☐ | 1 soft water |
| ■■ | ☐☐ | 2 medium water |
| ■■■■■■■■ | ☐☐ | 3 hard or very hard water |
5.6 Measuring water hardness
The (B3) indicator light comes on following a predetermined period of operation that depends on a water hardness setting. The machine can also be programmed according to the actual hardness of the local water supply, in which case descaling may be required less frequently.
- Remove the water hardness test indicator paper (A19) from its pack.
- Immerse the paper completely in a glass of water for one second.
- Remove the paper from the water and shake lightly. After about a minute, 1, 2, 3, or 4 red squares form, depending on the hardness of the water.
6. CLEANING
Important: Before maintenance or cleaning of the appliance, turn it off, unplug from the main socket and allow to cool.
Do not use solvents, abrasive detergents or alcohol to clean the coffee machine.
Do not use metal objects to remove encrustations or coffee deposits as they could scratch metal or plastic surfaces.
None of the components or accessories is dishwasher safe.
If the machine is not used for more than one week, before using it again, we strongly recommend you perform a rinse cycle.
The following parts of the machine must be hand cleaned and dry regularly:
- drip tray (A8): the drip tray should be emptied and cleaned after each use or when the level indicator (red) rises through the metal grid.
Remove the drip tray, empty the water and clean the drip tray with a cloth, dry and then reassemble the drip tray.
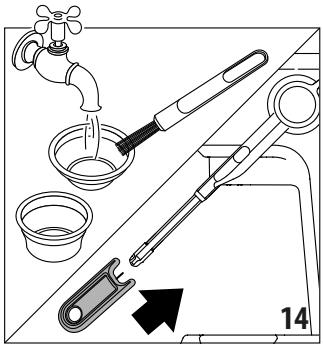
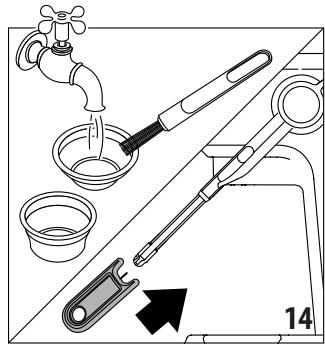
- cups filter (A15), (A16): After using the appliance, always rinse the filters under abundant running water. Use the brush (A9) to clean (fig. 14).
- coffee spout (A7): After every 200 coffees, rinse the coffee spout by delivering about 0.5 l of water from the coffee spout (press the 6 button without using ground coffee).
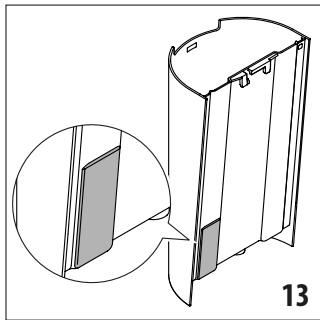
water tank (A2): Clean the water tank regularly (about once a week) and whenever you replace the water softener filter (if present) with a damp cloth and a little mild washing up liquid, especially internally in the sensor area (fig. 13); rinse with running water.
steam wand (A5): After every use, remove with a soft damp cloth any milk residues from the steam wand. Lift the steam wand and place it in "OFF" (auto clean) position (fig. 10). The appliance delivers water from the steam wand.
Wait that the steam wand cool down and open the hole of the nozzle with the cleaning needle (A10) (fig. 14).
7. DESCALING
Before use, read the instructions and the labelling on the descaler pack.
It is important to use De'Longhi descaler only. Using unsuitable descaler and/or performing descending incorrectly may result in faults not covered by the manufacturer's guarantee.
Descaler could damage delicate surfaces. If the product is accidentally spilt, dry immediately.
- Descale the machine when the B3 indicator lights turns on.
- Remove and empty the drip tray (A8), then reposition it in the machine.
- Empty the water tank (A2) (if present, remove the water softener filter).
Pour the descaler into the water tank up to the level 'A' marked on the inside of the tank (corresponding to the contents of one 100ml pack). - Add water (1 litre) up to level 'B'. Now reposition the water tank in the machine.
Make sure the filter holder (A14) is not attached and position a recipient under the hot coffee spout (A7) and steam wand (A5).
Press and hold the ^5 (B1) and _3^5 (B4) buttons for 3 seconds.
Press (B6) button; the (B3) indicator light blinks and the indicator light turns orange.
Press and hold the (B6) button for 3 seconds to start descending. The indicator light (B6) starts blinking. - The descale programme starts and the descaler liquid comes out of the steam wand and coffee spout. The descale programme removes limescale deposits from inside the appliance by automatically performing a series of rinses and pauses until the water tank is empty.
Delivery stops and the (B2) indicator light turns on, the Espanso indicator light turns white.
Empty and rinse the water tank. - Fill the water tank to MAX level with fresh water and empty the recipient used to collect the descaler solution and replace it empty.
Press the (B6) button to start the rinse cycle.
- When the rinsing process is over, the (B3) indicator light goes out and descending is complete and the appliance is ready to use.
Please note: If you accidentally activate descending, you can stop it by pressing and holding the (B6) button for at least 10 seconds.
8. TECHNICAL DATA
Voltage: 220-240V~50-60Hz
Absorbed power: 1450W
Max. water tank capacity: 1.6 l
Size LxDxH: 207x346x328 mm
Weight: 5 kg
9. STATISTICS
This mode allows you to have all the statistics data.
Make sure the machine is turned off.
Press and hold the 2 × Espresso (B5) button for 3 seconds and simultaneously press the On/Off switch (A6) to enter the Statistics settings.
Press the following buttons to select the appliance's data:
| Buttons | Data |
| dB | total automatic frothing time (minutes) |
| 2xEspresso | water quantity delivered (liters) |
| Espresso | total numbers of coffee beverages |
| total numbers of descalings | |
| total numbers of steam delivered |
9.1 Indicator light:
number of blinks to indicate units (from 1 to 9)
number of blinks to indicate tens (from 10 to 90)
Espresso number of blinks to indicate hundreds (from 100 to 900)
2xEspresso number of blinks to indicate thousands (from 1000 to 9000)
number of blinks to indicate tens of thousands (from 10000 to 90000)
| Problem | Cause | Solution |
| There is water in the drip tray (A8) | This water comes from the internal circuits of the machine and is a normal consequence of their operation | Empty and clean the drip tray on a regular basis |
| No espresso coffee is delivered | No water in the water tank (A2) | Fill the water tank |
| Coffee ground too finely | Adjust the quantity and grinding level | |
| Blockage in the cups filter (A15) or (A16) | Rinse the filters under running water | |
| The water tank (A2) is not properly in place and the valves at the bottom are not open | Press down lightly on the tank to open the valves at the bottom | |
| Limescale in the water circuit | Descale the appliance | |
| The espresso coffee drips from the edges of the filter holder (A14) rather than the holes | The filter holder has been inserted incorrectly or is dirty | Attach the filter holder correctly and rotate firmly as far as it will go |
| Blockage in the cup filter (A15) or (A16) | Rinse the filters under running water | |
| The coffee spout gasket has lost elasticity or is dirty | Clean the coffee spout gasket. Have the coffee spout gasket replaced by Customer Services | |
| The filter holder (A14) cannot be attached to the machine | Too much coffee has been placed in the filter | Use the measuring scoop (A18) supplied and make sure you are using the correct filter for the type of preparation |
| The coffee crema is too light (delivered from the spout too fast) | The pre-ground coffee is not pressed down firmly enough | Tamp the pre-ground coffee more firmly |
| There is not enough pre-ground coffee | Increase the quantity of pre-ground coffee | |
| The pre-ground coffee is too coarse | Use only pre-ground coffee for espresso coffee makers | |
| The wrong type of pre-ground coffee is being used | Change the type of pre-ground coffee | |
| The coffee froth is too dark (delivered from the spout too slowly) | The pre-ground coffee is pressed down too firmly | Press the coffee down less firmly |
| There is not enough pre-ground coffee | Reduce the quantity of pre-ground coffee | |
| The espresso coffee spout (A7) is blocked | Clean the coffee spout | |
| The cup filter (A15) (A16) is blocked | Clean the cup filter | |
| The pre-ground coffee is too fine | Use only pre-ground coffee for espresso coffee makers | |
| The pre-ground coffee is too fine or damp | Use pre-ground coffee for espresso coffee makers only and make sure it is not too damp | |
| After delivering coffee, the filter remains attached to the coffee spout | Insert the filter holder (A14) again, deliver coffee, then remove the filter holder | |
| The water tank indicator (B2) blinking and Espresso led is on (B6) | Air in the hydraulic circuit | Verify water tank position and water presence. Press Espresso button (B6) and wait until delivery in the drip tray stops |
| The machine will not make any drink and the water tank light is on | No water in the water tank (A2) or no water tank in the machine | Fill the tank with water or insert the water tank |
| The machine does not function and all the lights flash | Disconnect the machine immediately and contact authorised Customer Services. | |
| No milk froth is formed when making cappuccino | Milk not cold enough | Always use milk at refrigerator temperature |
| If you are in "manual steaming", steaming procedure could be wrong | Review the "manual steaming" paragraph | |
| Nozzle is dirty | Clean the steam wand (A5) | |
| Limescale in the water circuit | Descale as described in section "Descaling" | |
| No steam is produced | Nozzle is blocked/dirty | Clean the nozzle' hoses with the tool |
| Water sensor in the water tank is not working properly | Water tank is dirty | Clean the water tank internally, and dry the back panel |
| Descaling led is on | Descaling is required | Perform descaling |
LatteArt - Texture Micromousse
Texture fine
Texture dense
5.2 Descalcification
. 2xEsP r 10 (B5) jll l b aal yaaugb 10 10 A6 On/Off taia Iaai Ggll
.
:JgJtJtJtJtJtJtJtJtJtJtJtJtJtJtJtJtJtJtJtJtJtJtJtJtJtJtJtJtJtJtJtJtJtJtJtJtJtJtJtJtJtJtJt
| الإستعمال | الترجمة |
| (عَدُّدُ) نَزَلَبِيْ لَعَنَتَبِيْ الحَلَسِيرِ وَالَجْدِيَ وَالَجْدِيَ وَالَجْدِيَ وَالَجْدِيَ وَالَجْدِيَ وَالَجْدِيَ وَالَجْدِيَ وَالَجْدِيَ وَالَجْدِيَ وَالَجْدِيَ وَالَجْدِي· | الإستعمال |
| (عَدُّدُ) نَزَلَبِيْ لَعَنَتَبِيْ الحَلَسِيرِ وَالَجْدِيَ وَالَجْdِيَ وَالَجْdِيَ وَالَجْdِيَ وَالَجْdِي· | Espresso |
| عَدُّدُ) نَزَلَبِيْ لَعَنَتَبِيْ الحَلَسِيرِ وَالَجْdِيَ وَالَجْdِيَ وَالَجْdِيَ وَالَجْdِي· | Espresso |
| عَدُّدُ) نَزَلَبِيْ لَعَنَتَبِيْ الحَلَسِيرِ وَالَجْdِيَ وَالَجَdِيَ وَالَجْdِي· | |
| عَدُّدُ) نَزَلَبِيْ لَعَنَتَبِيْ الحَلَسِيرِ وَالَجْdِيَ وَالَجَdِي· |
:gagglg 1.9
(911)1j0)
(90 10) C

(900 100) alal aljol alasgl

(9000 1000)


[1] a2jzJtJzJzJzJ.7
Jjoo ooc joc goll ciaalallg ciaalzill jol,olauwll J. ajjll lclwll
ydd. DeLonghi yjrglll l jo oolal lalln 10
lll! g/9 wioo rgc jy jno alldw
aIla I aIb2v Ugoc OgdU Ld Aoo
cilll kwl lll . aai jil bawll ayjll cllu wjj Jjo cald dJgadaae
J.(B3)
.(A8)Cjlll (A2)(A1)
A' sall 100 d
glal jgsjgl JJ. B'sgssall (j1) cll aol .slal
joo 100 eeggog jz (A14) zoll Jol oJ st (A5) Jwll gjg (A7) aIswll ogall
3 8 (B4) g (B1)
(B3) jwall Cuao Jaoog: (B6) jll Jc bwiJ ESPRESS .jaiuU uU U ESPRESS
aBj 3 aJ (B6) jll Jc bawj yawg bawl . Jawgill B6) gall wgal d.
aJ 1 J 1 J 1 J 1 J 1 J 1 J 1 J 1 J 1 J 1 J 1 J 1 J 1 J 1 J 1 J 1 J 1 J 1 J 1 J 1 J 1 J 1 J 1 J 1 J 1 J 1 J 1 J 1 J 1 J 1 J 1 J 1 J 1 J 1 J
.1JgE g> 1gabllg cabbllc aIaLw L2B (B2) Jgall Cuae wll
espeo 1
a#
gblallllgljlll lallllglallllglallllglg 1
o yololssiwl jdl gswl o jysl alldiwl dcll 3
.0000000000000000000
aabaa aagaaagagagagagagagagagagagagagagagagagagagagagagagagagagagagagagagagagagagagagagagagagagagagagagagagagagagagagagagagagag
laabg bawl aay g y: (A8) 1alall gag aeg Jld (y) sgwll g ay lud s d
ybaill gao zlcg kbiig lwl jgl, ybaill gao zlcg jgl.
abal jglj alldaw (A15), (A16) jllj j (A9) 0j (A)
.14JkJU
oggall abal, gag 200 J: (A7) oggall j (Jc baiol) oggall no elal no jul 0.5 llg aabwgl
Lalal dai sai jie g E Spesso 10dol (B6) jllg lgl aalll alal
J 3.5
: (B7) jll jle bawl jialll abylj oobw jgl no
5
1.5
3
4.5
;B5) jll Jc bawl aowjyall wos ool J 20
JXeResso
OwJ (B5) jll Jc bawl yawlg bawl jwoss
ailll lglg bdo 3
5.5
: (B4) [1] 23.11 Jc baiol ccll jueo 3 JI CI ayzawwai Jai bai
| الله�� | الله�� الله�� | الله�� الله�� |
| 1 الله�� الله�� | ||
| 2 الله�� الله�� | ||
| 3 الله�� الله�� |
clal jus wu 6.5
g j 10000000000000000000000000000000000000000000000000000000000000000000
JgGd
(A19)clll jucjulgo aagjjj
L
. 10g 100
clal jwjc 1e cclc 1joo 1ofo 4 g3g2
.6
a a
.25
aLslo aaiu joi JgS g dlabio gl uioo
.
0gagll ggl aayy ylll llll j 1n no n nn nnnn
a a a a a a a a a a a a a a a
s2j . jlll baw je jllg e jao , ooll jao
Jllyll llll bll
clawll ooc dc woll go: cawll lwoo lo wll elj bok
.
Jlollol 3dolgdl dglaw cllal lcll jllj
a 1
.
JU JU JO AJOUIJU JU "OFF"gOgll 3 JUULg U
.
jcbuolal,duwul. Jdall go jlll wall
ailll j
3g 8gall llll lalld
doluiwdoic
gagog jaoa Jalio gai jaoi jao
aaii aaii iagai gai juiy daa b
yabwgygcyaln cclalnaa aalaa
.
jll jll jll jll jll jll jll jll jll jll
.(jlll jll)"A"gol
(ülaucy) SETTINGS a5g .5
j0 jg3 8dol (B4) g(B1) qB
aaii i 1
aalal no lalogai aalal
.(B3)g(B2)
jlll luee, jgl gao dai jilu liu y
.1slllly aai jn lscalogjgi
g jlllglj 1.5
:(B1) 1 jll jbcjol jbjll jcbj
a
1
2
aJ 2.5
Esecco
: (B6) jll jbcj b20d aJydl cJydl aJydl abg b
jaiwlg bawl jagall g (B3) 1g (B3)
4j jll 12j03 B6
.(aJyjll cJyjll aJyj1 aJyj1 30d0yjgl lJcJlal jbjil)
(3) a4 = a1 + 2 = 3
.(11J) (A4)
gbs aig yll gos gai slal l. jwgl 2a
Lsslogjoll
aababakawgbljlll jgln no yolno lla Jj
"OFF"goll g jllg
:gJ2.4
gogall jll jll jll jll jll jll jll
(12 Jk
jiaaii jogai liu 2.3
J 2xEsPsso Eesss o 2
gall 2000 gogall 3 gogall gio ailo 1d .aegll gog 4 aolll 1j oJwll jno aer .jil jnil jn jiall gogall no agalboll aill .jry .alaiwl oljol ogall gio ailo cwaig wll
| a. La Jolla de la Jolla de la Jolla de la Jolla de la Jolla de la Jolla de la Jolla de la Jolla de la Jolla de la Jolla de la Jolla de la Jolla de la Jolla de la Jolla de la Jolla de la Jolla de la Jolla de la Jolla de la Jolla de la Jolla de la Jolla de la Jolla de la Jolla de la Jolla de la Jolla de la Jolla de La Jolla de La Jolla de La Jolla de La Jolla de La Jolla de La Jolla de La Jolla de La Jolla de La Jolla de La Jolla de La Jolla de La Jolla de La Jolla de La Jolla de La Jolla de La Jolla de La Jolla de La Jolla de La Jolla de La Jolla de La Jolla de La Jolla de La Jolla de La Jolla de La Jolla deLa Jolla de La Jolla de La Jolla de La Jolla de La Jolla de La Jolla de La Jolla de La Jolla de La Jolla de La Jolla de La Jolla de La Jolla de La Jolla de La Jolla de La Jolla de La Jolla de La Jolla de La Jolla de La Jolla de La Jolla de La Jolla de La Jolla de La Jolla de La Jolla de La Jolla de Lajolla de La Jolla de La Jolla de La Jolla de La Jolla de La Jolla de La Jolla de La Jolla de La Jolla de La Jolla de La Jolla de La Jolla de La Jolla de La Jolla de La Jolla de La Jolla de La Jolla de La Jolla de La Jolla de La Jolla de La Jolla de La Jolla de La Jolla de La Jolla de La Jolla de LaJolla de La Jolla de La Jolla de La Jolla de La Jolla de La Jolla de La Jolla de La Jolla de La Jolla de La Jolla de La Jolla de La Jolla de La Jolla de La Jolla de La Jolla de La Jolla de La Jolla de La Jolla de La Jolla de La Jolla de La Jolla de La Jolla de La Jolla de La Jolla de La Jolla de La JJolla de La Jolla de La Jolla de La Jolla de La Jolla de La Jolla de La Jolla de La Jolla de La Jolla de La Jolla de La Jolla de La Jolla de La Jolla de La Jolla de La Jolla de La Jolla de La Jolla de La Jolla de La Jolla de La Jolla de La Jolla de La Jolla de La Jolla de La Jolla de La Jolla de La Jalolla de La Jolla de La Jolla de La Jolla de La Jolla de La Jolla de La Jolla de La Jolla de La Jolla de La Jolla de La Jolla de La Jolla de La Jolla de La Jolla de La Jolla de La Jolla de La Jolla de La Jolla de La Jolla de La Jolla de La Jolla de La Jolla de La Jolla de La Jolla de La Jolla de La JLolla de La Jolla de La Jolla de La Jolla de La Jolla de La Jolla de La Jolla de La Jolla de La Jolla de La Jolla de La Jolla de La Jolla de La Jolla de La Jolla de La Jolla de La Jolla de La Jolla de La Jolla de La Jolla de La Jolla de La Jolla de La Jolla de La Jolla de La Jolla de La Jolla de La JRolla de La Jolla de La Jolla de La Jolla de La Jolla de La Jolla de La Jolla de La Jolla de La Jolla de La Jolla de La Jolla de La Jolla de La Jolla de La Jolla de La Jolla de La Jolla de La Jolla de La Jolla de La Jolla de La Jolla de La Jolla de La Jolla de La Jolla de La Jolla de La Jolla de La JColla de La Jolla de La Jolla de La Jolla de La Jolla de La Jolla de La Jolla de La Jolla de La Jolla de La Jolla de La Jolla de La Jolla de La Jolla de La Jolla de La Jolla de La Jolla de La Jolla de La Jolla de La Jolla de La Jolla de La Jolla de La Jolla de La Jolla de La Jolla de La Jolla de La JSolla de La Jolla de La Jolla de La Jolla de La Jolla de La Jolla de La Jolla de La Jolla de La Jolla de La Jolla de La Jolla de La Jolla de La Jolla de La Jolla de La Jolla de La Jolla de La Jolla de La Jolla de La Jolla de La Jolla de La Jolla de La Jolla de La Jolla de La Jolla de La Jolla de LaJSolla de La Jolla de La Jolla de La Jolla de La Jolla de La Jolla de La Jolla de La Jolla de La Jolla de La Jolla de La Jolla de La Jolla de La Jolla de La Jolla de La Jolla de La Jolla de La Jolla de La Jolla de La Jolla de La Jolla de La Jolla de La Jolla de La Jolla de La Jolla de La Jolla de La.Jolla de La Jolla de La Jolla de La Jolla de La Jolla de La Jolla de La Jolla de La Jolla de La Jolla de La Jolla de La Jolla de La Jolla de La Jolla de La Jolla de La Jolla de La Jolla de La Jolla de La Jolla de La Jolla de La Jolla de La Jolla de La Jolla de La Jolla de La Jolla de La Jolla de La jolla de La Jolla de La Jolla de La Jolla de La Jolla de La Jolla de La Jolla de La Jolla de La Jolla de La Jolla de La Jolla de La Jolla de La Jolla de La Jolla de La Jolla de La Jolla de La Jolla de La Jolla de La Jolla de La Jolla de La Jolla de La Jolla de La Jolla de La Jolla de La Jolla de La JMolla de La Jolla de La Jolla de La Jolla de La Jolla de La Jolla de La Jolla de La Jolla de La Jolla de La Jolla de La Jolla de La Jolla de La Jolla de La Jolla de La Jolla de La Jolla de La Jolla de La Jolla de La Jolla de La Jolla de La Jolla de La Jolla de La Jolla de La Jolla de La Jolla de LaJColla de La Jolla de La Jolla de La Jolla de La Jolla de La Jolla de La Jolla de La Jolla de La Jolla de La Jolla de La Jolla de La Jolla de La Jolla de La Jolla de La Jolla de La Jolla de La Jolla de La Jolla de La Jolla de La Jolla de La Jolla de La Jolla de La Jolla de La Jolla de La Jolla de La JWolla de La Jolla de La Jolla de La Jolla de La Jolla de La Jolla de La Jolla de La Jolla de La Jolla de La Jolla de La Jolla de La Jolla de La Jolla de La Jolla de La Jolla de La Jolla de La Jolla de La Jolla de La Jolla de La Jolla de La Jolla de La Jolla de La Jolla de La Jolla de La Jolla de LaJJolla de La Jolla de La Jolla de La Jolla de La Jolla de La Jolla de La Jolla de La Jolla de La Jolla de La Jolla de La Jolla de La Jolla de La Jolla de La Jolla de La Jolla de La Jolla de La Jolla de La Jolla de La Jolla de La Jolla de La Jolla de La Jolla de La Jolla de La Jolla de La Jolla de La Jaolla de La Jolla de La Jolla de La Jolla de La Jolla de La Jolla de La Jolla de La Jolla de La Jolla de La Jolla de La Jolla de La Jolla de La Jolla de La Jolla de La Jolla de La Jolla de La Jolla de La Jolla de La Jolla de La Jolla de La Jolla de La Jolla de La Jolla de La Jolla de La Jolla de La Jonilla de La Jolla de La Jolla de La Jolla de La Jolla de La Jolla de La Jolla de La Jolla de La Jolla de La Jolla de La Jolla de La Jolla de La Jolla de La Jolla de La Jolla de La Jolla de La Jolla de La Jolla de La Jolla de La Jolla de La Jolla de La Jolla de La Jolla de La Jolla de La Jolla de La Julla de La Jolla de La Jolla de La Jolla de La Jolla de La Jolla de La Jolla de La Jolla de La Jolla de La Jolla de La Jolla de La Jolla de La Jolla de La Jolla de La Jolla de La Jolla de La Jolla de La Jolla de La Jolla de La Jolla de La Jolla de La Jolla de La Jolla de La Jolla de La Jolla de La Jollarde La Jolla de La Jolla de La Jolla de La Jolla de La Jolla de La Jolla de La Jolla de La Jolla de La Jolla de La Jolla de La Jolla de La Jolla de La Jolla de La Jolla de La Jolla de La Jolla de La Jolla de La Jolla de La Jolla de La Jolla de La Jolla de La Jolla de La Jolla de La Jolla de La Jolla De La Jolla de La Jolla de La Jolla de La Jolla de La Jolla de La Jolla de La Jolla de La Jolla de La Jolla de La Jolla de La Jolla de La Jolla de La Jolla de La Jolla de La Jolla de La Jolla de La Jolla de La Jolla de La Jolla de La Jolla de La Jolla de La Jolla de La Jolla de La Jolla de La Jolla DE LAJolla DE LAJolla DE LAJolla DE LAJolla DE LAJolla DE LAJolla DE LAJolla DE LAJolla DE LAJolla DE LAJolla DE LAJolla DE LAJolla DE LAJolla DE LAJolla DE LAJolla DE LAJolla DE LAJolla DE LAJolla DE LAJolla DE LAJolla DE LAJolla DE LAJolla DE LAJolla DE LAJolla DE LAJolla DE LA Jolla DE LAJolla DE LAJolla DE LAJolla DE LAJolla DE LAJolla DE LAJolla DE LAJolla DE LAJolla DE LAJolla DE LAJolla DE LAJolla DE LAJolla DE LAJolla DE LAJolla DE LAJolla DE LAJolla DE LAJolla DE LAJolla DE LAJolla DE LAJolla DE LAJolla DE LAJolla DE LAJolla DE LAJolla DELAJolla DE LAJolla DE LAJolla DE LAJolla DE LAJolla DE LAJolla DE LAJolla DE LAJolla DE LAJolla DE LAJolla DE LAJolla DE LAJolla DE LAJolla DE LAJolla DE LAJolla DE LAJolla DE LAJolla DE LAJolla DE LAJolla DE LAJolla DE LAJolla DE LAJolla DE LAJolla DE LAJolla DE LAJolla DELA Jolla DE LAJolla DE LAJolla DE LAJolla DE LAJolla DE LAJolla DE LAJolla DE LAJolla DE LAJolla DE LAJolla DE LAJolla DE LAJolla DE LAJolla DE LAJolla DE LAJolla DE LAJolla DE LAJolla DE LAJolla DE LAJolla DE LAJolla DE LAJolla DE LAJolla DE LAJolla DE LAJolla DE LAJolla DE LAAJolla DE LAJolla DE LAJolla DE LAJolla DE LAJolla DE LAJolla DE LAJolla DE LAJolla DE LAJolla DE LAJolla DE LAJolla DE LAJolla DE LAJolla DE LAJolla DE LAJolla DE LAJolla DE LAJolla DE LAJolla DE LAJolla DE LAJolla DE LAJolla DE LAJolla DE LAJolla DE LAJolla DE LAJolla DE LALAJolla DE LAJolla DE LAJolla DE LAJolla DE LAJolla DE LAJolla DE LAJolla DE LAJolla DE LAJolla DE LAJolla DE LAJolla DE LAJolla DE LAJolla DE LAJolla DE LAJolla DE LAJolla DE LAJolla DE LAJolla DE LAJolla DE LAJolla DE LAJolla DE LAJolla DE LAJolla DE LAJolla DE LAJolla DE LAJA. |
a 4.5

dally 1g204
jlogjgl 1.4
jdllll jgogj)jglb jlb (A17) jdllll jdl lal
Jgssd. aooj glsbl jlll blll Jaa .(I gddlll Jg
aJyoljagj 0j 0j 0j 0j 0j 0j 0j 0j 0j 0j 0j 0j 0j 0j 0j 0j 0j 0j 0j 0j 0j 0j 0j 0j 0j 0j 0j 0j 0j 0j 0j 0j 0j 0
gall jc aalll aaxll ggl aill aaxll
golll gdljzg 10 B1 10 (B1)
aJzlll jzlll lal aag (B6) 0jj
yagall bulao aolg cuaig aoagll jc bulaoal ago laic ojala ayslall ngst cuiu kyaiaa aoull agl lc
sgllll jgjjj J 1000000000000000000000000000000000000000000
Jg jag aay (A2) clll jjSlaog (A1) clll jjSce j

GjJgJgJgJgJgJgJgJgJgJgJgJgJgJgJgJgJgJgJgJgJgJgJgJgJgJgJgJgJgJgJgJgJgJgJgJgJgJgJgJgJgJgJg
j 1 j 1 j 1 j 1 j 1
.(3JkA)OOn/Off 1200
Espresso
aagwzg wal (4 JkW) (B6) jll Jc bdoi
.1yblg 1c9 gjglj
aillal alilal jglall lwh oogall gao aiao alisi
:dlglgwlJcJcJc
(A14) wall Jol A16 (A15) jai all yoo o aal go wall Jol aao oliloo go aiall yoo Jol aal o aoi jao aaiall yoo "INSERT" .(5JcJI)(glc) "CLOSE" gogall
jgljwog.1
all jbj .A1
A1J 2
A3
Jusll A4
a1 ≤ a2 ≤ a_3
aJy/1jz. A6
gagall .A7
C. a + b = 1 and c = 2 , d = 3 . A8
. A9
aBbI IyA10
swSol.A11
(ba)gduyol yoo) ayjy j. A12
oalllgagA13
woll Jol .A14
jL2cA15
jia 1 a. A16
A17
wJdAe2. A18
gall glgl clal gulil.A19
a001 1.1
gaijolj>jj.B1
sllj jgsaggo cuaa .B2
Uuljdljugo Luaa .B3
dalljbjjj.B4
2xgwsjB.85
gwwwjj.B6
J.87
Juswyl J.2
A2) all 13 Luy. lalall g a jg Jlsl 3Jssll dol wll alaloll gl uigkll g oJ .uogg
jIbJil
.1JkU)JcUd4uWggyjUpocuUdUjz


Register Now
www.delonghi.com/register