USER MANUAL V10 Pro DREAME
Dreame Cordless Vacuum Cleaner User Manual
For further information, please go to www.dreame.tech
Manufactured by: Dreame Technology (Tianjin) Limited
Address: 1-1-804-8, North, Finance Trade Center, 6865, Yazhou Road, Dongjiang Free Trade Zone, Tianjin Pilot Free
Trade Zone, Tianjin, China

Made in China
VVN3-EU-R00
Инстукции по Тхниke
6e30nacchoCTn
dreame
Dreame Cordless Vacuum Cleaner User Manual 01
To prevent accidents including electric shock or fire caused by improper use, please read this manual carefully before use and retain it for future reference.
Warning
This product can be used by children aged from 8 years and above and persons with physical, sensory, intellectual deficiencies, or limited experience or knowledge under the supervision of a parent or guardian to ensure safe operation and to avoid any risk of hazards. Cleaning and maintenance shall not be made by children without supervision.
The vacuum is not a toy. Children shall not play with or operate this product. Please exercise caution when using the vacuum near children. Do not allow children to clean or maintain the vacuum unless supervised by a parent or guardian.
Do not use the vacuum outdoors or on wet surfaces. Only use the vacuum on dry indoor surfaces. Do not touch the plug or any part of the vacuum with wet hands.
To reduce the risk of fire, explosion, or injury, check to make sure the lithium battery and charging adapter are undamaged before use. Do not use the vacuum if either the lithium battery or charger is damaged.
The soft roller brushbar, battery, metal connector pin, and vacuum are electrically conductive and should not be immersed in water or other liquid. Make sure to dry all filters after cleaning.
To prevent injury caused by moving parts, turn off the vacuum before cleaning the soft roller brushbar. The soft roller brushbar, dust compartment, and filter must all be properly installed before using the vacuum.
Only use the original charging adapter. Never use an unoriginal adapter, as this may cause the lithium battery to catch fire.
Do not use the vacuum to pick up flammable or combustible liquids, such as gasoline, or bleach, ammonia, drain cleaners or other liquids.
Do not use the vacuum to pick up drywall particles, ashes like fireplace ash, or smoking or burning materials such as coal, cigarette butts or matches.
Do not use the vacuum to pick up sharp or hard objects, such as glass, nails, screws, or coins, which may damage the machine.
Keep hair, loose clothing, fingers and other parts of the body away from the vacuum's openings and moving parts. Do not point the hose, wand or tools at your eyes or ears or put them in your mouth.
Do not put any object into the vacuum's openings. Do not use the vacuum with any opening blocked. Keep free of dust, lint, hair, or other items which may reduce airflow.
Do not rest the vacuum against a chair, table, or other unstable surface, as this may cause damage to the machine or personal injury. If the vacuum becomes damaged from being knocked over or is otherwise malfunctioning, please contact our authorized service department. Never attempt to disassemble the device on your own.
All instructions in the manual for recharging the battery must be strictly followed. Failure to properly charge the battery within the specified temperature range could damage the battery.
Only use accessories and replacement parts that are approved by Dream.
Do not use the vacuum without the clear dust compartment and filter in place.
Make sure the vacuum is unplugged when not used for extended periods as well as prior to performing any maintenance or repairs.
Please be extra careful when using the vacuum to clean stairs.
Do not install, charge, or use this product outdoors, in bathrooms, or around a pool.
Fire Hazard Warning: Do not apply any type of fragrance to the vacuum's filter. These types of products are known to contain flammable chemicals which may cause the vacuum to catch fire.
This product is designed for home use only.
We Dreme Technology (Tianjin) Limited, hereby, declares that this equipment is in compliance with the applicable Directives and European Norms, and amendments. The full text of the EU declaration of conformity is available at the following internet address: www.dreme.tech

means detachable supply unit
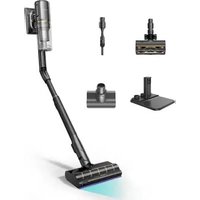
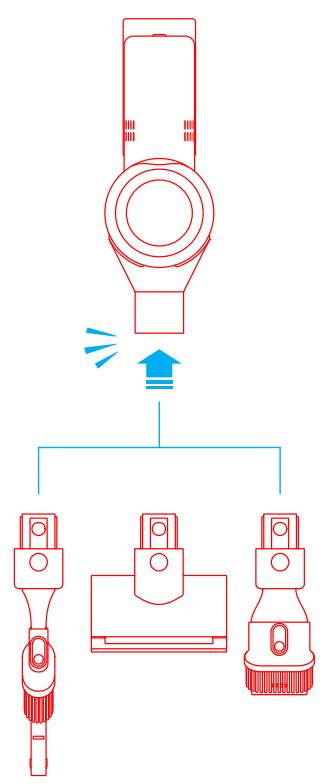
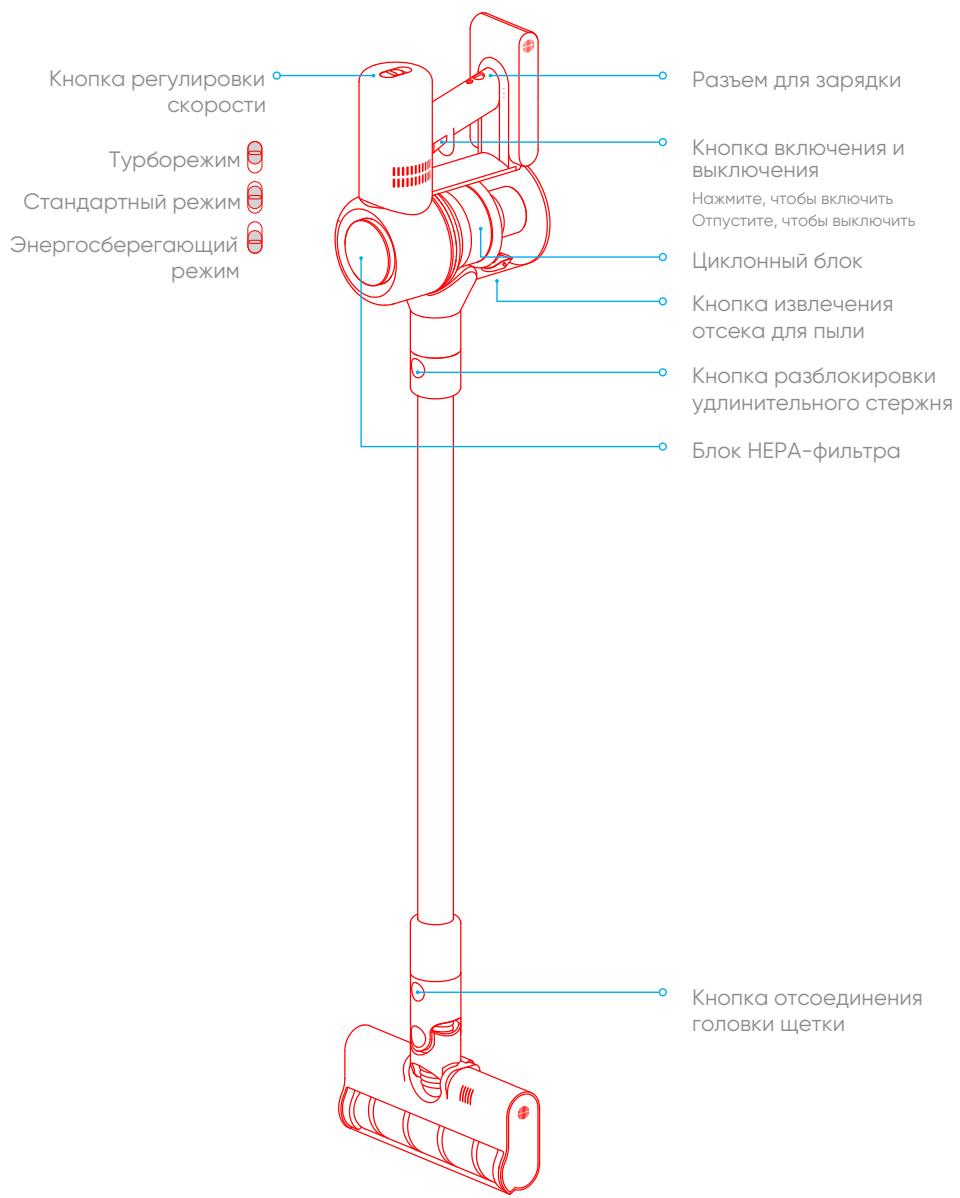
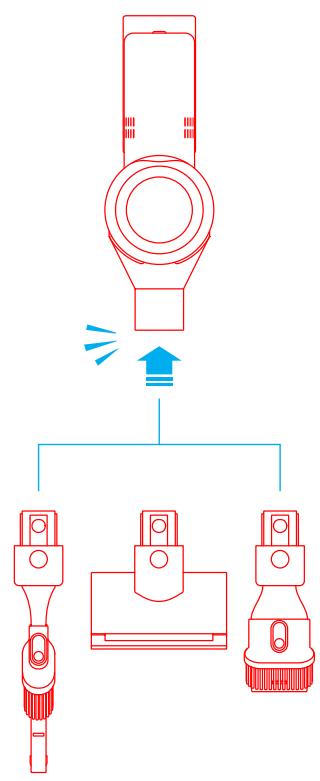
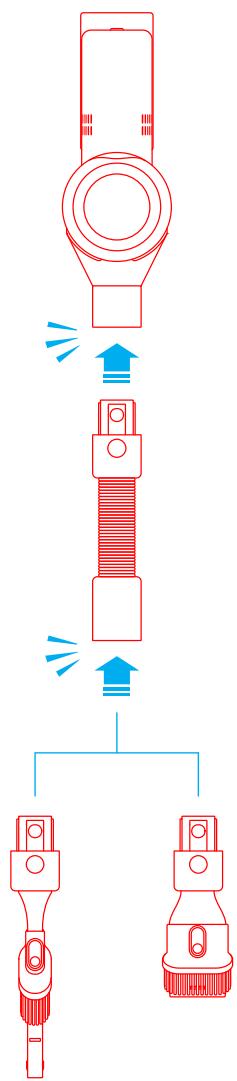
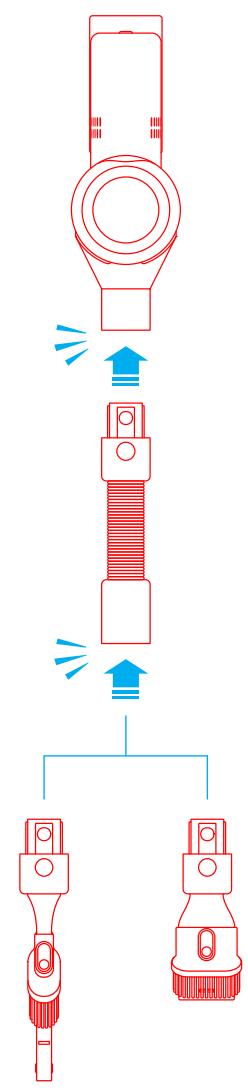
Product Overview
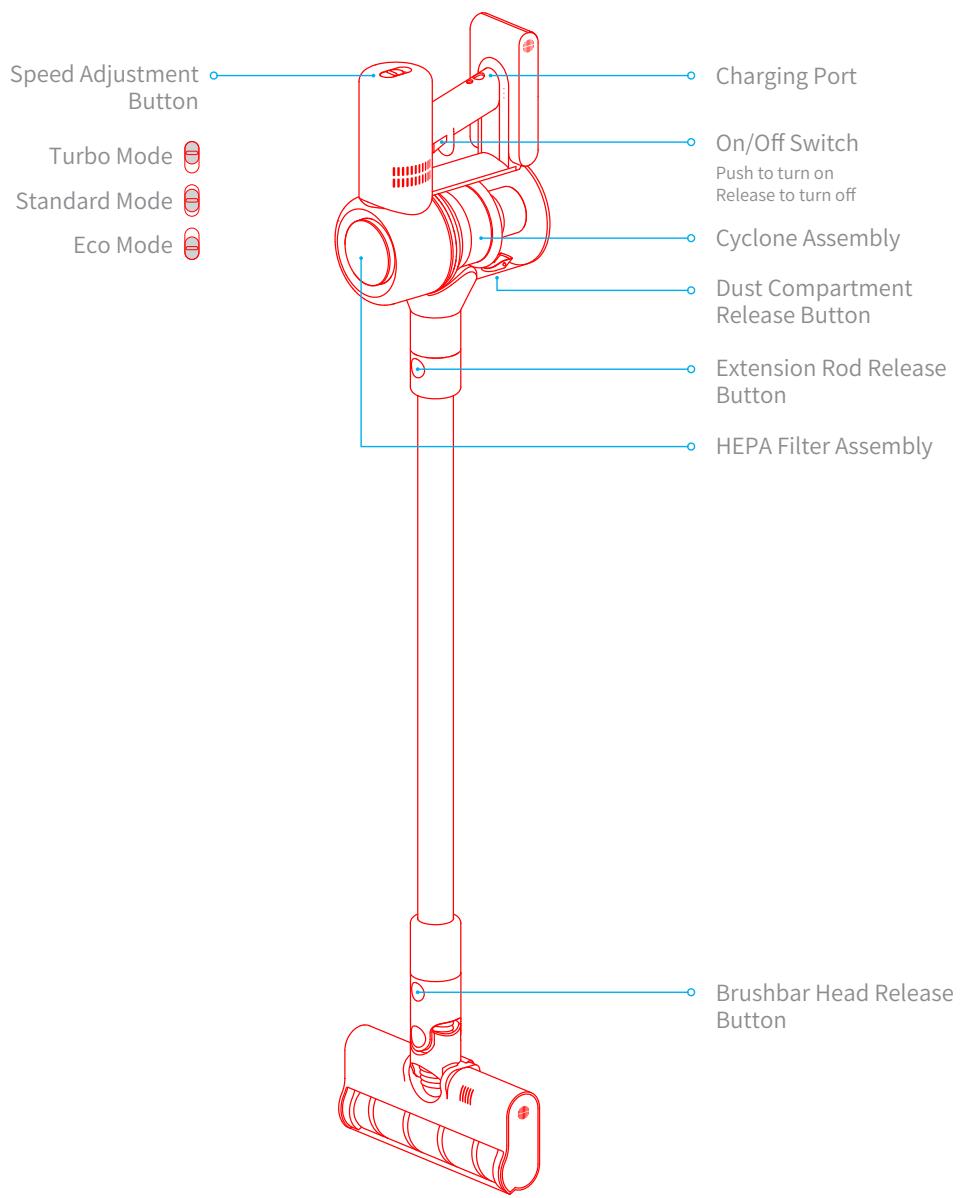
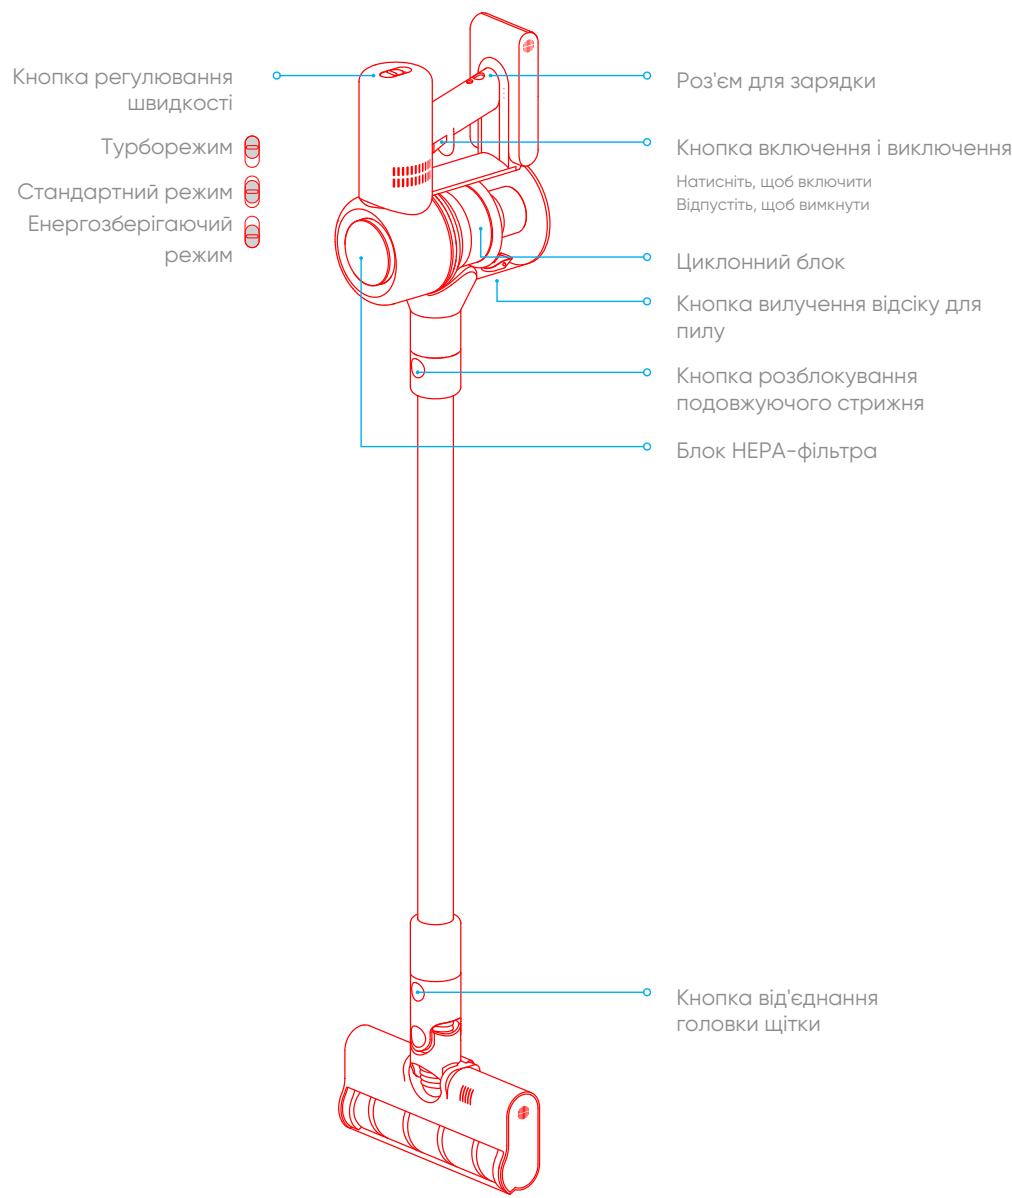
Part Names
Product Overview

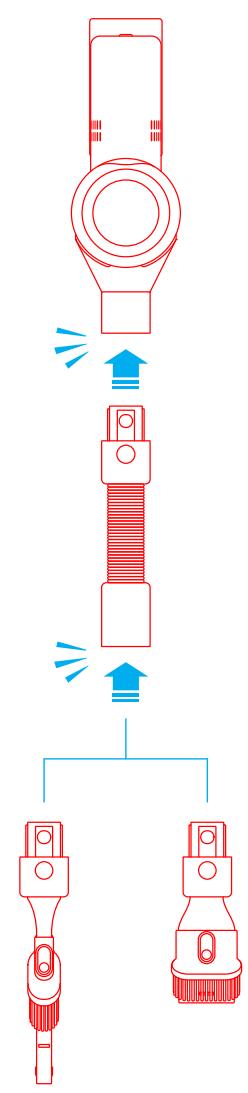
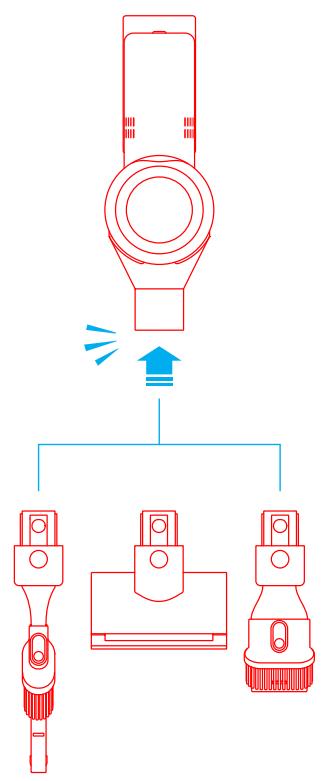
Accessories
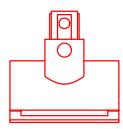
2-in-1 Crevice Nozzle

2-in-1 Brush Nozzle

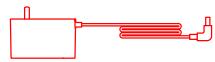
Extension hose
Soft Roller Nozzle
Mini-Motorized Nozzle
Power Adapter

Extension Rod
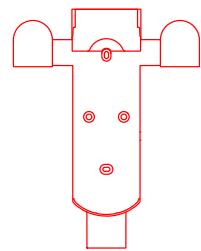
2-in-1 Charging & Storage Mount
(including screws × 2 , wall plugs × 2 )
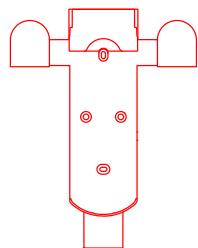
Installation
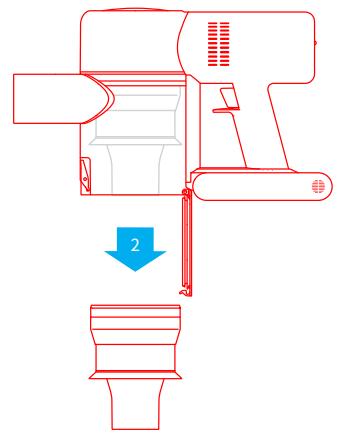
Vacuum and Accessories Installation Diagram

Insert till it clicks into place

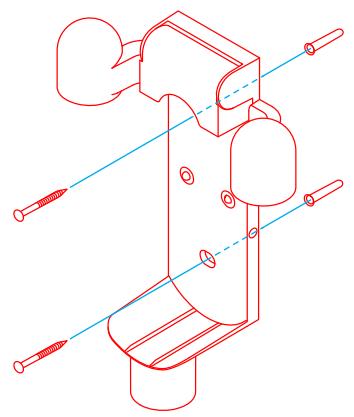
Installation
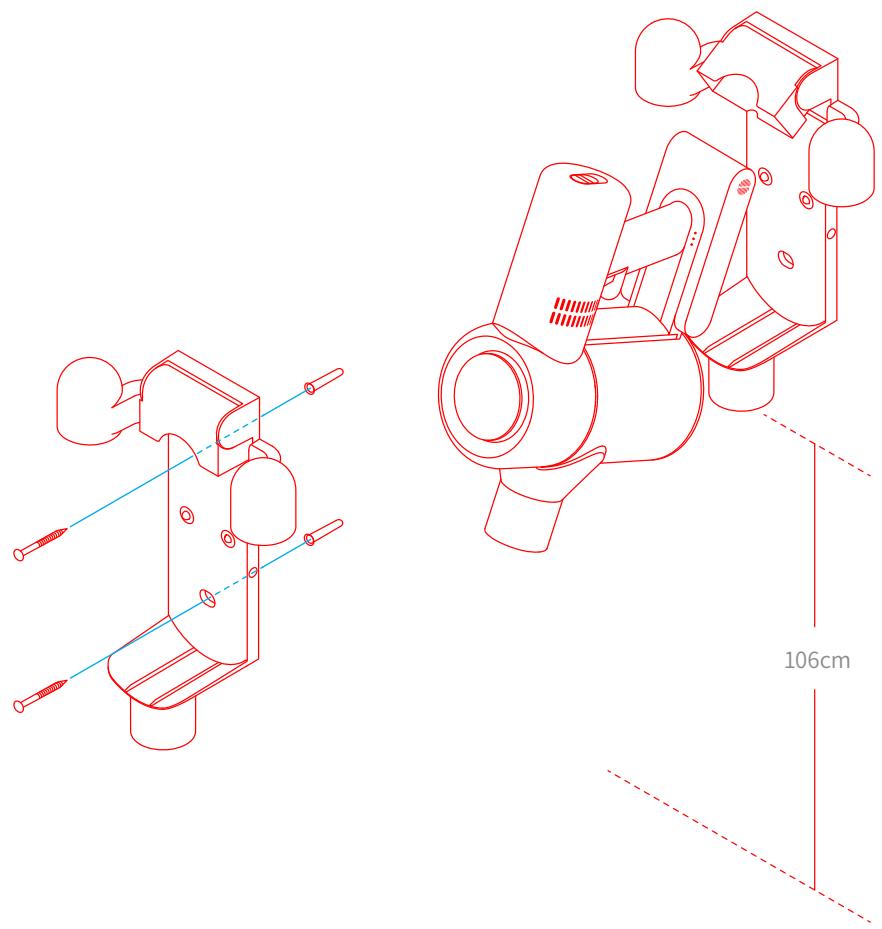
Installing the 2-in-1 Charging & Storage Mount
- The 2-in-1 charging & storage mount is an optional accessory, you can install it based on your requirements.
- The mount should be installed in a cool, dry place near a power outlet, out of direct sunlight, and away from moisture-prone areas, such as a kitchen.
- Securely install the mount using mounting hardware suitable for the type of wall selected. Make sure the installation area is clear of any pipes such as gas or water lines, and air ducts, electric wires and cables, or drainage lines.
- It is recommended to hire a professional to install the mount and to use protective clothing, goggles, and other protective equipment where necessary.
- Using an electric drill, mark and drill two 8mm diameter holes into the wall where desired to a depth of about 30mm . Insert the wall plugs into the holes, position the mount, then fasten it to the wall with the included screws.
How to Use
Note:
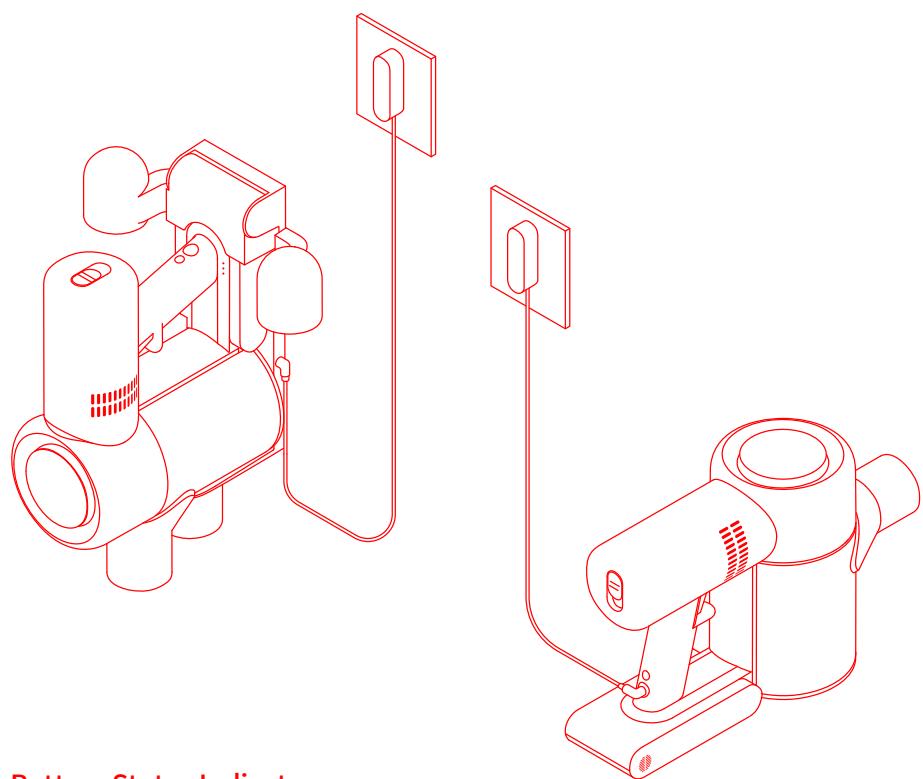
- Fully charge the vacuum before using it for the first time. This will take about 4 hours.
- Vacuum cannot be used while charging.
- Vacuuming at turbo mode for a prolonged period will cause the battery to heat up, which increases charging time. Allow the vacuum to cool down for 30 minutes before charging it.
Battery Status Indicator
Off

Blinking
OOn

Low battery

O O Fully charged

Half battery

Fully charged

Oo Nearly full
Note: Once the vacuum is fully charged, the indicator will turn off after 5 minutes, and the vacuum will enter the energy-saving mode.
Please read the Safety Instructions in this user manual before proceeding.
How to Use
Using Different Attachments
Mini-Motorized Nozzle: Strong vibrations yield deep cleaning action for removing mites and dust from mattresses and fabric surfaces.

2-in-1 Brush Nozzle: Suitable for vacuuming up dust and mites on beds, sofas, and other furniture fabric.
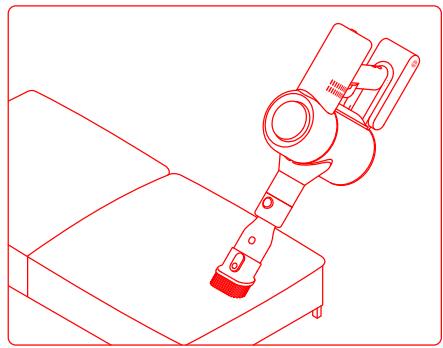
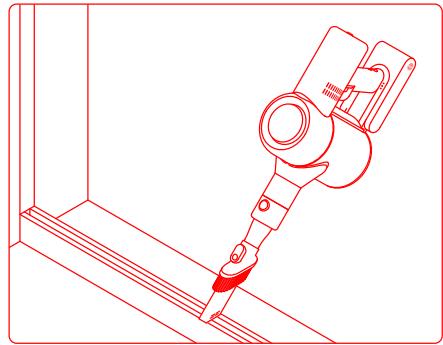
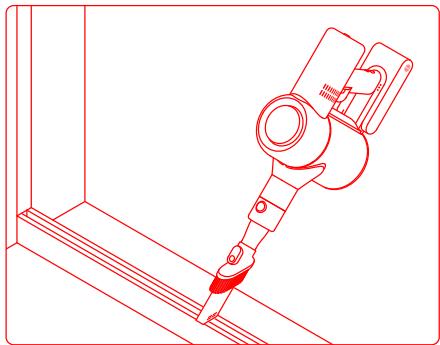
2-in-1 Crevice Nozzle: Suitable for vacuuming cracks, corners of doors and windows, stairs, and other hard-to-reach places.
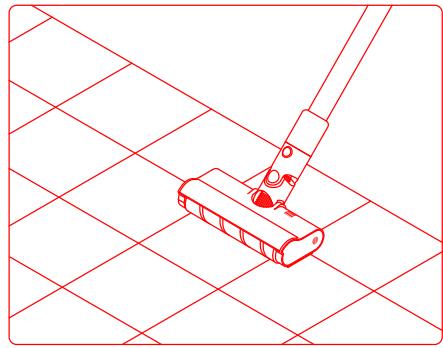
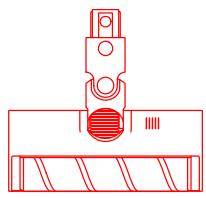
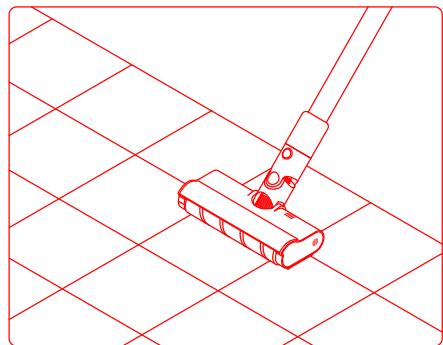
Soft Roller Nozzle: Suitable for vacuuming the hard surfaces such as floor, tile, marble, as well as for vacuuming up larger pieces of dirt and debris. The Soft Roller Nozzle can also be directly attached to the vacuum.
Extension hose: use for hard-to-reach corner cleaning.
Note:
- If any rotating part becomes stuck, the vacuum may turn off automatically. Remove any trapped foreign objects, then resume use.
- The vacuum will automatically shut off if its motor enters overheat protection mode. Wait until the motor's temperature returns to normal before resuming use.
Care & Maintenance
Tips:
- Always use genuine parts to keep your warranty from being voided.
- If the filter or nozzle becomes clogged, the vacuum will stop working shortly after being turned on. To restore functionality, clean the filter or nozzle.
- If the vacuum will not be used for an extended period, fully charge it, unplug its power adapter, and store it in a cool, low-humidity environment away from direct sunlight. To avoid over-discharging the battery, recharge the vacuum at least once every 3 months.
Cleaning the Vacuum
Wipe the vacuum with a soft dry cloth.
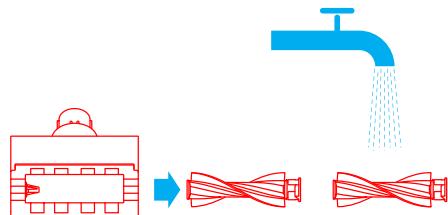
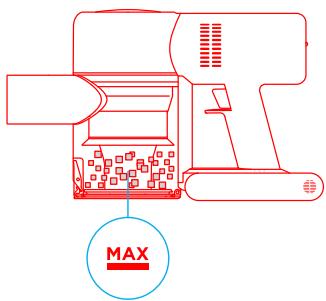
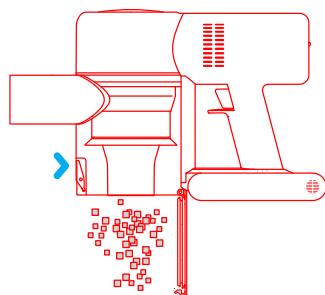
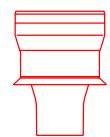
Cleaning the Dust Compartment
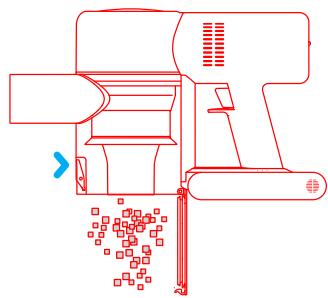
Before cleaning the dust compartment, disconnect the adapter and keep the vacuum's power switch in the off position. The vacuum's cleaning ability will be reduced if the dust compartment is filled to the "MAX" mark. To regain performance, empty the compartment.
To empty the dust compartment: Press the release button on the bottom of the compartment, then empty its contents.

Care & Maintenance
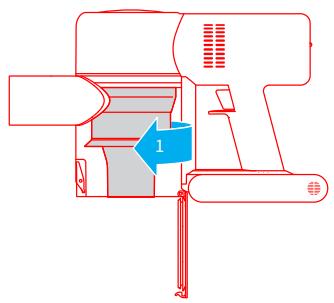
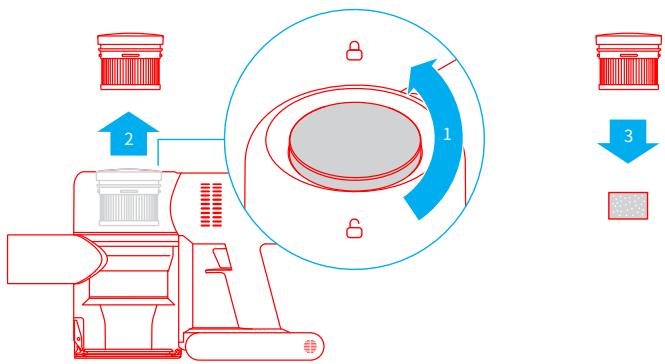
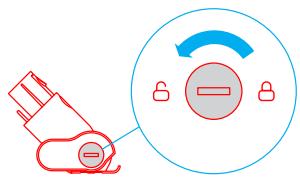
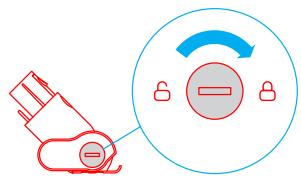
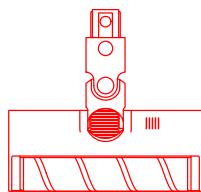
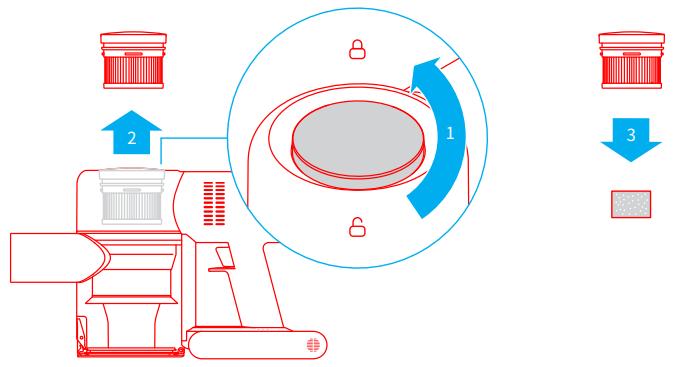
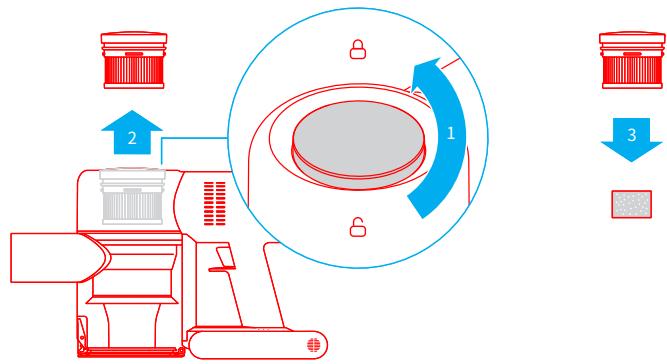
Cleaning the Cyclone Assembly
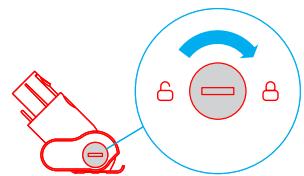
- Rotate the cyclone assembly in the direction illustrated to unlock it, then remove the cyclone assembly.

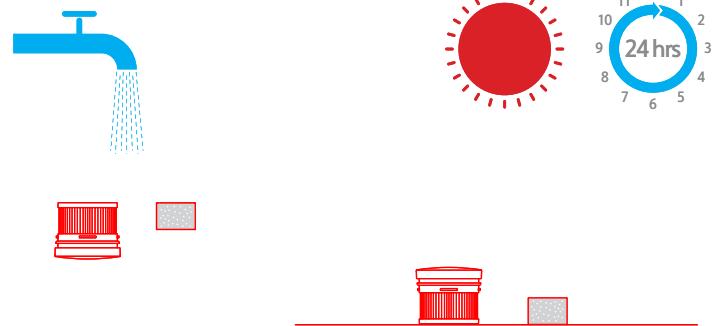
- Rinse the cyclone assembly with water until it is clean. To thoroughly dry the cyclone assembly, keep it in a ventilated or cool place for at least 24 hours. Caution: Do not clean the cyclone assembly in a dishwasher or washing machine, and do not attempt to dry it in a tumble dryer, oven, microwave, or near an open fire.
- Once it is dry, reinstall the cyclone assembly.


Care & Maintenance
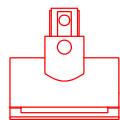
Cleaning the HEPA Filter Assembly
- Place the vacuum securely on a flat surface, then turn the HEPA filter assembly cover in the direction indicated and remove the HEPA filter assembly.
Note: Remove the built-in foam pad before cleaning the HEPA filter assembly. Rinse the HEPA filter and foam pad with water.
- Rinse the HEPA filter and foam pad with water. To thoroughly remove all dust caught in the filter, rotate the HEPA filter by 360 degrees while rinsing. Lightly tap the filter against a sink several times to remove any excess debris. Keep the HEPA filter in a well-ventilated and cool place to fully dry.
Note: Fully dry the filter (at least 24 hours) before reinstalling it.


Care & Maintenance
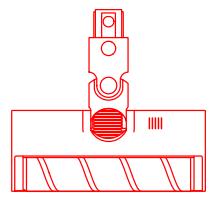
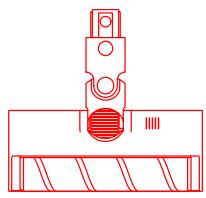
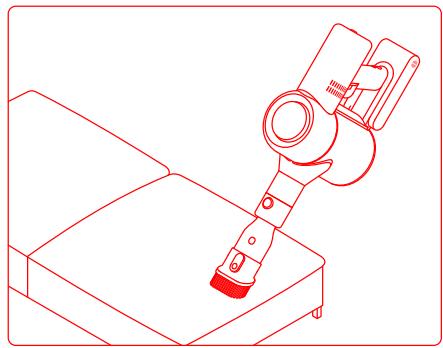
Cleaning the Soft Roller Nozzle and Mini-Motorized Nozzle
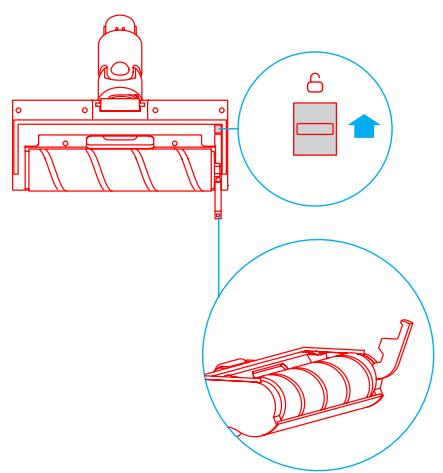
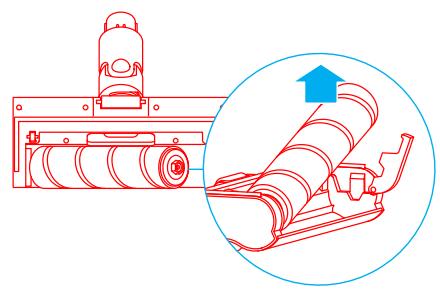
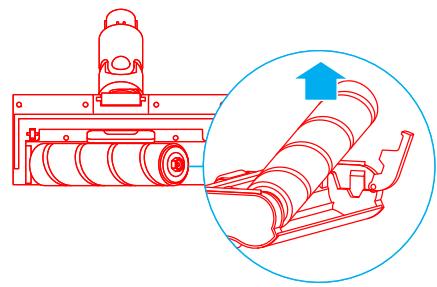
Note: To prevent injury from accidentally turning on the vacuum, make sure the Soft Roller Nozzle or Mini-Motorized Nozzle is detached from the vacuum before removing the head. The Mini-Motorized Nozzle and Soft Roller Nozzle contain electrical components, and the Soft Roller Nozzle head also contains bearings. Do not wash these parts with water. Be careful of sharp objects when removing debris caught in the heads of Soft Roller Nozzle and Mini-Motorized Nozzle.
Cleaning the Soft Roller Nozzle
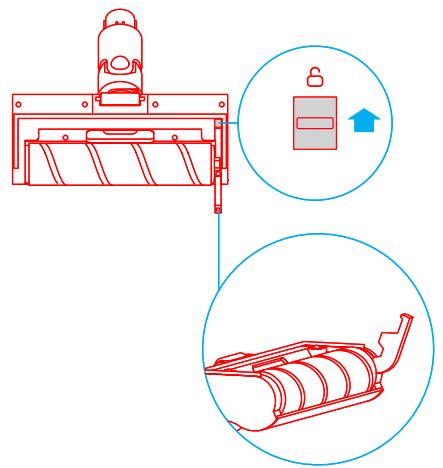
- Push the brushbar head release button in the direction of the arrow until the cover of the brushbar head pops to open, then remove the brushbar head by lifting it in the direction indicated.
- After you have finished cleaning the Soft Roller Nozzle, reinstall it by following the disassembly steps in reverse.
Care & Maintenance
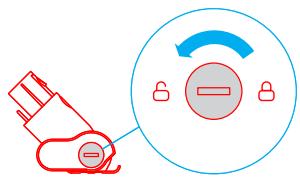
Cleaning the Mini-Motorized Nozzle
-
Use a coin as illustrated to rotate the lock counterclockwise until you hear a click.
-
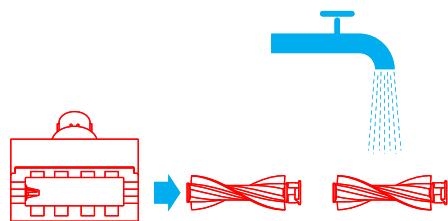
After unlocking the brush head, remove it from the Mini-Motorized Nozzle, then rinse and clean the brush head.
-
Stand the brush head upright in a well-ventilated area for at least 24 hours until it is fully dry.
-
Once the Mini-Motorized Nozzle is dry, reinstall it by following the disassembly steps in reverse.


Troubleshooting
If the vacuum is not working properly, please refer to the troubleshooting table below.
| Errors | Possible Causes | Solutions |
| Vacuum does not work | Vacuum is out of battery or low on power. | Fully charge the vacuum, then resume use. |
| Overheat protection mode triggered by a blockage. | Wait until the vacuum cools down, then reactivate it. |
| Suction opening or airway passage is blocked. | Clear any blockages from suction opening or airway passage. |
| Weak suction force | Dust compartment is full and/or HEPA filter assembly is clogged. | Empty the dust compartment and clean the HEPA filter assembly. |
| Attachment is blocked. | Clear any blockages in the attachment. |
| Motor makes a strange noise | Main suction opening or extension rod is blocked. | Clear any blockages in main suction opening or extension rod. |
| The first indicator is red after turning on the vacuum | Battery is damaged. | Please contact the after-sales service department for maintenance. |
| The first indicator blinks red after turning on the vacuum. | Power adapter is incompatible. | Only use the original power adapter to charge the vacuum. |
| Battery indicator does not light up while charging | The adapter is not connected to the vacuum. | Make sure the power adapter is plugged in properly. |
| The battery is fully charged and went into sleep mode. | Can be used normally. |
| If the problem persists after ruling out the above two possibilities. | Please contact the after-sales service department for maintenance. |
| Charges slowly | Battery temperature is too low or too high. | Wait until the battery's temperature normalizes, then resume use. |
This product contains batteries that can only be replaced by qualified technicians or after-sales service.
This product contains batteries that are non-replaceable.

All products bearing this symbol are waste electrical and electronic equipment (WEEE as in directive 2012/19/EU) which should not be mixed with unsorted household waste. Instead, you should protect human health and the environment by handing over your waste equipment to a designated collection point for the recycling of waste electrical and electronic equipment, appointed by the government or local authorities. Correct disposal and recycling will help prevent potential negative consequences to the environment and human health. Please contact the installer or local authorities for more information about the location as well as terms and conditions of such collection points.

Tuyau couple extensible
Brosse douce
He nCnoIb3yIte IbIneocOc,IaIc6opA IeKOBOCnIaMeHЯUxxCsI rIropUoxX KIkoCTeI, TAKNX KAc 6eH3IN, OTeJIbAteJI, AMMNak, OUnCTnteJI Tpy6 N.T.
He nCnoIb3yIte nbIlecoc dIyIc6opacactnIgncokapToHa, neIIa (Hanpimep, ot KAMInHa) I dyIMaXxCsryIINrOpaXx MaTePnaJIOB (Hanpimep, yTJI, OkypKOB IIIN cNueK).
He nCnoIb3yIte IbIeNecoc IaIc6opA ocTpbIX N TBepDbIX npEiMeTOB, TAKNX KAK CTekNo, TBO3nI, BInTHbl IIN MoHETbl, KOToPbIE MOrY IOBpeINb YCTPOI CTBO.
He IONYCKaIte IonoIaIaHnB BOLOC, CbO6oIHOJ OeXbl, IaIbceB IN pyrNx YactTe TeNa B OTBepCTIa N DInkXyIeIeCSc YacTn IIeIeCocA. He HApPabJIte UHaHr, Tpy6Ky IIN IHCTpymEnIb IB CTOpOHy Ira3 IInu Yuwei Hne KlaInte IX ce6e B pot.
He klaaTe npedMeTb B oTBepCTnBtneococ. He nCnoJIb3yIte nbinecoc, ecn KaKoe- IIn6o OTBepCTne 3a6IokipobAoHo. He dOnyckaiTe nOJaDaHnI pyxA, BOIOc HIn DpyrNx npedMeTOB, KOToPbIE MOrTy UMeHbUnTb NOTOK BO3dYxa.
He octabnIte nbIeoc nHa cTyIe, cToIe IINI dpyrIx HeycToHnbix nobepxHocTEx, NockoJIbky 3TO MoKet cTaB npUHHoNIOBpeXdEHHa YcTpoiCTBa IINI TpaBMbl. Ecln nbIeoc 6bl NOBpeXdEHN B peZbTate pAeHHa IINI IMeET dpYrIyo HncCpABHocTb, o6paTIteCb B HAII ABTopu3OBAHHbI cepBnCHbI ceHTp. He nbITaIteCb pa3o6paTb yCTpoiCTBO CAMOCTOReTbHO.
Heo6xoJIMo CToPOr CTeIOBAt BcEM INHCTpyKUmI M IO 3aPJIke AkkymyIaTOpa, OINCAHNbIM B 3tOM pyKOBoOJcTBe. HEnpABInbHaJ 3apJaKa aKKymyIaTOpa BHe yKa3aHHoro TEMpePaTyPhOro Dnana30Ha MoKe TcTaB PrnHHO erO NobpejKeHnra.
IcnoJIb3yIte ToJIbKO OIO6peHHbIe KOMnAHnei Dreame npHaJnxHocTn i CMeHHbIe DeTAlN.
He nCnoIb3yIte nbIeococ,ecnB Hero He yctaHOJIeHb IuCTbI OTCek dIyIbIIN fIbItp.
Y6eIITecb, yTO nbIIECOC OTKIIUOyeH, ecN OH He NCIOJIb3yETcB TteYeHne IINIteJIbHOrO nepiOJa BpeMeHn, a TAKKe PpeJbblIOJIHeHnEM KAKOTO-JIN6O O6CJIyXnBAHnI INI peMOHTa.
BydTe Oc6eHNo OoctopoxKbI pRi NcPoiJb3OBAHm PbIeocca HaJIecTHnIe.
He yctaHabJIbAaIte, He 3apJkaIte n He IcNoJIb3yIte 3TO yCTpoIcTBO Ha yIInCe, B BaHHbIX KOMHaTAX I HA TeppnTOPIN BOKpyI 6acceHa.
Onachoctb Bo3ropahan. He nCnoIb3yIte apomatn3aTOpbl Iny fInbTp a binecoca.
ДанньштпnpolykTOB coidepXHT JERKOBOCJIaMeHЯIoUeCЯ XIMNKATbI, KOTOpbIe MOryT CTaTb пчHHOB BO3rOpaHЯ nbJIeCOca.
TOyCTPOIcTBOC3DAHO NCKHIOUHTeJIbHO JIA6bITOBOIOCNIOJIb3OBAHIN.
Mby, kompanhna Dreame Technology (Tianjin) Limited. noDTBepxJaem,чTo DAHHOe 606pyoobAHne COOTBeTCTByET Tpe6OBaHnAM BCEx DeiCTBYUcIX DInpeKTHB EC n Ebponecknx CtAndapTOB C n3MeHeHnA M N IOnOJIHeHnA M. PoiHbI TEKT DeKJIpaCmN O COOTBeTCTBnH HOpMaTINBHyIM Tpe6OBaHnAM EC DoCTyPeH Na OphiuaJbHom caITe KOMPANH: www.dreame.tech
O63op yctpoiCTBa
HaimehoBaHnaJeTaJIeN
O63op yctpoiCTBa
Akceccyapbi

LJIeIeBaHacaIka"2B1"

Hacaikka-1eTka"2B1"

3JAACTNUHbIMARKINUJIAH
LJIETKACMRAKIMBAJIKOM
3neKtpnuecka YeTka npOTINB KJIeSei

AanTeP nTAnHn

山
KpenlenieIy3apJkN xpaHeHn "2B1" (BkIIOUOa 2 BnHTa n 2DIO6eJIa)
Cxema yctaHOBKN nbIeocasaakceccyapOB

BctabIyTe, noka He ycIbIuIte 9eIyok

YcTaHOBKa KpePJIeHnI dIa3apIckn I xpaHeHnI "2 B 1"
- Kpenenne nien 3apkni xpaHnna "2 B 1" -3TO dONoHnTeJbHbI akceccyap, KOtOpBIO MOnHO yCTaHOBNTb pni HeO6XoDmOcTn.
- Kpenenne cneyeet yctHaBnBaTb B cyxom npoxlaHOM MeCTe, pIOM Cpo3eKoI, BdJIOn OT npraMbIX COJIHeuHbIX LyueN I NOdBepKeHHbIX BO3JeICTBNU Obln o6laCTe, TaKIN KaK KyxHЯ.
- HadejHo yctahOBHTe KpeJIeHHe c NOMOuIPOxOJaIeO IJy BbI6paHOrO Tnna CTehbMOHTaXHO O6OpUdOBaHnY. Y6eINTeCb, UTO B06NaCTu YcTAHOBKn Het Ra3OBbIX BOIOpOBOHbIX Tpy6, BeHTUNaIcNOHHbIX 1axT, 3JeKTPnuecknx npoBODob, Ka6eJen nnDpeHaXhBX Tpy6.
- Дя установки крpenлени pekomehуетс haнть пофеснонаиnpи Heo6xOIMOCt ИСпОЛьЗOBaТь 3aПИTHуO ODEжд, 3aПИTHые OЧКи IpyrOe 3aПИTHoe 6obopydOBaHne.
5.CnmoaBIO 3eKtpueckoI dpenl OTMeTbe I npocBepInTe B HxHOM MeCTe Ha cTeHe DBA OTBepCTNJaMaTePOM 8 MM n fly6bHOn OKOLO 30 MM. BcTaBbTe JIO6eLn B OTBepCTNa, yCTaHOBtKe KpeJIeHne I npiKpeNte erO K cTeHe BVHTAMn N3 KOMJIeKta.
106cm
Инструкця
PpmeaHne.
HacdaKa-ueTka"2B1" pOxOJNTIy y6OpKnIbIIN KLeUeC KpOBaTeN,IMBAHO IN DpyToM Me6eBHO TKAHN.
LJETKa C MRAKIM BANIKOM: NOxOJDIT DIA Y60PK TBEpDlx NOBEPXHOCTeN, TAKNX KAK PON, PIIITKA, MPAMOP, a TAKXE DIA Y60PK KpynHbX qACTNu rpr3N mycopa. Kpome TORO, LETKY C MRAKIM BANIKOM MOXHO pINKpeINbI pRMO K Nblncoccy.

3JIaCTnHbIMRKMnIaHr: IcNoJIb3yIteIJIaOuCTKnTpyNDIOCTynhIxYrIIOB.
Pnnpmuehane.
Ecnkakra-n6o 13BpaaaiouXc8auchTei 3actpHnet, nIbeoc MoKet ABtomatueckn BIKIOUHTbcr. TTo6bl npdoJxntb nObn3oBaHne, ydaIIne BCE noctopOHnHe npedMeTb.
PiIeoc aotmatnuceKn bIKIOUChTc, KOrDa IBaTepatnepeHET pRexIM 3aunTb OT PepeRpeBa.
PdojXtne, noka Temnepatyta DbratateN HOPman3yET, npxeJe cem npdoJnxTb nCnObn3oBaHne.
YxOД n TexHnueckoe 6cIyXnBaHne
PekomeHdaCn
- IcnoJb3yIte opnHnHaJIbHbIe 3aIpaCTn, nHaue rapaHTnMoKet 6bITb aHHyJInpoBaHa.
- EcniФильТР ИИн HacaДka 3acopeпь, nbIeNocO npeKpaNT pa60TaTb cpa3y nocJIe BkHouEHHa. OuchTeФильТР ИИн HacaДky, yTo6bl npOdoJxNtB pa6Oty.
- Ecni nbilecoc He 6ydt NcnoIb3ObaTbcra B TeueHne IInTeIbHoro nepiOna BpeMeHN, OTKnIOUHTe aanTep nITAHN oT p03ETKn Ppi NpONHO 3apJKe i XpaHNTe eRO B npoxlaHoi cpeDe C Hn3KIM UPOBHe M BIAxHOctu BdaII ON pPmBix COJIHeuHbIX Jlyeu". ChTo6bl N36ExaTb NobpeXJeHn AKKMyIaTopa I3-3a Upe3MepHO pa3prkN, PoI3apJaxaIte nbilecoc 1 pa3 kaxdIbe 3 meca.
YnCTKa NbJIncocCa
IpoTpnte nbilecoc MraKo cyXoTKaHbIO.
OuICTKa OTCEKa IJI PbJIIN
OToeDInHte aanTep nHTaHn, npeeklouhTe BbIKIooatEn bntaHnBnIeococB noJoxHe "BbKn".Pa6oTa nbIeococ yxudHtC, kOrda nbIeScOpNk 6ydt3aONHeNo OTMeTKn "MAX".OuCTHne PbIEc6OpNk, uTObI BOCCTaHOBnTb HopMaJIbHyO pa6OTu. UOCTHbNbIEc6OpNk, HaxMnTe KhoNkU3BLeueHnB Eero HIXHe' cactn, a 3aTEM onyctOoiHte erO coedePkmOoe.
YxOД n TexHnueeCKoe 6cIyXnBaHne
OuNCTKa LUKHOHHOR6JOKA
1.Повернite сиклоньн b6LOKВУka3aHHom HanpaBNeHn,чTO6bl pa36JokpoBaTb,a 3aTeM CHIMITE erO.

2.ПомьваiteцIKIOHbI 6JOK BOIOJ, NOKA OH He CTAHET YNCTbIM. YTO6bl TцATEJIbHO INPOCUITb CIKIOHbI 6JOK, OCTaBBte erO B INPOXJaHOM, XOPoJO IPOBETPnBaEMOM NOMEUeHNI NO KpaHNe Mepe Ha 24 Vaca.
BhIMMaHHe! He MoIte cIKIOHHb 6JIOK B NOCyDOMOeHOn IIN CTIPaJIbHO MAIuHHe, He PbITaIteCb CyUHTb eRO B CyUINKe, Neu, MKNPOBOHOBoN neu IN y OTKpbITOrO ORH.
3. Korgda LcklonHHbI 6nok BbICOXHET, yCTaHOBInTe erHa MecTo.


YxOД n TexHnueckoe 6cIyXnBaHne
Ouinctka 6loka HEPA-Фильстра
1.Помecnte nbilecoC ha 6e3oIacHyO,poBHyIO NOBepXHOCTb,3aTeM NOBepHnTe KpbliKy 6Joka HEPA-ФиьтраВУКa3aHHOM HAnpabJIeHnN I CHIMITE erO.
Примочаиме.песдочсковблokaHEPA-ФильтраснIMITEВСТроEHNYI peHONПACTOBYIO npOKlaДКу.ПрOMоTe HEPA-Фильтп и peHONПACTOBYIO npOKlaДКу BOДОИ.
2.ПюмоTe HEPA-ФильТу ипehoнлactOBую npoklaДу BOДОИ.ЧTOБы TцаTeьHo yДАЛТь BCIO 3a6bUshyOcг ПьIb, BO BpEМЯБЯ NOВОрaЧВAn TE HEPA-ФильТу по КруУ. Clerka noctuHTe ФильТpo NO pAKOBIne HeCKOLbKO pa3,чTOБы YДАЛТь OCTaВшnСя мсор. OCTaBBte HEPA-ФильТВ пoxладHom, xopoшо npobetprBaemom MeCTe,чTOБы OH ПОЛHOCtBu ВсICox.
He BnKOpNCTOByIte NINOCOC, kIzO B HbOrO He BCTaHOBJIeHi YIcTNI BiDcIK DJIra NIIy I fIbTp.
He 3aIIuAaiTe, He 3apJxJaIe Te i He BVKOpNCTOByIe IeI pIpcTpiH a ByIiCi, B BaHHnx KIMHatax i Ha TepNItopi HABKOJIo 6aceHy.
He6e3neka 3aogopnHn. He BvKnOpncTobyIte apomatn3aTopn dIy fijltpa nInococa.
Дани ТП ПЮДУКТВ МICTИТь Лergko3aIMMCTI XIMIKATN, як MOжт b CTATN npUHNO 3aRopAHHЯ ПINOCOCA.
Ze npictriin CTbopeH BnKIOUHO nIynoBTOBO BIKOPiCTAHN.
Mn, kompania Dreame Technology (Tianjin) Limited. niztbpjkyemo, 0o dahe o6laanHHB iDIOBIAE BIMORAM BCIX IIOCHN INPEKTHIB EC I EBPONEcBkNX CTAndapTIB 3i 3mHAMn TA IOnOBHennHMn. NOBHNI TEKCT DEKnapaui npo BiIDIOBIDHicTB HopmatNBHM BIMOrAM EC DocTyHNI Ha OphiuiHOMy caTI KOMPahii: www.dreame.tech
Orla npnctroo
HaMyeHyBaHHaTeTaeJe
Orla npnctroIO
Akececyapn

LiiHnHa hacaKa "2B1"

Hacanka-uzitka"2B1

EnactuHmM'aknIaHa
LITKA 3 M'AKIM BAJIKOM
EneKtpnHa zitKa npotu KliizB

AanTep XnBHeHHa

山naHr
Kpinnnna 3apnki 36epirannn "2B1"
(BkIIOUaIOU 2 rBnHTa i 2 IIO6eJIa)
yctahobka
Cxema yctaHOBkn nnloococaiakcecyapib

BCTABnIe,IOKINHe KnaHe

yctahobka
YctahOBKa KpinIeHHn IJy 3apIckn i 36epirAHn "2B1"
- KpɪnneHЯ不断增强 3apRANKI 36epirāHNA "2 B 1" - Ze doJatKOBi akceCyap, kYkMоxHaBCTaHOBiTI npH Heo6xjIDHOCTi.
- Kpinenne nci BCTaHOBNIbATn BCyXOMy npoxoJHOMy MiCi, npuy 3 po3eTKOIO, daJIeKO BiD pIpMIX COHAnHx npOMEHIB iPIMiUeHb NiBUNeHOI BOJorOCTI, TAKNX JK KyXHJ.
- HadiiHo BCTaHObIb KpIIneHn 3a DoNOMoIO BuINOBiDHO nla O6paHOrO TnY CTiH NMTaxHOrO o6laHaHn. IpekoHaIteC, lo B o6lacti yctaHOBKn HeMaE r30Bnx i BOOpobiDnHex Tpy6, BeHTnJIauiHnX uaxT, eNeKtpuHnX npoBoiB, Ka6eJIIB a6o DpeHaxnX Tpy6.
4.Дя усановки Крпленинсяpekomehуетсайноти npофсioна i npи Heo6xIDnoctiВИКОПСТОВУВATN 3axnCHN OДЯ, 3axnCHI OKyЯрTN a Iиhe 3axnche OБlaДнанн.
- 3a Доломою eнектуни дрлі вдз haчte i npocbeprinb B nOtpi6Homy micuHa CTHi DBa OTBOPиДiametpOM 8 MM i ГлбиHoHO 6Jln3bko 30 MM. BCTABTe IIO6eJI B OTBOpN, BCTAHOBiTB KpiPileHHI i npikpiniT b Ioro Do CTIn rBnHTAMn 3 KOMPNeKtY.

106cm
Ihctpykciia
PnIMtka.
1.Передпершим ВИКОПИСТAHнЯМ ПОВHICTOЗараздіть пINOLOC.Це заиме 6лзько 4гOND.
2. He BvKOpncTObuYTe nIIOcOsc nID uac 3apAdkn.
3. Trpivane BIKOPINCTAHNЯ PIIIOOCOBA TYPbOpexMIMI pIPI3BOIDNTBdo HarpIBaHNA aKymyIaTOPa i 36IbWeHnY acy 3apJkN. 3aueKaaiTe 30 xBNIIN, IooP NIOOCOC OxONOB, nepu Hix 3apJxKatNi Ioro.

Ihdkatop cTahny akymyjiaTopa
Bukl.

MirotoHH
YBiMkHYTN.

Hn3bkyipBHeB 3apyakymyToppa

MaJIke NOBHN pIeHb 3apJy acMyIyTopa

Cepenipieh bapny aykymytaTopa

TobHni pibeHb 3apJy akymylTopa
Pmmtka. Hndkatop 3rache Hepee 5 XbvinH nicIa NOBHOZapdKn akymylToTa, a nnooc nepieDe b eheprooazadn pexim.
Iepn Hix npicntynatn do po60tn, npoHTaTe iHcTpykU3 TeXhIKe 6e3neK BcLbOMy KepiBnUcTBi KopNCTyaHa.
Ihctpykciia
BnKOpncTaanHpi3Hnx Hacaok
EeKtpnHa zitka npotn kniijb:
Cnblh NiB6pauii 3a6e3neuyi0b rnn6oKe OuMHENHJI DnI BnAJIeHNH KIIiUB iNNIY 3MaPuaic iTKAHINHX NOEpxOHJ.
Hacka-izitka"2B1"
PiiXoNITbIgI npi6npaHnI nnly i KJIiCIB 3 JIXOK, INBaHIB Ta iINHXM6JIeBOI TKAHNH.
EJaCTnHm'M'kN mJHaHr:
BVKOPNCTOBuyTe IJL OUYIeHH BAXKOIOCTyHINX MICb
LJIINHHa HacdaKa "2B1"
piXOaNTbIyI pIbIpaHnB I TpIiunHax, Kytax
IbVepei i BIKOH, HcXoJaqx i B IHux
BAJKOIOCTUYINHX MicJax.
LITKA 3 M'KIMBAJNKOM:
πiDxOДNTBДЯпибИРаHнТВерДnx NOBepxOHyb, TAKHX JIДNOrA, PIINTKa, МApMpy, a TAKOXДЯ 3iPbANHnBEiNkINxЧАntINOK 6pUy i CmITr. KpIM TORIOJITKY3M'KIMBaNlKOMMOXHa pNkpiTnnpaMoNoIINOCocA.
JaKIO nIIOOC He npaioe HAnlexHnHm YINHom, DInBItbCBy Ta6NIIO yCyHeHHeNCpPABHOCTi
HINXue.
| Послковскиеп�аоун
Послесoc не працюe | Можліві пічіні | Рішени |
| Ниькій ріві荫е зар\'яді о\'бі піл\'ococ
п\'ob\'и\'с'tо р\'o\'з\'ядіх\'еній | С\"р\'ob\'ьіп\'\'\'\'\
3\"р\'a\'dіntі піл\'ococ\\
a\'not\'m\
\"\'p\'od\'b\'x\'itіn\\"\'bik\'or\'i\'\
\"\'b\'u\'h\'\
3\"a\'ek\'ai\'e,\`\'p\'o\'n\'ococ\`oxol\'one\), a\
\"\'not\'m\
\"\'nob\'topno\\"y\'bim\'k\'it\).\ |
| В\'k\'lu\'e\'нін\'\'\'\
3\"a\'e\'e\'n\'ococ\`oxol\'one\), a\
\"\'not\'m\
\"\'nob\'topno\\"y\'bim\'k\'it\).\ | 3\"a\'e\'ak\'e,\`\'p\'o\'n\'ococ\`oxol\'one\), a\
\"\'not\'m\
\"\'nob\'topno\\"a\'k\'ib\'y\'t\`\
\"\'b\'u\'h\'\
3\"a\'e\'ak\'e,\`\'p\'o\'n\'ococ\`oxol\'one\), a\
\"\'not\'m\
\"\'nob\'topno\\"a\'k\'ib\'y\'t\`\
\"\'b\'u\'h\'\
3\"a\'e\'ak\'e,\`\'p\'o\'n\'ococ\`oxol\'one\), a\
\"\'not\' m\
\"\'nob\'topno\\"a\'k\'ib\'y\'t\`\
\"\'b\'u\'h\'\
3\"a\'e\'ak\'e,\`\'p\'o\'n\'ococ\`oxol\'one\), a\
\"\'not\'m\
\"\'nob\'topno\\"a\'k\'ib\'y\'t\`\
\"\'b\'u\'h\'\
3\"a\'el\'b\'n\'ococ\`oxol\'one\), a\
\"\'not\'m\
\"\'nob\'topno\\"a\'k\'ib\'y\'t\`\
\"\'b\'u\'h\'\
3\"a\'el\'b\'n\'ococ\`oxol\'one\), a\
\"\'not\'m\
\"\'nob\'topno\\"a\'k\'ib\'y\'t\`\
\";\\"b\'u\'h\'\
3\"a\'el\'b\'n\'ococ\`oxol\'one\), a\
\"\'not\'m\
\"\'nob\'topno\\"a\'k\'ib\'y\'t\`\
\";\\"b\'u\'h\'\
3\"a\'el\'b\'n\'ococ\`oxol\'one\), a\
\"\'not\'m\
\"\'nob\'topno \\"a\'k\'ib\'y\'t\`\
\";\\"b\'u\'h\'\
3\"a\'el\'b\'n\'ococ\`oxol\'one\), a\
\"\'not\'m\
\"\'nob\'topno\\"a\'k\'ib\'y\'t\`\
\";\\"b\'u\'h\'\
3\"a\'el\'b\'n\'ococ\`oxol\'one \>, a\
\"\'not\'m\
\"\'nob\'topno\\"a\'k\'ib\'y\'t\`\
\";\\"b\'u\'h\'\
3\"a\'el\'b\'n\'ococ\`oxol\'one\), a\
\"\'not\'m\
\"\'nob\'topno\\"a\'k\'ib\'y\'t\`\
\";\\"b\'u\'h\'\
3\"a\n\'e\'b\'n\'ococ\`oxol\'one\), a\
\"\'not\'m\
\"\'nob\'topno\\"a\'k\'ib\'y\'t\`\
\";\\"b\'u\'h\'\
3\"a\n\'e\'b\'n\'ococ\`oxol\'one\), a\
\"\'not\'m\
\"\'nob\'topno\\"a\'k\'ib\'y\'t \`\
\";\\"b\'u\'h\'\
3\"a\n\'e\'b\'n\'ococ\`oxol\'one\), a\
\"\'not\'m\
\"\'nob\'topno\\"a\'k\'ib\'y\'t\`\
\";\\"b\'u\'h\'\
3\"a\n\'e\'b\'n\'ococ\`oxol\'one\), a\
\"\'not\'m
\"\'nob\'topno\\"a\'k\'ib\'y\'t\`\
\";\\"b\'u\'h\'\
3\"a\n\'e\'b\'n\'ococ\`oxol\'one\), a\
\"\'not\'m
\"\'nob\'topno\\"a\'k\'ib\'y\'t\`\
\";\\"b\'u\'h\'\
3\"a\n\'e\'b\'n\n\'ococ\`oxol\'one\), a\
\"\'not\'m
\"\'nob\'topno\\"a\'k\'ib\'y\'t\`\
\";\\"b\'u\'h\'\
3\"a\n\'e\'b\'n\n\'ococ\`oxol\'one\), a\
\"\'not\'m
\"\'nob\'topno\\"a\'k\'ib\'y\'t\`\
" |
| Сл\'а\'ьnot\'у\'н\'с\'ьВCMOKТУВАнHA | Пл\'о\'3\'ip\'ніk 3\'a\'o\'n\'ь\'нін\'а\
6\'л\'ok HEPA-\`ф\'л't\rа. | 3\"b\'il\'h\'\"\
\"\'p\'o\'n\'o3\'bip\'nіk i o\'ch\'t\`{\`bok\}HEPA-\`ф\'l't\rа. |
| Hac\'adka 3\'ab\'o\'kOBaHa. | О\'ch\'t\`{\`hac\'adka\}Bid\`cm\`tt\` |
| Двігун відаі дівіні
ш汞 | О\'chOBHNY O'TBIP DIA BCMOKТУВАнHA a\(60\) shanr\`3a6\'nokob'HaH. | О\'ch\'t\`{\`chOBHNY O'TBIP DIA BCMOKТYВANH YA 60
shanr\`Bid\`cm\`tt\` |
| П\'ер\'иін\'дін\'а\'тOPRITb YerPBOHIM NICI
БКЛQUЕHNY PIILOSCOA | Ак\'у'MЯлгТОпошkoДж\'e.\` | З\'ber\'h\`{\`dopomorOko\`do\`bɪdɪny
nicl\'pədaxhNORO o'bclpy |
| П\'ер\'иін\'дін\'а\'тБИМЯDEЧЕВОМ NICI
БКЛQUЕHNY PIILOSCOA | Ад\'т\'рЖИВLEHNY HeCUMiCHy 3\"pricst\r{oem. | Він\'ор\'stobuyte T'ILBYO opriHINblHNY
ad\'т\'рЖИВLEHNY, zuob 3azp'djXATNI
piLIOsc. |
| I\'н\'дік\'атOP STANU
akymyJIATOPA He r\rOpITb
piДцAzar'daK | Ад\'т\'р He n'dkLIQUeHNY do
piLIOscOA | П\'e\'ko\`aItecya, zuo 6\'bok kivlneHNY
piДц'edHANO prabvnilho. |
| Ак\'у'MЯлгТОпошноэЗ\'aRavdIXeHNY i
ineri\\ssOB v cIplnyr pexIM. | П\'r\'stri\'p\`moxha\`Bikoprustobuybatn. |
| Ак\'у'MЯлгТОпошноэЗ\'aRavdIXeHNY i
ineri\\ssOB v cIplnyr pexIM. | Я\'ksuo Ye He yCyBaE pno6IeMny n\Ci\$n'BikKlIQUeHNY
dBox BiiueZeRaDAnHx MochJinBixx npriuHIn,
3\"ber\PiHTbCSa 3a dOpoloTOrO B
bIDdI NcIePraDaxHoro 06CbIpyOBuBaHNY. |
| П\'пстri\'За\'�дін\'а\'тБИМЯ
nobIJHo | Занад'tо nIzhБа a60 3aHaIqTO BIVSOKA
TeMnepatypa akymyJIATOPa | За\'e\'ka\`te,poKx Tempepatypa akymyJIATOPa
HOPMaiIzIyIBycS, a NotIM prOdoBxJyIte
BIVKOPICTAHNY. |
LcI npictpri miCtntb akmyJrTOpn, rki NOBHHI 3AMiHOBaTI TIlbkN KBaJIΦIKOBaHI faxibci a6o faxibci bIDiny nicIpaDaxHoro 06cIyROBaBHn.
LcI npicpiiMiCTntb He3miHHi AkymyIaTOPn.
aegaae aal allll lal lal lal HEPA jda ae gao cbe jai sssn bgsge jol kssall
.HEPA
HEPA jilb jilb jilb. HEPA jilb ic gaa jilb jilb jilb jilb jilb jilb jilb jilb jilb jilb jilb jilb jilb jilb jilb jilb jilb jilb jilb jilb jilb jilb jilb jilb jilb jilb jilb jilb jilb jilb jilb jilb jilb jilb
360 JHEPA jIJI rJrJrJrJrJrJrJrJrJrJrJrJrJrJrJrJrJrJrJrJrJrJrJrJrJrJrJrJrJrJrJrJrJrJrJrJrJrJrJr
a 1
Lalai 124 24 24 24 HEPA
AaJi 1 J (j) 24
a
a a a a a a a a a a a a a a a a a a a a a a a a a
a 1 1 1 1 1 1 1 1 1 1 1 1 1 1 1 1 1 1 1 1 1 1 1 1 1 1 1 1 1
Jalao de aelil albawl lslj jg w jy
a 124 a 125 a 126 a 127 a 128 a 129 a 130 a 131 a 132 a 133 a 134 a 135 a 136
Lill
aoclll 1jgbsy1 sly jgac
a aaa aaa aa aaa aaa aaa aaa aaa aaa aaa aaa aaa aaa
sally 1i 1
aee aee eae
3.3.2.1.2.2.2.2.2.2.2.2.2.2.2.2.2.2.2.2.2.2.2.2.2.2.2.2.2.2.2.2.2.2.2.2.2.2.2.2.2.2.2.2.2.2.2.2.2.2.2.2.2.2.
aiaia aiaaa aaiaaaaaaaaaaaaaaaaaaaaaaaaaaaaaaaaaaaaaaaaaaaaaaaaaaaaaaaaaaaaaaaaaaaaaaaaaaaaaaaaaaaaaaaaaaaaaaaaaaaaaaaaaaaaaaaaaaaaaaaaaaaaaaaaaaaaaaaaaaaaaaaaaaaaaaaaaaaaaaaaaaa
Lalai jia jia jia jia jia 24 25


a
y
y
cicililililililililililililililililililil
a
a
a aaa aaa aaa aa aaa aaa aaa aaa aaa aaa aaa aaa
Jluiuuiuuiyue ciuyiuiyue ciuiiuie