PIXMA MP750 - Inkjet multifunction printer CANON - Free user manual and instructions
Find the device manual for free PIXMA MP750 CANON in PDF.
| Product type | Multifunction inkjet printer (print, copy, scan, fax) |
| Brand | Canon |
| Model | PIXMA MP750 |
| Dimensions (L × W × H) | Approx. 445 × 365 × 205 mm |
| Weight | Approx. 9.5 kg |
| Power supply | 220-240 V AC, 50/60 Hz (or 110-120 V depending on region) |
| Power consumption | Approx. 15 A (max) at 120 V |
| Print type | Color inkjet (5 tanks: black, photo black, cyan, magenta, yellow) |
| Max print resolution | 4800 × 1200 dpi (optimized) |
| Supported paper sizes | A4, Letter, 4×6", 5×7", 8.5×11", envelopes, etc. |
| Automatic document feeder (ADF) capacity | Up to 35 sheets (A4/Letter, 20 lb) |
| Scanning | Color and B&W scanning, resolution up to 1200 dpi (optical) |
| Copying | Functions: borderless copy, duplex, 2-in-1, collate, repeat |
| Fax | Super G3 (33.6 kbps), speed and abbreviated dialing, automatic reception |
| Connectivity | USB 2.0 (Type B), PictBridge (direct camera connection), RJ11 telephone line |
| Display | Backlit LCD screen |
| Duplex printing | Automatic (built-in duplex unit) |
| Maintenance | Replaceable print head, individual ink tanks (no cartridge) |
| Safety | Automatic shut-off, surge protection, detailed safety instructions in manual |
| Cleaning | Print head cleaning via menu, automatic alignment, external cleaning with damp cloth |
| Repairability | Spare parts available (print head, ink tanks, tray, etc.); repair by authorized center recommended |
| General information | ENERGY STAR certified, Exif Print compatible, manual available in multiple languages |
Frequently Asked Questions - PIXMA MP750 CANON
User questions about PIXMA MP750 CANON
0 question about this device. Answer the ones you know or ask your own.
Ask a new question about this device
Download the instructions for your Inkjet multifunction printer in PDF format for free! Find your manual PIXMA MP750 - CANON and take your electronic device back in hand. On this page are published all the documents necessary for the use of your device. PIXMA MP750 by CANON.
USER MANUAL PIXMA MP750 CANON
This manual is copyrighted by Canon Inc. with all rights reserved.
Under the copyright laws, this manual may not be reproduced in any form, in whole or in part, without the prior written consent of Canon Inc.
© 2004 Canon Inc.
Disclaimer
Canon Inc. has reviewed this manual thoroughly in order that it will be an easy-to-use guide to your Canon MP780/750 Series. All statements, technical information and recommendations in this manual and in any guides or related documents are believed reliable, but the accuracy and completeness thereof are not guaranteed or warranted, and they are not intended to be, nor should they be understood to be, representation or warranties concerning the products described.
Specifications are subject to change without notice.

As an ENERGY STAR partner, Canon Inc., has determined that this product meets the ENERGY STAR guidelines for energy efficiency.
All information regarding non-Canon products was compiled from publicly available information. No representation is made regarding the accuracy thereof.

Super G3 is a phrase used to describe the new generation of fax machines that use ITU-T V.34 standard 33.6 Kbps modems. Super G3 High Speed Fax machines allow transmission time of approximately 3 seconds per page which results in reduced telephone line charges.
- Approximately 3 seconds per page fax transmission time based on Canon FAX Standard Chart (Standard Mode) at 33.6 Kbps modem speed.
The Public Switched Telephone Network (PSTN) currently supports 28.8 Kbps modem speeds or lower, depending on telephone line conditions.
Exif Print
This machine supports Exif 2.2 (also called "Exif Print"). Exif Print is a standard for enhancing the communication between digital cameras and printers.
By connecting to an Exif Print-compliant digital camera, the camera's image data at the time of shooting is used and optimized, yielding extremely high quality prints.
CE
This equipment conforms with the essential requirements of EC Directive 1999/5/EC. We declare that this product conforms with the EMC requirements of EC Directive 1999/5/EC at nominal mains input 230V , 50Hz although the rated input of the product is 200V - 240V , 50/60Hz . If you move to another EU country and are experiencing trouble please call the Canon Help Desk.
(For Europe Only)
Trademarks
- Canon is a registered trademark.
- PIXMA is a trademark of Canon Inc.
- Microsoft® and Windows® are registered trademarks of Microsoft Corporation in the U.S. and other countries.
- Macintosh, Mac and the Mac logo are registered trademarks of Apple Computer, Inc., registered in the U.S. and other countries.
- All other product and brand names are registered trademarks or trademarks of their respective owners.
How To Use The Documentation Provided
Easy Setup Instructions (Printed documentation):
Be sure to read this sheet first.
This sheet includes instructions for setting up your machine and getting it ready for use.
User's Guide (Electronic documentation):
Read this guide when starting to use the machine.
After following instructions in the Easy Setup Instructions, read this guide for instructions on printing from your computer, direct photo printing from selected digital cameras,
FAX faxing, copying, and scanning. This guide is included as an HTML file on the Setup CD-ROM. To read this manual, click the icon appeared on your computer after installing the drivers.
This guide contains the following information:
-
Document Handling
-
Preparing Your Machine For Fax
-
Paper Handling
-
Sending Faxes
-
Copying
Receiving Faxes
-
Photo Printing
-
Becoming Familiar With The Software
Directly From A Digital Camera
-
Troubleshooting
-
Printing From Your Computer
Software Guide (Electronic documentation):
This guide is available on the Setup CD-ROM.
Refer to this guide for full instructions on printing, scanning, and FAX faxing (For Windows only) from your computer. This guide, also included as an HTML file on the Setup CD-ROM, describes each function in detail, as well as the methods of using the MP Drivers, MP Navigator and the Fax driver. To read this manual, see the User's Guide. This guide contains the following information:
-
Printing
-
Scanning
Faxing
-
Advanced scanning
-
MP Navigator
Photo Application Guide (Electronic documentation):
This guide is available on the Setup CD-ROM.
This guide describes the utility software on the Setup CD-ROM, such as Easy-PhotoPrint and Easy-WebPrint, including instructions on how to scan data, various printing methods, and function details. Like the User's Guide, this guide is included on the Setup CD-ROM. To read this manual, see the User's Guide.
The FAX icon indicates items that are only applicable to MP780.
For how to CD-R printing, see User's Guide.
The electronic documentations may not be installed depending on the country of purchase. If not, copy the electronic documentations from "Manual" folder in Setup CD-ROM to your computer's hard disk.
How To Read The HTML Manuals
Various Web browsers are available for seeing HTML view and therefore the same text or image may appear different depending on the browser you use. The HTML manuals have been prepared on the assumption that it would be displayed and read under the following conditions:
For Windows:
- Web browser: Microsoft® Internet Explorer 5.0 or later
Web browser screen: Full screen - Resolution of display (Desktop): 800 × 600 pixels or above
Color amount of display: 16 bit or more
For Macintosh:
- Web browser: Microsoft® Internet Explorer 5.0 or later, Safari 1.0 or later
Web browser screen: Full screen - Resolution of display (Desktop): 800 × 600 pixels or above
Color amount of display: 32,000 or more - We recommend you use Safari as your browser to view the HTML manuals on Macintosh. If you don't have Safari, download it on Apple Computer Inc.'s homepage and install it.
Reading The Document
Symbols Used In This Guide
WARNING
Indicates a warning concerning operations that may lead to death or injury to persons if not performed correctly. In order to use the machine safely, always pay attention to these warnings.
CAUTION
Indicates a caution concerning operations that may lead to injury to persons or damage to property if not performed correctly. In order to use the machine safely, always pay attention to these cautions.
#
Indicates notes for operation or additional explanations. Reading these is highly recommended.
(See page nn)
Indicates a page number where additional information can be found.
FAX
Indicates items that are only applicable to MP780.
- (Operation branch title)
Used for an operation that can be performed in branch procedures.
- (Operation branch-step)
Used to explain each operation of a branch procedure.
Buttons Used In This Guide
[button name]
Text enclosed in these brackets indicates a button on the Operation Panel of the machine or an item on the computer to be manipulated. Example: [Color]
Text enclosed in these brackets indicates a message or selectable menu item which appears on the LCD (Liquid Crystal Display). Example:
Terms Used In This Guide
machine General term used to represent MP780/750.
default A setting that remains in effect unless you change it.
document The original sheets of paper, pages of a book, or photographs you copy, fax, or scan with the machine.
paper Paper on which you can print with the machine.
menu A list of settings from which you select an item to set up or change. A menu has a title which appears on the LCD.
Selecting The Language For The LCD
1 Press [Menu] repeatedly until <4 .SYSTEM SETTINGS> appears.
2 Use [<] or [> to select
3 Use [4] or [▶] to select the language, then press [OK].
Safety Information
Please read the safety warnings and cautions provided in this guide to ensure that you use your machine safely. Do not attempt to use the machine in any way not described in this guide. For detailed safety information, see User's Guide.
WARNING
You may cause an electric shock/fire or damage the machine if you ignore any of these safety precautions.
- Location
- Do not place the machine close to flammable solvents such as alcohol or thiners.
Power supply
- Never attempt to plug or unplug the machine from the power supply when your hands are wet.
- Always push the plug all the way into the power outlet.
- Never damage, modify, stretch or excessively bend or twist the power cord. Do not place heavy objects on the power cord.
- Never plug the machine into a power socket that is shared with other equipment (extension lead/cord, 2- or 3-way adapter, etc.).
- Never use the machine if the power cord is bundled or knotted.
- If you detect smoke, unusual smells or strange noises around the machine, immediately unplug the machine at the power supply and contact your local authorized Canon dealer or the Canon help line.
Using the machine in such conditions may result in fire or electrical shock.
- Periodically, unplug the machine and use a dry cloth to wipe off any dust or dirt collected on the plug and the power outlet.
If the machine is placed at a location exposed to a lot of dust, smoke, or high humidity, the dust collected on the plug absorbs moisture and may cause insulation failure and fire.
Maintenance
- Use a damp cloth to clean the machine. Never use flammable solvents such as alcohol, benzene or thinners. If flammable solvents come in contact with electrical components inside the machine, it could cause a fire or electrical shock.
- Always turn OFF the power and unplug the machine from the power outlet before cleaning the machine. If you accidentally switch the machine ON while cleaning it, it may result in injury or damage the machine.
- Handling
- Do not attempt to disassemble or modify the machine. There are no user serviceable parts inside the machine.
The machine contains high-voltage components. Never attempt any maintenance procedure not described in this guide. Incorrect maintenance procedures may damage the machine, or cause a fire or electrical shock.
- Do not use flammable sprays near the machine.
This could cause a fire or electrical shock if the spray comes into contact with electrical components inside the machine.
Others
- This product emits low level magnetic flux. If you use a cardiac pacemaker and feel abnormalities, please move away from this product and consult your doctor.
- When setting the machine near electric products with fluorescent lighting, separate the machine at least 5 7/8 inches (150 mm) from electric products equipped with fluorescent lighting. If you place it near to them, the machine may malfunction as a result of the noise emitted by the fluorescent lighting.
- When turning OFF the power, be sure to press [ON/OFF] and confirm that the Alarm Lamp has shut off. If you pull the power plug out of the wall outlet while the Alarm Lamp is lit or flashing, the print head is not protected, and you may not be able to print later.
CAUTION
You may cause injury or damage the machine if you ignore any of these safety precautions.
- Location
- Place the machine on a flat, stable, vibration-free surface that is strong enough to support its weight.
- Do not install the machine in a location that is very humid or dusty, in direct sunlight, outdoors, or close to a heating source. Installing in such a location may result in fire or electrical shock. To avoid the risk of fire or electrical shocks, install the machine in a location with an ambient temperature range of 41^ to 95^ ( 5^ to 35^ ) and humidity of 10% to 90% (condensation free).
- Do not place the machine on a thick rug or carpet. If fibers or dust come inside the machine, it could cause a fire.
Power supply
- Never remove the plug by pulling on the cord.
Pulling on the power cord may damage the cord and cause a fire or electrical shock. - Do not use an extension cord as this may result in fire or electrical shock.
- Ensure that the area around the power outlet is kept clear at all times so you can easily unplug the power cord if necessary. Otherwise you will be unable to disconnect the power plug in case of an emergency.
- Never use a power supply source other than the one rated for the machine in the country where you purchased the machine as it may result in fire or electrical shock.
The operating requirement of this machine is as follows:
110-120V AC, 50/60 Hz or 220-240V AC, 50/60 Hz (depending on local electrical requirements)
- Handling
- Close the Document Cover gently to avoid catching your hand. Failing to do so may result in personal injury.
- Do not press down hard on the Document Cover when using the Platen Glass to scan thick books. This may damage the Platen Glass and Document Cover, and/or result in personal injury.
- When moving the machine, carry the machine at both ends.
- Do not insert your hands into the machine while it is printing. Parts inside the machine are moving and this may result in injury.
- Do not turn the machine upside down. Ink may leak out and stain clothing or the surrounding area.
- Print head/Ink tanks
- For safety reasons, store print heads and ink tanks out of the reach of small children. If a child ingests any ink, consult a doctor immediately.
- Do not shake print heads or ink tanks. Ink may leak out and stain clothing or the surrounding area.
- Never touch the print head.
Legal Limitations On Use Of Your Product And Use Of Images
It may be unlawful to make copies of, scan, print or use reproductions of the following documents. The list provided is non-exhaustive. When in doubt, check with a legal representative in your jurisdiction.
- Paper money
Money orders
Certificates of deposit - Postage stamps (canceled or uncanceled)
- Identifying badges or insignias
- Selective service or draft papers
- Checks or drafts issued by governmental agencies
-
Motor vehicle licenses and certificates of title
-
Traveler's checks
- Food stamps
Passports - Immigration papers
- Internal revenue stamps (canceled or uncanceled)
- Bonds or other certificates of indebtedness
Stock certificates
Copyrighted works/works of art without permission of copyright owner
Users In Canada
Pre-installation Requirements For Canon Facsimile Equipment
A. Location
Supply a suitable table, cabinet, or desk for the machine. See the Appendix for the machine's specific dimensions and weight.
B. Order Information
- Provide only a single line touch-tone or rotary telephone set terminated with a standard 4-pin modular telephone plug. (Touch-tone is recommended if available in your area.)
- Order a CA11A modular wall jack, which should be installed by the telephone company. If the CA11A modular wall jack is not present, installation cannot occur.
- Order a normal business line from your telephone company's business representative. The line should be a regular voice grade line or an equivalent one. Use one line per machine.
DDD (Direct Distance Dial) line
-or-
IDDD (International Direct Distance Dial) line if you communicate overseas
NOTE
- Canon recommends an individual line following industry standards, such as the 2500 (touch-tone) or 500 (rotary/pulse dial) telephones. A dedicated extension off a PBX (Private Branch Exchange) unit without "Call Waiting" can be used with your facsimile unit. Button telephone systems are not recommended because they send non-standard signals to individual telephones for ringing and special codes, which may cause a fax error.
C. Power Requirements
The power outlet should be a two-prong grounded receptacle (Single or Duplex). It should be independent from copiers, heaters, air conditioners or any electric equipment that is thermostatically controlled. The rated value is 120 volts and 15 amperes. The CA11A modular jack should be relatively close to the power outlet to facilitate installation.
Notice
This equipment meets the applicable Industry Canada terminal Specifications.
Avis
Le present matériel est conforme aux specifications techniques applicables d'Industrie Canada.
Before installing this equipment, users should ensure that it is permitted to be connected to the facilities of the local telecommunications company. The equipment must also be installed using an acceptable method of connection. In some cases, the company's inside wiring associated with a single-line individual service may be extended by means of a certified connector assembly (telephone extension cord). The customer should be aware that compliance with the above conditions may not prevent degradation of service in some situations.
The Ringer Equivalence Number is an indication of the maximum number of devices allowed to be connected to a telephone interface. The termination on an interface may consist of any combination of devices subject only to the requirement that the sum of the RENs of all the devices does not exceed five.
Even if the dual-line option is installed, the REN is applicable to each port.
Avis
Repairs to certified equipment should be made by an authorized Canadian maintenance facility designated by the supplier. Any repairs or alterations made by the user to this equipment, or equipment malfunctions, may give the telecommunications company cause to request the user to disconnect the equipment.
Users should ensure for their own protection that the electrical ground connections of the power utility, telephone lines and internal metallic water pipe system, if present, are connected together. This precaution may be particularly important in rural areas.
CAUTION
- Users should not attempt to make such connections themselves, but should contact the appropriate electric inspection authority, or electrician, as appropriate.
- This Class B digital apparatus meets all requirements of the Canadian Interference-Causing Equipment Regulations.
- Cet apparéil numérique de la classe B respecte toutes les exigences du Règlement sur le matériel brouilleur du Canada.
Customer Technical Supports
Canon Canada Inc., offers a full range of customer technical support* options:
- For interactive troubleshooting, e-mail technical support, the latest driver downloads and answers to frequently asked questions (www.canon.ca)
- Automated interactive telephone support on most current products 24 hours, 7 days a week (1-800-652-2666)
- Free live technical support Mon - Fri 9am-8pm EST (excluding holidays) for products still under warranty (1-800-652-2666)
-
The location of the authorized service facility nearest you (1-800-652-2666)
If the problem cannot be corrected by using one of the above technical support options, repair options are available at the time of your call to the Free live technical support number above or via the website at www.canon.ca -
Support program specifics are subject to change without notice.
CANON CANADA INC.
1-800-652-2666
24 HOURS A DAY, SEVEN DAYS A WEEK
http://www.canon.ca
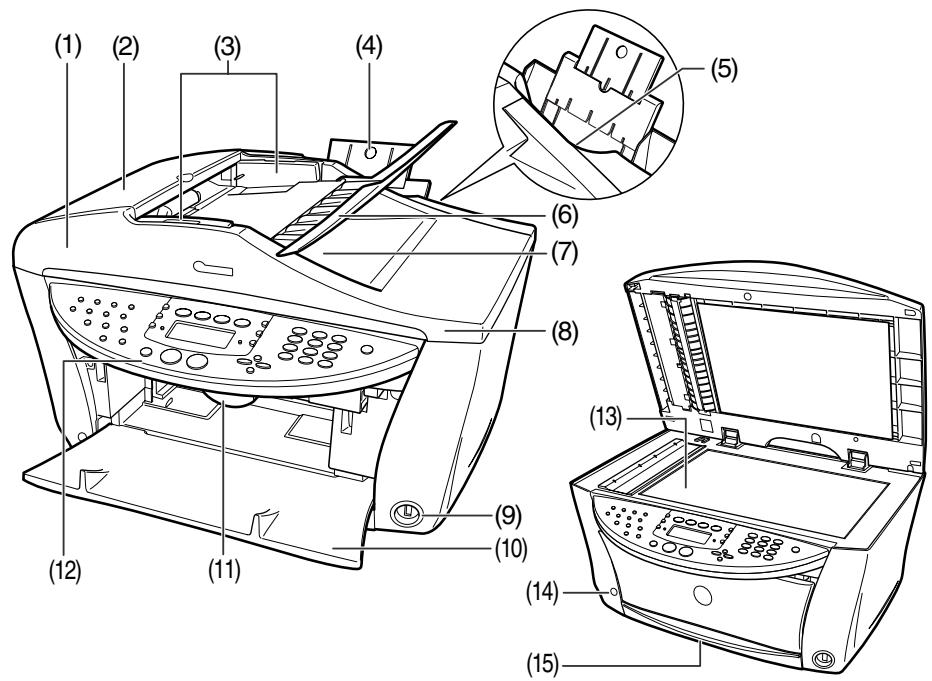
Main Components And Their Functions
MP780 is shown here.

- The Operation Panels for MP780 and MP750 are different.
Machine
- Front
(1) ADF (Automatic Document Feeder)
Automatically scans in documents loaded in the Document Tray.
(2) Feeder Cover
Open when clearing jammed documents.
(3) Document Guides
Adjust these guides to match the document width.
(4) Paper Support
Supports paper loaded on the tray. Extend it before loading paper by putting your finger in the rounded indent and pulling out the extension until it stops.
(5) Auto Sheet Feeder
Load paper here with the side to print onto facing up. Automatically feeds one sheet at a time from the Paper Support.
(6) Document Tray
Open to load a document. Once loaded, the document is fed one page at a time. Load the document with the side you want to scan facing up.
(7) Document Output Slot
Documents scanned from the Document Tray are delivered here.
(8) Document Cover
Covers the Platen Glass. Open this cover when loading a document on the Platen Glass.
(9) Direct Print Port (for digital camera)
Used to connect a PictBridge- or Canon Bubble Jet Direct-compatible digital camera or digital video camcorder to the machine when printing images directly from the camera. For details, see page 29.
(10) Paper Output Tray
Printouts are output to this tray. Open the tray before you start copying or printing, by pressing the Open Button. If closed, the tray will automatically open when the machine starts to copy or print.
When not being used, keep it closed in the machine.
(11) Scanning Unit Lever
Pull forward to open the Scanning Unit.
(12) Operation Panel
Displays the operating status of the machine. It is also used to change or check the settings of each function. For details, see page 18.
(13) Platen Glass
Used to load a document to be processed.
(14) Open Button
Press this button to open the Paper Output Tray accommodated in the machine.
(15) Cassette
Load paper here with the side to print onto facing down.
Rear view and interior
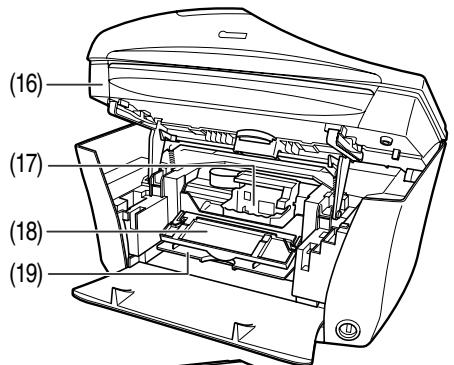
(16) Scanning Unit (Printer Cover)
Lift this unit until it locks into place when the Inner Cover 2 needs to be opened.
(17) Print Head Holder
Used to install a print head.
(18) Inner Cover 2
Open this cover when replacing the ink tanks, or clearing a paper jam.
(19) Inner Cover 1
Open this cover when replacing the ink tanks, or clearing a paper jam.
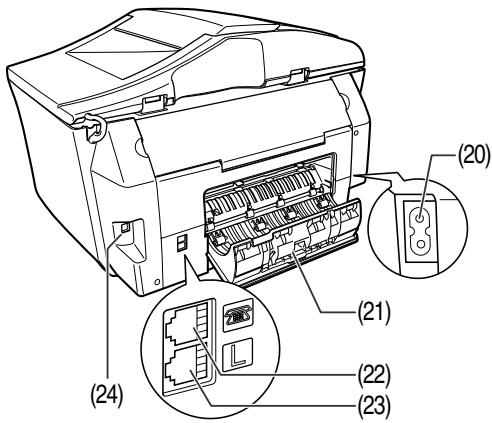
(20) Power Connector
Used to connect the power cord to the machine.
(21) Rear Cover
Open when clearing jammed paper.
(22) External Device Jack
Connects the external device.
(23) Telephone Line Jack
Connects the telephone line.
(24) USB Connector (for computer)
Used to connect the machine to a computer for scanning, printing, and other operations.
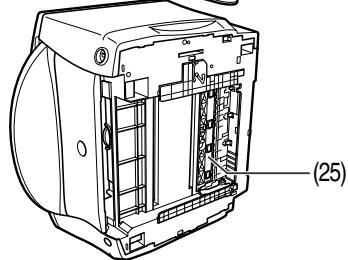
(25) Duplexing Transport Unit
Open to clear paper jams.
Operation Panel
MP780 is shown here.
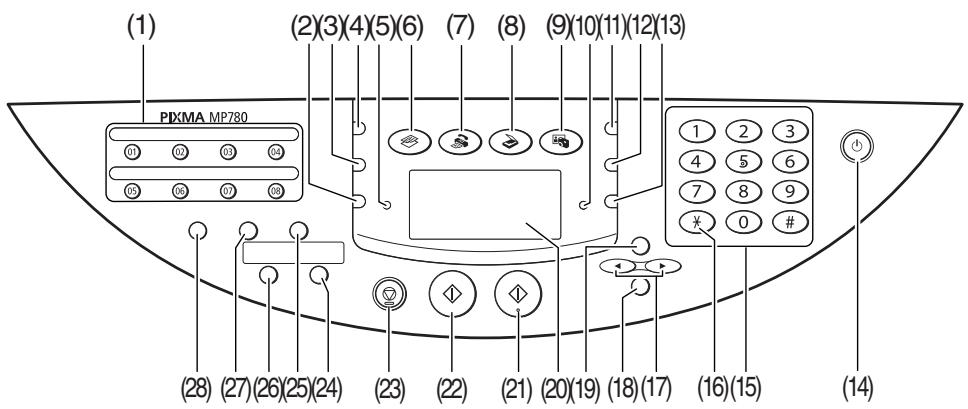
(1) FAX One-Touch Speed Dial Key
Push these buttons to dial pre-registered fax or telephone numbers.
(2) [Feed Switch]
Selects the paper source.
(3) [Image Quality]
Selects the copy resolution and FAX fax resolution.
(4) [Exposure]
Selects the copy exposure and FAX fax exposure.
(5) In Use/Memory Lamp
Flashes or lights during operation. Lights also when there are documents stored in the machine's memory.
(6) [COPY]
Switches the machine to copy mode.
(7) [FAX] [FAX]
Switches the machine to fax mode.
(8) [SCAN]
Switches the machine to scan mode. In scan mode, the machine scans a document to your computer according to the settings selected. This button is used when the machine is connected to a computer.
(9) [PHOTO]
Switches the machine to photo print mode.
(10) Alarm Lamp
Flashes when the machine is turned ON or OFF, when an error occurs, or when paper or ink has run out.
(11) [Enlarge/Reduce]
Sets the enlargement or reduction ratio for copying.
(12) [Collate]
Selects software collation (sorting).
(13) [Paper]
Selects the paper size and paper type for copying, and FAX for received faxes.
(14) [ON/OFF]
Turns the machine ON and OFF. Before turning ON the machine, make sure the Scanning Unit is closed.
(15) Numeric Keys
Enter numerical values such as the number of copies, as well as FAX fax/telephone numbers and characters.
(16) [FAX] [Tone]
Switches temporarily to tone dialing. Also changes the mode when entering characters.
(17) [ (-)] and [ (+)]
Scroll through menu selections, and increase or decrease the number of copies or the image file number.
(18) [OK]
Selects items in menus, and confirms selections. Restores the machine to normal operation if there is an error while printing or if paper jams. Ejects documents remaining in the ADF.
(19) [Menu]
Accesses the settings to customize operation of your machine.
(20) LCD (Liquid Crystal Display)
Displays messages, menu selections, and the operation status.
(21) [Color]
Starts color copying, or FAX faxing.
(22) [Black]
Starts black & white copying, or FAX faxing.
(23) [Stop/Reset]
Cancels operations and returns the machine to standby mode.
(24) [Two-Sided]
Selects two-sided copying.
(25) [FAX] [Hook]
Engages or disengages the telephone line.
(26) [2 on 1]
Selects 2 on 1 copying.
(27) [Coded Dial]
Press this button and a two-digit code to dial a pre-registered fax or telephone number.
(28) [FAX] [Redial/Pause]
Redials the last dialed number. Also enters pauses between or after numbers when dialing or registering numbers.
LCD (Liquid Crystal Display)
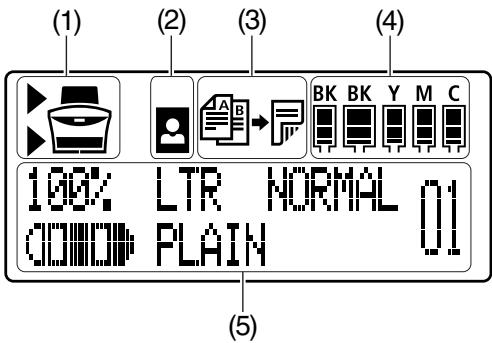
(1) Feed Switch
“▶” is displayed by the currently selected paper source. This is displayed above when the Auto Sheet Feeder is selected, or below when the Cassette is selected.
(2) Borderless/with border
Indicates whether a border should be applied. means without a border ("borderless").
(3) Two-sided copying
Displayed when two-sided copying is selected.
(4) Remaining ink
Indicates how much ink is left. Displays from the left in the following sequence: 6BK/3eBK/6Y/6M/6C. (See page 41 for ink tank installation instruction.)
(5) Messages
Displays messages, menu items, and the status of operations.
- Messages displayed on the LCD may differ, depending on the specification of your machine.
Document Requirements
| Platen Glass | ADF | |
| Document type | • Special types of paper • Photographs • Book • Documents that are not suitable for the ADF | Multipage documents of the same size, thickness, and weight |
| Size (W × L) | Max. 81/2×113/4in. (216×297 mm) | Max. 81/2×39 in. (216 mm×1 m) Min. 41/8×57/8in. (105×148 mm) |
| Quantity | • 1 sheet | • Max. 35 pages of A4- or letter-size sheets (20 lb. or 75 g/m2paper) • Max. 30 pages of legal-size sheets (20 lb. or 75 g/m2paper) • 1 sheet for sizes other than these |
| Thickness | Max. 3/4in. (20 mm) | 0.002 to 0.005 in. (0.06 to 0.13 mm) |
| Weight | — | 13 to 24 lb. (50 to 90 g/m2) |

Loading Documents
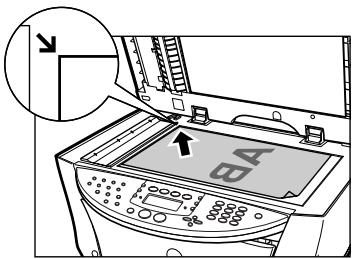
Using The Platen Glass
1 Lift the Document Cover.
2 Load your document on the Platen Glass.
Align the upper left corner of your document with the alignment mark on the upper left corner of the Platen Glass.
3 Gently close the Document Cover.
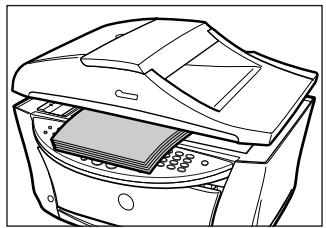
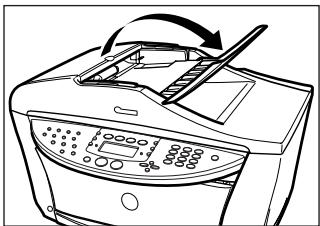
Using The ADF
1 Remove any documents from the Platen Glass.
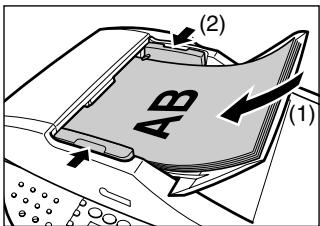
2 Open the Document Tray.
3 Load the document in the ADF (1).
4 Adjust the Document Guides to match the document width (2).
Recommended Paper And Requirements
| Media Type | Load Limit | |
| Auto Sheet Feeder | Cassette | |
| Plain paper | Approx. 150 sheets(17 lbs or 64 g/m2) | Approx. 150 sheets(17 lbs or 64 g/m2) |
| Envelopes | Approx. 10 envelopes | 5 envelopes |
| Super White Paper | Less than 1/2 in. (13 mm) thick | Less than 1/2 in. (13 mm) thick |
| High Resolution Paper | Approx. 80 sheets | Approx. 80 sheets |
| Glossy Photo Paper | 10 sheets (A4/Letter),20 sheets (4" × 6") | 10 sheets (A4/Letter),20 sheets (4" × 6") |
| Matte Photo Paper | 10 sheets | 10 sheets |
| Photo Paper Plus Glossy | 10 sheets (A4/Letter/5" × 7"),20 sheets (4" × 6") | 10 sheets (A4/Letter/5" × 7"),20 sheets (4" × 6") |
| Photo Paper Plus Double Sided | 10 sheets (A4/Letter/5" × 7") | 10 sheets (A4/Letter/5" × 7") |
| Photo Paper Plus Semi-Glossy | 10 sheets (A4/Letter/5" × 7"),20 sheets (4" × 6") | 10 sheets (A4/Letter/5" × 7"),20 sheets (4" × 6") |
| Photo Paper Pro | 10 sheets (A4/Letter),20 sheets (4" × 6") | 10 sheets (A4/Letter),20 sheets (4" × 6") |
| Transparencies | 30 sheets | 30 sheets |
| T-Shirt Transfers | 1 sheet | 1 sheet |
Auto Sheet Feeder And Cassette
Paper can be loaded into the machine at two locations: the Auto Sheet Feeder at the rear, and the Cassette at the front. To switch the paper source, press [Feed Switch]. The selected feeder is indicated on the LCD.
Loading Paper In The Auto Sheet Feeder
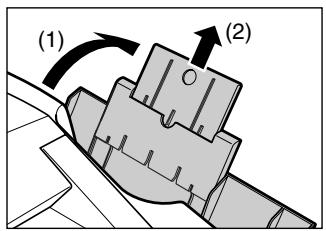
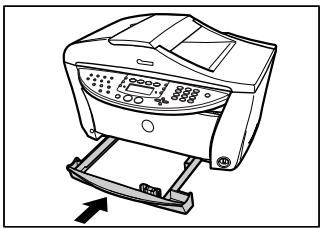
1 Open the Auto Sheet Feeder (1), then pull out the Paper Support (2).
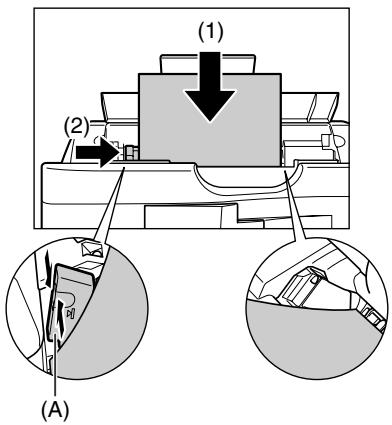
2 Place a stack of paper (print side up) in the Auto Sheet Feeder (1), and pinch the paper guide (A) and adjust it to the left side of the stack (2).
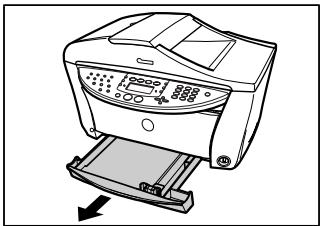
Loading Paper In The Cassette
1 Pull out the Cassette towards you.
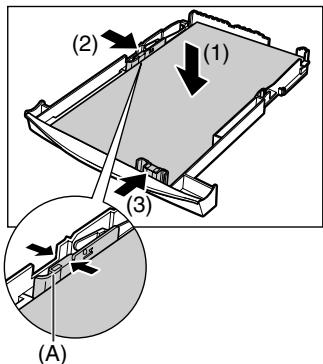
2 Load the stack of paper (print side down) (1). Grasp the paper guide (A) and align it to the left edge of the paper stack (2). Align the front edge of the paper stack in the same way (3).
3 Load the Cassette into the machine.
Making Copies
When making color or black & white copies, you can adjust the print resolution and density. You can also change reduction or enlargement settings. For more information, see User's Guide.
1 Load the document on the Platen Glass or the ADF.
2 Press [COPY].
3 Select the paper source with [Feed Switch].
4 Use [] or [] to select the number of copies, or enter the number using the Numeric Keys (max. 99 copies).
5 Adjust the settings for your document as necessary.
6 Press [Color] for color copying, or [Black] for black & white copying.
Advanced Copy Features
2 on 1 copying Reduces two document pages to fit onto one page. Press [2 on 1].
Two-sided copying Reduces two document pages to a single sheet of paper. Press [Two-Sided].
Collation Makes multiple copies of a document delivered in sorted sets. Press [Collate].
Borderless copying Copies color images so that they fill the entire page without borders.*
Repeating an Copies an image multiple times onto a single page.* image on a page
- For more information, see User's Guide.
5 Photo Printing Directly From A Digital Camera
Connecting a PictBridge compatible or Canon "Bubble Jet Direct" compatible digital camera or digital video camcorder to the MP780/750 enables you to print captured images directly without using a computer.
Connecting To A Digital Camera
1 Turn on the machine.
2 Select the paper source with [Feed Switch].
3 Load the paper in the Auto Sheet Feeder or the Cassette.
4 Make sure the camera is turned off.
5 Connect the camera to the machine using the USB cable (for connection to a computer) supplied with the camera.
The digital camera turns itself on automatically when the connection is established. If your model of camera does not turn itself on automatically, turn it on manually.
6 You are now ready to print images from the camera.
Examples Of Connecting The Machine
Connecting A Computer
Telephone line (analog)
Telephone or
Answering machine
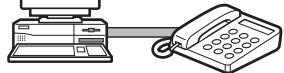
Connecting A Telephone Or Answering Machine
Telephone line (analog)
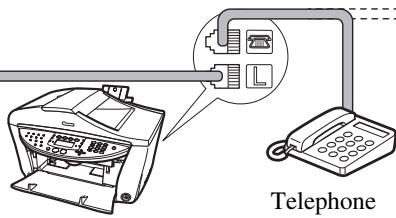
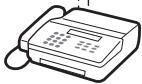
Answering machine
ADSL Connection
For details on ADSL connection and settings, see the manual supplied with your ADSL modem.
ISDN Connection
For details on ISDN connection and settings, see the manuals supplied with your terminal adapter or dial-up router.
Setting The Telephone Line Type
1 Press [FAX], then press [Menu].
2 Use [] or [] to select
3 Use [] or [] to select
4 Use [] or [] to select the telephone line type.
: Suitable for tone dialing.
-
5 Press [OK], then press [Stop/Reset].
Registering Sender Information
1 Press [FAX], then press [Menu].
2 Use [] or [] to select
3 Use [] or [] to select
4 Use the Numeric Keys to enter the date and time (in 24-hour format), then press [OK].
5 Use [] or [] to select
6 Use the Numeric Keys to enter your fax/telephone number (max. 20 digits, including spaces), then press [OK].
7 Use [] or [] to select
8 Use the Numeric Keys to enter your name (max. 24 characters, including spaces), then press [OK].
9 Press [Stop/Reset].
Registering One-Touch Speed Dialing Or Coded Speed Dialing

- There is also a group dialing method to send a document to all numbers in the registered group. For details, see User's Guide.
1 Press [FAX], then press [Menu].
2 Use [] or [] to select
3 Use [] or [] to select <1 -TOUCH SPD DIAL> or
-
If you select < 1 -TOUCH SPD DIAL>:
-
Use [▲] or [▶] to select a One-Touch Speed Dial Key (01 to 08) then press [OK] twice.
-
If you select
: -
Use [<] or [>] to select a coded speed dialing code (00 to 99) then press [OK] twice.
4 Use the Numeric Keys to enter the fax/telephone number you want to register (max. 40 digits, including spaces and pauses) then press [OK] twice.
5 Use the Numeric Keys to enter a name (max. 16 characters, including spaces) then press [OK].
6 Press [Stop/Reset] to return to standby mode.
Changing Or Deleting A One-Touch Speed Dial And A Coded Speed Dial
Follow this procedure:
- Follow the procedures from step 1 to 3 under "Registering One-Touch Speed Dialing Or Coded Speed Dialing".
To change a registered number:
- Use [] to delete the registered number.
- Use the Numeric Keys to enter the new number.
- Press [OK], then press [Stop/Reset].
To change a registered name:
- Press [OK] twice.
- Press and hold [ ] to delete the registered name.
- Use the Numeric Keys to enter the new name.
- Press [OK], then press [Stop/Reset].
- To delete an entire entry:
- Press and hold [▲] to clear the registered number.
- Press [OK], then press [Stop/Reset].
The name will automatically be deleted when you delete the number.
Setting Daylight Saving Time (Summer Time)
1 Press [FAX], then press [Menu] three times.
2 Use [] or [] to select
3 Use [<] or [> to select
- If you select <OFF> and press [OK]:
- Go to step 13.
- If you select <ON> and press [OK]:
- Go to step 4.
4 Press [OK] twice.
5 Use [▲] or [▶] to select the month when summer time starts, then press [OK] twice.
6 Use [▲] or [▶] to select the week when summer time starts, then press [OK] twice.
7 Use [▲] or [▶] to select the day when summer time starts, then press [OK] twice.
8 Use the Numeric Keys to enter the time (in 24-hour format) when summer time starts, then press [OK] three times.
9 Use [▲] or [▶] to select the month when summer time ends, then press [OK] twice.
10 Use [<] or [>] to select the week when summer time ends, then press [OK] twice.
11 Use [<] or [>] to select the day when summer time ends, then press [OK] twice.
12 Use the Numeric Keys to enter the time (in 24-hour format) when summer time ends, then press [OK].
13 Press [Stop/Reset].
Guidelines For Entering Numbers, Letters, And Symbols
1 Press [] to switch to uppercase letter mode (:A), lowercase letter mode (:a), or number mode (:1).
2 Use the Numeric Keys to enter a character. Press the button repeatedly until the character you want appears.
-
To enter two characters that are under the same button:
-
Press the Numeric Key, press [▶], then press the same Numeric Key again.
-
To enter a space:
-
Press [▶] twice.
In number mode, press [▶] once.
-
To delete a character:
-
Press [A].
-
To delete an entire entry :
-
Press and hold [<].
Without lowercase letter mode:
| Button | Letter mode | Number mode |
| [1] | 1 | |
| [2] | ABCabc | 2 |
| [3] | DEFdef | 3 |
| [4] | GHIghi | 4 |
| [5] | JKLjkl | 5 |
| [6] | MNOmno | 6 |
| [7] | PQRSpqrs | 7 |
| [8] | TUVtuv | 8 |
| [9] | WXYZwxyz | 9 |
| [0] | 0 | |
| [#] | -.*#!";::^_=/|?$@%&+(.){{}}<> | |
With lowercase letter mode:
| Button | Uppercase letter mode | Lowercase letter mode | Number mode |
| [1] | 1 | ||
| [2] | ABCÄÄÄÄÄÄÄEÇ | abcäáááãáeç | 2 |
| [3] | DEFDEÉEÉ | deföéèè | 3 |
| [4] | GH I I I I I | gh i i i i | 4 |
| [5] | JKL | jkl | 5 |
| [6] | MNONÖÖÖÖO | mnoñóóóðo | 6 |
| [7] | PQRSP | pQRSP | 7 |
| [8] | TUVÜUUÜ | tuvüúuú | 8 |
| [9] | WXYZ' | wxyzy | 9 |
| [0] | 0 | ||
| [#] | -.*#!",::^ _=/'?$@%&+([]{}\<> | ||
| [*] | Uppercase letter mode (: A) → Lowercase letter mode (: a) → Number mode (:1) | ||
Sending Methods
1 Load the document on the Platen Glass or the ADF.
2 Press [FAX].
3 Adjust the settings for your document as necessary.
4 Dial the recipient's number using the Numeric Keys or speed dialing.
5 Press [Color] for color sending, or [Black] for black & white sending.
One-Touch Speed Dialing
1 Press the One-Touch Speed Dial Key (01-08) that has been assigned the number you want to dial.
Coded Speed Dialing
1 Press [Coded Dial].
2 Use the Numeric Keys to enter the 2-digit code (00-99) assigned to the number you want to dial.
Receive Modes
If You Want To Receive Only Faxes Automatically With Your Machine, Or You Have A Dedicated Telephone Line For Fax Use Only:
-
Select
. -
When you receive a fax call:
The machine will receive the fax automatically.
- When you receive a voice call:
You will not be able to answer the call.
If You Receive Mainly Voice Calls And Sometimes Faxes, Or You Want To Receive Faxes Manually:
-
Select
. -
When you receive a fax call:
The telephone will ring. Pick up the handset and if you hear a beep, press [Black] or [Color] on the machine to receive the fax.
- When you receive a voice call:
The telephone will ring. Pick up the handset to answer the call.
- For remote receiving:
If you are far from your machine, dial 25 (the remote receiving ID) on your telephone to receive faxes.
If You Want To Receive Voice Messages On Your Answering Machine And Receive Faxes Automatically:
-
Select
. -
When you receive a fax call:
First the answering machine connected to your machine will respond to an incoming call, and then the machine will receive taxes automatically.
- When you receive a voice call:
The answering machine connected to your machine will respond to an incoming call.
If You Want To Receive Faxes Automatically As Well As Voice Calls:
-
Select
. -
When you receive a fax call:
The machine will receive the fax automatically.
- When you receive a voice call:
The machine will ring. Pick up the handset to answer the call.
If You Have Subscribed To A Distinctive Ring Pattern Detection (DRPD) Service With Your Telephone Company (US only):
- Select .
- When you receive a fax call:
- When you receive a voice call:
The machine will ring according to the ring pattern you have chosen and receive the fax automatically.
The machine will ring according to the ring pattern you have chosen. Pick up the handset to answer the call.
If You Have Subscribed To The Telstra FaxStream™ Duet Service (Australia only) Or The Telecom FaxAbility Service (New Zealand only):
- Select .
- When you receive a fax call:
The machine will ring and receive the fax automatically.
- When you receive a voice call:
The machine will ring. Pick up the handset to answer the call.
Setting The Receive Mode
1 Press [FAX], then press [Menu].
2 Press [OK].
3 Use [] or [] to select the receive mode.
4 Press [OK].
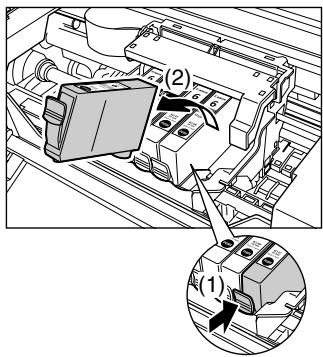
Replacing An Ink Tank
1 Make sure the power is turned ON.
2 Press the Open Button (1) to open the Paper Output Tray (2).
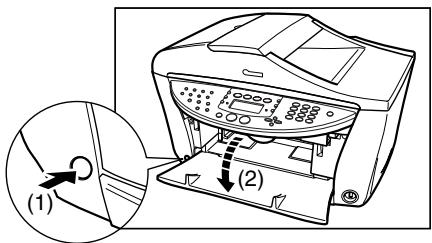
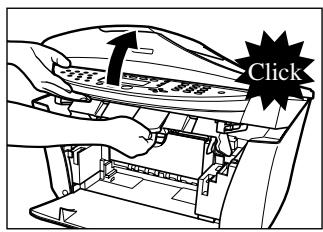
3 Lift up the Scanning Unit until it stops.
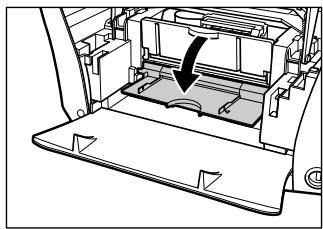
4 Open the Inner Cover 1.
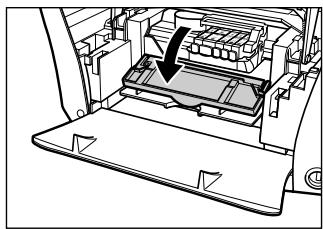
5 Open the Inner Cover 2.
6 Press the empty ink tank's tab (1), then remove it from the slot (2).
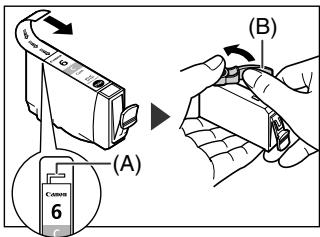
7 Remove the new ink tank from its packaging, then pull the orange tape toward the arrow so that the protective film does not remain on the air hole (A). Then hold the ink tank as shown and remove the orange protective cap (B).
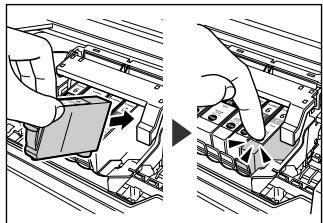
8 Insert the ink tank diagonally into the print head.
9 If you need to replace another ink tank, repeat steps 6 to 8.
10 Close the Inner Cover 2.
11 Close the Inner Cover 1.
12 Close the Scanning Unit.

Maintaining The Print Head
Cleaning The Print Head
1 Press [Menu] repeatedly until
2 Use [▲] or [▶] to select
3 Press [OK].
Aligning The Print Head Automatically
1 Load A4- or letter-size plain paper in the Auto Sheet Feeder.
2 Press [Menu] repeatedly until
3 Use [] or [] to select
4 The pattern is printed.
PIXMA
MP780 / MP750
Supports techniques client
(11) [Agrandissement/Réduction]
(23) [Stop/Restauration]
(28) [FAX] [Bis/Pause]
(18) Tapa interior 2
(19) Tapa interior 1
(28) [FAX] [Rediscar/Pausa]
-
Para introduzir bois caractères que seennent na mesma tecla:
-
Carregue na tecla numérica e em [▶],(before, after, before, after, after, after, after, after, after, after, after, after, after, after, after, after, after, after, after, after, after, after, after, after, after, after, after, after, after, after, after, after, after, after, after, after, after, after, after, after, after, after, after, after, after, after, after, after, after, after, after, after, after, After, After, After, After, After, After, After, After, After, After, After, After, After, After, After, After, After, After, After, After, After, After, After, After, After, After, After, After, After, After, After, After, After, After, After, After, After, After, After, After, After, After, After, After, After, After, After, After, After, After, A
-
Para introduzir um espaço:
-
Carregue dosas vezes em [B].
Ohta-ku, Tokyo 146-8501, Japan
Europe, Africa and Middle East
Canon Europa N.V.
P.O.Box 2262
1180 EG Amstelveen, Netherlands
Canon (U.K.) Ltd.
Woodhatch
Reigate
Surrey
RH2 8BF
United Kingdom
Canon Middle East FZ-LLC
P.O.Box 27616
Dubai
United Arab Emirates
email: info@canon-me.com
Nyherji HF
Skaftahlid 24
105 REYKJAVIK
Iceland
Telephone: +354 569 7700
Canon South Africa
POBox1782
HALFWAY HOUSE 1685
SOUTH AFRICA
General Phone number +27 11 265-4900
General Fax number +27 11 265-4954
Canon Communication & Image France S.A.