
L410 - Camera CANON - Free user manual and instructions
Find the device manual for free L410 CANON in PDF.
| Product Type | Multifunction device (fax, copy, print) |
| Brand | Canon |
| Model | L410 |
| Power supply | Mains power cord (230 V, 50 Hz) |
| Main functions | Copy, fax, print, scan (via PC), duplex, enlarge/reduce, sort, PC fax send, remote reception, multi-address transmission |
| Display | LCD display with keypad navigation |
| Paper handling | Paper feeder and cassette, standard sizes (A4, etc.) |
| Consumables | Replaceable toner cartridge |
| Maintenance and cleaning | Unplug before cleaning, use a damp (not wet) cloth, do not use alcohol or solvents |
| Safety | Use only the supplied power cord, do not use an extension cord, avoid humidity and heat sources, keep children away |
| Spare parts and repairability | User-replaceable toner cartridge; for other repairs, contact a Canon authorized technician |
| General information | Electronic manual on CD-ROM (Multi-lingual User Manual CD); manuals available in multiple languages; online support and FAQ |
Frequently Asked Questions - L410 CANON
User questions about L410 CANON
0 question about this device. Answer the ones you know or ask your own.
Ask a new question about this device
Download the instructions for your Camera in PDF format for free! Find your manual L410 - CANON and take your electronic device back in hand. On this page are published all the documents necessary for the use of your device. L410 by CANON.
USER MANUAL L410 CANON
PykoBODCTBO NO haaypa60tbI Ru
Початок роботи Uk
About the Supplied Manuals. 10
Navigating the Menu and Text Input
Method 10
Connecting the Power Cord and Turning
ON the Power. 11
Specifying the Initial Settings. 11
Specifying Initial Fax Settings and
Connecting a Telephone Cable. 11
Setting a Paper Size and Type 12
Installing the Driver / Software............12
Perform Useful Tasks 13
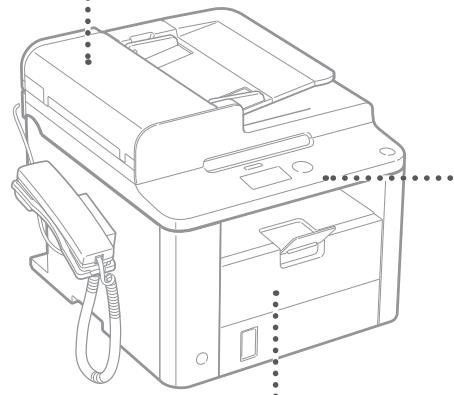
Clearing Paper Jams. 14
Replacing Toner Cartridge 15
Table des matieres
CbeHnO BxOaXuB KOMnJIeK
pyKOBODCTbax. 108
Ta yBIMKHeHH JINBLeHH 117
BctaHOBLeHHNoaTHOBHX
napaMeTpiB 117
3a3haeHHNoaTKOBn npaMeTpB
fakcy Ta niiKluoyehnTelefoHHoro
Kabelenio 117
UcTaHOBJIeHHHΦOpMaTy Ta Tnny
nanepy. 118
UcTaHOBJIeHnI DaPaHbepa
Ta nporpamHoro 3a6e3neueHHra.118
Hopnci yHKcii
UcyHeHHaMHnHaHHnHnanepy 120
3aHa KaTprnJa 3 ToHepom 121
Satures
Executive tarefas uteis .55
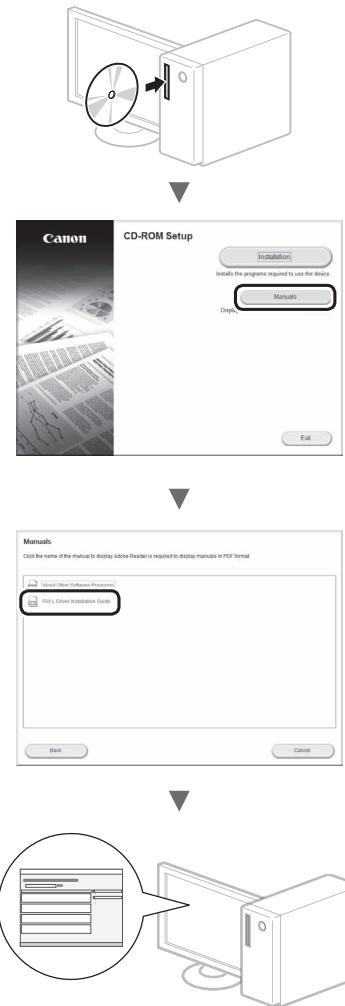
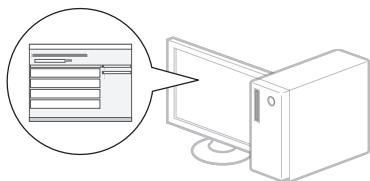
Read this manual first. This manual describes the installation of the machine, the settings, and a caution. Be sure to read this manual before using the machine.
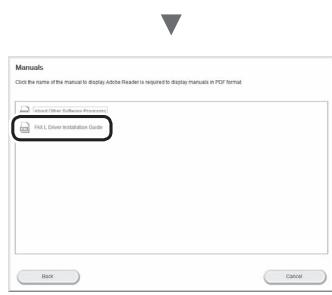
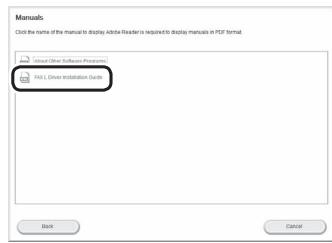
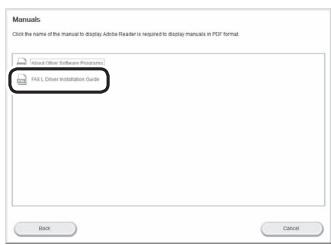
② FAX L Driver Installation Guide (User Software CD-ROM):
Read this manual next. This manual describes software installation.
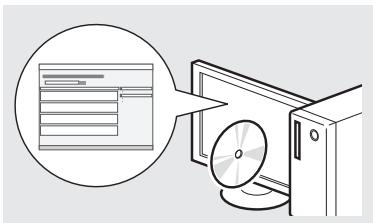
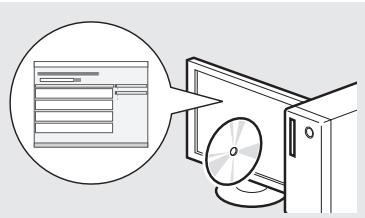
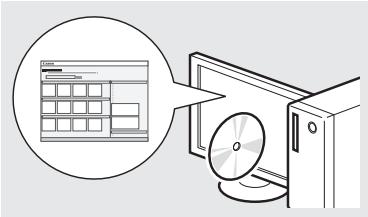
③ e-Manual
(Multi-lingual User Manual CD):
Read the desired chapter to suit your needs. The e-Manual is categorized by subject to find desired information easily.

Viewing the e-Manual from the CD-ROM
1 Insert the Multi-lingual User Manual CD in your computer.
2 Select your language.
3 Click [Display Manuals].
Depending on the operating system you are using, a security protection message appears.
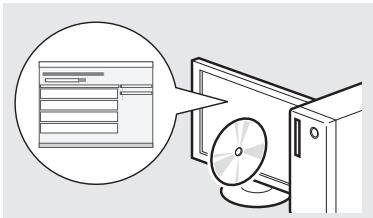
Navigating the Menu and Text Input Method
Navigating the Menu
Item selection or moving the cursor among the menu items
Select an item with [] or [] . Proceed to the next hierarchy with [OK] or [] . Return to the previous hierarchy with [ ] (Back) or [] .
Setting confirmation
Press [OK]. However, when
Text Input Method
Changing entry mode
Press [▼] to select
Entering text, symbols, and numbers
Enter with the numeric keys or [ # ] (SYMBOLS).
For details on the switchable mode or the available text, see the right side of this page.
Moving the cursor (Entering a space)
Move with [] or [] . Move the cursor to the end of the text and press [] to enter a space.
Deleting characters
Delete with [C] (Clear). Pressing and holding [C] (Clear) key deletes all characters.
Entering text, symbols, and numbers
| Entry mode: <aA> | Entry mode: <12> | |
| ① | @ . - _/ | 1 |
| ② | ABCabc | 2 |
| ③ | DEFdef | 3 |
| ④ | GHlghi | 4 |
| ⑤ | JKLjkl | 5 |
| ⑥ | MNOmno | 6 |
| ⑦ | PQRSpqrs | 7 |
| ⑧ | TUVtuv | 8 |
| ⑨ | WXYZwxyz | 9 |
| ⑩ | (Not available) | 0 |
| # | @ . / - _!? & $ %
( ) [ ] { } < > * += " , : ; ' ^ | \ | (Not available) |
Changing entry mode
| Entry mode | Available text |
| <aA> | Alphabet (capital and small letters) and symbols |
| <12> | Numbers |
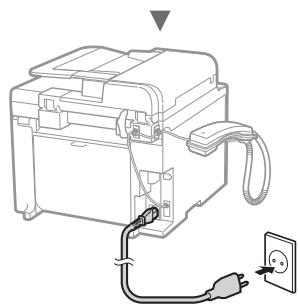
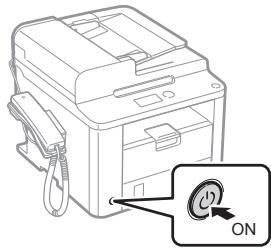
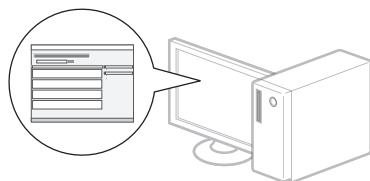
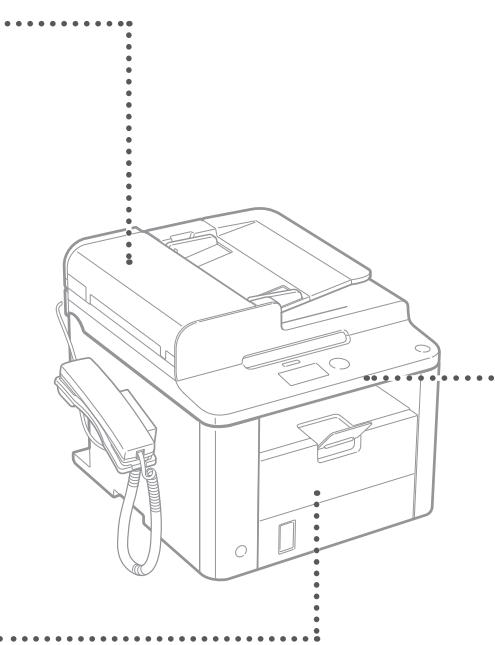
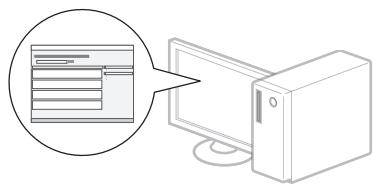
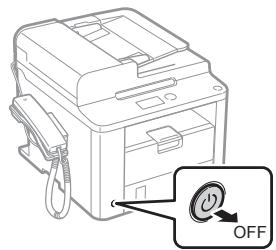
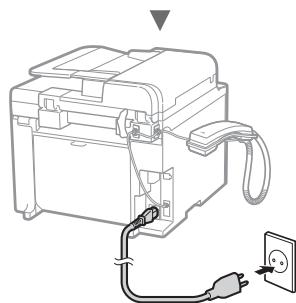
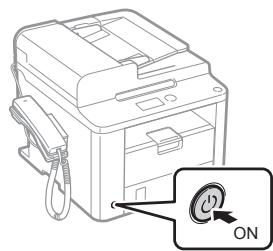
Connecting the Power Cord and Turning ON the Power
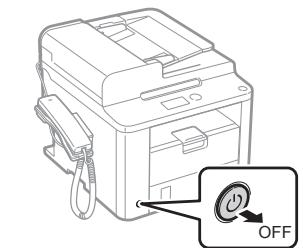
Do not connect the USB cable at this time. Connect it when installing software.
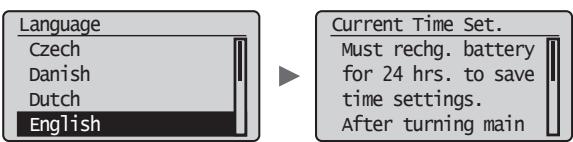
Specifying the Initial Settings
Follow the instructions on the screen, set the language and time. For details on navigating the menu and how to input the numbers, see "Navigating the Menu and Text Input Method" (P:10).
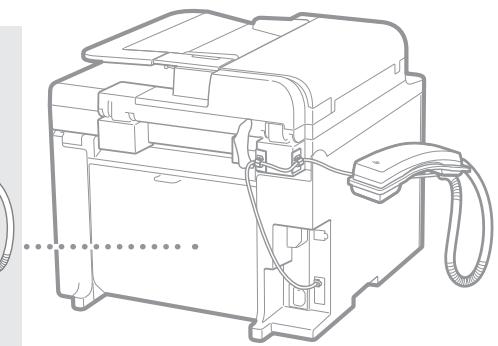
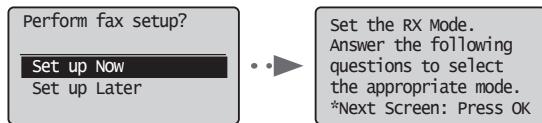
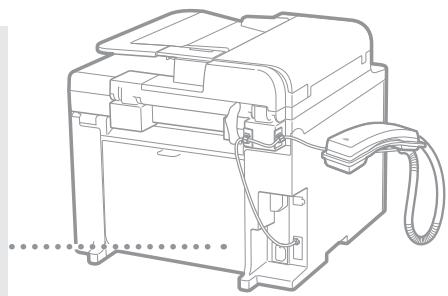
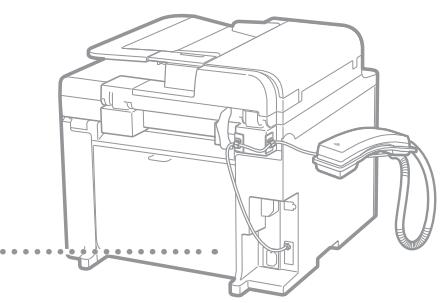
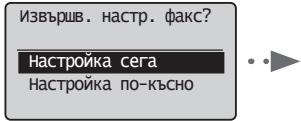
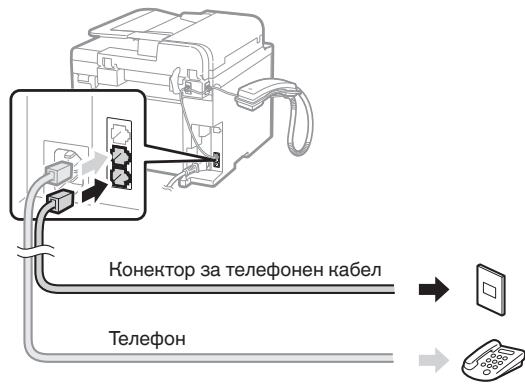
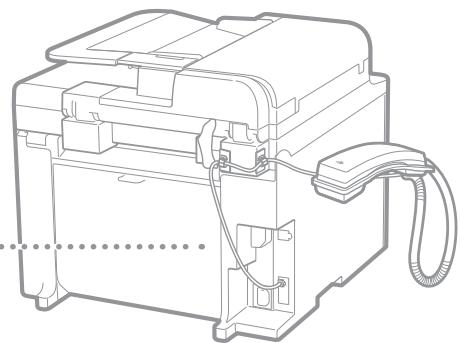
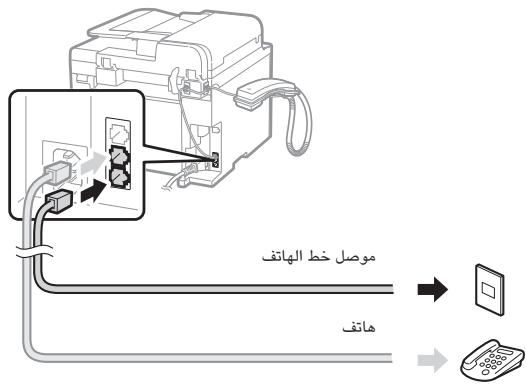
Specifying Initial Fax Settings and Connecting a Telephone Cable
1 Specify the initial fax settings.
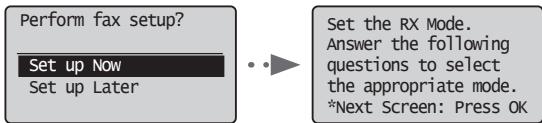
e-Manual "Fax" "Using the Fax Functions" "Receiving Faxes" "RX Mode"
Follow the "Fax Setup Guide" to specify a fax number, a unit name, and a receive mode. For more details on the receive mode, see the e-Manual.
How to use a username
When you send a document, the sender information that you registered is printed on the recipient's paper.
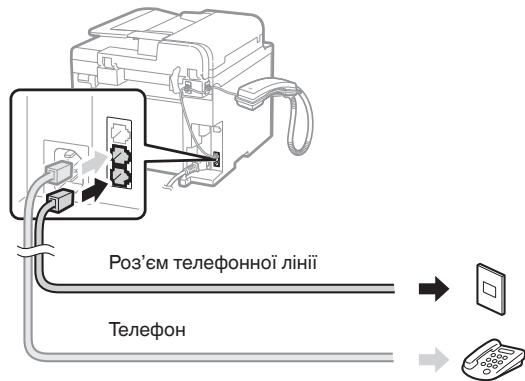
2 Connect a telephone cable.
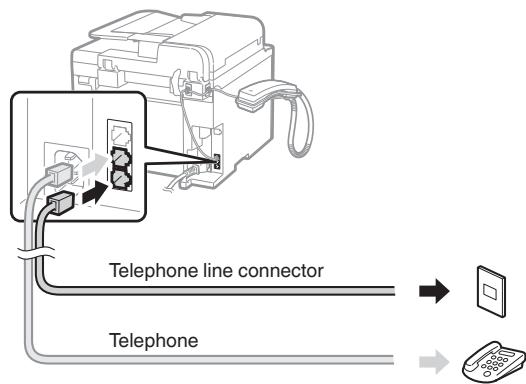
When
When installing the handset
For more details, see the supplied manual with the handset.
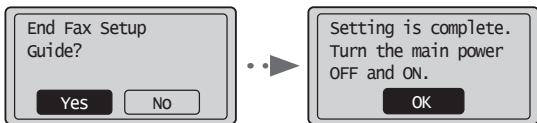
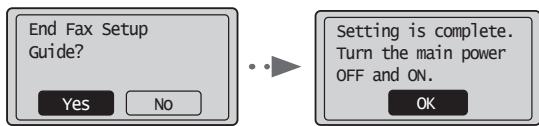
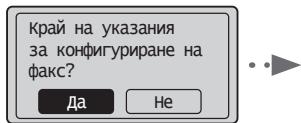
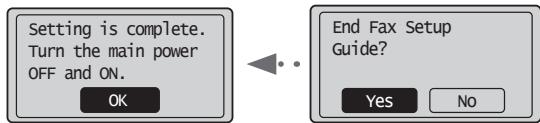
3 Exit the Fax Setup Guide, and then restart the machine.
e-Manual "Fax" "Using the Fax Functions" Changing Fax Settings (Settings that Can Be Specified Using the [Menu] Button") "Configuring Send Settings" "Select Line Type"
Turn OFF the machine and wait for at least 10 seconds before turning it ON again. The telephone line types are not detected automatically. See the e-Manual and set a telephone line manually.
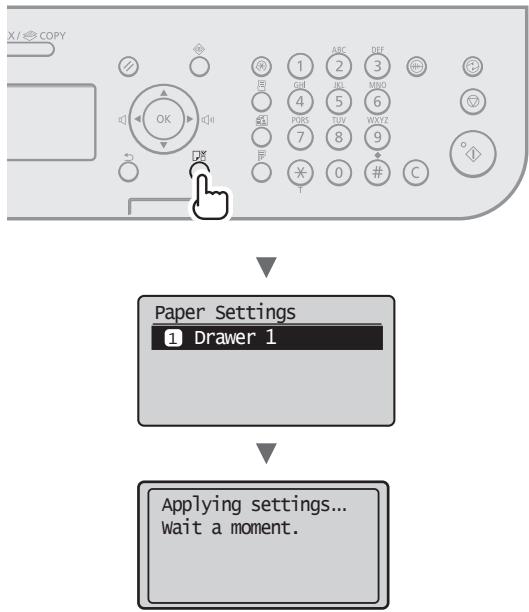
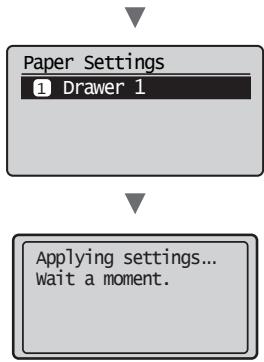
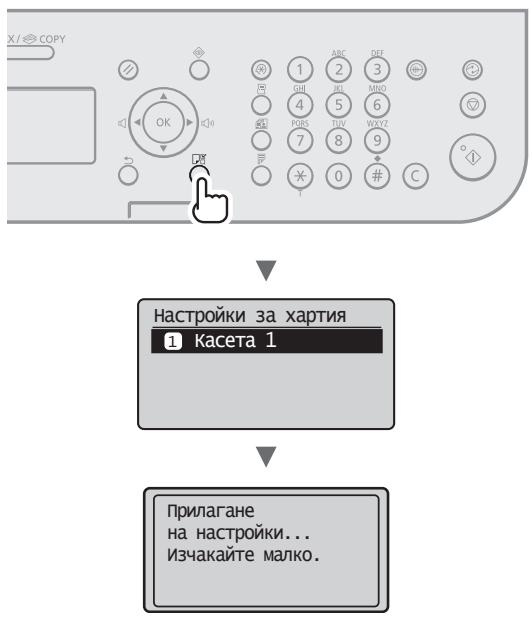
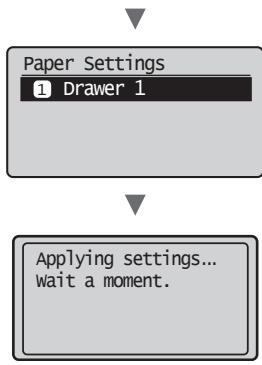
Follow the instructions on the screen, set the paper size and type.
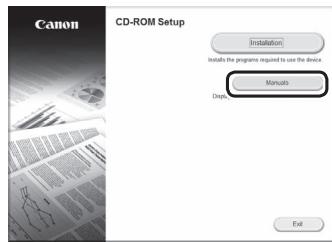
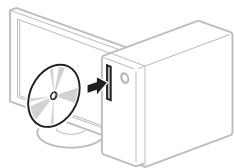
Install the driver and software using the User Software CD-ROM. For details on the installation procedures, see the FAX L Driver Installation Guide.
- We ask for the user's cooperation for the Product Extended Survey Program. For details, see the descriptions on the screen.
Perform Useful Tasks
You can use various functions in this machine. Following functions are the overview of the main functions that you can use routinely.
Copy
Enlarged/Reduced Copies
You can enlarge or reduce standard size documents to copy on standard size paper or specify the copy ratio in percentage.
2-Sided Copying
You can copy 1-sided documents on both sides of paper.
Collating
You can sort copies into sets arranged in page order.
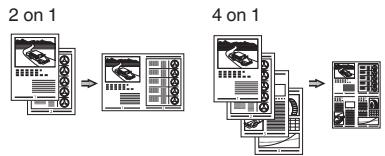
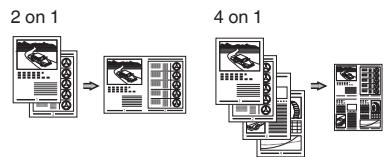
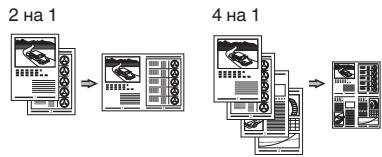
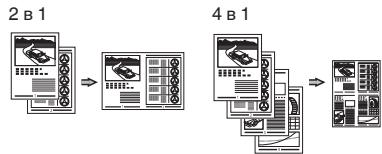
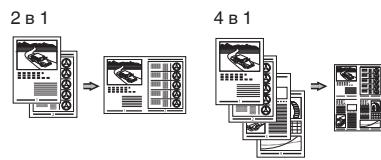
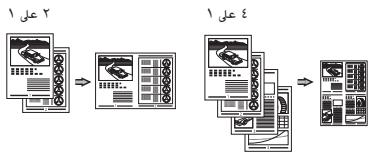
Reduced Layout
You can reduce multiple documents to copy them onto one sheet.
Copying ID Card
You can make a copy of a 2-sided card onto one side of paper.
Fax
Sending a Document Directly from a Computer (PC Fax)
In addition to the normal sending and receiving faxes, you can use the PC fax.
Sending
You can register fax destinations in the address book. You can specify the destinations using various methods, enabling you to send documents quickly and easily.
Destination search
One-touch keys
Coded dialing
- Destination Group
- Specifying from the sending history
- Sequential broadcast
- Delayed sending
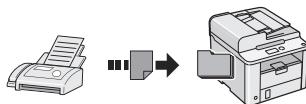
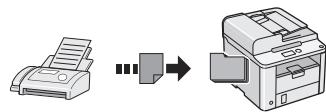
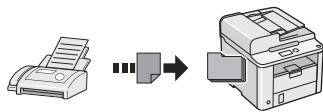
Receiving
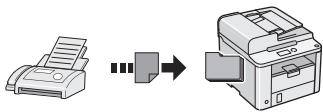
Receiving in the memory. You can store the received documents in the memory. You can print the stored documents at any time or if you do not need them, you can delete them.
Remote Receiving
If an external telephone is connected, you can switch to the fax receiving mode immediately by dialing the ID number for fax receiving using the dial buttons of the telephone during a phone call.
Polling Receiving
You can retrieve pre-loaded documents from a sender's fax machine when you want to receive the fax.
Enlarged/Reduced Printing
2-Sided Printing
Reduced Layout
You can reduce multiple documents to print them onto one sheet.
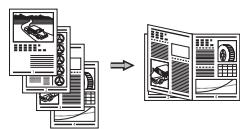
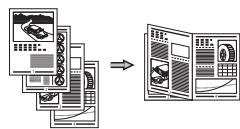
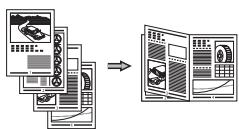
Booklet Printing

Poster Printing
Watermark Printing
Displaying a Preview before Printing
Selecting a "Profile"
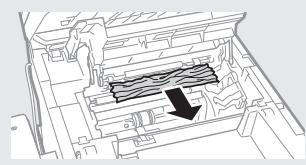
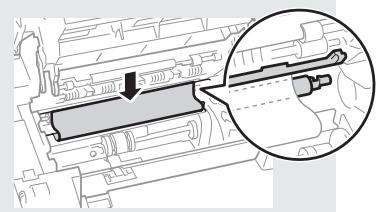
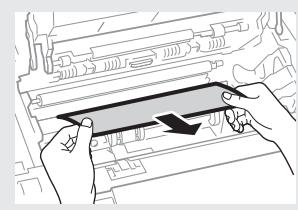
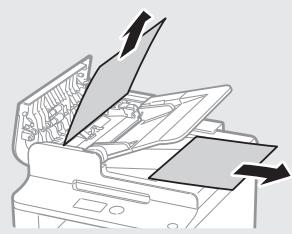
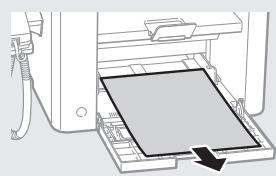
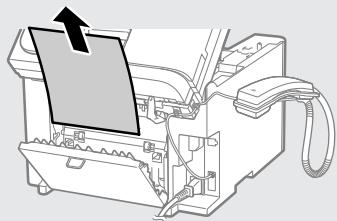
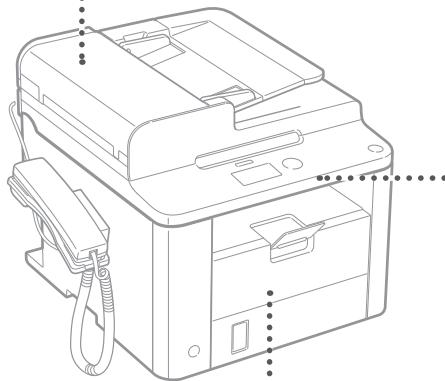
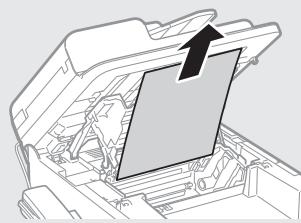
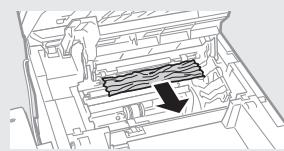
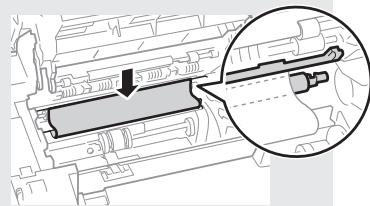
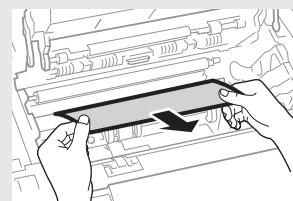
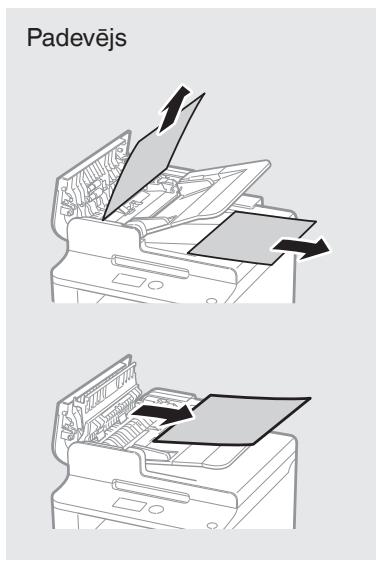
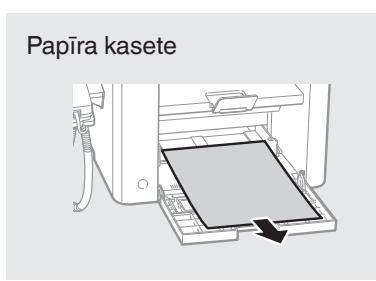
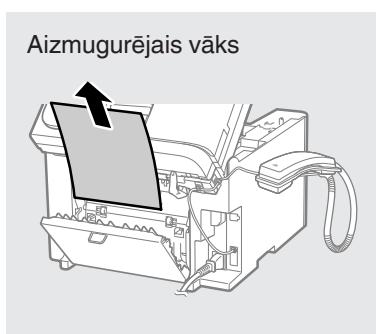
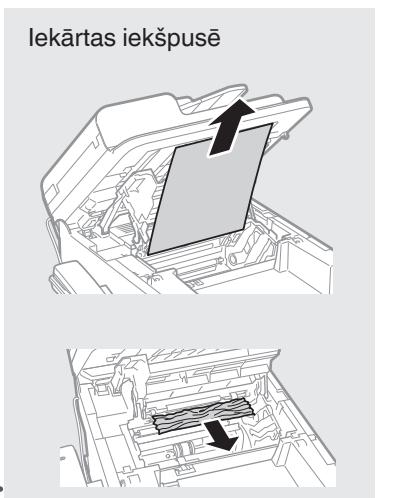
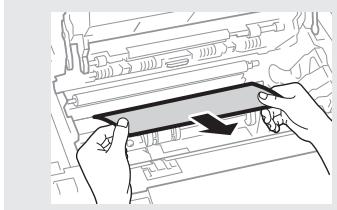
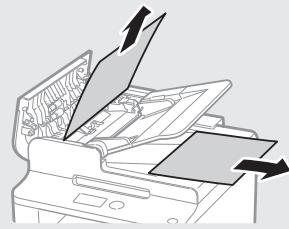
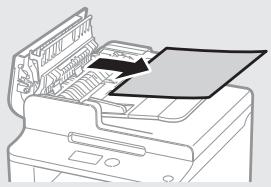
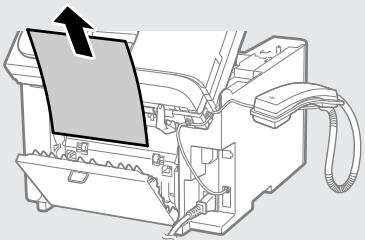
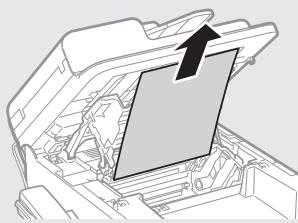
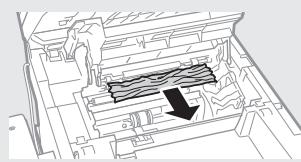
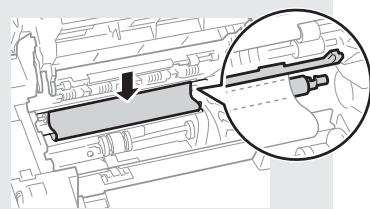
If the following screen appears, a paper jam has occurred in the feeder or inside the machine. Following the procedure displayed on the screen, remove the jammed document or paper. This manual indicates only areas where paper jams occur. For details on each function, see the e-Manual.
Paper jam.
Press [▶] to
display steps.
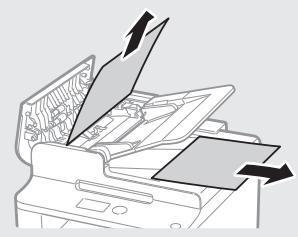
Feeder

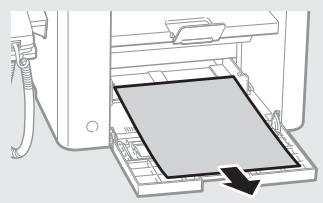
Paper Cassette
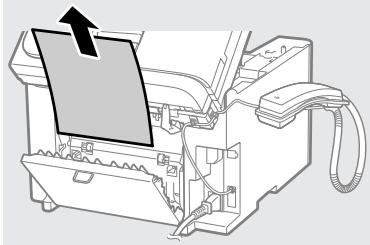
Back Cover
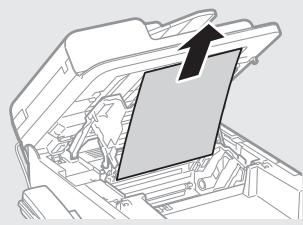
Inside the machine
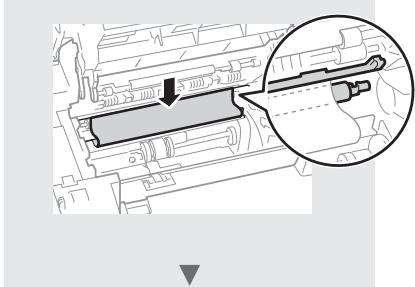
Toner cartridges are consumables. When the toner becomes nearly empty or has run out completely in the middle of a job run, a message appears on the screen, or the following problems may occur. Take the appropriate action accordingly.
When a Message Appears
When the toner becomes nearly empty in the middle of a job run, a message appears on the screen.
| Message | When the message is displayed on the screen | Description and Solutions |
| <Prepare toner cartridge.> | When the toner cartridge needs a replacement soon. | Shake the toner cartridge to evenly distribute the toner inside the cartridge. e-Manual “Before Replacing the Toner Cartridge” We recommend that the toner cartridge be replaced before printing high-volume documents. e-Manual “Replacing the Toner Cartridge” |
| <Toner is nearly out.> | When the toner cartridge has reached the end of its life. | Shake the toner cartridge to evenly distribute the toner inside the cartridge. e-Manual “Before Replacing the Toner Cartridge” If this message does not disappear, replace the toner cartridge. e-Manual “Replacing the Toner Cartridge” If this message is displayed, the incoming fax will be stored in the memory without being printed. Also, reports may not be printed, even if they are set to be printed automatically. If <Continue Print. When Toner Is Nearly Out> in <RX Print Settings> is set to <On>, however, printing will be continued, but white streaks or smudges may appear on printouts. e-Manual “Printing the Report Automatically” e-Manual “Continue Print. When Toner Is Nearly Out” |
When white streaks appear on the output, or the output is partially faded
When white streaks appear on the output or the output is partially faded, the toner cartridge has almost reached the end of its life, even if no message appears on the screen. When the print quality becomes unacceptable, see the following to fix the problem.
When White Streaks Appear on the Output or the Output Is Partially Faded
When the toner nearly runs out, white streaks appear on the output, or the output is partially faded.


No message appears on the screen, if the toner nearly runs out. Replace the toner cartridge when white streaks appear on the output, or the output is partially faded.
When this problem occurs
Follow the steps in the procedure below before replacing the toner cartridge. The machine continues printing until the toner runs out completely.
e-Manual "Before Replacing the Toner Cartridge"
When the print quality is still unacceptable
If the problem persists after you have followed the steps in the procedure below, replace the toner cartridge.
e-Manual "Replacing the Toner Cartridge"

WARNING
Indicates a warning concerning operations that may lead to death or injury to persons if not performed correctly. To use the machine safely, always pay attention to these warnings.

CAUTION
Indicates a caution concerning operations that may lead to injury to persons if not performed correctly. To use the machine safely, always pay attention to these cautions.
Keys and Buttons Used in This Manual
The following symbols and key names are a few examples of how keys to be pressed are expressed in this manual.
Operation panel keys: [Key icon] + (Key name)
Example: [] (Stop)
Display:
- Buttons and items on the computer display: [Preferences]

WARNING
To avoid the risk of personal injury or damage to the equipment and for legal information, read the Legal Notice and Important Safety Information in Multi-lingual User Manual CD that is included with the product.
Important Safety Instructions
Please read the "Important Safety Instructions" in this manual and in the e-Manual thoroughly before operating the machine.
As these instructions are intended to prevent injury to the user and other persons or to prevent destruction of property, always pay attention to these instructions and operational requirements.
Please note that you are responsible for all damages caused by failure to follow the directions provided herein, using the device for any purpose for which it was not intended, or repairs or alterations made by anyone other than a Canon-approved technician.
Installation

WARNING
- Do not install the machine near flammable substances such as alcohol-based products or paint thinners. If these substances come in contact to the electrical parts inside the machine could ignite these substances and cause a fire or increase your risk of electric shock.
- Do not place necklaces and other metal objects or containers filled with liquid on the machine. If foreign substances come into contact with electrical parts inside the machine, this may result in a fire or electrical shock. If any of these substances falls into the machine, turn off the power to the machine immediately and contact your local Canon dealer.

CAUTION
-
Do not install the machine in the following locations. Doing so may result in personal injury, fire or electrical shock.
-
Unstable location
- A location subject to excessive vibrations
- A location where block the ventilation slots (too close to walls, bed, shaggy rug, and other similar objects)
- A damp or dusty location
- A location exposed to direct sunlight or an outside place
- A location subject to high temperatures
- A location near open flames
-
A location with poor ventilation system
-
Although ozone is generated from the machine during operation, it does not have any affect on the human body. However, if you intend to use the machine for long periods of time, ensure that the installation location is well ventilated.
- Do not connect unapproved cables to this machine. Doing so may result in a fire or an electric shock.
- Machines with a hard disk may not operate properly when used at high altitudes of about 3,000 meters above sea level, or higher.
Power Supply

WARNING
- Do not use power cords other than the one provided, as this can result in a fire or electrical shock.
- Do not modify or bend the power cord and do not pull on it with great force. Do not place heavy objects on the power cord. Damaging the power cord may result in a fire or an electric shock.
- Do not plug or unplug the power plug with wet hands, as this can result in electrical shock.
- Do not use extension cords or multi-plug power strips with this machine. Doing so may result in a fire or electric shock.
- Do not bundle up or tie up the power cord in a knot, as this can result in a fire or electrical shock.
- Insert the power plug completely into the AC power outlet. Failure to do so can result in a fire or electrical shock.
- Remove the power plug completely from the power outlet during a thunder storm. Failure to do may result in a fire, electric shock, or malfunction.

CAUTION
- Use only a power supply that meets the voltage requirements listed herein. Failure to do so may result in a fire or electric shock.
- Do not obstruct the power outlet where this machine is connected, so that you can unplug the power cord easily in an emergency.
Handling

WARNING
- Do not disassemble or modify the machine. There are high-temperature and high-voltage components inside the machine which may result in a fire or electrical shock.
- Do not allow children to touch or play with the power cord and cables or internal or electrical parts. Doing so may result in serious personal injury.
- Please contact an authorized Canon dealer if the machine makes an unusual noise, emits an unusual smell, or emits smoke or excessive heat. Continued use may result in a fire or electric shock.
- Do not use flammable sprays near the machine. If flammable substances come into contact with electrical parts inside the machine, this may result in a fire or electric shock.

CAUTION
- For your safety, please unplug the power cord if the machine will not be used for a long period of time.
- Use caution when opening and closing covers to avoid injury to your hands.
- Keep hands and clothing away from the rollers in the output area. If the rollers catch your hands or clothing, this may result in personal injury.
- The inside of the machine and the output slot is very hot during and immediately after use. Avoid contact with these areas to prevent burns. Also, printed paper may be hot immediately after being output, so use caution when handling it. Failure to do so may result in burns.
Maintenance and Inspections

WARNING
- Turn off the machine and unplug the power cord from the outlet before cleaning. Failure to do so may result in a fire or an electric shock.
- Unplug the power plug from the power outlet periodically and clean the area around the base of the power plug's metal pins and the power outlet with a dry cloth to remove dust and grime. When damp, accumulated dust may cause short circuiting or fires.
- Use a damp, well wrung-out cloth to clean the machine. Dampen cleaning cloths with water only. Do not use alcohol, benzenes, paint thinners, or other flammable substances. If these substances come into contact with electrical parts inside the machine, this may result in a fire or electric shock.
- Check the power cord and plug regularly for damage. Check the machine for rust, dents, scratches, cracks, or excessive heat generation. Use of poorly-maintained equipment may result in a fire or electric shock.
Consumables

WARNING
- Do not dispose of used toner cartridges in open flames. This may cause an ignition, and result in burns or fire.
- If you accidentally spill or scatter toner, carefully wipe up the loose toner with a damp, soft cloth and avoid inhaling any toner dust. Never use a vacuum cleaner to clean up loose toner. Doing so may cause a malfunction in the vacuum cleaner or result in a dust explosion due to static discharge.

CAUTION
- Keep the toner cartridges and other consumables out of the reach of small children. If toner is ingested, consult a physician or poison control center immediately.
- Do not attempt to disassemble the toner cartridge. The toner may scatter and get into your eyes or mouth. If toner gets into your eyes or mouth, wash them immediately with cold water and consult a physician.
- If toner spills from the toner cartridge, avoid inhaling it or allowing it to come into contact with your skin. If the toner comes into contact with your skin, wash immediately with soap. If you inhale the toner or your skin becomes irritated due to contact with the toner, consult a physician or poison control center immediately.
Others

WARNING
If you are using a cardiac pacemaker:
This machine generates a low level magnetic field. If you feel any abnormalities in your body while using this machine, please move away from the machine and consult your physician immediately.
Legal Notices
Legal Limitations on Usage of Your Product and the Use of Images
Using your product to scan, print or otherwise reproduce certain documents, and the use of such images as scanned, printed or otherwise reproduced by your product, may be prohibited by law and may result in criminal and/or civil liability. A non-exhaustive list of these documents is set forth below. This list is intended to be a guide only. If you are uncertain about the legality of using your product to scan, print or otherwise reproduce any particular document, and/or of the use of the images scanned, printed or otherwise reproduced, you should consult in advance with your legal advisor for guidance.
- Paper Money
-Traveler's Checks
Money Orders
Food Stamps
Certificates of Deposit
Passports
Postage Stamps (canceled or uncanceled) - Immigration Papers
Identifying Badges or Insignias - Internal Revenue Stamps (canceled or uncanceled)
- Selective Service or Draft Papers
Bonds or Other Certificates of Indebtedness - Checks or Drafts Issued by Governmental Agencies
Stock Certificates
Motor Vehicle Licenses and Certificates of Title
Copyrighted Works/Works of Art without Permission of Copyright Owner
Considerable effort has been made to make sure that the manuals for the machine are free of inaccuracies and omissions. However, as we are constantly improving our products if you need an exact specification, please contact Canon.
CLASS 1 LASER PRODUCT
LASER KLASSE 1
APPAREIL A LASER DE CLASSE 1
APPARECCHIO LASER DI CLASSE 1
PRODUCTO LÁSER DE CLASE 1
APARELHO A LASER DE CLASSE 1
LUOKAN 1 LASER-TUOTE
LASERPRODUKT KCLASS 1
② FAX L Driver Installation Guide (User Software CD (Brukerprogramvare-CD)):
Lesdennehandbokenetterpa. Dennehandboken beskriver programvareinstallasjon.
③ Elektroniskhandbok (Multi-lingual User Manual CD (Flerspraklig brukerhandbok-CD)):
BbOd TeKCTa, CmMbOJIOB uHcSeI
BBOOOCyueCTBIAETCnMOUBoU
HIOPOBObIX KJIaBNI HINKHOH
[(CNMBOJIbI].
PiOIO6Hee OpeKHMe,Ha KOToPbIM
MOKHNO PepeKJIOUYTcR,HNIO
DOCTYINOM TEKCTe CM.BnpAOB
yactn 3TOI CTpaHNUbl.
Ipepeeene Kycpcopa (BvOd npo6ena)
IpeMeCTnB KypCop MOHHO
KJIaBNiAMn [A] n [B]. IpeMeCTnTE
KypCop B KOHeT TEKTa N
HaJMMTe [B], YTObBi BBeCTn np06en.
YdaJIeHHe CmMBOJIOB
YdaJIITb CnMBOJIb MOJHO C NOMOUIKHN [C] (CTepeTb).
BbOD TeKCTa, CmMBOJIOB uHcSeI
I P E D Y U P E K E D E H N E
CopeHnT npdeynpeKdHeNe 6o npaunx, KOTOpbIe B cLyuea HepaBnHbORHO bblONHeNMy MOrT pNBeCTN K TpaBM He IIN rIbSeu NIOe.ДЯ 63onacnoHcKcnlyataun annapata BCerda o6baaTe BHNMaHne A3TH npdeynpeKdHeNIA.
BHIMAHNE
CopeHnT npEynpeJdHHeN6 opeaunx, KOTOpBie B cLnyae HnePAINbHORo BblNOJHEHNE MORY pIeBcTn K TpaBMAM IIOJe. JIe 6eOanchoh EKcnPATAuAn annapata BcERda obaaaiTe BHIMAHHe Ha 3Tu npEynpeJdHHeN.
KlaBnH N KHOHNI, nCNoJIb3yEmblc B DaHHOM PykoBoDCTBe
CLeNyUcHcNMBOblI Ha3BaHnI KlaBnI npEcdTabJIOT c6oB npImepbI HauHMaEmbIX KlaBnI, NcIOJIb3yEmbIX B 3TOM pyKOBODCTBE.
- KlaBnIi napeJIy npaBLeHnIy: [3HaOck KlaBnIiN] + (Ha3BaHne KlaBnIiN)
PpIMeP: [⑤] (CTon)
Co06ueHnHa nCnIeee:
KHOHNI NYHKTbMeHIO,OTO6paKaemble Ha DCnIe KOMNBoTepe: [Preferences] (HaCTpoHn)
I PTEyIpyEKeHJEHNE
TTObIи36eHaTb TpaBmblnNIOBpeHdEHHNOOBpyOBAHnI N03NaHOKMTbCS cOpHINIEcKo INHΦOPMaueH, IPOuNTaHE pa3DeIb「PiPBOBbIE NOLOHKeHHN E BAHXbIy Kya3AHNN IO texhNiE be3ObaCHOnTn HA KomAHT-DnCHe «Multi-lingual User Manual CD(MHOrO3bUHneBy pkyOBoDCBa nolb3ObaTeJIa), BXoDAEM B KOMPiNEt NOCTaBkN yctPOBCTBA.
BaHHbIe yHa3aHnI NO TEXHnke 6e3OnaChOCTN
Peped naujom pabotb cannapatom BHMMATEJbHO pOHTaTte pa3dien KaHbIe yka3aONTO xEHNIke 6e03oAocCTn BDAHNOM pYKOBoCTBe NdoKYMeTe 7eHKeTPOHOHoe pyKOBOCTBO JIOJI3OBAOTaeN.
IocKbky 3Tu yka3aHnI npeHa3NaHeBbI IyI npeoTbaueHnMaTePbJIbHOYUe6BaIuNITRAPMPOBAHnI NpIb3ObATEJINpyrNixLIu, o63aTeJIbHO BpaasAteBHIMaHne Ha 3Tu yka3aHnIHnTeBOAHN K hCnIpytaau.
POMHNTE, YTO BBY HECTe OTBETCTBEHNOCTb 3a IIO60IyUeep6, BO3HNKIMN BCJELDCTBNE HEBBIIOHHEHIN OINCAHHbIX B DAHHOM DOJKMHTE YKA3AHIN, HEHAJIENKAUeIRO ICNPOI3OBAHYNY CTOPIOCTBa IINO6IOBOER pEMOTA INI N3MEHENHIN, PPOI3BEDEHNbIX HE CEPTNIUPOBAHbIM TEKNHcEChM CTEUaIANTCm Canon.
YctaHObKa
I P E D Y N P E X E D E H N E
He yctahabnbaite annapat prdom c
IeHOBOCPnlaMeHApUOuMnCBAeUcTbMaN, TaKIMn KaK
cnptocodephauaee npOdyhtbl nIi pa36abHTeIN kpaCHn.
HoHTAKT 3TN BeueCTB C 3JIeKTPnueeCKHMn KOMnHOHTamn BHytpn
annapata MOeT CTbI pRnuHoi BOCpIaMeHEHHN 3THX BeueCTB
n, KaK pe3yJbTaT, NOkapa NII yBeJIuHeHHn PNCa IopaHeHHn
3JIeKTPnueeCKHM TOKOM.
He NomeuHa Te Ha annapat 6paCteBti NdpyrHe MeTaJIHueChne IpeDMeTbI HmEHOCTn C BOiO. KOHTAHT NocTOPOHNHX BeUeCTB CJeHETPNIEChMn KOMTOHENTAMB HByTPn Annapata MOJET CTaB PInuHNO Bo3rOpAHnI HnnpaKeHnN 3JeKtPNueChm TOhM.B C Lyuey nonadHnA 3TxN BeUeCTB BByTPb Annapata HEmdJIeHNo BblKlHyTe NTaHne Annapata N oBaPaNTEcB K MeCTHMy Dnlepy Canon.
A BHIMAHNE
He yctahabinba Te annapat B onncaHHbIX HnHE MeCTax. Heco6IIOeHne TOTe TpeBHOHMOKET nPnBeCTIN K TpABMe, NOkAPy IIN NPOpaKeHEnO 3eKTHTpmeCkHM TOKOM.
- HevcToHuaBnOBepxHOCTb.
- MeCTO, NOBepKHeHHOe Ype3MePnoH Bn6paun.
MeToB, a KOTOPOM BERTNIAHIOHObIE OTEBPCTNa 6bUyt 3aKpbTbI (CJIIMKOM 6bIN3KO CTeNE, Ha KPOBaTH iN N KOpe C dIINHHbIM BOPCOM INI DpyNX IOXOXHX pEDEMtax).
BlaJHoe Hn3aNbJIeHHoe NOMEueHne
- Mecto, noBepxKHeHoe Bo3eIeTBnIO npMOrO cLHeHOro Cbeta, nHa yLnIe.
- MecTo, NOBepKeHHoe BO3eHCTBnIO BbICOKHX TempeAtyp
- MecTo B6n3n OTKpbITOrO OrH
- PomeueHne 6e3 doJHKHOB BeHTnJIaCIN.
I XOTB B IPOUCECE pa60bI DaHNOHO annpaTa BbIDJeTcSOzOH, HNe OKHa3bBaET BlnHrNHa HOrganM ChEoBHeKa. OJaHo, ECLN PIIaHNPyeCT DoJIgAR HeNeppeyBnHra PaOTo aPapata, y6eDInTeCb, YTO MeCtO yCTaHOBKn XOpOIO BEHTINHpYteCn.
He IocoeiHnIeK dHOMy annapaty HeYtBepJdHbIe Ka6JI. Hec6JIIOJeHnE 3TOrO TpeBOaHnMy MOKeT pINBeCTN K NOXApH NIOpA9eHnHO JAEKTPnueCkIM TOKOM.
- UcTpoIcTBa C HeCTKIM DnCHOM MOrTy pa6oTaB HeNpaBnIbHO Ha BbICOTE OKOLO 3000 MeTpOB H6JIbSe HaJ yPoBhem MOpR.
HCTOCHNK HNTAHNA
I P E D U Y P E X D E H N E
He IcnoIb3yIre DpyIhe UHypbl NHTaHna, KpOme UHypa, BxOJaIeToB BOHMJIeKT PnIHPTApa-3TO MOHET CTaTb PnIHNOH BO3rOpAHIN HIN NOPaJXEHNE 3JIeHTPnHECHN TOMOH.
HeMoDfNpUpyTeHcFbAiteUHpNTaHnA,taTahHeCINbHO He pactrmbaHTe rOe.HcTaBtE TReJeHbIpeDMeTbHa UHp NTaHnA. NPOBekdHeNe UhpyaPiTaHnA MoHET npBcEtN KnoKapy HIN NopAKeHHIO 3JEnkTPhueckHM TOKOM.
He BCTaJIrIe 1JIeTcIeJIb IIHypa NITaHnB P03ETHy n He H3BLeKaJIte IEOMkByIM pyKAMN -3TO MOHT npMbECTN K nopAKeHInO 3EIOHTPNIeCKHM TOKOM.
He IcnoIb3yIte ydIINHITeIbHBeIshHyI IuIydIIHNITeIc HecOJIbKIMM PO3ETKHAMC C daHHBM AnnapaTOM. Heco5JIOJeHne 3TOrTO Tpe6oBaHnMOHET PnBvECTN K IOHOpA HOpaHEnHO 3JEHTPNUHECKHM TOHKON
He cBOPaHbIe IUnHy pIITaHnI He 3Aba3bIaIte erO y3lOM - 3TO MOHET CTATb PInuHHOB3TopaHnI INI NopaHeN3JIeKTPnEChIM TOHOM.
BCTABJRAIeUTeNCJIbUHypaNITAHNA BPO3eTHY cETNIpeMeHHORTO TKAIOJIHOCTbO. HeBbIIOJIeHNHe 3TOrO IpaBnA MoJET CTbA PPCHNOH BO3rOpAHNA INI NpOAPKeHHZJEHTPNUECKHM TOKOM
- PoiHocTbO OTOCoEINHnIe IHTENCeJIb IHHpya NITAHnO rTO pO3eTHN BO BVPmR rPO3bI. HecobJIOJeHnE 3TO Tpe6OBaHNs MOKET nPMBcTn K OJAKy, nopAkeHnIO 3JIeKTPnueChnM TokOM WIn BxOyD anPaTa n3 cTpOra.
BHHIMAHNE
IcnoJb3yIte ToJIbKO TOT NCTOCHIN KITaHnK, KOToPbI OTBeaETpe6OBAHnR M K AnpRJeEHnO, OINCAHBIM B DAHHOM DOKYMHeTe. HeBbIpONHeHne 3TOr PAnBaHnMoEeT CTaB pInuHnOH BO3rOpAHn HN NopAKeHnE 3eHbHTPrueCkM TOKOM.
He 3aoropaxHbAte po3eTHy, K KOTOPoI NOdKnIOueH annapat, Tc0b6 MoHO Hb6 IoBe 6e3 Tpyda OTOeDMNHTb UHyp NITAHIN B 3KCTpeHOM CJyae.
06paueHne c annapatom
A INPEUINPEXDEHNE
He pa3bnpaIte aInpapat I He nbIaTIEcB yTO-JIb6IO h3MeHnITb B erOyCTPOICTBE. HeNTOPbIE KOMHOENETb BYHTpAmpaTaCINBHO HArpeBaOTcN INHAXoTcRc NOD BlyCOHIM HAprrKeHNEM, YTO MOHET CtAe pInHHoB BO3rOpAHIN INI pOnaHEHnE 3J6HTPrNECHM TOKOM.
He paepeaIte DeTmPiNACaBcK HnHpyPiTHAeNHa6JIaM, a TaHOHe BHTpEnHHM Nn3JIeHTpueChHM KOMIOHEHTAM NnIITpAtb C HMM. 3TO MOJEPINECTC K NOJUeHNIO CepeB3bIX TpABM.
Ecn annapat n3daet Heo6bHhB yM, BbyIeJIeT HnPbBHy hB 3aIax IIN DbIM INIyIpe3MePHO HArpeBaETc, O6pATITcB K yIOJHOMOeHOMy DInIepy Canon. IpoDoJIeHne 3KCTIyatauIN B TAHIX YCBOINX MOHT CTaB npHHOn BO3rOpAHHa INI NopAHeHH AIEKTPNUECKHM TOKOM.
He paIbJIyIe B6JIH3n aiIappaTae IerKOBOCIIaMeHHOUJIpeCe BeBcECTBa. KOHTaRt IeKOBOCIIaMeHIOUJIpeCe BcEueCTCB 3JeKTHPrUeCHKMn KOMIOHOETAMBIHYTpri aiIappaTae MOJET CTaB PnIHNO HO3TOpAHNI NIN OPOAHEHNI 3JeKTHpEChHM TOKOM.

BHIMAHNE
Buejx 6e3oNaChocTn OTcoeHnHJTe 1hyp nIaHnO T 3JeKTPocetN,ecn annapaT He HcNoJIb3yETC DOJIroe Bpemr.
-Будte octopoHbI npO tKpbTIN n 3aKpbTIN KpbIeK, YTO6bl He TpaBMPOBaTb pyKN.
I3GeraiTe KOHTaTpyuN OeJbI C BaJIiKAMn B O6NaCTH bVBoDa. IonoJaAne pyu NIOJ OeJbI MeHd yBaJIiKAMn MOHeT npINBeCTN K NOJyEHIno TpaMbI.
B npocese n cpa3y jhe nocle pa6bTBI BHYtpenhne KOMnoHeHtBI n o6Iaftb BOKpyr BvIbOHorO LOTHa annapata RaJIHOcTc OeHb ropuMn. He pRkacaiTeCb K 3TNM o6laTREM, qTO6bl He npLuyntb oKoHn. Kpme TOrO, OTneuataHHaB yMara cpa3y nocle BbIOda MoKeT 6bITb rOpueh, N0TOMy o6paauTteCb C Hei ankhypatHO. B npOTNBOM clyuae moKHo noluyntb oKoHn.
TexHHuechoe 06cIyHnBaHne nOCMOTpbI

PENDEYINPEXHEHNE
BbIIOUaJIe annpat IN OTOcEOINHRIte UHyp NITAHnAOT PO3eTHNIpeD OOChTKeH. HeBbIOJNHeHne 3TOrO npABInIA MOpET CTAtbPnIHNO B03rOPOAHn INI npoAKeHEn 3JeHTPNuCeHmN TOHOM.
- PepnoiDyecn H3BLeKaHte WTeNceJIb ShHpya PtntAHnIg N3 PO3eTNI nPpOuHsAaTE 30Hy BOKpyr OCHOBaHm MetaJIHneCHX KONTAKTOB WTeNCEJIa N pO3eTHNI CyXOI TKAHbIO, QTO6bl NOJHOCTbU ydaJIbT bJIbN rpr3b. PbJIb, OCEBsaHa Na BlaXHoI NOBepxHOCTN, MOKET CTAb TnpuHNoH KOPOTKORO 3aMbIkaHn IIN NoJXapa.
Длгчнкп anapata nCnoIb3yIte BlaJHHyO xopoIoO OTHaTyO TkaHb. CMaIbBaT bHaBДЯ OChnTHe Heo6OxHMo ToIbHo B OBe. He IcNoJIb3yIte CnIPT, 6eH3OJIbHne BeUeCTBa, pactBoPntEn Kpackn NdpYrNe IeRIOBocPnaMeHraOuJeceB BeUeCTBa.HoHTaK TStN BeUeCTB C JeHTPruCeKIMN KOMNoHEtAmn BHyTPn anapata MoKT CTaB pInHHOn BO3rOpAHn HIN npopAKeHnE 3JeKTPnuCeKHM TOHOM.
- PerylraPho npOBepaIte OTCyTCTBHe NOBpeKdEHH mHypa NITaHnH IHTeTcEJI. PpOBepaIte OTCyTCTBHe KORPO3N, MEXAHueChOH DeOpmauIN, cApAHH, TpeuIN HJIN Ype3MePHOrO HArpeBaHnA nnapata. NcOJIb3ObaHne O6OpyDobAHn, KOtopoe He o6ClyNuHaBaTeTc DOJHXbIM O6Ab3OM, MOHET pRnVBeCTn K NOnkay JNJN nopaaHEHHIO 3JIeKTHPnYeCHm TOKOM.
PacxohbIe MaTepnaJIbl

IPEDyIPEXDEHNE
He bpcaae TpapobanhIbe Kaptpnndn CTOtePOMB O KTHpbItbOroHb.3To MOHEt pNBEHcN K HX BOCnPAmEHeHHo N, KaK cJeDCTBne, K NOJYNEHIO OKOROB ININ BO3NHHOBEHNO IOKapa.
- PnC sluyaHOM paCCbIaHIN TOhepa OCTOpOJHO BbITpTte TOHeP MRAHIO bAAJHO TKAHbIO, He bIXaY erO. He nCOJIb3yIe TbJIeCoc dAn OCHtHN IpcBcHAnHoro TOhepa. B IpOTIBHOM CUYae BO3MOKHO NOpeKdHeNc PbIEcoCA NlB3pbIB NJIi, BbI3BaHHb CTATNueCEhM pA3prDom.

BHIMAHNE
XpaHnTe KapTpndHc TOHePOM nDpyrHe pacxOdbIe MatepmaJIb B meCTax, HeNDocTyHbIX dJIa DteT. B cIyae npOrIaTbIbaHN ToHEp HMeIeHHO oBaTHTecb K BpaHy IIN B TOCHNOLONRNECKM CEHTP.
He bItaiTecb pa36bapb KapTpndc TOhepOM.ToHep MoKET npocInaTbcn nonacb B Ia3a Hn pot. PnPi nopaAHH ToHEpaB rIa3a Hn pot HeMeJeHNO pPOMoTe INX XOJIoHOH BOOn I o6PaTtEeK B bpaUy.
- EcInn 3 KapTnPdIgA npocbIaNcra ToHep, cTapaNTecb He BbIXaTb erO n36beraTe erO KOHTaTc C KOHe. Ppi nonaHaHH ToHepa HKOxy cpa3y Jce CMoITe erO BOIoC mblOnm. B cnyae BbIXaHHToHepa IIN Bo3NHKnOBeHHa KOHXOrpo pa3DpaJHeHH N3-3a KOHTaTc C ToHEpOM HEmdJIeHHo o6paTHeTcB K BPauY IIN B TOCHKIOGNueckn CEHTP.
Друroe

PENEYPENEXDEHNE
EcnI nCnOJb3yETc KApDIOCTMMyJrTOp: 3OTn aNpanat CO3aET cNa6oe MArHNTHOe nOE. EcnI Bbl yBCTByTe NdCKMOΦT BO BPem pa6oTBc a npapatoM, OTouHnte PoJaJIbSe OTE annpaTAt HMeMeIeHNO pOHOHcYbTnpyIteCBpAOM.
IOpnduecka HhOpmaun
IOpnduueckne orpaHnueHna HcNoJIb3OBAHne n3dJIyN n3o6paHexn
IcnoIb3ObaHnne npino6peTeHHOro Bamn n3delenn dIy
CKAHIOPOBAHnN, neaHTn IIN BOCPON3BEdEHnO nOpEeJIeHHbIX
DOKymeTOB INbIMn CnOcO6Amn, a TaKHe NcNoIb3ObaHnE
I3O6paJaeHN H, noLyehNBrB W pe3yIbTate cAnHOpOBaHnN,
NeaHTn IIN BOCPON3BEdEHnN DpyrMn CnOcO6OM pRn NOMOuN
npino6peTeHHOro Bamn n3delenN, MOKeT 6bITb 3aIpeSeH0 3aKOHOM
mMOeT NBLeYb 3a Co6O yroLoBHy N/u/NI rpaKdAchkyUO
OTBeCTBHeHocTb. HenOnHb CnICoK TaNHX DOKymeTOB npInBeDeH
NHKe. 3ToT CnICoK PpeHa3aHueH dIy NcNoIb3ObaHnN ToIbKBO
B KaueCTBe OprHeNTnpa. Ppi Bo3NHIOBEHNi COMHeH N B
3aKOHHOCTN IcNoIb3OBAHnBaDAHHO n3delenN dIra CAnHOpOBaHnN,
NeaHTn IIN BOCPON3BEdEHnN InbIM CnOcO6OM KaOgo-Nb6O
DOkymeTa Iu/IIu IcNoIb3OBAHnN I3O6paJeHN, POlyeHNbX B
pe3yIbTate CAnHOpOBaHnN, neaHTn IIN BOCPON3BEdEHnN DpyrMn
CnO6OM, 3apaHee o6paTHec 3a KOHCyIbTaueH K OpNctY.
-БуMaXHbIe DeHbIg
- Dopokhbie yekn
-ⅡIaTeKhbIe nOpyuHnIa
- PpODoBOJIbCTBeHHbIe TaIOHbI
-ДeIo3nTHbIe cepTnФнKaTbI
- PnacnopTa
-Почтовые Марки (погашений Или Неногашениь)
-IMMmrgpaunOHhIe DOKyMeHTbI
- IndentnФикuaHOBHe KapTOKINJIN3HaKNOTJIuNIA
BHTpeHnne Mapn rep6oBOrO c6opa (noraeeHbIe nIIn HeNoRaeeHHBe)
- HeKOTOpBie DOkUMeHbI Ha o6cIyJxHbAHe IIN nepeBoDhble BekceIa
- O6niragun nn npytne dnonroBbte ceptnnKaTbI
- Yekn nnn nepeboDhble BeKceJIa, BbIaNHbIe roCydapCTBeHHbIMN UypeJHDeHNaMn
Akuun
- ABTomo6nIbHbIe npaba n DOhymeHTbl, ydoCTOBepraHouzne npaba co6CTBeHHOCTn
- PpOu3BcEeHn, OxpaHReMbIe 3aHOAmn 06 aTbOpchOM npabe/IpOu3BcEeHn NcYcCTBa, 3aPpeUeHbIe dIy BocpOu3BcEeHn 6e3 pa3peUeHn 06laJaTeJIa aTbOpcknx npab
BctaHOBJIeHHI noaTHKOBHX npaMeTpib
BnKohNyIte iNCTpyKuII, 0o BiIO6paKaHaOTbCra Ha ekpaH, 0o6 BcTaHOBHTM MOBy Ta vac. DOKlaHy IHOpMaUIO npO nepMeiueHHa MIX NpHKTAMM MeHTo Ta cNoCObn BBeDEHHa CnOp DnBiTbCBA PO3dJI "PepMeiueHHa MIX NpHKTAMM MeHTo Ta cnOci6 BBeDEHHa TeKCTy" (CTop.116).


Current Time Set. Must rechg. battery for 24 hrs. to save time settings. After turning main
3a3haeHnI NOaTHOBHX napameTpIB fakcy Ta nIDKIOUeHHr TetefoHHoro ka6eJIIO
1 YukaiTb noaTkoBi npametpn faKcy.
BnKohnyIte IHCTpykui,3a3NaHcHb INoC6NHy 3nactpoOBaHHaKaCy",uO6yka3aTINHOmeP aKcy, im' npinlaNy Ta peHKIM OTPmAHn. DOKHaDiHiy iHΦopMaHIO pOpeKIM OTPmAHn IOnaHO B EKeKtPOHHOMY Noc6HnHy.
EeKtpoHHn Noci6HnK “FaCc” “BnKOpCTaHHaYHcuiy faKcY "OtpMaHHaKaCib" PeXmOTpMaHHa
BnKOpNCTaHH imeni hopncTyBaay
Плд уаснлалнг ДOKумента з apeectpobahi BiIDOMOCTI по BiIDпраВикпдpykyOTься на Фakсимльнomy NOiDOMлeнHi OdeprHyBa YA.
2 PiiDKHIOUHTb TeIeΦoHHN Ka6eJIb.
KolnHa dncnle3'ABLcTbCnOBiDMLeHnn
NiKnIOHTb TenefoHHn Ka6eB TaK, Ra 3o6paKeHo Ha MaJIOnHy.
PiIiHJIIOUeHHcIyXaBKn
ДяОТРИМANHЯДOKЛадноi iHΦOPMaцii ДИ. noci6HNK 3 KOMПЛЕКТУ NOCTABKN CNYXABKN.
3 BnDiTb 3 peHmMy nepeIy noci6Hnka 3 HacTpOIOBaHHaФaKcy Ta nepe3anyctIb anapaT.
BmKHiTb anapat i noeKaIte npHaMHi 10 cekynd nepi Hix yBIMKHyTu Ioro 3HOBy. TnHn TeLefoHHx liHi He Bn3HaayoTbcra ABTomaTuHo. NpeerJIbHe "EeKeTPOHHn Noc6Hn" i HaCTpoTe TelefoHHy liHiO BpyuHy.
EeKeTPOHHN Noci6HnK “ΦaKc” BnKOpNCtAHnHaFHyHKuiФaCcy” 3MiHa napAMetpiB PhaCy (napAMetprn, raki MoKHna BCTaHOBHTn 3a DOmOroHO KhoHNi [Menu] (MeHo)) 3MiHa napAMetpiB NaDCnlaHnH" "Bn6ip TnPy LiHii"
YctaHOBJIeHHaΦopMaTy Ta TIny nanepy
BnKohnyIte iHCTpyKuII, 10o BiIObpaKaHaOTbcra Ha ekpaHi, Ta BCTaHOBIb TIN i fOpmat nanepy.

UcTaHOBJIeHHaIpaIbepa Ta nporpamHoro 3a6e3neueHHa
YctaHOBITpaBepiporpamHe 3a6e3neueHnry, BnKOpNCTOByOuN User Software CD (KomnaT-dnck 3 npOrpAMHM 3a6e3neueHHm KOpNCtBuca). DlaOTpMaHnDOKlaHDHOi HΦopMaui iPo npOeDpy BCTaHOJIENHn DVB.FAX L Driver Installation Guide".

- Порсимо корисьв в Зяп уась у рограмi Product Extended Survey Program. Дожладиwe дИВ. onIC на ekpani.
HopnciФyнцii
Ha zbomy anapati moKHa BnKoHyBaTpi3H iii. HnKHe HabedeHO OrIaO ChOBHx yHHu, rKi MOKHa BnKOpNCTOBByBaT uODeHNO.
KonioBaHHa
36ijbweHH a6o 3MeHweHH koni
Mozha 36iIbIbIyBaTn a60 3MeHbYBaTn DOKymeHTn CTaHapTHoro FOpmaty, uO6 OTpIMyBaTn iX KOII HA panepi cTaHdApTHoro FOpmaty a60 3aHaatn KoefiiciJENT MacuTa6yBaHHa konii y BiDCOTkax.
Д党支部а
Mozha koniiobatn odnoctopohhi dohymeHTn ha obuBa 6okn apkyua.
CoptyBaHHa
Koii moXHa copTyBaTHn IO KOMJIeKTax y nopAHy po3TaUyBaHH CTOPIHOK.
3MeHsEHH MaHET
MoHHa 3MeHUnTn KInbKa DOKyMEnTIB, Uo6 KoniIOBaTu IX Ha OINH apKyu.
KonioBaHHn noCbiDeyHn
MoJHa po6HTn KOII DBOCTOPOHHbOi KapTKI 3 OJHO 60ky npenepy.
ΦaKc
HaCnlaHna 6aHcy 6e3nocepHbO 3 HOMn'IOtepa (aHcHmIbHn 3B'r30k 3a DonomoroIO HOMn'IOtepa)
Okpim 3BnauHoro peHmMy HaCnlaHHa Ta oTPMaHHaФaKcIB MOHHa BnKOpNCTOByBaTHn FaKcMInbHn 3B'3OK3a DOnOMOrOIO KOMN'OTepa.
HaDCnJIaHnI
B aJpeChi KHN3 MoKHa peEcTpyBaTH OeepHyBaHbIb PhaKcIB. 3apeecTpyBaTH aJpeCaTIB MOKHa KJIbKOMa cnOcO6Am, 10 Do3BOJNTb HaDCnlaTH DOKymeHTN WBnDHO Ta 3pyHo.
-ПошукадPECaTA
Klabiwi BnKInky OndHm DOTIKOM
KoObaHnHa6ip
- Гунаадресатов
Bn6ip 3 kypnaIy naiclaHx DokymeHTiB
-Послідовна розсILAна
BiklaedeHeHaDCnlaHHa
OTpMaHHa
OtpmHaHb B nam'rtb. OtpMaHi DOhymeHTn MOxHa 36epiratn B nam'rti. 36epexKeHi DOhymeHTn MOxHa B 6yDb- yKn Yac po3dpykBaTH a6o BndaJIHTn, RaIcO BOHn 6ilbHe He notpi6hi.
Remote Receiving (BiДдалесе OТРИманнг)
JiKIO nIKHNoeHO 3OBHiHNI TeleFOH, MoKHbIpa3y nepemkhnyanapaT Ha peKHM OTPMaHHaKcy, H6paBUn iDeHTnΦikauiHm HOpE OTPMaHHaKcY 3a DonOMOrO KhoNOK Ha6Opy NiJ vac OTPMaHHd3BInKa.
OtpmamHaHa3nT
Y Bac 3Mora BnDObTy nonepeHbO 3aBaHTaJHeHi DOKyMeHTn 3 fakCmIbHOro anapata BiInpaBnKa came ToDi, KOJI Bam NOTpi6HO OTPMaTHn fakc.
Друн
36ilbweHHa6o 3MeHweHHa 306paHexb IJIa DpyKU DBOCTOPOHHi dpyK
3MeHsHeHm MaKeT
MoHHa 3MeHUnTI KJIbKa DOKymeHTiB, IIO DO3BOJNTb po3dpyKuBaTn iX Ha OndHomy apKyuli.

Друнбpoшурn
Apyk pIaHaTIB
Apyk BOJHnX 3HaHb
PonepegnnepergndpeepBnHOHaHnM npHy
Bn6ip“npoΦilno
YcyHeHHaMnHaHn panepy
Jkio 3'YBVCN HabeHn HnKHe ekpaH, y npicTpoi nOdaBaHn a6o B anapati CTaIOc 3MHNHn PAnepy. BInHOHyOnu BkazIBKn, 0o 3'YBnIinCn Ha ekpaHi, ycHbTe 3IM'Tn nnip. U cybOMy noc6HNy 3a3NaueHi TlkbN oblacti, de TpAnJIeTBcR 3MHNHn PAnepy. DOKlaHy iHOpMaio npo KOnHy fynKciIO nOdaHO B ELeKTPOHnOMy noc6HNy.
8v Paper jam.
Press [▶] to
display steps.
Pnpctpii noaBAHnA

Haceta niananepy
3aDnKa KpnK
BHytpiushi yactHH anapaTa
Kapri ndi 3 Tohepom - ce BntpaTHi MaTepiAIn. JIIO np lac pky 3aDaHn TOhep nobHi cTu MaJHe 3aKiHyTcBc, Ha ekpani BiO6paHaETbCn POiOMJIeHHa 60 BnHnKaIbTo b ONcaHI HnKHe NOMIIHN. Y TaKOMy pa3i cId BKnITu BiIDNHOx 3axoDIB.
Y pa3i nOBn NOBIDOMJIeHHA
KIOIiD apyk3aBdHnTOHepeMaiKe 3akHcyTbcra,HaekpHi 3'ABJIeTbcNOBIDOMLeHH.
EneKtpoHnH nOci6HnK, "Ipeed 3amHIO KApTpndka 3 ToHepOM"
JHKIOAHHCTbDpyHyBceHHe3aobibHa
Rkio npo6lema He 3HnKHe HabItb nicIa BnKoHaHHa HabeDeHOi HNue npoeDpyu, 3AmHiTb KapTpndk i3 TohepOM.
EleKtpoHHn Noci6NHk,3aMaHa KapTpua 3 ToHepOM
CNMBOJIN, IOBUNHOPNCOTBYOTbC B CbOMy noci6HHky
IIOPEEDHEHH
I03haaC nonepedxehnra CTocobHO onepaui, kki MOkytb npri3BecNdo TpaBMyBaHHa B pa3i ix HnpabINbHoro BVKHOHHa. 3 MeTOO 6e3neuHoro KOpNCtBuHHa anapatom 3aBkDn 3BaKaJte Ha ci nonepedxehnHa.
A yBATA
I03Haaε 3aCTepeHHeN CTOcoBHO Onepaui, kI MoHyTb
Ipi3BcTeN Do TpaBMyBaHH B pa3i iX HnPaBmBHorO BHKoHaHH.
3 MeTOO 6e3NeHOrO KOpNCtBuHH anapaTom 3aBKn 3BaKaJte
Ha ci 3aCTepeHHeHH.
Klabiwi ta KhoHnH, 0o 3raDyOToBcR B cIbOMy noci6HHy
CIMBOJI Ta Ha3Bn KlaBiU, BHKOpNCTOByBaHi B CbOMy Noci6Hky, NO3HaueHITaKIM YINHOM.
- KnaBii nanei kepyBaHnHa: [PiKToRpaMa KnaBii] + (Ha3Ba KnaBii) HapnKnlaD: [ ] (CtoT)
-Дисплел:(Укхить міце пізніаніченя.) - KhoŋnKa Ta eIemEnTn Ha IucPiJIeI KOMn'IoTepa: [Preferences] (Hactpoyni)
A NONEPEIXEHNA
Ioo yHnHytn p3nHy TiJeCNHX TpaBM a6o yuKoDKeHHa 0blaHaHnH, a taOx Ioo otPmaTIO npDmHi BiDOMocTi, npOHTaTe "HaJeHHi npabObi NOBIDOMLeHHa" Ta "BaHJIbBi BIDOMocTI npo TexHky 6e3neHN" Ha Multi-lingual User Manual CD (Komnakt-DnCK 3 noc6HnKaMn KilbKoma MoBAM), kKn BxOdnTy b KOMnJIeKT NocTaauHHa BInpOby.
BaxIiBi iHcTpynuii 3 texhikn 6e3neHn
Ipeedpo6oTOO3 anapatom ybaXHOIOPOHTAITE"BaXnHiB iHCTpyKu3 3TexHIk6e3neKeN" B cObMy noc6hNy Ta EJIeKTPoHmOy noc6hNy.
3aBxNdi 3eBraTaeYbary Ha ni IHCTpyuui Ta BMOMn do ekCnIyataui;ixDOTPImAHn DOnomarae 3anO6irTNpaBMyaHnIO KOPcTByaHa ta iHnxX Oc6, a TAOK NouKoJdxHeHHo MaHa.
MaHTe Ha yBa3i, 0o Bn HeCeTe BiDnOBaIaNbHicTb 3a BcI 36HTN H BAChIIOK HeNDOTPMHAAH HABEDeHN TY THa3IBOK, 6yDb-RAHORO BVKNOpCTAHHH NpICrTOPO KeHtPOK He 3a PnIN3HAueHennM, a TaKoK BVKOHAnHnpeMOHTY MoIMPiKaUd 6yB-NHM, KpIM TeHXuHOro cneIaJICTA 3 NOBHObaHeHnnMn BiD KomNaHII Canon.
YctaHOBJIeHHI
A NONEPEIXEHHA
He BCTaHOBJIIOHTe anapat nO6IHy IeJrKo3aIMMCTHX peOBOHn Ha 3pa3OH CnIrpTOBMICHN BIVpOBiB a60 po3UHHNKIB. KOHTAHT JeRKO3aIMCtHX peOBoHn 3 eJeEeTpNCHMN DeTaJIaMM BCEpeHi anapata MOKe npIbBeCTn do noKeKei a60 ypaJHeHHe JeEeKTPNCHM CTpyOMM
He Klaitb Ha anapat Hamncta, iHsi MeTaeBi npedmetn a6o MicKocti 3 pidyHO. KOHTAeCTOpOHHX peOboHH 3 eEeKTPnuHMM DetAJIyM BcepeDHI anapata MoJe npI3BeCTn Do noKeXi abo ypaKeHHN eEeKTPnuHMM CTpyMOM. RaIO 6yDbKa 3 xu PEoBHH NOTpAnITb YcepeDHy anapata, HeraHOB BMNHITb XINBEHHa anapata Ta 3bePHTcBd O MiCeBOrO DInlepa Canon.
A yBATA
Hnue OncaHO Micu, HbIDnoBidi nBCTAHOBJENH anapata. PoTaUyBaHH anapata B TACOM MICu Mce NoPn3BcTeN Do TineChnT PABM, NOHEKIo aO bpaXeHH EJIeKTPNCHM CTpyNM.
-HeBIDIOBIDHemic
- Micnce, BЯкomy moхлби сильни Biбрацii
- Y miçux, De 6tiHyTbCBe HHTnIaJiHi OTBOPH (HaT0 6m3bko Do CTIn, liKHa, nyxHacto KlnIma Ta iHxHx nOdi6hns npedmetiB)
- Y BOLOrHx a6o 3aIIneHx MiCzIax
- Hndbopi a6o nipnnpmcoHnHn npomHHaM
- Y Mцях i3 BVCOHOI TEmpepaTypoHO
- BIIa BiKpnToro BOrHIO
- Y micyx i3 noraHO BOHTINLAciHIO CnCTeMOHO
XoayBpe3yIbTaTIpo60Tu anapata yTBOpIO6Tc03OH,BIH 3OBcIM He BnIbMaE HaIOcBnK OpraH3M.Ta RnOo anapat Mae BVOKOPCTOBYBaTHC NpOTrHm TpNBAInx PEOIDIB,PO6BaTe npo Do6py BeHTINrUIO MICuI HOrO BCTAHOBENH.
- He πίdινημαήte do ζύβοτo anapata HerapehOMeHDoBaHπa6βει. Βe moze πριπδβεctnt do Σηθεχι afo ypaJeuHŋ eIeKtpnHnM CTpyMOM.
JaHIO anapatn 3 HOpCTKHIM DNCHOM BHNOPHCTOBYBATN Ha BNCOTI noHaad 3000 MeTpB NaD pIBHEM MOpR, BOH MOKYtbpauObaTHe HAneJHHM YIHOM.
HKepeNo HnBHeHHa
IIOPEEDXEHH
He HOpIcTMyTeB iHUNMIM hUnpyam 3aMCTb IhUpa JxHBeJIeHNHa 3 KOMnJIeHTy NOCTABKN, OCHJIbKNI MOHE np3BecTeN DO NOKeHi a60 ypaJaeHHeEJeLErTHPNHcM CTpYMn
He MoHnΦiKnyTe He 3rNaHaTe 5uP XnVBLeHnH, He TgHtB Noro 3 npNklaDAnHM 3naHoI CnH. He CTaBe HA uHyp XnVBLeHnB BaxKi PnpEdMeTn. PnOKnOHeHH nHypa XnVBLeHnMoKe npM3BeCTn Do noXeHki a60 ypAxeHH eJeEKTpnHm cTpyMOM.
- He BCTABJRA Te Ta He BIMMAI Te WITENCEJI SHHpya JXHBLEHN MOKPIMN pykamn, OCKJIbKNI CE MOKe Ipn3BecTm Do ypaKeHHA eJHEKTPNHIM CTyPMOM.
He BHKOpHcTOBMyTe 3 UmAn apatom OUmHyprNIOOBYbAчu P0rTaJyHbAyBaJI HxIbIeHnHa 3 KInbKoMa oPoTeKamU. Me OMe JpM3BeCTDo IIOXeHJI a6O ypaJxHeHnEJeETPrHnHM CTyPOM.
He 3moTyIe Ta He 3ab'3aYIte UHyp y By3OJ, OCKiIbKn ce MoJe npIzBecTn do IIOKeKi a6o ypaKeHHN eJIeKTPuNHM CTpyMOM.
PobHCTO BCTABJIte 1eTENCeJIb UHpya JHHJEnHHB PO3eTHy MEpeKi 3mHHoro cTpyM. JIIOU cIIOHO He 3ro6HtN, MOKe CTATINCA NOHeka a60 ypaKeHHa ENEHTpHnHM cTpyMOM.
-Пдчасгозиповсichtю ВиMaIte StTeNceьшнуражИВLEння 3рOSTK.Н.НEDOTРIMAHNЯцБОru npaBILA може пИЗБeCTNido NOHKeHi,уразжЕнrayелКТуМСТPyMOM aбо HeCppaBHOCTi anapata.
A yBATA
BkOpNCTOByTE NJIe DKepeNo XHbEHeHHa, Hanpyra HkoR0 bIDIOBIAe HabeJeHN MTy BnMOrAM. JIcHcIbO r He 3po6nTH, MOKe CTATCSN POKEHa a6o ypaKeHN eJekTprHmHcN cTpyOM.
3a63neTe BInhNIO doctyn IO po3eTHNIO,do IHOI niDIIHOaebTcB anapat,ioy pa3i haraJIbHOI noTp6bn 6bna 3MoraJeKo BRINHATI WHTENCEJI bHypa KMBLeHHa.
NoBODHeHH
IIOPEKeHHH
He moHphiKyIte anapat i He po36paIte Ioro. UcepeHHI anapata e DetaiJI, XIe nepeSyBaIOb TIId BnCOHO HAnpyTO Ta pO3irpITi Do BnCOHXN TMENepaTc BOH NMOyTb Pn3BcCTn DO noKekH a6o ypaKeHHraElenTpCHNt CTPMOM.
He do3BolnTe DITM TOpHaTncs Hhpya KnVBLeHn, Ka6eJIb, BHTpIiHIX MexAHI3IM Ta eIeHTprUHNx Detanei a6o rpaTmC3 3 HmH. HeDopTpmAnHHu bOro npabnla moKe np3Becn Do BAKKHX TIleChNX TpABM.
- POMITNBWHN HADMIPHe HarpiBaHnHa anapata a6o He3BvHnI yum, 3anax YH dHM IeB HOrO, 3eBPHiTbCdo BNOBHOBAxHeHOro DInepa Canon. NoidaJIbe BVOpIcCTAHnMoKe pIIN3BeCTn Do nOKeJei a60 ypaJaeHHN eEeKTPuHm CTpymOM.
He KopHcyTneJerKo3aMnCTHMn aePo30JIaMn No6Iyn3y anapara. HoNTAeTJeKo3aMnCTnx peOOBH 3 eJEKTPNuHMMn DeTALMN BCEpeDnH anapara MoNe pnp3BcTeN do noHexi a60 ypaKeHHJ eJEKTPNuHMM CTpymOM.

YBATA
3 MpiHyBaHb 6beIeKn BInMaIte StTcEJIb SHypa XHBLeHnHa anapata, kHIO bIN He BVHOpHCTOByBaTHMeTbCn POTrAROM TpNBAIoro YAcY.
- 06epeHHo BiKpNBaIte Ta 3aKpNBaIte KpnHn, 106 He TpaBMyBaTn pyKn.
TpIMaTe pyKn OpaI npAJI BiB pOJIHbB B o6laCTi BvBeDeHn. IOTpApIJIHHy pK a6o OJMy B pOJIKN MoHe pN3BecTeNo TtIEChNX TpABM.
BHytpiHni cactnHn anapata b BvbiHn loTOK dyke po3irpiTi niD yac BnKopriCTaHHa Ta biDpa3y nCJIra hBoTo. Uo6 yHnKHytn onKiB, YNkaiTe KOHTaTy 3 ZmHn cactnHAMn. Kpim ToTO, Opa3y NiclA BVBedeHnn o03pykBiHN MOChTy 6b tyraprAi, TOX noOBdTec3 3 HMMObeEHO. HeoBepehHiCtB MoKe pni3BeCTn Do onKiB.
Texhne 6cIyroByaHH Ta orJn
AIOIPEEDJHEHH
- Pered YuHHeNHAM BIMHKITb anapat i BmIMtB 7tENCeMb UHypa HJMBLEHHA 30peTn. JHKUO bTO He 3pO6bUTN, MOKe CTaTHCA NOHEXa a6o ypaJHexHN eJeETPCHINM cTpyMOM.
- Yac BiJ yacy BnMaIte wTencelb i3 po3eTKn Ta BNTpaIte cyXIOI TKHINHOO pII nI 6pUd i3 po3eTKn TA 3 OCHOBI METaJIeBHX WtIPiB wTencelB. Bolorin pII mOKe np3BeCTn DO KOpOTKOrO ZAMHAnHa a6o NOKeKHi.
OuHuaTe anapat BOLOIO IO dbpe BnKpyeHOIO TKAHHIO. 3B0oJHyTe 1O tKaHHNy IInIe BoIO. He BnOpictoyite cInrpt, 6eH3OI, PO3uHHNtN Ta iHJI leKo3aMnCTi peOBOHH. HoTakT TaIXx peOBOHH 3 eJeKTPnuHmIM DeTaIaMn BCEpeHNi anapata MoJE np3BeCTn Do noHexKi a6o ypaKeHH J eKeKTPnuHm CTyMOM. - Perylnpno HepeBipRte UHpy KINBLeHHa Ta Wtencelb Ha HABHCTb NsIOKdHexHb. PHepeBipRte Anapat Ha HABHcTb Ixki, 3a3y6IiN, NoDpRnH, TpiuHn abo NaMmPhe HarpiBaHH. BkopniCTaHH 6OlaDaHHn B nOrAHOMy CTAHI MoE pIn3BecTN Do noNekHi a60 ypaKeHHe EJIeKTPNHIM CTpyMOM.
BntpaThi MaTepiAn
A NONEPEIXEHHA
He KndaaTe BVNOPCTaHI KaTPnDJI 3 TOhePOM y BIDKPHTN BOrOb. Ye Moze CnpuHnHTn 3aMaHn J npu3BcTe Do oPiKIB a6o noKeJx.
- RaKIO TOHEB BINADKO BO3CNHABCS, 6OeEHO 3iTpIb
P3CNHANH NPOOJOK BOLORO M'RAHO TKAHHOO; CTepEJIITCBs, 106 He BvNxHyTu NIO. HiONHe Ne pnpBpaTe PO3CNHANH TOHEP NINOOCOM. Ue MoKe np3BcETn Do HecnPabHOCTI NINOOCCA a60 BV6xy NIIy Bpe3yIbTaTt CTaTHNHO rO3p4y.

YBATA
36epiraTe KaptniKhi 3 Tohepom Ta iHwi BntpaHi MaTeiaIb Micux, HeoocTynnx DJIa dTeir. Li pa3i KObTaHHr TohepaHeraiHo 3BepHtbcra do likapar a60 TOcHkoIorHOrO ceHTpy.
He HamaraTecra po3i6paTn KapTpndj 3 TOhepOM.ToHep MoHe pO3cinaTCHN JnoTpanNTB Oo1 a60 pot. JHIO ToHep NoTpanNTb B oio pot, HeraHO npomHteix XOLOHOIO BOODO Ta 3EBPHtCBdoJIkaPAr.
- RaKsqo ToHep BnCnnaBc3 KapTpndJa, CstapaiTeca He BdNxaTn Iyoro Ta cnldHyIte, 06b HIn He Notpamnb Ha ukipy. RaKsqo ToHep NotpapanbHa ukiPy, HeaHIO BmMHe Te i3 MInOM. RaKsqo BV BnDnxHynn ToHep a60 ukiPap noPa3HeHa BhacIdoK hOHTa 3 NHM, HeaHIO 3BePHiTcB Do loIkapra a60 TokCNKOloriHORO ueHTpy.
Inhe
A NONEPEDJXEHHA
Rkso BN BHOpNCTOByTe KApDIOCTMMyJLTop UeI anapat yTbPoIE Cna6He MaHIThe None. BiyBwIn BOrpAH3Mi RHKcB NopyuHenHa iD qac pOboTN 3 cIM anapatom, BiDiIdiB bIg HbOro HeraHo npOKOHcyblTyItec3 IkaPem.
HaIexHi npabObi nobiDomJIeHHa
IOpHdUnHi 06MeJHeHHa 0oDo BnKOpNCTaHHa Bnpo6y Ta 3o6paKeHb
BnKOpNCTaHnIbOTo BnOByIaI cKaHyBaHH,dpKy a6o
KoIIOBaHH 6yIb-RAHM IHINM YINOM NEBHNX DOHYMEHTIB
Ta BnKOpNCTaHnI TaHXN bIXdCAHOBAHnx,HaDpyKOBaHHx a6o
ChOIIOBAHnx 6yb-RAHM IHINM YINOM 3O6paKeHb MOte 6bTyN
3a6oPBOHe O3aKOHm TA CTaTH pNcYHOO pPrTARHeHHNdo
KpIMHaJIbHoI a60 rIpMaJdHCbKO I bIDNoiDaJIbHOCTI.
HenOBHn CnIMOC K TaHX N DoKUMeHTIB HabeDeHO HINcYe. CeI CNICOKCTbOpEH NLIse dIra DoBIduHN. JkUO BnMHKAHOb CymHIBN Udo
3aKOHHOCTI BnKOpNCTaHn I BnOBy I da CNaYBaHH,dpKy a6o
KoIIOBaHH 6yb-RAHM IHINM YINOM NEBHNX DOHYMEHTIB Ta/a6o
BnKOpNCTaHnI TaHX N BiDCaHOBAHnx,HaDpyKOBaHHx a6o
6yb-RAHM IHINM YINOM ChONiIOBAHnx 3O6paKeHb,cllD
3BePHTNCsA 3a Po'8CHeHHM DIO PAuNHsA 3IOPOUHHN PITAHb
- PanaepoBi rpowi
- DopokhiyeKn
-Платінгі доруенні - PpOdoBolbU TALoHn
-Денишіceptнфікати - Pnoptn
-Поштови марн (nогаши abo Henorajaши)
-IMMirpauiHIDOKyMeHTN - ldeHTnΦiKauiHni KapTKn a60 3NaKn po3pi3HeHHa
-BnHytpiHm Mapn rep6oBoro 36opy (noraeni a60 Henorataehi) - DOKUMENTI ZOdo BiiCbKOBoI NOBHHOCTI
- O6liraüi a6o iHsi dokymeHTn npo 60proBti 3o6o'raHHa
- YeKENa6o KbNTanHcii, BnDaHi yprAOBIMn aReHcIyAMN
-Akiohepi ceptnikatni - IocbiDueHnB0iTaTceptnPhiKaTnHa npaBO BnaChocti
Tbopn, 0x oxopoHrOHTcB3aKOHAMn npo aBTOpcbKi npaba/BNTbOpn MmCTeUcTBa 6e3 OTpIMaHHra 3roDn BlaCHnKa abTOPcbKnX npab
Бул doхладeo 3nauchnx 3ycnIb dIЯTOrO, lo6 y noc6HnKaxdo anapata byni BIDcTyHI HETOHOCTI ta ynyuChn. Ondak, 3BaXaUOHy NaTe, zu MM NOCTIHO BDOCKoHaIOEMO haui npOdyKTN, 3BepHiTbCrydo KOMpanII Canon, RaIoo Bam 3NaDo6JIbTaCToHHi TexHiHHi xapaKTePncTnKn.
Par komplektacija ieklautajam rokasgramatam
Current Time Set. Must rechg. battery for 24 hrs. to save time settings. After turning main
8v Paper jam. Press [▶] to display steps.
Current Time Set. Must rechg. battery for 24 hrs. to save time settings. After turning main
Pradinić fakso paramétru nustatymas ir Telefono kabelio prijungimas
1 Nurodykite pradinius fakso parametrus.

Kahepoolne printinine
Execut instalare fax?
Instalare acum
Instalare mai tārziu

Trimiterea unui document direct de la computer (PC fax)
Pe länga trimiterea si receptionarea normala a faxurilor, puteti sautili sifaxul PC-ului.
Trimiterea
Puteti sā inregistrati destinatièle de fax in agenda de adrese.
Puteti specifica destinatièle utiliser diferite metode, astfel incat sā trimitei documentele rapid.si simplu.
①HpaTHo pBHOBOIDCTBO (HactOaTO):
PpOcTeTe nIbPBO TOBa pKoBOdCTBO. BTOBA pKoBOdCTBO Ce ONCbAT HnCTaIIpaHETo Ha yCTpoiCTBOTo, NaCTpoiKnTE nPeDyPpeJKeHnTa. PpeiDa hNtON3BaTe MaunHata, npOcTeTe TOBa pKoBOdCTBO.

② FAX L Driver Installation Guide (User Software CD (HompaTДиС сnotpe6ntelchen coФуер)):
PpOHTeTe pBkoBOJCTBOTo CJIed TOBa. B TOBa pBkoBOJCTBO Ce OINcBa HnHCTaIInpaHeTO Ha coΦTyepa.
③ e-Manual (EJelKtpoHnHO pBHOBOdCTBO)
(Multi-lingual User Manual CD (HOMnant MInch C MHOoe3uHo pHoBOdCTBO 3a notpe6nteJI)
IpoOeTeTe IaIaBaTt, KoTTo Bn e Heo6XoDmA. CbIbPkaHnE To h a e-Manual (ELeKTOPOHn PbHOBOvCTBo) e KaTeOpRi3pAoNo TMe, 3aJa ce yueChn HAmHpArETo Ha JKeLaHaTa NHeΦopMaZuN.
Пгелlexдане ha e-Manual (ElenentponHno pbHOBOdCTBO) OT KOMMaNT dIcHa
1 Поставete Multi-lingual User Manual CD (Компацдис с Многоетно рьковоству за потpeбиту) в Компютва.
2 136epeTe e3Hk.
3 LpakHeTe Bbpxy [Display Manuals] (Pokan p'kbOBoCTBaTa).
※BaaHcMMOCTOTIINOL3BaHnATAonepaHOnHa NCNTema CeNoHA3Ba Cbo6eHMe 3aAuta HA ChrpyHOCTTA.
MetoHaBbBeHdaHe Ha TeKCT
CmHa Ha peHnMa Ha BbBeHdaHe
HaTnCHete [ ] 3a da n36epeTe
BbBeHdahe TeHCT, CnMBOJn cnΦpN
BbBeHdaIe C6byToHnte CuΦnIy [(#) (CNMBOJN). 3a NOpO6HOctn 3a peKHMnTe, HA KOHTo MOHe Da ce ppeBKLIOHy, HNI TEKCTA, KOHTo MOHe Da Ce BbBeHJa, BK. JdChata CTpaHa Ha Ta3N CTpaHnua.
IpeMeCTBaHe Ha Kypcopa (BbBBeHdaHe Ha nHTepBaJI)
ПпсмсгБанго ce n3BbPbWA С ПОМOTа HA [ ]ИИN [ ]. ПпсмсгБеТe Kypcра Do Кра HA TeKCTa И HATINCHeT [ ], За DA BБBeDEte INHTepBaI.
N3tpnBaHe Ha 3Haun
I3tpnBaIte c nOmoTa Ha [C] (N3uCTBaHe).AkoHaTncHeTe 3aIbPjHtE KlaBnJa [C] (N3uCTBaHe),Ie N3tpnTe BCnUKn 3Haun.
BbBeHdahe TeHCT, CnMbOIn n uΦpN
| Реким на БъECHданe: <A> | Реким на БъECHданe: <a> | Реким на БъECHданe: <12> | |
| 1 | @,-/ | 1 | |
| 2 | ABC | abc | 2 |
| 3 | DEF | def | 3 |
| 4 | GHI | ghi | 4 |
| 5 | JKL | jkl | 5 |
| 6 | MNO | mno | 6 |
| 7 | PQRS | pqrs | 7 |
| 8 | TUV | tuv | 8 |
| 9 | WXYZ | wxyz | 9 |
| 0 | (He e досстен) | 0 | |
| # | -.*!!,::^_=/!?.$@ %&+()[](?)<> | (He e dосстен) | |
| * | (Смяна на рекима на БъECHданe) [A]→[a]→[12] | ||
CmHa Ha peHnMa Ha BbBeHdaHe
Yka3BaHe Ha nbpBOHaJHnHTe NaCTpoiHK Ha φaKca N CBbP3BaHe Ha TeIefoHen Ka6eJ
1 YkaKeTe IpbBOHaauJIHnTE HaCTpoKn Ha φaKaCa.

CleBaIe INHCTpyKcIMTe B PbKOBOCTBO 3a
HaCTPOBBAHe Ha PhaKca, 3a Da 3aJaTe HOMep Ha
PhaKca, IMe Ha yCTpoiCTBOTo n peHM Ha NOLyUbaHe.
3a NOBeue NOpIOb6HOCTn OTHOCHO peKMITE Ha
NOLyUbaHe Bk. e-Manual (ELeKTPoHNO PbKOBOCTBO).
e-Manual (EneKtpOnHPObHOBoOIOCTBO),Fax" (FaKc) Using the Fax Functions"(N3nOJI3BaHe Ha yHKUInTe Ha fAnca)Receiving Faxes" (IoiyuaBaHe Ha fAncboce)RX Mode" (PeHHMa Hn oJyuaBaHe)
Kan ce n3noI3Ba nOte6nTeJIChOTnHe
Korato n3npaatae dohyment, nHΦopmaunra 3a n3npaaua, KOIto cTe peRnCTpnpaln, ce OTpeaTbHa dokymenta Ha noLyuataJI.
2 CbpbKHeTe TelefoHHnKa6eJ.
Korato Ha dincniee ce nokae < CBbp3Ba He ten. liHHra.>CBpbKeTe TelefoHNnHa Ka6en, KaTO H3IOJ3BaTe 3a cnpaBkA Fmrypata.
PnHCTaInpaHe Ha cLywaKaTa
3a noBue He HnΦopMaun BHK. p'koBOcTBOTO, npedocTaBeHO CbC cnUshaJkata.
3 N3JIe3Te OT PbKOBODCTBO 3a HacTpoBHaBe Ha ΦaKca, cIeI KOeTO pectapTnpaIte MaunHata.

I3KJIIOYETE yCTpOCTBTO nI3UaKaIte noHe 10 cekyni, npedn da ro BKLIOYITE OTHOBo. TINbT Ha TElefoHHaTa IInHna He ce OTkPnBa aBTOMATuHNo.Bx.e-Manual (ELeKTPOHNO pboHOdCTBO) nHaCTpOTe TElefoHHaTa IInHna pBuHO.
e-Manual (ElektroHNO pBkoBoDCTBO), "Fax" (Фанс) > "Using the Fax Functions" (Изпалова не ункин'te на phankca) > "Changing Fax Settings (Settings that Can Be Specified Using the [Menu] Button") (Помяна на havingonhte Na phankca (насчтοйн'te, конту мочьда се унakат урета (Мено)) > "Configuring Send Settings" (Конфигурира themselves on havingonhte за израше) > "Select Line Type" (Избор на тинлел)
3aandahe Ha φopMaTa N TnPaHa XapTnATo
HaTo CLeDbate INHCTpyKuNITe Ha ekpaHa, 3aJaIte fOpMaTa I TnIa Ha XapTna.
HnctaInpaHe Na dpaBepa/coTyepe
Инсталар Te Драивера и coфтуера ot User Software CD (Компацт дисс с поразец софтуер). 3a подравна Информacea отоно почу рпеспгпп по Исталаре вж. FAX L Driver Installation Guide.


- MoIIM NOTpe6nteJIte Da OKaHaT CbDeIcTBHe 3a nporpaMaTa Product Extended Survey Program. 3a NOBHee NOpO6HocTN BHK. ONncaHnraTa Ha ekpaHa.
I3pbJHHeHneHa nOJe3n 3aJaU
MoKeTe Da n3NoI3BaTe pa3nHn FyHKuHn Ha yCtpoiCTBTO.CneDbA o63Op Ha OCHOBHnTe FyHKuHn, KOTo MoKeTe Da n3NoI3BaTe B eHeDHeBHata Cn npaKTnKa.
KoHpaHe
YBeJIuYeH/HaMaJIeH N KONJIA
Mochete da yBelenuabaTe nHn HamaJIaBaTe DOhymeHTN CbC cTaHdapTeH φOpMaT, TaKa Ye da rN KOIpaTe Ha XapTna CbC cTaHdapTeH φOpMaT. MoChete da 3aJaTe CbOTHOseHne Ha KOIpaHe B PpoceHTN.
2-cTpaHNO KOnnpaHe
MozheTe da KOniPate eJHoCTpaHHN DOKymeHTN OT DBeTe CTpaHn HaJIcT XapTna.
Homnlektybahe
Mochete da copTpate KOJIaTb KOMJIeKTI NO HOpE Na CTpaHnla.
HamaJeHo oΦopMJIeHne
MoHHe Ta HamaJIaBaTe MHOKeCTBO DOKyMeHTN, 3a Da Tn KOnIpaTe Ha eDIN JInCT.
Honnpahe Ha JInuHN DOKyMeHTN
Mozhe Ta Kaonipate DByCTpaHEn LInueH DoKymeHT OT eHaTcPapaHa Ha IInCT XapTna.
ΦaKc
HnpeHTHO n3npaune Ha DOhymeHT OT KOMNtbp (faoCOT KOMNtbp)
Ocben HOpMaIHOTo I3npa7ae I NOlyu7BaHe Ha ΦaKCOBE, MoKeTe Da I3NoJl3BaTe ΦyHKUraTa, ΦaHc OT KOMNHTbP.
H3npaapane
MoKeTe Da 3aIaMeTbBe PhAc MecToHa3HaueHnBa aDpeChata KnHa. MoKeTe Da 3aJaDeTe MeTOHa3HaueHnE To Upe3 pa3JIuHn MeToDi, KoETO Bn DaBa Bb3MOxHoc T da N3Pauate 6bp30 n JneCHO DOKyMeHTN.
TbpcHeHaMeCTOHa3HaueHne
-Бутониаськраетно Habиранe
- Na6npaHe Upe3 KODoBe
- Гуна на мостонанauthени.
- 3aadaBaHe OT xpoHOLIOrTa Ha nIpaaHa
-Последователноразпрашанe
- 3a6abENo n3npaunahe
Toluyabahe
Получаване В пametТ. ПolyчehHTe DOKHMENTMOJOHe da ce cxbpaaHbATВ pamETTHa MaMaHnHaTa.MoJTe Da OTNeuHaTaTE CbXpaHEnHTe DOKHMENTNo BCaKO BpeMe NJIaHO HmATE HJxJaOT TЯ -ДЯ ГИ N3TpneTe.
OdaJIeueHo nolUyabaHe
Ako e cBbp3aH BbHsEeTe TeneOHN, MoKeTe Da npBkIIOHnTE BeHara Ha peKIM Ha nolUyabaHe Ha fakCOBE, KaTO NO BpeMe Ha pa3roBOp HabepeTe IeHTnFikauOnHHn HOMep 3a nolUyabaHe Ha fakCOBe Upe3 bYToHnTE 3a Na6HpaeHa TelefoHa.
PonckBahe 3a noIyabaHe
MoKeTe Da n3BLeueTe npedBaupTeJHo 3apeHn DOhymeHTn OT faKca Ha noJaTeJr, KOraTo NcKaTe Da noluynte fakca.
Пechат
OTneuatBaHe C yBelenuabaH/HamajlaBaHe
2-cTpaHEn neuT
HamaIeHo oΦopMJIeHne
MoHHe Ta HamaJIaBaTe MHOJeCTBO DOKyMeHTN, 3a Da rO TneuTaTe Ha eINH JInCT.
Peeat Ha KHHKHN
OTneuTaBaHe Ha IJaKaTu
OTneuyatbahe Ha BOden 3HaK
Ioka3BaHe Ha Bn3yaJIH3aUJn IpeJn OTneuTaBaHe
I36bnpaHa ,pnoΦn
OTctpaHbAhe Ha 3aceHnlaTa xapTna
Ako ce noBn To3n EkapaH, TOBa O3HaCyBa, Ye mMa 3aceHaJaXapTna BNoDaBaUToYcTpOcTBo Ha MaunHa. CneDbAKn IpOeDypaTa, Noka3aHa Ha ekpaHa, OCTpaHeTe 3aceHaJIny DOKymEn Tnn XapTna. TOBa pKOBODCTBO yKa3Ba cAmO MeCtata, KbTeO To3acJaXapTna. 3a NoDpO6Ha INΦOpMaunr 3a BCKaOT FyhKnInTe Bk. e-Manual (EleKTpoHNO pKOBODCTBO).
8v3aceH.xapT.
HaTINCH. [▶], 3a
Да ИЗБeДeTe
CTbIKNITE.
IpaBaAzo yctpoiCTBO

Haceta 3a xaptna
3aenkan
BbtpseuhoctHaMaunHaTa

Tohe Kacetnte ca KOHCymatBn. Korato ToheT e Ha npBbPwBaHe Nn CBpHn HApBnHO, DOKaTO ce N3NJIra DaJeHa 3aJaHa, Ha ekpaHa Ce noka3Ba CbO6eHne NIn E Bb3MOxHn Da Bb3HnKHe HrKaOH ot CneDHTe npo6IeMn. PpeepmeTe CbotBeTHnte DeiCTBnCnped Cnya.
Pn noBa ha cbo6eHne
Korato Tohepbt 3aOnueHne da npBbPbBa,doKaTo ce n3nbHna DaedHa 3aDaHa,ce noka3Ba cbo6eHne Ha ekpaHa.
| Съоб Shedne | Кога на ekрANA ce показв това съоб Shedne | Описане и рeshеня |
| <ПриготveTe Тонер касета.> | Korato skopo size ce наложи дa ce smehi Тонер касета. | РазклATEte TOHep Kasetata, за дa ceразп dedelten ToHepbT paBHomepHo BbВ Бьтrewhoctta и. e-Manual (ЕLEKTPOHNO рьковodctBO),Before Replacing the Toner Cartridge" (П配电сmaHATA ha TOnep Kasetata) ПрелорытELNo e da поимени ToHep Kasetata подаритelno,:aLo size пechатate obemnctn dokumentn. e-Manual (ЕLEKTPOHNO рьковodctBO),Replacing the Toner Cartridge" (Смана ha Тонер касета) |
| <THp. e nochу иЗчepи.> | Korato topeh kasetata e доCTIHHLa kpaia na ЕнспlioatauzhoHHNci cn ЖИBOT. | РазнлATEte TOHep Kasetata, за дa ceразп dedelten ToHepbT paBHomepHo BbВ Бьтrewhoctta и. e-Manual (ЕLEKTPOHNO рьковodctBO),Before Replacing the Toner Cartridge" (П配电сmaHATA ha TOnep Kasetata) Ако ТОВа съоб Shedne He Ичe3Ne, Смehete ToHep Kasetata. e-Manual (ЕLEKTPOHNO рьковodctBO),Replacing the Toner Cartridge" (Смана ha Тонер кasetata) Ако ТОВа съоб Shedne He pOkaJHe, пrieeTURAaHTe ФakCOBE size ce cьхрановat В пamETTa, b3 size ce peaTAT. ВзмоJO e OTchETite cbyso da He se OTpeaTBat dORI aKO e 3aДaDEHO da CE peaTAT abTomaTHUHO. Ако обаe <Прдьлжаванe otnev. priи Ичeрдан ToHep>В <Hactr.pechatprpi получ.> e 3aДaDEHa Na <ВknL>., peaTahETO size пбдьлжи, Ho ha pa3peaTKNite Моче DA ce nachaTat belenЧeRTN iINI ПETNa. e-Manual (ЕLEKTPOHNO рьковodctBO),Printing the Report Automatically" (AВТOMaTHUHO OTpeaTBAHe Na OTchetи) e-Manual (ЕLEKTPOHNO рьковodctBO),Continue Print. When Toner Is Nearly Out" (П配电ьлжаванe otnev. priи Ичeрдан ToHep) |
Horato no pa3neuathnnte Hma 6eHn cepTH nHn pa3neuathnTe ca uactNuHO n36eJeHn
Korato matepnaite ce otnea bat HepabHomepeho n C 6einnn Hbni n Tx, DOpn H na epaHa da hma cbo6eHne, Tohe p Kacetata e doctnHaIa kpar Ha ekcnloatauohnnc n nepno. Korato KaeeCTBOTo Ha neat ctahe He npneMInBO, Bk. no-doJy ka Ka otCTpaHnte npo6nema.
Horato maTePnaJIte ce neaTat HepaBHomepHo nIc 6eIy IbNci PO TAX
Korato Tohep KaceTa e Ha npBbPbBaHe, MaTepaTc Ce neaTaT HepabHomepNo nC 6eInn BnIIO TxA.


He ce noka3Ba cbo6eHne Ha ekpaHa, aKo TohepBt e Ha npmbpShaBe. 3aMeHete ToHep Kacetata, Korato MaTePnAJIte Ce neyataT HepaBHomepHo NIn C 6eJIn HbUcN IO TReX.
Horato To3n npo6lem Bb3HNKBA
CneBaIe CTbIhnte B doIyOnHcHaTApnoeDpya, npEi Da 3AmHnTe ToHep KaceTata. MaunHata npOdbJIkaba da neHaTa, DOkaTo ToHepBT CbPmN DOKpaI.
e-Manual (Elektroho pkoBocTo), Before Replacing the Toner Cartridge" (Ppei cmaHa ta Ha tohep kaceTa)
Horato hauectboto Ha nevat Bce oue e He3aobolntelho
Ako npo6IembT He ce OTCpaHn, cIeI KaTo I3BbPwHte CTbNKeTbe D0JIHaTa IpoUeDpya, 3aMeHeTe ToHep KaceTaTa.
e-Manual (Elektroho pboKoBocTo) Replacing the Toner Cartridge" (CmHaTa Ha ToHep Kaceta)
N3noJI3BaHn CmBOLIN B HactoIOTOpbHOBOdCTBO
I PENEYPENKDEHNEI
IpeDynpexJeHne, CbP3aHO c Oepaunu, KOITPO npn HnnpBnIO n3TbJIHeHHe MOrAT da DOBeDat DO HapaHraBaHe Nm CMbpt.
3a da nIIOJI3BaTe 6e3OJaCHO MaIHHATA, BnHaN Cb6JIIODaBAJTe Te3I npdeynpeKdEHHIA.
BHIMAHHE!
IpeynpexkdeHne 3a BHNMaHne, BbB Bp3Ka c Onpaun, KOHTO pni HnepaBnIO H3TbJIHeHne MOAT Da DOBeDat Do HapaHbaHe.
3a da nI3noI3BaTe 6e3oIacHO MaIHHata, BINaHc b6JIouDaBai Te3n npdeynpeKdEHHA.
KlaBnHm6yToHn, H3NoJ3BaHn B TOBa pIbKOBoCTBO
CIMBOJTE NaHMeHOBAHnRA Ta Ha 6yTOHn, PNOOCHEN NO-DOLy, Ca pIIMeP 3a HauHnA, PO-KoITOn Ce O3HaHabat B TOBa pBkoBOcTBO 6yToHnTe, KOITOTrpa6Ba Da n3NoJ3BaTe.
- ByToHnHa paobToHnIpaHeI: [NkoHa ha KlaBnIa] + (Ime Ha KlaBnIa) PpIMep: [⑦] (CToI)
-Дисглел:<3адайтесданаги.> - ByToHn i eIeMeHTn Ha IINcIIeR Ha KOMIOTbpa: [Preferences] (Ппсдночтань)
I PENEYIPENKDEHNEI
3aДаи36eHHTe риССа OT hapaHRBaHe Илп NOВрEDA ha боурDAbaHTo, KaTOи 3a HOPMatIBHa INHfOpMaUIn, IpoчETe правна鉴别нь в Multi-lingual User Manual CD (Компт дсн с MнORoe3uHnPo tьKOBoDCTBO 3a NOTpe6bITeI),npedocTaeBc n пpoJyТа.
Baxnn yka3aHHa 3a 6e30nachOCT
PnepdJa hno3Bate MaunHnata, BHmATEIHO npOHTepe p3aDela BaxHHu yka3aHnna 3a 6e3oNaCHOT' O HAcTOAHTO pKbKOBOCTBO, KaHTO n B-e-Manual (EJEKTOPOHO pKbKOBOCTBO).
TbkyeTaHaTe3nYka3aHnEJaCepeJeDoTbpaTHe npahraBaHnHa NoItepeBTEyHaAdoTyNlUaNJaCeN36BeHHe HauacHeHO MaMATEpHaHn UeHTBnCnA3BaWteYka3aHnTAuN3NCBaHmTa 3a pa60Ta.
ImaItePpeBDn, CBe BHe HocTe OTTOBOPHOCTTa 3a BCNUKNoIeTN,
pnpnuHEnB CJIeCTBNe HeCnA3BaHToH Na DaJeHtBE HACTOuTO pBoBOODcBO Yka3aHn, I3NoJ3BaHToH YaCTPOJCTBO T3 aEIN,
paaJInH NOT H3NaueHIne, KaKTo N B CJeDcTBVe NOPaBH NIM
MOdNfKaunn, INBbPseHn OT KoEt O Da Liue, KOEt He e OTOPI3nPAh
TexHKn Ha Canon.
MOHTaK
A INPEUYIPKENDEHME!
He IplacpaIte MaunHATA B 6JIb3OCT do 3aIaIIMn BeueCTBa, KaTo Haprnpmep npOdyNTi, CbIbPDAuIaNIOXoI, NIN PA3peIITeN 3a 6On. Ako Te3n BeueCTBra J5B3AT B KOHTAe C eEKeTPhueChnte YactIn B MaunHATA, TOBA MoJHe da Bb3IaIaMeHn BeueCTBaTn U da DObede NoKnap IN IONBIOUeH NICH OT eEKeTPhueChn yUpd.
He nocTabaIte 6nHyTu n dpyTu MeTaJIHn PpeDMTe, HNTO CbdoBe cTeHoCTN Bbpxu MaunHATA. Ako YyKnDi BEUeCTBa BJIa3AT B KOHTANT C eJeKTPnueChNTe cHaT N BcTPOJcTBOTO, TOBA MOKe Ha PpeDn3BnHa NoKap IIN eJeKTPnueChN yIap.AKO B MaunHATA NOnaIHe BbHNO TJILO, He3ababHO rNkHIOUeTe N Ce CBbPKeTe C MeCTHn PpeCTaBtIeHa Canon.
ABHIMAHNE!
He Iruacipaai Te MauiHHATA Na CJIeHNHTe MecTa. Hecnla3BaHETO Na ToBa Yka3aHne MoHe Da doBebe Do qH3NueChn HapaRbAHn, noHap nI IN TOKOB yUAP.
Hecta6nHa OCHOBA
- MRCTO CbC CINH TpENTHeNIA.
- Macto, Na KoToE 0e 3a 6IoKnpa DocTbTbT Do BEHTInaUHOHNITE OTBOpN (peKaIeHn 6Ii3O Do CTEnI, IerIa, MbXECTn KINJIMN INDpyTN nOdo6Hn)
BlaXHoHnIpaUHO MRCTO
- MRCTO, IN3IOXHEO HA DNPEKTHA CJIbHYeBa CBETLIHa, INI HA OTKPNTO
-Място,пдюжно Ha BИСОн Temпературn
- MRCTO, 6IN3O DO OTHPNI3TOUHN HA OfBH
- HeNo6pe BeHTnIpaHO MRCTO
BbIpeKHe No Bpeme Ha paOta MaunHata reHepnpa 03OH,TOBa HE Oa3Ba BmJHHe BByPxy YOBeka.AHO obae Bb3hAMEprBATE da INIOI3BaTe MaunHata npOdbJIHKeTIHo,OCHyptepo Do6pa BEHTIIaUHa HA MRCTOTA paOToA.
He CbP3BaTHe eoO6peHn Ka6eN KbM Ta3n Ma7nHa. Hecp3BaHTo Ha ToBa yka3aHHe MOHe Da DOBeDe Do IOHap NIN TOHOyap.
Bb3MOHHO e MaJIINHHTE c TBpD dNcK da He pa60TJr npABInHO, aKo CE hNoI3Ba Hat na MeCTa HADMOPcBA BVCOuHa NT OKOIO 3000 MToPA nI IN NOBEHe HAD MOpCKOTAO PABHNUe.
EeHTpuecko 3axpaHbHe
A PDEyPPEKDEHIE!
He npo3aBte 3axpaHbaui Ka6eN, paIyHnHOn OT To3H, KOITo e pdeOCTaBcH, 3aQTO TOBa MOJc Da ppeIN3BnKa IIOKap Nm TOKOB ydap.
HeMoHnIpaIte HeOrbAite 3axpaHbauaHa Ka6eN He ro bIpaIte npekaleHo CnIO. He noctabraTe TeKHN pEdmEt N Bbpxy 3axpaHbauaHa Ka6eN ToBpeKaHdHTo Ha 3axpaHbauaHa Ka6eN MoKe Da DoBeDe Do ToHap An ToKOB Uyad.
- He Bкн�ьаite ИИн 3ннсчыгоуе с мokр рьцe, ть кato MoHe Da npedINsBnKATE TOKOB ydap.
- He Bклчыао Машинatable В удь/лнгпел Илп радзноглгел. Hecna3baHETO ha TOBA yka3aHne MОke da do BOBeDe Do noKap mI IN TOKOB udap.
He 3aBbP3BaIte Na Bb3eI 3axpaHbAuaKabE, TbI KaTO TOBA MOHe da npedn3BnKa nOkap nn ToKOB ydap.
- PocstabeTe 7eCSeLa DOKpA B eELKTPnueCha MpeHa. B npOTnBHe Cnyau MoNeJa pPeDn3BnKaTe NOpAkap NIn eELKTPnueChu Unap.
- Pto BPEme Ha rpbMOTEBUNH 6bpyn H3KJIIOUaHTe UcENCeA tO KOHTaTa. Hecnla3BaHETO HA TOBA yka3aHMe MOJE da DOBeJe Do noHAp, TOKOB Yadap NIN NOBPeDA HA CAMOTO UCTPOICTBO.
BHUMAHNE!
BHKJIOUHBAIITeMaJIINHATAcMoB EJI.MPEHJI, KOHTIO NHOKNHPBAT eJN. IN3NCBAHNAITa, NOCOCHENI B HACTOUIOTo. HeCn3BaHETO Na Toba yka3AHJe MOHKe Da DOBeDE Do NOKAP NII TKOK Uydp.
He npenpueaIte Doctbna do eI. KOHTaIa, B KOITo BHIOHbATE MaMHHaTa, 3a da MOHETe 6bP3O da I3KIOHHTe 10ceJa B CJIyAa H aabapria.
Pa60Ta C MaunHaTa
I PDEUYPENKDEHNEI
He p3706b4Ite HINMOdHnpuiaTe MaUNHata. MaUNHata CbIbPjHa N3IOJHEn HA BnCOKa TEMHPaTy a BnCOKo HapJeHne HOMTOHEHTN, KOINTO MORAT Da pInHnRTP NIOKAP INIK TOKOB YdAp.
He nO3B0JbAaIte Ha deca da pinnat nnIa da cn Irgparrc bC 3axpaHbaaIg Ka6eI,dpYrTe Ka6eN,HNTO C BbTpeUHnTE eJeKTPnueChnTE qactN. Hecna3BaHTo ha Toba yka3aHme MoHe da doBeDe Do cepno3HN Fmneuchn HapahBaHnIy.
B cnuyaie MaunHata H3daba CtpaHH 3Byu,OTeJI HeecCTBeHN MnPH3MM,nyueK INI npHeOmePA hONHtA,ceCBpJHETe C OTOpHINAPn PnpctabInTe Ha Canon.13N013BaHToHa MaunHata B TaKINBA cnuyan MOKe Da DOBede Do nOxap An NTOK TOUd yad.
He IaIIO3BaJIte NEcHoo3AIIIMn CnpeIIOBE 6IINO DO yCTPOIeCTBO. AHO 3aIaIIMN BeIeCECTBA BJIATB KOHTAKC T NIOEYKeCHNEKITc actIn B YCTPOIeCTBO,TOA MOHE DA pIepI3BnHa IOJAP nIINTOHKU Oyad.

BHIMAHNE!
- O t c b o 6 p a k e H I N 3 a 6 e 3 0 n a c h o c t n 3 K l i u v b a Ite 3 a x p a H b a i n y Ka 6 e, K OR A T O H I M A d a N 3 p o N 3 B a t e M a u H n H a t a D b I r o B p e m e.
- Oтваряпу И застаряпу КацштЕ Виимателно, 3aда n36berheTe Наразьвае на рьцete си.
- Pia3ete pIeTe I npexnTe CN OT bPrtAnTe yCTpoiCTBa B neaTHATA oBlaCT. AHO pIeTe IIN dpXHTe BN 6bDat 3axbaHaTt ON bPrtAnTe yCTpoiCTBa, MoHe Da NOLyHrTe HapAHBaHe.
BbtpeunoccttHa maunHATA n3xOHNr OTbOp ca cnHOr Harpetn no BpeMe ha pa60a N mAnHO cIeT ToBA.136BaHTe DOnnp Do Te3n qactn, 3a da npedToBpATHe n3rapHnA. PaNeYaTaHATA xapTna MOKe da e ropeza h enoCpeDCTBeHO cIeN i3JIn3aHETo CnOT pInnHTepa, Taka ye BHIMABAITE, KORATO B3eMATE.B npotINBEH cIyuaM OMe Da ce H3ROPTE.
IopdpbHHa n npoΦnlaHTnHa
A PIEDYIENPEKDEHNEI
Изклочец MaHINHATAи n3BaDeTe IeNCeNAIOTKoHTaT,пддяЯ noCHCTBaTe.HeNa3BaHETO NaToBA yKa3aHne MoKeДа doBeDoNo pOJHAPnN ToKOB yUpd.
ИзклочаиTe OВЕме Ha BpeMe 3axpaHbuaNЯ Ka6eI OT eLEKtpuYeCEchATA Мр经Aи NOUCTBaJIte MЯCTOTO OKIoO OCHOBaT ha METAInHTe UINΦTOBE И KONTaTc CBc CyXa KbPna, 3a da OTCpaHNTe Npaxa I MPbCOTnTa. Пин HablaJxHЯBaHe Cb6paHnIT pax NaobuSABA OnaCHOCTTA ot KbCo CbeDInHHe mNn NoJap.
Почистайтmaшинатca влajкен,Но добpeицededн napцal. Hablaжнвайтпагада з почствае само c boda. He nol3BaIte aIkoXOL,бeH3eHOBN pnoDyNTi,разpeДТЕЛЗa 6OЯ ИлpyrпзлamnIMBEseCTBA.AKO nIoobHN BeueCTBA BIA3ATВКOHtAHTC eJELHTpUneCnTEЧАСИВУCTBOTO,TOBA MOKe DA npedIN3BINA noJxap IM IN TOKOB yIap.
-Побераяпгелу ретбови зрпавьстваши Кбел
ицелся. Побераяпгелу машинота за рыд, влъбати.
Одразваня, пкнати ил п配电могно нарраве.
Изаллbaанeto недбpe подьрхано оборудане д
дobende до поар пол токов удад.
HOhCyMaTHuBn
A PIEDYIENPEKDEHNEI
He xbprnIte ynoTpe6eHnTe Tohep HaceTH BOrbn. Toba MoKe He da BoBeDe do 3aapanBaHe n PecneKtBnHO -n3rapaHnna nn noXap.
Ako HeBOLHO pa3Jeete nn pa3cnne Tohepa, BHMaTeJIHO ro nonIte cbc cyx, MeK napcaJn H368raBe T BmUbaHeTo Ha n3npaHEnoT OT hepa. B NkAkb CnyaHne H3no13BaTe npaxocMkaHa 3a nouchTaBaHeTo ha pa3JIr Tohep. B npotnbEn CnyaH e Bb3MOXHO npaxocMkaKaHata da ce nobpeDi nn Da BtBHHHe npaxoBAe EcKnlo3nnpaDn eJeHTPoCTaTHHO pa3peJdaHe.
BHIMAHHE!
CbXpaHbAaTe KaceTte CToHEp N DpyrTne KOHCymtBn DaJeYOTdoCTbna Ha MaHN Hea.BcIyauH Na IOrltbuahe Ha ToHepa Hes3abAHO Ce CBpKeTe CLekap HIn C cHTbpa 3a KOHTpol Ha OTPaPBHaHTra.
He ce onntBaTte da pa3rIIO6BaTe TOhe KaceTne.TohepbT MoKe Da ce pa3npbCHe N cactnUs OT HeRo Da nonaHAT B OHTe nn yCTata.AKO cactnUs OT ToHEpa nonaHAT B OHTe nn yCTata.He3abAbHO nI3MmTe Cbc CTyeHa BOa I NOtbpCeTe MeDnHcKa NOMOu.
Ako Tohept Ce pa3lee OT KaceTata, N368BaIte BdNsiBaHeto My,KaKTo I KOHTaTMy C KOHata BN.AHO Tohept BVe3e BO KHTaC T KOHATA, He3a6abH0 FO 3MmIte CbC canyH.AKO BnIwate ToHepa NN KOHATA Bc B3pAlnB CLeDCTBne Ha KOHTaT C Tohepa HE3a6abH0 Ce CbPKeTe C Jekap nn C ueHTpb 3a KOHTPO HA OTPABHHra.
Дугн
A PIEDYIENPEKDEHNEI
- Ako n3poIaBte CbpeHcTmMyaTOp (neiCmeKbP): ToBa ycTrooiCTBO c3daba Cna6o MaHnTHO noJe. AnO cyBCTBaTe KaBHTo I da 6nlo aHOMaIMN B TraIoTO cn npa60Ta C Ta3n MaMaHa, He3a6abHo ce OTdaJeHete OT HeN e CoHCyItnpaIte C JeKaprA cN.
3aHOHObO orpaHnueHnE
(L) "Receiving Faxes" (RX) "RX Mode"
puiui puiui iui
-1511111111111111111111111111111111111
.4Lall 1e (..lll bbs s)
silll aclaw ci
ailll aellw gll lall jbll
jglal jzai zai jzai jzai jzai
aaiiae i j 1 aaii 1 1 1 1 1 1 1 1 1 1 1 1 1 1 1 1 1 1 1 1 1 1 1 1 1 1 1 1 1 1 1
(ωS[]) "Fax" (ωS[]) e-Manual
(ωsklalldzgl) "Using the Fax Functions"
Changing Fax Settings (Settings that Can Be Specified)
<Using the [Menu] Button

(a a a a) [Menu]
(JLwJrJl)“Configuring Send Settings" (JLj)“Select Line Type"
Caiuuiie aususususususususususususususususususususususususususususususususususususususususususususususususususus
auiy
Jusu Jusu Jusu Jusu Jusu Jusu Jusu Jusu Jusu Jusu Jusu Jusu Jusu Jusu Jusu Jusu Jusu Jusu Jusu Jusu
(220 )
Current Time Set.
Must rechg. battery for 24 hrs. to save time settings
After turning main

Language
Czech
Danish
Dutch
English
(00) User Software CD pLdiluJgoljU golll golll p 1234567890123456789012345678901234567890123456789012345678901234567890123456789012345678901234567890123456789
.FAX L Driver Installation Guide


Product Extended Survey 2015-2016.
aegi jgjll bayol gai lal gl gbi gill al

aLbck.8sll 3 aalwcll lssll jzdi kck.8sll g pLwll .dkiak.8gla 3 10
#
J 1 1 1 1 1 1 1 1 1 1 1 1 1 1 1 1 1 1 1 1 1 1 1 1 1 1 1 1 1 1 1 1 1 1 1 1 1 1 1
Jw
Juslls Jss Jg j 100000000000000000000000000000000000000000000000000000
ac( 1 + b) = 1 + b d)
= v00 - v1 ≤ ≤ 0
jggl 1
juaobuhui
aalglgagglgeqlglallllglss
a
clawdhaclub
aololololololb
aclbll 3 aiee
"do
Je aale 3jbi aill lilb gll jai .jgl liq yssall llgll pssll diSay. pbbio kai qolisiul dlKgill aassslll
#
0joo/0jso
J 1 J 1 J 1 J 1 J 1 J 1 J 1 J 1 J 1 J 1 J 1 J 1 J 1 J 1 J 1 J 1 J 1 J 1 J 1 J 1 J 1 J 1 J 1 J 1 J 1 J 1 J 1 J 1 J 1 J 1 J 1 J 1 J 1 J 1 J
aIwJyggjic
| الصصفós و الحرفية | الصصفós | الصصفós |
| "Before Replacing the Toner Cartridge" (الإستعمال) بعساحل مسبيعة بعساحل مسبيعة بعساحل مسبيعة بعساحل مسبيعة بعساحل مسبيعة بعساحل مسبيعة بعساحل مسبيعة بعس踝بiale مسبيعة بعس踝بiale مسبيعة بعس踝بiale مسبيعة بعس踝بiale مسبيعة بعس踝بiale مسبيعة بعس踝بiale مسبيعة بعس踝بiale مسبيعة بعس踝بiale مسبيعة بعس踝بiale مسبيعة بعس踝بiale مسبيعة بعس踝بiele مسبيعة بعس踝بiele مسبيعة بعس踝بiele مسبيعة بعس踝بiele مسبيعة بعس踝بiele مسبيعة بعس踝بiele مسبيعة بعس踝بiele مسبيeva بعس踝بiale مسبيeva بعس踝بiale مسبيeva بعس踝بiale مسبيeva بعس踝بiale مسبيeva بعس踝بiale مسبيeva بعس踝بiale مسبيeva بعس踝بiale مسبيeva بعس踝بiale مسبيeva بعس踝بiale مسبيeva بعس踝بiale مسبيeva بعس踝بiele مسبيeva بعس踝بiele مسبيeva بعس踝بiele مسبيeva بعس踝بiele مسبيeva بعس踝بiele مسبيeva بعس踝بiele مسبيeva بعس踝بiele مسبيeva بعس踝بiele مسبيeva بعس踝بiele مسبيeva بعس踝بiele مسبيeva بعس踝بisle مسبيeva بعس踝بiele مسبيeva بعس踝بiele مسبيeva بعس踝بiele مسبيeva بعس踝بiele مسبيeva بعس踝بiele مسبيeva بعس踝بiele مسبيeva بعس踝بiele مسبيeva بعس踝بiele مسبيeva بعس踝بiele مسبيeva بعس踝بbole مسبيeva بعس踝بbole مسبيeva بعس踝بbole مسبيeva بعس踝بbole مسبيeva بعس踝بbole مسبيeva بعس踝بbole مسبيeva بعس踝بbole مسبيeva بعس踝بbole مسبيeva بعس踝بbole مسبيeva بعس踝بbole مسبيeva بعس踝بisle مسبيeva بعس踝بbole مسبيeva بعس踝بbole مسبيeva بعس踝بbole مسبيeva بعس踝بbole مسبيeva بعس踝بbole مسبيeva بعس踝بbole مسبيeva بعس踝بbole مسبيeva بعس踝بbole مسبيeva بعس踝بbole مسبيeva بعس踝بpole مسبيeva بعس踝بpole مسبيeva بعس踝بpole مسبيeva بعس踝بpole مسبيeva بعس踝بpole مسبيeva بعس踝بpole مسبيeva بعس踝بpole مسبيeva بعس踝بpole مسبيeva بعس踝بpole مسبيeva بعس踝بpole مسبيeva بعس踝بbole مسبيeva بعس踝بbole مسبيeva بعس踝بbole مسبيeva بعس踝بbole مسبيeva بعس踝بbole مسبيeva بعس踝بbole مسبيeva بعس踝بbole مسبيeva بعس踝بbole مسبيeva بعس踝بbole مسبيeva بعس踝بole مسبيeva بعس踝بbole مسبيeva بعس踝بbole مسبيeva بعس踝بbole مسبيeva بعس踝بbole مسبيeva بعس踝بbole مسبيeva بعس踝بbole مسبيeva بعس踝بbole مسبيeva بعس踝بbole مسبيeva بعس踝بbole مسبيeva بعس踝بodule مسبيeva بعس踝بodule مسبيeva بعس踝بodule مسبيeva بعس踝بodule مسبيeva بعس踝بodule مسبيeva بعس踝بodule مسبيeva بعس踝بodule مسبيeva بعس踝بodule مسبيeva بعس踝بodule مسبيeva بعس踝بodule مسبيeva بعس踝بbole مسبيeva بعس踝بbole مسبيeva بعس踝بbole مسبيeva بعس踝بbole مسبيeva بعس踝بbole مسبيeva بعس踝بbole مسبيeva بعس踝بbole مسبيeva بعس踝بbole مسبيeva بعس踝بbole مسبيeva بعس踝بcole مسبيeva بعس踝بcole مسبيeva بعس踝بcole مسبيeva بعس踝بcole مسبيeva بعس踝بcole مسبيeva بعس踝بcole مسبيeva بعس踝بcole مسبيeva بعس踝بcole مسبيeva بعس踝بcole مسبيeva بعس踝بcole مسبيeva بعس踝بbole مسبيeva بعس踝بbole مسبيeva بعس踝بbole مسبيeva بعس踝بbole مسبيeva بعس踝بbole مسبيeva بعس踝بbole مسبيeva بعس踝بbole مسبيeva بعس踝بbole مسبيeva بعس踝بbole مسبيeva بعس踝بCole mسبيeva بعس踝بCole mسبيeva بعس踝بCole mسبيeva بعس踝بCole mسبيeva بعس踝بCole mسبيeva بعس踝بCole mسبيeva بعس踝بCole mسبيeva بعس踝بCole mسبيeva بعس踝بCole mسبيeva بعس踝بCole mسبيeva بعس踝بColem mسبيeva بعس踝بCole mسبيeva بعس踝بCole mسبيeva بعس踝بCole mسبيeva بعس踝بCole mسبيeva بعس踝بCole mسبيeva بعس踝بCole mسبيeva بعس踝بCole mسبيeva بعس踝بCole mسبيeva بعس踝بCole mسبيeva bgaشم مسchieva بعس踝بbole مسchieva بعس踝بbole مسchieva بعس踝بbole مسchieva بعس踝بbole مسchieva بعس踝بbole مسchieva بعس踝بbole مسchieva بعس踝بbole مسchieva بعس踝بbole مسchieva بعس踝بbole مسchieva بعس踝بbole مسchieva بعس踝بcole mسchieva بعس踝بcole mسchieva بعس踝بcole mسchieva bgaشم مسchieva بعس踝بbole مسchieva bgaشم mسchieva bgaشم mسchieva bgaشم mسchieva bgaشم mسchieva bgaشم mسchieva bgaشم mسchieva bgaشم mسchieva bgaشم mسchieva bgaشم mسchieva bgaشم mسchieva bgaشم mسchieva bgaشم mسchieva bgaشم mسchieva baillie mسchieva baillie mسchieva baillie mسchieva baillie mسchieva baillie mسchieva baillie mسchieva baillie mسchieva baillie mسchieva baillie mسchieva baillie mسchieva baillie mسchieva baillie mسchieva baillie mسchieva baillie mسchieva baillie mmбعه مسchieva بعس踝بiale مسchieva بعس踝بiale مسchieva bgaشم مسchieva bgaشم mسchieva bgaشم mسchieva bgaشm mسchieva bgaشm mسchieva bgaشm mسchieva bgaشm mسchieva bgaشm mسchieva bgaشm mسchieva bgaشm mسchieva bgaشm mسchieva bgaشm mسchieva bgaشm mسchieva bgaشm mسchieva bgaشm mسchieva bgaشm mسchievas bgaشم mسchievas bgaشm mسchievas bgaشm mسchievas bgaشm mسchievas bgaشm mسchievas bgaشm mسchievas bgaشm mسchievas bgaشm mسchievas bgaشm mسchievas bgaشm mسchievas bgaشm mسchievas bgaشm mسchievas bgaشm mسchievas bgaشm mسchieVAS bgaشم mسchievas bgaشم mسchievas bgaشm mسchievas bgaشm mسchievas bgaشm mسchievas bgaشm mسchievas bgaشm mسchievas bgaشm mسchievas bgaشm mسchievas bgaشm mسchievas bgaشm mسchievas bgaشm mسchievas bgaشm mسchieVAS bgaشم mسchieVAS bgaشm mسchieVAS bgaشm mسchieVAS bgaشm mسchieVAS bgaشm mسchieVAS bgaشm mسchieVAS bgaشm mسchieVAS bgaشm mسchieVAS bgaشm mسchieVAS bgaشm mسchieVAS bgaشm mسchieVAS bgaشm mسchieVAS bgaشm mسchieVAS bgaشm mسchievas bgaشm mسchievas bgaشm mسchieVAS bgaشm mسchieVAS bgaشm mسchieVAS bgaشm mسchieVAS bgaشm mسchieVAS bgaشm mسchieVAS bgaشm mسchieVAS bgaشm mسchieVAS bgaشm mسchieVAS bgaشm mسchieVAS bgaشm mسchieVAS bgaشm mسchieVAS bgaشм mسchieVAS bgaشm mسchieVAS bgaشm mسchieVAS bgaشm mسchieVAS bgaشm mسchieVAS bgaشm mسchieVAS bgaشm mسchieVAS bgaشm mسchieVAS bgaشm mسchieVAS bgaشm mسchieVAS bgaشm mسchieVAS bgaشm mسchieVAS bgaشm mسchieHAS bgaشم mسchieHAS bgaشم mسchieHAS bgaشم mسchieHAS bgaشم mسchieHAS bgaشم mسchieHAS bgaشم mسchieHAS bgaشم mسchieHAS bgaشm mسchieHAS bgaشm mسchieHAS bgaشm mسchieHAS bgaشm mسchieHAS bgaشm mسchieHAS bgaشm mسchieHAS bgaشm mسchieHAS bgaشm mسchieHAS bgaشm mسchieHAS bgaشm mسchieHAS bgaشm mسchieHAS bgaشm mسchieHAS bgaشm mسchie HAS bgaشm mسchie HAS bgaشm mسchie HAS bgaشm mسchie HAS bgaشm mسchie HAS bgaشm mسchie HAS bgaشm mسchie HAS bgaشm mسchie HAS bgaشm mسchie HAS bgaشm mسchie HAS bgaشm mسchie HAS bgaشm mسchie HAS bgaشm mسchie HAS bgaشم mسchie HAS bgaشm mسchie HAS bgaشm mسchie HAS bgaشm mسchie HAS bgaشm mسchie HAS bgaشm mسchie HAS bgaشm mسchie HAS bgaشm mسchie HAS bgaشm mسchie HAS bgaشm mسchie HAS bgaشm mسchie HAS bgaشm mسchie HAS bgaشm mسchieHAS bgaشm mسchie HAS bgaشm mسchie HAS bgaشm mسchie HAS bgaشm mسchie HAS bgaشm mسchie HAS bgaشm mسchie HAS bgaشm mسchie HAS bgaشm mسchie HAS bgaشm mسchie HAS bgaشm mسchie HAS bgaشm mسchie HAS bgaشم mسchie HAS bgaشم mسchie HAS bgaشm mسchie HAS bgaشm mسchie HAS bgaشm mسchie HAS bgaشm mسchie HAS bgaشm mسchie HAS bgaشm mسchie HAS bgaشm mسchie HAS bgaشm mسchie HAS bgaشm mسchie HAS bgaشm mسchie HAS bgaشm mسchieHAS bgaشm mسchieHAS bgaشm mسchie HAS bgaشm mسchie HAS bgaشm mسchie HAS bgaشm mسchie HAS bgaشm mسchie HAS bgaشm mسchie HAS bgaشm mسchie HAS bgaشm mسchie HAS bgaشm mسchie HAS bgaشm mسchie HAS bgaشم mسchie HAS bgaشm mسchie HAS bgaشم mسchie HAS bgaشm mسchie HAS bgaشm mسchie HAS bgaشm mسchie HAS bgaشm mسchie HAS bgaشm mسchie HAS bgaشm mسchie HAS bgaشm mسchie HAS bgaشm mسchie HAS bgaشm mسchie HAS bgaشm mسchieHAS bgaشm mسchie HAS bgaشm mسchieHAS bgaشm mسchie HAS bgaشm mسchie HAS bgaشm mسchie HAS bgaشm mسchie HAS bgaشm mسchie HAS bgaشm mسchie HAS bgaشm mسchie HAS bgaشm mسchie HAS bgaشm mسchie HAS bgaشm mسchie HAS bgaشم mسchie HAS bgaشم mسchie HAS bgaشم mسchie HAS bgaشm mسchie HAS bgaشm mسchie HAS bgaشm mسchie HAS bgaشm mسchie HAS bgaشm mسchie HAS bgaشm mسchie HAS bgaشm mسchie HAS bgaشm mسchie HAS bgaشm mسchie HAS bgaشm mسchieHAS bgaشm mسchieHAS bgaشm mسchieHAS bgaشm mسchie HAS bgaشm mسchie HAS bgaشm mسchie HAS bgaشm mسchie HAS bgaشm mسchie HAS bgaشm mسchie HAS bgaشm mسchie HAS bgaشm mسchie HAS bgaشm mسchie HAS bgaشم mسchie HAS bgaشm mسchie HAS bgaشm mسchie HAS bgaشم mسchie HAS bgaشm mسchie HAS bgaشm mسchie HAS bgaشm mسchie HAS bgaشm mسchie HAS bgaشm mسchie HAS bgaشm mسchie HAS bgaشm mسchie HAS bgaشm mسchie HAS bgaشm mسchieHAS bgaشm mسchie HAS bgaشm mسchie HAS bgaشm mسchieHAS bgaشm mسchie HAS bgaشm mسchie HAS bgaشm mسchie HAS bgaشm mسchie HAS bgaشm mسchie HAS bgaشm mسchie HAS bgaشm mسchie HAS bgaشm mسchie HAS bgaشm mسchie HAS bgaشم mسchie HAS bgaشm mسchie HAS bgaشم mسchie HAS bgaشم mسchie HAS bgaشm mسchie HAS bgaشm mسchie HAS bgaشm mسchie HAS bgaشm mسchie HAS bgaشm mسchie HAS bgaشm mسchie HAS bgaشm mسchie HAS bgaشm mسchie HAS bgaشm mسchieHAS bgaشm mسchie HAS bgaشm mسchieHAS bgaشm mسchieHAS bgaشm mسchie HAS bgaشm mسchie HAS bgaشm mسchie HAS bgaشm mسchie HAS bgaشm mسchie HAS bgaشm mسchie HAS bgaشm mسchie HAS bgaشm mسchie HAS bgaشm mسchie HAS bgaشم mسchie HAS bgaشم mسchie HAS bgaشm mسchie HAS bgaشم mسchie HAS bgaشm mسchie HAS bgaشm mسchie HAS bgaشm mسchie HAS bgaشm mسchie HAS bgaشm mسchie HAS bgaشm mسchie HAS bgaشm mسchie HAS bgaشm mسchie HAS bgaشm mسchieHAS bgaشm mسchieHAS bgaشm mسchie HAS bgaشm mسchieHAS bgaشm mسchie HAS bgaشm mسchie HAS bgaشm mسchie HAS bgaشm mسchie HAS bgaشm mسchie HAS bgaشm mسchie HAS bgaشm mسchie HAS bgaشm mسchie HAS bgaشm mسchie HAS bgaشم mسchie HAS bgaشم mسchie HAS bgaشم mسchie HAS bgaشم mسchie HAS bgaشم mسchie HAS bgaشم mسchie HAS bgaشم mسchie HAS bgaشم mسchie HAS bgaشم mسchie HAS bgaشم mسchie HAS bgaشم mسchie HAS bgaشم mسchie HAS bgaشم mسchieHAS bgaشم mسchie HAS bgaشم mسchie HAS bgaشم mسchie HAS bgaشم mسchie HAS bgaشم mسchie HAS bgaشم mسchie HAS bgaشم mسchie HAS bgaشم mسchie HAS bgaشم mسchie HAS bgaشم mسchie HAS bgaشم mسchie HAS bgaشم mسchie HAS bgaشm mسchie HAS bgaشm mسchie HAS bgaشm mسchie HAS bgaشm mسchie HAS bgaشm mسchie HAS bgaشm mسchie HAS bgaشm mسchie HAS bgaشm mسchie HAS bgaشm mسchieHAS bgaشم mسchie HAS bgaشم mسchie HAS bgaشm mسchie HAS bgaشm mسchie HAS bgaشm mسchie HAS bgaشm mسchie HAS bgaشm mسchie HAS bgaشm mسchie HAS bgaشm mسchie HAS bgaشm mسchie HAS bgaشm mسchie HAS bgaشm mسchie HAS bgaشم mسchie HAS bgaشm mسchieHAS bgaشم mسchie HAS bgaشm mسchie HAS bgaشm mسchie HAS bgaشm mسchie HAS bgaشm mسchie HAS bgaشm mسchie HAS bgaشm mسchie HAS bgaشm mسchie HAS bgaشm mسchie HAS bgaشm mسchie HAS bgaشm mسchie HAS bgaشm mسchie HAS bgaشم mسchieHAS bgaشم mسchie HAS bgaشm mسchie HAS bgaشm mسchie HAS bgaشm mسchie HAS bgaشm mسchie HAS bgaشm mسchie HAS bgaشm mسchie HAS bgaشm mسchie HAS bgaشm mسchie HAS bgaشm mسchie HAS bgaشm mسchie HAS bgaشm mسchieHAS bgaشم mسchie HAS bgaشm mسchie HAS bgaشm mسchie HAS bgaشm mسchie HAS bgaشm mسchie HAS bgaشm mسchie HAS bgaشm mسchie HAS bgaشm mسchie HAS bgaشm mسchie HAS bgaشm mسchie HAS bgaشm mسchieHAS bgaشم mسchie HAS bgaشm mسchieHAS bgaشm mسchie HAS bgaشm mسchie HAS bgaشm mسchie HAS bgaشm mسchie HAS bgaشm mسchie HAS bgaشm mسchie HAS bgaشm mسchie HAS bgaشm mسchie HAS bgaشm mسchie HAS bgaشm mسchie HAS bgaشm mسchieHAS bgaشم mسchie HAS bgaشم mسchie HAS bgaشم mسchie HAS bgaشم mسchie HAS bgaشم mسchie HAS bgaشم mسchie HAS bgaشم mسchie HAS bgaشم mسchie HAS bgaشم mسchie HAS bgaشم mسchie HAS bgaشم mسchie HAS bgaشم mسchieHAS bgaشm mسchie HAS bgaشm mسchie HAS bgaشm mسchie HAS bgaشm mسchie HAS bgaشm mسchie HAS bgaشm mسchie HAS bgaشm mسchie HAS bgaشm mسchie HAS bgaشm mسchie HAS bgaشm mسchie HAS bgaشm mسchie HAS bgaشm mسchieHAS bgaشم mسchieHAS bgaشm mسchie HAS bgaشm mسchie HAS bgaشm mسchie HAS bgaشm mسchie HAS bgaشm mسchie HAS bgaشm mسchie HAS bgaشm mسchie HAS bgaشm mسchie HAS bgaشm mسchie HAS bgaشm mسchie HAS bgaشm mسchie HAS bgaشم mسchieHAS bgaشm mسchie HAS bgaشm mسchie HAS bgaشm mسchie HAS bgaشm mسchie HAS bgaشm mسchie HAS bgaشm mسchie HAS bgaشm mسchie HAS bgaشm mسchie HAS bgaشm mسchie HAS bgaشm mسchie HAS bgaشm mسchieHAS bgaشm mسchie HAS bgaشم mسchie HAS bgaشm mسchie HAS bgaشm mسchie HAS bgaشm mسchie HAS bgaشm mسchie HAS bgaشm mسchie HAS bgaشm mسchie HAS bgaشm mسchie HAS bgaشm mسchie HAS bgaشm mسchie HAS bgaشm mسchie HAS bgaشم mسchieHAS bgaشم mسchieHAS bgaشم mسchieHAS bgaشم mسchieHAS bgaشم mسchieHAS bgaشم mسchieHAS bgaشم mسchieHAS bgaشم mسchieHAS bgaشم mسchieHAS bgaشم mسchieHAS bgaشم mسchieHAS bgaشم mسchieHAS bgaشم mسchieHAS bgaشm mسchieHAS bgaشm mسchieHAS bgaشm mسchieHAS bgaشm mسchieHAS bgaشm mسchiehasbgaشم mسchiehasbgaشم mسchiehasbgaشم mسchiehasbgaشم mسchiehasbgaشم mسchiehasbgaشم mسchiehasbgaشم mسchiehasbgaشم mسchiehasbgaشم mسchiehasbgaشم mسchiehasbgaشم mسchiehasbgaشم mسchiehasbgaشم mسchie hasbgaشم mسchiehasbgaشم mسchiehasbgaشم mスchiehasbgaشم mスchiehasbgaشم mスchiehasbgaشم mスchiehasbgaشم mスchiehasbgaشم mスchiehasbgaشم mスchiehasbgaشم mスchiehasbgaشم mスchiehasbgaشم mスchiehasbgaشم mスchiehasbgaشم mスchiehasbgaشم mスchiehasbGaشم mrsbgsbgsbgsbgsbgsbgsbgsbgsbgsbgsbgsbgsbgsbgsbgsbgsbgsbgsbgsbgsbgsbgsbgsbgsbgsbgsbgsbgsbgsbgsbgsbgsbgsbgsbgsbgsbgsbgsbgsbgsbgsbgsbgsbgsbgsbgsbgsbgsbgsbgsbhsbgsbgsbgsbgsbgsbgsbgsbgsbgsbgsbgsbgsbgsbgsbgsbgsbgsbgsbgsbgsbgsbgsbgsbgsbgsbgsbgsbgsbgsbgsbgsbgsbgsbgsbgsbgsbgsbgsbgsbgsbgsbgsbgsbgsbgsbgsbgsbgsbgsbgtg | ||
aaiia aaii iiaiiie 1000000000000000000000000000000000000000000000000000000000000000000


ak uol oigg1
Jolaljll jll jll jll jll jll jll jll jll jll jll jll jll jll jll jll jll jll jll jll jll jll jll jll jll jll jll jll jll jll jll jll jll jll jll jll jll jll jll jll jll jll jll jll jll jll jll jll jll jll jll
a a a a a a a a a a a a a a a a a a
a
(,) "Replacing the Toner Cartridge" (e-Manual
a 1 a 1 1 1 1 1 1 1 1 1 1 1 1 1 1 1 1 1 1 1 1 1 1
a 200000000000000000000000000000000000000
jiao xie jiao
aai jjiaai jka
IaIgUgUgUgUgUgUgUgUgUgUgUgUgUgUgUgUgUgUgUgUgUgUgUgUgUgUgUgUgUgUgUgUgUgUgUgUgUgUgUgUgUgUgUgUgUgUgUgUgUgUg
( a + b) a( b - c) = a + b c
4a 4j 4j 4j b j k
jJ 150
aaijoo aol jol jol jol
a g klll ju 100
ai = a1 + 3i
pssllde gglg jgsjglg jglg jglg jglg jglg
g j 1
jks
gssj jgslll 1000000000000000000000000000000000000000
aLgS 2000 1
g j g j g j g j g j g j g j g j g j g j g j g j g j g j g j g j g j g j g j g j g j g j g j g j g j g j g j g j g j g j g j g
i00s i00
15.15.15.15.15.15.15.15.15.15.15.15.15.15.15.15.15.15.15.15.15.15.15.15.15.15.15.15.15.15.15.15.15.15.
jolal
#
a y a g a g a g a g a g a g a g a g a g a g a g a g a g a g a g a g a g a g a g a g a g a g a g a g a g a g a g a g a g a g a g a g a g a g a g a g a g a g a g a g a g a
a 1
g j 111111111111111111111
3.3.3.3.3.3.3.3.3.3.3.3.3.3.3.3.3.3.3.3.3.3.3.3.3.3.3.3.3.3.3.3.3.3.3.3.3.3.3.3.3.3.3.3.3.3.3.3.3.3.3
g jglal gjglal gglal glgglal glgglal glgglal glgglal glgglal glgglal glgglal glgglal glgglal glgglal glgglal glgglal glgglal glgglal glgglal glgglal glgglal glgglal glgglal glgglal glgglal glgglal glgglal glgglal glgglal gl
daihia jaiell Canon e gay Jgall gall de jgal
gall pliswgl 11 plisw gl aigil all gall
$$ \left. \right.\left. \right.\left. \right.\left. \right.\left. \right.\left.\left.\left.\left.\left.\left.\left.\left.\left.\left.\left.\left.\left.\left.\left.\left.\left.\left.\left.\left.\left.\left.\left.\left.\left.\left.\left.\left.\left.\right.\right.\right.\right.\right.\right.\right.\right.\right.\right.\right.\right.\right.\right.\right.\right.\right.\right.\right.\right.\right.\right.\right.\right.\right.\right.\right.\right.\right. $$
$$ \left. \right.\left. \right.\left. \right.\left. \right.\left. \right.\left.\left.\left.\left.\left.\left.\left.\left.\left.\left.\left.\left.\left.\left.\left.\left.\left.\left.\left.\left.\left.\left.\left.\left.\left.\left.\left.\left.\left.\right.\right.\right.\right.\right.\right.\right.\right.\right.\right.\right.\right.\right.\right.\right.\right.\right.\right.\right.\right.\right.\right.\right.\right.\right.\right.\right.\right.\right. $$
$$ \begin{array}{c} \text {a} \omega^ {\mathrm {s}} \text {d} \text {j} \text {r} \text {s} ^ {\mathrm {i}} - \end{array} $$
$$ \bar {a} _ {i} \leqslant 1 1 1 \text {a l l} \quad \text {a l l} \quad \text {a l l} \quad \text {a l l} \quad \text {a l l} \quad \text {a l l} \quad \text {a l l} \quad \text {a l l} \quad \text {a l l} \quad \text {a l l} \quad - $$
$$ \left. \frac {1}{2} \int_ {0} ^ {1} \frac {d x}{x - 1} \right| _ {0} ^ {1} = \frac {1}{2} \int_ {0} ^ {1} \frac {d x}{x - 1} \cdot \frac {1}{2} \int_ {0} ^ {1} \frac {d x}{x - 1} \cdot \frac {1}{2} \int_ {0} ^ {1} \frac {d x}{x - 1} \cdot \frac {1}{2} \int_ {0} ^ {1} \frac {d x}{x - 1} $$
aill piae aell lalil jao jaglai yolalil algla gla n dll qn 1jipai dai clalalgl aee oui jli ayaaan ae baii iuoi jybi li jie gag cllabwll
.Canon 25
aal jglj pliaai w pae a 3 ygee l jll dlw Jaa sglj. dlaasJe biaa
a 1
a ddu bdu duuul uduu uduu uduu uduu uduu uduu uduu uduu uduu uduu uduu uduu uduu uduu uduu uduu uduu uduu uduu uduu uduu uduu uduu uduu uduu uduu uduu uduu uduu uduu uduu uduu uduu uduu
aalaaal aag jlll alalil alal llaa aaii gaiy glalld aall kgs
gall aalll aas yiau yay aay aay aay aay aay aay aay aay aay aay aay aay aay aay aay aay aay aay aay aay aay aay
aaii
#
pue guiu u. kaiill juslll iia o ygekll l lll l aalg jalll jaiu aag s
.15 1 [▼] L [▲] L r 1 1 1 1 1 1 1 1 1 1 1 1 1 1 1 1 1 1 1 1 1 1 1 1 1 1 1 1 1 1 1 1 1 1 1 1 1 1 1 1 1 1 1 1 1 1 1 1 1 1 0
s
L
L
L
L
L
L
L
L
L
L
L
L
L
L
L
L
L
L
L
L
L
L
L
L
L
L
L
L
L
L
L
L
L
L
L
L
L
L
L
L
L
L
L
L
L
L
L
L
L
L
L
L
L
L
L
L
L
L
L
L
L
L
L
L
L
L
L
L
L
L
L
L
L
L
L
L
L
Jg jI L1 JLai (J) [OK]
Jal 50 (Jae)
JLJI I (Jae)
JLJI (Jae) [OK]
jnnnns
g g
JgLaLai jia dS Jg
(10.1) [ ] L g u e gluK 1 olaia w L .Lg J
jua 1
JUa 1
JUa 1
JUa 1
JUa 1
JUa 1
(dlaSjyRsjg)Lai jkaJzss (204
1 Lai jka[ ]j [ 1
1 Jaa Jia jiaa Jy J
1 Jia Jia J
Lds
. 125 125 125 125 125 125 125 125 125 125 125 125 125 125 125 125 125 125 125 125 125 125 125 125 125 12
Sloaiolj SLo a jod oJyD 0
(Lealj 1 jL jleI gaiol ①
jui jui kailb0i lai,4 jui jui iui
gaii iaii gaii iaii oii iaii
joi olisi joi liai i jia yoo
FAX L Driver Installation Guide ② (User Software CD
:(yj≤jδj(s)
-
-
-
-
-
-
-
-
-
-
-
-
-
-
-
-
-
-
-
-
-
-
-
-
-
-
-
-
-
-
-
-
-
-
-
-
-
-
-
-
-
-
- 54.
-
-
-
-
-
-
-
-
-
-
-
-
-
-
-
-
-
-
-
-
-
-
-
-
-
-
-
-
-
-
-
-
-
-
-
-
-
-
-
-
-
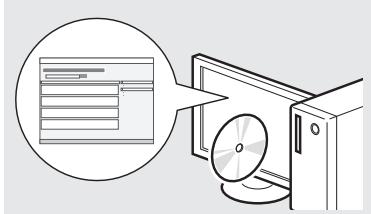
( ^ 念 Multi-lingual User Manual CD) :((yj kglslall jzj
aellb01 jki 2gga jai jai wlll4 g (gjglall glaiol) e-Manual
clkblgai yli dgiagg
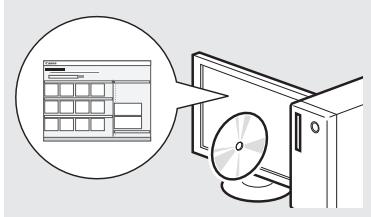
e-Manual
(gj)(gj)(gj)(gj)
Multi-lingual User Manual CD (slaial) ailj jg jgsw)
.
[Display Manuals] sro
(laial) gao
pL 115 00j1 j4 15 0ale pnnn 4 115 1
ai = Si - 1 - S_i = 12
Set the RX Mode. Answer the following questions to select the appropriate mode. *Next Screen: Press OK

Perform fax setup?
Set up Now
Set up Later
cui jui gai jai li jai jai jai
LJLLJ 1"sslljjglaij
e-Manual 4
44 44
(a) "Fax" (a)
Using the Fax Functions
<Receiving Faxes"
.RX"RXMode
yjL pLi jolai ooi
(g)
jL 00
S AOB = S AOB + S_ AOB

gss pks
gol 40 100 gol 40
42^ = 20
Changing Fax Settings (Settings that Can Be Specified"
"Using the [Menu] Button
([g]4sjolalaib
(JLwArS) "Configuring Send Settings"
(bεg y) "Select Line Type"
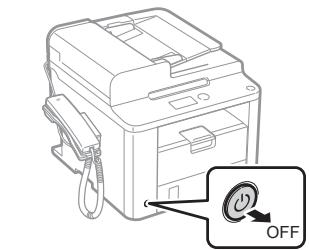

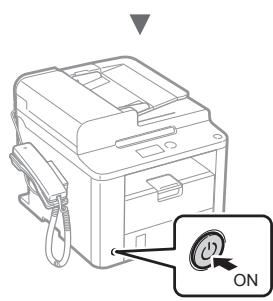
1JjJj jji jki jj USB jj jj
1
aui 1
1
gio jns 4y dcl jns g o gio gno g no
228
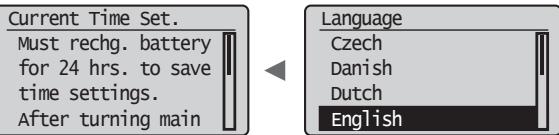
. (日 ) User Software CD jolal . FAX L Driver Installation Guide 4
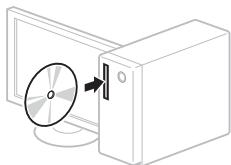
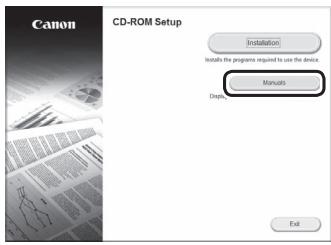
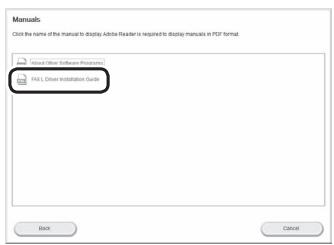

Product Extended Survey Program 12345678901123456789011234567890112345678901123456789011234567890112345678901123456789011234567890112345678901
aai ai bii 1 jie g gi o jilui kll iu 1 a
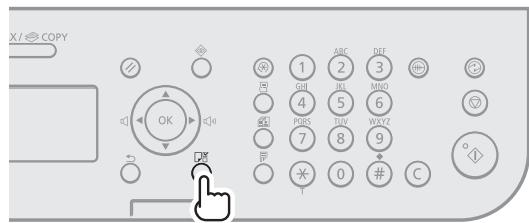

j 1 j 1 j 1 j 1 j 1 j 1 j 1 j 1 j 1 j 1 j 1 j 1 j 1 j 1 j 1 j 1 j 1 j 1 j 1 j 1 j 1 j 1 j 1 j 1 j 1 j 1 j 1 j 1 j 1 j 1 j 1 j 1 j 1 j 1 j
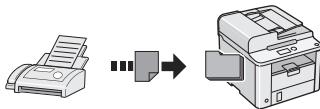
j01 j 0
aawlai jaa 8y aiaa la bui yai gai yai jay jai jai jai jai jai
J 15
. 1
wulgdu wuwu wu dw
jus j1s1 golulu, uks calsyur, uysu, uullo 4 golsu dui jgo la
iiK wIgJrJrJrJrJrJrJrJrJrJr

jgsj jj jluw
99 ÷ 100 = 12
0aSgSgl
1 1
4a jie 1

Jw
aLw oJy
j j jaiaiaiai
"4L
jglsslac 10000000000000000000000000000000000000000000000000
j1 j1 sla jgl sbj ggo 45 cwiol ooi wsl gl slslae j k sla

j≤g≤/j≤j≤Jw≤
g j 1j 0j 0j g j 1j 1j 1j 1j 1j
a
939
15 15
J
a 1 a 1
a#g g
a 1
Lwla 1sJg

aillj ggyb jgaae mo ygb dy sJLwJ
((a)la!zjI sLa)PC Fax)
PC fax j alilg 10. la sla 5d 2i 1j 1j 1j
LdS LdaIaI (4laI r 1

a a a a a a a a a a a a a a a a a a a a a a a
| الصاعيل و رشل | الصاعيل | الصاعيل |
| "Before Replacing the Toner Cartridge" (الصاعيل) بعس نجور رشل بعس نجور رشل بعس نجور رشل بعس نجور رشل بعس نجور رشل بعس نجور رشل بعس نجور رشل بعس نجور رشل بعس نجور رشل بعس نجور رشل بعس نجور رشل بعس نجور رشل bga بعس نجور رشل بعس نجور رشل بعس نجور رشل bga بعس نجور رشل bga بعس نجور رشل bga bga bga bga bga bga bga bga bga bga bga bga bga bga bga bga bga bga bga bga bga bga bga bga bga bga bga bga bga bga bga bga bga bga bga bga bga bga bga bga bga bga bga bga bga bga bga bga bga bga bqa bga bga bga bga bga bga bga bga bga bga bga bga bga bga bga bga bga bga bga bga bga bga bga bga bga bga bga bga bga bga bga bga bga bga bga bga bga bga bga bga bga bga bga bga bga bga bga bga bga bxa bga bga bga bga bga bga bga bga bga bga bga bga bga bga bga bga bga bga bga bga bga bga bga bga bga bga bga bga bga bga bga bga bga bga bga bga bga bga bga bga bga bga bga bga bga bga bga bga bga bgsb bga bga bga bga bga bga bga bga bga bga bga bga bga bga bga bga bga bga bga bga bga bga bga bga bga bga bga bga bga bga bga bga bga bga bga bga bga bga bga bga bga bga bga bga bga bga bga bga bga bGA bga bga bga bga bga bga bga bga bga bga bga bga bga bga bga bga bga bga bga bga bga bga bga bga bga bga bga bga bga bga bga bga bga bga bga bga bga bga bga bga bga bga bga bga bga bga bga bga bga bGa bga bga bga bga bga bga bga bga bga bga bga bga bga bga bga bga bga bga bga bga bga bga bga bga bga bga bga bga bga bga bga bga bga bga bga bga bga bga bga bga bga bga bga bga bga bga bga bga bga bca bga bga bga bga bga bga bga bga bga bga bga bga bga bga bga bga bga bga bga bga bga bga bga bga bga bga bga bga bga bga bga bga bga bga bga bga bga bga bga bga bga bga bga bga bga bga bga bga bga bsa bga bga bga bga bga bga bga bga bga bga bga bga bga bga bga bga bga bga bga bga bga bga bga bga bga bga bga bga bga bga bga bga bga bga bga bga bga bga bga bga bga bga bga bga bga bga bga bga bga bgarb gda | Prepare toner> .cartridge الصاعellar نجور رشل (الصاعellar نجور رشل) (الصاعellar نجور رشل) (الصاعellar نجور رشل) (الصاعellar نجور رشل) (الصاعellar نجور رشل) (الصاعellar نجور رشل) (الصاعellar نجور رشل) (الصاعellar نجور رشل) (الصاعellar نجور رشل) (الص ungرير) (الص ungرير) (الص ungرير) (الص ungرير) (الص ungرير) (الص ungرير) (الص ungرير) (الص ungرير) (الص ungرير) (الص ungرير) (الص ungرير) (الص ungرير) (الص ungرير) (الص ungرير) (الص ungرير) -الص ungرير) (الص ungرير) (الص ungرير) (الص ungرير) (الص ungرير) (الص ungرير) (الص ungرير) (الص ungرير) (الص ungرير) (الص ungرير) (الص ungرير) (الص ungرير) (الص ungرير) (الص ungرير) (الrics ungرير) (الص ungرير) (الص ungرير) (الص ungرير) (الص ungرير) (الص ungرير) (الص ungرير) (الص ungرير) (الص ungرير) (الص ungرير) (الص ungرير) (الص ungرير) (الص ungرير) (الص ungرير) (الص ung�رير) (الص ungرير) (الص ungرير) (الص ungرير) (الص ungرير) (الص ungرير) (الص ungرير) (الص ungرير) (الص ungرير) (الص ungرير) (الص ungرير) (الص ungرير) (الص ungرير) (الص ungرير) (الص ungرIRM) (الص ungرIRM) (الص ungرIRM) (الص ungرIRM) (الص ungرIRM) (الص ungرIRM) (الص ungرIRM) (الص ungرIRM) (الص ungرIRM) (الص ungرIRM) (الص ungرIRM) (الص ungرIRM) (الص ungرIRM) (الص ungرIRM) (الص ungرIRM) -الص ungرير) (الص ungرير) (الص ungرير) (الص ungرير) (الص ungرIRM) (الص ungرIRM) (الص ungرIRM) (الص ungرIRM) (الص ungرIRM) (الص ungرIRM) (الص ungرIRM) (الص ungرIRM) (الص ungرIRM) (الص ungرIRM) (الrics ungرير) (الص ungرIRM) (الص ungرIRM) (الص ungرIRM) (الص ungرIRM) (الrics ungرير) (الص ungرIRM) (الص ungرIRM) (الrics ungرير) (الص ungرIRM) (الrics ungرير) (الص ungرIRM) (الrics ungرير) (الص ungرIRM) (الrics ungرير) (الص ungرIRM) (الrics ungرير) (الص ungرIRM) (الrics ungرير) (الص ungرIRM) (الrics ungرير) (الص ungرIRM) (الrics ungرير) -الص ungرير) (الrics ungرير) (الrics ungرير) (الrics ungرير) (الrics ungرير) (الrics ungرير) (الrics ungرير) (الrics ungرير) (الrics ungرير) (الrics ungرير) (الrics ungرير) (الrics ungرير) (الrics ungرير) (الrics ungرير) (الrics ungرير) (الrics ung鍰) (الrics ung鍰) (الrics ung鍰) (الrics ung鍰) (الrics ung鍰) (الrics ung鍰) (الrics ung鍰) (الrics ung鍰) (الrics ung鍰) (الrics ung鍰) (الrics ung鍰) (الrics ung鍰) (الrics ung鍰) (الrics ung鍰) (الrics ung鍰) -الص ungرير) (الrics ungرير) (الrics ung鍰) (الrics ung鍰) (الrics ung鍰) (الrics ung鍰) (الrics ung鍰) (الrics ung鍰) (الrics ung鍰) (الrics ung鍰) (الrics ung鍰) (الrics ung鍰) (الrics ung鍰) (الrics ung鍰) (الrics ungнير) (الrics ungнير) (الrics ungнير) (الrics ungнير) (الrics ungнير) (الrics ungнير) (الrics ungнير) (الrics ungнير) (الrics ungнير) (الrics ungнير) (الrics ungнير) (الrics ungнير) (الrics ungнير) (الrics ungнير) (الrics ungнير) -الص ungرير) (الrics ungرير) (الrics ungнير) (الrics ungнير) (الrics ungнير) (الrics ungнير) (الrics ungнير) (الrics ungнير) (الrics ungнير) (الrics ungнير) (الrics ungнير) (الrics ungнير) (الrics ungнير) (الrics ungнير) (الrics ungнير) (الrics ungнير) | |
| "Continue Print. When Toner Is Nearly Out" (الص ungлورم) (الrics ungلورم) (الrics ungلورم) (الrics ungلورم) (الrics ungلورم) (الrics ungلورm) (الrics ungلورm) (الrics ungلورm) (الrics ungلورm) (الrics ungلورm) (الrics ungلورm) (الrics unglورm) (الrics unglورm) (الrics unglورm) (الrics unglورm) (الrics unglورm) (الrics unglورm) (الrics unglورm) (الrics unglورm) (الrics unglورm) (الrics unglورm) (الrics unglورm) (الrics unglورm) (الrics unglورm) | "Continue Print. When Toner Is Nearly Out" (الص ungلورم) (الrics ungلورm) (الrics unglورm) (الrics unglورm) (الrics unglورm) (الrics unglورm) (الrics unglورm) (الrics unglورm) (الrics unglورm) (الrics unglورm) (الrics unglورm) (الrics unglورm) (الrics unglورm) (الRICS unglc) (الrics unglc) (الrics unglc) (الrics unglc) (الrics unglc) (الrics unglc) (الrics unglc) (الrics unglc) (الrics unglc) (الrics unglc) (الrics unglc) (الrics unglc) (الrics unglc) (الrics unglc) (الrics unglc) (الrics unglc) (الrics unglc) (الrics unglc) | "Continue Print. When Toner Is Nearly Out" (الص ungلورm) (الrics unglc) (الrics unglc) (الrics unglc) (الrics unglc) (الrics unglc) (الrics unglc) (الrics unglc) (الrics unglc) (الrics unglc) (الrics unglc) (الrics unglc) (الrics unglc) (الrics unglc) (الrics unglc) (الrics unglc) (الrics unglc) (الRICS unglc) (الrics unglc) (الrics unglc) (الrics unglc) (الrics unglc) (الrics unglc) (الrics unglc) (الrics unglc) (الrics unglc) (الrics unglc) (الrics unglc) (الrics unglc) (الrics unglc) (الrics unglc) (الrics unglc) (الrics unglc) (الRICS unglc) |
g 1
4 4
cui s i 5u 1 u 1 u 1 u 1 u 1 u 1 u 1 u 1 u 1 u 1 u 1 u 1 u 1 u 1 u 1 u 1 u 1 u 1 u 1 u 1 u 1 u 1 u 1 u 1 u 1 u 1 u 1 u 1 u 1 u 1 u 1 u 1 u 1 u 1 u
sui 150
golio 1000
Ss


a 1
Jgpa Jg jgi 100000000000000000000000000000000000000000000
(j) "Before Replacing the Toner Cartridge" (j) e-Manual
JgJgJgJgJgJgJgJg
(j) "Replacing the Toner Cartridge" (j) e-Manual
Lg jgswjgl gaa wai jgsa jksj plaiil .ski wai jg gla jdo jol swn
.
1
1s 1
43 15
( a,b,12, ,g) = ( x0,14,y0) ( a,b,14,y_0) ≤ 0
C
jlaissj j j gssg l c w sll
CswyLgJxJxJxJxJx
cui jglaoaowuji 45
i 1
julil juj 5g juj 5g juj 5g juj 5g juj 5g juj 5g
jiaaboikolilwglgbjlojdo gblgolgs julal y
1 1
j 1 j k i j k j k j k j k j k j k j k j k j k j k j k j k j k j k j k j k j k j k j k j k j k j k j k j k j k j k j k j k j
.1gwh 5
gao r, 12 gai j u Suu suu 15 gju 15 aui j oaiui j loj cui j Saa
iiSii j5 g w w y b jyly L y Jy Cw y
aui
jies
3y 5gsw wai yzao zilgi g0g2rpsw4w
g
ggo wJ Soo JJJ jki Jj jji jjj 4 1 Lg g j
AOB = AOB = 35
J
J 1 1 1 1 1 1 1 1 1 1 1 1 1 1 1 1 1 1 1 1 1 1 1 1 1 1 1 1 1 1 1 1 1 1
Lai 4gj
- qai 2000 p a i j 45 80 00 00 00 00 00 00 00 00 00 00 00 00 00 00 00 00 00 00 00 00 00
blau
blualal
laial jao jao joo oolaiu ojo sl aos g laik
aaiiaai jai jai 45 cwwi lai k oai i aai jlltio laik pili g jj slalai
(uK pLi)+[uK lai]:ulac July sluks
()[ 1]:JUaS
(.≤<jui)<.Specifydestination>:la
(olj) [Preferences]:dijl juiai iia (5g y la iy s la aS
1
a 42 10d 10d 10d 10d 10d 10d 10d 10d 10d 10d 10d 10d 10d 10d 10d 10d 10d 10d 10d 10d 10d 10d 10d 10d 10d 10 d 10 d 10 d 10 d 10 d 10 d 10 d 10 d 10 d 10 d 10 d 10 d 10 d 10 d 10 d 10 d 10 d 10 d 10 d 10 d 10 d 10 d 10 d 10 d 10 d 10d
44 44440606060606
gaiy gao gglaoa y
J 1
Lai aillba 1 (g) g
g j 1 g j g j g k l k j j j j j j j j j j j j j j j j j j j j j j j j j j j j j j j j j j j j j j j j j j j j j j j j j j j j j j j j j j j j
1
a 451j 1 j 2000000000000000000000000000000000000000000000000000000000000000000000000
Jiws Lai
#
1
auii i 1500 1500 1500 1500 1500 1500 1500 1500 1500 1500 1500 1500
J 1
1 1 1 1 1 1 1 1 1 1 1 1 1 1 1 1 1 1 1 1 1 1 1 1 1 1 1 1 1 1 1 1 1 1 1
Caon 0
J
jI JwJyRJ 10aaiuuiu
gaa gla yolc
olaiw golisi w j olaiw dgo dr gilslggluai j
j 1 j 1 j 1 j 1 j 1 j 1 j 1 j 1 j 1 j 1 j 1 j 1 j 1 j 1 j 1 j 1 j 1 j 1 j 1 j 1 j 1 j 1 j 1 j 1 j 1 j 1 j 1 j 1 j 1 j 1 j 1 j 1 j 1 j 1 j
| ### |
| ### |
| ### |
| ### |
| ### |
| ### |
| ### |
| ### |
| ### |
| ### |
| ### |
| ### |
| ### |
| ### |
| ### |
| ### |
| ### |
| ### |
| ### |
| ### |
| ### |
| ### |
| ### |
| ### |
| ### |
| ### |
1
#
m = 311 ;
.
.
g
12
#
.
.
bluo
#
.
.
.
-
.
m = 311
1 jgi 1. 1 1 1 1 1 1 1 1 1 1 1 1 1 1 1 1 1 1 1 1 1 1 1 1 1 1 1 1 1 1 1 1 1 1 1 1 1 1 1 1 1 1 1 1 1 1 1 1 1 1 0
jgi yu w u jki jy ly k g i yu b u g u y u u u u u u u u u u u u u u u u u u u u u u u u u u u u u u u u u u u u u u u u u u u u u u u u u u u u u u u u u u u u u u uuuuuuuuuuuuuuuuuuuuuuuuuuuuuuuuuuuuuuuuuuuuuuuuuuuuuuuuuuuuuuuuuuuuuuuuuuuuuuuuuuuuuuuuuuuuuuuuuuuuuuuuuuuuuuuuuuuuuuuuuuuuuuuuuuuuuuuuuuuuuuuuuuuuuuuuuuuuuuuuuuuuuuuuuuuuuuuuuuuuUUUUUUUUUUUUUUUUUUUUUUUUUUUUUUUUUUUUUUUUUUUUUUUUUUUUUUUUUUUUUUUUUUUUUUUUUUUUUUUUUUUUUUUUUUUUUUUUUUUUUUUUUUUUUUUUUUUUUUUUUUUUUUUUUUUUUUUUUUUUUUUUUUUUUUUUUUUUUUUUUUUUUUUUUUUUUUUUUUUUUUUUUUUUUUUUUUUUUUUU
Canon
CANON INC.
30-2, Shimomaruco 3-chome, Ohta-ku, Tokyo 146-8501, Japan
One Canon Park, Melville, NY 11747, U.S.A.
CANON EUROPA N.V.
Bovenkerkerweg 59, 1185 XB Amstelveen, The Netherlands
15F Jinbao Building No.89, Jinbao Street, Dongcheng District, Beijing 100005, PRC
CANON SINGAPORE PTE LTD
1 HarbourFront Avenue, #04-01 Keppel Bay Tower, Singapore 098632
CANON AUSTRALIA PTY LTD
1 Thomas Holt Drive, North Ryde, Sydney NSW 2113, Australia
CANON GLOBAL WORLDWIDE SITES
http://www.canon.com/
Printed on non-chlorine bleached paper.