RIVIERA 600 - Griddle ROLLER GRILL - Free user manual and instructions
Find the device manual for free RIVIERA 600 ROLLER GRILL in PDF.
User questions about RIVIERA 600 ROLLER GRILL
0 question about this device. Answer the ones you know or ask your own.
Ask a new question about this device
Download the instructions for your Griddle in PDF format for free! Find your manual RIVIERA 600 - ROLLER GRILL and take your electronic device back in hand. On this page are published all the documents necessary for the use of your device. RIVIERA 600 by ROLLER GRILL.
USER MANUAL RIVIERA 600 ROLLER GRILL
Conditions of warranty
The warranty that is applicable for the whole appliance is the commercial warranty of the distributor or dealer. Please contact the shop where you purchased your appliance for information regarding the specific terms of the same.
The warranty provides no right to damages.
The provisions that follow are not exclusive of the benefit of the legal warranty provided for by articles 1641 et seq. of the Civil Code relating to failures and hidden defects.
Exclusion clauses of the warranty
Incorrect installation and improper maintenance, mainly if the same is not carried out as per the regulations in force or the instructions provided in this user manual. Any violent thermal shock leading to irreparable damage of the plate is not covered by the warranty. (Deglazing = sudden cooling with ice cubes and cold water when the plate is still hot after cooking).
The warranty does not cover repairs required due to incorrect operations, inappropriate use, use for professional purposes, negligence or overloading of the appliance, as well as those resulting from variations of the electrical supply, overvoltage or faulty installations.
The damage caused due to shocks and bad weather is not covered by the warranty. The material is transported at the risk of the user; in case of delivery by carrier, the recipient must issue reservations vis-à-vis the carrier before any delivery of the appliance.
The warranty comes to an end in case of intervention, repairs or modification by unqualified persons, or use for inappropriate purposes.
| Models | PL 400 E | PL 600 E |
| External dimensions | 410x450x280 mm | 610x450x280 mm |
| Cooking surface | 390x380 mm | 590x380 mm |
| Weight | 13 Kgs. | 18.5 Kgs. |
| Power | 3000 W | 3500 W |
| Unit number | 1 | 2 |
| Ampere | 13 A | 15 A |
| Voltage | 220-240V ~ | 230-240V ~ |
Matching of the wire colours : Phase
Neutral
Earth
Brown or Black or Grey
Blue
Yellow-Green
8. STANDARDS AND LEGAL PROVISIONS
The appliance conforms to the following standards :
IEC/EN 60335-1
IEC/EN 60335-2-38
EN 55014-1 + 55014-2
EN 61000-3-2 + 61000-3-3
9. REMOVAL OF ELECTRICAL AND ELECTRONIC WASTE
The appliance respects the directives :
2002/96/CE (DEEE) No.34270064800021
2002/95/CE (ROHS)
2006/95 CE
2004/108 CE
Do not throw the appliance in domestic waste.
The appliance must be dumped at an electrical equipment recycling centre.
The materials of the appliance are actually reusable. By getting rid of the electrical and electronic waste in a proper manner, recycling and any other form of reusing the used equipment, you make a significant contribution to the protection of the environment.
Please contact your distributor for any information regarding the collection of electrical and electronic waste.
10. GARANTIE
Conditions de garantie
Congratulations on your purchase of this top-of-the-line cooking appliance manufactured in France. You have selected an appliance that combines the best technical features with great user-friendliness. We hope that you derive the maximum possible satisfaction.
1. SAFETY INSTRUCTIONS
Please follow these instructions carefully to avoid any risk of fire, electric shock, burns or other injuries and damage. While using this appliance, there are some basic safety precautions that must always be followed, such as:
- Never leave the machine working without any watching.
- Read the operations manual that is to be systematically kept with the appliance.
- Always install the appliance by following the instructions. A distance of minimum 10cm from the partition or the wall is required.
- This appliance is meant for outdoor use.
- Protect the appliance from direct sun light, frost and humidity.
- Keep the appliance out of reach of children or disabled persons without supervision.
- Never move the appliance when it is in operation or while the cooking surface is still hot.
- Check that the appliance is properly in the stop position (0) before connecting or disconnecting it.
- Do not touch the hot surfaces of the appliance.
The plate is still hot:
- Drain most of the fats and cooking juice with the wooden spatula towards the outlet (No.4 in the photo) in front of the plate.
- Let the plate cool down and clean it with warm soapy water and a slightly abrasive pad. Collect the cooking residues in the drip tray (No.5 in the photo).
- Then use some white vinegar to neutralize the cooking smells.
- Finally, wipe the plate before putting it away or using it again.
Do not put ice cubes or other on the plate that is still hot (deglazing), which may lead to a violent thermal shock and permanent damage.
The plate is cold:
- Clean the plate with a wet sponge and some dishwashing liquid.
- Wipe the plate with a soft and clean cloth.
- Remove and empty the tray (No.5 in the photo) filled with fats and cooking juice.
- Clean the tray (No.5 in the photo) with a wet sponge and some dishwashing liquid (can also be washed in a machine) and wipe.
- After the tray (No.5 in the photo) dries, put it back in the appliance.
- Clean the outer case of the appliance without using any abrasive product.
- Never clean the appliance under a water jet, the seepage may cause irreparable damage to the appliance.
- Never immerse the appliance, cord or plug in water or any other liquid to avoid any electric shock.
Attention to the capacity of the drip tray (No.5 in the photo): consider emptying it regularly, any overflowing inside the appliance may cause irreparable damage.
When the appliance is not in use for a long time, we strongly recommend that the appliance be kept in a dry place.
c) Use of the appliance:
Control and display elements
| Control/Display | Function |
| Thermostat (No. 3 in the photo) | Switching on of the appliance and temperature setting. |
| Green light indicator (No. 1 in the photo) | Appliance switched on (indicator on) Appliance switched off (indicator off) |
| Orange light indicator (No. 2 in the photo) | Heating up of the plate (indicator on) Desired temperature reached (indicator off) |
Never use the appliance without its juice collector tray (No. 5 in the photo).
Starting the appliance
Turn the thermostat (No.3 in the photo) to the desired position: the green pilot light (No.1 in the photo) switches on, the appliance has started. And the orange pilot light (No.2 in the photo) switches on: the plate is heating.
The orange thermostat light (No.2 in the photo) switches off when the cooking plate reaches the desired temperature.
Grease the plate before cooking every time.
Temperature setting
Set the temperature by positioning the thermostat (No.3 in the photo) to the desired temperature. The orange pilot light (No.2 in the photo) switches on if a higher level of temperature is required and switches off when the same is reached.
Stopping the appliance
Set each control knob (No.3 in the photo) to 0, the corresponding green pilot light (No.1 in the photo) is switched off: the appliance is no longer functioning.
Let the device cool.
Disconnect the power cable.
Clean the appliance. (Refer to. 6. Cleaning)
d) Breakdown/Repairs:
In case of breakdown or a damaged part, please call your after-sale service and entrust any technical operation to a qualified person.
When you contact the maintenance department of your Distributor or shop, provide full reference of your appliance (commercial description, type and serial number). This information is given on the rating plate that can be seen behind the appliance.
6 CLEANING AND MAINTENANCE
The temperature of the hot surfaces can be very high when the appliance is in operation. Always use the control knobs.
- Do not use the appliance for functions other than the determined use.
- Do not let the power cord hang from the side of the trolley or any counter top, or let it come in contact with hot surfaces.
- Do not use the appliance near combustible materials.
- Ensure that the ventilation ports of the appliance are not blocked during use.
- Do not drop the appliance, power cord or the plug in water or any other liquid to avoid electric shock.
- If the cord is harmed, it must be replaced by the producer, his after sale service or persons of similar skills to avoid any risk.
- The repairs must be entrusted only to a qualified person.
- Use original spare parts only.
- After cooking, do not forget to disconnect the appliance before cleaning it.
2. CONTENTS OF THE CARDBOARD BOX
Appliance: A plancha
Accessories: - One wooden spatula
- This manual
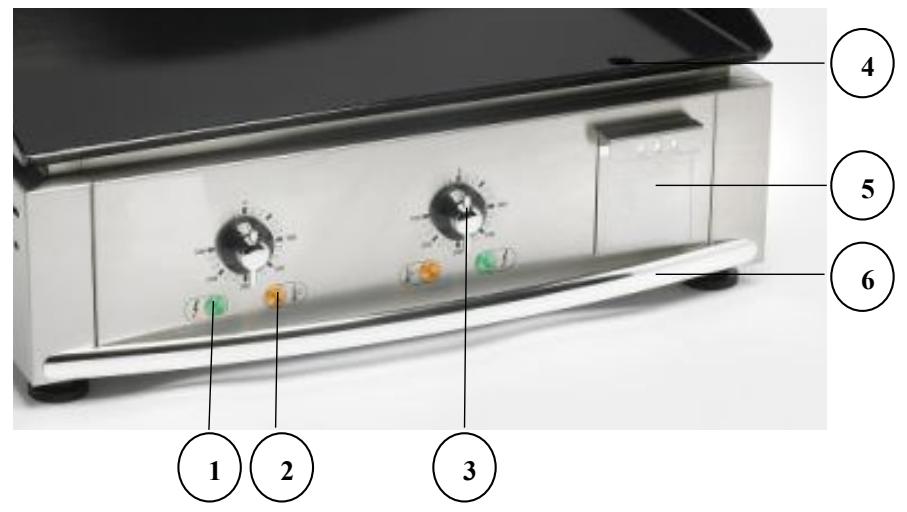
1 Power-on light
2 Thermostat light
3 Thermostat/commutator
4 Outlet for juices and fats
5 Juice collector tray
6 Utensil holder with anodised curved handle
Refer to detailed exploded view of PL 400 E and PL 600 E at the end of the document.
3. CONFORMITY OF USE
Use the appliance to grill and quickly sear meat, sausages, fish, shellfish, vegetables, onions as well as for fried eggs or even an omelette.
4. USAGE INSTRUCTIONS
This plancha is an enamelled steel solid cooking plate. The points on the plate are cundum ( white spots = hardness of 9/10). This is a new hardening process which increases the longevitu of the cooking plate. The plate's smooth surface provides direct heat transfer to the food being cooked, without heat loss at the centre as in the periphery thanks to incoloy resistances (1 for PL 400 E and 2 for PL 600 E) that cover the entire cooking surface.
To switch on and heat the plate, just turn the control knob of the thermostat (No.3 in the photo) to the desired position. Your plancha is ready when the thermostat indicator light (No. 2 in the photo) is off.
While cooking, the temperature can be regulated using the control knob of the thermostat (No. 3 in the photo) to avoid over-cooking. The orange light indicates the heating periods.
Meat is cooked at a temperature ranging between 250 and 300^ .
Your appliance is equipped with a tray (No. 5 in the photo) that is fully removable to drain juice and fats. It must be cleared regularly. It is recommended to pour a little water in the tray when you start cooking to facilitate maintenance and to avoid the solidification of fats at the bottom of the tray at the end of the meal.
Never use the appliance without the drip tray (No. 5 in the photo).
5. FUNCTIONING / HANDLING
a) Installation/Assembly:
- Unpack carefully the plancha of its packaging.
- Place the plancha on a flat and heat-resistant surface.
- Never place the appliance near a wall or a partition made of combustible materials even if it is properly insulated.
- A distance of minimum 10cm with the partition or the wall is required.
- Remove the "Food enamel" label and the red label on the plate as well as the protective film around the appliance without forgetting to remove the film that protects the juice collector tray (No. 5 in the drawing). Use a solvent like acetone or other solvents to remove these labels.
b) First use:
When you use this appliance for the first time, heat the plate outside for approx. 30 min to remove any residual oil smoke from the manufacturing of the metal parts. This may emit a slight smell for a few moments.
The appliance does not need to be kept switched on at full capacity: the temperature must be adapted to the products that are to be cooked to limit power consumption.
First cleaning
Clean the appliance before its first use. (Refer to. 6 Cleaning)
Connecting the appliance
- Check that the voltage and frequency of the electrical network match the values indicated on the rating plate.
- Always check that the power plug or cable is not damaged.
- Ensure that each control knob is properly set to 0.
- Unwind the power cable completely and connect it to a plug connected to the earth.
- The appliance is connected.
Note: In case of connection of the appliance to a plug without a protection wire or directly to the electrical network, ensure that the appliance is connected by a qualified person.