TMFP72BX2 - Built-in oven THOMSON - Free user manual and instructions
Find the device manual for free TMFP72BX2 THOMSON in PDF.
| Product type | Built-in oven |
| Brand | THOMSON |
| Model | TMFP72BX2 |
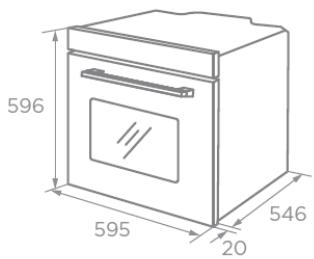
| External dimensions (W x D x H) | 595 x 546 x 596 mm |
| Recess dimensions (W x D x H) | 560 x 550 x 590 mm |
| Net weight | 41.0 kg |
| Usable volume | 72 L |
| Power supply | 220-240 V ~ 50-60 Hz |
| Maximum power | 3.2 kW |
| Energy class | A+ |
| Energy consumption (conventional) | 1.00 kWh/cycle |
| Energy consumption (fan-assisted) | 0.65 kWh/cycle |
| Cooking modes | Natural convection, pulsed fan-assisted, ECO, fan-assisted, radiant heat, double grill + fan, double grill, pizza, bottom heat, defrost, fermentation, air fry |
| Additional functions | Automatic menu (10 programs), rapid preheat, keep warm, reminder, child lock, interior light |
| Cleaning | Pyrolytic (self-cleaning, 2 hours at 450°C) |
| Supplied accessories | Cooking grid (x1), baking tray (x1), air fry basket (x1), telescopic rails (x2) |
| Interior lamp type | Halogen 25 W, efficiency class G |
| Safety | Pyrolysis door locking, child lock, automatic shutdown, cooling ventilation |
| Installation | Built-in under worktop or in column, respect niche dimensions and ventilation |
| After-sales service | Darty: 0 978 970 970 (France), Vanden Borre: +32 2 334 00 00 (Belgium), Fnac: 0 969 324 334 |
Frequently Asked Questions - TMFP72BX2 THOMSON
User questions about TMFP72BX2 THOMSON
0 question about this device. Answer the ones you know or ask your own.
Ask a new question about this device
Download the instructions for your Built-in oven in PDF format for free! Find your manual TMFP72BX2 - THOMSON and take your electronic device back in hand. On this page are published all the documents necessary for the use of your device. TMFP72BX2 by THOMSON.
USER MANUAL TMFP72BX2 THOMSON
Hotline Darcy France
BELANGRIJKVEVELIGHEIDSINSTRUCTIES. 2
PRODUCTOVERZICHT. 7
ACCESSIONS. 9
IMPORTANT SAFETY INSTRUCTIONS. 2
PRODUCT OVERVIEW. 7
ACCESSIONS. 9
Using the Accessories. 9
Accessory Installation. 10
HEATING MODES (FUNCTIONS) 12
INSTALLATION 14
ELECTRICAL CONNECTION. 17
BEFORE USING THE OVEN. 17
Setting the Time. 18
OPERATION 18
Reminder function. 18
Barbecues function. 19
Quick preheating. 19
Childproof lock. 19
Air fry function. 20
Automatic menu. 20
Interior lighting. 21
ENERGY EFFICIENT USE. 24
CLEANING AND MAINTENANCE. .25
TROUBLESHOOTING. .30
SPECIFICATIONS. 31
DISPOSAL. 32
This product has been manufactured and sold under the responsibility of Etablissements Darty et Fils (S.A.S).
THOMSON, and the THOMSON logo are trademarks used under license by
Etablissements Darty et Fils (S.A.S) – further information at www.thomson-brand.com.
All other products, services, companies, trademarks, trade or product names and logos referenced herein are the property of their respective owners.
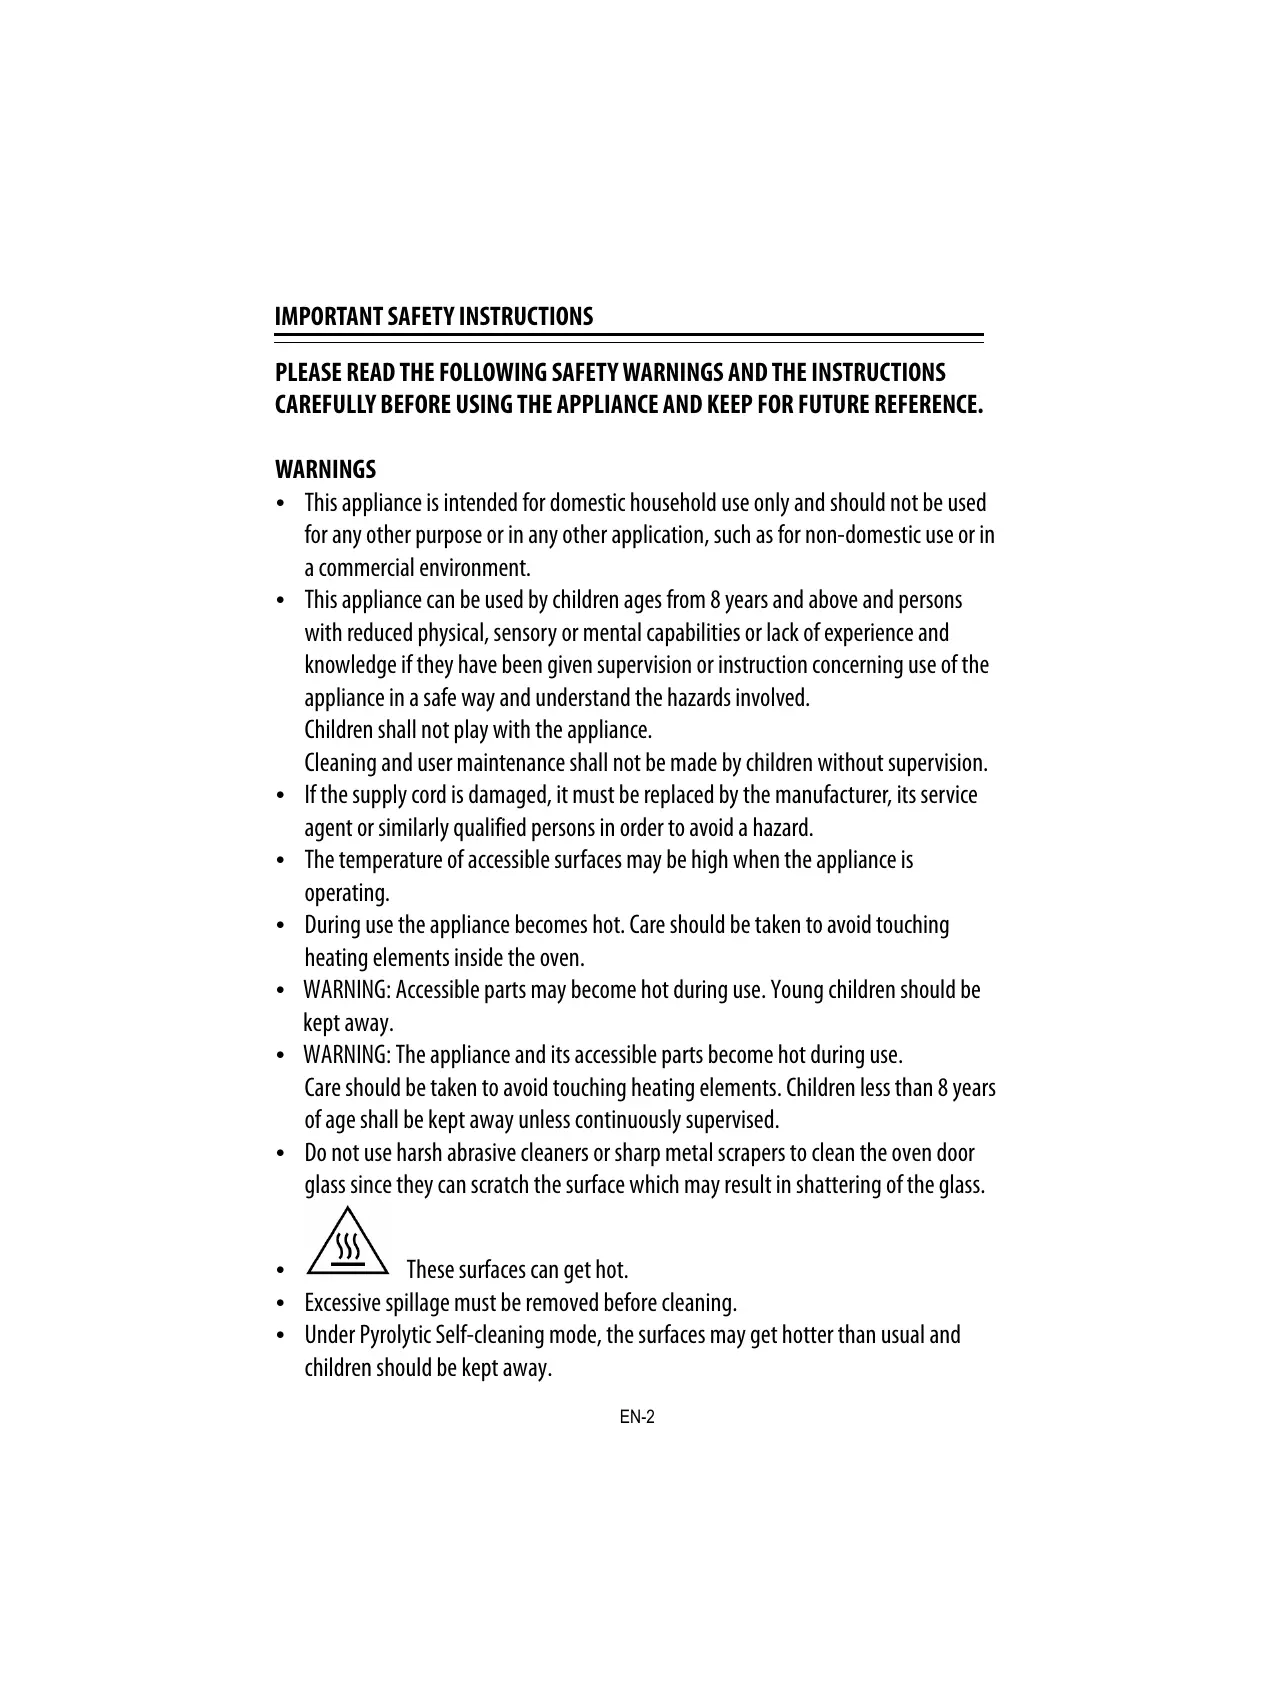
PLEASE READ THE FOLLOWING SAFETY WARNINGS AND THE INSTRUCTIONS CAREFULLY BEFORE USING THE APPLIANCE AND KEEP FOR FUTURE REFERENCE.
WARNING
- This appliance is intended for domestic household use only and should not be used for any other purpose or in any other application, such as for non-domestic use or in a commercial environment.
- This appliance can be used by children ages from 8 years and above and persons with reduced physical, sensory or mental capabilities or lack of experience and knowledge if they have been given supervision or instruction concerning use of the appliance in a safe way and understand the hazards involved. Children shall not play with the appliance.
Cleaning and user maintenance shall not be made by children without supervision.
- If the supply cord is damaged, it must be replaced by the manufacturer, its service agent or similarly qualified persons in order to avoid a hazard.
- The temperature of accessible surfaces may be high when the appliance is operating.
- During use the appliance becomes hot. Care should be taken to avoid touching heating elements inside the oven.
- WARNING: Accessible parts may become hot during use. Young children should be kept away.
- WARNING: The appliance and its accessible parts become hot during use. Care should be taken to avoid touching heating elements. Children less than 8 years of age shall be kept away unless continuously supervised.
- Do not use harsh abrasive cleaners or sharp metal scrapers to clean the oven door glass since they can scratch the surface which may result in shattering of the glass.
These surfaces can get hot.
- Excessive spillage must be removed before cleaning.
-
Under Pyrolytic Self-cleaning mode, the surfaces may get hotter than usual and children should be kept away.
-
Place the tray and wire rack at the same level on both sides, make sure they are in a horizontal and stable position.
- A steam cleaner is not to be used.
- WARNING: Ensure that the appliance is switched off before replacing the lamp to avoid the possibility of electric shock.
- The lamp inside the product is used for lighting of the product. This lamp is not suitable for household room illumination.
- The appliance must not be installed behind a decorative door in order to avoid overheating.
- The plug must be remained easily accessible after installation of the appliance.
- Regarding the instructions for all necessary spaces with dimensions, the method of fixing and how the appliance is to be fixed to its support, refer to the section "INSTALLATION".
- The means for disconnection must be incorporated in the fixed wiring in accordance with the wiring rules.
- The appliance shall be installed in accordance with national wiring regulations NF C 15-100.
- Regarding the detailed instructions for the safe use of the appliance, the precautions during user maintenance and bulb replacement, refer to the sections "OPERATION" and "CLEANING AND MAINTENANCE".
- Regarding the method of fixing and cables connection, refer to the section "ELECTRICAL CONNECTION".
- After each cooking cycle, the cooling fan will continue to run for a while to ensure quick cooling and safe operation of the oven.
- The door should preferably be closed in all cooking modes.
- Do not hang any cloth or garment to the handle of the oven.
- Do not line the oven's cavity with aluminium foil for easier cleaning: The oven may overheat and the enamel coating of the cavity may be damaged.
- The fixed wiring insulation must be protected, for example, by insulating sleeving having an appropriate temperature rating.
- When in Pyrolytic Self-cleaning mode, all accessories must be removed from the chamber.
Only use this appliance indoors. The appliance must only be used for the preparation of food and drink. The appliance must be supervised during operation.
Always slide accessories into the cavity correctly.
Risk of electric shock!
- Incorrect repairs are dangerous. Repairs may only be carried out and damaged power cables replaced by one of our trained after-sales technicians. If the appliance is defective, unplug the appliance from the mains socket or switch off the circuit breaker in the fuse box.
- The cable insulation on electrical appliances may melt when touching hot parts of the appliance. Never bring electrical appliance cables into contact with hot parts of the appliance.
- Do not use any high-pressure cleaners or steam cleaners, which can result in an electric shock.
- A defective appliance may cause electric shock. Never switch on a defective appliance. Unplug the appliance from the mains socket or switch off the circuit breaker in the fuse box.
Risk of fire!
- Combustible items stored in the cavity may catch fire. Never store combustible items in the cavity. Never open the appliance door if there is smoke inside. Switch off the appliance and unplug it from the mains socket.
- A draught is created when the appliance door is opened. Greaseproof paper may come into contact with the heating element and catch fire. Do not place greaseproof paper loosely over accessories during preheating. Always weight down the greaseproof paper with a dish or a baking tin. Only cover the surface required with greaseproof paper. Greaseproof paper must not protrude over the accessories.
Risk of injury!
- Scratched glass in the appliance door may develop into a crack. Do not use a glass scraper, sharp or abrasive cleaning aids or detergents.
- The hinges on the appliance door move when opening and closing the door, and you may be trapped. Keep your hands away from the hinges.
Risk of burns!
- The appliance becomes very hot. Never touch the interior surfaces of the appliance or the heating elements.
- Always allow the appliance to cool down.
- Keep children at a safe distance.
- Accessories and ovenware become very hot. Always use oven gloves to remove accessories or ovenware from the cavity.
- Alcoholic vapors may catch fire in the hot cooking compartment. Never prepare food containing large quantities of drinks with high alcohol content. Only use small quantities of drinks with high alcohol content. Open the appliance door with care.
Risk of scalding!
- The accessible parts become hot during operation. Never touch the hot parts.
- When you open the appliance door, hot steam can escape. Steam may not be visible, depending on its temperature. When opening, do not stand too close to the appliance. Open the appliance door carefully. Keep children away.
- Water in a hot cavity may create hot steam. Never pour water into the hot cavity.
Hazard due to magnetism!
Permanent magnets are used in the control panel or in the control elements. They may affect electronic implants, e.g., heart pacemakers or insulin pumps. Wearers of electronic implants must stay at least 10 cm away from the control panel.
Causes of Damage
- Accessories, foil, greaseproof paper or ovenware on the cavity floor: do not place accessories on the cavity floor. Do not cover the cavity floor with any sort of foil or greaseproof paper. Do not place ovenware on the cavity floor if a temperature of over 50^ has been set. This will cause heat to accumulate. The enamel will be damaged.
-
Aluminium foil: Aluminium foil in the cavity must not come into contact with the door glass. This could cause permanent discoloration of the door glass.
-
Silicone pans: Do not use any silicone pans, or any mats, covers or accessories that contain silicone. The oven sensor may be damaged.
- Water in a hot cooking compartment: do not pour water into the cavity when it is hot. This will cause steam. The temperature change can cause damage to the enamel.
- Moisture in the cavity: Over an extended period of time, moisture in the cavity may lead to corrosion. Allow the appliance to dry after use. Do not keep moist food in the closed cavity for extended periods of time. Do not store food in the cavity.
- Cooling with the appliance door open: Following operation at high temperatures, only allow the appliance to cool down with the door closed. Do not trap anything in the appliance door. Even if the door is only left open a crack, the front of nearby furniture may become damaged over time. Only leave the appliance to dry with the door open if a lot of moisture was produced while the oven was operating.
- Fruit juice: when baking particularly juicy fruit pies, do not pack the baking tray too generously. Fruit juice dripping from the baking tray leaves stains that cannot be removed. If possible, use the deeper universal pan.
- Extremely dirty seal: If the seal is very dirty, the appliance door will no longer close properly during operation. The fronts of adjacent units could be damaged. Always keep the seal clean.
- Appliance door as a seat, shelf or worktop: Do not sit on the appliance door or place or hang anything on it. Do not place any cookware or accessories on the appliance door.
- Inserting accessories: depending on the appliance model, accessories can scratch the door panel when closing the appliance door. Always insert the accessories into the cavity as far as they will go.
- Carrying the appliance: do not carry or hold the appliance by the door handle. The door handle cannot support the weight of the appliance and could break.
- If you use the residual heat of the switched off oven to keep food warm, a high moisture content inside the cavity can occur. This may lead to condensation and can cause corrosion damage of your appliance. Avoid condensation by opening the door or use "Defrost" mode.
When taking out food, please wear heat-insulating gloves to prevent burns!
Pay attention to the hot air when opening the oven door.
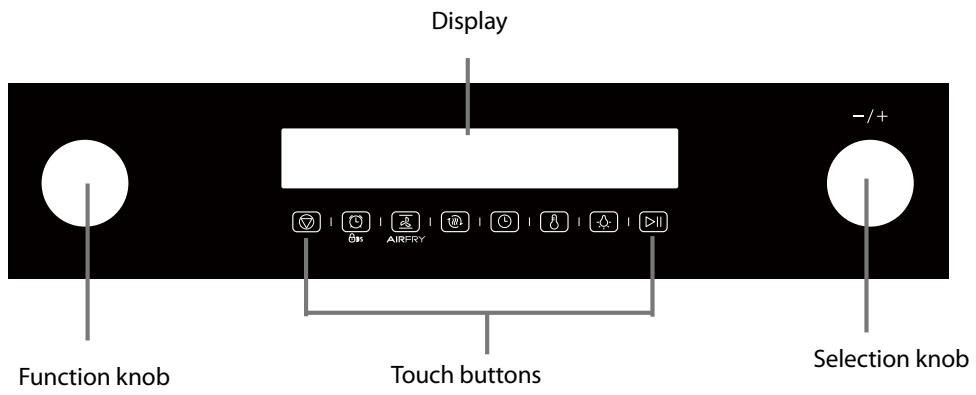
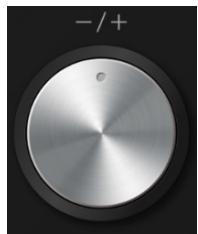
Control Panel
The two knobs are retractable.
Before using the knobs, you need to push buttons to make them pop out.


When the points on two knobs are in the central positions, push the knobs which will pop out or retract.
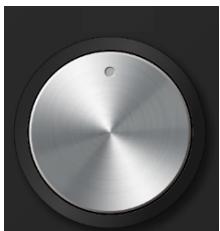
When the knobs pop out, turn them to select the desired function or setting.
Turn this function knob to select the cooking function.
Turn this knob to adjust the time or temperature.
Touch buttons
| 1 | Cancel the current setting and return to the standby state. |
| 2 | Press briefly to enter the reminder function setting. Press and hold for 3 seconds to enter or exit the child lock state. |
| 3 | Provide fast and even heat distribution, the hot air also takes away the moisture on the surface of the food, generating crunchy and crispy frying. |
| 4 | Preheat the cavity to ensure the taste of food. |
| 5 | Enter the time setting state. |
| 6 | Enter the temperature setting state. |
| 7 | Press this key to turn on or off the lamp. |
| 8 | Start and pause the cooking process. |
Using the Accessories
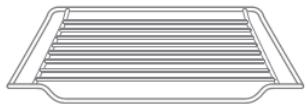
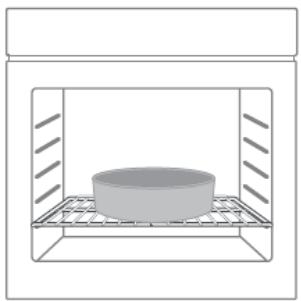
Grill rack x1
Grill food or place heat-resistant cooking containers
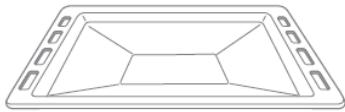
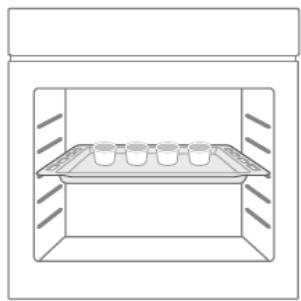
Grill tray x1
Cooking food or receiving food scraps
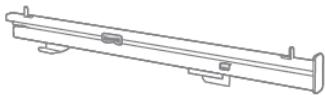
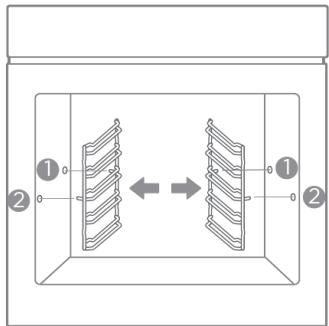
Slide rail x2
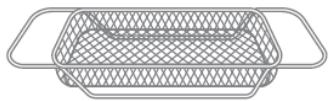
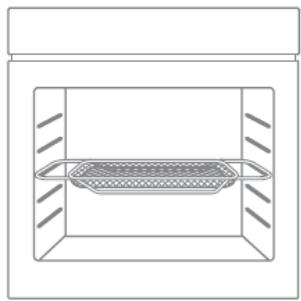
Air fry basket x1
Air fry function specific
Only use original accessories. They are specially adapted for your oven.
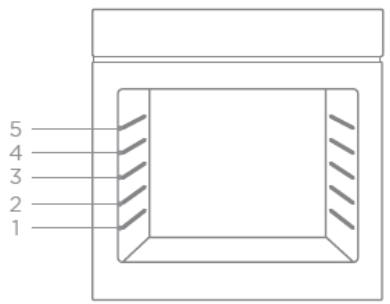
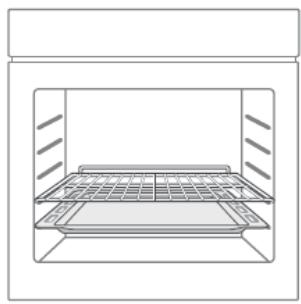
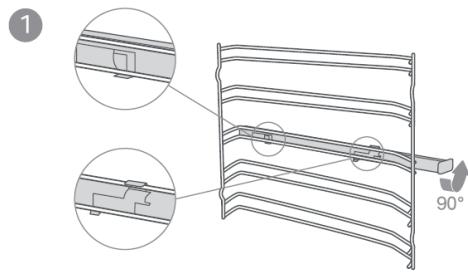
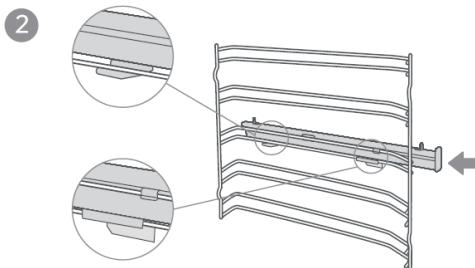
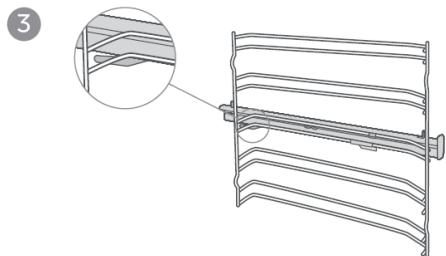
Accessory installation
The cavity has five shelf positions. The shelf positions are counted from the bottom up. For the oven to work properly, the grill rack and grill tray should only be placed between the first and fifth levels. When used together, place the grill tray under the grill rack.

Your oven has various heating modes which make your oven easier to use.
To enable you to find the correct heating mode for your dish, please refer to the below table.
| Heating Mode | Time | Temperature | Preheat | Use | |
| 1 | Conventional | 0 ~ 9 hours | 30°C ~ 250°C | Optional | For traditional baking and roasting on one level. Especially suitable for cakes with moist toppings. |
| 2 | Convection | 0 ~ 9 hours | 50°C ~ 250°C | Optional | For baking and roasting on one or more levels. Heat comes from the ring heater surrounding the fan evenly. |
| 3 | ECO | 0 ~ 9 hours | 140°C ~ 240°C | No | For energy-saving cooking |
| 4 | Conventional +Fan | 0 ~ 9 hours | 50°C ~ 250°C | Optional | For baking and roasting on one or more levels. The fan distributes the heat from the heating elements evenly around the cavity. |
| 5 | Radiant Heat | 0 ~ 9 hours | 150°C ~ 250°C | Optional | For grilling small amounts of food and for browning food. Please put the food in the center part under the grill heating element. |
| 6 | Double Grill + Fan | 0 ~ 9 hours | 50°C ~ 250°C | Optional | For grilling flat items and for browning food. The fan distributes the heat evenly around the cavity. |
| 7 | Double Grill | 0 ~ 9 hours | 150°C ~ 250°C | Optional | For grilling flat items and for browning food |
| 8 | Pizza | 0 ~ 9 hours | 50°C ~ 250°C | Optional | For pizza and dishes which need a lot of heat from underneath. The bottom heater and ring heater will work. |
| 9 | Bottom Heat | 0 ~ 9 hours | 30°C ~ 220°C | Optional | For adding extra browning to the bases of pizzas, pies, and pastries. Heating comes from the bottom heater. |
| 10 | Defrost | 0 ~ 9 hours | 50°C | No | For gently defrosting frozen food |
| 11 | Fermentation | 0 ~ 9 hours | 30°C ~ 45°C | No | For making yeast dough and sour dough to culture yogurt. |
| Additional function | Time | Temperature | Preheat | Use | |
| Pyrolytic Self-cleaning | 2 hours | 450°C | No | To heat up to a very high temperature. Residues will burn. | |
Caution :
- If you open the oven door during an ongoing operation, the operation will not be paused. Please be especially careful with the risk of burns.
- Do not cover the ventilation slots. Otherwise, the appliance may overheat. To make the oven cool down more quickly after the operation, the cooling fan may continue to run for a period afterwards.
Keep warm
| Heating Mode | Time | Temperature | Preheat | Use |
| 0 ~ 9 hours | 65°C ~ 120°C | No | For keeping warm the ready food |
Installation dimensions (measurements in mm)
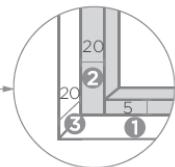
Cupboard Diagram (Standing Cupboard)
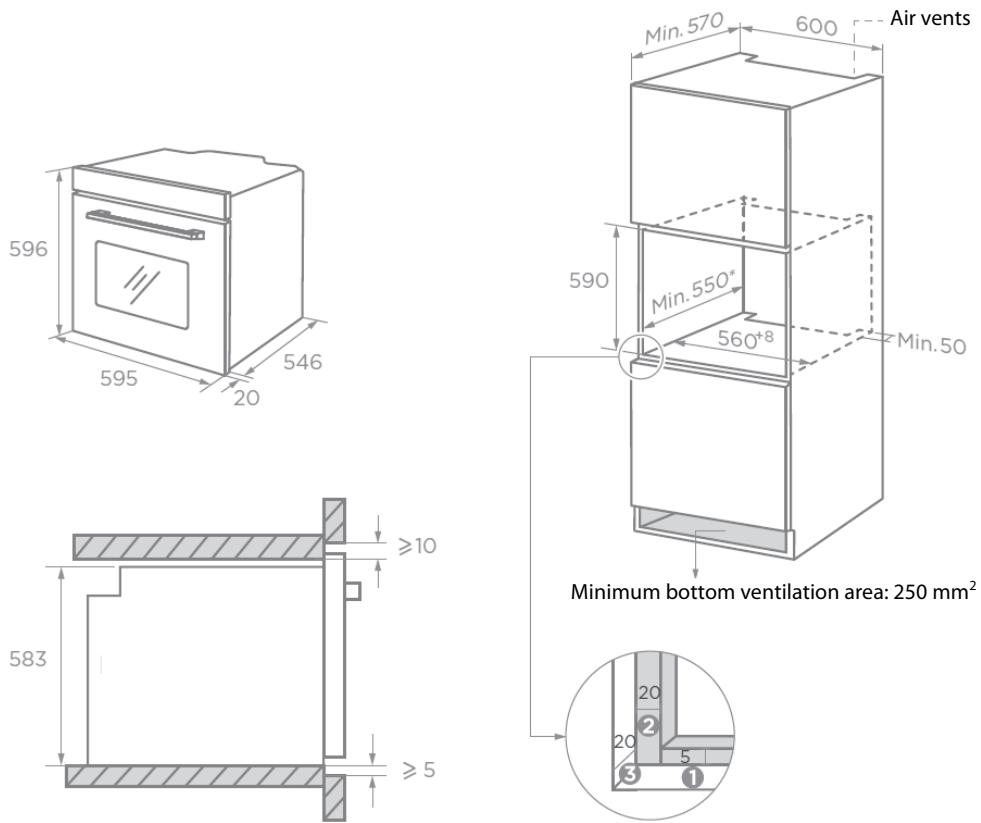
Reserve 5 mm for the door panel at the top and bottom respectively.
2 Reserve 20mm for the door panel on the left and right respectively.
Reserve 20~mm for the door panel in thickness.
- The thickness of the cupboard board is 20mm
- If the power socket is installed on the back of the appliance, the depth of the cupboard opening shall be increased from a minimum of 590mm to 620mm .


Without hob
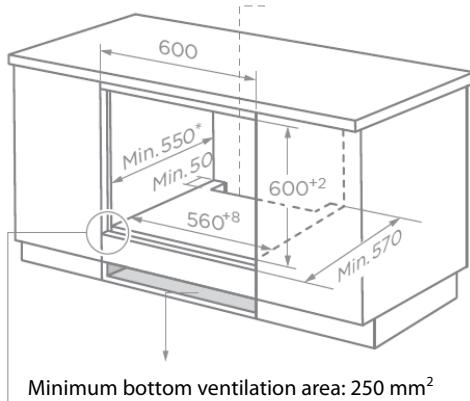
Reserve 5mm for the door panel at the top and bottom respectively.
2 Reserve 20mm for the door panel on the left and right respectively.
3 Reserve 20mm for the door panel in thickness.
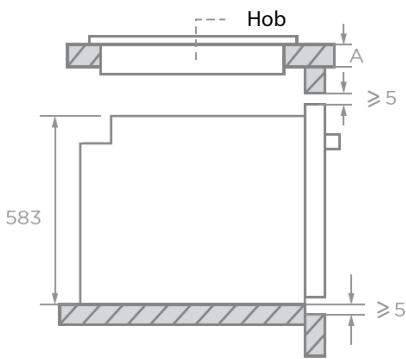
With hob
If the appliance is installed under the hob, the minimum thickness of worktop A is shown below:
| Hob type | Worktop A |
| Induction hob | 37 mm |
| Full-surface induction hob | 47 mm |
| Gas hob | 30 mm |
| Electric hob | 27 mm |
To operate this appliance safe, please be sure that it has been installed to a professional standard respecting the installation instructions. Damages occur because of incorrect installation are not within the warranty.
During installation, please wear protective gloves to prevent yourself from getting cut by sharp edges.
Check the appliance if there is any damage before installation and do not connect the appliance if the appliance is damaged.
Before turning on the appliance, please remove all the packaging materials and adhesive film from the appliance.
It is necessary to have the plug accessible or incorporate a switch in the fixed wiring, in order to disconnect the appliance from the supply after installation when necessary.
Warning: The appliance must not be installed behind a decorative door in order to avoid overheating.
Mounting the oven in the cabinet
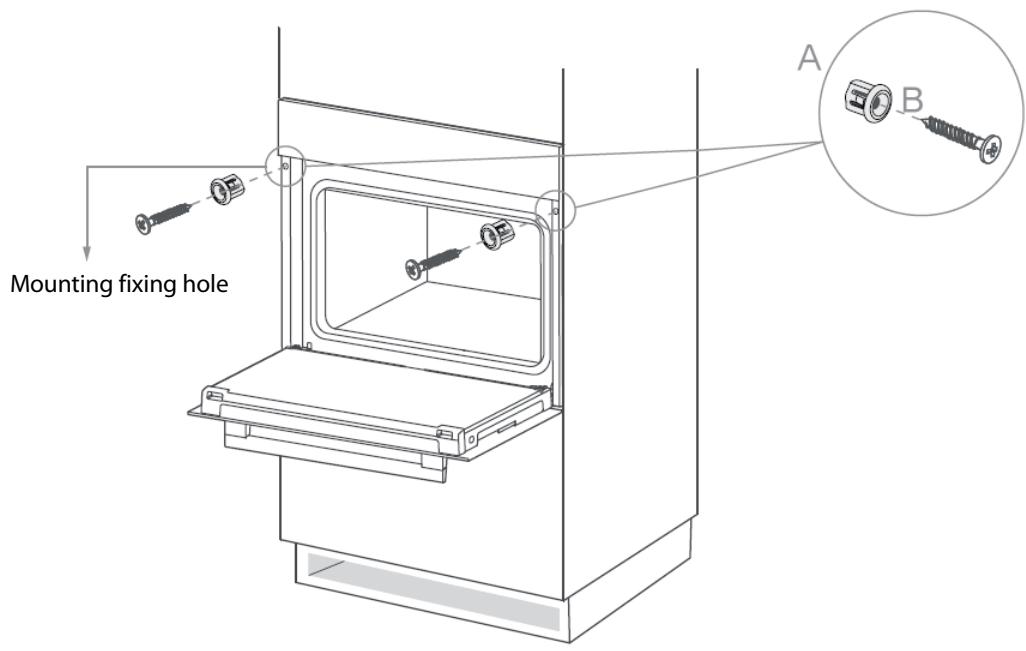
- Carefully push the oven into the cabinet, making sure that it is in the centre.
- Insert the bushings (A) into the holes on the oven front.
- Secure the oven to the cabinet using the screws (B).
CAUTION : Do not over tighten the screws to avoid damage to the oven housing. Use a screwdriver only!
Electrical connections must only be performed by a qualified and authorised electrician.
The brown wire must be connected to the terminal marked L.

The blue wire must be connected to the terminal marked N.
The green and yellow wire must be connected to the terminal marked E or the earth symbol

Before using the oven to prepare food for the first time, you must clean the cavity and accessories.
- Remove all stickers, surface protection foils and transport protection parts.
- Remove all accessories from the cavity.
- Clean the accessories thoroughly with warm soapy water and a dish cloth or soft brush.
- Ensure that the cavity does not contain any leftover packaging, such as polystyrene pellets or wooden piece which may cause risk of fire.
- Wipe the smooth surfaces in the cavity and the door with a soft, wet cloth.
- To remove the new-appliance smell, heat up the appliance when empty and with the oven door closed.
- Keep the kitchen highly ventilated while the appliance is heating up for the first time. Keep children and pets out of the kitchen during this time. Close the door to the adjacent rooms.
- Adjust the settings indicated. You can find out how to set the heating mode and the temperature in the next section OPERATION.
Settings
| Heating mode | Conventional |
| Temperature | 250°C |
| Time | 0,5 hour |
After the oven has cooled down:
- Clean the smooth surfaces in the cavity and the door with warm soapy water and a dish cloth.
- Dry all surfaces.
Setting the Time
Before the oven can be used, the time should be set.

- After the oven has been electrically connected, touch
-
You can set time of day in hours by turning the right knob.
-
Touch again.
- You can set time in minutes by turning the right knob.
- Touch to finish the setting.
NOTE : The clock has a 24-hour display.
OPERATION
Reminder function
- In the standby state and during cooking, touch
-
Turn the right knob to adjust the hour digit.
-
Touch to confirm.
-
Turn the right knob to adjust the minute digits.
-
Touch to complete the setting.

to enter the reminder setting.
NOTE
- During cooking, touch to view the reminder time.
- The reminder time has been set. During cooking, touch reminder time.

twice to modify the
Barbecues function
- In standby state or reminder state, turn the left knob to select the function.
-
Turn the right knob to adjust the temperature.
-
Touch to enter the time setting.
-
Turn the right knob to adjust the time.
-
Touch to start cooking. During cooking, you can touch to pause.
NOTE
- During cooking, repeatedly touch to modify the temperature and repeatedly touch to modify the time.
- During cooking, the function can be changed by turning the left knob, and the time remains unchanged. The temperature is the default temperature of the current function, and it will start running 6 seconds after the change.
Quick preheating
- In standby state or reminder state, turn the left knob to select the function.
-
Turn the right knob to adjust the temperature.
-
Touch to enter the time setting.
- Turn the right knob to adjust the time.
- Touch to start quick preheating.
NOTE
- Preheating can shorten the cooking time and improve the taste of food.
After preheating, put the ingredients in the oven for cooking. - When the preheating temperature is reached, the buzzer sounds and the progress bar is always on.
Childproof lock
Your oven has a childproof lock so that children cannot switch it on accidentally or change any settings.
When you touch and hold 35 for 3 seconds, childproof lock is activated. The lock symbol will be displayed.
Touch and hold for 3 seconds again, the oven is unlocked. The lock symbol will disappear from the display.
You can activate or deactivate childproof lock when the oven is working or not.
Air fry function

- In standby or reminder state, touch AIRFRY.
-
Turn the right knob to adjust the temperature.
-
Touch to enter the time setting.
-
Turn the right knob to adjust the time.
-
Touch to start cooking.
NOTE
During cooking, repeatedly touch to modify the temperature and repeatedly touch to modify the time.
Automatic menu
- In standby state, touch and hold setting.

for 3 seconds to enter the automatic menu
- Turn the right knob to select the menu.
- Touch to start cooking.
NOTE
- For the menu without preheating program, the countdown starts directly after it is started.
- For the menu with preheating program, you need to wait for preheating before putting the ingredients in the oven.
| Code | Menu name | Weight | Mode | Time | Temperature | Preheat |
| Ar01 | French Fries | 350g | AIRFERY | 19min | 200°C | Yes |
| Ar02 | French Fries | 750g | AIRFERY | 23min | 230°C | Yes |
| Ar03 | Chicken drumsticks | 500g | AIRFERY | 20+10min | 250°C | No |
| Ar04 | Chicken drumsticks | 1000g | AIRFERY | 20+12min | 250°C | No |
| Ar05 | Chicken Nugget | 200g | AIRFERY | 17min | 250°C | Yes |
| Ar06 | Vegetable Nuggets | 180g | AIRFERY | 11,5min | 250°C | Yes |
| Ar07 | Mozzarella Fries | 120g | AIRFERY | 10min | 250°C | Yes |
| Ar08 | Onion Rings thick cut | 160g | AIRFERY | 11,5min | 220°C | Yes |
| Ar09 | Breaded Mushrooms | 125g | AIRFERY | 13min | 230°C | Yes |
| Ar10 | Breaded Mushrooms | 250g | AIRFERY | 13min | 230°C | Yes |
Suggested menu table
| Menu name | Form | Mode | Time | Temperature | Level |
| Sponge cake (simple) in a box shape | Box | 50min | 170°C | 2 | |
| Sponge cake (simple) in a box shape | Box | 70min | 140°C | 1 | |
| Sponge cake with fruits in a round form | Round form | 50min | 150°C | 1 | |
| Sponge cake with fruits on a tray | Tray | 70min | 140°C | 1 | |
| Raisins brioche mu ns (yeast cake) | Muffin form | Preheat: 19min Baking: 11min | 220°C | 2 | |
| Gugelhupf (with yeast) | Tray | Preheat: 11min Baking: 60min | 150°C | 1 | |
| Mu ns | Muffin form | Preheat: 8.5min Baking: 30min | 160°C | 1 | |
| Muffins | Muffin form | Preheat: 8.5min Baking: 30min | 150°C | 1 | |
| Apple yeast cake on a tray | Tray | Preheat: 10min Baking: 42.5min | 160°C | 1 | |
| Water sponge cake (6 eggs) | Spring form | Preheat: 9.5min Baking: 41min | 160°C | 1 | |
| Water sponge cake (4 eggs) | Spring form | Preheat: 9min Baking: 26min | 160°C | 1 | |
| Water sponge cake | Spring form | Preheat: 9.5min Baking: 41min | 160°C | 1 | |
| Apple Yeast cake on a tray | Tray | Preheat: 8min Baking: 42min | 150°C | 2 | |
| Hefezopf (Callah) | Tray | 40min | 150°C | 2 | |
| Small cakes 20 | Tray | 36min | 150°C | 2 | |
| Small cakes 40 | Tray | Preheat: 10min Baking: 34min | 150°C | 2+4 | |
| Butter yeast cake | Tray | Preheat: 8min Baking: 30min | 150°C | 2 | |
| Shortbread | Tray | Preheat: 8min Baking: 13min | 170°C | 2 | |
| Shortbread 2 trays | Tray | Preheat: 8.3min Baking: 12min | 160°C | 2+4 | |
| Vanilla cookies | Tray | Preheat: 8min Baking: 10min | 160°C | 2 | |
| Vanilla cookies | Tray | Preheat: 8min Baking: 14min | 150 °C | 2+4 | |
| White bread (1 kg flour) box shape | Box | Preheat: 9min Baking: 50min | 170 °C | 1 | |
| White bread (1 kg flour) box shape | Box | Preheat: 12min Baking: 45min | 170 °C | 1 | |
| Fresh Pizza (thin) | Tray | Preheat: 9.5min Baking: 21min | 170 °C | 2 | |
| Fresh Pizza (thick) | Tray | Preheat: 10min Baking: 45min | 170 °C | 2 | |
| Fresh Pizza (thick) | Tray | Preheat: 8min Baking: 41min | 170 °C | 2 | |
| Bread | Tray | Preheat: 9min Baking: 30min | 190 °C | 1 | |
| Beef tender loin 1.6 kg | Tray | 55min | 180 °C | 2 | |
| Meatloaf 1 kg meat | Tray | 75min | 180 °C | 1 | |
| Chicken 1 kg | Tray | 50min | 180 °C | Rack:2 Tray:1 | |
| Fish 2.5 kg | Tray | 70min | 170 °C | 2 | |
| Ribs tomahawk cooked B.T. | Tray | 85min | 120 °C | 3 | |
| Pork Roast of the neck 1.2 kg | Tray | 82min | 160 °C | 1 | |
| Chicken 1.7 kg | Tray | 78min | 180 °C | Rack:2 Tray:1 |
Interior lighting
When you open the oven door, the interior lighting switches on.
You can touch to activate or deactivate the internal lighting.
Replaceable light source by a professional
This product contains a light source of energy efficiency class G.
ENERGY EFFICIENT USE
- Remove all accessories, which are not necessary during the cooking & baking process.
- Do not open the door during the cooking & baking process.
- Decrease the temperature setting in not fan assisted modes to 50^ at 5min to 10min before end of cooking & baking time. So you can use the cavity heat to complete the process.
- Use ECO heating mode , whenever possible. You can reduce the temperature by 20^ to 30^ .
- You can cook and bake using ECO heating mode on more than one level at the same time.
- If it is not possible to cook and bake different dishes at the same time, you can heat one after the other to use the preheat status of the oven.
- Do not preheat the empty oven, if it is not required. If necessary, put the food into the oven immediately after reaching the temperature.
- Do not use reflective foil, like aluminium foil to cover the cavity floor.
- Use dark mat finish and light weighted baking moulds and containers. Try not to use heavy accessories with shiny surfaces, like stainless steel or aluminium.
Turn the oven off and remove the power plug from the mains socket before cleaning.

Risk of electric shock!
Penetrating moisture may cause an electric shock. Do not use any high-pressure cleaners or steam cleaners.

Risk of burns!
Never clean the appliance immediately after switching off. Let the appliance cool down.
To ensure that the different surfaces are not damaged by using the wrong cleaning agent, observe the information in the table. Do not use
sharp or abrasive cleaning agents,
metal or glass scrapers to clean the glass in the oven door,
metal or glass scrapers to clean the door seal,
- hard scouring pads and sponges,
- cleaning agents with high concentrations of alcohol.
Wash new sponge cloths thoroughly before use.
Allow all surfaces to dry thoroughly before using the appliance again.
| Area | Cleaning |
| Stainless steel front | Hot soapy water : Clean with a dish cloth and then dry with a soft cloth. Remove flecks of limescale, grease, starch and albumin (e.g. egg white) immediately. Corrosion can form under such flecks. Do not use glass cleaners or metal or glass scrapers for cleaning. |
| Plastic front | Hot soapy water : Clean with a dish cloth and then dry with a soft cloth. Do not use glass cleaners or metal or glass scrapers for cleaning. |
| Door panels | Glass cleaner : Clean with a dish cloth and then dry with a soft cloth. Do not use a glass scraper. |
| Door handle | Hot soapy water : Clean with a dish cloth and then dry with a soft cloth. |
| If descaler comes into contact with the door handle, wipe it off immediately. Otherwise, any stains will not be able to be removed. | |
| Door seal | Hot soapy water: Clean with a dish cloth. Do not scour. |
| Cooking compartment | Hot soapy water or a vinegar solution : Clean with a dish cloth and dry with a soft cloth. If the oven is very dirty: Do not use oven spray or other aggressive oven cleaners or abrasive materials. Scouring pads, rough sponges and pan cleaners are also unsuitable. These items scratch the surface. Allow the interior surfaces to dry thoroughly. |
| Accessories | Hot soapy water : Soak and clean with a dish cloth or brush. If there are heavy deposits of dirt, use a stainless-steel scouring pad. |
Notes :
- Slight differences in colour on the front of the appliance are caused by the use of different materials, such as glass, plastic and metal.
- Shadows on the door panels, which look like streaks, are caused by reflections made by the interior lighting.
Enamel is baked on at very high temperatures. This can cause some slight color variation. This is normal and does not affect operation. The edges of thin trays cannot be completely enameled. As a result, these edges can be rough. This does not impair the anti-corrosion protection.
Always keep the appliance clean and remove dirt immediately so that stubborn deposits of dirt do not build up.
Tips
- Clean the cooking compartment after each use. This will ensure that dirt cannot be baked on.
- Always remove flecks of lime scale, grease, starch and albumin (e.g. egg white) immediately.
- Remove flecks of food with sugar content immediately, if possible, when the fleck is still warm.
- Use suitable ovenware for roasting, e.g. a roasting dish.
Pyrolytic self-cleaning function
Your oven is equipped with "Pyrolytic Self-cleaning" mode. You can use this mode to clean the cooking compartment effortlessly.
The cooking compartment is heated up to a very high temperature. Residues from roasting, grilling and baking will burn. In this mode, the temperature and operating time cannot be adjusted.
NOTE:
For your safety, the oven door is locked and cannot be opened until the temperature reduces to a section which is relatively safe. The interior lighting remains off during cleaning.
WARNING
Risk of burns!
The cooking compartment becomes extremely hot during the pyrolytic self-cleaning mode. Never open the oven door. Allow the oven to cool down. Keep children, disabled and old people without self-care ability away from the oven.
Risk of harm to health!
In the pyrolytic self-cleaning mode, the cooking compartment heats up to a very high temperature so that remnants left over from roasting, grilling, baking and so on will burn off. This process releases vapors, which can irritate the mucous membranes. While the cleaning function is running, keep the kitchen well ventilated. Do not remain in the room for long periods. Keep children and pets away from the oven.
Before starting the pyrolytic mode
Caution!
- Remove accessories and cookware from the cooking compartment before running the pyrolytic mode. No excess spillage allowed to be retained in the cavity.
- A large number of food remnants, fat and meat juices may catch fire when pyrolytic mode is in progress. Before you start the cleaning function, always remove the food residues and remnants from the cooking compartment.
- Clean the inside of the appliance door and along the edges of the cooking compartment in the area around the seal. Do not scrub or remove the seal.
Risk of fire!
- The appliance will become very hot on the outside during pyrolytic mode. Never hang combustible objects, e.g. tea towels, on the door handle. Do not place anything against the front of the oven. Keep children away from the oven.
- If the door seal is damaged, a large amount of heat will be generated around the door. Do not scrub or remove the seal. Never operate the oven if the seal is damaged or missing.
Setting pyrolytic self-cleaning mode
- Turn the function knob until the display show the symbol

- Touch to start cleaning. The default cleaning time is 2 hours (2:00).
The oven door will automatically lock and cannot be opened.
- Once cleaning starts, you cannot change any setting expect pausing and stopping.
- When the cleaning process is finished, the oven will beep.
- Once the cooking compartment has cooled down, use a damp cloth to wipe off the ash that has been left behind in the cooking compartment and around the oven door.
NOTES :
- During the pyrolytic mode, the frame inside the oven may discolour. This is normal and does not affect performance. The discolouration can be removed with the help of stainless-steel cleaning agent.
- Bad soiling may cause white deposits to remain on the enamel surfaces. These are residues from the food and are harmless. It does not affect performance. You can remove these residues using lemon juice or other kinds of cleaning agents if needed.
Door Cleaning
With good care and cleaning, your appliance will retain its appearance and remain fully functional for a long time to come.
For cleaning purposes and to remove the door panels, you can detach the appliance door. There is a lock lever on the left and right hinges of the appliance door. When the locking levers are closed, the appliance door is secured in place. It cannot be detached. When the locking levers are open in order to detach the appliance door, the hinges are locked. They cannot snap shut.
Warning
- The hinges on the appliance door move when opening and closing the door, and you may be trapped. Keep your hands away from the hinges.
- If the hinges are not locked, they can snap shut with great force. Ensure that the locking levers are always fully closed or, when detaching the appliance door, fully open.
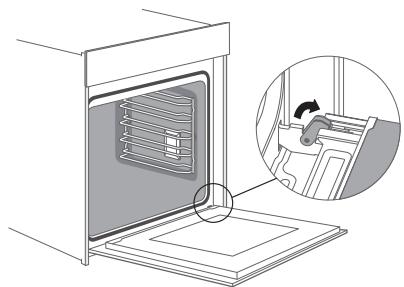
Removal and installation of oven door
- Open the appliance door fully.
- Fold open the two locking levers on the left and right.
- Close the appliance door as far as the limit stop.
- With both hands, grip the door on the left- and right-hand side, and pull it out upwards.
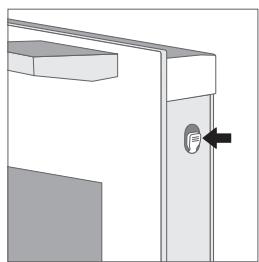
- The plastic inlay in the door cover may become discolored. To carry out thorough cleaning, you can remove the cover. Press the left and right switches of the cover.
- After removing the door cover, that rest parts of the appliance door can be easily taken o so that you can go on with the cleaning . When the cleaning of the appliance door has finished , put the cover back in place and press on it until it clicks audibly into place
NOTE
Reattach the appliance door in the opposite sequence to removal.
| Problem | Possible Cause | Possible Solution |
| The oven does not start. | • Power is not connected. • The main power switch is not turned on. • Oven door is not closed. | • Connect power supply. • Turn on the power switch. • Close the oven door. |
| Lamp does not come on. | It's broken. | Contact after-sales service. |
| Has a pungent odour or smoke | first use | No processing required |
| Food is not cooked. | • Temperature is too low. • Food portion is too large. | • Use a higher temperature. • Cook food in smaller pieces or extend the cooking time. |
| Burnt or uneven food | • The temperature is set too high or the cooking time is too long. • The food is too close to the heating tube. | • Adjust the cooking temperature or time. • Adjust the placement layers of accessories. |
| The fan did not stop working after stopping the heating. | Fan delays blowing for heat dissipation. | No processing required |
Warning - Risk of electric shock!
Incorrect repairs are dangerous. Repairs may only be carried out and damaged power cables replaced by one of our trained after-sales technicians. If the appliance is defective, unplug the appliance from the mains socket or switch off the circuit breaker in the fuse box. Contact the after-sales service.
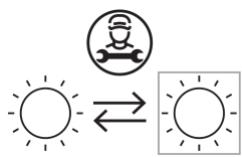
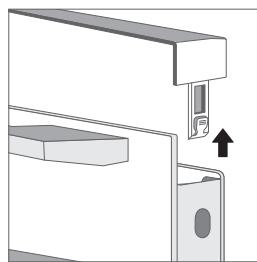
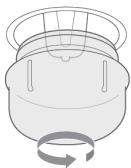
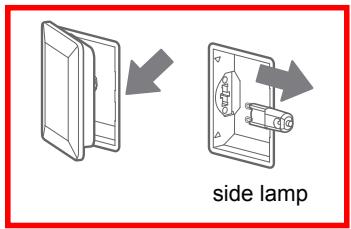
Replacing the lamp on the corner of the cavity
If the cavity lamp fails, it must be replaced.
When handling the halogen lamp, use a dry cloth. This will increase the service life of the lamp.
Risk of electric shock!
When replacing the lamp, the lamp socket contacts are live. Before replacing the lamp, unplug the appliance from the mains socket or switch off the circuit breaker in the fuse box.
Risk of burns!
The appliance becomes very hot. Never touch the interior surfaces of the appliance or the heating elements. Always allow the appliance to cool down. Keep children at a safe distance.
- Place a towel in the cold cavity to prevent damage.
- Turn the glass cover anticlockwise to remove it.
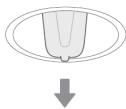
- Pull out the lamp - do not turn it.
- Assemble a new lamp.
- Assemble the glass cover back in.
Lamp specifications :25 watt, 230 V halogen lamps
If the glass cover of the halogen lamp is damaged, it must be replaced.
| Information for domestic ovens | |||
| Symbol | Value | Unit | |
| Model identification | TMFP72BX2 | ||
| Type of oven | Electric oven | ||
| Mass of the appliance | M | 41,0 | kg |
| Number of cavities | 1 | ||
| Heat source per cavity (electricity or gas) | Electricity | ||
| Volume per cavity | V | 72 | l |
| Energy consumption (electricity) required to heat a standardised load in a cavity of an electric heated oven during a cycle in conventional mode per cavity (electric final energy) | ECeletric cavity | 1,00(at | kWh/cycle |
| Energy consumption required to heat a standardised load in a cavity of an electric heated oven during a cycle in fan-forced mode per cavity (electric final energy) | ECeletric cavity | 0,65(at | kWh/cycle |
| Energy Efficiency Index per cavity | EEIcavity | Conventional(at: 117,6Fan-forced(at):76,5 | |
| Rating / Supply voltage and frequency | 220-240V~ 50-60Hz |
| Max power | 3,2 kW |
| Oven lamp power | 25 W |
| Top heating element (W) | 900 W |
| Grill heating element (W) | 1370 W |
| Bottom heating element (W) | 1070 W |
| Convection heating element (W) | 1904 W |
| Cooling fan (W) | 37 W |
| Cleaning (Enamel/catalytic/Pyrolytic) | Pyrolytic |
| Net weight kg | 41.0 kg |
| Outside dimensions (W*D*H) | 595 * 546 * 596 mm |
| Cabinet/furniture cut-out sizes (W*D*H) | 560 * 550 * 590 mm |
| Energy Class (letter for the sticker) * | A+ |
| Usable volume (litres) | 72L |
| Size : (Small/Medium/Large) | Large |
| Made in | PRC |
- Energy class: A^+++ D (A^+++ = economical)
D = less economical)
DISPOSAL
As a responsible retailer we care about the environment. As such we urge you to follow the correct disposal procedure for the appliance and packaging materials. This will help conserve natural resources and ensure that it is recycled in a manner that protects health and the environment.
You must dispose of this appliance and its packaging according to local laws and regulations. Because this appliance contains electronic components, the appliance and its accessories must be disposed of separately from household waste when the appliance reaches its end of life.
Contact your local authority to learn about disposal and recycling. The appliance should be taken to your local collection point for recycling. Some collection points accept appliance free of charge.
We apologize for any inconvenience caused by minor inconsistencies in these instructions, which may occur as a result of product improvement and development.