
Amilo XA 2528-P6010 - Laptop FUJITSU - Free user manual and instructions
Find the device manual for free Amilo XA 2528-P6010 FUJITSU in PDF.
| Product type | Laptop |
| Brand | Fujitsu |
| Model | Amilo XA 2528-P6010 |
| Processor | Intel Core Duo (estimated) |
| RAM | 1 GB (estimated) |
| Hard drive | 80 GB (estimated) |
| Screen | 15.4-inch TFT |
| Screen resolution | 1280 x 800 pixels (WXGA) |
| Graphics card | Integrated (estimated) |
| Weight | Approximately 2.8 kg |
| Dimensions (W x D x H) | Approximately 360 x 260 x 30 mm |
| Power supply | AC adapter 19 V, 3.16 A |
| Battery | Lithium-Ion, 6 cells |
| Battery life | Approximately 2 to 3 hours (estimated) |
| Operating system | Windows Vista pre-installed |
| Connectivity | USB 2.0, FireWire, Ethernet LAN, Modem, S-Video, DVI-I, audio jacks |
| Wireless | WiFi 802.11b/g, Bluetooth (optional) |
| Security | Kensington lock |
| Webcam | Integrated |
| Optical drive | CD/DVD-ROM |
| Maintenance and cleaning | Use a soft, dry cloth. Avoid liquids. |
| Spare parts and repairability | Contact Fujitsu support or an authorized reseller. |
Frequently Asked Questions - Amilo XA 2528-P6010 FUJITSU
User questions about Amilo XA 2528-P6010 FUJITSU
0 question about this device. Answer the ones you know or ask your own.
Ask a new question about this device
Download the instructions for your Laptop in PDF format for free! Find your manual Amilo XA 2528-P6010 - FUJITSU and take your electronic device back in hand. On this page are published all the documents necessary for the use of your device. Amilo XA 2528-P6010 by FUJITSU.
USER MANUAL Amilo XA 2528-P6010 FUJITSU
... technical questions or problems?
Please refer to:
- our Hotline/Help Desk (see Help Desk List or on the Internet at: "www.fujitsu-siemens.com/helpdesk")
- your sales partner
- your sales office
Additional information is contained in the Help Desk List and the "Warranty" manual.
You can find the "Warranty" manual on your notebook by clicking on Start - Manual or on the "Drivers & Utilities" CD/DVD or on our website.
The latest information on our products, tips, updates, etc. can be found on the Internet at: "www.fujitsu-siemens.com"
This manual was produced by Xerox Global Services
Published by
Fujitsu Siemens Computers GmbH
AG 04/07
Edition 1, April 2007
Order No.: 10600816217
Order No.: 440 N30822
AMILO Xa Series
Getting Started
English
Norsk
Português
Cesky
Türkce
Slovensko
Slovenský
Microsoft, MS, Windows and Windows Vista are registered trademarks of Microsoft Corporation.
Acrobat Reader is a trademark of Adobe Systems Incorporated.
Macrovision is a trademark of Macrovision Corporation, USA.
MultiMediaCard is a registered trademark of Infineon Technologies AG
Sony and Memory Stick are registered trademarks of Sony Electronics, Inc.
All other trademarks referenced are trademarks or registered trademarks of their respective owners, whose protected rights are acknowledged.
Copyright © Fujitsu Siemens Computers GmbH 2007
All rights, including rights of translation, reproduction by printing, copying or similar methods, in part or in whole, are reserved.
Offenders will be liable for damages.
All rights reserved, including rights created by patent grant or registration of a utility model or design.
Delivery subject to availability. Right of technical modification reserved.
Contents
Innovative technology.. 1
Are you missing information? 1
Notational conventions 2
Important notes 3
Declarations of Conformity 3
Information sources 4
Safety information 5
Drivers and utilities 5
Ports and operating elements 6
Preparation for use and operation 7
Unpacking and checking your notebook 7
Selecting the location 7
Connecting the mains adapter 8
Switching the notebook on for the first time 8
Switching on the Notebook 9
Switching off the Notebook 10
Battery 10
Easy Launch keys 11
Touchpad and touchpad buttons 11
Using touchpad buttons 12
Microphone and loudspeakers 13
Adjusting the volume 14
Wireless components (wireless LAN/Bluetooth) 15
Switching the wireless LAN/Bluetooth module on and off 15
BIOS Setup Utility 15
Troubleshooting and tips 16
Restoring installed software 16
Restoring the operating system, drivers, manuals and special software 17
The notebook's date or time is incorrect 17
A beep sounds at a rate of one per second 17
The notebook's LCD screen remains blank 17
The LCD screen is difficult to read 17
The external monitor remains blank 18
The external monitor is blank or the image is unstable 18
The notebook cannot be started 19
The notebook stops working 19
The printer does not print 20
The radio connection to a network does not work 20
Innovative technology...
and ergonomic design make your AMILO a reliable, convenient notebook. If you have purchased a notebook with a Microsoft Windows operating system, this will be pre-installed and optimally configured for you. The notebook is ready to use when you switch it on for the first time.
This "Getting Started" guide tells you how to prepare your AMILO for use. If you encounter any problems, helpful information can be found in the section "Troubleshooting and tips", Page 16.
The "optional" components described in this manual are only available for certain models and must be selected at the time of purchase. At the time this manual is printed it is not possible to say whether the "model-specific" components and functions described in this manual will be available for your own particular model.
Are you missing information?
An overview with further information about your notebook can be found in "Information sources", Page 4.
Notational conventions
| ! | Pay particular attention to text marked with this symbol. Failure to observe this warning endangers your life, destroys the device, or may lead to loss of data. Failure to follow the instructions may lead to loss of data, invalidate your warranty, destroy the device, or endanger your life |
| i | indicates important information that is required to use the device properly. |
| > | refers to an action which you must carry out. |
| ↓ | indicates a result |
| This style | flags data entered using the keyboard in a program dialog or command line, e.g. your password (Name123) or a command to launch a program (start.exe) |
| This style | refers to information displayed by a program on the screen, e.g.: Installation is completed |
| This style | is for • terms and texts in a software user interface, e.g.: ClickSave. • names of programs or files, e.g. Windows or setup.exe. |
| "This style" | is for • cross-references to another section, e.g. "Safety information" • Querverweise auf eine externe Quelle, z. B. eine Webadresse: Lesen Sie weiter auf "www.fujitsu-siemens.com" • indicates names of CDs and DVDs as well as names and titles of other materials, e.g.: "CD/DVD Drivers & Utilities" or "Safety" manual |
| Abc | refers to a key on the keyboard, e.g.: F10 |
| This style | flags concepts and text that are emphasised or highlighted, e.g.: Do not switch off device |
Important notes
This chapter contains references to other sources of information. It is essential that you observe the safety information for your notebook.
Declarations of Conformity
The "Declarations of Conformity" concerning the AMILO can be found at our Internet address: www.fujitsu-siemens.com".
Hereby, Fujitsu Siemens Computers, declares that the AMILO is in compliance with the essential requirements and other relevant provisions of Directive 1999/5/EC.
Information sources
In this "Getting Started" manual you will find the information you need to prepare your notebook for use. More detailed instructions and technical information for your notebook are contained in the "EasyGuide" manual. Manuals available only as PDF files can be printed out if you connect a printer to your notebook.
| Information source | Type of information | Where? |
| Quick Start Guide (printed) | Poster with information about getting started | Accessories kit |
| "Safety" manual (printed and/or PDF file) | Safety information | Accessories kit and/or on your notebook |
| "Recovery Process" manual (printed and/or PDF file) | Information on restoring the operating system, drivers, manuals and special software | Accessories kit, on your notebook or on our website "www.fujitsu-siemens.com/support/" |
| "EasyGuide" manual (PDF file) | Detailed instructions for commissioning, operation and technical information | The manuals are located on your notebook under Startsymbol - Manual or in some cases, updated versions can be found on our website at: "www.fujitsu-siemens.com/support/" |
| "Wireless LAN" manual (PDF file) | Detailed instructions for using wireless LAN and technical information | |
| "Warranty" manual (PDF file) | General guarantee conditions | |
| information files (e.g. *.TXT, *.DOC, *.CHM, *.HLP) | Information on utilities and programs | |
| information files (e.g. *.TXT, *.DOC, *.CHM, *.HLP) | Information on the operating system, the webcam and Bluetooth | In the software for these applications |
Safety information

Pay attention to the information provided in the "Safety" manual and in the following safety notes.
- When cleaning the notebook, observe the relevant notes in the "EasyGuide"manual.
- Your notebook is equipped with numerous security features that offer you a high level of security according to a multi-level concept. Details are contained in the "Security functions" chapter in the "EasyGuide" manual.
- Pay attention to the additional safety notes for devices with radio components provided in the "Safety" manual.
- Keep this operating manual together with the device. If you pass this device on to others, you should also give them the operating manual.
This notebook complies with the relevant safety regulations for data processing equipment. If you have questions about using your notebook in a particular area, please contact your sales outlet or our Hotline/Help Desk.
Drivers and utilities
If a Windows operating system is installed on your notebook, you will find additional information on the system and drivers, help programs and updates on your notebook or on our website "www.fujitsu-siemens.com/support".
If you need to reinstall your operating system, you can reload the original software and the original drivers of your notebook onto the hard disk using the "Drivers & Utilities" CD/DVD or the drivers from our website.
Ports and operating elements
This chapter presents the individual hardware components of your notebook. It provides an overview of the notebook's displays and ports. Please familiarise yourself with these components before you start to work with your notebook.
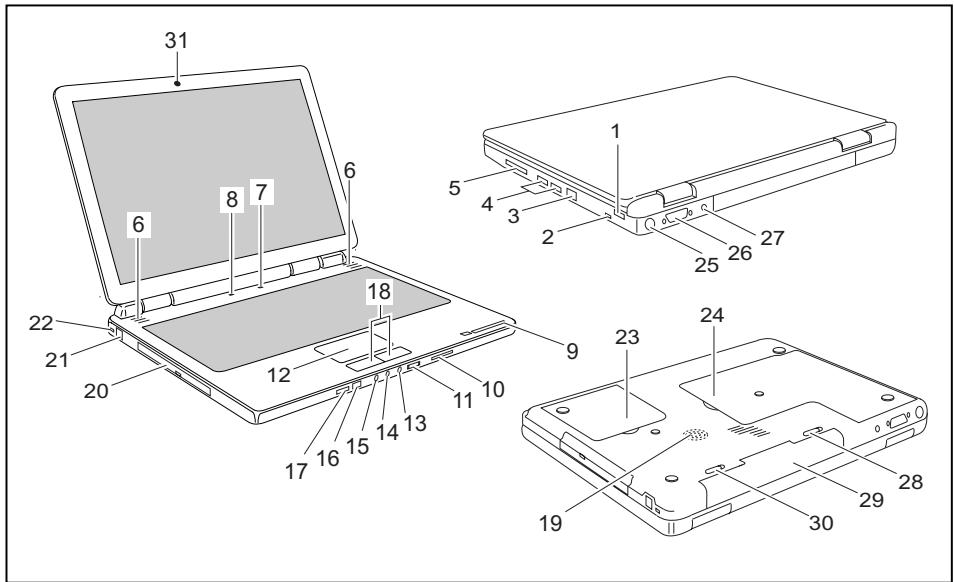
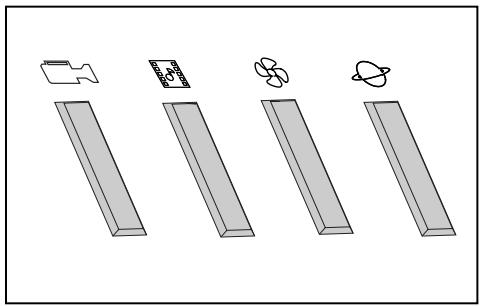
1 = USB port
2 = FireWire port
3 = LAN port
4 = USB ports
5 = ExpressCard slot
6 = Built-in loudspeakers
7 = ON/OFF switch of the notebook
8 = Easy Launch keys
9 = Status indicators
10 = Memory card slot
11 = Volume control
12 = Touchpad
13 = Headphones/SPDIF port (loudspeaker port / line out)
14 = Microphone port
15 = Line in
16 = Remote control interface
17 = On/Off switch for wireless LAN, Bluetooth
18 = Touchpad keys
19 = Bass loudspeaker (subwoofer)
20 = CD/DVD drive
21 = Modem port
22 = Kensington Lock
23 = Service compartment (hard disk(s))
24 = Service compartment (memory)
25 = S-Video out socket
26 = DVI-1 monitor port
27 = DC IN jack
28 = Battery release latch
29 = Battery
30 = Battery release latch
31 = Webcam
Preparation for use and operation

Please observe the safety information in the section "Important notes", Page 3.
You must charge the battery and install the application programmes before you can work with the notebook. The operating system and drivers required are preinstalled.
This chapter also describes the basics for operating your notebook.
Unpacking and checking your notebook

Should you discover any damage incurred during transportation, notify your local sales outlet immediately!
Unpack all the individual parts.
Check your notebook for damage incurred during transportation.

We recommend that you keep the original packaging material.
You may need the packaging in the future if you need to transport your device.
Selecting the location

Select a suitable location for the notebook before setting it up. Consider the following points when selecting a location:
- Never place the notebook on a soft surface (e.g. carpeting, upholstered furniture, bed). This can block the air vents and cause damage due to overheating.
- Do not place the notebook directly on your legs for extended periods. The underside of the notebook heats up during normal operation. Extended contact with the skin can become unpleasant or even result in burns.
- Place the notebook on a stable, flat, non-slip surface. Please note that the rubber feet may mark certain types of surfaces.
- Keep other objects 100mm away from the notebook and its mains adapter to ensure adequate ventilation.
- Never cover the ventilation slots on the notebook or the mains adapter.
- Do not expose the notebook to extreme environmental conditions. Protect the notebook against dust, humidity and heat.
Connecting the mains adapter

Please read the information in "Safety information", Page 5.
The power cable supplied conforms to the requirements of the country in which you purchased your notebook. Make sure that the power cable is approved for use in the country in which you intend to use it.
The mains adapter's power cable must only be connected to a mains socket if the notebook is connected to the mains adapter.
Make sure that the rated current of the mains adapter is not higher than that of the power system to which you connect it (see technical data for the mains adapter).
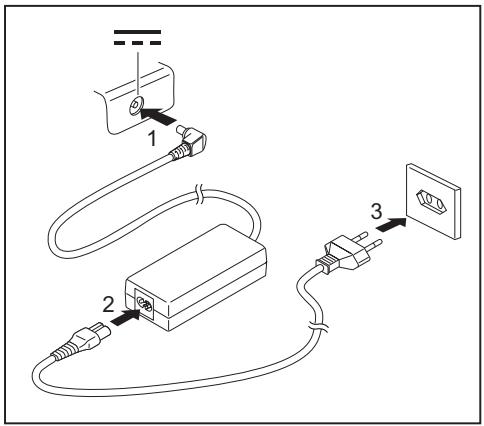
Connect the mains adapter cable (1) to the DC jack (DC IN) of the notebook.
Plug the power cable (2) into the mains adapter.
Plug the power cable (3) into a mains outlet.
Switching the notebook on for the first time

When you switch your notebook on for the first time, the supplied software is installed and configured. Due to the fact that this installation procedure must not be interrupted, you should set aside enough time for it to be fully completed and connect the notebook to the mains outlet using the mains adapter.
During installation, the notebook must only be rebooted when you are requested to do so!
Your operating system is pre-installed on the hard disk to facilitate the procedure when you use your notebook for the first time.
Switch the notebook on (see "Switching on the Notebook", Page 9).
During installation, follow the on-screen instructions.
Consult the operating system manual if anything is unclear about the requested input data.

If a Windows operating system is installed on your notebook, you will find additional information on the system as well as the drivers, help programs, updates, manuals, etc. on your notebook or on the "Drivers & Utilities" CD/DVD or on our website (see "Information sources", Page 4).
Switching on the Notebook
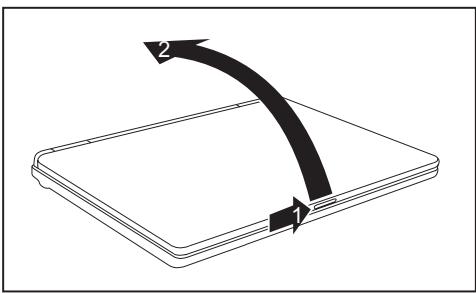
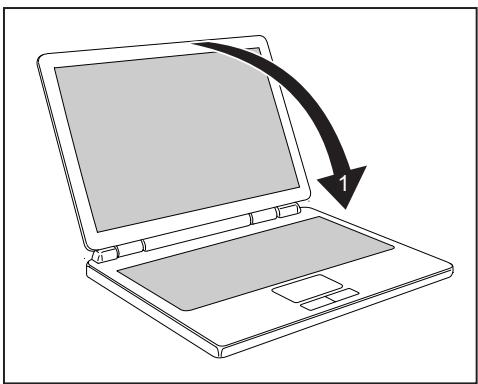
Slide the release button in the direction of the arrow (1) and unfold the LCD screen upward (2).
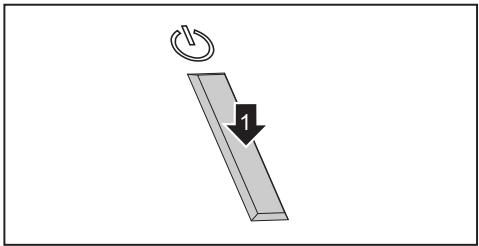
Press the ON/OFF switch (1) to switch the notebook on.
The power-on indicator is lit.
Switching off the Notebook
Shut down the operating system properly (e.g. from the Windows Start menu, by clicking on Start - Shut Down - Shut down - OK).
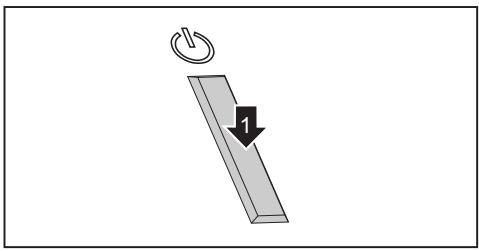
If the notebook is not switched off automatically, press the ON/OFF switch (1) for approx. five seconds.
Close the LCD screen (1) so that it locks into place.
Battery

The battery in the notebook is not fully charged at the time of delivery. You must first charge the battery with the mains adapter connected to the power socket (see "Connecting the mains adapter", Page 8).
The battery supplies your notebook with the necessary power during mobile use. The battery indicator displays the current state of the battery.
Information on how to install and remove the battery, how to maintain and service it, and how to optimise the battery operating time can be found in the "EasyGuide" manual.
Easy Launch keys
Your notebook is equipped with Easy Launch keys. With the pre-installed software you can launch the following applications or functions by pressing a single button.

Webcam
With this key you can start your system's integral webcam.

Multimedia
This button starts multimedia applications.

Silent Mode (whisper mode)
This key reduces the speed of the fan.
When the Silent Mode is switched on, the processor and graphics do not operate at the full performance level.
This reduced power is adequate for most office applications however.

Internet
With this button you can start the standard internet browser of your system.
Touchpad and touchpad buttons

Keep the touchpad clean. Protect it from dirt, liquids, and grease.
Do not use the touchpad if your fingers are dirty.
Do not rest heavy objects (e.g. books) on the touchpad or the touchpad buttons.
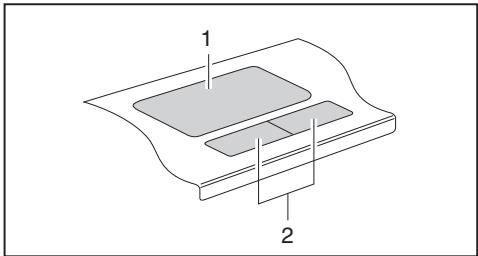
1 = Touchpad
2 = Touchpad buttons
The touchpad enables you to move the mouse pointer on the screen.
The touchpad buttons allow you to select and execute commands. They correspond to the buttons on a conventional mouse.
Using touchpad buttons
Moving the pointer
Move your finger on the touchpad.
The pointer will move accordingly.
Selecting an item
Move the pointer to the item you wish to select.
Tap the touchpad once or press the left button once.
The item is selected.
Executing a command
Move the pointer to the field you wish to select.
- Tap the touchpad twice or press the left button twice.
The command will be executed.
Dragging an object
Select the desired object.
Press and hold the left button and drag the object to the desired position with the finger on the touchpad.
The item will be moved.

Using the key combination + 5 you can turn off the touchpad to avoid moving the pointer on the screen accidentally (see also "Key combinations" in the "EasyGuide" manual).
Microphone and loudspeakers

1 = Built-in loudspeakers
2 = Built-in microphones
4 = Volume control
Two stereo loudspeakers, two microphones, one bass loudspeaker and one volume controller are installed in your notebook.
The bass loudspeaker and the two loudspeakers form a so-called subwoofer system for true listening pleasure. Internal loudspeakers are used to produce the treble and mid-range tones. The bass loudspeaker is used to produce the bass tones. As these bass tones are not perceived directionally, only one bass loudspeaker is necessary and the installation location is not important (underside of the notebook).

If you connect an external microphone, the built-in microphone is disabled.
If you connect headphones or external loudspeakers, the built-in loudspeakers are disabled.
Use the key combination + 6 to switch the loudspeaker off and on.
Adjusting the volume

The built-in volume control does not support the optical SPDIF interface.
Set the desired volume with the key combination + 10 or + 11 .
or
Set the desired volume with the volume control.
or
Double-click on the loudspeaker symbol in the tool bar and on Mixer.
or
Select Startsymbol - (Settings) - Control Panel - Hardware and Sound - Sound: Adjust volume control.
Use the slide control to change the volume.
To turn the loudspeaker on or off, double-click the loudspeaker symbol in the tool bar.
Wireless components (wireless LAN/Bluetooth)

The installation of a wireless LAN/Bluetooth module not approved by Fujitsu Siemens Computers GmbH voids the permits (CE!) issued for this device.
Wireless LAN and Bluetooth (optional) are integrated in your notebook.
Switching the wireless LAN/ Bluetooth module on and off

Check whether the wireless LAN module is activated/deactivated in the installed wireless LAN software.
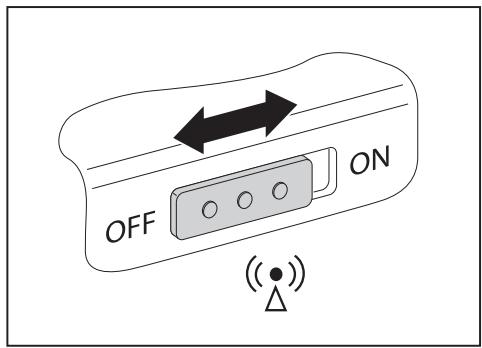
Move the slider to the "ON" position to activate the wireless LAN/Bluetooth module.
The wireless LAN/Bluetooth indicator lights up when the wireless LAN/Bluetooth module is switched on.

You can find more information on using Wireless LAN or Bluetooth in the relevant manual or in the Help files (see "Information sources", Page 4).
To make use of the full range of Bluetooth functions, install the Bluetooth software.
BIOS Setup Utility
With the BIOS Setup Utility you can change a number of parameters and thus the configuration of your notebook. For example, you can use the BIOS Setup Utility to set the date and time. The BIOS Setup Utility can also be used to assign passwords. The "EasyGuide" manual explains how to open and close the BIOS Setup Utility.
Troubleshooting and tips

Refer to the safety information in the "Safety" manual when connecting or disconnecting cables.
If a fault occurs, try to correct it as described. If you fail to correct the problem, proceed as follows:
Make a note of the steps and the circumstances that led to the fault. Also make a note of any error messages displayed.
Switch the notebook off.
Contact the Hotline/Help Desk.

You can find the telephone numbers in the help desk list. Please have the following information ready when you call:
- The model name and serial number of the notebook. The serial number is located on a sticker on the underside of the notebook.
Notes of any messages that appear on the screen and information on acoustic signals. - Any changes you have made to the hardware or software since receiving the notebook.
- Any changes you have made to the BIOS Setup settings since receiving the notebook.
- Your system configuration and all peripheral devices connected to your system.
- Your sales contract.

Our notebooks have been designed primarily with mobile applications in mind. This means that considerable effort has been made to optimise components and equipment in terms of weight, space and energy requirements. Depending on the particular configuration you have purchased, it is possible that functionality may be slightly reduced compared to a desktop PC if you are running processor-intensive gaming software, e.g. games with intensive 3D graphics. Updating your hardware with drivers which have not been approved by Fujitsu Siemens Computers may result in performance losses, data losses or malfunction of the equipment. A list of approved drivers and current BIOS versions can be downloaded from: "http://www.fujitsu-siemens.de/support/downloads.html"
Restoring installed software

Please create backup copies of your files on a regular basis. If data is lost, you can restore your applications using the data carriers. However, if you do not have backup copies of your own data files, it is no longer possible to restore them.
If your operating system will not start, or if there are errors on the hard disk, the pre-installed software may have to be re-installed.
Restoring the operating system, drivers, manuals and special software
You can find information on how to restore the operating system, drivers, manuals and special software in the "Recovery Process" manual.
The notebook's date or time is incorrect
| Cause | Troubleshooting |
| Time and date are incorrect. | ► Set the time or date in the Main menu of the BIOS Setup Utility. |

If the time and date are repeatedly incorrect when you switch on the notebook, the buffer battery that supplies the internal clock is dead.
Please contact your sales outlet or our hotline/helpdesk.
A beep sounds at a rate of one per second
| Cause | Troubleshooting |
| The battery is almost flat. | ► Charge the battery. |
The notebook's LCD screen remains blank
| Cause | Troubleshooting |
| Monitor is switched off. | Press a key or enter the password |
| External monitor or television set connected. | Press the key combination [Fn] + [F3] (switch screen output). |
The LCD screen is difficult to read
| Cause | Troubleshooting |
| Reflected glare | ► Turn the notebook or alter the tilt of the LCD screen. |
The external monitor remains blank
| Cause | Troubleshooting |
| Monitor is switched off. | Switch the external monitor on. |
| Power saving has been activated (monitor is blank). | Press any key to continue. |
| Brightness is set to dark. | Adjust the brightness of the monitor. |
| Screen output is set to the notebook's LCD screen | Press the key combination Fn + F3 (switch screen output). |
| The external monitor's power cable or data cable is not connected properly. | Switch off the external monitor and the notebook. Check whether the power cable is plugged properly into the external monitor and into the power socket. Check whether the data cable is properly connected to the notebook and the external monitor (if it is plugged in with a connector). Switch on the external monitor and the notebook. |
The external monitor is blank or the image is unstable
| Cause | Troubleshooting |
| The wrong external monitor has been selected or the wrong screen resolution has been set for the application program. | Terminate the application program in Windows by pressing Alt + F4. If the fault persists after closing the program, switch over to the notebook's internal LCD screen with Fn + F3. Change the following setting: Set the screen resolution: Select the required resolution with Startsymbol - (Settings) - Control Panel - Appearance and Personalisation - Personalisation: Adjust the screen resolution as required. Select monitor: Right-click on the desktop. Under Personalisation - Display Settings choose screen 1 or 2 and under Advanced Settings - Monitor choose the correct monitor. |
The notebook cannot be started
| Cause | Troubleshooting |
| The battery is not installed correctly. | Switch the notebook off. Check whether the battery is installed correctly in its compartment. Switch the notebook on. |
| The battery is dead. | Charge the battery. or Install a charged battery. or Connect the mains adapter to the notebook. |
| The power adapter is not connected correctly. | Switch the notebook off. Check whether the mains adapter is connected correctly to the notebook. Switch the notebook on. |
The notebook stops working
| Cause | Troubleshooting |
| Notebook is in energy saving mode. | Leave energy saving mode. |
| An application programme has caused the malfunction. | Close the application program or restart the notebook by switching it on/off or with a warm boot. |
| The battery is dead. | Charge the battery. or Install a charged battery. or Connect the mains adapter to the notebook. |
The printer does not print
| Cause | Troubleshooting |
| The printer is not switched on. | Make sure that the printer is switched on and is online (see the manuals supplied with the printer). |
| The printer is not connected correctly. | Check that the cable connecting the notebook and the printer is connected properly. |
| The printer driver is faulty or not correctly installed, or it is the wrong printer driver. | Check that the cable connecting the notebook and the printer is connected properly. Check whether the correct printer driver is loaded (see printer documentation). |
The radio connection to a network does not work
| Cause | Troubleshooting |
| The radio component is disabled. | Switch the radio component on (see "Switching the wireless LAN/ Bluetooth module on and off", Page 15). |
| The radio component is enabled. Despite this, the wireless connection to a network does not work. | Check whether the radio connection is switched on via the software. Further information on using the radio component can be found in the corresponding manual or in the help files (see "Information sources", Page 4). |
Innhold
Innovativ technologi 1
Restaurant software instalado

Vypnuti notebookku 10
Akumulátor 10
Tlacitka pro snadne spusteni 11
Tmavy LCD monitor notebookku 17
Spatne citelne udaje na LCD monitoru notebookku 17
Prohlášeni o shodě (Declarations of Conformity)
Prohlášeni o shodě (Declarations of Conformity) notebookku AMILO naleznete na internetové adrese "www.fujitsu-siemens.com".
Uygunluk Bildirgesi (Declarations of Conformity) 3
Bilgi kaynaklari 4
Uygunluk Bildirgesi (Declarations of Conformity)
Izjave o skladnosti (Declarations of Conformity)
Izjave o skladnosti (Declarations of Conformity) za AMILO so na voljo na splenetem mestu "www.fujitsu-siemens.com".
Podjetje Fujitsu Siemens Computers izjavlja, da je AMILO izdelan v skladu z osnovnimi zahtevami in drugimi upostevinimi predpisi 1999/5/ES. (Zvezno ministrostvo za gospodarstvo.
Viri informacij
Prehlásenia o zhode (Declarations of Conformity) 3
Zdroje informaci 4
Ovladace a utility 5
Pripojenia a ovladacie privky 6
Uvedenie do prevadzky a obsluha 7
Vybalenie a kontrola notebooku 7
Volba miesta instalacia 7
Klavesy Easy Launch 11
Touchpad a tlacidla Touchpad 11
Pouzite tlaclidla Touchpad 12
Mikrofon a reproductory 13
Nastavenie hlasitosti 14
Rádiove componenty (Wireless LAN / Bluetooth) 15
Zapinanie a vypinanie modulu Wireless LAN/ Bluetooth 15
Prehlásenia o zhode (Declarations of Conformity)
Prehlásenia o konformite (Declarations of Conformity) k AMILO najdete na internete pod "www.fujitsu-siemens.com".