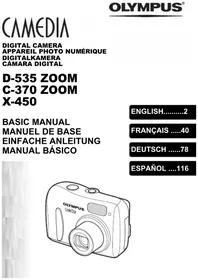
Stylus 300/400 - Digital Camera OLYMPUS - Free user manual and instructions
Find the device manual for free Stylus 300/400 OLYMPUS in PDF.
| Product type | Digital camera (still image and display) |
| Brand | Olympus |
| Model | Stylus 300 / Stylus 400 (μ [mju:] 300 / 400 DIGITAL) |
| Dimensions (W × H × D) | 99 mm × 56 mm × 33.5 mm (without protrusions) |
| Weight | 165 g (without battery or card) |
| Power supply | Olympus LI-10B rechargeable lithium-ion battery / AC adapter (optional) |
| Lens | Olympus 5.8–17.4 mm (35–105 mm equivalent in 35 mm), F3.1–F5.2 |
| Sensor | CCD 1/2.5", 3.34 MP (gross) for Stylus 300; 4.23 MP (gross) for Stylus 400 |
| Effective resolution | Stylus 300: 3.2 MP; Stylus 400: 4.0 MP |
| Optical zoom | 3× |
| Digital zoom | Up to 5× (depending on recording mode) |
| LCD screen | 1.5" TFT color LCD, 134,000 pixels |
| Viewfinder | Real-image optical viewfinder |
| Memory | xD-Picture Card (16–256 MB) |
| Recording formats | Photo: JPEG (DCF); Video: QuickTime Motion JPEG |
| Shutter speed | 1/2 s to 1/1000 s (up to 4 s in Night mode) |
| Flash | Auto, Red-eye reduction, Forced, Off |
| Shooting modes | P (Auto), Portrait, Landscape, Night, Self-portrait, Video |
| Connectors | USB mini-B, Video output (NTSC/PAL), DC IN jack |
| Water resistance | Equivalent to IPX4 (resistant to water splashes, not for immersion) |
| Operating temperature | 0 °C to 40 °C |
| Included accessories | Wrist strap, USB cable, video cable, LI-10B battery, LI-10C charger, CD-ROM (reference manual, software) |
Frequently Asked Questions - Stylus 300/400 OLYMPUS
User questions about Stylus 300/400 OLYMPUS
0 question about this device. Answer the ones you know or ask your own.
Ask a new question about this device
Download the instructions for your Digital Camera in PDF format for free! Find your manual Stylus 300/400 - OLYMPUS and take your electronic device back in hand. On this page are published all the documents necessary for the use of your device. Stylus 300/400 by OLYMPUS.
USER MANUAL Stylus 300/400 OLYMPUS
CONTENTS/TABLE DES MATIÈRES/INHALT/CONTENIDO
ENGLISH 2
FRANÇAIS. 46
DEUTsCH 90
ESPANOL 134
CONTENTS
GETTING STARTED 4
MENUFUNCTIONS 17
SHOOTING BASICS 24
SELECTING A RECORD MODE 31
PLAYBACK 32
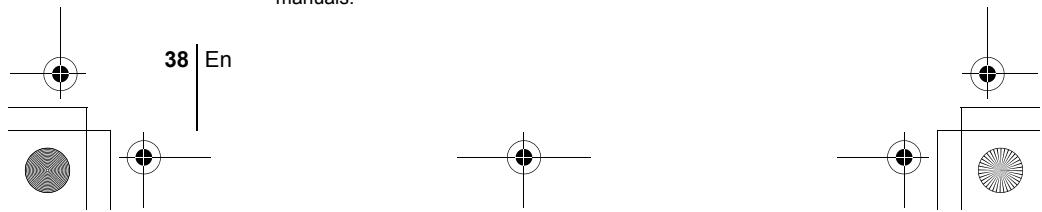
PRINT SETTINGS 37
DOWNLOADINGPICTURESTOACOMPUTER. 38
ERROR CODES 40
SPECIFICATIONS 41
These instructions are only for quick reference. For more details on the functions described here, refer to the "Reference Manual" on CD-ROM.
This basic manual contains guidelines for using Olympus Stylus 300/400 DIGITAL (μ [mju:] 300/400 DIGITAL). Except where otherwise specified, the explanations in the manual apply to both models.
Before using your camera, read this manual carefully to ensure correct use.
We recommend that you take test shots to get accustomed to your camera before taking important photographs.
These instructions are only a basic manual. For more details on the functions described here, refer to the Reference Manual on the CD-ROM. For connection to the PC or installation of provided software, refer to the Software Installation Guide included in the CD-ROM package.
For customers in North and South America
For customers in USA
Declaration of Conformity
Model Number :Stylus 300 DIGITAL,Stylus 400 DIGITAL RM-2 (Remote control)
Trade Name :OLYMPUS
Responsible Party : Olympus America Inc.
Address :2 Corporate Center Drive, Melville, New York 11747-3157 U.S.A.
Telephone Number :631-844-5000
Tested To Comply With FCC Standards FOR HOME OR OFFICE USE
This device complies with Part 15 of the FCC rules. Operation is subject to the following two conditions:
(1) This device may not cause harmful interference.
(2) This device must accept any interference received, including interference that may cause undesired operation.
For customers in Canada
This Class B digital apparatus meets all requirements of the Canadian Interference-Causing Equipment Regulations.
For customers in Europe

"CE" mark indicates that this product complies with the European requirements for safety, health, environment and customer protection. "CE" mark cameras are intended for sales in Europe.
Trademarks
- IBM is a registered trademark of International Business Machines Corporation.
- Microsoft and Windows are registered trademarks of Microsoft Corporation.
- Macintosh is a trademark of Apple Computer Inc.
- All other company and product names are registered trademarks and/or trademarks of their respective owners.
- The standards for camera file systems referred to in this manual are the "Design Rule for Camera File System/DCF" standards stipulated by the Japan Electronics and Information Technology Industries Association (JEITA).

GETTING STARTED
NAMES OF PARTS
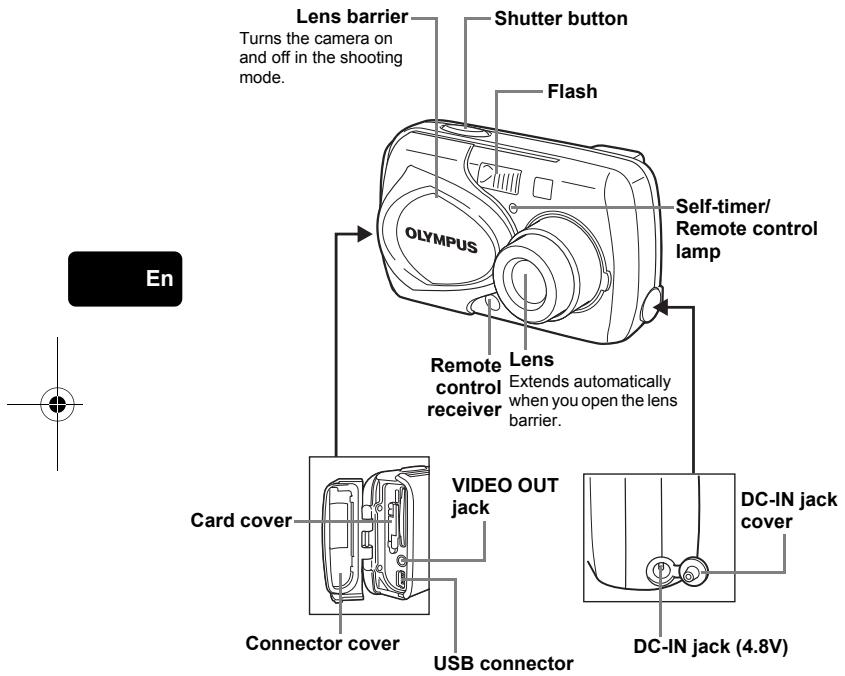

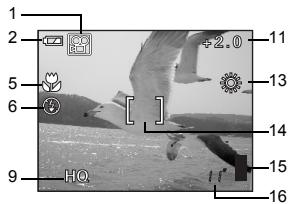
MONITOR INDICATIONS
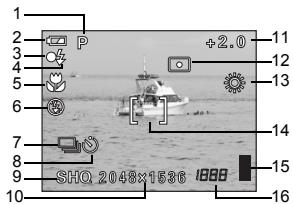
Shooting mode
Still picture
Movie
En
| Items | Indications | |
| 1 | Shooting mode | P, B, D, F, G, H, I, J, K |
| 2 | Battery check | D, C |
| 3 | Green lamp | ○ |
| 4 | Flash stand-by/ Camera movement warning/ Flash charge | L (Lights) R (Blinks) |
| 5 | Macro mode | # |
| 6 | Flash mode | ◎, ⇟, ⇋ |
| 7 | Sequential shooting | □, □ |
| 8 | Self-timer Remote control | # |
| 9 | Record mode | SHQ, HQ, SQ1, SQ2 |
| 10 | Resolution | 2272 × 1704, 2048 × 1536, etc. |
| 11 | Exposure compensation | -2.0 – +2.0 |
| 12 | Metering | # |
| 13 | White balance | √, √, -√, √ |
| 14 | AF target mark | [ ] |
| 15 | Memory gauge | □, □, □, □ |
| 16 | Number of storable still pictures Seconds remaining | 16 16" |
6 En
Playback mode
Screens with the information display set to ON are shown below.

Still picture
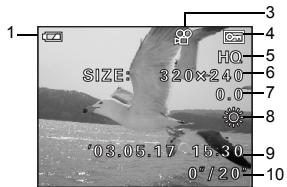
Movie
| Items | Indications | ||||||||||||||||||||||||||||||||||||||||||||||||||||||||||||||||||||||||||||||||||||||||||||||||||||||||||||||||||||||||||||||||||||||||||||||||||||||||||||||||||||||||||||||||||||||||||||||||||||||||||||||||||||||||||||||||||||||||||||||||||||||||||||||||||||||||||||||||||||||||||||||||||||||||||||||||||||||||||||||||||||||||||||||||||||||||||||||||||||||||||||||||||||||||||||||||||||||||||||||||||||||||||||||||||||||||||||||||||||||||||||||||||||||||||||||||||||||||||||||||||||||||||||||||||||||||||||||||||||||||||||||||||||||||||||||||||||||||||||||||||||||||||||||||||||||||||||||||||||||||||||||||||||||||||||||||||||||||||||||||||||||||||||||||||||||||||||||||||||||||||||||||||||||||||||||||||||||||||||||||||||||||||||||||||||||||||||||||||||||||||||||||||||||||||||||||||||||||||||||||||||||||||||||||||||||||||||||||||||||||||||||||||||||||||||||||||||||||||||||||||||||||||||||||||||||||||||||||||||||||||||||||||||||||||||||||||||||||||||||||||||||||||||||||||||||||||||||||||||||
| 1 | Battery check | ☐ ☐ ☐ ☐ ☐ ☐ ☐ ☐ ☐ ☐ ☐ ☐ ☐ ☐ ☐ ☐ ☐ ☐ ☐ ☐ ☐ ☐ ☐ ☐ ☐ ☐ ☐ ☐ ☐ ☐ ☐ ☐ ☐ ☐ ☐ ☐ ☐ ☐ ☐ ☐ ☐ ☐ ☐ ☐ ☐ ☐ ☐ ☐ ☐ ☐ ☐ ☌ ☐ ☐ ☐ ☐ ☐ ☐ ☐ ☐ ☐ ☐ ☐ ☐ ☐ ☐ ☐ ☐ ☐ ☐ ☐ ☐ ☐ ☐ ☐ ☐ ☐ ☐ ☐ ☐ ☐ ☐ ☐ ☐ ☐ ☐ ☐ ☐ ☐ ☐ ☐ ☐ ☐ ☐ ☐ ☐ ☐ ☐ ☐ ☐ ☐ ☻ ☾ ☐ ☐ ☐ ☐ ☐ ☐ ☐ ☐ ☐ ☐ ☐ ☐ ☐ ☐ ☐ ☐ ☐ ☐ ☐ ☐ ☐ ☐ ☐ ☐ ☐ ☐ ☐ ☐ ☐ ☐ ☐ ☐ ☐ ☐ ☐ ☐ ☐ ☐ ☐ ☐ ☐ ☐ ☐ ☐ ☐ ☐ ☐ ☐ ☐ ☽ ☾ ☐ ☐ ☐ ☐ ☐ ☐ ☐ ☐ ☐ ☐ ☐ ☐ ☐ ☐ ☐ ☐ ☐ ☐ ☐ ☐ ☐ ☐ ☐ ☐ ☐ ☐ ☐ ☐ ☐ ☐ ☐ ☐ ☐ ☐ ☐ ☐ ☐ ☐ ☐ ☐ ☐ ☐ ☐ ☐ ☐ ☐ ☐ ☐ ☓ ☐ ☐ ☐ ☐ ☐ ☐ ☐ ☐ ☐ ☐ ☐ ☐ ☐ ☐ ☐ ☐ ☐ ☐ ☐ ☐ ☐ ☐ ☐ ☐ ☐ ☐ ☐ ☐ ☐ ☐ ☐ ☐ ☐ ☐ ☐ ☐ ☐ ☐ ☐ ☐ ☐ ☐ ☐ ☐ ☐ ☐ ☐ ☐ ☐ ☔ ☐ ☐ ☐ ☐ ☐ ☐ ☐ ☐ ☐ ☐ ☐ ☐ ☐ ☐ ☐ ☐ ☐ ☐ ☐ ☐ ☐ ☐ ☐ ☐ ☐ ☐ ☐ ☐ ☐ ☐ ☐ ☐ ☐ ☐ ☐ ☐ ☐ ☐ ☐ ☐ ☐ ☐ ☐ ☐ ☐ ☐ ☐ ☐ ☐ ☕ ☐ ☐ ☐ ☐ ☐ ☐ ☐ ☐ ☐ ☐ ☐ ☐ ☐ ☐ ☐ ☐ ☐ ☐ ☐ ☐ ☐ ☐ ☐ ☐ ☐ ☐ ☐ ☐ ☐ ☐ ☐ ☐ ☐ ☐ ☐ ☐ ☐ ☐ ☐ ☐ ☐ ☐ ☐ ☐ ☐ ☐ ☐ ☐ ☐ ☑ ☐ ☐ ☐ ☐ ☐ ☐ ☐ ☐ ☐ ☐ ☐ ☐ ☐ ☐ ☐ ☐ ☐ ☐ ☐ ☐ ☐ ☐ ☐ ☐ ☐ ☐ ☐ ☐ ☐ ☐ ☐ ☐ ☐ ☐ ☐ ☐ ☐ ☐ ☐ ☐ ☐ ☐ ☐ ☐ ☐ ☐ ☐ ☐ ☐ ☘ ☐ ☐ ☐ ☐ ☐ ☐ ☐ ☐ ☐ ☐ ☐ ☐ ☐ ☐ ☐ ☐ ☐ ☐ ☐ ☐ ☐ ☐ ☐ ☐ ☐ ☐ ☐ ☐ ☐ ☐ ☐ ☐ ☐ ☐ ☐ ☐ ☐ ☐ ☐ ☐ ☐ ☐ ☐ ☐ ☐ ☐ ☐ ☐ ☐ ☓ ☎ ☎ ☎ ☎ ☎ ☎ ☎ ☎ ☎ ☎ ☎ ☎ ☎ ☎ ☎ ☎ ☎ ☎ ☎ ☎ ☎ ☎ ☎ ☎ ☎ ☎ ☎ ☎ ☎ ☎ ☎ ☎ ☎ ☎ ☎ ☎ ☎ ☎ ☎ ☎ ☎ ☎ ☎ ☎ ☎ ☎ ☎ ☎ ☎ ☎ ★ ☎ ☎ ☎ ☎ ☎ ☎ ☎ ☎ ☎ ☎ ☎ ☎ ☎ ☎ ☎ ☎ ☎ ☎ ☎ ☎ ☎ ☎ ☎ ☎ ☎ ☎ ☎ ☎ ☎ ☎ ☎ ☎ ☎ ☎ ☎ ☎ ☎ ☎ ☎ ☎ ☎ ☎ ☎ ☎ ☎ ☎ ☎ ☎ ☎ ☽ ☿ ☿ ☿ ☿ ☿ ☿ ☿ ☿ ☿ ☿ ☿ ☿ ☿ ☿ ☿ ☿ ☿ ☿ ☿ ☿ ☿ ☿ ☿ ☿ ☿ ☿ ☿ ☿ ☿ ☿ ☿ ☿ ☿ ☿ ☿ ☿ ☿ ☿ ☿ ☿ ☿ ☿ ☿ ☿ ☿ ☿ ☿ ☿ ☿ ☿ ☍ ☿ ☿ ☿ ☿ ☿ ☿ ☿ ☿ ☿ ☿ ☿ ☿ ☿ ☿ ☿ ☿ ☿ ☿ ☿ ☿ ☿ ☿ ☿ ☿ ☿ ☿ ☿ ☿ ☿ ☿ ☿ ☿ ☿ ☿ ☿ ☿ ☿ ☿ ☿ ☿ ☿ ☿ ☿ ☿ ☿ ☿ ☿ ☿ ☿ ☮ ☐ ☐ ☐ ☐ ☐ ☐ ☐ ☐ ☐ ☐ ☐ ☐ ☐ ☐ ☐ ☐ ☐ ☐ ☐ ☐ ☐ ☐ ☐ ☐ ☐ ☐ ☐ ☐ ☐ ☐ ☐ ☐ ☐ ☐ ☐ ☐ ☐ ☐ ☐ ☐ ☐ ☐ ☐ ☐ ☐ ☐ ☐ ☐ ☐ ☊ ☐ ☐ ☐ ☐ ☐ ☐ ☐ ☐ ☐ ☐ ☐ ☐ ☐ ☐ ☐ ☐ ☐ ☐ ☐ ☐ ☐ ☐ ☐ ☐ ☐ ☐ ☐ ☐ ☐ ☐ ☐ ☐ ☐ ☐ ☐ ☐ ☐ ☐ ☐ ☐ ☐ ☐ ☐ ☐ ☐ ☐ ☐ ☐ ☐ ☦ ☦ ☦ ☦ ☦ ☦ ☦ ☦ ☦ ☦ ☦ ☦ ☦ ☦ ☦ ☦ ☦ ☦ ☦ ☦ ☦ ☦ ☦ ☦ ☦ ☦ ☦ ☦ ☦ ☦ ☦ ☦ ☦ ☦ ☦ ☦ ☦ ☦ ☦ ☦ ☦ ☦ ☦ ☦ ☦ ☦ ☦ ☦ ☦ ☦ ☻ ☻ ☻ ☻ ☻ ☻ ☻ ☻ ☻ ☻ ☻ ☻ ☻ ☻ ☻ ☻ ☻ ☻ ☻ ☻ ☻ ☻ ☻ ☻ ☻ ☻ ☻ ☻ ☻ ☻ ☻ ☻ ☻ ☻ ☻ ☻ ☻ ☻ ☻ ☻ ☻ ☻ ☻ ☻ ☻ ☻ ☻ ☻ ☻ ☻ ☪ ☐ ☐ ☐ ☐ ☐ ☐ ☐ ☐ ☐ ☐ ☐ ☐ ☐ ☐ ☐ ☐ ☐ ☐ ☐ ☐ ☐ ☐ ☐ ☐ ☐ ☐ ☐ ☐ ☐ ☐ ☐ ☐ ☐ ☐ ☐ ☐ ☐ ☐ ☐ ☐ ☐ ☐ ☐ ☐ ☐ ☐ ☐ ☐ ☐ ☫ ☺ ☺ ☺ ☺ ☺ ☺ ☺ ☺ ☺ ☺ ☺ ☺ ☺ ☺ ☺ ☺ ☺ ☺ ☺ ☺ ☺ ☺ ☺ ☺ ☺ ☺ ☺ ☺ ☺ ☺ ☺ ☺ ☺ ☺ ☺ ☺ ☺ ☺ ☺ ☺ ☺ ☺ ☺ ☺ ☺ ☺ ☺ ☺ ☺ ☺ ☻ ☻ ☻ ☻ ☻ ☻ ☻ ☻ ☻ ☻ ☻ ☻ ☻ ☻ ☻ ☻ ☻ ☻ ☻ ☻ ☻ ☻ ☻ ☻ ☻ ☻ ☻ ☻ ☻ ☻ ☻ ☻ ☻ ☻ ☻ ☻ ☻ ☻ ☻ ☻ ☻ ☻ ☻ ☻ ☻ ☻ ☻ ☻ ☻ ☮ ☐ ☐ ☐ ☐ ☐ ☐ ☐ ☐ ☐ ☐ ☐ ☐ ☐ ☐ ☐ ☐ ☐ ☐ ☐ ☐ ☐ ☐ ☐ ☐ ☐ ☐ ☐ ☐ ☐ ☐ ☐ ☐ ☐ ☐ ☐ ☐ ☐ ☐ ☐ ☐ ☐ ☐ ☐ ☐ ☐ ☐ ☐ ☐ ☕ ☼ 0" " " " " " " " " " " " " " " " " " " " " " " " " " " " " " " " " " " " " " " " " " " " " " " " " " " " " " " " " " " " " " " " " " " " " " " " " " " " " " " " " " " " " " " " " " " " " " " " " " " " " 2 | 3 | 4 | 5 | 6 | 7 | 8 | 9 | 10 | 11 | 12 | 13 | 14 | 15 | 16 | 17 | 18 | 19 | 20 | 21 | 22 | 23 | 24 | 25 | 26 | 27 | 28 | 29 | 30 | 31 | 32 | 33 | 34 | 35 | 36 | 37 | 38 | 39 | 40 | 41 | 42 | 43 | 44 | 45 | 46 | 47 | 48 | 49 | 50 | 51 | 52 | 53 | 54 | 55 | 56 | 57 | 58 | 59 | 60 | 61 | 62 | 63 | 64 | 65 | 66 | 67 | 68 | 69 | 70 | 71 | 72 | 73 | 74 | 75 | 76 | 77 | 78 | 79 | 80 | 81 | 82 | 83 | 84 | 85 | 86 | 87 | 88 | 89 | 90 | 91 | 92 | 93 | 94 | 95 | 96 | 97 | 98 | 99 | 100 | 101 | 102 | 103 | 104 | 105 | 106 | 107 | 108 | 109 | 110 | 111 | 112 | 113 | 114 | 115 | 116 | 117 | 118 | 119 | 120 | 121 | 122 | 123 | 124 | 125 | 126 | 127 | 128 | 129 | 130 | 131 | 132 | 133 | 134 | 135 | 136 | 137 | 138 | 139 | 140 | 141 | 142 | 143 | 144 | 145 | 146 | 147 | 148 | 149 | 150 | 151 | 152 | 153 | 154 | 155 | 156 | 157 | 158 | 159 | 160 | 161 | 162 | 163 | 164 | 165 | 166 | 167 | 168 | 169 | 170 | 171 | 172 | 173 | 174 | 175 | 176 | 177 | 178 | 179 | 180 | 181 | 182 | 183 | 184 | 185 | 186 | 187 | 188 | 189 | 190 | 191 | 192 | 193 | 194 | 195 | 196 | 197 | 198 | 199 | 200 | 201 | 202 | 203 | 204 | 205 | 206 | 207 | 208 | 209 | 210 | 211 | 212 | 213 | 214 | 215 | 216 | 217 | 218 | 219 | 220 | 221 | 222 | 223 | 224 | 225 | 226 | 227 | 228 | 229 | 230 | 231 | 232 | 233 | 234 | 235 | 236 | 237 | 238 | 239 | 240 | 241 | 242 | 243 | 244 | 245 | 246 | 247 | 248 | 249 | 250 | 251 | 252 | 253 | 254 | 255 | 256 | 257 | 258 | 259 | 260 | 261 | 262 | 263 | 264 | 265 | 266 | 267 | 268 | 269 | 270 | 271 | 272 | 273 | 274 | 275 | 276 | 277 | 278 | 279 | 280 | 281 | 282 | 283 | 284 | 285 | 286 | 287 | 288 | 289 | 290 | 291 | 292 | 293 | 294 | 295 | 296 | 297 | 298 | 299 | 300 | 301 | 302 | 303 | 304 | 305 | 306 | 307 | 308 | 309 | 310 | 311 | 312 | 313 | 314 | 315 | 316 | 317 | 318 | 319 | 320 | 321 | 322 | 323 | 324 | 325 | 326 | 327 | 328 | 329 | 330 | 331 | 332 | 333 | 334 | 335 | 336 | 337 | 338 | 339 | 340 | 341 | 342 | 343 | 344 | 345 | 346 | 347 | 348 | 349 | 350 | 351 | 352 | 353 | 354 | 355 | 356 | 357 | 358 | 359 | 360 | 361 | 362 | 363 | 364 | 365 | 366 | 367 | 368 | 369 | 370 | 371 | 372 | 373 | 374 | 375 | 376 | 377 | 378 | 379 | 380 | 381 | 382 | 383 | 384 | 385 | 386 | 387 | 388 | 389 | 390 | 391 | 392 | 393 | 394 | 395 | 396 | 397 | 398 | 399 | 400 | 401 | 402 | 403 | 404 | 405 | 406 | 407 | 408 | 409 | 410 | 411 | 412 | 413 | 414 | 415 | 416 | 417 | 418 | 419 | 420 | 421 | 422 | 423 | 424 | 425 | 426 | 427 | 428 | 429 | 430 | 431 | 432 | 433 | 434 | 435 | 436 | 437 | 438 | 439 | 440 | 441 | 442 | 443 | 444 | 445 | 446 | 447 | 448 | 449 | 450 | 451 | 452 | 453 | 454 | 455 | 456 | 457 | 458 | 459 | 460 | 461 | 462 | 463 | 464 | 465 | 466 | 467 | 468 | 469 | 470 | 471 | 472 | 473 | 474 | 475 | 476 | 477 | 478 | 479 | 480 | 481 | 482 | 483 | 484 | 485 | 486 | 487 | 488 | 489 | 490 | 491 | 492 | 493 | 494 | 495 | 496 | 497 | 498 | 499 | 500 | 501 | 502 | 503 | 504 | 505 | 506 | 507 | 508 | 509 | 510 | 511 | 512 | 513 | 514 | 515 | 516 | 517 | 518 | 519 | 520 | 521 | 522 | 523 | 524 | 525 | 526 | 527 | 528 | 529 | 530 | 531 | 532 | 533 | 534 | 535 | 536 | 537 | 538 | 539 | 540 | 541 | 542 | 543 | 544 | 545 | 546 | 547 | 548 | 549 | 550 | 551 | 552 | 553 | 554 | 555 | 556 | 557 | 558 | 559 | 560 | 561 | 562 | 563 | 564 | 565 | 566 | 567 | 568 | 569 | 570 | 571 | 572 | 573 | 574 | 575 | 576 | 577 | 578 | 579 | 580 | 581 | 582 | 583 | 584 | 585 | 586 | 587 | 588 | 589 | 590 | 591 | 592 | 593 | 594 | 595 | 596 | 597 | 598 | 599 | 600 | 601 | 602 | 603 | 604 | 605 | 606 | 607 | 608 | 609 | 610 | 611 | 612 | 613 | 614 | 615 | 616 | 617 | 618 | 619 | 620 | 621 | 622 | 623 | 624 | 625 | 626 | 627 | 628 | 629 | 630 | 631 | 632 | 633 | 634 | 635 | 636 | 637 | 638 | 639 | 640 | 641 | 642 | 643 | 644 | 645 | 646 | 647 | 648 | 649 | 650 | 651 | 652 | 653 | 654 | 655 | 656 | 657 | 658 | 659 | 660 | 661 | 662 | 663 | 664 | 665 | 666 | 667 | 668 | 669 | 670 | 671 | 672 | 673 | 674 | 675 | 676 | 677 | 678 | 679 | 680 | 681 | 682 | 683 | 684 | 685 | 686 | 687 | 688 | 689 | 690 | 691 | 692 | 693 | 694 | 695 | 696 | 697 | 698 | 699 | 700 | 701 | 702 | 703 | 704 | 705 | 706 | 707 | 708 | 709 | 710 | 711 | 712 | 713 | 714 | 715 | 716 | 717 | 718 | 719 | 720 | 721 | 722 | 723 | 724 | 725 | 726 | 727 | 728 | 729 | 730 | 731 | 732 | 733 | 734 | 735 | 736 | 737 | 738 | 739 | 740 | 741 | 742 | 743 | 744 | 745 | 746 | 747 | 748 | 749 | 750 | 751 | 752 | 753 | 754 | 755 | 756 | 757 | 758 | 759 | 760 | 761 | 762 | 763 | 764 | 765 | 766 | 767 | 768 | 769 | 770 | 771 | 772 | 773 | 774 | 775 | 776 | 777 | 778 | 779 | 780 | 781 | 782 | 783 | 784 | 785 | 786 | 787 | 788 | 789 | 790 | 791 | 792 | 793 | 794 | 795 | 796 | 797 | 798 | 799 | 800 | 801 | 802 | 803 | 804 | 805 | 806 | 807 | 808 | 809 | 810 | 811 | 812 | 813 | 814 | 815 | 816 | 817 | 818 | 819 | 820 | 821 | 822 | 823 | 824 | 825 | 826 | 827 | 828 | 829 | 830 | 831 | 832 | 833 | 834 | 835 | 836 | 837 | 838 | 839 | 840 | 841 | 842 | 843 | 844 | 845 | 846 | 847 | 848 | 849 | 850 | 851 | 852 | 853 | 854 | 855 | 856 | 857 | 858 | 859 | 860 | 861 | 862 | 863 | 864 | 865 | 866 | 867 | 868 | 869 | 870 | 871 | 872 | 873 | 874 | 875 | 876 | 877 | 878 | 879 | 880 | 881 | 882 | 883 | 884 | 885 | 886 | 887 | 888 | 889 | 890 | 891 | 892 | 893 | 894 | 895 | 896 | 897 | 898 | 899 | 900 | 901 | 902 | 903 | 904 | 905 | 906 | 907 | 908 | 909 | 910 | 911 | 912 | 913 | 914 | 915 | 916 | 917 | 918 | 919 | 920 | 921 | 922 | 923 | 924 | 925 | 926 | 927 | 928 | 929 | 930 | 931 | 932 | 933 | 934 | 935 | 936 | 937 | 938 | 939 | 940 | 941 | 942 | 943 | 944 | 945 | 946 | 947 | 948 | 949 | 950 | 951 | 952 | 953 | 954 | 955 | 956 | 957 | 958 | 959 | 960 | 961 | 962 | 963 | 964 | 965 | 966 | 967 | 968 | 969 | 970 | 971 | 972 | 973 | 974 | 975 | 976 | 977 | 978 | 979 | 980 | 981 | 982 | 983 | 984 | 985 | 986 | 987 | 988 | 989 | 990 | 991 | 992 | 993 | 994 | 995 | 996 | 997 | 998 | 999 | 1000 |
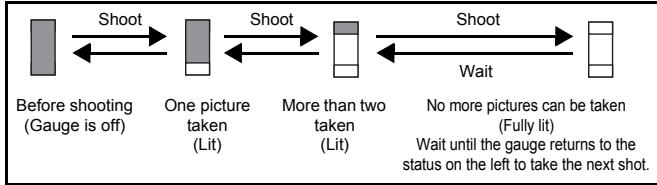
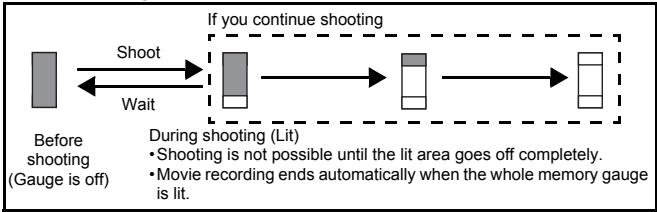
Memory gauge
The memory gauge lights up when you take a picture or record a movie. While the gauge is lit, the camera is storing the picture or the movie on the card. The memory gauge indication changes as shown below depending on the shooting status.
When the whole memory gauge is lit, wait a few moments until the lit area goes off before taking the next shot.
When taking still pictures
En
When recording movies
Battery check
If the remaining battery power is low, the battery check indication on the monitor changes as follows when the camera is turned on or while the camera is in use.
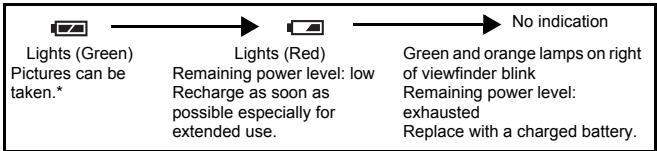
- Energy consumption varies greatly depending on the camera's operational status. The camera may turn off without displaying the low battery warning. Recharge as soon as possible.
En
Weatherproof feature
The camera is weatherproof and is not damaged by water spray from any direction. However, it cannot be used underwater. Observe the following precautions when using the camera.
Olympus will not assume any responsibility for malfunction of the camera caused by water getting inside as a result of misuse by the user.

- Do not wash the camera with water.

- Do not drop the camera into water.

- Do not take pictures underwater.
- The camera loses its waterproof capability if the battery compartment cover, connector cover or DC-IN jack cover is open. Make sure that all the covers are closed before using the camera.
- Wipe any water off the camera before changing the battery or card.
- Keep the lens out of the water when taking pictures. (The camera may not focus correctly.)
- If the camera gets splashed, wipe the water off as soon as possible with a dry cloth. Salt water spray or droplets can cause damage to the camera if the camera is not wiped dry as soon as possible.
- Do not apply excessive force to or attempt to peel off the rubber packing of the battery compartment cover, connector cover or DC-IN jack cover.
- If the rubber packing becomes worn or damaged, contact your nearest Olympus service center. (A charge is made for replacement of parts.)
- If the rubber packing of the battery compartment cover, connector cover or DC-IN jack cover contains dirt or sand, wipe it off before closing the cover, otherwise water may get inside the camera.
- The rechargeable battery and other camera accessories are not weatherproof. Care should be taken when using the accessories.


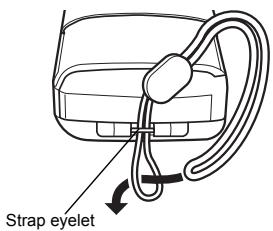
ATTACHING THE STRAP
1 Thread the short end of the strap through the strap eyelet.
2 Thread the long end of the strap through the loop that has already gone through the eyelet.
3 Pull the strap tight, making sure that it is securely fastened and does not come loose.
En
CHARGING THE BATTERY
This camera uses an Olympus lithium ion battery (LI-10B). The battery is dedicated to this camera and other batteries do not work. The battery is not fully charged when the camera is purchased. Fully charge the battery on the specified charger (LI-10C) before first use. For details, read the charger's instructions (provided).
About the battery
Make sure that the + and - terminals of the battery shown in the illustration on the right are correctly oriented when loading the battery into the charger.
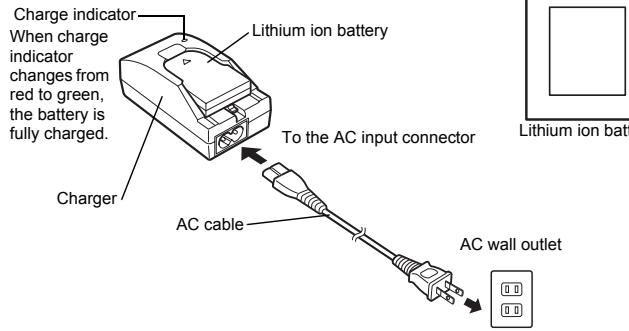
Connector terminals
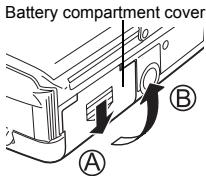
LOADING THE BATTERY
Important
- Be sure to reset the date and time after changing the battery.
1 Make sure that:
- The monitor is off.
- The lens barrier is closed.
- The lamp on the right of the viewfinder is off.
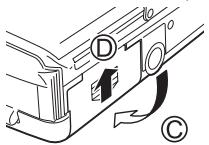
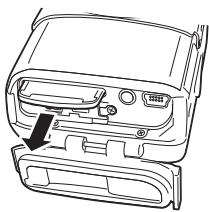
2 Slide the battery compartment cover in the direction of (the direction indicated by the mark on the cover), and lift it up in the direction of B.
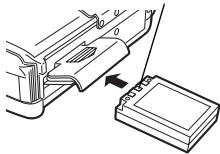
3 Insert the battery in the direction shown in the illustration.
4 Close the battery compartment cover so that it pushes the battery down inside . While pressing the mark, slide the cover in the direction of .
- If the battery compartment cover seems hard to close, do not force it. With the battery compartment cover shut, press the in the direction shown in the illustration.
Connector terminals
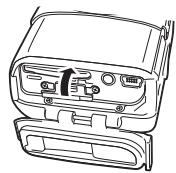
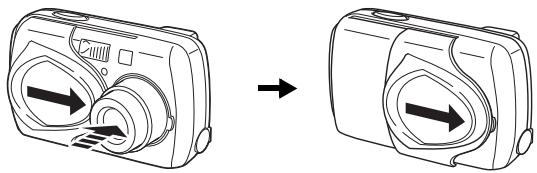
INSERTING A CARD
"Card" in this manual refers to the xD-Picture Card. The camera uses the card to record pictures.
1 Make sure that:
- The monitor is off.
- The lens barrier is closed.
- The lamp on the right of the viewfinder is off.
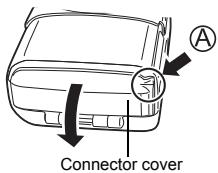
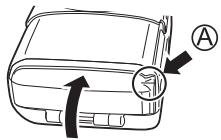
2 Open the connector cover while pressing the mark in the illustration.
En
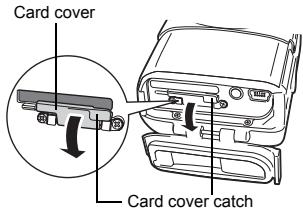
3 Open the card cover by pulling the card cover catch towards you.
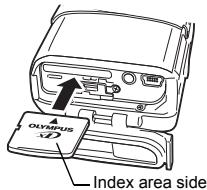
4 Face the card the correct way and insert it into the card slot.
- Insert the card while keeping it straight.
- Inserting the card the wrong way or at an angle could damage the contact area or cause the card to jam.
- If the card is not inserted all the way, data may not be written to the card.
5 Close the card cover.
12
En


6 Close the connector cover.
- Press the A mark in the illustration when closing the connector cover.
Note:
Do not close the connector cover without first closing the card cover.
Removing the card
1 Open the connector cover and the card cover.
2 Push the card all the way in to unlock it, then let it return slowly.
- The card is ejected a short way and then stops.
Note:
Releasing your finger quickly after pushing the card all the way in may cause it to eject forcefully out of the slot.

3 Hold the card straight and pull it out.

Note
- Do not press on the card with hard or pointed items such as ballpoint pens.
En
En
13
When shooting pictures
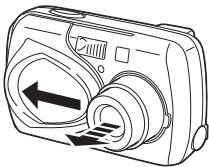
Power on: Open the lens barrier.
The camera turns on in the shooting mode. The lens extends and the subject is displayed on the monitor. If the lens does not extend when the lens barrier is opened, there is a possibility that the barrier is not fully open. Open the lens barrier fully until you feel it click.
When using the camera for the first time or after the camera has been left for about 1 hour with the battery removed, the date and time are reset. In this event, "SET DATE & TIME" appears on the monitor when the camera is turned on.
Press to turn off the monitor. The camera is still on.
En
Power off: Close the lens barrier slightly until it almost touches the lens barrel.
The lens barrier stops just before it touches the lens and the lens retracts. Wait until the lens is fully retracted before closing the lens barrier completely.
The camera turns off. (The monitor also turns off.)

Note
- Do not push the lens barrier forcefully against the lens as this may damage the lens or cause it to malfunction.

When playing back pictures
Power on: Press with the lens barrier closed.
The camera turns on in the playback mode. The monitor turns on and the last picture taken is displayed.

Power off: Press
The monitor and the camera turn off.

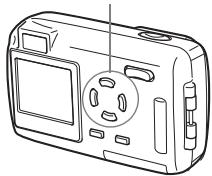
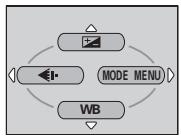
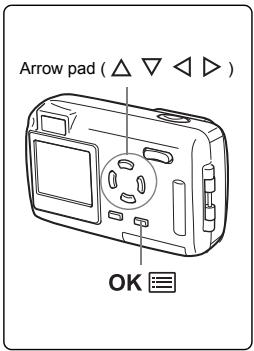
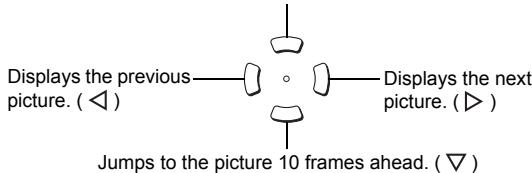
Arrow pad (△ ▽ △ ▷)
Note
- Never open the card cover, remove the card or the battery, or connect or disconnect the AC adapter while the camera is turned on. Doing so could destroy all data on the card. Destroyed data cannot be restored. When changing the card, be sure to turn the camera off before opening the card cover.
SELECTING A LANGUAGE
1 Open the lens barrier fully.
- The lens extends and the monitor turns on.
2 Press OK.
- The top menu is displayed.
3 Press on the arrow pad to select MODE MENU.
4 Press to select the SETUP tab, then press .
5 Press to select , then press
6 Press to select a language, then press OK.
7 Press OK again to exit the menu.
8 Close the lens barrier to turn the camera off.


SETTING THE DATE AND TIME
1 Open the lens barrier fully.
- The lens extends and the monitor turns on.
2 Press OK.
- The top menu is displayed.
3 Press on the arrow pad to select MODE MENU.
4 Press to select the SETUP tab, then press .
5 Press to select , then press .
- The green frame moves to the selected item.
6 Press to select one of the following date formats: Y-M-D (Year/Month/Day), M-D-Y (Month/Day/Year), D-M-Y (Day/Month/Year). Then press .
- Move to the year setting.
- The following steps show the procedure used when the date and time settings are set to Y-M-D.
7 Press to set the year, then press to move to the month setting.
To move back to the previous setting, press
- The first two digits of the year are fixed.
8 Repeat this procedure until the date and time are completely set.
- The camera only displays the time in 24-hour time system ("2 p.m." would be "14:00").
9 Press OK.
- For a more accurate setting, press OK when the time hits 00 seconds. The clock starts when you press the button.
10 Close the lens barrier to turn the camera off

- The date and time settings will be canceled if the camera is left without batteries for approximately one day.

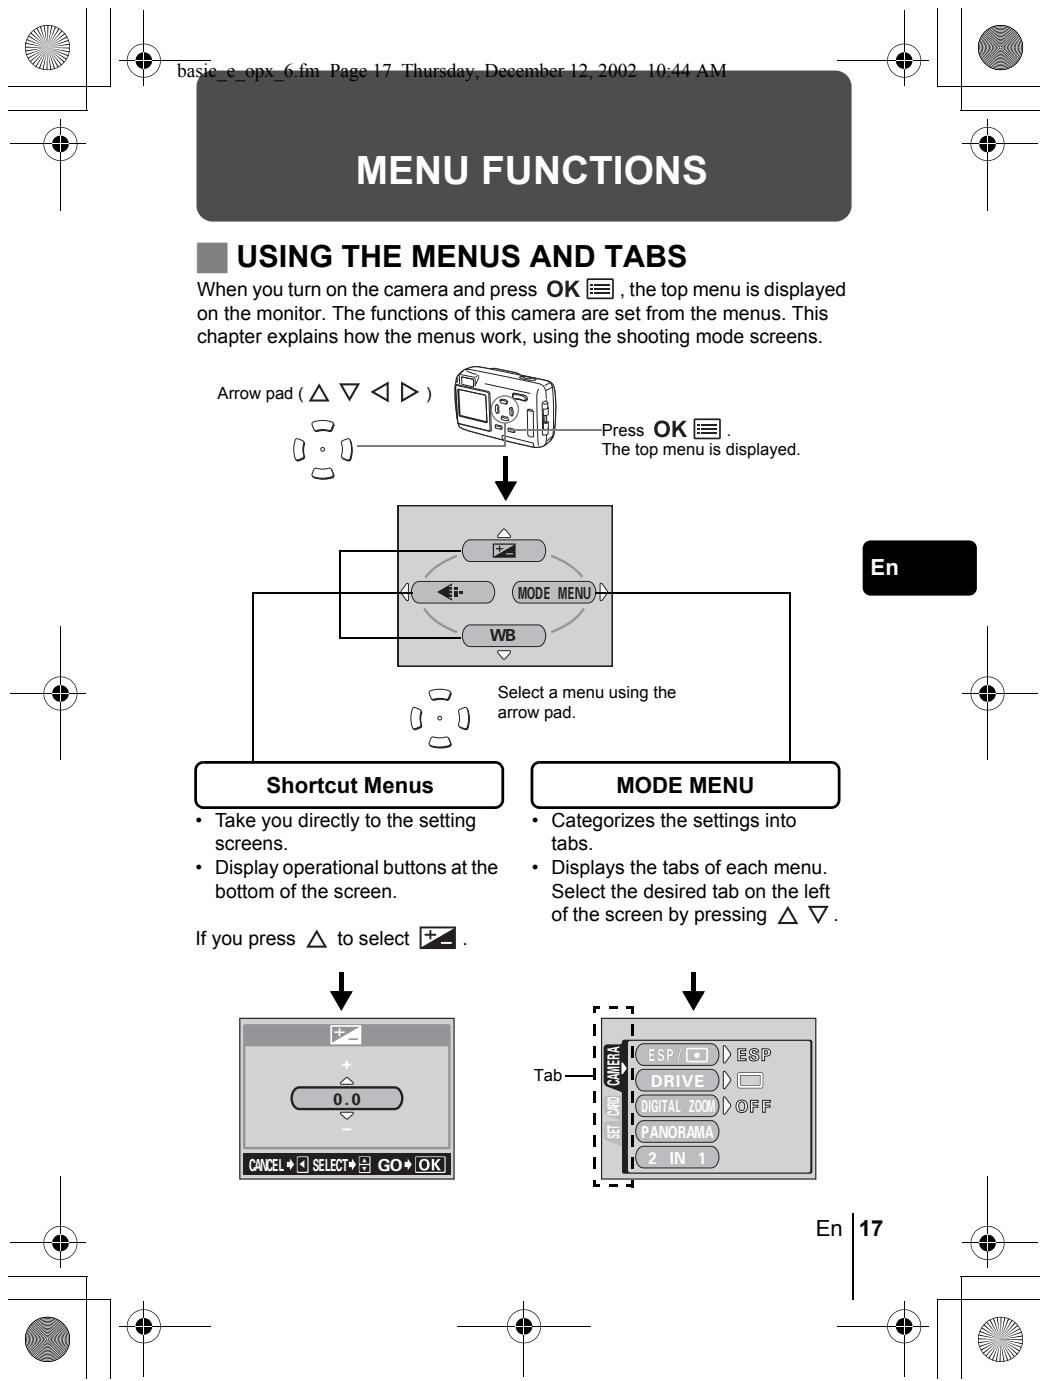
How to use the menus
1 Press OK to display the top menu. Press
2 Press to select a tab, then press .
Top menu
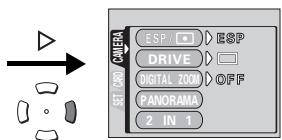
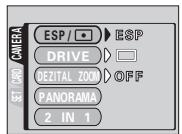
CAMERA tab
Press to return to the tab selection screen.
En
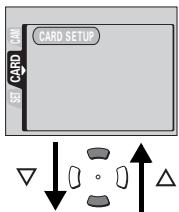
CARD tab
SETUP tab


3 Press to select an item, then press .

The green frame moves to the selected item.
To return to select an item, press or OK.
4 Press to select a setting. Press OK to complete setting. Press OK again to exit the menu and return to shooting.


Note
- Not all items can be selected depending on the camera mode and settings.
- Pressing the shutter button with a menu other than the menus in SETUP tab open allows you to take pictures using the settings currently selected.
- If you want to save the settings after the camera is turned off, set ALL RESET to OFF.


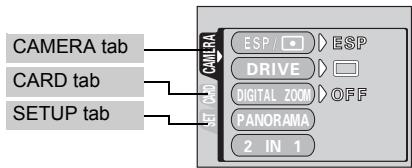
Mode menus
The MODE MENU is divided into tabs. Press to select a tab and display the associated menu items.
These instructions are only for quick reference. For more details on the functions described here, refer to the "Reference Manual" on CD-ROM.
Shooting mode
En
| CAMERA tab | |
| ESP/☐ | Selects the metering method from ESP or SPOT (☐). |
| DRIVE | Selects the shooting mode from☐ (single-frame shooting) or ☑ (sequential shooting). |
| DIGITAL ZOOM | Extends the maximum optical zoom, making possible up to approx. 5x zoom. |
| PANorama | Allows panorama pictures to be taken with Olympus CAMEDIA-brand cards. |
| 2 IN 1 | Combines two still pictures taken in succession and stores them as a single picture. |
| CARD tab | |
| CARD SETUP | Formats a card. |
| SETUP tab | |
| ALL RESET | Selects whether to keep the current camera settings when you turn off the power. |
| # | Selects a language for on-screen display. |
| # | Turns the beep sound (used for warnings, etc.) on and off. |
En
21


| REC VIEW | Selects whether to display pictures on the monitor while saving them to a card. |
| PIXEL MAPPING | Checks the CCD and image processing functions for errors. |
| Adjusts the brightness of the monitor. | |
| Sets the date and time. | |
| VIDEO OUT | Selects NTSC or PAL according to your TV's video signal type. TV video signal types differ depending on the region. |
Playback mode
En
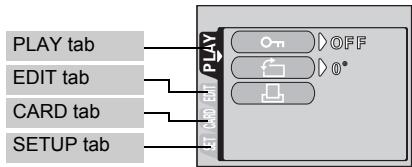
PLAY tab
| On | Protects pictures from accidental erasure. |
| ♀ | Rotates pictures 90 degrees clockwise or counterclockwise. |
| ♂ | Stores print reservation information on the card. |
EDIT tab
| BLACK&WHITE | Creates a black and white picture and saves it as a new picture. |
| SEPIA | Creates a sepia-toned picture and saves it as a new picture. |
| Makes the file size smaller and saves it as a new picture. |
CARD tab
| CARD SETUP | Erases all image data stored on the card or formats the card. |
| SETUP tab | |
| ALL RESET | Selects whether to keep the current camera settings when you turn off the power. |
| # | Selects a language for on-screen display. |
| ■ | Turns the beep sound (used for warnings, etc.) on and off. |
| ○ | Adjusts the brightness of the monitor. |
| ◇ | Sets the date and time. |
| VIDEO OUT | Selects NTSC or PAL according to your TV's video signal type.TV video signal types differ depending on the region. |
| # | Selects the number of frames in the index display. |
En
En
23

SHOOTING BASICS
SHOOTING MODES
This camera has 7 shooting modes to choose from depending on the shooting conditions and the effect you want to achieve.
1 Open the lens barrier fully.
- The lens extends and the monitor turns on.
2 Press ()
- The screen for selecting the shooting mode (virtual dial) is displayed.
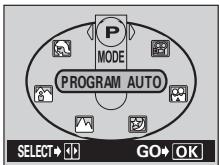
Virtual dial screen
En
3 Select the mode best suited to your purpose from the following.
- Press to select the mode.
4 Press OK.
- The virtual dial screen will disappear. It will disappear after a while even if the OK button is not pressed.
P PROGRAM AUTO (Factory default setting)
Used for regular photography. The camera automatically makes the settings for natural color balance. Other functions, such as the flash mode and metering, can be adjusted manually.
PORTRAIT
Suitable for taking a portrait-style shot of a person. Importance is placed on reproducing skin texture. The camera automatically sets the optimal shooting conditions.
LANDSCAPE + PORTRAINT
Suitable for taking photos of both your subject and the landscape. The camera automatically sets the optimal shooting conditions.
24 En


4 Press the shutter button all the way (fully).
- The camera takes the picture, and a beep sounds.
- When the green lamp stops blinking, you can take the next picture.
- The orange lamp blinks while the picture is stored on the card.
Taking still pictures using the view finder
1 Open the lens barrier fully.
- The lens extends and the monitor turns on. Press to turn the monitor off.
2 Position the AF target mark in the viewfinder on the subject.
3 Take the picture by following the same procedure as for shooting using the monitor.
En

Note
- Never open the card cover, remove the battery or disconnect the AC adapter while the orange lamp is blinking. Doing so could destroy stored pictures and prevent storage of the pictures you have just taken.
IF CORRECT FOCUS CANNOT BE OBTAINED (FOCUS LOCK)
When the subject you want to focus on is not in the center of the frame and you cannot position the AF target mark on it, you can focus the camera on another point at roughly the same distance (focus lock) and take the picture as explained below.
1 Open the lens barrier fully.
- The lens extends and the monitor turns on.
2 Position the AF target mark on the subject you want to focus on.
- When shooting a hard-to-focus subject, point the camera at an object about the same distance away as the subject.
Monitor
AF target mark
26
En


3 Press the shutter button halfway until the green lamp lights.
- The focus, exposure, and white balance are locked.
- When the green lamp blinks, the focus is not locked. Release your finger from the shutter button, re-position your subject and press the shutter button halfway again.
4 Keeping the shutter button pressed halfway, recompose your shot.
5 Press the shutter button fully.
RECORDING MOVIES
1 Open the lens barrier fully.
- The lens extends and the monitor turns on.
2 Press () to display the virtual dial screen.
3 Press to select , then press OK.
- Movie recording is set and the camera returns to the shooting mode.
- The mark and the total recordable time depending on the card memory capacity are displayed on the monitor.
4 Decide the composition while looking at the image on the monitor.
- The optical zoom can be used to enlarge the subject.
5 Press the shutter button halfway.
- The focus and white balance are locked.
6 Press the shutter button fully to start recording.
- The orange lamp on the right of the viewfinder lights.
- During movie recording, lights red and the time you can shoot is displayed.
7 Press the shutter button again to stop recording.
- The orange lamp blinks while the movie is stored on the card.
- When the remaining recording time has been used up, recording stops automatically.


Note
- The magnification of the optical zoom cannot be changed during movie recording. The zoom is fixed in the Wide position. To use the zoom, set "DIGITAL ZOOM" to "ON".
- During movie recording, the flash is disabled.
- It takes longer to store movies than still pictures.
- The seconds remaining varies depending on the record mode and the amount of space available on the card.
- You cannot record movies with sound.
ZOOMING IN ON A SUBJECT (OPTICAL ZOOM)
Telephoto and wide-angle shooting are possible at 3x magnification (the optical zoom limit, equivalent to 35mm - 105mm on a 35mm camera). By combining the optical zoom with the digital zoom, zoom magnification can be increased to a maximum of approximately 15x .
En
Magnification of the digital zoom
When SQ2 (640× 480) is selected: up to 5×
Other record modes: up to 4×
1 Open the lens barrier fully.
- The lens extends and the monitor turns on.
2 Press the zoom button.
- Press the zoom button toward W to zoom out.
- Press the zoom button toward T to zoom in.
3 Take the picture.

Note
- Pictures taken with the digital zoom may appear grainy.
USING THE FLASH
1 Open the lens barrier fully.
- The lens extends and the monitor turns on.

2 Press (12) to set flash mode.
- The current flash setting is displayed.
Each time you press , the flash mode changes in the following sequence:
"AUTO"-" Red-eye reduction"-" Fill-in flash"-" Flash off".
3 Press the shutter button halfway.
- When the flash is ready to fire, the orange lamp lights steady.
4 Press the shutter button fully to take the picture.
Auto-flash (No indication)
The flash fires automatically in low light or backlight conditions.
Red-eye reduction flash (
The red-eye reduction flash mode reduces this phenomenon by emitting preflashes before firing the regular flash.
Fill-in flash ( )
The flash always fires every time the shutter button is released.
Flash off (②)
The flash does not fire even in low light conditions.
USING THE SELF-TIMER/REMOTE CONTROL
Self-timer : This function is useful for taking pictures with yourself included in the photograph.
Remote control: Shooting is possible using the remote control device (sold separately in some regions). This is useful when you want to take a picture with yourself in it or a night scene, without touching the camera.
1 Mount the camera on a tripod or place it on a stable, flat surface.
2 Open the lens barrier fully.
- The lens extends and the monitor turns on.
3 Press () to set the self-timer mode ( ) or remote control mode ()
- The setting changes between [4]1 OFF, [4]2 and [4]3 each time is pressed.


4 Take the picture.
- When using the remote control device, point it at the remote control receiver on the camera and then press the shutter button on the device.
Self-timer : The self-timer/remote control lamp lights for about 10 seconds, then starts blinking. After blinking for about 2 seconds, the picture is taken.
Remote control : The self-timer/remote control lamp blinks for about 2 seconds before taking the picture.
MACRO MODE SHOOTING
The macro mode allows you to shoot at a distance of 20 cm to 50 cm (0.7 ft. to 1.6 ft.) from your subject.
Regular photographs can be taken, but the camera may take time to focus on distant subjects.
En
1 Open the lens barrier fully.
- The lens extends and the monitor turns on.
2 Press (to set macro mode.
- The setting changes between ON and OFF each time is pressed. When the macro mode is selected, is displayed on the monitor.
3 Take the picture.

Note
- If you are close to a subject, the picture in the viewfinder is different from the area that the camera actually records. For macro mode shooting, we recommend using the monitor.

SELECTING A RECORD MODE
Choose the best record mode for your purposes (printing, editing on a PC, website editing, etc.).
| Record mode | Description | Quality | File size |
| SHQ | ·A high quality mode. ·Fewer images can be saved to a card. ·Takes longer to store the images. Uses ·Good for printing. ·Can be enlarged to A4 (210mm × 297mm / 8.3" × 11.7") size. ·Good for processing on a PC. | Clearer | Larger |
| HQ | ·Factory default setting. Uses ·Good for editing on a PC or printing in postcard size. | ||
| SQ1/SQ2 | ·The resolutions are smaller than in SHQ or HQ. ·A standard quality mode. ·More images can be saved to a card. Uses ·Attaching images to e-mail or simply viewing them on a PC. | Normal | Smaller |
En
1 In the shooting mode top menu, press to select .
2 Press to select the desired record mode.
- For still pictures, you can choose from SHQ, HQ, SQ1 and SQ2.
- For movies, you can choose HQ or SQ.
3 If you choose SQ2 for still pictures, press to display the screen for selecting the resolution. Press to choose a resolution.
4 Press OK.
- Press OK again to exit the menu.
En
31
PLAYBACK
- The monitor turns on and displays the last picture taken. (Single-frame playback)
2 Use the arrow pad to play back other pictures.
Jumps to the picture 10 frames back. (△)
En
3 Press to cancel playback.
- The monitor and camera turn off.
QUICK VIEW (Double-click playback)
This function lets you play back pictures while the camera is in the shooting mode. This is useful when you want to check shooting results and resume shooting quickly.
Functions available in normal playback mode are also available in QUICK VIEW.
1 Press twice quickly (double-click) while in the shooting mode.
- The camera immediately enters the playback mode and displays the last picture taken. (Single-frame playback)
2 Press the shutter button halfway to return to the shooting mode.
- The camera returns to shooting mode, and is ready to take pictures.

Close-up playback
Pictures displayed on the monitor can be enlarged in steps up to 4 times the original size. This function is useful when you want to check the details of a picture.
1 Use the arrow pad to display the still picture you want to enlarge.
- You cannot enlarge pictures with .
2 Press the zoom button toward T.
- To return the picture to the original size (1 ×) , press the zoom button toward W.
Index display
This function lets you show several pictures at the same time on the monitor. It is useful for quickly finding the picture you want to view. The number of pictures shown can be 4, 9 or 16.
1 In the single-frame playback mode, press the zoom button toward W.
- Use the arrow pad to select the picture.
- To return to single-frame playback, press the zoom button toward T.
PLAYING BACK MOVIES
1 Press
- The monitor turns on.
2 Use the arrow pad to display the picture with 品
3 Press OK.
- The top menu is displayed.
4 Press to select MOVIE PLAY.
5 Press to select MOVIE PLAYBACK, then press OK.
- The movie is played back. When playback ends, the display automatically returns to the beginning of the movie.


- Press OK again after playback ends to display the MOVIE PLAYBACK menu.
PLAYBACK : Plays back the entire movie again.
FRAME BY FRAME :
Plays back the movie manually one frame at a time.
:Leaves the movie playback mode.
Press to select from PLAYBACK, FRAME BY FRAME or EXIT, then press OK.
When FRAME BY FRAME is selected
: Displays the first frame of the movie.
: Displays the last frame of the movie.
: Displays the next frame. The movie can be played continuously by holding the button down.
: Displays the previous frame. The movie can be played continuously in reverse by holding the button down.
OK : Displays the MOVIE PLAYBACK menu.
En
PROTECTING PICTURES
You are recommended to protect important pictures to avoid accidentally erasing them.
1 Press
- The monitor turns on.
2 Use the arrow pad to display the picture you want to protect.
3 Press OK.
- The top menu is displayed.
4 In the top menu, select MODE MENU PLAY o , and press .
5 Press to select ON, then press OK.
- To cancel protection, select OFF.
6 Press OK to exit the menu.
- The Protect icon 0m appears on the screen.

Note
- Protected pictures cannot be erased by the single-frame/all-frame erase function, but they are all erased by formatting.
34 En


ERASING PICTURES
This function enables you to erase recorded pictures. This can be done either one frame at a time or to all the pictures on the card at once.

Note
- Once erased, pictures cannot be restored. Check each picture before erasing to avoid accidentally erasing pictures you want to keep.
Single-frame erase
1 Press
- The monitor turns on.
2 Use the arrow pad to display the picture you want to erase.
3 Press OK.
- The top menu is displayed.
4 Press to select.
5 Press to select YES, then press OK.
- The picture is erased and the menu is closed.
All-frame erase
1 In the playback mode top menu, select MODE MENU CARD CARD SETUP, and press .
2 Press to select ALL ERASE, then press OK.
3 Press to select YES, then press OK.
- All the pictures are erased.
FORMATTING (CARD SETUP)
This function lets you format a card. Formatting prepares cards to receive data. Before using non-Olympus cards or cards which have been formatted on a PC, you must format them with this camera.

Note
- All existing data, including protected data, is erased when the card is formatted. Once erased, pictures cannot be restored, so make sure that you do not erase important image data. Download important image data to a PC before formatting the card.
1 In the top menu, select MODE MENU CARD CARD SETUP, and press .
- Shooting mode The FORMAT screen is displayed.
- Playback mode The CARD SETUP screen is displayed.
2 If the FORMAT screen is displayed, press to select YES.
If the CARD SETUP screen is displayed, press to select FORMAT, then press OK. When the FORMAT screen appears, press to select YES.
3 Press OK.
- The BUSY bar is displayed and the card is formatted.
En
PLAYBACK ON A TV
Use the Video cable provided with the camera to play back recorded images on your TV.
1 Make sure that the camera and the TV are turned off. Connect the Video cable to the VIDEO OUT jack on the camera and the video input terminal on the TV.
2 Turn the TV on and switch to the video input mode.
3 Press

- You are recommended to use the optional AC adapter when using the camera with a TV.
- Make sure that the camera's video output signal type is the same as the TV's video signal type.
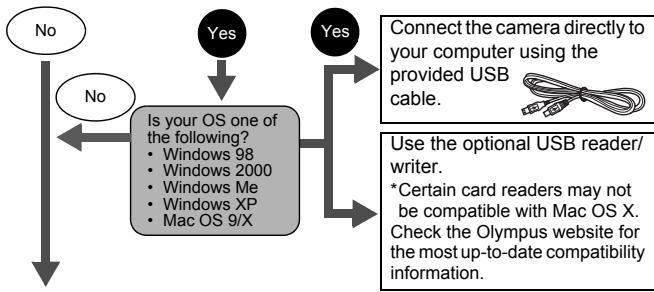
DOWNLOADING PICTURES TO A COMPUTER
By connecting the camera to a computer with the provided USB cable, images on a card can be transferred to the computer. Some OS's (operating systems) may need a special setup before connecting to the camera for the first time. Follow the chart below. For details of the procedures in the chart, refer to the "Reference Manual" on the software CD. Also refer to the "Software Installation Guide" included in the CD-ROM package.
En

- Even if your computer has a USB connector, data transfer may not function correctly if you are using one of the operating systems listed below or if you have an add-on USB connector (extension card, etc.).
Windows 95/NT 4.0 - Windows 98/98 SE upgrade from Windows 95
- Mac OS 8.6 or lower (except Mac OS 8.6 equipped with USB MASS Storage Support 1.3.5 installed at the factory)
Data transfer is not guaranteed on a home-built PC system or PCs with no factory installed OS.

Note
- You can view images using: graphics applications that support the JPEG file format (Paint Shop Pro, Photoshop, etc.); Internet browsers (Netscape Communicator, Microsoft Internet Explorer, etc.); CAMEDIA Master software; or other software. For details on using commercial graphics applications, refer to their instruction manuals.
- QuickTime is needed for playing back movies. QuickTime is included on the provided software CD.
- If you want to process images, make sure to download them to your computer first. Depending on the software, image files may be destroyed if the images are processed (rotated, etc.) while they are on the card.
FOR OTHER OS USERS
Users running other OS cannot use the provided USB cable to connect the camera directly to a computer.
- Windows 95 - Windows NT - Mac OS before OS 9
You can download images directly to your computer using an optional floppy disk adapter or PC card adapter.
Does your computer have a USB interface? Is there a port marked on your computer?
Does your computer have a built-in PC card slot?

Consult your nearest Olympus representative.
For more details, refer to the "Reference Manual" on CD-ROM. For connection to the PC, refer to the "Software Installation Guide" included in the CD-ROM package.

ERROR CODES
En
| Monitor indication | Possible cause | Corrective action |
| NO CARD | The card is not inserted, or it cannot be recognized. | Insert a card or insert a different card. Wipe the gold contacts with a commercially available cleaning paper and insert the card again. If the problem persists, format the card. If the card cannot be formatted, it cannot be used. |
| CARD ERROR | There is a problem with the card. | Use a different card. Insert a new card. |
| WRITE-PROTECT | Writing to the card is prohibited. | Read-only has been set using a computer. Use the computer again to cancel the read-only setting. |
| CARD FULL | The card is full. No more pictures can be taken or no more information such as print reservation can be recorded. | Replace the card or erase unwanted pictures. Before erasing, download important images to a PC. |
| NO PICTURE | There are no pictures on the card. | The card contains no pictures. Record pictures. |
| PICTURE ERROR | There is a problem with the selected picture and it cannot be displayed. | Use image processing software to view the picture on a PC. If that cannot be done, the image file is damaged. |
| CARD SETUP POWER OFF IF FORMAT SELECT B GON OK | The card is not formatted. | Format the card. |
| CARD COVER OPEN | The card cover is open. | Close the card cover. |
| Y/M/D | The date and time are not set. | Set the date and time. |
En
SPECIFICATIONS
Product type : Digital camera (for shooting and displaying)
Recording system
Still picture
Digital recording, JPEG (in accordance with Design rule for Camera File system (DCF)), Exif 2.2, Digital Print Order Format (DPOF), PRINT Image Matching II
Movie
:QuickTimeMotionJPEGsupport
Memory
: xD-Picture Card (16 - 256MB)
No. of storable pictures (when a 16 MB Card is used)
| Resolution | Record mode/No. of storable pictures | |||
| Stylus/μ[mju:]400 DIGITAL | Stylus/μ[mju:]300 DIGITAL | |||
| 2272 × 1704 | SHQ | 5 | — | — |
| HQ | 16 | |||
| 2048 × 1536 | SQ1 | 20 | SHQ | 6 |
| HQ | 20 | |||
| 1600 × 1200 | SQ2 | 24 | SQ1 | 24 |
| 1280 × 960 | 38 | SQ2 | 38 | |
| 1024 × 768 | 58 | 58 | ||
| 640 × 480 | 99 | 99 | ||
| Record mode | Resolution (Frames/sec) | Memory capacity in sec. per movie |
| HQ | 320 × 240 (15 frames/sec) | 16 |
| SQ | 160 × 120 (15 frames/sec) | 70 |
No. of effective pixels
Stylus/μ[mju:] : 3,200,000 pixels
300 DIGITAL
Stylus/μ[mju:] : 4,000,000 pixels
400 DIGITAL
Image pickup device
Stylus/μ[mju:] : 1/2.5" CCD solid-state image pickup, 3,340,000
300 DIGITAL pixels (gross)
Stylus/μ[mju:] : 1/2.5" CCD solid-state image pickup, 4,230,000
400 DIGITAL pixels (gross)
Lens : Olympus lens 5.8 mm to 17.4 mm (equivalent to 35 mm to 105 mm lens on 35 mm camera), F3.1 to F5.2
Photometric system : Digital ESP metering, Spot metering
Shutter speed : 1/2 to 1/1000 sec. (max. 4 sec. in Night scene mode)
Shooting range : 0.5m (1.6 ft.) to (normal) 0.2m (0.7 ft.) to (macro mode)
Viewfinder : Optical real image viewfinder
Monitor : 1.5" TFT color LCD display, 134,000pixels
Outer connector : DC-IN jack, USB connector (mini-B),VIDEO OUT jack
Automatic calendar : 2000 – 2099 system
Weatherproof : Equivalent to IEC Standard publication 529 IPX4 feature (under OLYMPUS test conditions)
Operating environment
Temperature : 0 to 40^ (32°F to 104°F) (operation) -20 to 60°C (-4°F to 140°F) (storage)
Humidity : 30% to 90% (operation)/10% to 90% (storage)
Power supply : Specified lithium ion rechargeable battery or AC adapter
Dimensions : 99 mm (W) × 56 mm (H) × 33.5 mm (D)
(3.9" × 2.2" × 1.3")
(excluding protrusions)
Weight : 165 g (0.4 lb.) (without battery or card)
SPECIFICATIONS ARE SUBJECT TO CHANGE WITHOUT ANY NOTICE OR OBLIGATION ON THE PART OF THE MANUFACTURER.
TABLE DES MATIÈRES
GUIDE RAPIDE DE DEMARRAGE 46
FONCTIONS DU MENU 59
PRISE DE VUES - INSTRUCTIONS DE BASE 66
SELECTION MODE D'ENREGISTREMENT 73
AFFICHAGE 74
RéGLAGES D'IMPRESSION 79
TRANSFERT DES PHOTOS VERS UN ORDINATEUR.... 80
CODESD'ERREUR 82
CHARACTERISTIQUES 84
Fr
m = 311
NIGHT SCENE [SCEN NUIT]
(DCF)), Exif 2.2, Digital Print Order Format (DPOF),
PRINT Image Matching II.
Vidéo
Adresse 2 Corporate Center Drive, Melville,
New York11747-3157, USA
Telefonnummer 1-631-844-5000
NIGHT SCENE [ESC. NOCT]
Windows 98/ 98 SE (Second Edition)
Windows Me/2000/XP
Mac OS 9.0 - 9.1/OS X
Conector exterior : Jack DC-IN, conector USB (mini-B), jack VIDEO OUT
Sistema de : 2000-2099 calendario automatico
San-Ei Building, 22-2, Nishi Shinjuku 1-chome, Shinjuku-ku, Tokyo, Japan
Customer support (Japanese language only): Tel. 0426-42-7499 Tokyo
OLYMPUS AMERICA INC.
Two Corporate Center Drive, Melville, NY 11747-3157, U.S.A. Tel. 631-844-5000
Technical Support (USA)
24/7 online automated help: http://support.olympusamerica.com/
Phone customer support: Tel. 1-888-553-4448 (Toll-free)
Our phone customer support is available from 8 am to 10 pm
(Monday to Friday) ET
E-Mail: distec@olympus.com
Olympus software updates can be obtained at: http://olymprus.com/digital/
OLYMPUS OPTICAL CO. (EUROPA) GMBH.
Premises/Goods delivery: Wendenstrasse 14-18, 20097 Hamburg, Germany
Tel. 040-23 77 33
Letters: Postfach 10 49 08, 20034 Hamburg, Germany
European Technical Customer Support:
Please visit our homepage http://www.olympus-europa.com
or call our TOLL FREE NUMBER : 00800 - 67 10 83 00
for Austria, Belgium, Denmark, Finland, France, Germany, Italy, Luxemburg,
Netherlands, Norway, Portugal, Spain, Sweden, Switzerland, United Kingdom
- Please note some (mobile) phone services/provider do not permit access or request an additional prefix to +800 numbers.
For all not listed European Countries and in case that you can't get connected
to the above mentioned number please make use of the following
CHARGED NUMBERS: +49 180 5 - 67 10 83 or +49 40 - 237 73 899
Our Technical Customer Support is available from 9 am to 6 pm MET (Monday to Friday)
2003 OLYMPUS OPTICAL CO., LTD.
Printed in China
VT419901