
TDS6030, TDS6080 - Iron BOSCH - Free user manual and instructions
Find the device manual for free TDS6030, TDS6080 BOSCH in PDF.
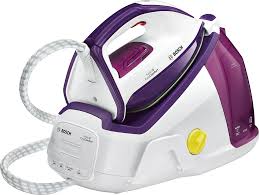


| Product type | Steam station |
| Brand | BOSCH |
| Compatible models | TDS6030, TDS6080 |
| Power | 2400 W |
| Water tank capacity | 1.5 L |
| Maximum steam pressure | 5 bar |
| Weight | 4.0 kg |
| Dimensions (W x D x H) | 30.0 x 20.0 x 30.0 cm |
| Power supply | 220-240 V, 50-60 Hz |
| Main functions | EasyComfort, Calc'nClean, Eco, Pulsesteam, vertical ironing, automatic shut-off |
| Maintenance and cleaning | Descaling boiler and iron, rinsing anti-scale filter, cleaning soleplate with damp cloth |
| Safety | Automatic shut-off after 8 min, SecureLock locking, hot surface protection |
| Spare parts and repairability | Anti-scale filter, boiler cap, Calc'nClean tank (depending on model) |
| General information | Domestic use, max altitude 2000 m, grounded outlet required |
Frequently Asked Questions - TDS6030, TDS6080 BOSCH
User questions about TDS6030, TDS6080 BOSCH
0 question about this device. Answer the ones you know or ask your own.
Ask a new question about this device
Download the instructions for your Iron in PDF format for free! Find your manual TDS6030, TDS6080 - BOSCH and take your electronic device back in hand. On this page are published all the documents necessary for the use of your device. TDS6030, TDS6080 by BOSCH.
USER MANUAL TDS6030, TDS6080 BOSCH
Register your new Bosch now: www.bosch-home.com/welcome
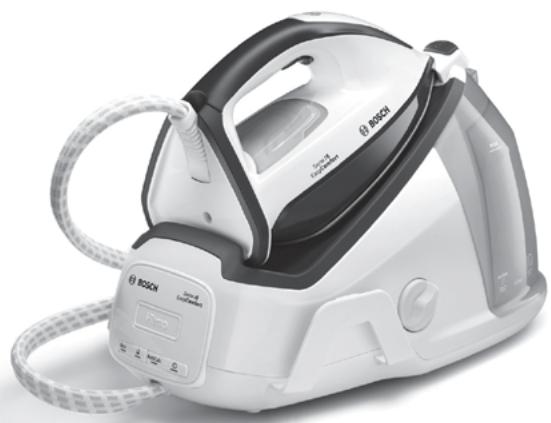

Serie 16 (TDS60..) EasyComfort

BOSCH
de Gebrauchsanleitung en Operating instructions fr Notice d'utilisation it Istruzioni per l'uso nl Gebruiksaanwijzing da Brugsanvising no Bruksanvisning
sv Bruksanvisning fi Käytöhjeet es Instrucciones de uso pt Instruções de utilização el Odyieic xpon tr Kullanma talimati pl Instrukcja obslugi
hu Hasznalatiutasitask uk Inctpykui 3 BnKOpncTaHHa ru Hnctpykun IIO 3KcIaTaun ro Instructiuni de folosire ar kz TaaandahyKeHHderi HcyakaybIK

Index
| DEUTSCH | 6 |
| ENGLISH | 14 |
| FRANÇAISE | 22 |
| ITALIANO | 30 |
| NEDERLANDS | 38 |
| DANSK | 46 |
| NORSK | 54 |
| SVENSKA | 62 |
| SUOMI | 70 |
| ESPAÑOL | 78 |
| PORTUGUES | 86 |
| ЕLVHNIKA | 94 |
| TÜRKQE | 102 |
| POLSKI | 110 |
| MAGYAR | 118 |
| УКPassIHСыKA | 126 |
| РУССКИ | 134 |
| ROMÁN | 142 |
| العربية | 157 |
| ΚΑ3ΑΚ | 158 |
DEUTSCH
ESPANOL
ENGLISH
PORTUGUES
FRANÇAISE
EMAHNIKA
ITALIANO
TÜRKÇE
DUTCH
POLISH
DANISH
HUNGARIAN
NORWEGIAN
UKRAINIAN
SWEDISH
RUSSIAN
FINNISH
ROMANIAN
KAZAKH
General safety instructions
During use, the decalcifying or rinsing aperture of the boiler is under pressure and must not be opened. The appliance must not be left unattended while it is connected to the supply mains. Remove the plug from the socket before filling the appliance with water or before pouring out the remaining water after use. The appliance must be used and placed on a stable surface. When placing the iron on its stand or on its heel, make sure that the surface on which the stand or heel is placed is stable. The appliance should not be used if it has been dropped, if there are visible signs of damage, or if it is leaking water. It must be checked by an authorized Technical Service Centre before it can be used again. To avoid dangerous situations, any work or repair that the appliance may need, e.g., replacing a faulty mains cable, must only be carried out by qualified personnel from an Authorized Technical Service Centre. This appliance can be used by children aged 8 years and above and persons with reduced physical, sensory, or mental capabilities or lack of experience and knowledge if they have been given supervision or instruction concerning use of the appliance in a safe way and understand the hazards involved. Children shall not play with the appliance. Cleaning and user maintenance shall not be made by children without supervision. Keep the appliance and its cord out of reach of children under 8 years of age when it is turned on or cooling down. This appliance is designed only for household use up to 2000m above sea level. CAUTION: Hot surface. Surface is liable to get hot during use.
Important notices
- Carefully read through the operating instructions for the appliance and safeguard them for future reference.
- This appliance has been designed exclusively for normal household use in a home environment.
- This appliance must be used only for the purposes for which it was designed, i.e., as an iron. Any other use will be considered improper and consequently dangerous. The manufacturer will not be held responsible for any damage arising from misuse or improper use.
- This appliance is to be connected and used in accordance with the information stated on its characteristics plate.
- This appliance must be connected to an earthed socket. If it is absolutely necessary to use an extension cable, make sure that it is suitable for 16A and has a socket with an earth connection.
- The appliance must never be placed directly under the tap to fill the water tank.
- The electrical plug must not be removed from the socket by pulling the cable.
- Never immerse the iron in water or any other fluid.
- Do not leave the appliance exposed to weather conditions (rain, sun, frost, etc.)
- This appliance reaches high temperatures and produces steam during use, which could cause scalds or burns if not used properly.
- Do not allow the power cable to come into contact with the soleplate when it is hot.
Advice on disposal
Our goods come in optimised packaging. This basically consists in using non-contaminating materials which should be handed over to the local waste disposal service as secondary raw materials. Your local town council can give you information about how to dispose of obsolete appliances.

This appliance is labelled in accordance with European Directive 2012/19/EU concerning used electrical and electronic appliances (waste electrical and electronic equipment - WEEE).
The guideline determines the framework for the return and recycling of used appliances as applicable throughout the EU.
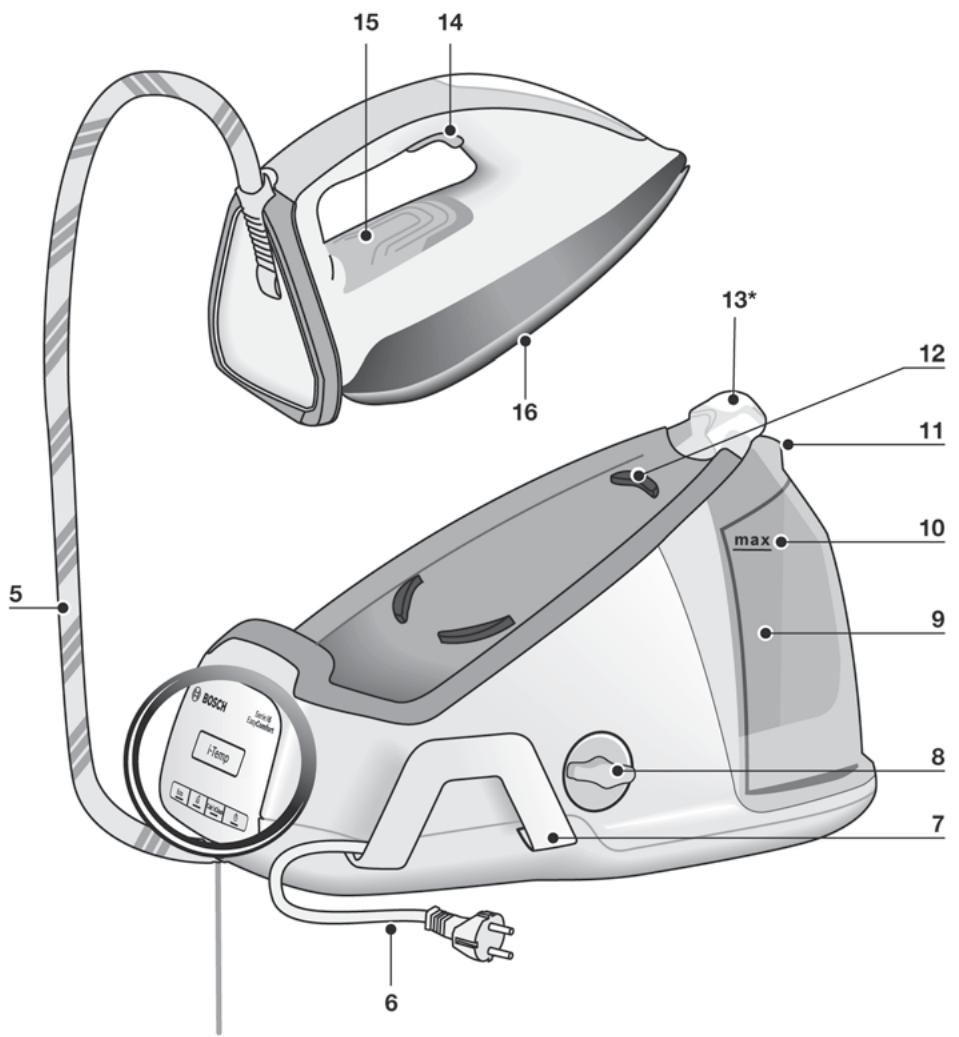
Description

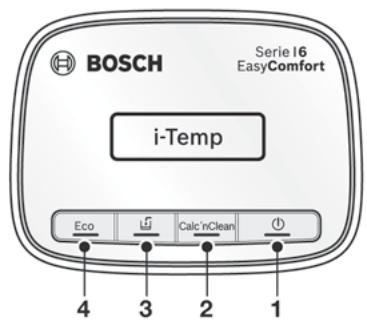
- "on / off" button with indicator light
- "Calc'nClean" descending button with indicator light
- "Water tank empty" button with indicator light
- Energy saving "Eco" button with indicator light
- Steam hose
- Mains cable
- Mains cable and steam hose storage holder
- Boiler cap / "Calc'nClean" scale collector *
- Water tank
- Level mark for maximum filling
- Filling lid
- Iron pad
- Iron lock system "SecureLock" *
- Steam release button
- Iron indicator light
- Soleplate
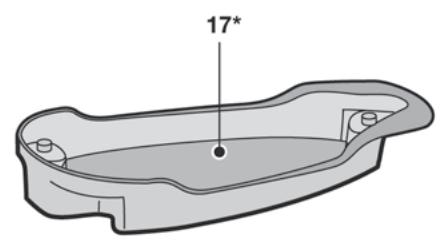
- "Calc'nClean" container *
Introduction

EasyComfort for simple, fast and safe ironing.
Discover the new way of ironing with EasyComfort – no more changing the temperature of the iron and tedious pre-sorting! Now all ironable materials, from ultra fine delicates to extra thick fabrics, are creasefree in a flash with a single temperature setting. Which means more time to do other things.

1. Filling the water tank
This appliance has been designed to use normal tap water.
Important: Do not use additives! The addition of other liquids, such as perfume, vinegar, starch, condensation water from tumble dryers or air conditioning systems, or chemicals will damage the appliance. Any damage caused by the use of the aforementioned products will make the guarantee void!
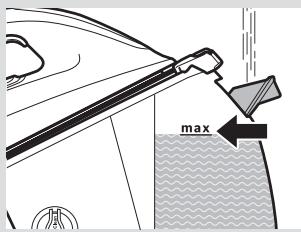
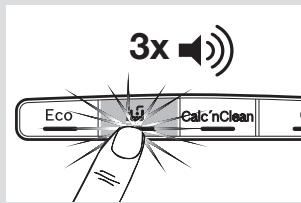
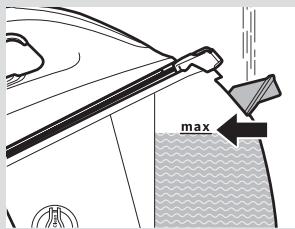
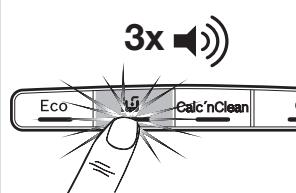
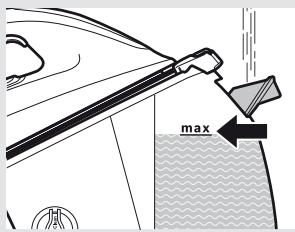
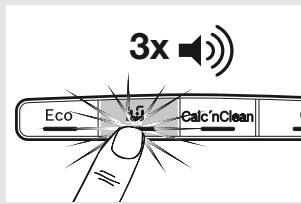
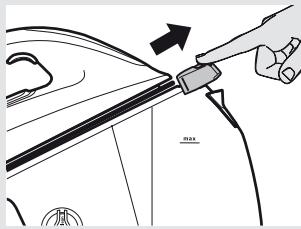
1 Open the filling lid (11). 2 Fill the water tank (9). Never fill beyond the level "max" (10) for maximum filling! 3 Close the filling lid. 4 Refill the water tank when the indicator light (3) comes on. Three beeps will be heard. Important: Once refilled, press button (3).
Tip: To prolong the optimum steam function, you may mix tap water with distilled water 1:1. If the tap water in your area is very hard, mix tap water with distilled water 1:2.

2. Heating
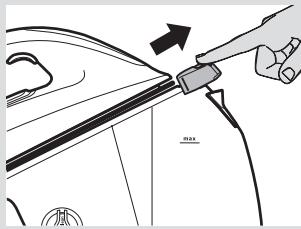
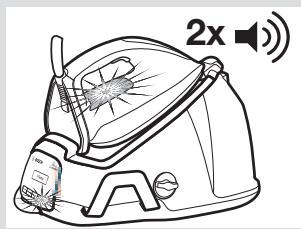
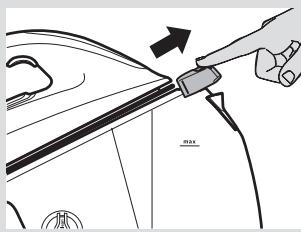
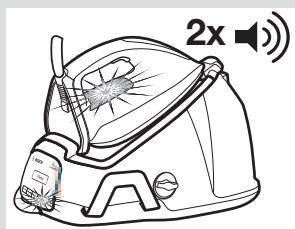
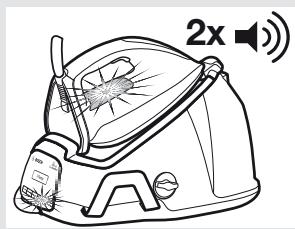
If your steam station is equipped with an iron lock system (13*), release the iron by pressing the button. Unwind the steam hose (5) and the mains cable (6). Plug the mains cable into an earthed socket. Press the button (1) to switch the appliance on. Indicator lights (1, 15) will flash, indicating that the appliance is heating up. When the iron is ready to use, the indicator lights (1, 15) will remain permanently lit. Two beeps will be heard.
3. Ironing
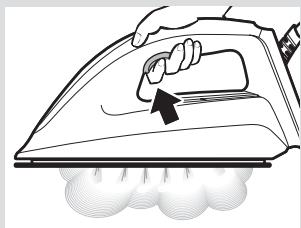
Press the steam release button (14) for ironing with steam.
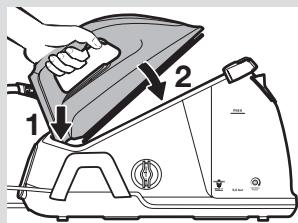
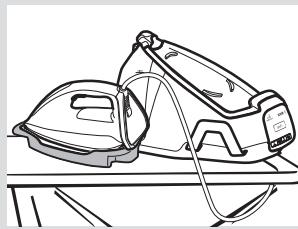
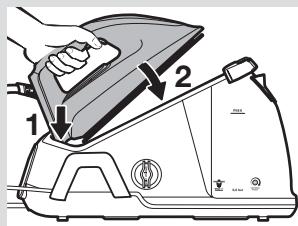
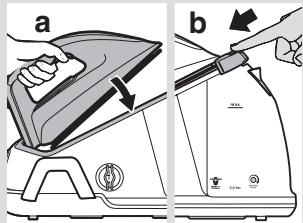
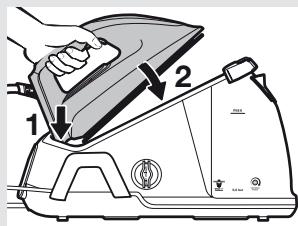
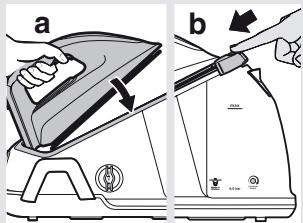
Important: When placing the iron on the pad, be sure to first insert the heel in the upper side of the control panel, as shown in the figure.
Tip: For better ironing results, iron the last strokes without pressing the steam release button (14) to dry the garment.

"PulseSteam" function
This appliance has a special function for tackling difficult creases.
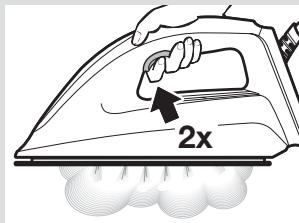
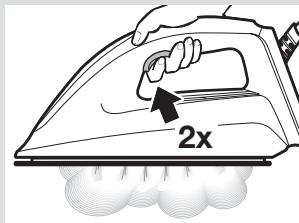
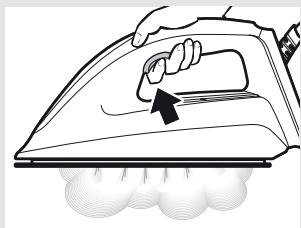
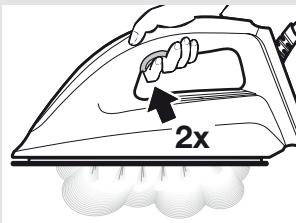
Press the steam release button (14) two times in quick succession (double-click). Powerful shots of steam will be released.

Vertical steam
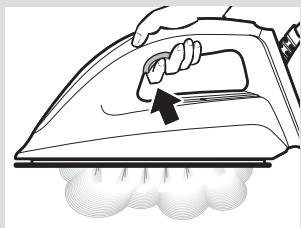
Can be used to remove creases from hanging clothes, curtains, etc.
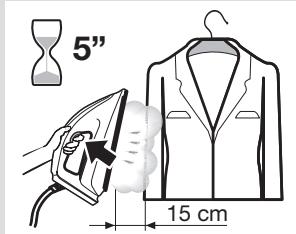
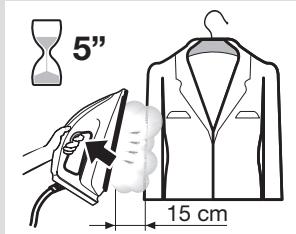
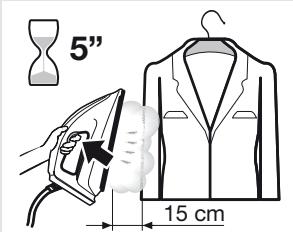
Hold the iron in an upright position 15 cm away from the garment to be steamed. Press the steam release button (14) repeatedly with pauses of at least 5 seconds.
Warning! Never point the steam jet at garments being worn, or at people or animals.

4. Energy saving
If the energy saving setting is selected, you can save energy and water and still achieve good results when ironing most of your garments.
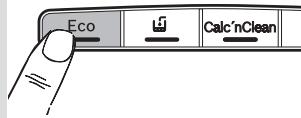
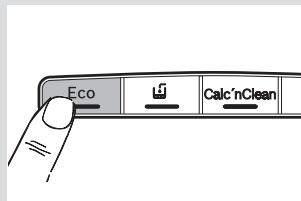
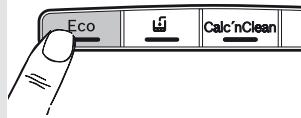
Press the energy saving button "Eco" (4). The indicator light will come on. To switch back to the normal energy setting, press the "Eco" button again. It is advisable to use the normal energy setting to get optimum results on thick and very wrinkled fabrics.

5. Auto switch off
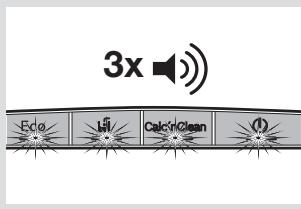
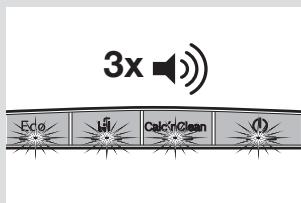
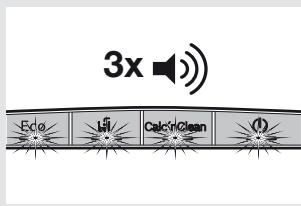
For your safety and to save energy, the appliance switches off automatically when it has not been used for 8 minutes. Three beeps will be heard, and all indicator lights (1, 2, 3, 4) will flash.
1 To switch the steam station back on, press the steam release button (14) again.

Cleaning & Maintenance

1. Descaling process
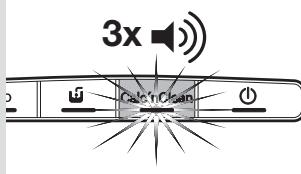
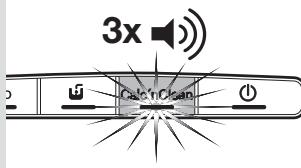
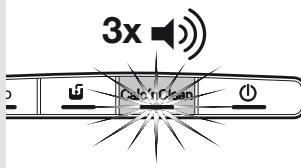
Important: to keep your appliance in good condition for a long time, you should carry out the descaling process after a period of use. The "Calc'nClean" indicator light (2) will flash and three beeps will be heard, indicating that the process should be performed.
Descaling the boiler
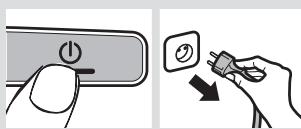
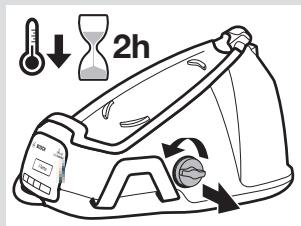
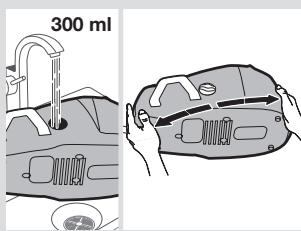
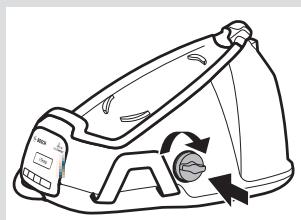
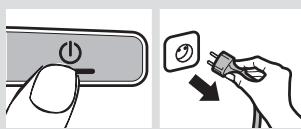
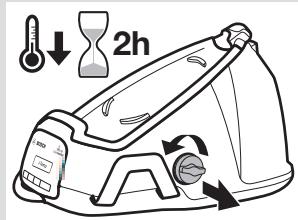
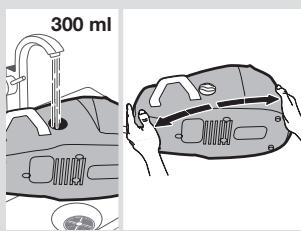
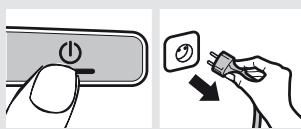
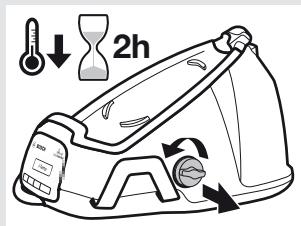
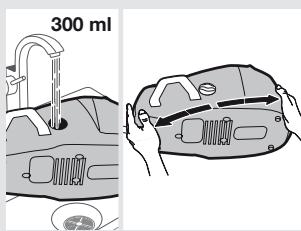
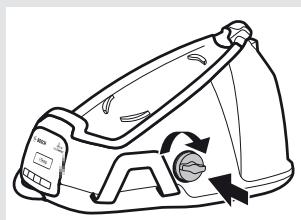
Press the button (1) to switch the appliance off. Unplug the appliance and let it cool down for at least 2 hours. 2 Empty the water tank. 3 Remove the iron from the pad (12). 4 Unscrew and remove the boiler cap (8) and take it out. Empty the boiler completely. 5 Fill the boiler with approximately 300 ml of tap water. Close the boiler cap and shake the base unit for a few moments. Then, empty it completely.
Important: To obtain the best result, we recommend that this operation be performed twice. Before re-closing, make sure no water remains in the boiler.
If your appliance is equipped with scale collector (8*) , it must be washed (see the "Descaling the scale collector" section). 7 Replace and tighten up the cap.
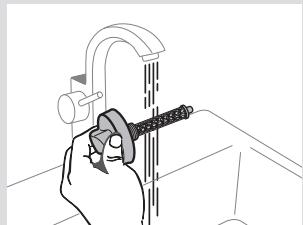
Descaling the limescale collector *
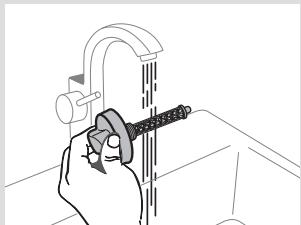
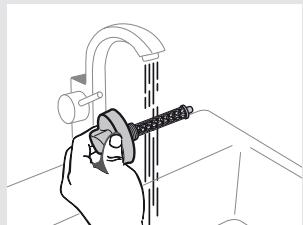
1 Place the limescale collector under the water tap. 2 Wash it up until limescale residues are removed.
Descaling the iron
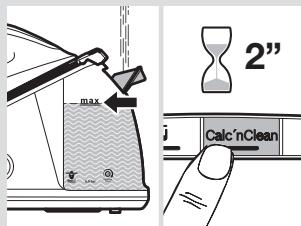
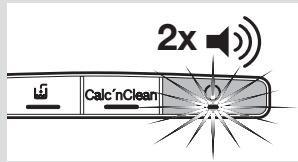
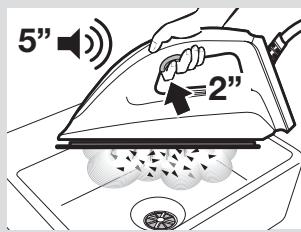
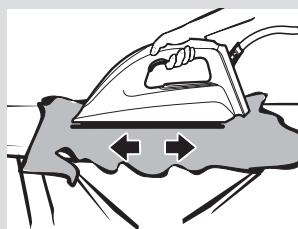
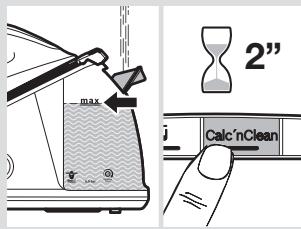
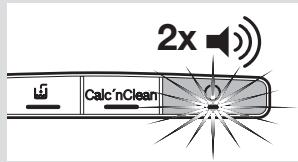
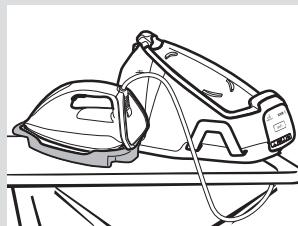
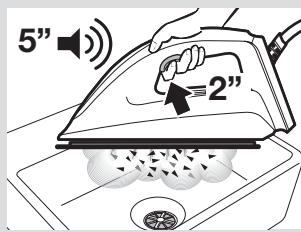
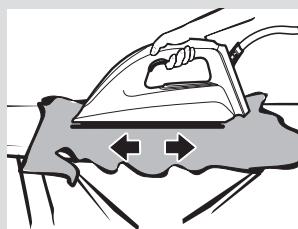
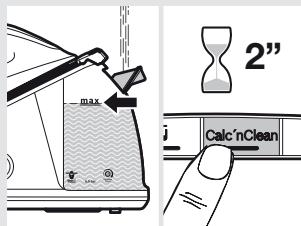
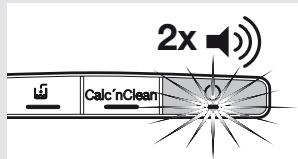
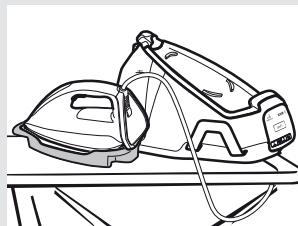
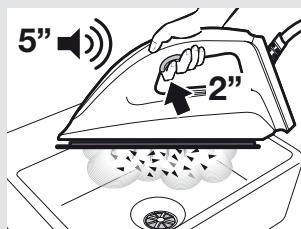
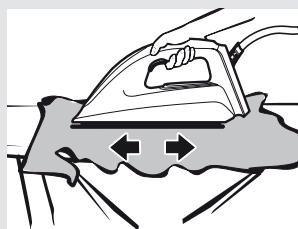
1 Fill the tank (9) with tap water. 2 Plug in the mains cable (6) and press the button (1) to switch the appliance on. Press the descaling button (2) for 2 seconds. Its indicator light will remain permanently lit. 4 Wait until the indicator light (1) stops flashing and remains lit permanently. Two beeps will be heard. Hold the iron in a horizontal position over an empty sink to collect the water. If your appliance is equipped with a "Calc'nClean" container (17*) , place the iron on it. 6 Press the steam release button (14) for 2 seconds. The descaling process will start automatically. Warning: boiling water and steam will be released through the soleplate, carrying limescale and/or deposits that may be inside. During the process, a beep will be heard every 5 seconds. After approximately 3 minutes, the iron will stop releasing steam. A long beep will be heard, indicating that descaling process has finished. The appliance will switch off automatically. To clean the soleplate (16), immediately rub off any residue by running the hot iron over a wet cotton cloth.

2. Cleaning the appliance
Regularly clean your appliance for proper maintenance. Attention! Burn risk!
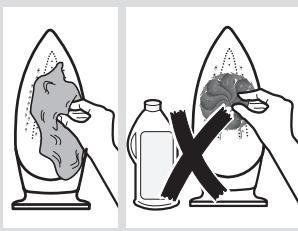
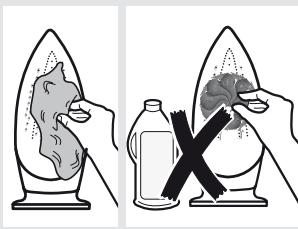
If the appliance is only slightly soiled, wipe it with a damp cotton cloth only, and then dry it. To keep the soleplate smooth, you should avoid contact with hard metal objects. Never use a scouring pad, or chemicals to clean the soleplate.

Storing the appliance
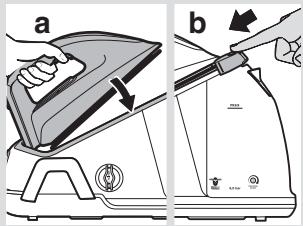
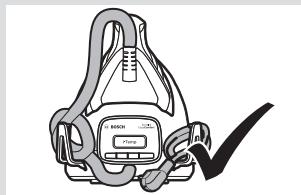
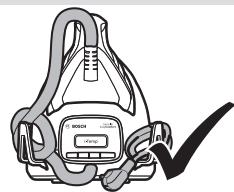
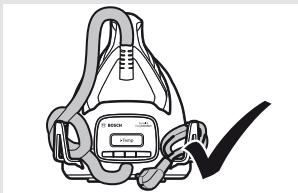
Unplug the appliance and let it cool down. Empty the water tank (9). Place the iron on the steam station, standing on the pad (12). If your steam station is equipped with iron lock system (13*), fix the iron to it. First insert the heel and then block the tip moving the lock system against the iron. Store the steam hose (5) and the mains cable (6) on the storage holder (7).

Troubleshooting
| Problem | Possible causes | Solution |
| The iron begins to smoke when switched on. | 1. During first use: certain components on the appliance have been lightly greased at the factory and may produce a small amount of smoke when initially heated. 2. During subsequent use: the soleplate may be soiled. | 1. This is completely normal and will stop after a short while. 2. Clean the soleplate according to the cleaning instructions in this manual. |
| Water flows through the holes on the soleplate. | 1. The water is condensing inside the tubes because steam is being used for the first time or has not been used for a long time. | 1. Point the iron away from the ironing area and press the steam release button until steam is produced. |
| Dirt comes out through the soleplate. | 1. There is a build up of limescale or minerals in the boiler and iron. 2. Chemical products or additives have been used. | 1. Carry out a cleaning cycle (see the “Descaling process” section). 2. Never add products to the water (see the “Filling the water tank” section). Clean the soleplate with a damp cloth. |
| The “Calc'nClean” indicator light (2) does not turn off. | 1. The iron descaling process has been stopped before being completed. | 1. Restart and complete the iron descaling process. |
| The appliance makes a pumping sound. | 1. Water is being pumped into the steam tank. 2. The sound does not stop. | 1. This is normal. 2. If the sound does not stop, do not use the steam station and contact an authorised technical service centre. |
| Loss of pressure during ironing. | 1. The steam release button has been activated for too long a period of time, meaning it has been pressed too frequently. | 1. Use the steam release button at intervals. |
| Water spots appear on the garment during ironing. | 1. May be caused by steam condensed on the ironing board. | 1. Wipe the textile cover of the ironing board, and iron any water drops to dry them. |
| The hose gets hot during use. | 1. This is normal. It is caused by the steam passing through the hose during steam ironing. | 1. Place the hose on the opposite side so that you do not touch the hose during ironing. |
| Water leakage from the boiler. | 1. Boiler cap (8) is loose. | 1. Tighten the cap. |
If the above tips do not solve the problem, get in touch with our customer service.
You can download this manual from the Bosch local homepages.
Vertical steam ironing
This product is marked in accordance with the European Directive 2012/19/EC on waste electrical and electronic equipment (WEEE). The directive sets the framework for the return and recycling of used appliances across the EU. Please return the product at the end of its working life to your local collection point or return it to the shop where you bought it.
This product is marked in accordance with the European Directive 2012/19/EC on waste electrical and electronic equipment (WEEE). The directive sets the framework for the return and recycling of used appliances across the EU. Please return the product at the end of its working life to your local collection point or return it to the shop where you bought it.
Description of the appliance

- Power switch with indicator light
- Calc'nClean button with indicator light
- Water tank fill button with indicator light
- Kpnuka 6aky naporehepaTopa / kOJIeKTopДЯЗборунakuny «Calc'nClean»*
- Pe3epByap DJIa BOiN
- BiДмітka МaktionальHoro piВну hanOBHeHHa
- Kpuioka OTBOPy IJIa HAnOBHeHHa 12.Пдста Кдяпраски
- Пистрий Фікcaць пpackи «SecureLock» *
- Khonka Bvnyscu napu
- IHHaKAp npacKn 16.Пидашва
- Emhictb «Calc'nClean»
Bctyn

Ipacka EasyComfort - Kpaanse piweHnJa npocToro, WbndKoro i 6e3neHoro npacyBaHH.
Before using the iron for the first time, read the instructions for use carefully and remember how to set the temperature and pre-iron the fabric! Now you can iron delicate and sensitive fabrics perfectly in just a few minutes by using the soleplate temperature setting. This means you can spend more time on your favorite activities.

1. Filling the water tank
Removing the iron from the base
1 Fill the water tank (9) with distilled water. 2 Plug the power cord (6) into the outlet and press the button (1) to turn on the appliance. 3 Press and hold the steam button (2) for 2 seconds. The indicator will light up with a steady light. Wait until the indicator stops flashing and becomes a steady light. Then you will hear two beeps. 5 Hold the iron horizontally over the sink: water will flow out of it. If your appliance comes with the "Calc'nClean" container (17*), place the iron on it. 6 Press the steam release button (14) and hold it for 2 seconds. The descaling process will start automatically. Caution! Scale and dirt will be expelled through the soleplate with water and steam. During the process, every 5 seconds you will hear a beep. 7 After about X minutes, the iron will stop emitting steam. You will hear a long beep indicating the end of the descaling process. Then the appliance will turn off automatically. 8 To clean the soleplate (16), remove all limescale residues by wiping the soleplate with a damp cloth.
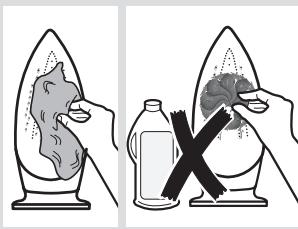

2. Cleaning the iron
Regularly clean the appliance to ensure proper functioning.
Caution! Risk of burns!
1 If the appliance is only slightly dirty, wipe it with a damp cloth and then dry it. 2 To maintain the soleplate surface smooth, avoid contact with metal objects. In any case, do not use abrasive cleaners, scouring pads, or chemical agents for cleaning the soleplate.

Storing the appliance
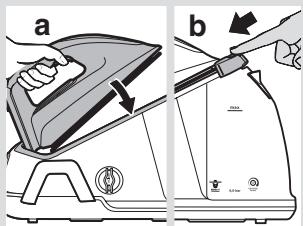
1 Unplug the appliance from the outlet and let it cool down. Empty the water tank (9). 2 Place the iron on the steam station base (12). If your steam station is equipped with an iron locking device (13*), lock the iron with its help. First, insert the front part of the iron into the corresponding recess, then lock the iron by sliding the locking device onto it. 3 Place the steam hose (5) and power cord (6) in the storage compartment (7) provided for them.
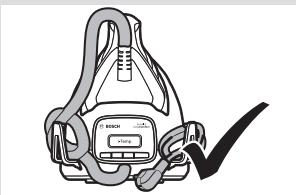

Troubleshooting
Problem
The iron is turned on, but no steam comes out.
Possible cause
1. During first use: The appliance parts were lubricated at the factory, so during the first heating, a small amount of steam may be emitted. 2. During subsequent use: Possibly, the water tank is empty.
Piwenn
- The language a b c o j l o T h O H o p m a n l b h e Ta c k o p o np i n n H t b c r.
- Clean the iron as described in the instructions.
| ПюбLEMа | Можлови prочун | Рiwенья |
| Крзь OTвори упiodшев TeчЕ ВODа. | 1. Вoda КONDс ecTyCSу TrpБкax, ТOMУ сц Функци родач rapи ВИКористовс bvespe abso DoBro He BИКористовуВалася. | 1. СпreamуITE пpackу поа зону п��сУВаньЯ та кільka разови натусIHITь Na KONKY BИЧСУКу napи, ДOKи He Роче ВИХОДТи napa. |
| 3 OTвори пiodшев ВИХОДТь 6рud. | 1. Y baskу naporeheparopa i npacsiу TВОрИСВан acnip abo MINEpaIbHi BiDkIaIeHNNY. 2. БуLO ВИKористану ximiuhi zasobni abso Domiшки. | 1. ВИКонай TE zuKII OUnselenHЯ (ДODATKOBA IHФОм晋дяп Havesdenaу y poZdiIi «Пю畴ура ВИДалenHЯ haknyu'). 2. НIKOLи He doDAbaIteу Вodу CTOPOHHI peUOBINH (ДODATKOBA IHФОм晋дяп Havesdenaу y poZdiIi «HANOBHeHЯ peЗерByapa dlya BODIN'). Oчирть пiodшь 3a DoPOMorOTo BOJORoi TKAHNH. |
| Индikatop «Calc'nClean» (2) He BIMNKaETbcry. | 1. Пю畴ура ВИДаленну hakinyu I3 npackи buly na nepeДчасno 3уПинеси. | 1. 3anycrtiteb 3NoBv pnoeDpyru BИДалenHЯ hakinyi I doBeDiTb IIdo KINca. |
| Усeredини ристою чутп 3byknomп. | 1. Вoda PerekayuEtsc nompoю do baskу naporeheparopa. 2. 3Byk He npinnHЯtsc. | 1. Lce HopmaJIbNeЯВиSe. 2.Якso 3Byk He npinnHЯtsc, He BИKористовипупapOBу CTaHцIO Ta 3BepHITbcrydo ABTOPIZOBAHOrO cepBicHOrO ueHTpy. |
| Пд чac npacsyВання падаe ТИСК. | 1. Кнок BAИнSCy napи buly na HATSCHyta npotrayom 3aHaIdTo TrpIBaIoro Qucy, abso Bn HATSCaJIи I3 aHaIdTo quchTo. | 1. HATSCaIte Khonky BИNysCvy napи 3 DeяКIM i INTeRbAionom. |
| Y proUCEi npacsyВання на ВИрби 3'ЯВЯЛOTься мokрі плами. | 1. И доши дяnpacsyВанья 3iБrabCS kondeHcaT. | 1. BvtrpiTb TkaHInne POKpTTy DoшкДяnpacsyВанья ta CkОристайтеся п��СЮДЯп TII pIDcyuBaHnY. |
| Пд чac ВИКористаньшалгНагriBaETbcry. | 1. Lce HopmaJIbNeяВиSe. Lcet rapanlEtsc TOMU, сц пд чac npacsyВанья 3 BИKористаньm napи ShIaNHomПрoxOДыпnapa. | 1. ПеремICTntb shIaNrY npotINeJexHni 6iK takIM chINHom, сцбВи He topKaIncs MyoR npotrayom p��syВанья. |
| I3 baskу naporeheparopa Teчe ВODa. | 1. Кшиcka baskу naporeheparopa (8) He zaKpyeHa. | 1. 3aTyrHITb kpiShky |
If malfunctions are not eliminated, contact the service center.
The latest models can be downloaded from the regional Bosch website.
Attention! Never direct the steam jet at people or animals.

4. Energy saving
By selecting the energy saving mode, you can save electricity while getting satisfactory results for most items.
1 Press the energy saving button «Eco» (4). The light indicator turns on. 2 To return to normal energy consumption mode, press the «Eco» button again. It is recommended to use normal energy consumption mode for optimal ironing of thick and heavily wrinkled fabrics.

5. Automatic shut-off
For your safety and to save electricity, the appliance automatically turns off if it is not used for 8 minutes.
In this case, you will hear three sound signals, and all light indicators (1,2,3,4) will start flashing.
1 To switch the iron back on, press the steam release button on the handle (14).

Cleaning and care


Aa

(6)(5)
.(7)
1
2
3


(5.4.3.2)
(14)

4.1

__SUPPIMER__
s 2"Calc'nClean
2
1 1
4

aal aal bll dai w g jil kay aal bll g jin jui li .
.4) (sulsiil) "Eco" ailll j j j 1
1
Jc baii jie ai bll Jiaoi all baiy jie g jy Jiaii Jiaai ll baiy jie gai yjw yjg.(yui)"Eco" jll jilji jlc Juaaill aai jll oaiy jayai jll jai bll
2
1.1

jll lglao jao slalal alalal alalal alalal alalal
160
.ally j jall jll jlll all jll jll jll
1.21 2.21 3.21 4.21 5.21 6.21 7.21 8.21 9.21
.
a
aII 150
#
la Jilicl jaiiill aig lae iolalipidilwgl wlll g aegall liaa aiele (g lii
a 11111111111111111111111111111
a.o. j.e. 10 o uol. 10 a.o. 10 o o.o. 10 cio.o.
eEU/19/2012 aaggaaaagaaagaaagaaagaaagaaagaaagaaagaaagaaagaaagaaagaaagaaagaaagaaagaaagaaagaaagaaagaaagaaagaaagaaagaaagaaagaaagaaagaaagaaagaaagaaagaaagaaagaaagaaagaa
aiee aee eae eae eae
a aagaa gaaas la ygjodc! g aaiiell o jgjglj jn jnl j


2
all jj.9
.
cJoll a23 cUbc.11
ol all olw g 12
* "SecureLock" 13.13
j1.14
"Calc'nClean" 17
"Calc'nClean" a
Therefore, a1 = 2√5, a2 = -2√5
a 4
5
15
a jll a jll 8.8
*“Calc'nClean”
1
EasyComfort
oolllll 1 -EasyComfort
y 1 y
a

aalee
1
Aabβ = g ÷ 12g
lglg 1y
A B 且 j0 ⇒ 2g 且 B 亦为
y
a a a a a a a a a a a a a a a a a a a a a a a a a a a a
alilijjul jolijj1
J 1
e 1
J aJ bJc = 1
j 1
a 1
Ailoojul ool Jia juaaia iia
J 8 n nn Jn Jn Jn Jn
J 1
1
alaijuiyabijj yblaoi Igicgwlg aoyjbljgl jaiy
Jlcl JlsbI jg jg y. jgeJIy JlsbJ jg JleJI
a
8 jn nn Jlslj 1 Jglii n e I y Jy Jy Jy Sll lI y sll b
. 1
Jia jie jie lii bji iai xu 1 Juaei jn jin jin jin jin jin jin jin jin jin jin jin jin jin jin jin jin jin jin jin jin jin jin jin jin jin jin jin jin jin jin jin jin jin jin jin jin jin jin jin jin jin jin
j5yds Juaaia jia 1 aaii i baa aaii
Jooa aia
2000 1j j 11
2015 CBW GS
. 1
- Laii 11 11 jao la bia jiaie k jia jia i Jaa
A 2
y j 1
jlll buiuie jie y iia Juaaiiui 11111111111111111111111
KannbKayinci3dk
Before using the spray, carefully read the instructions on the label and the user manual. Keep the spray away from children. If the spray gets into your eyes, rinse them with plenty of water and consult a doctor if irritation persists. Do not spray near open flames or hot surfaces. If the spray is used in a confined space, ensure adequate ventilation. Do not puncture or incinerate the container, even after it is empty. Keep the spray away from food and drink. If swallowed, seek medical advice immediately and show the label or container to the doctor. Do not spray towards people or animals. Keep the spray out of reach of children. Do not allow children to play with the spray. If the spray comes into contact with skin, wash the affected area with soap and water. This spray is only intended for use at altitudes up to 2000 meters. High pressure. Do not puncture the container.
Byn:
- Acnanka aphaIraH naIdaIaHny keHiIderi HcCKayIbIKtbl MyKnT OKbl IN sbIFbIHb3 Da, OHbl 6oJaawKaCaKTan KoIbIHb3.
- Atanfah acn an yj kafdaibHa naJaIaHyfa apHaJIfah, COHdbIKtaH OHbl EHdipictik MaKcattapfKaONdaHyfKaON bepiImei.
- Byanacnan TeKaHa apNaHb MaKcTaBHa caN, rFnYyTik peTInHe fHa KOnDaHbIybl Tnic. AcnantbHKe3 KeIgren backcanaa naJaDaaHbIybl 6ypbc xHe, CoNbIKtaH, KayinTi 60bnT TaHbIaNbI. ΘHdipywi KypbIbHbIb dypbic Hemece Tnicti Typde naJaDaanbOayda nainda Bonfah Ke3 KeIgren 3anaa ysin JKayapkepiJik apTnaDbI.
- Byu acnantbI TexHKnabIK CnattTamaNapbl Xa3blfah TaKtaaJaTa bI aKnapaTkac Kece Kocy XeHe KOJdaHy KaKeT.
- ByanTbJxepre TynbikTaIraH yawbikKa Kocy KaKet. 3apTKbiUbMiHdTeT type naDanaHy KaKet 6oRHa JkaFdaJa, on 16 A caikec XaHe xepre TybIKtany Kocblmbi 6ap yawbikneH xa6dbikTaIraHa HKe 3 KeTki3iH3. Cy KOHTeHepiIN ToTbIpy MaKcTaBHa acnAnTbI eWkaaHc cy Ky6bIpbI uYmErHiH actbHa TikeNei opHaJAcTbIpyFa 60ImaNDbI. AibipdbHcbmbH yawbiktah Jyknbln sbifapya 6oJmaiDbI.
- Do not immerse the appliance in water or other liquids.
- Do not immerse the appliance in water or other liquids.
- Do not use the appliance near flammable materials or at high temperatures. Do not use the appliance with wet hands or near water.
Before cleaning, unplug the appliance.
Our products are manufactured under strict quality control. If you have any questions regarding the appliance, please contact our customer service department. We will be happy to assist you.
This appliance complies with the European Directive 2012/19/EU on waste electrical and electronic equipment (WEEE). This directive sets out the requirements for the collection and recycling of waste electrical and electronic equipment.
Spare parts

- 1. Indicator light for "On/Off" button 2. Indicator light for "Calc'nClean" button 3. Indicator light for "Water level" button 4. Indicator light for "Eco" button
- This appliance
- 7. Power cord 8. Power cord and plug
8. Water tank / "Calc'nClean" collector* 9. Water tank 10. Maximum fill level mark 11. Key lock 12. Steam button 13. Steam lock button "SecureLock"* 14. Spray button 15. Steam indicator light 16. Steam button 17. "Calc'nClean" container
Introduction

Thank you for choosing the EasyComfort steam iron.
EasyComfort humidifiers are designed to operate reliably at low temperatures and to be used with various types of water. At extreme temperature parameters, using hard water may cause deposits to form on heating elements. In this case, you may need to clean the device more frequently.

1. Filling with water
Fill the water tank with clean water.
Note: You can add essential oils or fragrances to the water tank, but do not add them directly to the water tank. It is recommended to use a separate container to mix the oil with water before adding it to the tank.
1. Open the water tank cap (11). 2. Fill the water tank (9). Do not exceed the "max" mark (11)! 3. Close the water tank cap. 4. When the indicator light (3) turns on, the water tank is empty. The device will beep. Note: After filling, press the button (3) again.
Tip: To extend the life of this function, you can dilute the water with distilled water in a 1:1 ratio. If the water in your area is very hard, dilute it with distilled water in a 1:2 ratio.

2. Cleaning
1 If the device has been used with a cleaning solution (13*), rinse it thoroughly with clean water. 2 Disconnect the power cord (6) from the outlet. 3 To remove the tank, press the button (1). The indicator lights (1, 15) will turn off, and the tank will be released. When the tank is empty, the indicator lights (1, 15) will flash.

3. Maintenance
1 To perform maintenance, press the button (14).
Note: When the device is not in use, unplug it and store it in a dry place, away from direct sunlight.
Tip: For optimal performance, press the button (14) to activate the self-cleaning function.

"PulseSteam" Function
This function is designed to remove limescale deposits.
1 Press the button (14) twice. The device will emit steam.

This device is intended for drilling holes in walls, floors, and other surfaces.
1. Place the device at a distance of 15 cm from the wall in a vertical position. 2. Press the start button (14) for 5 seconds to begin operation.
Warning: This device may cause damage if used improperly. Do not use it on wet or damp surfaces.

4. Cleaning and maintenance
If cleaning parameters are not set, clean the device with a dry cloth. Do not use water or other liquids, as this may cause damage.
1. Press the "Eco" cleaning button (4). The indicator light will turn on. 2. To adjust the cleaning mode, press the "Eco" button again. The cleaning mode can be adjusted to suit different surfaces.

5. Storage
For safety and cleaning purposes, the device should be stored in a dry place, away from direct sunlight and heat sources.
The device will emit a signal and all indicator lights (1,2,3,4) will turn off.
1. To turn off the device, press the start button (14) again.

Troubleshooting and technical service

1. Troubleshooting process
Note: To ensure safe operation, the troubleshooting process should be performed by a qualified technician. The "Calc'nClean" indicator light (2) will flash and emit a signal, indicating that the process is required.
Troubleshooting
1 Remove the filter, rinse it (1) with water. 2 Soak the filter in water for 2 hours. 3 Rinse it with running water (12). 4 Boil the filter (8) for 10 minutes. Rinse it with boiling water. 5 Fill the filter with 300 ml of water. Close the filter lid tightly and let it stand. Then, rinse it with boiling water.
Note: For a stronger cleaning effect, it is recommended to repeat the procedure twice.
If water does not come out of the spout, clean it.
6 If the filter is clogged with scale (8*), it should be cleaned (see "Cleaning and Descaling the Filter"). 7 Rinse the filter and dry it.
Cleaning and Descaling the Filter
1 Pour 300 ml of water into the filter. 2 Add the descaling agent and let it sit.
Cleaning with vinegar
1 Pour vinegar (9) into the water. 2 Disconnect the power cord (6), remove the filter (1). 3 Press the cleaning button (2) for 2 seconds. The indicator light will turn on. 4 When the indicator light (1) stops blinking and stays on, the cleaning process is complete. 5 For rinsing, pour clean water into the tank up to the MAX mark. If the filter was cleaned with "Calclean" container, pour it into the tank. 6 Press the cleaning button (14) for 2 seconds. The cleaning process will start automatically. Note: It is possible that water may remain in the filter and/or the tank after cleaning. The process will stop automatically after 5 seconds. 7 After 3 minutes, the cleaning process will stop. The indicator light will turn on, indicating that the cleaning process is complete. The filter will be clean. 8 Remove the tank (16), pour out the water, and rinse the filter under running water.

2. Cleaning the Filter
Clean the filter regularly to ensure proper operation.
Note! Risk of burns!
1 If the filter is heavily scaled, soak it in a descaling solution. 2 To avoid damaging the filter, do not use metal brushes. Use a soft cloth or sponge for cleaning.

Storing the Filter
1 Remove the filter and rinse it. Pour water (9) and rinse. 2 Disconnect the power cord (12) and store it. This will prevent the cord from getting tangled. 3 Store the filter in a dry place, away from direct sunlight.

Accessories
MoeJe
Ytik KocbIINFaHda TyTIn WbIFapa 6aTaaiDbI.
blktmajce6entepi
1.AnfaW pet naiJaIaNHaHda: KpybIrIbIHyh Kei6ip Kypamdac 6eJIweKTepi 3aybITra XeHIN MaINaHfAH XHe aNFAW pet KbI3DbIpbIrlFaH Ke3De TYTIHHa3rAHTa MEnIWeepIH sbIFapByMymKiH. 2. Keinri nai dananybapbcihda: Tyfbi npactahfah 0onybi bIKTImaJ.
Uewim
1.БулжafdaiToIbIKTaN KaIbIITbI 60bnTn Ta6blNaDbI KHe 6ipazdaH coH ToKtan KaIaNbl. 2. TyfbiOpbIOcbI HycKayJIbIKTafti Ta3aJaiy HycKayIapbHa cai Ta3aJahbI3.
| Mòcène | bíkTmán ce6bentepi | IeWiim |
| Cy Túfátpáfaftbicañlalaynapdañarafábl. | 1. By anfàw petKoIandaHbIJIfAHDbIKTaHHeMece y3ak yαkbIT 6oBbI KoIandaHbIImaI TyprhDbIKTaH, cyTúfátterdiñ iwiñnde 6byaaiHanyda. | 1. YtɪkTi yɪtɪkTey aɪMaflbɪnahanapbl 6aβblTTan, 6yIbIfapblMaɪbɪnna 6byIbIfapу Túmecin 6bacMbI3. |
| Kip TúfátpádañHbIfadbl. | 1. Boŋleper MeN yɪtɪ k iwiñndeKaTkaH KaK HeMeceMinhepaJdap JxHaNbI KαIdbI.2. XmMjaIbIK ΕHIMdep HemeceKocPanaIap naIdaIaHbIDbI. | 1. Ta3aIay zücklɪn eTki3iɪ3 (“KaK keTipuy npoʊeci" 6eɪmɪnKapaHbɪ3).2. Eɪskaɪaɪn cyfA eHɪmdepKocPanaIbɪ3 (“CóBaɪnTOIbɪpy" 6eɪmɪn KapaHbɪ3).TúfátdbI dbIMkbIJShybepekneH ta3aIaHbɪ3. |
| "Calc'nClean"InHdɪkaTOp ⅠaMbI(2) əwneɪdi. | 1. YtɪkTeN kaK keTipuy npoʊeciAraKTaIImaɪ TOKtaTbIDbI. | 1. YtɪkTeN kaK keTipuy npoʊeciKaɪta icke KocBɪn, aɪfblHa deɪiH opbɪDaɪbɪ3. |
| Kþrblfbo copatbɪn dIbIbICbIbIbI. | 1. Cy 6y 6aRbɪNa copbɪnbɪKæTbɪp.2. DlIbIbIC TOKtAmai ⅠbɪFádbI. | 1. Byn KaIbɪntbɪ xəfdaɪ.2. Erep dIbIbIC ⅢbɪFyblTOKtaMaca, 6y CTaHцЯсblɪNkoIdaHbI3 JxəHe eKɪletTI TexHɪkaIbɪK KbI3MeT KepCetU optaIbɪbɪHa xəbapLacbɪbɪ3. |
| YtɪkTey Ke3iHedKbIcMbI JxOfALdbI. | 1. By ⅠbɪFapu Túmeci y3ak yαkbIT 6oBbI icke Koclbɪnfah,Яftni əte xxi bSbIrlaH. | 1. By ⅠbɪFapu TúmeciHapalbɪkTapmennaIdaIaHbɪnbl. |
| YtɪkTey 6apbIcblndaKniIMdi cydaKapbIbI naɪda6bIaIbI. | 1. YtɪkTey tAcTacbɪnDa 6yIbɪnCyra aɪHaIyblaHbIbIaHbIbI 6aɪlaNbIcTbI 6oIbIbI MyMKiH. | 1. YtɪkTey tAcTacbɪnHbɪNTOkbImaIbI yCTɪH CypTɪH3JxəHe ke3 KeIletH cydaKapbɪn KeNTipuy ywiñHTɪkTeHi3. |
| Ⅶnahr Jxymblc6apbIcblnda bIcTBk 6oIbIbIKeTedi. | 1. Byn KaIbɪntbɪ xəfdaɪ.MyHbɪn cIe6bi - 6yMuHeytɪkTey 6apbIcblnda 6yIbɪn ⅠbɪnHapkblbɪI eTyɪ. | 1. ŠliNaHRre yɪtɪkTey 6apbIcblndaTImey ywiɪn, onbl KaPamɑ-Kapcbl JxakKa KɔIbɪbɪ3. |
| Boɪnepdɛn cy aflbɪn Tþr. | 1. Boŋleper KaKnaflbɪ (8) 6oCaFah. | 1. KaKnaKTbI 6eKemdeHɪ3 |
ErepKorapbidafkeHectepMcenehiweuyre KEMEKTecnce,TyTbIHyUbInapFaKbI3MetKepcety opTaIbIfbIMeXaOapJaacblb3.
Byn HycayIbIKtBi xeprinikTi Bosch 6actbl 6etTepinenyKtEn anyFa 6oJaBl.


- INDEX
- GENERAL SAFETY INSTRUCTIONS
- IMPORTANT NOTICES
- ADVICE ON DISPOSAL
- DESCRIPTION
- INTRODUCTION
- EASYCOMFORT FOR SIMPLE, FAST AND SAFE IRONING
- FILLING THE WATER TANK
- HEATING
- IRONING
- PULSESTEAM" FUNCTION
- VERTICAL STEAM
- ENERGY SAVING
- AUTO SWITCH OFF
- CLEANING & MAINTENANCE
- DESCALING PROCESS
- DESCALING THE BOILER
- DESCALING THE LIMESCALE COLLECTOR
- DESCALING THE IRON
- CLEANING THE APPLIANCE
- STORING THE APPLIANCE
- TROUBLESHOOTING
- VERTICAL STEAM IRONING
- DESCRIPTION OF THE APPLIANCE
- BCTYN
- IPACKA EASYCOMFORT - KPAANSE PIWEHNJA NPOCTORO, WBNDKORO I 6E3NEHORO NPACYBAHH
- REMOVING THE IRON FROM THE BASE
- CLEANING THE IRON
- PROBLEM
- POSSIBLE CAUSE
- PIWENN
- AUTOMATIC SHUT-OFF
- CLEANING AND CARE
- EASYCOMFORT
- AALEE
- KANNBKAYINCI3DK
- BYN
- BEFORE CLEANING, UNPLUG THE APPLIANCE
- SPARE PARTS
- THANK YOU FOR CHOOSING THE EASYCOMFORT STEAM IRON
- FILLING WITH WATER
- CLEANING
- MAINTENANCE
- CLEANING AND MAINTENANCE
- STORAGE
- TROUBLESHOOTING AND TECHNICAL SERVICE
- TROUBLESHOOTING PROCESS
- CLEANING AND DESCALING THE FILTER
- CLEANING WITH VINEGAR
- CLEANING THE FILTER
- STORING THE FILTER
- ACCESSORIES
- MOEJE
- BLKTMAJCE6ENTEPI
- UEWIM
Brand : BOSCH
Model : TDS6030, TDS6080
Category : Iron