
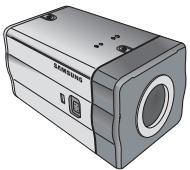
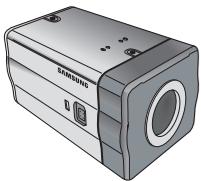
SCC-B2015P - Surveillance Camera SAMSUNG - Free user manual and instructions
Find the device manual for free SCC-B2015P SAMSUNG in PDF.

User questions about SCC-B2015P SAMSUNG
0 question about this device. Answer the ones you know or ask your own.
Ask a new question about this device
Download the instructions for your Surveillance Camera in PDF format for free! Find your manual SCC-B2015P - SAMSUNG and take your electronic device back in hand. On this page are published all the documents necessary for the use of your device. SCC-B2015P by SAMSUNG.
USER MANUAL SCC-B2015P SAMSUNG
SCC-B2315(P)/SCC-B2015P
User Manual


CAUTION
RISK OF ELECTRIC SHOCK DO NOT OPEN

CAUTION: TO REDUCE THE RISK OF ELECTRIC SHOCK, DO NOT REMOVE REAR COVER. NO USER SERVICEABLE PARTS INSIDE. REFER TO QUALIFIED SERVICE PERSONNEL.

This symbol indicates high voltage is present inside. It is dangerous to make any kind of contact with any inside part of this product.

This symbol alerts you that important literature concerning operation and maintenance has been included with this product.
To prevent damage which may result in fire or electric shock hazard, do not expose this appliance to rain or moisture.
WARNING
- Be sure to use only the standard adapter that is specified in the specification sheet. Using any other adapter could cause fire, electrical shock, or damage to the product
- Incorrectly connecting the power supply or replacing battery may cause explosion, fire, electric shock, or damage to the product.
- Do not connect multiple cameras to a single adapter. Exceeding the capacity may cause abnormal heat generation or fire.
- Securely plug the power cord into the power receptacle. Insecure connection may cause fire.
- When installing the camera, fasten it securely and firmly. A falling camera may cause personal injury.
- Do not place conductive objects (e.g. screwdrivers, coins, metal things, etc.) or containers filled with water on top of the camera. Doing so may cause personal injury due to fire, electric shock, or falling objects.
- Do not install the unit in humid, dusty, or sooty locations. Doing so may cause fire or electric shock.
- If any unusual smells or smoke come from the unit, stop using the product. In such case, immediately disconnect the power source and contact the service centre. Continued use in such a condition may cause fire or electric shock.
- If this product fails to operate normally, contact the nearest service centre. Never disassemble or modify this product in any way. (SAMSUNG is not liable for problems caused by unauthorized modifications or attempted repair.)
- When cleaning, do not spray water directly onto parts of the product. Doing so may cause fire or electric shock.
CAUTION
- Do not drop objects on the product or apply strong shock to it. Keep away from a location subject to excessive vibration or magnetic interference.
- If you want to relocate the already installed product, be sure to turn off the power and then move or reinstall it.
- Remove the power plug from the outlet when then there is a lightning. Neglecting to do so may cause fire or damage to the product.
- Keep out of direct sunlight and heat radiation sources. It may cause fire.
- Install it in a place with good ventilation.
- Avoid aiming the camera directly towards extremely bright objects such as sun, as this may damage the CCD image sensor.
- Apparatus shall not be exposed to dripping or splashing and no objects filled with liquids, such as vases, shall be placed on the apparatus.
- The Mains plug is used as a disconnect device and shall stay readily operable at any time.
FCC Statement
This device complies with part 15 of the FCC Rules. Operation is subject to the following two conditions:
1) This device may not cause harmful interference, and
2) This device must accept any interference received including interference that may cause undesired operation.
Note
This equipment has been tested and found to comply with the limits for a Class A digital device, pursuant to part 15 of FCC Rules. These limits are designed to provide reasonable protection against harmful interference when the equipment is operated in a commercial environment. This equipment generates, uses, and can radiate radio frequency energy and, if not installed and used in accordance with the instruction manual, may cause harmful interference to radio communications. Operation of this equipment in a residential area is likely to cause harmful interference in which case the user will be required to correct the interference at his own expense.
Important Safety Instructions
- Read these instructions.
- Keep these instructions.
- Heed all warnings.
- Follow all instructions.
- Do not use this apparatus near water.
- Clean only with dry cloth.
- Do not block any ventilation openings. Install in accordance with the manufacturer's instructions.
- Do not install near any heat sources such as radiators, heat registers, or other apparatus (including amplifiers) that produce heat.
- Do not defeat the safety purpose of the polarized or grounding-type plug. A polarized plug has two blades with one wider than the other. A grounding type plug has two blades and a third grounding prong. The wide blade or the third prong is provided for your safety. If the provided plug does not fit into your outlet, consult an electrician for replacement of the obsolete outlet.
- Protect the power cord from being walked on or pinched particularly at plugs, convenience receptacles, and the point where they exit from the apparatus.
- Only use attachments/accessories specified by the manufacturer.
- Use only with cart, stand, tripod, bracket, or table specified by the manufacturer, or sold with the apparatus.
- Unplug this apparatus. When a cart is used, use caution when moving the cart/aparatus combination to avoid injury from tip-over.
- Refer all servicing to qualified service personnel. Servicing is required when the apparatus has been damaged in any way, such as power-supply cord or plug is damaged, liquid has been spilled or objects have fallen into the apparatus, the apparatus has been exposed to rain or moisture, does not operate normally, or been dropped.
Safety Precautions....2
Important Safety
Instructions 4
Contents 5
Overview 6
Special Features 7
Part Names and
Functions 8
Side View 8
Rear Panel 10
Installation 13
Before Installation. 13
Checking the contents
of the package. 13
Things to keep in mind during
installation and use. 13
Connecting the Auto Iris
Lens Connector 14
Installing the Camera... 15
Mounting the lens 15
Setting the ALC lens
selection switch 16
Adjusting the back focus.... 16
Connecting cables and
checking operation 17
Camera Setup 19
CAMERA ID 20
IRIS 20
WDR. 20
ALC. 21
ELC. 22
SHUTTER 22
AGC 23
MOTION 24
MOTION DET 24
DAY/NIGHT 26
DAY. 27
NIGHT. 28
AUTO 28
EXT 29
WHITE BAL 29
PRIVACY 30
SPECIAL 31
LANGUAGE 31
V-SYNC. 31
DIGITAL ZOOM 32
VIDEO SET 32
DNR 33
FLICKERLESS. 33
SYSTEM INFO 34
RS-485 34
EXIT 35
Product
Specifications 36
This enriched WDR (Wide Dynamic Range) Day/Night camera can clearly implement both dark and bright parts on the screen with the dual shutter.
When a bright object such as window occupies a part of the screen, it appears white in conventional cameras. But using the state-of-the-art WDR function that this camera provides, you can see the clear image. This Day/Night camera activates the colour mode when in the illumination over the normal value. Otherwise it activates B/W (Black/White) mode by removing the IR cut function, which can improve the sensitivity for identifying objects even in a dark area.
It also incorporated the low speed shutter and Sens Up (Uses the field accumulation method) functions to enhance the low illumination feature.
This camera can be mainly used in the dark places such as basement parking lots under comparatively low illumination. In daytime, it displays the colour screen with a horizontal resolution of 540 lines but at night, it uses the Day/Night feature along with the Sens Up function to identify objects in a dark area. You can also connect the infrared ray emission equipment to this camera.
DAY/NIGHT
This function can make the IR Cut filtering function inactive under the illumination below the normal value.
High Sensitivity
It implements images of high sensitivity using the up-to-date SuperHAD P/S CCD.
WDR
The WDR function of this camera is the state-of-the-art technology that can effectively enlarge the range for screen gain. It is mainly used for taking photos for window scenes inside a building. Using this technology, you can clearly see both indoor and outdoor images, and can enjoy the excellent picture quality, which is enabled by automatically adjusting the WDR level.
Low Illumination
It uses the digital signal technologies such as low illumination and Day/Night functions that make your camera identify objects even in the worst environment.
Superior Backlight Adjustment
When an object has a bright illumination or sunlight behind it, this camera automatically improves the shaded object picture quality.
Digital Power Synchronization
The full digital Line Lock function directly adjusts the vertical camera synchronization to enhance the operationability and reliability of this camera.
High Resolution
This camera has realized high resolution of 540 lines using the top-notch full digital image processing and special algorithm technologies.
Output Signal Setting
You can set the following Video output signals: Image reversion (Horizontal, Vertical, or both), Privacy, Horizontal/Vertical profiling, and digital zooming.
Part Names and Functions
Side View
1 Auto Iris Lens Connector
This groove is used for screwing the mount adapter, a part of the bracket where the camera will be installed.
Mount Adapter Fixing Grooves
These grooves are used when fixing screws of the mount adapter connected to the bracket when installing the camera on it.
Back Focus Control Bar
You can adjust the back focus by moving it up and down.
Automatic Shutter Lens Control Cable
This cable transmits the power and signals from the camera for controlling the lens shutter.
5 ALC Lens Selection Switch
This switch is used to select the type of the Auto Iris lens for use. After this setting, you have to also set the lens type in the Setup menu (In ALC... and WDR... submenus of IRIS).
- DC: When the Auto Iris lens is installed for DC control signals, set the switch to "DC."
VIDEO: When the Auto Iris lens is installed for Video control signals, set the switch to "VIDEO."
Auto Iris Lens (Optional)
This lens is installed on this camera.
Note
When the camera lens becomes dirty, softly clean it with a lens tissue or a cloth soaked in pure ethanol.

Rear Panel
AC24/DC12V(SCC-B2315,B2315P)
AC220V-240V(SCC-B2015P)
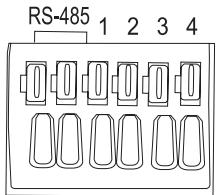
1 Input/Output Connector
This connector has input and output jacks for RS-485 control signals, Day & Night switching, and alarm output signals.


NO:1 2 3 4 5 6
| No. | Function | Description |
| 1 | RS-485 DATA+ | Jack for connection to RS-485 DATA+ signal line. |
| 2 | RS-485 DATA- | Jack for connection to RS-485 DATA- signal line. |
| 3 | ALARM OUT | Alarm out jack for motion detection. (Open Collector, On Gnd) |
| 4 | GROUND | Grounding jack. |
| 5 | DC +5V | Power supply jack for RS-485 JIG. Use within typical DC +5V 100mA |
| 6 | EXTERNAL SENSOR | Input jack for Day & Night conversion. High (DC +3V~+5V): Day mode Low (0V): Night mode |
Setup Switch
This switch is used to set the function or property. When this switch is pressed for at least 2 seconds, the Setup menu appears.
- [Left/Right] movement or changing the displayed value: By pressing this switch left or right, you can move left or right on the menu or change the displayed value.
- [Up/Down] movement: By pressing this switch up or down, you can move up or down on the menu.
- Setting: When you press this switch in the menu, the selected value or function is confirmed. To enter a submenu, press this button.
3 Power Display LED
When the power is normally connected, the red LED lights.
4 Video OUT Jack
This is connected to the Video Input jack of the monitor and it outputs the Video signals.
Power Connection Jack
This is connected to the Power cable.
Before Installation
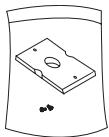
Checking the contents of the package
Make sure that the following items are included in the package.
Camera
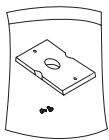
Camera Holder(Mount)

User's Manual

C Mount Adapter

Auto Iris Lens Connector
Things to keep in mind during installation and use
- Do not disassemble the camera on your own.
Always be careful when handling the camera. Do not strike the camera by your fists or shake it. Please be careful not to be careless when storing and operating it. - Do not place or operate the camera in any wet environment such as rain or wet surfaces.
- Do not clean the camera with rough sandpaper. Please always use a dry cloth when cleaning it.
- Put the camera in a cool area free from direct sunlight. Otherwise, the camera may be damaged.
Connecting the Auto Iris Lens Connector
The Auto Iris Lens Connector that is provided with your camera consists of the following parts:
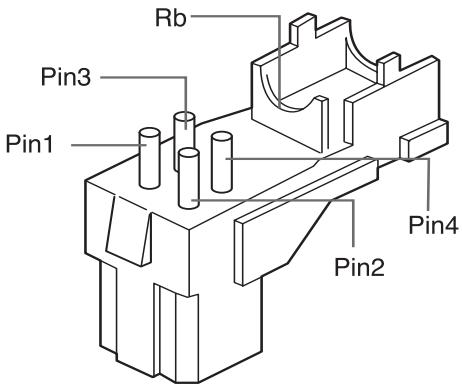
Connect each uncovered shutter control cables to the Auto Iris Lens Connector as the following:
| Pin No. | DC Control Type | Video Control Type |
| 1 | Damp(-) | Power (+12V) |
| 2 | Damp(+) | Not applicable |
| 3 | Drive(+) | Video Signal |
| 4 | Drive(-) | Ground |
Installing the Camera
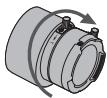
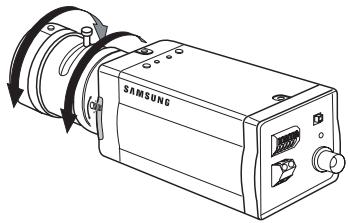
Mounting the lens
When using the CS lens
Mount the CS lens by rotating it clockwise as shown in the picture:
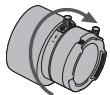
CS lens
When using the C lens
After mounting the C-mount adapter by rotating it clockwise, turn the C lens clockwise until it is fixed as shown in the picture.

C lens
Setting the ALC lens selection switch
You can set the lens selection switch located on the side of the camera according to the lens type. When the mounted lens is an auto Iris lens of DC control type, set the switch to "DC." When the mounted lens is an auto Iris lens of Video control type, set the switch to "VIDEO."
Adjusting the back focus
The back focus of the camera is adjusted at the factory before delivery but some lenses can be out of focus depending on the lens type. In this case, you have to adjust the back focus. The following describes how to adjust the back focus of the lenses.
In case of the lens with no zooming function
① After exposing the camera to an object with high resolution (like a dart-patterned image) at a distance of more than 10m , set the lens focus ring to infinite () .
② Adjust the Back Focus Control Bar until the object is of best quality.
③ Fix the screw of the Back Focus Control Bar.
In case of the lens with zooming function
① After exposing the camera to an object with high resolution (like a dart-patterned image) at a distance of 3 to 5m , fully rotate the lens zoom to the TELE direction. Then adjust the lens focus ring until the object is of best quality.
② Fully rotate the lens zoom to the WIDE direction and adjust the Back Focus Control Bar until the object is of best quality.
③ Repeat step 1 and 2 two or three times until the focuses of Zoom TELE and Zoom WIDE are clear enough.

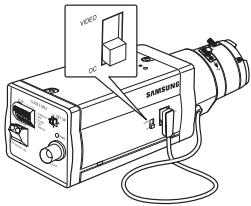
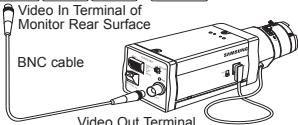
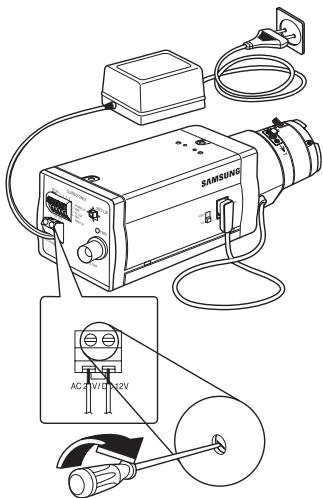
Connecting cables and checking operation
- Connect one end of the BNC cable to the VIDEO OUT jack on the rear of the camera.
- Connect another end of the BNC cable to the VIDEO IN jack on the monitor.
VIDEO LINE

AUDIO LINE

- Finally connect the power adapter to the camera. You can connect 2 lines of the power adapter to the camera using the Slot Head screwdriver as shown in the picture.
(GND: cable with the white stripe line)
Note
Connect any power source of AC 24V and DC 12V irrespective of polarity.
This chapter describes how to configure the camera-related settings. If you press the Setup switch for at least 2 seconds, the Setup menu appears. The Setup OSD (On-screen Display) map brief is like the following:
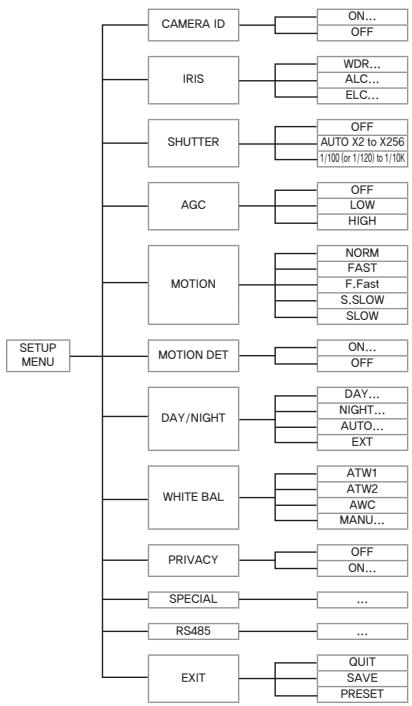
CAMERA ID
This CAMERA ID menu is used to assign a camera ID to this camera. If you press the Setup switch when the CAMERA ID menu is selected, the corresponding setup screen appears.
You can input a camera ID composed of alphabets, numbers, and special characters up to 20 characters long. The input camera ID can be displayed at the desired location when using the LOCATION... submenu.
When you press the Setup switch in RET, the screen returns to the upper menu.
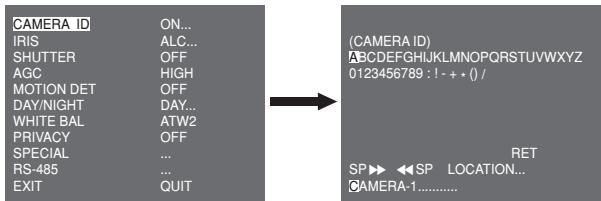
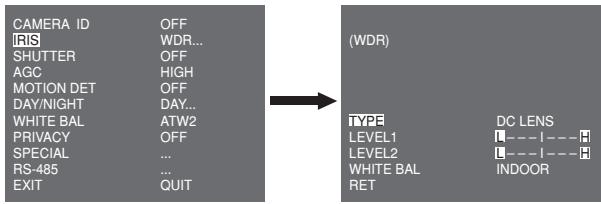
IRIS
The IRIS menu is used to set the automatic light control method for this camera. After setting the ALC Lens Selection Switch, select any of DC LENS and VIDEO LENS in the ALC... and WDR... submenus.
WDR...
If you press the Setup switch when the WDR... submenu is selected, the corresponding screen appears.
First select any of DC LENS, VIDEO LENS, and MANU in TYPE. You can adjust the shutter speed in LEVEL 1 and the brightness in LEVEL 2. You can also select any of ALL, OUTDOOR, and INDOOR in WHITE BAL. In case of ALL, this camera controls both indoor and outdoor images.
ALC...
If you press the Setup switch when the ALC... submenu is selected, the corresponding screen appears. First select any of DC LENS and VIDEO LENS in TYPE.
You can make the BLC (Back Light Compensation) function active or not. For setting the BLC zone, you can select any of BOTTOM..., TOP..., LEFT..., RIGHT... and CENTRE... The actual location is displayed when you enter each item.
In case of USER..., you can set the desired BLC zone by defining the size and location. You can set the Video output level in LEVEL. Its selectable range is from -9 to +9.
ELC...
If you press the Setup switch when the ELC... submenu is selected, the corresponding screen appears. You can make the ELC (Electronic Light Control) function active or not.
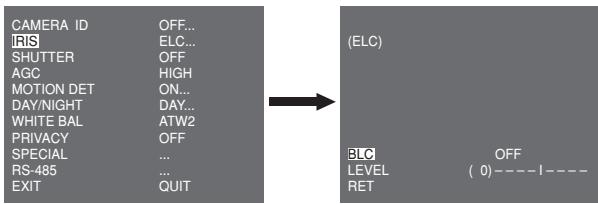
Like the same as the ALC configuration, you can set the BLC zone and assign the level of the high speed shutter.
SHUTTTER
The SHUTTER menu is used to set the high speed electronic shutter and AUTO low speed shutter.
The high speed electronic shutter can be used 7 different speeds and is commonly used for imaging fast moving objects.
(NTSC: from 1/100 to 1/10K, PAL: from 1/120 to 1/10K). The low speed electronic shutter can be any of 13 speeds from X2 to X256 and it slows the shutter speed to make images clearer in dark illumination. If you select an AUTO low speed, the shutter speed is automatically lowered depending on the darkness level.
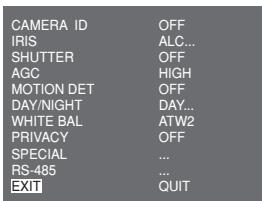
| CAMERA ID | OFF |
| IRIS | ALC... |
| SHUTTER | AUTO X4 |
| MOTION | SLOW |
| MOTION DET | OFF |
| DAY/NIGHT | DAY... |
| WHITE BAL | ATW2 |
| PRIVACY | OFF |
| SPECIAL | ... |
| RS-485 | ... |
| EXIT | QUIT |
If you keep pressing the LEFT/RIGHT Setup switch, shutter speeds toggles in the following order:
OFF AUTO X2 AUTO X4 AUTO X6 AUTO X8 AUTO X12 AUTO X16 AUTO X24 AUTO X32 AUTO X48 AUTO X64 AUTO X96 AUTO X128 AUTO X256 OFF 1/100 (NTSC), 1/120 (PAL) 1/250 1/500 1/1000 1/2000 1/4000 1/10K
Note
When the IRIS mode is ELC or WDR, you cannot use high speed shutters.
AGC
The AGC (Auto Gain Control) menu is used to set the AGC level of the camera. When the AGC is active, the camera automatically increases the sensitivity by amplifying the Video signal when the strength of the signal falls below the normal value.
| CAMERA ID | OFF |
| IRIS | ALC... |
| SHUTTER | OFF |
| AGC | LOW |
| MOTION DET | OFF |
| DAY/NIGHT | DAY... |
| WHITE BAL | ATW2 |
| PRIVACY | OFF |
| SPECIAL | ... |
| RS-485 | ... |
| EXIT | QUIT |
Only when OFF or a high speed shutter is selected in the SHUTTER menu, you can set the AGC level. You can select any of OFF, LOW, and HIGH.
Note
When the DAY/NIGHT is set to AUTO, the AGC is displayed with --- so you cannot change its setting.

MOTION
The MOTION menu is used to set the intensity of the camera AGC level for monitoring motions. This function is available only in AUTO low speed mode. You can select any of S.SLOW, SLOW, NORM, FAST, and F.FAST according to the AGC intensity level.
| CAMERA ID | OFF |
| IRIS | ALC... |
| SHUTTER | AUTO X2 |
| MOTION | SLOW |
| MOTION DET | OFF |
| DAY/NIGHT | DAY... |
| WHITE BAL | ATW2 |
| PRIVACY | OFF |
| SPECIAL | ... |
| RS-485 | ... |
| EXIT | QUIT |
To monitor very fast moving objects in dark illumination, select F.FAST. To monitor non-moving objects in dark illumination, select S.SLOW.
MOTION DET
The MOTION DET menu is used to configure the motion detection related settings. If you press the Setup switch when ON... is selected in the MOTION DET menu, the corresponding screen appears.
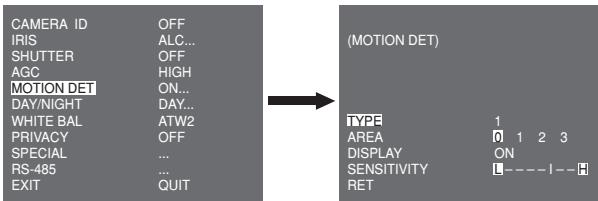
There are 3 different types like 1, 2, and 3. You cannot change the setting for type 2 because it is prefixed with the full screen. In case of 1 and 3, you can set the motion detection area on your own.
Those 3 types are like the following:
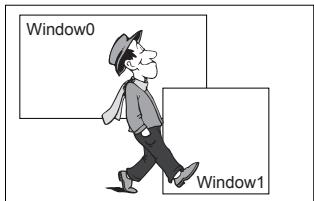
- Window type: The selected area is displayed with a box. The motion can be detected for the area only.
You can manually set the motion detection area. You can use the UP/DOWN/LEFT/RIGHT Setup switch to set the size. To move to POSITION, press the switch. After setting the position using the UP/DOWN/LEFT/RIGHT Setup switch, press the Setup switch to move to the upper menu. To set the size and position for AREA, select any of 0, 1, 2, and 3.
- Label type: The box-typed motion detection area is prefixed. The detected area is displayed with size and position changing. You cannot change AREA because it is displayed with “---.”

-
Block type: The screen displays with small blocks. When a motion is detected in the selected blocks, the small blocks are displayed on the screen.
-
PRESET: The whole screen becomes the motion detection area.
- USER...: You can manually set the motion detection area. Use the UP/DOWN/LEFT/RIGHT Setup switch to set the area. To erase the selected block, press the Setup switch.

In order to set the motion detection area on your own, you have to specify the size and location for the area setting.
When ON is selected in DISPLAY, the detected motion is displayed on the screen and the camera sends the Alarm Out signal.
You can also assign the sensitivity for motion detection.
DAY/NIGHT
The DAY/NIGHT menu is used to configure the day and night related settings for this camera. This camera can turn the IR (Infrared) filter on or off.
| CAMERA ID | OFF |
| IRIS | ALC.. |
| SHUTTER | OFF |
| AGC | HIGH |
| MOTION DET | OFF |
| DAY/NIGHT | DAY.. |
| WHITE BAL | ATW2 |
| PRIVACY | OFF |
| SPECIAL | ... |
| RS-485 | ... |
| EXIT | QUIT |
Note
In case of B/W mode, it may fail to focus when B/W mode is converted to Color mode.
That is because it must have the condition to have IRIS opened for the maximum before adjusting the Back-Focus.
The smaller the F number of lens is, the lower the focus depth of field is (e.g. Using a high speed electronic shutter may lower the depth of the camera).
It is required to set the focus under the condition that IRIS is open for the maximum in color mode.
DAY...
If you press the Setup switch when the DAY... submenu is selected, the corresponding screen appears. You can set the values for C-GAIN, AGC COLOUR, AGC DETAIL, and C-KNEE in Day mode. Colour images are implemented by these settings.
(DAY)
C-GAIN
AGC COLOR
AGC DETAIL
C-KNEE
RET
(7)-- -1
(0)---1-
(7)1-
(5)---1--
Note
When the value of AGC DETAIL becomes large, it also makes the noise stand out.
NIGHT...
If you press the Setup switch when the NIGHT... submenu is selected, the corresponding screen appears.
(NIGHT)
COLOR/BW
RET
COLOR...
Even in night mode, you can see colour images in bright illumination. Therefore you can select any of COLOUR... and BW... In case of COLOUR..., you have to set the colour temperature for white balance. You can also specify the settings for red and blue colours on your own. In case of BW..., when the BURST is set to ON, the burst signals are output with the BW Composite Video signals. And no burst signals are output when the BURST is set to OFF.
AUTO...
This automatically converts the DAY mode to NIGHT mode and vice versa depending on illumination. In low illumination, it removes the IR filtering function to raise the sensitivity. Otherwise, it activates the IR filtering function to lower the sensitivity.
If you press the Setup switch when the AUTO... submenu is selected, the corresponding screen appears.
(AUTO)
LEVEL
(0)!
DAY
NIGHT
2S
NIGHT
DAY
5 S
RET
For this function, you can specify the level for each conversion between Day and Night.
Note
When the DAY/NIGHT is set to AUTO, the AGC is displayed with --- so you cannot change its setting.
EXT
This automatically converts the colour mode to BW mode and vice versa by interfacing with an external sensor.
| CAMERA ID | OFF |
| IRIS | ALC... |
| SHUTTER | OFF |
| AGC | HIGH |
| MOTION DET | OFF |
| DAY/NIGHT | EXT |
| WHITE BAL | ATW2 |
| PRIVACY | OFF |
| SPECIAL | ... |
| RS-485 | ... |
| EXIT | QUIT |
WHITE BAL
The WHITE BAL menu is used to configure the white balance related settings for this camera.
| CAMERA ID | OFF |
| IRIS | ALC... |
| SHUTTER | OFF |
| AGC | HIGH |
| MOTION DET | OFF |
| DAY/NIGHT | DAY... |
| WHITE BAL | ATW1 |
| PRIVACY | OFF |
| SPECIAL | ... |
| RS-485 | ... |
| EXIT | QUIT |
To adjust the white balance, 4 different modes are provided as follows:
- ATW1 (Auto Tracing White Balance mode 1): The camera can automatically adjust the colour temperature in real time according to the ambient temperature change. The colour temperature variation range is approximately from 2500^ to 9300^ .
ATW2: Its colour temperature variation range is approximately from 2000^ to 10000^ .
- AWC (Auto White Balance Control): The colour temperature setting is made once. After selecting this, expose to an object to memorize the colour temperature of it and press the Setup switch. The fixed colour temperature is applied.
- MANU...: You can manually set the current colour temperature. You can also specify the settings for red and blue colours on your own.
PRIVACY
The PRIVACY menu is used to configure the privacy related settings for this camera. If you press the Setup switch when ON... is selected in the PRIVACY menu, the corresponding screen appears.
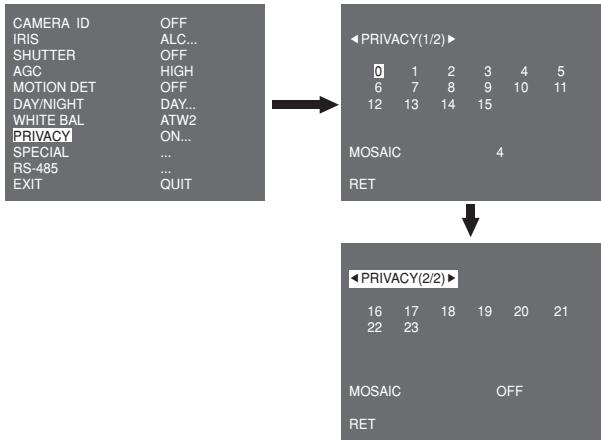
You can set 24 privacy zones in total. For configuration for 0 to 15 zones, you have to set the size, location, and colour. In case of configuration for 15 to 23 zones, you have to additionally set the type.

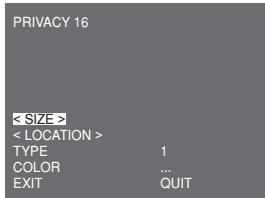
In case of type1, a box type zone is set while a diamond type zone is set for the type 2. When the privacy is any from 0 to 15, four different sizes of mosaics are provided. When the privacy is any from 16 to 23, you cannot change the size of the mosaic because it is already prefixed. For 16 to 23 privacies, you cannot set the colour of the mosaic.
SPECIAL
The SPECIAL menu is used to configure the special settings for this camera. If you press the Setup switch when ... is selected in the SPECIAL menu, the corresponding screen appears.
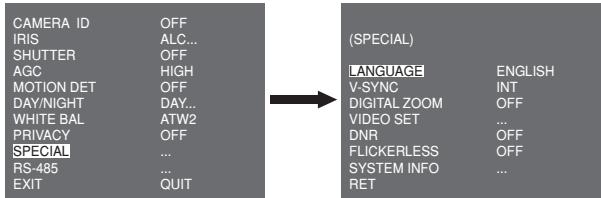
LANGUAGE
You can change the OSD language using the LEFT/RIGHT Setup switch.
V-SYNC
You can select a vertical synchronization mode between INT and LINE. In case of INT, the camera uses the inside crystal oscillator for synchronization. In case of LINE, the camera uses the frequency of the external power for synchronization.
Note
In case of LINE, it doesn't support DC 12V, for which "---" is displayed.
DIGITAL ZOOM
You can set the level and ratio of digital zoom. If you press the Setup switch when ON... is selected in DIGITAL ZOOM, the corresponding screen appears.
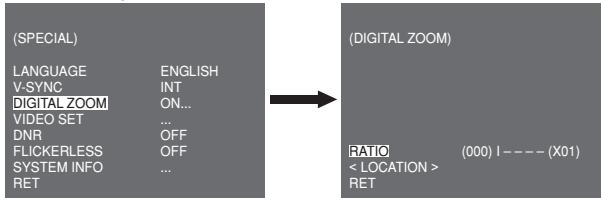
The first displayed number means the zoom ratio and the second displayed number is the magnification. When the level reaches 130, the magnification becomes 2. After the zooming position is selected, the digital zoom function applies.
VIDEO SET
You can configure the Video output related settings. If you press the Setup switch when ... is selected in VIDEO SET, the corresponding screen appears.
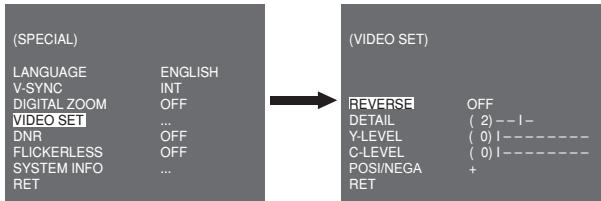
You can set the values for REVERSE, DETAIL, Y-LEVEL, C-LEVEL, and POSI/NEGA.
In case of REVERSE, the camera provides 3 different reversion modes: horizontal (H), vertical (V), and both (H/V).
DNR
You can configure the DNR (Digital Noise Reduction) related settings. If you press the Setup switch when ON... is selected in DNR, the corresponding screen appears.
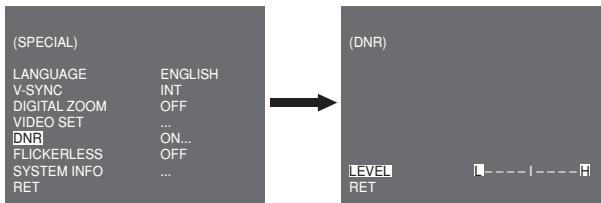
You can set the level for this configuration.
FLICKERLESS
When this is set to ON, the shutter speed is set to 1/100 sec (for NTSC) or 1/120 sec (for PAL) to prevent from flickering by the discordance between vertical synchronization frequency and on-and-off frequency of the light.
SYSTEM INFO
You can check the system-related information. If you press the Setup switch when ... is selected in SYSTEM INFO, the corresponding screen appears.
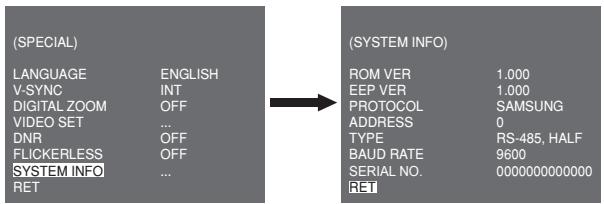
You can find the system information about ROM version, EEP version, protocol, address, type, baudrate, and serial number.
RS-485
The RS-485 menu is used to configure the RS-485 communication related settings for this camera. You can connect to RS-485 through the rear panel.
DATA+ DATA-
If you press the Setup switch when ... is selected in the RS-485 menu, the corresponding screen appears.
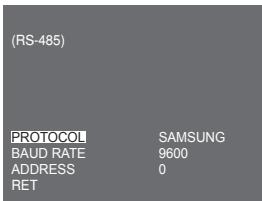
You can set the protocol, baudrate, and address (range: 0 to 255) for this communication
EXIT
The EXIT menu is used to exit from the SETUP menu. You can select the following options:
- QUIT: Ignores the change and returns to the previous settings.
SAVE: Saves the change. - PRESET: Ignores the change and returns to the factory default settings.
Product Specifications
| Item | Details | ||||
| Product type | CCTV Camera (WDR & DAY/NIGHT) | ||||
| Power source | SCC-B2315: AC 24V ± 10% (60Hz ± 0.3 Hz), DC 12V +10%-5% | ||||
| SCC-B2315P: AC 24V ± 10% (50Hz ± 0.3 Hz), DC 12V +10%-5% | |||||
| SCC-B2015P: AC 220 to 240V ± 10% (50Hz ± 0.3 Hz) | |||||
| Broadcast type | SCC-B2315P, B2015P: PAL Standard Colour System SCC-B2315: NTSC Standard Colour System | ||||
| Power consumption | SCC-B2315(P): Approx. 4W SCC-B2015P: Approx. 4.5W | ||||
| Image device | 1/3" P/S Super-HAD CCD | ||||
| Effective pixels | NTSC: 768(H) x 494(V) / PAL: 752(H) x 582(V) | ||||
| Scanning mode | NTSC: 525 Lines, 2:1 Interlace / PAL: 625 Lines, 2:1 Interlace | ||||
| Scanning line frequency | Horizontal: NTSC-15,734Hz(INT)/15,750Hz(LL) PAL-15,625Hz(INT)/15,625Hz(LL) Vertical: NTSC-59.94Hz(INT)/60Hz(LL) PAL-50Hz(INT)/50Hz(LL) | ||||
| Synchronization mode | INT/Line Lock | ||||
| Resolution | 540/570 TV Lines (COLOUR/BW) | ||||
| S/N Ratio | Approx. 50dB | ||||
| Min. Scene Illumination | Colour | Lux | Sens-Up Off | 0.40 Lux(F1.2, 50 IRE) | |
| 0.24 Lux(F1.2, 30 IRE) | |||||
| 0.12 Lux(F1.2, 15 IRE) | |||||
| Sens-Up x256 | 0.0005 Lux(F1.2, 15 IRE) | ||||
| B/W | Lux | Sens-Up Off | 0.04 Lux(F1.2, 50 IRE) | ||
| 0.024 Lux(F1.2, 30 IRE) | |||||
| 0.012 Lux(F1.2, 15 IRE) | |||||
| Sens-Up x256 | 0.00005 Lux(F1.2, 15 IRE) | ||||
| Item | Details | ||||
| Dynamic Range | NTSC: x128 / PAL: x160 | ||||
| IRIS | WDR/ALC/ELC | ||||
| Electronic shutter speed | High Speed: OFF~1/10K sec Low Speed: OFF~X256 | ||||
| AGC | OFF/LOW/HIGH | ||||
| Motion | F.FAST/FAST/NORM/SLOW/S.SLOW | ||||
| Motion Detection | ON/OFF | ||||
| Day/Night | DAY/NIGHT/AUTO/EXT | ||||
| White Balance | ATW1/ATW2/AWC/MANUAL Mode (3200°K, 5600°K, R/B Gain adjustment) | ||||
| Privacy | ON/OFF | ||||
| Signal output | Composite Video (1.0 Vp-p, 75ohm, BNC) | ||||
| AI lens | VIDEO/DC | ||||
| Lens mount | CS/C (Mount Adaptor) | ||||
| Operation temperature | -10°C~+50°C | ||||
| Operation humidity | ~90% | ||||
| Size | 65(W) x 55(H) x 130.5(D)mm | ||||
| Weight | SCC-B2315(P): Approx. 410g SCC-B2015P: Approx. 600g | ||||
SAMSUNG

13/14
Correct Disposal of This Product
(Waste Electrical & Electronic Equipment)
(Applicable in the European Union and other European countries with separate collection systems)
This marking shown on the product or its literature, indicates that it should not be disposed with other household wastes at the end of its working life. To prevent possible harm to the environment or human health from uncontrolled waste disposal, please separate this from other types of wastes and recycle it responsibly to promote the sustainable reuse of material resources.
Household users should contact either the retailer where they purchased this product, or their local government office, for details of where and how they can take this item for environmentally safe recycling.
Business users should contact their supplier and check the terms and conditions of the purchase contract. This product should not be mixed with other commercial wastes for disposal.
SCC-B2315(P)/SCC-B2015P
Bedienungsanleitung

SCC-B2315(P)/SCC-B2015P
Guide d'utilisation


ATTENTION
RISQUE DE ECHOC ELECTRIQUE NE PAS OUVRIR

ATTENTION: POUR REDUIRE LES RISQUES DE CHOCES ELECTRIQUES, NE PAS OUVRIR LE COUVERCLE ARRRIERE. LES PIECES INTERIEURES NE ARE SPONT ACCESSIBLE A LUTILISATEUR. FAITES APEL AU PERSONNEL DE MAINTENANCE QUALIFIE.

Support deamera (Socle)
Guide d'utilisation
SCC-B2315(P)/SCC-B2015P
Manual de usuario

SCC-B2315(P)/SCC-B2015P
Manuale d'uso
