
SBS 525 WDIL - Fridge SABA - Free user manual and instructions
Find the device manual for free SBS 525 WDIL SABA in PDF.


| Product type | Fridge freezer |
| Brand | SABA |
| Model | SBS 525 WDIL |
| Energy class | A+ |
| Annual energy consumption | 408 kWh/year |
| Fridge volume | 338 L |
| Freezer volume | 175 L |
| Defrosting | Automatic (No Frost) |
| Storage autonomy | 10 h |
| Freezing capacity | 10 kg / 24 h |
| Climate class | SN / N / ST (+10°C to +38°C) |
| Noise level | 43 dB(A) |
| Voltage / Frequency | 220-240 V ~ 50 Hz |
| Input power | 130 W / 1 A |
| Interior lighting | LED module 12 V DC - 5 W |
| Refrigerant | R600a (isobutane) / 70 g |
| Dimensions (W x D x H) | 895 x 745 x 1788 mm |
| Net weight | 98 kg |
| Installation type | Free-standing |
| Number of doors | 2 |
| Special functions | Touch screen, water dispenser, Vacation / Quick Freeze / Quick Cool modes, lock, door alarm |
| Maintenance | Interior cleaning with baking soda; manual defrosting if necessary |
| Safety | Child lock, safety instructions (R600a flammable) |
| Spare parts and repairability | LED module replaceable by qualified technician; after-sales service for other parts |
| General information | User manual available online; compliance with WEEE standards |
Frequently Asked Questions - SBS 525 WDIL SABA
User questions about SBS 525 WDIL SABA
0 question about this device. Answer the ones you know or ask your own.
Ask a new question about this device
Download the instructions for your Fridge in PDF format for free! Find your manual SBS 525 WDIL - SABA and take your electronic device back in hand. On this page are published all the documents necessary for the use of your device. SBS 525 WDIL by SABA.
USER MANUAL SBS 525 WDIL SABA
Thank you to have chosen the SABA quality. This product has been created by our professional team and according to the European regulation. For a better use of your new device, we recommend you to read carefully this user manual and keep it for record.
TABLE OF CONTENTS
SAFETY INSTRUCTIONS.GB-2
TECHNICAL INFORMATION. GB-5
DESCRIPTION OF THE DEVICE .GB-7
INSTALLATION . GB-8
USE .GB-9
USING THE CONTROL PANEL .GB-10
INSTRUCTION FOR WATER DISPENSER.GB-18
MAINTENANCE. GB-24
CLEANING. GB-28
ENERGY SAVING ADVICE .GB-29
TROUBLESHOOTING .GB-30
ACCESSIONS . GB-31
DISPOSAL. .GB-31
DISPOSAL OF OLD ELECTRICAL APPLIANCES...GB-32
SAFETY INSTRUCTIONS
- This appliance can be used by children aged from 8 years and above if they have been given supervision or instruction concerning use of the appliance in a safe way and understand the hazards involved. Cleaning and maintenance by the user must not be carried out by children, unless they are aged 8 years or over and only under adult supervision. Keep the appliance and its cable out of reach of children under 8 years of age.
- This appliance can be used by persons with reduced physical, sensory or mental abilities or lack of experience and knowledge if they have been given supervision or instruction concerning use of the appliance in a safe way and understand the hazards involved.
Children must not use the appliance as a toy. - If the supply cord is damaged, it must be replaced by the manufacturer, its service agent or similarly qualified persons in order to avoid a hazard.
- This appliance is intended to be used in household and similar applications such as:
- staff kitchen areas in shops, offices and other
working environments;
-farm houses;
- by clients in hotels, motels and other residential type environments;
- bed and breakfast type environments.
- WARNING: Keep ventilation openings, in the appliance enclosure or in the built-in structure, clear of obstruction.
- WARNING: Do not use mechanical devices or other means to accelerate the defrosting process, other than those recommended by the manufacturer.
- WARNING: Do not damage the refrigerant circuit.
- WARNING: Do not use electrical appliances inside the food storage compartments of the appliance, unless they are of the type recommended by the manufacturer.
- Do not store explosive substances such as aerosol cans with a flammable propellant in this appliance.
- Regarding the information for the installation, operation, maintenance and disposal of the
device, refer to the following paragraph of the instruction manual.
Caution: Risk of fire
- For disposal of product, refer to
and . - For the replacement method of light bulb, refer to
.
TECHNICAL INFORMATION
| Brand | SABA SBS525WDIL |
| Category of household refrigerating appliance | catalogue 7 |
| Energy class | A+ |
| Annual energy consumption | 408kWh/an |
| Storage volume | Refrigerator: 338L Freezer: 175L |
| Defrost | Refrigerator: automatic Freezer: automatic **** |
| Fridge compartment Freezer compartment | Frost-Free Frost-Free |
| Temperature rise time | 10h |
| Freezing capacity | 10kg /24h |
| Climate class + Ambient range | S N / N / ST (+10°C to +38°C) |
| Noise | 43 dB(A) re 1 pW |
| Rated voltage and frequency / Input power | 220-240V 50Hz / 130W-1A |
| LED light Power | LED 12VDC-5W |
| Refrigerant/Amount | R600a/70g |
| Product dimension (W x D x H) | 895x745x 1788(mm) |
| Net weight | 98kg |
| Type of installation | Free Standing |
DESCRIPTION OF THE DEVICE
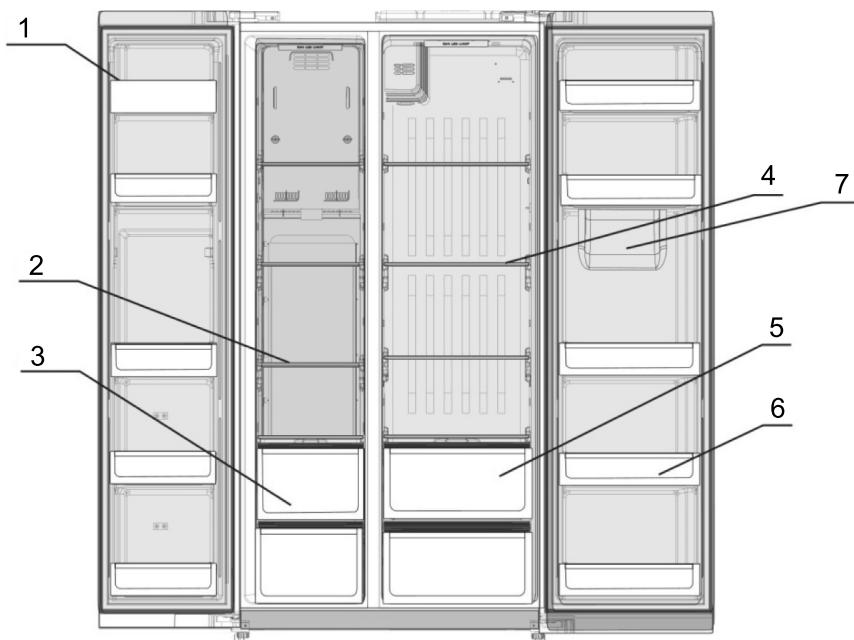
- Freezer door rack
- Freezer compartment glass shelf
- Freezer compartment drawer
- Refrigerator compartment glass shelf
- Vegetable crisper
- Refrigerator door rack
- Water dispenser
NOTE: The appliance design is subject to change without prior notice.
INSTALLATION
Position the appliance and allow it to stand for two to three hours before it is turned on for the first time to a low the system to settle. Do not position next to any heat source e.g. cooker, boiler or in direct sunlight etc.
Allow at least 10cm of space at the top and 10 cm of space on both sides of the appliance and between the back of the appliance and the wall for adequate air circulation. The appliance is not designed for recessed installation ('building in').
Install on a good firm level surface, and any unevenness of the floor should be corrected prior to installation, slight unevenness can be overcome by adjusting the front feet.
USE
- This appliance is designed no operate in ambient temperature between 10^ and 38^ . If these temperatures are exceeded, i.e. colder or warmer, the appliance will not operate correctly. If the ambient temperatures are exceeded for long periods, the temperature in the freezer section will rise above -18^ and food spoilage may occur.
- Remove all packaging materials from the appliance. Wash the inside of the cabinet with lukewarm water and bicarbonate of soda (5ml to 0.5 liter of water). Dry the appliance thoroughly.
- When you use the freezer for the first time or after defrosting, set the thermostat control to the maximum position for at least 2 hours before introducing food to be stored, and then readjust to the normal position.
- If there is a power failure, do not open the door. Frozen food should not be affected if the failure lasts for less than 12 hours. If the failure is longer, then the food should be checked and either eaten immediately or cooked and then re-frozen.
USING THE CONTROL PANEL
The display control panel is in the left refrigerator door. Please see the below for details:

Button instruction:
A. Freezer temperature adjustment
B. Mode Settings
C. Refrigerator temperature adjustment
D. Lock/Unlock
Display:
- Vocation mode
- Quick freezing mode
- Quick cooling mode
- Lock
- Freezer temperature
- Fridge temperature
- OFF mode
Function setting:
First power on
When the refrigerator is first time powered on, the control panel is set to the initial SMART mode display after 2 seconds: -18^ freezer compartment and 5^ in fridge compartment.
Control panel operation
Lock/Unlock LOCK
To use the lock function you must press the lock button D (the symbol on the display will be lit). is will cause all actions to be ignored, until the lock is removed.
To unlock the display and functions, hold the lock button D for 3 seconds (the symbol on the display will be disappear).
Setting the freezer temperature
Press the A key can set the freezer temperature. At the first pressing, the freezer temperature showed at blink. Then to press continue, you can set the temperature form -16^ to -24^ .
Setting the fridge temperature
Press the C key can set the fridge temperature. At the first pressing, the fridge temperature showed at blink. Then to press continue, you can
set the temperature form 2^ to 8^ .
The appliance has 4 pre-set modes that can be selected by pressing the
mode button B and these are:
Vacation mode — quick freezing mode — quick freezing and cooling
mode — quick cooling — none(back to normal temperature setting)
Vacation mode
This mode is designed to prevent your appliance from wasting energy during times when it's not in regular use (when you are on vacation/holiday for example). By selecting this function the temperature of the freezer compartment will automatically be set to -18^ and the fridge compartment will be turned off.
To use the vacation mode you must press the mode button until the vacation icon is lit on the display. To exit the vacation mode press the mode button until no mode icon is lit on the display.
Important note: If this mode is selected then all food and drinks must be removed from the fridge compartment.
Quick freezing mode
This mode is designed for when freezing items that are not already prefrozen. If you are placing fresh food inside the freezer then ideally you should have lowered the temperature beforehand ready to accommodate it and facilitate as quick a freeze as possible. You may need to pre select the quick freeze mode as early as 12 hours before. By selecting this function the temperature of the freezer compartment will automatically be set to -24^ for a maximum of 26 hours (after this time the temperature will revert to what it was previously set at). If the temperature of freezer goes below -24^ during the 26 hours then the appliance will exit the quick freeze mode automatically.
To use the quick freeze mode you must press the mode button until the quick freeze icon is lit on the display. To exit the quick freeze mode press the mode button until no mode icon is lit on the display.
Quick freezing and cooling mode
This mode is designed for times when the refrigerator warms past the point of cooling, such as when the weather is extremely warm,
the refrigerator doors are opened frequently, or a large batch of food is placed inside the refrigerator. In order to restore a colder temperature in the refrigerator, put the quick freeze & cool setting on to set the unit to the coolest temperature.
By selecting this function the temperature of the freezer and fridge compartments will automatically be set to -24^ and 2^ for a maximum of 26 hours for the freezer setting and 2 hours 30 minutes for the fridge setting (after this time the temperature will revert to what it was previously set at).
If the temperature of freezer goes below -24^ during the 26 hours then the appliance will exit the quick freeze mode automatically.
To use the quick freeze and cool modes together you must press the mode button until the quick freeze and cool icons are lit on the display. To exit thequick freeze and cool mode press the mode button until no mode icon is liton the display.
Quick cooling mode
This mode is designed for times when the refrigerator warms past the point of cooling, such as when the weather is extremely warm, the refrigerator door is opened frequently, or a large batch of warm food is placed inside the refrigerator. In order to restore a colder temperature in the refrigerator, put the quick cool setting on to set the unit to the coolest temperature. By selecting this function the temperature of the fridge compartment will automatically be set to 2^ for a maximum of 2 hours and 30 minutes (after this time the temperature will revert to what it was previously set at).
Door open alarm
The e will be a sound alarm when the fridge or freezer door is open for more than 120S, the sound alarm will disappear if the door closed or press the mode button for 2S.
Notes: if found error code like E1/E2/E5/E6/E7, please contact after service for repairment.
Door Height Adjustment
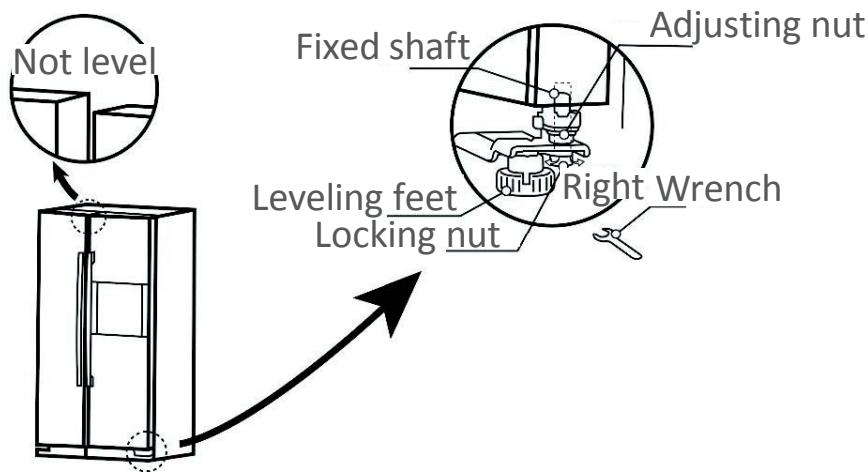
If the doors of the appliance are not aligned then the height of them can be adjusted, if required please follow the below steps.
Note: The maxi um height adjustment is 5mm
Rotate the locking nut clockwise (as shown in the diagram below) with a wrench for 2 full rotations to loosen it. You can now rotate the adjusting nut (as shown in diagram below) to raise or lower the height of the door. Once the door is set to your desired position, then tighten the locking nut by rotating it anti-clockwise.
When the fridge door is low:
Open the door, use a wrench to rotate the adjusting nut anti-clockwise to raise the height of the door. Once the doors are aligned, then tighten the locking nut by rotating it anticlockwise.
When the fridge door is high:
Open the door, use a wrench to rotate the adjusting nut clockwise to lower the height of the door. Once the doors are aligned, then tighten the locking nut by rotating it anticlockwise.
TEMPERATURE INDICATE
In order to help you get the correct adjustment of your device, it is equipped with a temperature gauge placed in the coldest area.
For the proper storage of food in your refrigerator and in particular in the coldest area, make sure that «OK» appears in the temperature indicator.
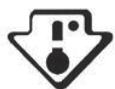
The symbol on the left side indicates the location of the coldest area of your refrigerator. It defines the height of this area.
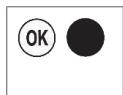
If «OK» is not displayed, the average temperature in this area will be very high. You ought to adjust the thermostat to a colder setting.
For every modification of your thermostat, you are supposed to wait for the stabilization of the temperature inside the unit before proceeding, if necessary, to a new setting. Do change the position of the thermostat gradually and wait at least 12 hours before re-checking.
For every modification of your thermostat, you are supposed to wait for the stabilization of the temperature inside the unit before proceeding, if necessary, to a new setting. Do change the position of the thermostat gradually and wait at least 12 hours before re-checking.
NOTE: after charging the device for fresh food or after repeated or prolonged door openings, it is normal that the inscription «OK» does not appear in the temperature indicator. Wait at least 12 hours before readjusting the thermostat.
INSTRUCTION FOR WATER DISPENSER
Warning
- Only purified and cold boiled water have access to this water dispenser, and the two kinds must free from any impurity). Coke, apple juice and other soft drinks that contain Carbon dioxide are forbidden.
- It is not allowed to fi 1 water when the water boxes is removed from the machine door.
- Never fi 1 more water than the maximum figu e that indicated on the water box.
- Check out whether the water box is on its foundation bed when you are not able to get water normally as usual.
-
When you are trying to move the water box, be sure that there is no water in it.
-
You are not allowed to remove any element of the water valve.
- When use the machine for the first time o it has been out of application for a long time, remove and clean it up before you put it into application.
- If water in this machine has been out of use for a long period, you had better to drain them out of the dispenser and add pure water, and then it can be used as usual.
- It is suggested that the product should be cleaned up every three to six months.
- When you are cleaning this product, if cleaning solution is used, you had better put the water box to its original position, and fi 1 the water box, then you shall drain 5 to 6 cups of water, in case that there is any rudimental dirt of water dispenser instruction after you used cleaning solution
- When you are opening or closing the door of the water dispenser, try to avoid overexerting in case that water in the box move and overflws.
- Do not touch the bottle frame above when adding water.
Instruction of water dispenser
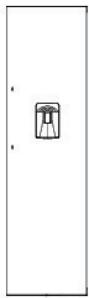
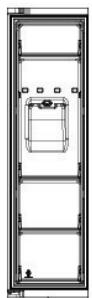
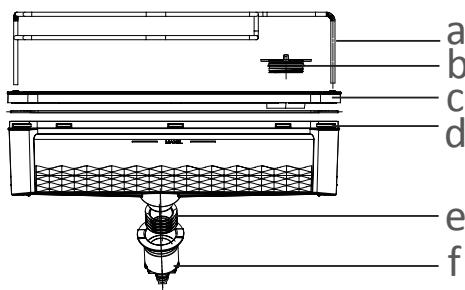
a. Steel wire fence string
b. Renovate to fi 1 water
c. Water box cover
d. Water box body
e. Seal ring
f. Water valve elements
Filling of drinking water:
Open the water box, open the water injection cover and then you can add water:

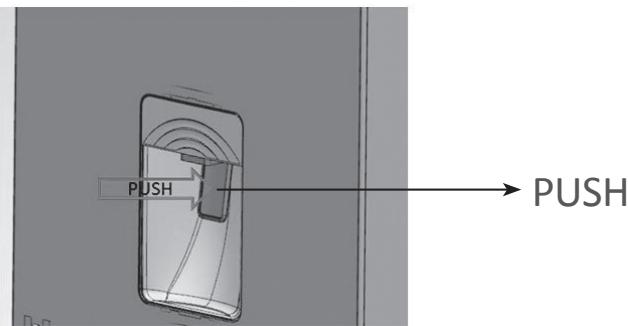
How to Get the Drinking Water
- Push the water shank inward by the cup
- When you put the hand shank inward, there will be come water outfl ws, when the hand shank is in its original position, no water outfl ws.
How to Remove and Clean up the Water Dispenser
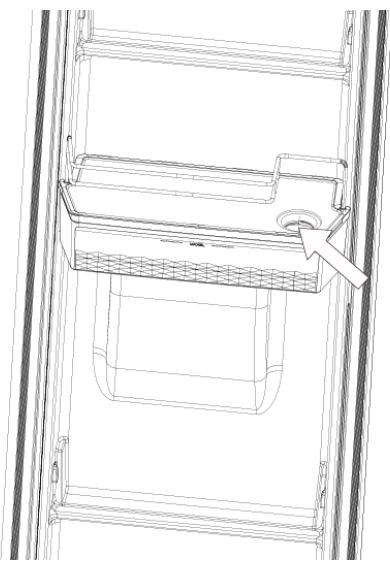
First Step: remove
1. Take out the elements of the water box
Stick to both sides of the water box elements with both of your hands, and draw out the elements of the water box outwards through 45 above.
You can translate the water box (to the side of the user) and get the elements when the elements are out of water valve elements (when you move the box, be sure that there is no water in it.)
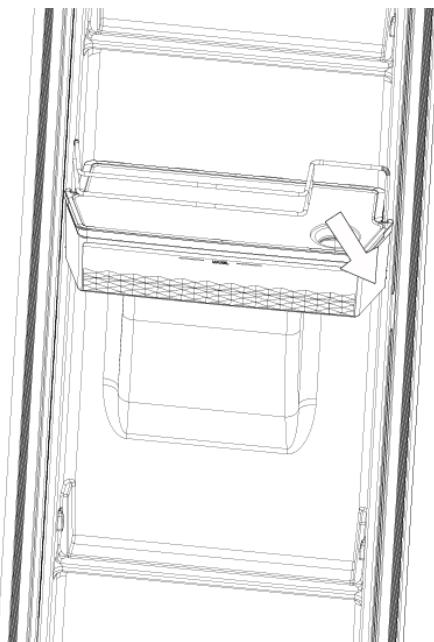
2. The Installation of water box elements
To keep the hanging slot of the water box elements direct to the hangers on the door liner. The seal ring at the bottom of the box shall direct to the entrance of the water salve elements, insert it to the corresponding position along with the 45^ slantly.
MAINTENANCE
FREEZER DEFROSTING
Note: Care must be taken when performing the following procedure.
- The appliance is frost free, so there shouldn't be any requirement to defrost the freezer.
However, in the unlikely event the appliance does need defrosting please follow the below steps: - Try to use as much as possible of the food in the freezer, before defrosting.
However, any food that is left, wrap in newspaper and place aside until ready to place back after cleaning. - Switch the appliance off t the wall socket and remove the plug.
- Open the freezer door.
- Place a suitable container to collect the water created from the defrosted ice.
- After defrosting, clean and dry the interior.
- Switch the appliance on and replace any frozen food.
Defrosting can be accelerated by putting bowls of hot (not boiling) water in the freezer and loosening the frost with a suitable plastic scraper.
NOISE FROM YOUR APPLIANCE
You may notice some rather unusual noises. The noises are caused by circulation of refrigerant in the cooling system. It has become more pronounced since the introduction of CFC free gases. This is not a fault and will not affect the performance of your fridge.
PROLONGED OFF PERIODS
If the appliance is not in use for a long period of time, proceed as follows:
- Disconnect from the mains supply.
- Clean and dry the inside (see 'Cleaning and maintenance').
- Leave the door open to prevent any unpleasant smells from building up while the appliance is not in use.
NOTES FOR USE
Do clean and defrost your appliance regularly.
Do check contents of the compartments every so often.
Do store commercially prepared food in accordance with the instructions given on the packets.
Do choose high quality fresh food and be sure it is thoroughly clean before freezing it.
Do wrap all food in food quality polythene bags or air tight containers and make sure any air is excluded.
Do Not store poisonous or any dangerous substances in your freezer. It is designed for the freezing of edible foodstuffs only.
Do Not consume food which has been frozen for an excessive length of time.
Do Not leave the door open for long periods, as this will make the appliance more costly to run and cause excessive ice formation.
Do Not use sharp objects such as knives to remove the ice from the appliance.
Only use a plastic scraper.
Do Not put hot food into the appliance. Let it cool down to room temperature.
Do Not put liquid-fi led bottles or sealed cans containing carbonated liquids into the freezer as they may burst.
Do Not give children ice-cream and water ices
direct from the freezer as the low temperature may cause 'freezer burns' on the lips.
Do Not try to keep frozen food which has thawed; it should be eaten within 24 hours or cooked and re-frozen.
CHANGING THE LIGHT BULB
- The fridge and freezer lights are energy efficient long life LEDs. The efore, they should not need replacing throughout the life of the product.
- The bulb is a direct current 12V LED module and in the unlikely event it does fail then it will need to be replaced by a qualifies engineer.
CLEANING
- Unplug the appliance.
- Remove all substances.
- Clean the inside and outside walls with a clean sponge or soft cloth using warm water or 1 teaspoon of bicarbonate of soda to 1.2 liters of water.
- Rinse well and wipe dry with a clean soft cloth. If the appliance is not to be used for a long period of time then it is recommended to remove all the food stuff, clean the inside of the appliance and leave the door open to allow the air to circulate thus avoiding unpleasant odors.
ENERGY SAVING ADVICE
- Do not install the appliance close to sources of heat, such as a cooker, dishwasher or radiator.
- Locate the appliance in a cool well-ventilated room and make sure that the air vents are clear.
- Try to avoid keeping the doors open for a long time, as warm air will enter the cabinet and may cause a build-up of ice as well as affecting the energy consumption. Ensure there are no obstructions preventing the doors from closing properly.
- Ensure that the door seals are clean and there are no tears or splits.
- Keep the most perishable foods, (those with a short shelf-life, such as cooked meats), in the coldest part of the fridge. e Salad Crisper Box is the warmest part of your fridge and should be used for vegetables, salads and fruits etc.
- Do not overload the appliance: the cooling air that circulates and keeps the appliance cold gets blocked, and pockets of warm air form.
- Do not put hot food into the fridge or freezer - let it cool down first.
TROUBLESHOOTING
Before calling for service please check the following.
THE APPLIANCE IS NOT WORKING.
Check the plug; is inserted correctly into the mains socket.
Check there is power to the mains socket by plugging another appliance in; if the other appliance does not work either, check the fuse in the plug.
THE APPLIANCE IS NOISY WHEN OPERATING.
Check the appliance is level and it is not in contact with another appliance or kitchen furniture.
THE APPLIANCE DOES NOT COOL SUFFICIENTLY.
If the door has been opened too often or it has been left open for a while it will take time for the appliance to reach its set temperature.
Check the airflow over the rear of the appliance has not been reduced due to insufficient clearance.
Check if a large quantity of fresh food has been introduced.
ACCESSORIES
Energy label
FR/GB manual
Egg tray
DISPOSAL
The refrigerating gas contained in the circuit of this appliance is isobutane (R600a); it causes a low level of pollution but is inflammable. Please contact your local disposal department for advice on the correct method of disposal.
DISPOSAL OF OLD ELECTRICAL APPLIANCES

The European directive 2012/19/EU on
Waste Electrical and Electronic Equipment
(WEEE), requires that old household
electrical appliances must not be disposed of in the normal unsorted municipal waste stream.
Old appliances must be collected separately in order to optimize the recovery and recycling of the materials they contain, and reduce the impact on human health and the environment.
The crossed out "wheeled bin" symbol on the product reminds you of your obligation, that when you dispose of the appliance, it must be separately collected.
Consumers should contact their local authority or retailer for information concerning the correct disposal of their old appliance.

- TABLE OF CONTENTS
- SAFETY INSTRUCTIONS
- Caution: Risk of fire
- TECHNICAL INFORMATION
- DESCRIPTION OF THE DEVICE
- INSTALLATION
- USE
- USING THE CONTROL PANEL
- Button instruction:
- Display:
- Function setting:
- Control panel operation
- Setting the freezer temperature
- Setting the fridge temperature
- Vacation mode
- Quick freezing mode
- Quick freezing and cooling mode
- Quick cooling mode
- Door open alarm
- Door Height Adjustment
- Note: The maxi um height adjustment is 5mm
- When the fridge door is low:
- When the fridge door is high:
- TEMPERATURE INDICATE
- INSTRUCTION FOR WATER DISPENSER
- Warning
- Instruction of water dispenser
- Filling of drinking water:
- How to Get the Drinking Water
- How to Remove and Clean up the Water Dispenser
- Take out the elements of the water box
- The Installation of water box elements
- MAINTENANCE
- FREEZER DEFROSTING
- NOISE FROM YOUR APPLIANCE
- PROLONGED OFF PERIODS
- NOTES FOR USE
- CHANGING THE LIGHT BULB
- CLEANING
- ENERGY SAVING ADVICE
- TROUBLESHOOTING
- THE APPLIANCE IS NOT WORKING.
- THE APPLIANCE IS NOISY WHEN OPERATING.
- THE APPLIANCE DOES NOT COOL SUFFICIENTLY.
- ACCESSORIES
- DISPOSAL
- DISPOSAL OF OLD ELECTRICAL APPLIANCES
Brand : SABA
Model : SBS 525 WDIL
Category : Fridge