
CMNV7184B - Washing machine CANDY - Free user manual and instructions
Find the device manual for free CMNV7184B CANDY in PDF.



| Product Type | Combined Refrigerator-Freezer |
| Brand | CANDY |
| Model | CMNV7184B |
| Climate Class | SN, N, ST, T |
| Refrigerant | R600a (isobutane) |
| Power Supply | 220-240 V / 50 Hz |
| Main Functions | Smart ECO, Fast Cooling, Fast Freezing, Vacation, Wi-Fi SimplyFi |
| Purification Technology | PURACTION EVO (UV photocatalysis) |
| Water Dispenser | Yes, internal |
| Defrosting | Automatic |
| Interior Lighting | LED |
| Display Type | Vertical or round (depending on version) |
| Child Lock | Yes, via Lock icon |
| Alarms | Open door, freezer overheat, sensor error |
| Number of Shelves | Multiple (depending on model) |
| Crisper Drawer | With humidity control |
| Adjustable Feet | Yes |
| Door Reversibility | Possible, requires qualified intervention |
| Spare Parts Available | Thermostats, sensors, boards, lights (7 years), handles, hinges, shelves (7 years), door gaskets (10 years) |
| Warranty | 2 years (EU), varies by country |
Frequently Asked Questions - CMNV7184B CANDY
User questions about CMNV7184B CANDY
0 question about this device. Answer the ones you know or ask your own.
Ask a new question about this device
Download the instructions for your Washing machine in PDF format for free! Find your manual CMNV7184B - CANDY and take your electronic device back in hand. On this page are published all the documents necessary for the use of your device. CMNV7184B by CANDY.
USER MANUAL CMNV7184B CANDY
e.g., Bed and Breakfast (B&B),
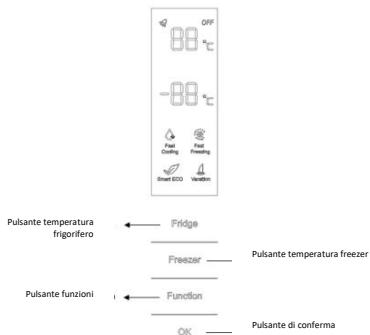
VERTICAL DISPLAY (ON SOME MODELS ONLY)
INTERNAL USER INTERFACE (ON SOME MODELS ONLY)

WATER DISPENSER (ON SOME MODELS ONLY)
Tips for keeping food perfect in the Fridge
Where to store your foods in the fridge
Storing Frozen Food
ENERGY SAVING
TAKE CARE
Defrosting
Cleaning and Care
CHANGING THE INTERNAL LIGHT
REVERSING THE DOOR SWING
TROUBLESHOOTING
Thank you for purchasing this product.
Before using your refrigerator, please carefully read this instruction manual in order to maximize its performance. Store all documentation for subsequent use or for other owners. This product is intended solely for household use or similar applications such as:
- the kitchen area for personnel in shops, offices and other working environments
on farms, by clientele of hotels, motels and other environments of a residential type
at bed and breakfasts (B&B)
- for catering services and similar applications not for retail sale.
This appliance must be used only for purposes of storage of food, any other use is considered dangerous and the manufacturer will not be
responsible for any omissions. Also, it is recommended that you take note of the warranty conditions. Please, to obtain the best possible performance and trouble free operation from your appliance it is very important to carefully read these instructions. Failure to observe these instructions may invalidate your right to free service during the guarantee period.
SAFETY INFORMATION
This guide contains many important safety information. Please, we suggest you keep these instructions in a safe place for easy reference and a good experience with the appliance.
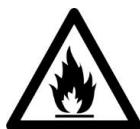
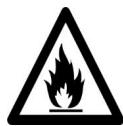
The refrigerator contains a refrigerant gas (R600a: isobutane) and insulating gas (cyclopentane), with high compatibility with the environment, that are, however, inflammable.

Caution: risk of fire
If the refrigerant circuit should be damaged:
- Avoid opening flame and sources of ignition.
Thoroughly ventilate the room in which the appliance is situated
WARNING!
- Care must be taken
while cleaning/carrying the appliance to avoid touching the condenser metal wires at the back of the appliance, as you might injure your fingers and hands or damage your product.
- This appliance is not designed for stacking with any other appliance. Do not attempt to sit or stand on top of your appliance as it is not designed for such use. You could injure yourself or damage the appliance.
- Make sure that the mains cable is not caught under the appliance during and after carrying/moving the appliance, to avoid the mains cable becoming cut or damaged.
- When positioning your appliance, take care not to damage
your flooring, pipes, wall coverings, etc. Do not move the appliance by pulling by the lid or handle. Do not allow children to play with the appliance or tamper with the controls. Our company declines to accept any liability should the instructions not be followed.
- Do not install the appliance in humid, oily, or dusty places, nor expose it to direct sunlight and to water.
- Do not install the appliance near heaters or inflammable materials.
- If there is a power failure, do not open the lid. Frozen food should not be affected if the failure lasts for less than 20 hours. If the failure is longer, then the food
should be checked and eaten immediately or cooked and then refrozen.
If you find that the lid of the chest freezer is difficult to open just after you have closed it, don't worry. This is due to the pressure difference which will equalize and allow the lid to be opened normally after a few minutes. - Do not connect the appliance to the electricity supply until all packing and transit protectors have been removed. - Leave to stand for at least 4 hours before switching on to allow compressor oil to settle if transported horizontally. - This freezer must only be used for its intended purpose (i.e., storing and freezing of edible
foodstuff).
- Do not store medicine or research materials in the Wine Coolers. When the material that requires a strict control of storage temperatures is to be stored, it is possible that it will deteriorate or an uncontrolled reaction may occur that can cause risks.
- Before performing any operation, unplug the power cord from the power socket.
- On delivery, check to make sure that the product is not damaged and that all the parts and accessories are in perfect condition. If in the refrigeration system a leak is noted, do not touch the wall outlet and do not use open flames. Open the window and let air
into the room. Then call a service center to ask for repair.
- Do not use extension cords or adapters.
- Do not excessively pull or fold the power cord or touch the plug with wet hands.
- Do not damage the plug and/or the power cord; this could cause electrical shocks or fires.
- If the supply cord is damaged, it must be replaced by the manufacturer, its service agent or similarly qualified person in order to avoid a hazard.
- Do not place or store inflammable and highly volatile materials such as ether, petrol, LPG, propane gas, aerosol spray cans, adhesives, pure alcohol, etc. These materials may cause an explosion.
- Do not use or store inflammable sprays, such as spray paint, near the Wine Coolers. It could cause an explosion or fire.
- Do not place objects and/or containers filled with water on the top of the appliance.
- We do not recommend the use of extension leads and multi-way adapters.
- Do not dispose of the appliance on a fire. Take care not to damage the cooling circuit/pipes of the appliance in transportation and in use. In case of damage do not expose the appliance to fire, potential ignition source and immediately ventilate the room where the appliance is situated.
- The refrigeration
system positioned behind and inside the Wine Coolers contains refrigerant. Therefore, avoid damaging the tubes.
- Do not use electrical appliances inside the food storage compartments of the appliance, unless they are of the type recommended by the manufacturer.
- Do not damage the refrigerant circuit.
- Do not use mechanical devices or other means to accelerate the defrosting process, other than those recommended by the manufacturer.
- Do not use electrical appliances inside the food storage compartments, unless they are of the type recommended by the manufacturer.
- Do not touch internal cooling elements,
especially with wet hands, to avoid cracks or injuries.
- Maintain the ventilation openings in the appliance enclosure or in the built-in structure, free of obstruction.
- Do not use pointed or sharp-edged objects such as knives or forks to remove the frost.
- Never use hairdryers, electrical heaters or other such electrical appliances for defrosting.
- Do not scrape with a knife or sharp object to remove frost or ice that occurs. With these, the refrigerant circuit can be damaged, the spill from which can cause a fire or damage your eyes.
- Do not use mechanical devices or other equipment to hasten the defrosting
process.
- Absolutely avoid the use of open flame or electrical equipment, such as heaters, steam cleaners, candles, oil lamps and the like in order to speed up the defrosting phase.
- Never use water to wash the compressor position, wipe it with a dry cloth thoroughly after cleaning to prevent rust. It is recommended to keep the plug clean, any excessive dust residues on the plug can be the cause of fire.
- The product is designed and built for domestic household use only.
- The guarantee will be void if the product is installed or used in commercial or non-residential domestic household premises.
- The product must be
correctly installed, located and operated in accordance with the instructions contained in the User Instructions Booklet provided.
- The guarantee is applicable only to new products and is not transferable if the product is resold.
- Our company disclaims any liability for incidental or consequential damages.
- The guarantee does not in any way diminish your statutory or legal rights.
- Do not perform repairs on this Wine Cooler. All interventions must be performed solely by qualified personnel. If you are discarding an old product with a lock or latch fitted to the door, ensure that
it is left in a safe condition to prevent the entrapment of children.
- This appliance can be used by children aged from 8 years and above and by persons with reduced physical, sensory or mental capabilities or with a lack of experience and knowledge; provided that they have been given adequate supervision or instruction concerning how to use the appliance in a safe way and understand the hazards involved.
- Children should not play with the appliance. Cleaning and user maintenance should not be made by children without supervision.
- Locks: If your Fridge/Freezer is
fitted with a lock, to prevent children being entrapped keep the key out of reach and not in the vicinity of the appliance. If disposing of an old Fridge/Freezer, break off any old locks or latches as a safeguard.
FOR appliances without a 4-star compartment: this refrigerating appliance is not suitable for freezing foodstuffs. FOR a free standing appliance: this refrigerating appliance is not intended to be used as a built-in appliance. FOR Wine Coolers: this appliance is intended to be used exclusively for the storage of wine.
COMBI REFRIGERATOR CANDY
Climate Class
The appliance is designed to operate at the limited range of ambient temperature, depending on
climate zones. Do not use the appliance at temperatures outside the limit. The climate class of your appliance is indicated on the label with technical description inside the fridge compartment.
| Climate Class | Amb. T. (°C) | Amb. T. (°F) |
| SN | From 10 to 32 | From 50 to 90 |
| N | From 16 to 32 | From 61 to 90 |
| ST | From 16 to 38 | From 61 to 100 |
| T | From 16 to 43 | From 61 to 110 |
- extended temperate (SN): 'this refrigerating appliance is intended to be used at ambient temperatures ranging from 10°C to 32°C ;
- temperate (N): 'this refrigerating appliance is intended to be used at ambient temperatures ranging from 16°C to 32°C ;
- subtropical (ST): 'this refrigerating appliance is intended to be used at ambient temperatures ranging from 16°C to 38°C ;
- tropical (T): 'this refrigerating appliance is intended to be used at ambient temperatures ranging from 16°C to 43°C' ;
TRANSPORTATION INSTRUCTIONS
The appliance should be transported only in a vertical upright position. The packing as supplied must be intact during transportation. If during the course of transport the product has been transported horizontally, it must only be laid on its left hand side (when facing the door front) and it must not be operated for at least 4 hours to allow the system to settle after the appliance is brought back to upright position.
- Failure to comply with the above instructions could result in damage occurring to the appliance. The manufacturer will not be held responsible if these instructions are disregarded.
- The appliance must be protected against rain, moisture and other atmospheric influences.
INSTALLATION INSTRUCTIONS
- If possible avoid placing the appliance near cookers, radiators or in direct sunlight as this will cause the compressor to run for long periods. If installed next to a source of heat or refrigerator, maintain the following minimum side clearances:
| From Cookers | 4" (100 mm) |
| From Radiators | 12" (300 mm) |
| From Fridges | 4" (100 mm) |
- Make sure that sufficient room, with an average temperature of between 16°C and 32°C, is provided around the appliance to ensure free air circulation. Ideally, a space of no less than 9cm on the back and 2cm on the sides.
- The appliance should be located on a smooth surface.
- It is forbidden to use the refrigerator outdoors.
- Protection from moisture. Do not locate the freezer in a moist space to avoid the metal parts rusting. Do not spray water on the freezer, otherwise it will weaken the insulation and cause current leakage.
- Refer to the "Cleaning and Care" section to prepare your appliance for use.
- If the freezer is installed in unheated areas, garages, etc., in cold weather condensation may form on the outer surfaces. This is quite normal and is not a fault. Remove the condensation by wiping with a dry cloth.
- Never place the refrigerator in a wall recess or into fitted cabinets or furniture. When it is working, the grille at the back may become hot and the sides warm. Do not drape the refrigerator with any covering. The most energy-saving configuration requires drawers, food boxes, and shelves to be positioned in the product; please refer to the above pictures.
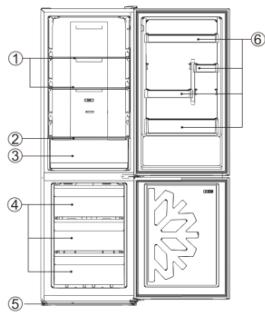
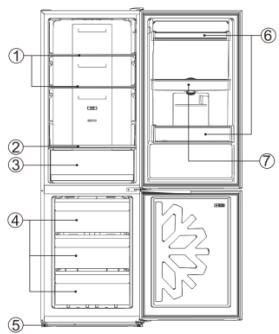
| No | Description |
| 1 | Fridge shelves |
| 2 | Crisper Cover |
| 3 | Crisper |
| 4 | Freezer drawers |
| 5 | Adjustable Feet |
| 6 | Refrigerator door racks |
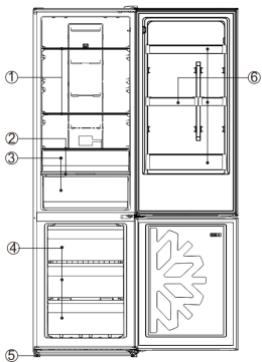
| No | Description |
| 1 | Fridge shelves |
| 2 | Crisper Cover |
| 3 | Crisper |
| 4 | Freezer drawers |
| 5 | Adjustable Feet |
| 6 | Refrigerator door racks |
| 7 | Water tank assembly |
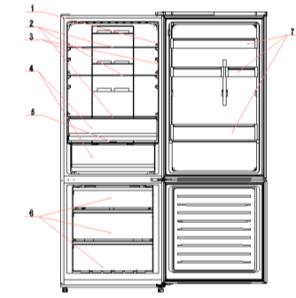
| No | Description |
| 1 | Fridge shelves |
| 2 | Crispercover |
| 3 | Vegetable and fruit crisper |
| 4 | Freezing drawers |
| 5 | Leveling feet |
| 6 | Door balcony |
| No | Description |
| 1 | Light switch |
| 2 | Fridge shelves |
| 3 | Light |
| 4 | Crisper box |
| 5 | Crisper box cover |
| 6 | Freezer drawers |
| 7 | Door balcony |
STARTING TO USE
Before you start using the freezer, please check that:
- The interior is dry and air can circulate freely at the rear.
- Clean the interior as recommended under the "TAKE CARE" section (electric parts of the refrigerator can only be wiped with a dry cloth).
- Do not switch on until 4 hours after moving the fridge/freezer. The coolant fluid needs time to settle. If the appliance is switched off at any time, wait 30 minutes before switching back on to allow the coolant fluid to settle.
- Before connecting the refrigerator to the mains supply, position the thermostat control dial. The thermostat control dial is located inside the fridge compartment.
- Turn the thermostat knob to the "3" position and turn on the electricity. The compressor and the light inside the refrigerator will begin to work.
- Before storing foods in your refrigerator, turn the refrigerator on and wait for 24 hours to make sure it is working properly and to allow the fridge/freezer to reach the correct temperature.
- Open the door 30 minutes later. If the temperature in the refrigerator has decreased obviously, it shows that the refrigerator system works well. When
the refrigerator operates for a period of time, the temperature controller will automatically set the temperature within limits it opens.
COMBI OPERATION
Appliance connected to power at the first time:
When the appliance is connected to power at the first time, the display will be lit for 2 seconds before going normal and the appliance runs with intelligence function.
Display Control: When the refrigerator door is closed and there is no button operation in 3 minutes, the display light goes off.
When the display light is off, open the refrigerator door or click any button to light it up.
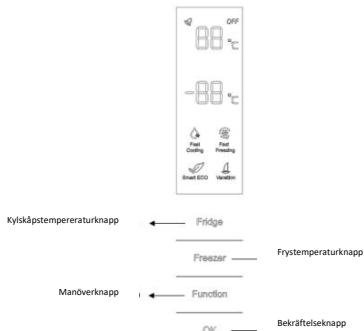
VERTICAL DISPLAY (if present)
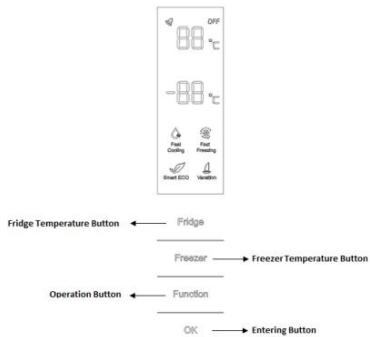
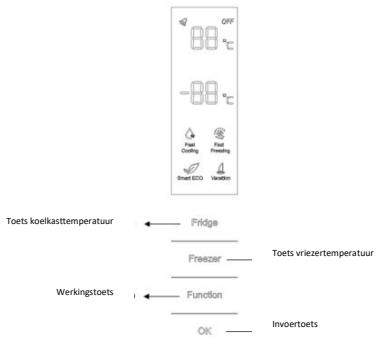
TEMPERATURE SETTING: Click the "Fridge" or
"Freezer" button and when it flickers in the symbol, temperatures can be set. Each time when the button is clicked, the temperature changes accordingly.
Temperatures cannot be set under functions of fast cooling, fast freezing, Smart ECO and vacation. Under temperature setting, if there is no button operation in 5 seconds, the button stops flickering and the set temperature comes into effect.
SMART ECO: Activate the Smart Eco button to set the temperatures of the fridge in max. energy efficiency conditions (+4°C for fridge temperature, -18°C for freezer temperature).
To enter Smart Eco: Click "option" until it flickers and then click "OK" to enter this function.
To deactivate Smart Eco: Click "option" until it goes to Smart ECO, click "OK" to quit this function and the light goes off.
FAST COOLING: Activate Fast Cooling mode to start an additional pulse for a fast freezing of the fridge compartment. The function is activated and confirmed by the switching on of the dedicated LED icon.
To enter Fast Cooling: Click "option" until it flickers in "Fast Cooling" and then click "OK" to enter this function.
To deactivate Fast Cooling: Click "option" until it goes
to "fast cooling" and then click "OK" to deactivate this function.
FAST FREEZING: Activate Fast Freezing to rapidly freeze large quantities of food while preserving their nutritional properties. When the light in Fast Freezing goes off, the freezer temperature returns to the value it had before fast freezing. When the Fast Freezing time is up (26 hours), it deactivates automatically. When it goes to Vacation, Fast Freezing stops.
To enter Fast Freezing: Click "option" until it flickers in "Fast Freezing" and then click "OK" to enter this function.
To deactivate Fast Freezing: Click "option" until it goes to "fast freezing" and then click "OK" to quit this function.
VACATION: In case of long stops, the Vacation function can be used. This function deactivates the fridge compartment, while leaving the freezer on. Ensure that there is no food inside the fridge compartment before using this function. The function is activated and confirmed by the switching on of the dedicated LED icon. The light in Vacation goes off and the refrigerator temperature returns to the value it had before Vacation.
Vacation quits under functions of Smart ECO and Fast Cooling.
To enter Vacation: Click "option" until it flickers in "Fast Freezing" and then click "OK" to enter this function.
To deactivate Vacation: Click "option" until it goes to "Vacation" and then click "OK" to quit this function.
POWER OFF MEMORY: The refrigerator can automatically keep all the settings in case of power off. When the unit is plugged in again, the refrigerator will run with the settings before power off.
POWER-ON DELAY: To prevent harm to the refrigerator in case of sudden power cut and power on, the unit does not start immediately if the power off time is less than 5 minutes.
FREEZER OVER-TEMPERATURE ALARM (only in case of power on): When the freezer temperature is higher than 10° C at the first time connected to power, the symbol light of the freezer chamber goes on and the number representing temperature flickers.
Press any button or wait for 5 seconds, flickering stops and it goes back to the temperature that was set.
REFRIGERATOR DOOR OPENING ALARM: When the refrigerator is open over 3 minutes, the buzzer will buzz. Close the door or press any button to stop the alarm, but for the latter, the alarm will go off again after 3 minutes.
SENSOR FAULT ALARM: When it shows "E0", "E1", "E2" or other abnormal symbols, it means sensor faults and the refrigerator needs repair.
ROUNDED DISPLAY (if present)
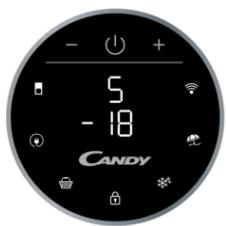
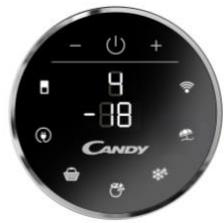
Rounded Display is a touch user interface. When the refrigerator is turned on, white LED lights will be enlightened. When the functions are pressed, the icon lights change from white to blue.
SETTING TEMPERATURE: Press MODE icon to change the temperature.
In the models with PURACTION EVO, press the "MODE" button for 3 seconds to lock and unlock the display.
- Refrigerator Temperature: Press MODE icon once, the refrigerator digit blinks, and manage the temperature of the refrigerator with "4" and "--" buttons.
Freezer Temperature: Press MODE icon twice, the freezer digit blinks, and manage the temperature of the freezer with "+" and "-" buttons.
PURACTION EVO icon: You can deactivate the PURACTION EVO function by pressing the appropriate icon and the PURACTION EVO icon will be off.
ECO MODE Icon: Press Eco Mode icon to set temperatures of the fridge in max. energy efficiency conditions (+5°C for fridge temperature, -18°C for freezer temperature). The function is activated and confirmed when the icon LED changes from white to blue.
If you want to exit the ECO mode function, you need to press the Eco Mode icon again and the refrigerator temperature turns back to normal operation.
SUPER COOLING Icon: Press Super Cooling icon to start an additional pulse for a fast freezing of the fridge compartment. The function is activated and confirmed when the icon LED changes from white to blue.
If you want to exit the Super Cooling function, you need to press the Super Cooling icon again and refrigerator temperature turns back to normal operation.
LOCK Icon: Press Lock icon to block display user interface. If the lock function is selected, the icon (LED) should turn into blue. When Lock function is turned on the user cannot set any new functions. To turn off Lock function, the user must perform a long press on the icon for 3 seconds to unlock display.
SUPER FREEZING Icon: Press Super Freezing icon to rapidly freeze big quantities of food keeping intact nutritional food properties. The function is activated and confirmed when the icon LED changes from white to blue.
If you want to exit the Super Freezing function, you
need to press the Super Freezing icon again and the freezer temperature turns back to normal operation.
HOLIDAY Icon: In case of long stops, the Holiday function can be used. This function deactivates the fridge compartment, while leaving the freezer on.
Ensure that there is no food inside the fridge compartment before using this function. The function is activated and confirmed when the icon LED changes from white to blue.
If you want to exit the Holiday function, press the Holiday icon again. The light in Holiday goes off and the refrigerator temperature returns to the value before Holiday.
Wi-Fi Icon: This appliance is equipped with SmartFi+ technology that allows you to control it remotely via App. Press the Wi-Fi icon for 3 seconds to activate the Wi-Fi function, and the icon light changes from white to blue.
Machine Enrollment (on App): Download the SimplyFi App on your device. The Candy SimplyFi App is available for devices running both Android and iOS, both for tablets and for smartphones. Get all the details of the SmartFi+ functions by browsing the App in DEMO mode.
Open the App, create the user profile, and enroll the appliance following the instructions on the device display or the "Quick Guide" attached to the machine. This operation is necessary only for the first installation. To finalize the enrollment, follow the instructions on the smartphone's screen.
Refrigerator usage from remote by App: When the enrollment is completed, the Wi-Fi LED will be switched on. From now on, it will be possible to manage the product by using the buttons on the display or using the App: both will be aligned according to the last command given.
INTERNAL USER INTERFACE (if present)

SET Button: Press the SET button to set the temperature until you reach the desired level, where level 1 is the warmest and level 4 is the coldest. Under normal operating conditions, we recommend using an intermediate setting (level 2). Once the setting takes effect, it immediately enters the corresponding stall for operation control, and the stall indicator lights up for 3 seconds and then goes out. Factory default temperature is set to 2.
Long press the "SET" key for more than 3 seconds to enter the hardware self-check program. The hardware self-check operation is effective within 10 minutes, and the long button operation after 10 minutes is invalid.
Wi-Fi Button: This appliance is equipped with SmartFi+ technology that allows you to control it remotely via App. Press the Wi-Fi icon for 3 seconds to activate the Wi-Fi function, and the icon light changes from white to blue.
Machine Enrollment (on App): Download the
SimplyFi App on your device. The Candy SimplyFi App is available for devices running both Android and iOS, both for tablets and for smartphones. Get all the details of the SmartFi+ functions by browsing the App in DEMO mode.
Open the App, create the user profile, and enroll the appliance following the instructions on the device display or the "Quick Guide" attached to the machine. This operation is necessary only for the first installation. To finalize the enrollment, follow the instructions on the smartphone's screen.
Refrigerator usage from remote by App: When the enrollment is completed, the Wi-Fi LED will switch on. From now on, it will be possible to manage the product by using the buttons on the display or using the App: both of them will be aligned according to the last command given.
FAST COOL Button: when the "FAST COOL" button is pressed, the rapid cooling function is activated, according to the 21° C to refrigeration control gear. Maximum running time is 3 hours, after which the temperature will be set to 1.
If the "SET" button is pressed during the speed cooling process, the instant cooling function is immediately withdrawn and the default is entered into the next gear.
TECHNICAL FEATURES FRESHNESS CONTROL (if present)
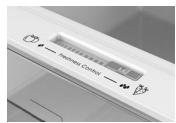
Thanks to freshness control, you can guarantee the
right humidity level for vegetables and fruits in the crisper drawer (Fresh drawer). The humidity gets bigger as the rod goes from left to right.
PURACTION EVO (if present)
The PURACTION EVO function is started by pressing the "PURACTION EVO" icon on the display, which lights up. It works when the button is pressed for a certain period of time (20 minutes) and at each door opening. The cycles have been optimized to guarantee the best efficiency and the lowest energy waste.
LED UVA lights activate a titanium filter which produces a "photocatalysis" reaction, which destroys the bacteria in the air inside the refrigerator. The filter has a duration of 10 years. The antibacterial system must be switched off during the energy consumption test.
WATER DISPENSER (if present)
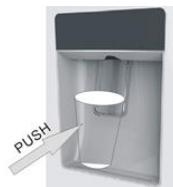
The water dispenser allows you to get chilled water without opening the fridge compartment door.
Before first use
Before using the water dispenser for the first time, remove and clean the water tank located inside the fridge compartment.
- Lift the water tank out of the fridge compartment.
- Open the water tank cover and then clean the water tank and cover
in warm soapy water. Rinse thoroughly.
- After cleaning, attach the cover to the water tank and then replace the water tank back on the fridge door.
- Clean the dispenser pad outside the fridge door.
Filling the water tank with water
- Open the small cover.
- Fill the water tank with drinkable water up to the Max line.
- Close the small cover.
Dispensing
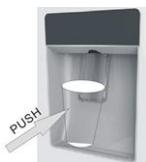
To dispense water, push the dispenser pad gently, using
a glass or container. To stop the flow of water, pull your glass away from the dispenser pad.
Tips for keeping food perfect in the Fridge
Take extra care with meat and fish: cooked meats should always be stored on a shelf above raw meats to avoid bacterial transfer. Keep raw meats on a plate which is large enough to collect juices and cover it with cling film or foil.
Leave space around food: this allows cold air to circulate around the Fridge, ensuring all parts of the Fridge are kept cool.
Wrap up food! to prevent transfer of flavors and drying out, food should be separately packed or covered. Fruit and vegetables need not be wrapped.
Pre-cooked food should be cooled properly: allow pre-cooked food to cool down before placing in the Fridge. This will help to stop the internal temperature of the Fridge from rising.
Shut the door! To prevent cold air escaping, try to limit the number of times you open the door. When returning from shopping, sort foods to be kept in your fridge before opening the door. Only open the door to put food in or take it out.
Where to store your foods in the fridge: Position different food in different compartments according to the table below.
| Refrigerator compartment | Type of food |
| Door or balconies of fridge compartment | ·Foods with natural preservatives, such as jams, juices, drinks, condiments. ·Do not store perishable foods |
| Crisper drawers | ·Fruits, herbs and |
| (salad drawer) | vegetables should be placed separately in the crisper bin • Do not store bananas, onions, potatoes, garlic in the refrigerator |
| Fridge shelf – middle | • Dairy products, eggs |
| Fridge shelf – top | • Foods that do no need coocking, such as ready-to-eat foods, deli meats, leftovers. |
| Freezer drawer(s)/tray | • Foods for long-term storage • Bottom drawer for raw meet, poultry, fish • Middle drawer for frozen vegetables, chips. • Top tray for ice cream, frozen fruit, frozen baked goods. |
Cool area: This is where to store foods which will keep longer if they are kept cool. Milk, eggs, yogurt, fruit juices, hard cheeses (e.g., Cheddar). Opened jars and bottles of salad dressings, sauces, and jams. Fats, e.g., butter, margarine, low-fat spreads, cooking fats, and lard.
Coldest area (0°C to 5°C): This is where foods which must be cold to keep them safe should be kept: - Raw and uncooked foods should always be wrapped. - Pre-cooked chilled foods, e.g., ready meals, meat pies, soft cheeses. - Pre-cooked meats, e.g., ham. - Prepared salads (including pre-packed mixed green salads, rice, potato salad, etc.). - Desserts, e.g., fromage frais, home-prepared food and leftovers, or cream cakes.
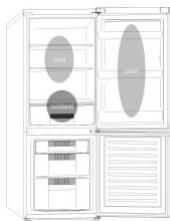
Crisper: This is the most humid part of the fridge. Vegetables, fruit, fresh salad items (e.g., unwashed whole lettuce, whole tomatoes, radishes, etc.) can be stored here.
WE RECOMMEND THAT ALL PRODUCE KEPT IN THE SALAD BIN IS WRAPPED.
NOTE: Always wrap and store raw meat, poultry, and fish on the lowest shelf at the bottom of the fridge. This will stop them dripping onto or touching
other foods. Do not store inflammable gases or liquids in the fridge.
Electrical operation: After 3 hours on the freezer, the temperature in the cabinet above -12°C, the alarm light is lit, and buzzer sounds.
Storing Frozen Food
Prepackaged commercially frozen food should be stored in accordance with the frozen food manufacturer's instructions for a freezer compartment.
To ensure that the high quality achieved by the frozen food manufacturer and the food retailer is maintained, the following should be remembered:
- Put packets in the freezer as quickly as possible after purchase.
- Do not exceed "Use By" or "Best Before" dates on the packaging.
| DO | DON'T |
| Defrost food from the freezer thoroughly in a fridge or in a microwave oven following defrosting and cooking instructions. | Use pointed sharp edged objects such as knives, forks to remove the ice. |
| Defrost frozen meat completely before cooking. | Put hot food in the freezer. Let it cool down first. |
| Store commercially frozen food in accordance with the instructions given on the packets that you buy. | Put liquid-filled bottles or sealed cans containing carbonated liquids into the freezer as they may burst. |
| Check contents of the refrigerator at regular intervals. | Remove items from the freezer with wet hands. |
| Clean and defrost your refrigerator regularly. | Freeze fizzy drinks. |
| Prepare fresh food for freezing in small portions to ensure rapid freezing. | Consume ice-cream and water ices direct from freezer. It may cause "freezer burns" on lips. |
| Always choose high quality fresh food and be sure it is thoroughly clean before you freeze it. | Store poisonous or dangerous substances in the freezer. |
| Wrap all foods in aluminum foil or freezer quality plastic bags and make sure any air is excluded. | |
| Wrap frozen food when you buy it and put it into the freezer shortly. | |
| Keep food for as short a time as possible and adhere to "Best Before", "Use By" dates. |
For more about storing, download the App and visit "Tips & Hints".
It's suggested to set the temperature at 4°C in the fridge compartment, and, if possible, at -18°C in the freezer compartment. - For most food categories, the longest storage time in the fridge compartment is achieved with colder temperatures. Since some particular products (such as fresh fruits and vegetables) may be damaged by colder temperatures, it is suggested to keep them in the crisper drawers, whenever present. If not present, maintain an average setting of the thermostat. - For frozen food, refer to the storage time written on the food packaging. This storage time is achieved whenever the setting respects the reference temperatures of the compartment (one-star -6°C, two stars -12°C, three stars -18°C).
ENERGY SAVING
For better energy saving, we suggest:
- Installing the appliance away from heat sources and not exposed to direct sunlight, and in a well-ventilated room.
- Avoid putting hot food into the refrigerator to avoid increasing the internal temperature and therefore causing continuous functioning of the compressor.
- Do not excessively stuff foods so as to ensure proper air circulation. Defrost the appliance in case there is ice to facilitate the transfer of cold.
- In case of absence of electrical energy, it is advisable to keep the refrigerator door closed.
- Open or keep the doors of the appliance open as little as possible.
- Avoid adjusting the setting to temperatures too cold.
- Remove dust present on the rear of the appliance.
TAKE CARE
Defrosting
This appliance has an automatic defrosting system; no need to defrost by hand.
Cleaning and Care
After defrosting, you should clean the Fridge/Freezer internally with a weak solution of bicarbonate of soda. Then rinse with warm water using a damp sponge or cloth and wipe dry. Wash the baskets in warm soapy water and ensure they are completely dry before replacing them in the Fridge/Freezer.
Condensation will form on the back wall of the fridge; however, it will normally run down the back wall and into the drain hole behind the salad bin. The drain hole will have a "cleaning spike" inserted into it. This ensures that small pieces of food cannot enter the drain. After you have cleaned the inside of your fridge and removed any food residues from around the hole, use the "cleaning spike" to make sure that there are no blockages. Use standard furniture polish to clean the fridge/freezer exterior.
Make sure that the doors are closed to prevent polish getting on the magnetic door seal or inside.
The grille of the condenser at the back of the fridge/freezer and the adjacent components can be vacuumed using a soft brush attachment.
Do not use harsh cleaners, scouring pads, or solvents to clean any part of the fridge/freezer.
CHANGING THE INTERNAL LIGHT
- Before carrying out the LED replacement, always disconnect the mains supply.
- Hold and lift up the LED light cover.
- Remove the old LED by unscrewing it in an anti-clockwise direction.
- Replace with a new LED light by screwing it in a clockwise direction, making sure that it is secure in the light holder.
- Refit the light cover and re-connect your fridge to the mains supply and switch on.
REVERSING THE DOOR SWING: Disassemble the Refrigerator Door
- a. Use a tool to remove the screw off the hinge cover, and then remove the latter. Insert the communication line into the hole on the cabinet top.
b. Use a tool to remove the 4 screws off the upper hinge cover and then remove the latter. Pry up the door bush and small end cap cover on the door. c. Insert the door bush and door communication line into the hole on the door and then put on the small end cap cover. d. Use a tool to remove the 2 screws as shown in the below figure to remove the hole cover on the cabinet top and get the cabinet communication line out of the hole.
Pry up the small end cap cover on the door and get out the door bush and door communication line.
e. Insert the door bush into the round hole on the door and then put on the small end cap cover. f. Move the refrigerator door upward over 500mm to remove the door.
- a. Use a tool to remove the 3 screws off the middle hinge cover and then remove the middle hinge.
b. Move the freezer door upward over 500mm to remove the door. c. Remove the adjustable front feet under the lower hinge; use a tool to remove the 4 screws from the lower hinge and then disassemble the lower hinge. Door disassembly is finished.
Assemble door, lower hinge accessories to the corresponding positions
- a. Use a tool to get the door bush out as
shown in the below figure and assemble it to the corresponding position of the other side. b. Use a tool to remove the screws off the stopper ass as shown in the below figure and then assemble them to the other side of the door.
c. Use a tool to remove the axle and two stoppers on the lower hinge and then assemble them to the position as shown in the below figure.
Assemble the refrigerator door and freezer door to the opposite side
- a. Remove the adjustable front foot as shown below by hand and then assemble the lower hinge to the other side of the cabinet and fix the screws by using a tool. b. Assemble the shorter adjustable front foot to the lower hinge side and adjust the height of the foot to make the refrigerator stay in level.
- Put on the freezer door and turn the middle hinge by 180 degrees and then assemble it to the other side of the cabinet; use a tool to screw up the 3 screws to fix the middle hinge.
- Put on the refrigerator door and assemble the upper hinge to the other side of the cabinet; use a tool to screw up the 4 screws to fix the upper hinge.
- After that, connect the door communication line and the cabinet communication line and then put on the upper hinge cover and fix it using a screw.
Assemble the hole cover to the other side of the cabinet and use a tool to screw up the hole cover.
Door disassembly is finished here.
Double check that the door is aligned correctly and all the seals are closed on all sides. If necessary, re-adjust the levelling feet.
NOTE: If you want to have the door swing reversed, we recommend that your contact a qualified technician. You should only try to reverse the door yourself if you believe that you are qualified to do so. All parts removed must be saved to do the reinstallation of the door. You should rest the fridge freezer on something solid so that it will not slip during the door change process. Do not lay the fridge freezer flat as this may damage the coolant system. Ensure the fridge freezer is unplugged and empty. We recommend that 2 people handle the fridge freezer during assembly.
Troubleshooting
If the appliance does not operate when switched on, check: Power cut: If the internal temperature of the fridge/freezer compartment is -18°C or less when the power returns, your food is safe. The food in your fridge/freezer will remain frozen for approximately 16
hours with the door closed. Do not open the fridge/freezer door more than necessary.
The product is designed and built for domestic household use only. - The plug is inserted properly in the socket and that the power supply is on. (To check the power supply to the socket, plug in another appliance). The fuse has blown/circuit breaker has tripped/main distribution switch has been turned off. The temperature control has been set correctly. If the refrigerator is exceptionally cold, you may have accidentally adjusted the thermostat control dial to a higher position. If the refrigerator is exceptionally warm, the compressor may not be working. Turn the thermostat control dial to the maximum setting and wait a few minutes. If there is no humming noise, it is not working. Contact the local store where your purchase was made. If condensation appears outside of the refrigerator, this may be due to a change in the room temperature. Wipe off any residue of moisture. If the problem continues, contact the local store where your purchase was made. If the provided plug has been replaced, make sure the new plug is properly connected. If the appliance is still not operating after the above checks, please contact Customer Service. To contact the technical assistance, visit our website: https://corporate.haier-europe.com/en/ Under the section "website", choose the brand of your product and your country. You will be redirected to the specific website where you can find the telephone number and form to contact the technical assistance.
Scrapping Old Appliances
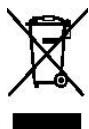
This appliance is marked according to the European directive 2012/19/EU on Waste Electrical and Electronic Equipment (WEEE).
WEEE contains both polluting substances (which can cause negative consequences for the environment) and basic components (which can be re-used). It is important to have WEEE subjected to specific treatments, in order to remove and dispose properly all pollutants, and recover and recycle all materials. Individuals can play an important role in ensuring that WEEE does not become an environmental issue; it is essential to follow some basic rules:
WEEE should not be treated as household waste.
WEEE should be handed over to the relevant collection points managed by the municipality or by
registered companies. In many countries, for large WEEE, home collection could be present.
In many countries, when you buy a new appliance, the old one may be returned to the retailer who has to collect it free of charge on a one-to-one basis, as long as the equipment is of equivalent type and has the same functions as the supplied equipment.
Conformity
By placing the CE mark on this product, we are confirming compliance with all relevant European safety, health and environmental requirements applicable in legislation for this product.
GUARANTEE
Minimum guarantee is: 2 years for EU Countries, 3 years for Turkey, 1 year for UK, 1 year for Russia, 3 years for Sweden, 2 years for Serbia, 5 years for Norway, 1 year for Morocco, 6 months for Algeria, Tunisia no legal warranty required.
AVAILABILITY OF SPARE PARTS
Thermostats, temperature sensors, printed circuit boards and light sources are available for a minimum period of seven years after placing the last unit of the model on the market.
Door handles, door hinges, trays and baskets for a minimum period of seven years and door gaskets for a minimum period of 10 years, after placing the last unit of the model on the market.
For further information about the product, please consult https://eprel.ec.europa.eu/ or scan the QR on the energy label supplied with the appliance.
TABLE OF CONTENTS
SAFETY INFORMATION
COMBI CANDY
Climate class
TRANSPORT INSTRUCTIONS
INSTALLATION INSTRUCTIONS
START-UP
COMBINED OPERATION
VERTICAL DISPLAY UNIT
ROUND DISPLAY UNIT
INTERNAL USER INTERFACE
TECHNICAL CHARACTERISTICS
FRESHNESS CONTROL
VERTICAL DISPLAY (IF PRESENT)
WATER DISPENSER (IF PRESENT)
THE VERTICAL DISPLAY
ROUND DISPLAY
INTERNAL USER INTERFACE
TECHNICAL SPECIFICATIONS
FRESHNESS CONTROL
ANTIBACTERIAL SYSTEM (if present)
WATER DISPENSER
at bed and breakfasts (B & B)
SENSOR FAULT ALARM (ALARM VED SENSORFEJL):
When it shows "E0", "E1", "E2" or other abnormal symbols, a sensor fault has occurred, and the refrigerator needs to be repaired.
ROUND DISPLAY (IF PRESENT)
VERTICAL DISPLAY (IF PRESENT)
ROUND DISPLAY (IF PRESENT)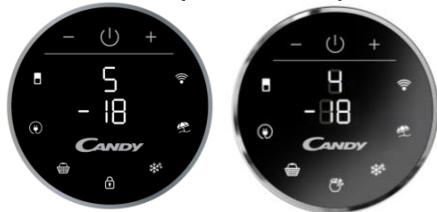
PURACTION EVO (IF PRESENT)
DISPOSAL OF OLD APPLIANCES
TECHNICAL SPECIFICATIONS
FRESHNESS CONTROL
ANTIBACTERIAL SYSTEM (if equipped)
WATER DISPENSER
DOOR ALARM FOR REFRIGERATOR: When
SAFETY INFORMATION
This manual contains important safety information. We advise you to keep these instructions in a safe place so that you can refer to them at any time and easily operate the device. The refrigerator contains refrigerant (R600a: isobutane) and insulation gas (cyclopentane) which are extremely environmentally compatible, but are flammable.

Caution: risk of fire
If the sealed cooling system is damaged:
- Avoid open flames and sources of ignition. Ventilate the room where the appliance is located well.
WARNING!
USER INSTRUCTIONS
TECHNICAL CHARACTERISTICS
FRESHNESS CONTROL
ANTIBACTERIAL SYSTEM (if present)
WATER DISPENSER
Tips for storing food perfectly in the refrigerator
How to store fresh food in the refrigerator
Storing frozen food
ENERGY LABEL
TROUBLESHOOTING
Installation
Cleaning and maintenance
CMRAHA HA KPYLUJKATA
OBPbUAAHE HABPATNTE
OTCTPAHRAHE HA IPOBJIEMN
Thank you for purchasing this product.
Before using your appliance,
please read this manual carefully
to achieve the best
efficiency. Keep this
document for future reference or
for other users. This product is intended
solely for domestic use or for
similar applications such as:
Kitchen areas for staff in shops, offices and other working environments; farmhouses; by clients in hotels, motels and other residential type environments; bed and breakfast (B & B)
for catering services and similar applications, but not for industrial processing of food.
The appliance must be used only for storing food; any other use is considered dangerous and the manufacturer is not liable for any damage and may void the warranty.
Please read these instructions carefully before using the appliance. To achieve the best possible efficiency and trouble-free operation of the refrigerator, it is very important to read these instructions carefully. Failure to follow these instructions may result in improper operation and void the warranty service.
SAFETY INFORMATION This manual contains important safety information.
We recommend that you keep these instructions
in a safe place for easy reference and proper use of the appliance.
The refrigerator contains the refrigerant
isobutane (R600a) and the insulating gas (cyclopentane), which are highly compatible with the environment, but they are flammable.

Warning: danger
of fire
If the cooling circuit is damaged:
- Avoid open flames and sources of ignition. Thoroughly ventilate
the room in which the appliance is located.
WARNING!
- Be careful when cleaning/moving the appliance and avoid touching the metal parts of the compressor at the back of the appliance, as you could injure your fingers or hands or damage your product. This appliance is not intended for storing any other items or for use by other persons. Do not attempt to repair or modify the inside of your appliance, as it is not intended for such use. You could injure yourself or damage the appliance. - Make sure that the power cord is not trapped under the appliance during and after moving it
to prevent damage to the power cord.
When positioning the appliance, be careful not to damage the floor, pipes, wall coverings, etc. Do not move the appliance by pulling the handle or the top. Do not allow children to play with the appliance or touch the controls. The manufacturer accepts no responsibility if the instructions are not followed. Do not install the appliance in damp, oily or dusty places, nor expose it to direct sunlight or water. Do not install the appliance near heat sources or flammable materials. If the power supply is interrupted,
Defrost the appliance. The frozen food should not be refrozen if the storage time has been less than 20 hours. If the storage time is prolonged, the food should be checked, removed, and refrozen immediately.
Do not touch the appliance if you notice that the lid of the horizontal freezer is opening automatically. This is due to the vacuum created inside, which will release and allow the lid to be opened after a few minutes. Do not connect the appliance to the electrical supply until all parts of the packaging and for transport have been removed. Leave it at rest
for 4 hours before switching it on, so that the compressor oil can be distributed, if it has been transported horizontally.
This freezer should only be used for its intended purpose (i.e., storing and freezing food products). Do not store medicines or research materials in the freezer. When materials that require temperature control are stored, it is possible that they may deteriorate or cause uncontrolled reactions, which could pose risks. - Remove the plug - Disconnect the power cord from the outlet. - Check the supply
Check that the product is not damaged and that all its parts and accessories are in perfect condition.
- If a leak is detected in the cooling system, do not touch the wall contacts and do not use open flames. Open the windows and leave the room ventilated. Then contact a service center for repairs. Do not use heaters or fans. Do not pull the power cord forcefully and do not bend the power cord, and do not touch the plug with wet hands. Do not damage the pipes and/or the power cord; this could cause electric shock or fire. Do not place or store flammable materials
and highly flammable materials such as ether, petrol, propane, butane, aerosols, paints, alcohol, etc. These materials can cause explosions.
If the power cord is damaged, to avoid danger, it must be replaced by the manufacturer, by a service technician, or by a person with similar qualifications. Do not use or store flammable sprays near the freezer. They can cause explosions or fire. Do not place objects/containers with water on the appliance. Do not obstruct the use of the plugs and adapters. - Do not damage
the appliance with fire. Be careful not to damage the cooling system/pipes of the appliance during transport or operation. In case of damage, do not expose the appliance to flames, disconnect it from the power source, and immediately ventilate the room where the appliance is located.
- The cooling system is designed for the interior of the wine refrigerator. The pipes must be protected from damage. Do not use electrical appliances in the storage compartments for food, unless they are of the type recommended by the manufacturer. Do not damage the cooling circuit. Do not use
Mechanical devices or other means to accelerate the defrosting process, other than those recommended by the manufacturer.
Do not use electrical appliances in the food storage compartments, unless they are of the type recommended by the manufacturer. Keep the ventilation openings on the appliance housing or in the built-in structure free of obstructions. Do not use sharp metal objects to remove frost. Do not touch the internal cooling elements, especially if your hands are wet, as you could burn or injure yourself.
- Never use steam cleaners, electric heaters, or similar electrical appliances for defrosting. Do not scrape with a knife or sharp object to remove frost or ice that has formed. These objects can damage the cooling circuit, and the resulting leak can cause a fire or injure you. Do not use mechanical devices or other equipment to speed up the defrosting process.
- Absolutely avoid using open flames or electrical equipment such as heaters, steam cleaners, candles, gas lamps, and similar, to speed up the defrosting process.
- Never use
Water for cleaning the compressor area: after cleaning, dry it well with a dry cloth to prevent rust.
- Keep the condenser clean. Accumulation of dust on the condenser can cause a fire.
- This appliance is intended for household use only.
- The warranty will be void if the product is installed or used in commercial or industrial applications.
- The product must be
- installed
- correctly, positioned
- and used in
- accordance with
- INSTRUCTIONS,
- This booklet contains
- the instructions for
- the consumer.
- the consumer.
- The warranty is valid only for new products and cannot be transferred if the product is resold. The company bears no responsibility for incidental or consequential damages.
- The warranty in no way reduces your legal or subjective rights.
- Do not perform repairs on this appliance yourself. Any intervention must be carried out only by qualified personnel.
- If you dispose of an old product with a lock or latch on the door, make sure it is left in a safe condition to prevent children from being trapped. This appliance can be used by children aged 8 years and above and by persons with
reduced physical, sensory or mental capabilities or lack of experience and knowledge, if they have been given supervision or instruction concerning use of the appliance in a safe way and understand the hazards involved.
- Children must not play with the appliance. Cleaning and maintenance must not be performed by children without supervision. Note: If your refrigerator/freezer is equipped with a lock, to prevent children from being trapped, keep the key away from children and not near the appliance. If disposing of an old fridge/freezer, remove all old doors and locks as a precautionary measure. For wine coolers: "This appliance is intended solely for
storing wine"
For free-standing appliances: "This cooling appliance is not intended for installation"; for appliances without a 4-star compartment: "This cooling appliance is not suitable for freezing foodstuffs";
CANDY
Climate class
The appliance is designed to operate in ambient temperature ranges depending on the climate zone. Do not use the appliance outside this range. The climate class of the appliance is indicated on the rating plate in the technical description in the installation section.
VERTICAL ADJUSTMENT (IF AVAILABLE)
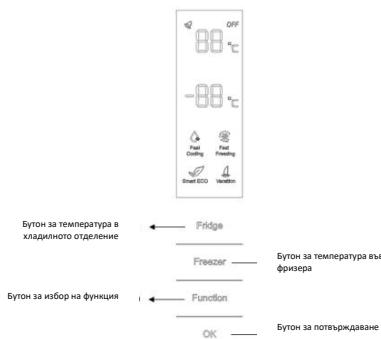
TEMPERATURE SETTING: Press the "Fridge" or "Freezer" button and while the indicator is flashing, you can set the temperature. The setting changes quickly with each press of the button. When the buttons "Fast Cooling", "Fast Freezing", Smart Eco and "Vacation" are activated, the temperature setting cannot be changed. During temperature setting, if no action is performed within 5 seconds, the button will stop flashing and the set temperature will be saved.
SMART ECO ("INTELLIGENT ECO
MODE"): Press the Smart Eco button to set the optimal energy efficiency temperature (+4°C for the fridge, -18°C for the freezer).
To turn on Smart Eco mode: Press the Function button until the Smart Eco icon starts flashing; then press OK to activate this mode.
To turn off Smart Eco mode: Press the Function button until the Smart Eco icon stops flashing; then press OK to turn off this mode. The icon lighting will turn off.
FAST COOLING (QUICK COOLING): You activate the "Quick Cooling" mode to quickly cool the refrigerator compartment. This
mode is automatically activated with the corresponding icon pressed.
To turn on Fast Cooling mode: Press the Function button until the Fast Cooling icon starts flashing; then press OK to set this mode.
To turn off Fast Cooling mode: Press the Function button until the Fast Cooling icon stops flashing; then press OK to turn off this mode.
FAST FREEZING (QUICK FREEZING): You activate the "Quick Freezing" mode to quickly freeze large quantities of food, preserving the nutritional properties. When the Fast Freezing icon lighting turns off, the temperature in the freezer returns to the set value, which was set before activating this mode. The Quick Freezing mode is programmed to turn off automatically after 26 hours. The Quick Freezing mode turns off when the Vacation mode ("Vacation") is activated.
To turn on Fast Freezing mode: Press the Function button until the Fast Freezing icon starts flashing; then press OK to turn on this mode.
To disable the Fast Freezing mode: press the Function button until the Fast Freezing icon stops blinking; then press OK to disable this mode.
VACATION ("HOLIDAY"): In case of
a prolonged period of non-use of the refrigerator, you can use the "Holiday" mode. In this mode, the refrigerator compartment stops working, but the freezer remains on. Make sure the refrigerator compartment has food before using this mode. This mode is activated and deactivated by pressing the corresponding icon. When the Vacation icon lights up, the temperature in the refrigerator compartment returns to the value set before activating this mode. When activating the Smart Eco and Fast Cooling modes, the Vacation mode is deactivated.
To enable Vacation mode: press the Function button until the Vacation icon starts blinking; then press OK to enable this mode.
To disable Vacation mode: press the Function button until the Vacation icon stops blinking; then press OK to disable this mode.
MEMORY FUNCTION FOR STORAGE:
The refrigerator remembers all settings in case of a power outage. When power is restored, the refrigerator continues to operate with the same settings that were set before the outage.
DELAYED START: To avoid damage to the refrigerator in case of a sudden power outage and subsequent restoration, the refrigerator will start automatically if the power outage was
less than 5 minutes.
HIGH TEMPERATURE ALARM IN THE FREEZER (only when switched on): When the temperature in the freezer is higher than 10°C during initial connection to power, the freezer indicator lights up, and the temperature number in the freezer starts blinking. Press the product button or wait 5 seconds. The number will stop blinking and return to the set temperature.
DOOR OPEN ALARM FOR THE REFRIGERATOR:
If the refrigerator door is left open for more than 3 minutes, an audible alarm will sound. Close the door or press the product button to stop the alarm, but note that the alarm will sound again after 3 minutes.
SENSOR ERROR ALARM: If the display shows "E0", "E1", "E2" or other unusual symbols, this means that one of the sensors is damaged. The refrigerator must be repaired.
CIRCULAR DISPLAY (IF AVAILABLE)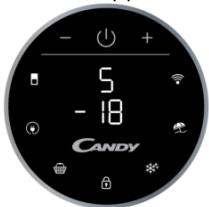
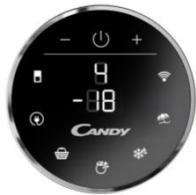
The circular display represents the user interface. When the refrigerator is turned on, the indicators will light up. When a button is pressed for any of the functions, the corresponding indicator lights up. TEMPERATURE SETTING: Press the "MODE" icon to change the temperature.
Button "PURACTION EVO": Press and hold for 3 seconds to turn off and on the appliance.
-Temperature in the refrigerator compartment: Press the "MODE" button repeatedly. The number for the refrigerator compartment will flash. You can set the desired temperature with the "+" and "-" buttons.
-Temperature in the freezer: Press the "MODE" button for the freezer. The number for the freezer will flash. You can set the desired temperature with the "+" and "-" buttons.
Button "PURACTION EVO": You can activate the "PURACTION EVO" function by pressing the button. The "PURACTION EVO" icon will light up.
Icon "ECO MODE": Press the "ECO MODE" icon to set the optimal energy efficiency temperature (+5°C in the refrigerator, -18°C in the freezer). The mode is activated and confirmed when the light on the icon changes from white to blue.
If you want to exit "ECO MODE", you must press the "ECO MODE" icon again and the temperature will return to the previous setting.
Icon "SUPER COOL": Press the "SUPER COOL" icon to start rapid cooling in the refrigerator compartment. The mode is activated and confirmed when the light on the icon changes from white to blue.
If you want to exit the mode
'SUPER COOL', you must press the 'SUPER COOL' icon again and the temperature will return to the previous setting.
Icon "LOCK": Press the icon
"LOCK" to lock the appliance to prevent unintended use. If this function is enabled, the icon (light) will stay on. When this function is enabled, you cannot change settings. To unlock the function, press and hold the icon for 3 seconds to turn it off.
Icon "SUPER FREEZE": Press the "SUPER FREEZE" icon to quickly freeze large quantities of food, preserving the nutritional properties. The mode is activated and confirmed when the light on the icon changes from white to blue.
If you want to exit the mode
"SUPER FREEZE", you must press the "SUPER FREEZE" icon again and the temperature will return to the previous setting.
Icon "HOLIDAY": In case of a long period of absence, you can use the "HOLIDAY" mode. In this mode, the refrigerator compartment stops working, but the freezer remains on. Make sure there is food in the refrigerator compartment before using this mode. The mode is activated and confirmed when the light on the icon changes from white to blue.
If the display shows "Error", you need to press the "Error" button again.
The temperature in the refrigerator compartment is set to the default value. To calibrate the "No Frost" system, press the button.
Wi-Fi icon: The appliance is equipped with SmartFi+ technology, which allows remote control via the app. Press the Wi-Fi icon and hold for 3 seconds to activate the Wi-Fi function. The light on the icon will change accordingly.
Registering the appliance (in the app):
Download the SimplyFi app on your device. The Candy SimplyFi app is available for Android and iOS devices, both for tablets and smartphones. You can learn about the functions of the SmartFi+ app by starting it in DEMO mode.
Open the app, create a user profile and register the appliance, following the instructions on the display.
The appliance is equipped with a user manual, included with the appliance. This manual is necessary only during the initial installation. To complete the registration, follow the on-screen instructions on your device.
Remote control of the refrigerator via the app: Once you have completed registration and the appliance is connected, the Wi-Fi indicator will light up. After that, you can control the appliance either by using the buttons on the display or through the app: they will reflect the last command and are synchronized.
Internal user interface (if available)

SET button: Press the SET button to adjust the temperature until you reach the desired level: "1" for the coldest, "4" for the warmest. Under normal operating conditions, we recommend using the middle setting (level "2"). When the setting is saved, the indicator light will blink for 3 seconds. The default temperature setting is level "2". Press and hold the SET button for 3 seconds to start the self-test program of the refrigerator. The self-test program lasts 10 minutes, during which the function for prolonged pressing of the SET button will not work.
Wi-Fi button: The appliance is equipped with SmartFi+ technology, which allows remote control via the app. Press the Wi-Fi icon and hold for 3 seconds to activate the Wi-Fi function. The light on the icon will change accordingly.
Registering the appliance (in the app):
Download the SimplyFi app on your device. The Candy SimplyFi app is available for Android and iOS devices, both for tablets and smartphones. You can learn about the functions of the SmartFi+ app by starting it in DEMO mode.
Open the app, create a user profile and register the appliance, following the instructions on the display. The appliance is equipped with a user manual, included with the appliance. This manual is necessary only during the initial installation. To complete the registration, follow the on-screen instructions on your smartphone/tablet.
AucmaunzouhoynpaBneHaeXnaadunnuka qpe3 npunoenmuo:Korato npinklouhnte c pernctpaunha ypeDa,HNdKaTopb3aWi-Fi ce CBteTHe.CnTe TOBa UeMoKTe Da npabIbaTe ypeDa KaTo KATO N3NoJ3Be TByOHTHe Ha DnCnJeu nnYpe3 npinloxehMeTO:Te ueOTHtATNocJeHATA 3daJaHa KOMaHd eEnHOBpEmHo.
Bytoh FAST COOL: KOrato HaTnchete 6yToHa FAST COOL,ce BKnIOBa peKm3a 3b6p3o OxlanDaHe, Bb3 OCHOBaHa 21°C ,O6O3NaeHn Ha KOHTPOnHn naHe. MakcmaHnTOBpeMe 3pa60ta nOtO npeKm e 3u., CneI KoTe TempePaTpyaTa Ce Bpua o6paTHo HnHBO"1".
Ako no bpeme ha 6bpr30TO oxlaJkDahe hatachete 6bytoha SET, pekimbt ce npekapraIBA BeDnara I xlaIaIIHHKbT ce BpIa oBaTHo Kbl mpeXdoHaTa hataroka.
TEXHUNECKN XAPAKTEPHCTNUKIN FRESHNESS CONTROL (Ako E HAJINUHA)
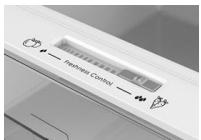
BlaarodareHne Ha Фуншпета 3a 3ana3BaHe на CBeKeCTTa, можете Да CTe CnIpyN, ч НИВОТА НВЯЖHOCTTA На ПLOДOBETe N
3eHnHyUHTe B YcEMeJKeTO 3a CBeXO cbXpaHene e npabInHoTo. PnpdBxHete nIb3raqA oT IaBO ha DaHO, 3a Da YBEuINHe TBAJHXOCTTa.
PURACTION EVO (AKO E HAIHHA)
Функиета „PURACTION EVO" ceстся рчес натисане на понота „PURACTION EVO", Когто светва на дислгя. Ть се вклочы, Когто 6утоьт e натисата орпебелен лорiod OT bрeme (20 MNHTI) и рпп BCЯКО отваре Н врата. Лкимпete ca ONТIMMЗИРANH, за де rapантURA на -Добрatura efeKFTHBHOCT и на -нисда Загба на e_HEргия. LED UVA CBETINHITE АктуВИРAT TITANHEМФЛТьр, КоTO АктуВИРа peakuzma на „фOTOKАТДИЗ", Когто разршава бадерпинь Вьь Вьздуха Bхладлнika. ФИNTlbрп Има пordьлжіntelНСТ 10 roДИН. Ан'tбадерпиньпата состEMA Трабба д за сизлочи no bpeme на Теста зnotpeбление на e_HEргия.
ДИСПЕHCEP 3A BOДА (АКОЕHAJIМУHA)
XpynkabOCT:TOBa e HauBnKaHHaTc aact OT
XlaqinHnka.3eIeHcyu, nloObe, cBeJa caIaTa, hAnp. HeMHTa 1aMapyI, ceIi DomATn, penNKn np. MoTg Da Ce CbXPAHBArTuK. HNE PEPNOPBcBAME, BCNUKN IPOJyKTN, CbXPAHBAHn BOTDEJIENHEIETO 3A CAJATN, DA BbDAT ONAKOBAHN.
3A6ELEKKA:BnHaRn onakobaiTe n cBxpanBaIte CypBO MeCO, nTIuN n pIb6 ha NaH-NHCKn PAOT B DOHNATA qaCT Ha XnaDInNtKa. TOBa Ie rN cPne da Kaanr nn da DOKOCBat dpyrn xpaHn. He CbxpanBaIbTe 3anaJInteHn raOBe Nn TEchOCTN B XnaDInNtKa.
EleKtpnuecka pa60ta, cIe3 3uaca BvB φpns3epa, Tempepatypata B ka6nHa t e nad-12°C, anapMaTa CBETInHa e BkIIOUeHa n 3yMep 3Byu.
CbxaheHHe Ha 3aMPa3eHa xpaHa
PpeBapTeHNO onakobHn 3ampa3ehaOT TbproBa xpHa Tp8Ba Da ce CbxpanBa cnopeN HcTpyKuNTHe Na pOun3BODHTeJIa Ha 3aMpa3eha XpHa 3a Kx P0n3epHa KaMepa. 3a Da ce rapaHTnpoDdpaJHKaHTo Ha BVCOKO KaueCTBO, NOCTHnHATO OT npObn3BODHTeJIa Ha 3aMaP3eHN XpAHn I N ot TbProBa eHa npe6Ho, Tp8Ba Da ce HmpeBnD CneDhoto:
- The appliance can be installed more quickly with the help of another person.
- Do not exceed the "Use by" or "Best before" dates indicated on the packaging.
| ДА | НЕ |
| РазмразяbaиTe xpaHATAOTфрпзераВхладинникИиВ МИКРОБьЛНоваФурна, кATO сLEDEВATEИнСТРУКУПИTe 3aразмразяbaиНЯ GOTBEve. | ИзползваиTe рpeДметиC остри рьбove кATOнOXOBe, ВИициЗЯпremaxвае на лесд. |
| РазмразяbaиTe habлароЗamразенTo MecoIпеди GOTBEve. | Слагаite ropeша xpaNaBb Фрпзера. OсавeteЯ пьрBO DA ce oxlaadi. |
| СыханяbaиTeЗамразенATA OTТьproвецхраанссорedиИнСТРУКУПИTe,nomecтениHaОпAKOБКУПTe,КОПТOKУБaTe. | Слагаite nbLHINCSteuHOCST bSYTILKINIлI3ATВОЕниMetaJIHNNcьdoBEc razirapaniNteчнocStY BByФрпзера,ТькотКOMТДаИЗБУХНAT. |
| ПюberяbaиTeСыдьржанetoHaXладинIHинka NaHa peRdOBHINIIHTEpВaII.N. | ИЗвождайTe npodyKTNOTфрпзера CMokрinerbue. |
| ПочистяныпразмразяbaиTe ФрпзераpeRdOBHo. | ЗамразяbaиTe ra3iPraHAnHahnITKII. |
| ПриюгяbaиТпяснхраHA Na 3aЗамрAZBaBe BМалки поци,зд acOsmigyrte 6bр30ЗамрAZBaHae. | КонсуmpаiteСладоiled И Кубчetedу ledДирекTHO OTфрпзера.Mоже дprinuHIn"STydOBO nI3rapaHNe"HaуCTNITE. |
| Винаги ИЗбирaiteВисkokokacheCTBENIPrechenxхраиипюреваяддпс calonichesteni Добpe р dedиDAгиЗмраite. | СыханяbaиTe OTРВИNHINlОпаснВБецемТВьБФрпзера. |
| ОпakовäиTe BCSЯха в alummeheBoФолноИиВ НайLOHOBITorpбчкNs 3aСыханяbaиTe BbФрпзераи се уBEReTe,ЧeВ ТяХ Hee octahanBb3dux. | |
| ОпakовäиTeЗамразенATAхранa,BalymunneBoФолноИиВ НайLOHOBITorpбчкNs 3aСыханяbaиTe BbФрпзераСКОPO СLEДТОВa. | |
| СыханяbaиTe xpaHATAKOLKOTo ce може по-Kратки и садыbaиTeДатITE"ГоДно Do", "ИзолзbaиTe do". |
For more information on storage, download the app and visit "Useful Tips".
- It is recommended to set the temperature in the fridge compartment to 4°C and, if
possible, -18°C in the freezer compartment.
For all categories of food, the recommended storage time in the fridge compartment is at the specified temperature. Since certain products (such as fresh meat and fish) may deteriorate at that temperature, it is recommended to store them in the dedicated drawers for fresh storage, if available. In any case, check the temperature of the appliance.
For frozen food, follow the storage time indicated on the food packaging. This time is achieved when the appliance settings correspond to the temperatures in the compartment (one star -6°C, two stars -12°C, three stars -18°C).
ENERGY EFFICIENCY
For better energy efficiency, we recommend:
Install the appliance away from heat sources and direct sunlight, in a well-ventilated room. Avoid placing hot food in the refrigerator, as this raises the internal temperature, leading to longer compressor operation. Do not overfill with food to ensure good air circulation. Defrost the appliance regularly, if applicable, to reduce cold air transfer. In case of a power outage, it is recommended to keep the refrigerator door closed. Open the door as little as possible. Avoid setting the thermostat to excessively low temperatures. Clean the appliance regularly from dust.
MAINTENANCE
Defrosting
The appliance is equipped with an automatic defrosting system, so manual defrosting is not necessary.
Before defrosting, you must remove the refrigerator/freezer plug from the socket. Follow the instructions, using a soft cloth and warm water with a little baking soda. Then rinse with clean water and dry thoroughly. Make sure the surfaces are completely dry before plugging the refrigerator/freezer back in. Condensation may form on the refrigerator's outer surface; this is normal and will disappear after a short time. The manufacturer's warranty does not cover damage caused by improper use.
To clean the interior of the refrigerator, remove all shelves and drawers, wash them with warm water and a mild detergent, then dry them. Use a soft cloth or sponge to clean the interior surfaces. Avoid using abrasive cleaners or solvents. Make sure to dry all parts thoroughly before putting them back. To clean the exterior, use a soft cloth and a mild detergent. Do not use abrasive pads or harsh chemicals.
The condenser coils on the back of the refrigerator/freezer can be cleaned with a vacuum cleaner using a soft brush attachment.
Do not use abrasive cleaning agents, scouring pads, or solvents to clean the refrigerator/freezer.
REPLACING THE DOOR GASKET
- Unplug the refrigerator before replacing the gasket.
- Pull and remove the gasket from the door.
- Remove the old gasket by pulling it in the direction opposite to the clock's hands.
- Install the new gasket by pressing it in the direction of the clock's hands and make sure it is securely attached to the door.
- Put the gasket back on the door, plug in the power cord, and start the refrigerator.
REVERSING THE DOOR HINGES
- a) Using a screwdriver, remove the screws from the top hinge and lift it off. Disconnect the communication cable from the opening in the top part of the body. b) Using a screwdriver, remove the 4 screws from the top hinge and take it off. Remove the hinge pin from the door. c) Insert the hinge pin and the communication cable into the opening on the door, then put the hinge back. d) Using a screwdriver, remove the 2 screws as shown in the illustration below to remove the hinge from the opening in the top part of the body and pull the communication cable out of the opening. Remove the door and the bushing and the communication cable. e) Insert the bushing into the round opening on the door and then put the hinge back. f) To remove the refrigerator door, you need to lift it more than 5 cm.
- a). Using a screwdriver, loosen the 3 screws on the duct of the middle shelf, then remove it. b). To remove the door hinge, you need to
lift it more than 5 cm.
b). Remove the pre-installed adjusting bracket from the lower shelf. Use a screwdriver to loosen the 4 screws on the lower shelf, then remove it. This completes the disassembly of the doors.
Mounting the door and lower shelf to their respective places
- a). Using a screwdriver, remove the plug as shown in the illustration below, then mount it in place on the rear side. b). Using a screwdriver, loosen the screws of the stoppers as shown in the illustration below, then remove them from the rear side. c). Using a screwdriver, remove the rest of the two stoppers from the lower shelf, then mount them in their places on the rear side, as shown in the illustration below.
Mounting the refrigerator/freezer door on the rear side
- a). First, remove the pre-installed bracket as shown below, then mount the lower shelf on the rear side and tighten the screws with a screwdriver. b). Mount the non-adjustable front bracket on the side of the lower shelf and adjust the height of the bracket so that the refrigerator remains in a horizontal position.
- Place the door hinge and turn the middle shelf 180 degrees, then mount it on the rear side of the housing. Use a screwdriver to tighten the 3 screws to secure the middle shelf.
- Place the bracket on the front side of the cabinet. Use a screwdriver to tighten the 4 screws to secure the bracket.
- Then connect the communication cables to the cabinet, and then place the bracket and tighten it with the screwdriver.
- Mount the bracket on the opening of the front side of the cabinet and use a screwdriver to tighten it. Properly align the bracket with the mounting holes. If necessary, adjust the leveling feet.
WARNING: If you want to reverse the door of the refrigerator, we recommend that you contact a qualified technician. Do not attempt to reverse the door yourself unless you have sufficient skills. Any disassembled part must be reinstalled after the door is reversed. The refrigerator must be unplugged and placed on a stable surface so that it does not tip over while reversing the door. Do not lay the refrigerator in any position, as this may damage the cooling system. Make sure the refrigerator is unplugged and empty. We recommend that the door reversal be performed by two people.
TROUBLESHOOTING
If the appliance does not work when it is turned on, check: - Power supply: The temperature of the refrigerator/freezer is -18°C or lower. When the refrigerator/freezer is set to freeze, the food is frozen. The food in the refrigerator/freezer remains frozen for up to 16 hours with the door closed. Do not open the refrigerator/freezer door more than necessary. - The product is designed and manufactured for domestic use only. - The plug is properly inserted into the socket and the power is on. (To check the power supply, turn on a lamp). - The thermostat is set correctly. The temperature control is set correctly. If the refrigerator is not cooling, the compressor may not be working. Turn the thermostat to the maximum setting and wait for a few minutes. If it does not start, it is not working. Contact the local dealer where the appliance was purchased. If the refrigerator is making a noise, this may be due to a change in room temperature. Remove all food from the appliance. If the problem persists, contact the local dealer where the appliance was purchased. If the power cord is damaged, check that it is replaced correctly. If after performing the above checks the appliance still does not work, please contact the service department. For technical assistance,
visit the website: https://corperate.haier-europe.com/en/. In the "websites" section, select the website for your country and your language. You will be redirected to the specific website where you can find the telephone number for contacting technical support.
DISPOSAL OF THE APPLIANCE
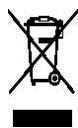
This product is marked in accordance with European Directive 2012/19/EC regarding waste electrical and electronic equipment (WEEE). WEEE contains both hazardous substances (which have negative effects on the environment) and basic components (which can be reused). It is important that WEEE is disposed of separately and correctly so that all hazardous substances are removed and all materials are recovered. Individual citizens can play an important role in ensuring that WEEE is not a problem for the environment; it is important to follow the basic rules: WEEE must not be treated as household waste.
WEEE must be delivered to designated collection points managed by the municipality or a registered representative. For large WEEE, in many countries there is the possibility of exchange on delivery.
In many countries, when purchasing a new device, the old one can be returned to the retailer, who is obliged to take it back free of charge on a one-for-one basis, provided that the device is of equivalent type and has the same functions as the new one.
Compliance
The marking on this product confirms compliance with all applicable European requirements for safety, health, and environmental protection, as required by legislation for this product. Warranty
The minimum warranty is: 2 years for EU countries, 3 years for Turkey, 1 year for the United Kingdom, 1 year for Russia, 3 years for Sweden, 2 years for Serbia, 5 years for Norway, 1 year
for Morocco, 6 months for Algeria; for Tunisia, no legal warranty is required.
AVAILABILITY OF SPARE PARTS
Thermostat, temperature sensors, heating elements, light bulbs: minimum 10 years after the last unit of the model is placed on the market. Door handles, door hinges, trays and baskets: minimum 10 years after the last unit of the model is placed on the market; for further information regarding the product, model, consult https://eprel.eec.europa.eu/ or scan the QR on the energy label supplied with the device.
SUMMARY
SAFETY INFORMATION
CANDY COMBI
Climate class
INFORMATION REGARDING TRANSPORT
INSTALLATION INSTRUCTIONS
USING THE FREEZER
OPERATING THE COMBI FRIDGE-FREEZER
VERTICAL DISPLAY
ROUND DISPLAY
INTERNAL USER INTERFACE
TECHNICAL SPECIFICATIONS
FRESHNESS CONTROL
ANTIBACTERIAL SYSTEM (if available)
WATER DISPENSER
INTERNAL USER INTERFACE
TECHNICAL SPECIFICATIONS
FRESHNESS CONTROL
ANTIBACTERIAL SYSTEM (if available)
WATER DISPENSER
FOOD STORAGE TIPS IN THE REFRIGERATOR
Storage of frozen products
ENERGY SAVING
CARE
Defrosting
Cleaning and care
REPLACING THE INTERIOR LAMP
REVERSING THE DOOR TO THE OTHER SIDE
TROUBLESHOOTING
UTILIZATION OF OLD APPLIANCES
Compliance
Thank you for purchasing this appliance. Before using the refrigerator, please read this instruction manual carefully to make the most of its features. Keep all documentation for future use by other users. The appliance is intended exclusively for domestic use, as well as for similar applications:
In kitchens for staff in shops, offices and other working environments;
In farmhouses, for clients of hotels, motels and other residential-type environments;
In bed and breakfast type hotels (B & B);
TEMPERATURE SETTING: Press the button
"Fridge" or "Freezer", and when the symbol starts flashing, you can set the temperature.
Each time you press the button, the temperature changes.
The temperature cannot be set during the following functions: Fast Cooling, Fast Freezing, Smart ECO, and Vacation. When setting the temperature, if no button is pressed for 5 seconds, the button stops flashing and the set temperature takes effect.
SMART ECO: Press the Smart Eco button to set the refrigerator temperature in the most energy-efficient mode (+4°C for the refrigerator compartment, -18°C for the freezer compartment).
To enter Smart Eco: press "option" until the light starts flashing, then
press "OK" to enter this function. To exit Smart Eco: press "option" until the function switches to Smart ECO, press "OK" to exit this function, the light goes out.
FAST COOLING: Activate the Fast Cooling mode to start an additional pulse for rapid cooling of the refrigerator compartment. The function is activated and confirmed by the corresponding indicator light.
To enter Fast Cooling: press "option" until "Fast Cooling" starts flashing, then press "OK" to enter this function.
To exit Fast Cooling: press "option" until the system switches to "Fast Cooling" mode, then press "OK" to deactivate this function.
FAST FREEZING: Activate the Fast Freezing mode to quickly freeze a large quantity of food while preserving their nutritional properties. When the light in Fast Freezing mode turns off, the freezer temperature returns to the value before Fast Freezing. When the Fast Freezing time increases (26 hours), it automatically turns off.
SIGNALING OF FREEZER COMPARTMENT
(Only when the appliance is plugged in): If
the freezer compartment temperature is above 10°C during the first hours after connection to the power supply, the freezer compartment indicator light turns on, and the symbol showing the temperature flashes.
Press any button or wait 5 seconds, the flashing stops, and the system returns to the set temperature.
REFRIGERATOR: If the refrigerator door remains open for more than 3 minutes, an audible alarm will sound. Close the door or press any button to stop the alarm. In the event of an alarm, the signal will be repeated after 3 minutes.
REFRIGERATOR TEMPERATURE SENSOR ALARM:
If the display shows "E0", "E1", "E2" or other error symbols, it indicates a sensor malfunction. The refrigerator needs repair.
DISPLAY CIRCLES (IF AVAILABLE)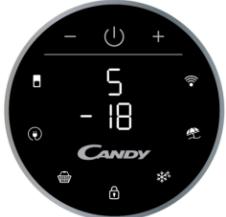
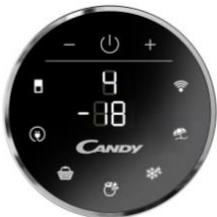
The display circles are
a touch user interface. When the refrigerator is on, the circles light up. When a function button is pressed, the icon changes from red to blue.
TEMPERATURE SETTING: Press the MODE button to change the temperature.
Humidity becomes higher when the slider moves left or right.
PURACTION EVO (OPTIONAL)
The PURACTION EVO function is activated by pressing the "PURACTION EVO" button on the display; the button then lights up. It operates when the button is pressed for a certain period (20 minutes) and with each door opening. The cycles are optimized to guarantee maximum efficiency and minimal energy consumption. The UV lamps activate titanium filters, resulting in a "photocatalysis" reaction that destroys bacteria in the air inside the refrigerator. The filter's lifespan is 10 years.
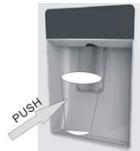
During the energy consumption test, the refrigerator should be disconnected.
ADVICE FOR STORING FOOD IN THE REFRIGERATOR
Pay special attention to meat:
Prepared meat dishes must be stored on the shelf above raw meat to prevent bacterial contamination. Store raw meat products on a plate large enough to prevent meat juices from dripping; also cover it with plastic wrap or foil.
The product compartment is cooled in this way: cold air will circulate in the refrigerator, maintaining a low temperature for all components inside it.
Wrap the products! To avoid the transfer of odors and drying out of products, they should be separated or covered. Fruits and vegetables must be wrapped in packaging.
Cooked dishes should be cooled properly: before placing a prepared dish in the refrigerator, wait until it has cooled down. This will prevent the temperature inside the refrigerator from rising.
Close the door! To avoid cold air leakage, try to open the refrigerator door as rarely as possible. Before putting purchased products in the refrigerator, sort them. Open the door only to take out or put in a product.
Storage zones in the refrigerator
Cool zone: a place where products will be stored longer if they are kept cool. Milk, yogurt, cottage cheese, fruit juices, hard cheeses such as cheddar. Opened jars for sauces, dressings, and jams. Fatty products, for example, butter, margarine, low-fat spreads, cooking oils, and lard.
Cold zone (from 0°C to +5°C): a place where products should be stored, the temperature of which must be low:
Cheeses and prepared products must be stored in packaging. -Ready-to-eat chilled products, such as cooked dishes, meat products, soft cheeses. -Cooked meat products, for example, ham. -Prepared salads (including packaged green salad mixes, rice and potato salads, etc.).
Desserts, for example, cheesecake, homemade dishes with cream.
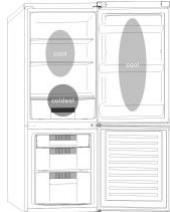
Crisper drawer for fruits and vegetables: the most humid zone of the refrigerator. Vegetables, fruits, fresh products for salads, etc. Here you can store lettuce, green tomatoes, radishes, etc. It is recommended to store all products for salads in packaging.
Note. Raw meat, poultry, and fish must be wrapped in packaging and stored on the lowest shelf in the lower part of the refrigerator. This prevents juices from dripping onto other products. Do not place flammable gases or liquids in the refrigerator.
If the temperature in the freezer after 3 hours of operation is above -12°C, the alarm indicator will sound and the buzzer will beep.
Storage of frozen products
Packaged products, previously frozen under industrial conditions, should be stored in accordance with the instructions of their manufacturer and for the freezer compartments.
To achieve the best quality of products, following the manufacturer's recommendations for frozen products, supported by the product organizer, you should remember the following:
1. Place the food in the freezer as soon as possible after purchase. 2. Do not exceed the storage time ("Use by...", "Best before") indicated on the packaging.
c. Insert the door hinge pin into the hole in the door, then attach the small end cap.
d. Use the tool to remove the screws, as shown in the figure below, to remove the cap of the hole on the upper part of the body and pull the wire out of the hole.
Remove the small end cap from the door and pull out the door hinge bushing.
e. Insert the hinge pin into the round hole in the door, then attach the small end cap.
f. Move the refrigerator door upward
by 500 mm to remove it.
- a. Use the tool to remove the 3 screws from the middle hinge cover, then remove the middle hinge.
b. Move the freezer door upward by 500 mm to remove the door. c. Remove the adjustable front feet and the lower hinge; use the tool to remove the screw and the lower hinge, then remove the lower hinge.
Door disassembly is complete.
Assemble the door by placing the lower hinge in the corresponding position.
- a. Use the tool to access the door bushing, as shown in the figure below, and insert it into the corresponding place on the other side.
If the problem cannot be resolved, contact the store where the appliance was purchased.

G
(B & B)
Therefore, AD = 2
J 1
Therefore, x1 = 2, x2 = -4
y
1
cb ②
2.
P
L
a 12 + a 22
Therefore, the area of triangle OBC equals the area of triangle COD plus the area of triangle BOC minus the area of triangle BOC.
Skill
1
jgl j
a.1i 1
2.
jll jgljj
Jiaiyj Jiu
a
1
Therefore, the area of triangle ACD equals the area of triangle COD plus the area of triangle BDO.
1
. 1
1
0j 1
1
Therefore, it is exactly x ≤ 1
1
j
y
Jia jia jia jia
g j 1
∴ = ( x 1,y 1) = ( x 2,y 2)
1/2
scally 8 glaa 1y gla
1
jies
puiu y
oiie iailgall
1
jieell jn jaiy
J 1
Therefore, the area of triangle OBC equals the area of triangle COD plus the area of triangle BOC minus the area of triangle BOC.
1
i
.
a#
y
.
0c1i+
L
4.1.2.1.1
j 1
1
i 15 1 1 y 1 p a b
4 2
The minimum value of a i aai is k .
y 1
-
1
1
- 1234567890
a
1
jll 1p j
Jb
jS| 8
J 1
a 1
gA
1j 1
1
| .دیبی نهان الهشام (هشام) | .دیبی نهان الهشام (هشام) | .دیبی نهان الهشام (هشام) |
| 90 مان 50 مان | 32 مان 10 مان | SN |
| 90 مان 61 مان | 32 مان 16 مان | N |
| 100 مان 61 مان | 38 مان 16 مان | ST |
| 110 مان 61 مان | 43 مان 16 مان | T |
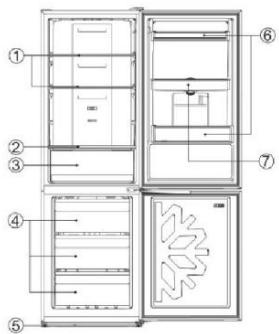
(1) Since g(x) = ln(1 + ax) - ln(1 - ax)
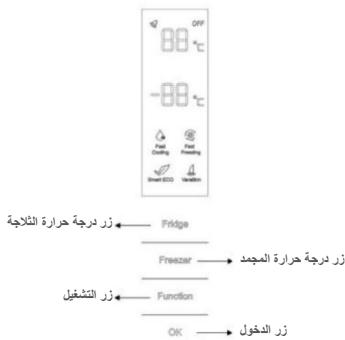

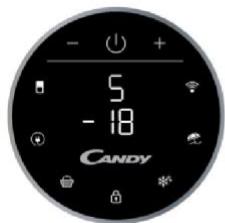
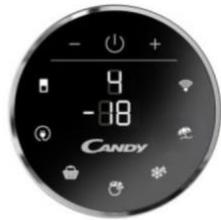
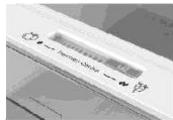
(1) PURACTION EVO
PURACTION EVO
Jae Jae. "PURACTION EVO"
10 10
Therefore, the area of triangle OBC equals the area of triangle COD plus the area of triangle BOC.
A. B. C. D. E.
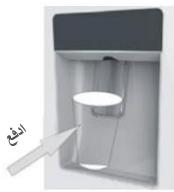
L
#
Jl l J 1 Jl j 2 LED 2 j 3 LED 4 LED 5 LED 6 LED 7 LED 8 L 5
#
aL
lll aln a jannall y slol pailal .a 1 all all jssg bas jy all jy p a all jall o gall e jall o gall o lla n a jy jy glall y slol b jay jay jay jay jay jay
aai 0j
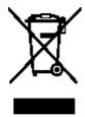
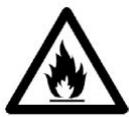
EU/19/2012 456 (WEEE) aee yiey yiey yiey yiey yiey yiey yiey yiey yiey yiey yiey yiey yiey yiey yiey yiey yiey yiey yiey yiey yiey yiey yiey yiey yiey yiey yiey yiey yiey yiey yiey yiey yiey yiey yiey yiey 456 ( WEEE) aee yiey yiey yiey yiey yiey yiey yiey yiey yiey yiey yiey yiey yiey yiey yiey yiey yiey yiey yiey yiey yiey yiey yiey yiey yiey yiey 456 ( wEEE) aee yiey yiey yiey yiey yiey yiey yiey yiey yiey 456 ( WEEE) aee yiey yiey yiey 456 ( WEEE) aee 456
- VERTICAL DISPLAY (ON SOME MODELS ONLY)
- INTERNAL USER INTERFACE (ON SOME MODELS ONLY)
- WATER DISPENSER (ON SOME MODELS ONLY)
- SAFETY INFORMATION
- WARNING
- COMBI REFRIGERATOR CANDY
- CLIMATE CLASS
- TRANSPORTATION INSTRUCTIONS
- INSTALLATION INSTRUCTIONS
- STARTING TO USE
- COMBI OPERATION
- APPLIANCE CONNECTED TO POWER AT THE FIRST TIME
- VERTICAL DISPLAY (IF PRESENT)
- TEMPERATURE SETTING: CLICK THE "FRIDGE" OR
- ROUNDED DISPLAY (IF PRESENT)
- INTERNAL USER INTERFACE (IF PRESENT)
- TECHNICAL FEATURES FRESHNESS CONTROL (IF PRESENT)
- PURACTION EVO (IF PRESENT)
- WATER DISPENSER (IF PRESENT)
- BEFORE FIRST USE
- FILLING THE WATER TANK WITH WATER
- DISPENSING
- TIPS FOR KEEPING FOOD PERFECT IN THE FRIDGE
- WHERE TO STORE YOUR FOODS IN THE FRIDGE: POSITION DIFFERENT FOOD IN DIFFERENT COMPARTMENTS ACCORDING TO THE TABLE BELOW
- STORING FROZEN FOOD
- ENERGY SAVING
- TAKE CARE
- DEFROSTING
- CLEANING AND CARE
- CHANGING THE INTERNAL LIGHT
- REVERSING THE DOOR SWING: DISASSEMBLE THE REFRIGERATOR DOOR
- ASSEMBLE DOOR, LOWER HINGE ACCESSORIES TO THE CORRESPONDING POSITIONS
- ASSEMBLE THE REFRIGERATOR DOOR AND FREEZER DOOR TO THE OPPOSITE SIDE
- TROUBLESHOOTING
- SCRAPPING OLD APPLIANCES
- CONFORMITY
- TABLE OF CONTENTS
- SENSOR FAULT ALARM (ALARM VED SENSORFEJL)
- ROUND DISPLAY (IF PRESENT)
- DISPOSAL OF OLD APPLIANCES
- CANDY
- VERTICAL ADJUSTMENT (IF AVAILABLE)
- SMART ECO ("INTELLIGENT ECO
- MEMORY FUNCTION FOR STORAGE
- DOOR OPEN ALARM FOR THE REFRIGERATOR
- INTERNAL USER INTERFACE (IF AVAILABLE)
- TEXHUNECKN XAPAKTEPHCTNUKIN FRESHNESS CONTROL (AKO E HAJINUHA)
- PURACTION EVO (AKO E HAIHHA)
- ДИСПЕHCEP 3A BOДА (АКОЕHAJIМУHA)
- XPYNKABOCT:TOBA E HAUBNKAHHATC AACT OT
- CBXAHEHHE HA 3AMPA3EHA XPAHA
- ENERGY EFFICIENCY
- MAINTENANCE
- REPLACING THE DOOR GASKET
- REVERSING THE DOOR HINGES
- MOUNTING THE DOOR AND LOWER SHELF TO THEIR RESPECTIVE PLACES
- MOUNTING THE REFRIGERATOR/FREEZER DOOR ON THE REAR SIDE
- DISPOSAL OF THE APPLIANCE
- COMPLIANCE
- AVAILABILITY OF SPARE PARTS
- SUMMARY
- SIGNALING OF FREEZER COMPARTMENT
- REFRIGERATOR TEMPERATURE SENSOR ALARM
- PURACTION EVO (OPTIONAL)
- ADVICE FOR STORING FOOD IN THE REFRIGERATOR
- PAY SPECIAL ATTENTION TO MEAT
- STORAGE ZONES IN THE REFRIGERATOR
- COLD ZONE (FROM 0°C TO +5°C): A PLACE WHERE PRODUCTS SHOULD BE STORED, THE TEMPERATURE OF WHICH MUST BE LOW
- STORAGE OF FROZEN PRODUCTS
- ASSEMBLE THE DOOR BY PLACING THE LOWER HINGE IN THE CORRESPONDING POSITION
- PURACTION EVO
- AL
- AAI 0J
Brand : CANDY
Model : CMNV7184B
Category : Washing machine