MMBV622M - MMBV622M--B - Blender BOSCH - Free user manual and instructions
Find the device manual for free MMBV622M - MMBV622M--B BOSCH in PDF.
Download the instructions for your Blender in PDF format for free! Find your manual MMBV622M - MMBV622M--B - BOSCH and take your electronic device back in hand. On this page are published all the documents necessary for the use of your device. MMBV622M - MMBV622M--B by BOSCH.
USER MANUAL MMBV622M - MMBV622M--B BOSCH
Register your new device on d MyBosch now an s: fit ne be e get fre / bosch-home.com e m welco
Crushed Ice herstellen
This appliance is intended for domestic use and the household environment only. Use the appliance only for processing normal amounts of food and for normal amounts of time in domestic use.
Do not exceed the permitted maximum quantities. This appliance is suitable for mixing liquid or semi-solid food, for cutting or chopping raw fruit and vegetables, for puréeing food and for chopping frozen food (such as fruit) or for crushing ice cubes. This appliance is suitable for applying a vacuum for processing or storage purposes. The appliance must not be used for processing other substances or objects. Only use the appliance indoors at room temperature and up to 2000 m above sea level.
Important safety notices
Read and follow the instruction manual carefully and keep for later reference! Enclose these instructions when you give the appliance to someone else.
If the instructions for correct use of the appliance are not observed, the manufacturer’s liability for any resulting damage will be excluded. This appliance can be used by persons with reduced physical, sensory or mental capabilities or lack of experience and/or knowledge if they are given supervision or instruction concerning safe use of the appliance and if they understand the hazards involved. Keep children away from the appliance and connecting cable and do not allow them to use it. Do not let children play with the appliance. Cleaning and user maintenance must not be performed by children. WW Risk of electric shock and fire! ■■ Connect and operate the appliance only in accordance with the specifications on the rating plate. Do not use the appliance if the power cord and/or appliance are damaged. Only our customer service may repair the appliance, e.g. by replacing a damaged power cord, in order to avoid hazards. ■■ Never connect the appliance to timer switches or remotecontrollable sockets. Never leave the appliance unattended while it is switched on! ■■ Do not place the appliance on or near hot surfaces, e.g. hobs. The power cord must not come into contact with hot parts or be pulled across sharp edges. 16
Important safety notices en
■■ Never immerse the base unit in water or place it in the dishwasher. Do not steam-clean the appliance. Do not use the appliance with damp hands.
■■ It must always be disconnected from the mains after each use, whenever the appliance is unsupervised, prior to assembly, disassembly or cleaning and in the event of an error. WW Risk of injury! ■■ Before replacing accessories or additional parts which move during operation, the appliance must be switched off and disconnected from the power supply. ■■ Care should be taken when handling the sharp cutting blades, emptying the container and during cleaning. ■■ To switch off the appliance, set the rotary selector to 0. ■■ After switching off, the drive continues running for a short time. Wait until the drive has come to a standstill. ■■ The appliance must be completely assembled before use. ■■ The blender jug, ToGo bottle and vacuum container should only be used with this appliance. WW Risk of suffocation! Do not allow children to play with the packaging material. WW Warning! ■■ Do not add liquids or foods above 60 °C. ■■ Check that there are no foreign objects in the blender jug. ■■ We recommend that the appliance is never switched on for longer than necessary to process food. Do not operate at no-load. ■■ Do not exceed the maximum permitted capacities. ■■ Only use the appliance with approved genuine parts and accessories. WW Important! It is essential to clean the appliance thoroughly after each use or after it has not been used for a long period. X “Cleaning and maintenance” see page 23
Congratulations on the purchase of your new Bosch appliance. You can find further information about our products on our website.
When using this instruction manual, you can unfold the cover pages of these instructions. There you will find illustrations marked with letters and numbering. Reference will be made to these illustrations throughout the manual (e.g. X Image sequence B).
1 Base unit / Motor block a Drive b Marking c Outlet opening d Cord tidy e Cord fastening f Supporting feet (4) 2 Vacuum unit a Cap b Clip for vacuum hose c Moisture sensors d Vacuum valve e Filter
Control panel a button (On/Off) b Rotary selector with marking c button button d e button f button g Marking h 0 zero position
/ i Marking Display panel a Status display b Symbols Blender jug a Container made of Tritan b Scale with 3 markings c Marking d Recess for lid lug e Blade insert with blender knife Lid a Vacuum seal b Lug ToGo bottle * a Container b Drinking cap c Lid d Vacuum seal Storage container (0.75 l / 1.5 l) * a Bowl b Lid c Vacuum seal d Setting rings for date (day/month) Vacuum hose a Connection to vacuum valve b Connection to container
* Depending on model
Before using for the first time
Before the new appliance can be used, it must be fully unpacked, cleaned and checked.
Never operate a damaged appliance! ■■ Remove the base unit and all accessories from the packaging and dispose of the packing materials.
Parts and controls en
■■ Check that all parts are present and examine them for obvious damage. X Fig. A ■■ Thoroughly clean and dry all parts before using for the first time. X “Cleaning and maintenance” see page 23
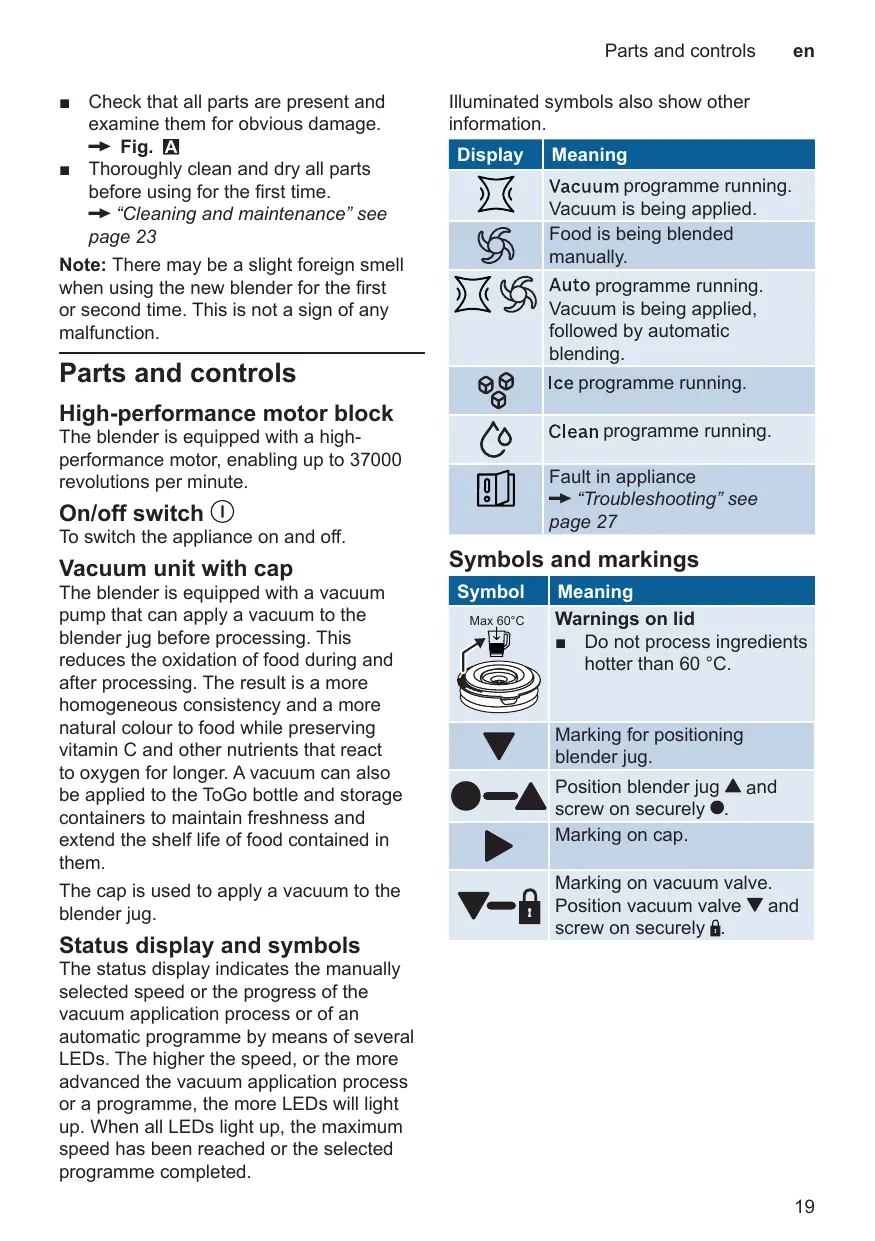
Illuminated symbols also show other information.
Vacuum is being applied. Food is being blended manually.
Note: There may be a slight foreign smell when using the new blender for the first or second time. This is not a sign of any malfunction.
Vacuum is being applied, followed by automatic blending.
High-performance motor block
The blender is equipped with a highperformance motor, enabling up to 37000 revolutions per minute.
X “Troubleshooting” see page 27
To switch the appliance on and off.
Vacuum unit with cap
The blender is equipped with a vacuum pump that can apply a vacuum to the blender jug before processing. This reduces the oxidation of food during and after processing. The result is a more homogeneous consistency and a more natural colour to food while preserving vitamin C and other nutrients that react to oxygen for longer. A vacuum can also be applied to the ToGo bottle and storage containers to maintain freshness and extend the shelf life of food contained in them.
The cap is used to apply a vacuum to the blender jug.
Status display and symbols
Symbols and markings
Warnings on lid ■■ Do not process ingredients hotter than 60 °C. Marking for positioning blender jug. Position blender jug and screw on securely . Marking on cap. Marking on vacuum valve. Position vacuum valve and screw on securely .
The status display indicates the manually selected speed or the progress of the vacuum application process or of an automatic programme by means of several
LEDs. The higher the speed, or the more advanced the vacuum application process or a programme, the more LEDs will light up. When all LEDs light up, the maximum speed has been reached or the selected programme completed. 19
For continuous adjustment of the blender knife speed.
Settings 0 Zero position - Blender will not start. Lowest speed Highest speed Highest speed, as long as rotary selector is held in this position. Note: If the rotary selector is not set to zero when switched on, the appliance cannot be operated. First turn the rotary selector to the zero setting.
Programme selection buttons
The appliance has 4 automatic programmes. The following programmes can be selected:
Programmes Automatic blending with vacuum applied To apply vacuum (for blender jug, ToGo bottle and storage containers) Cleaning programme For crushed ice Please note: –– To use the programmes, the rotary selector must be set to zero. –– Turning the rotary selector while using , or will stop the relevant programme. –– Pressing another programme selection button will stop the current programme. –– Briefly pressing the programme selection button will pause a programme. Press briefly again to restart. –– Pressing and holding or (approx. 2 seconds) will stop the relevant programme. To start the programme again, switch the appliance off and back on. 20
For processing up to 1.5 litres of food. The blender jug is made of Tritan. Tritan is an unbreakable plastic with no discernable taste or smell.
Warning! –– Do not add liquids or foods above 60 °C. –– Do not blend solid food without adding sufficient liquid. –– Mix powered food (e.g. icing sugar, cocoa powder, roasted soybeans, flour or protein powder) with sufficient liquid or fully dissolve it in liquid before blending it. When adding ingredients, observe the following values and markings on the blender jug. Maximum processing quantities max. 1.5 l X Liquids max. 1.0 l X Ingredients such as milk and dairy products liable to froth up with other ingredients X
Ingredients such as milk and dairy products liable to froth up
ToGo bottle and storage containers
To store food with vacuum applied.
Capacities ToGo bottle * Container, small * Container, large *
* Depending on model X “Accessories” see page 24
Lid with vacuum seal
For an air-tight seal on the blender jug,
ToGo bottle and storage containers. To remove a lid with vacuum applied, first grip the vacuum seal at one end and pull it up. Sufficient air has to get inside for the lid to be removed. The lids of the storage containers are equipped with a date indicator. Turn the two rings to set the day and month when the food was added.
The appliance has various safety systems.
X “Safety systems” see page 25
WWRisk of injury –– Do not reach into the blender knife. Grip the blade insert by the plastic only. –– Do not insert the mains plug until all preparations for working with the appliance are complete and the blender jug has been correctly positioned on the base unit. Warning! When the blender is assembled, do not lift it by the handle of the blender jug. To lift the blender, always grip it by the base unit/ motor block. X Image sequence B 1. Unwind the power cord to the required length. Important: Make sure that the power cord runs through the cable opening on the underside of the appliance. 2. Place the base unit on a stable and level work surface. Open the cap completely. 3. Turn the blender jug upside down and fit the blade insert with the sealing ring in it as shown. 4. Fit the lid of the blender jug onto the blade insert. 5. Rotate the blade insert clockwise to the stop with the help of the lid. 6. Remove the lid. Important: The recesses on the blade insert must be aligned with those on the blender jug.
7. Turn the blender jug up the right way and position on the drive as shown.
Marking pointing to . 8. Rotate the blender jug clockwise to the stop. Marking pointing to . 9. Prepare the food and add to the blender jug. Do not exceed the marking . Note: Always blend food with sufficient liquid as this will produce a better result. When adding ingredients liable to froth up such as milk and dairy products, do not exceed the marking . 10. Fit the lid and press on firmly. Observe the recess on the handle when doing so. Note: The lid can only be fitted in this position. 11. Close the cap and press down to the stop. 12. Insert the mains plug. Note: The blender can only be used if the following conditions are met. –– The blade insert and lid must be properly connected to the blender jug. –– The blender jug must be properly connected to the base unit. –– The cap must be completely closed.
Note: Table K shows examples for use of the blender.
Blending with automatic programme
1. Set the rotary selector to 0. Switch on the appliance with button. All indicators light up briefly once and a short signal tone sounds. The button lights up. 2. Press button. The and symbols light up. 3. The vacuum pump draws the air out of the blender jug. The status display LEDs light up one by one. Note: If the preset vacuum level is symbol then lights not reached, the up and 2 short signal tones sound. X “Troubleshooting” see page 27
4. The status display lights up halfway. The preset vacuum level is reached.
5. The blender starts processing automatically and blends the ingredients in a pulsing rhythm. The second half of the status display gradually lights up. 6. The blender ends processing automatically. Wait until the appliance comes to a standstill. 7. Switch off the appliance using button. Disconnect the mains plug. 8. Open the cap completely. 9. Turn the blender jug anticlockwise and remove. 10. Grip the vacuum seal at one end and pull it up. Sufficient air has to get inside the blender jug for the lid to be removed. 11. Pull the lid by the lug to remove. 12. Pour the blended food into another container. ■■ Clean all parts. X “Cleaning and maintenance” see page 23 Note: To keep the food fresh, put it in the ToGo bottle or storage containers after processing and apply a vacuum again. X “Storage with vacuum” see page 23
Manual blending with vacuum function
1. Set the rotary selector to 0. Switch on the appliance with button. All indicators light up briefly once and a short signal tone sounds. The button lights up. 2. Press button. The symbol lights up. 3. The vacuum pump draws the air out of the blender jug. The status display LEDs light up one by one. Note: If the preset vacuum level is not reached, the symbol then lights up and 2 short signal tones sound. X “Troubleshooting” see page 27 4. All status display LEDs are lit. The preset vacuum level is reached.
5. Set the rotary selector to the required level or
. The higher the speed, the more status display LEDs are lit. 6. Process the ingredients until the desired consistency is achieved. 7. Set the rotary selector to 0. Wait until the appliance comes to a standstill. ■■ Switch off the appliance using button. Disconnect the mains plug. ■■ Perform steps from 8. as described. X “Blending with automatic programme” see page 21
■■ Turn the rotary selector anticlockwise to and hold. the position
■■ The appliance will run at maximum speed for as long as the rotary selector is held. ■■ Release the rotary selector.
Blending without vacuum function
Prepare blender as described. X “Preparation” see page 21
1. Set the rotary selector to 0. Switch on button. the appliance with 2. Set the rotary selector to the required level or . The symbol lights up. The higher the speed, the more status display LEDs are lit. Note: During processing hold the blender securely by putting one hand on the cap. 3. Process the ingredients until the desired consistency is achieved. 4. Set the rotary selector to 0. Wait until the appliance comes to a standstill. 5. Switch off the appliance using button. Disconnect the mains plug. 6. Open the cap completely. 7. Turn the blender jug anticlockwise and remove. 8. Pull the lid by the lug to remove. Pour the blended food into another container. ■■ Clean all parts. X “Cleaning and maintenance” see page 23
Cleaning and maintenance en
Prepare the blender as described and add ice cubes. X “Preparation” see page 21
■■ Set the rotary selector to 0. Switch on the appliance with button. ■■ Press button. The symbol lights up. ■■ The blender automatically starts processing and crushes the ice cubes in a pulsing rhythm. The status display LEDs light up one by one. ■■ The blender ends processing automatically. Wait until the appliance comes to a standstill. ■■ Switch off the appliance using button. Disconnect the mains plug. ■■ Perform steps from 8. as described. X “Blending with automatic programme” see page 21
9. The vacuum pump draws the air out of the container. The symbol lights up.
The status display LEDs light up one by one. Note: If the preset vacuum level is symbol then lights not reached, the up and 2 short signal tones sound. X “Troubleshooting” see page 27 10. All status display LEDs are lit. The preset vacuum level is reached. button. 11. Switch off the appliance using Disconnect the mains plug. 12. Remove the hose from the ToGo bottle or container. Hold the cap securely and remove the hose from the vacuum valve. 13. Grip the vacuum seal at one end and pull it up. Sufficient air has to get inside the blender jug for the lid to be removed. 14. Open the drinking cap or lid.
Cleaning and maintenance
A vacuum can be applied to the ToGo bottle and storage containers with the blender to preserve the freshness and extend the shelf life of food contained in them.
WWWarning! No antibacterial effect results from vacuum application. Keep such food in the refrigerator and regularly check that it is still fresh! X Image sequence F 1. Add prepared or cooked food to the container required. 2. ToGo bottle: Fit the lid with the drinking cap and close securely. Fold up the lid. 3. Containers: Fit the lid and close securely. Set the date using the two rings on the lid. 4. Open the cap completely. 5. Fit the vacuum hose onto the vacuum valve. 6. Close the cap. Fit the hose onto the ToGo bottle or the lid of the container. 7. Set the rotary selector to 0. Switch on button. the appliance with 8. Press button.
The appliance and the individual parts used must be thoroughly cleaned after each use.
WWRisk of electric shock! –– Unplug the appliance before cleaning it. –– Never immerse the base unit in liquids and do not clean it in the dishwasher. –– Do not use a steam cleaner. WWRisk of injury! Do not touch the blender knife with your bare hands. Use a brush. Warning! –– Do not use cleaning agents containing alcohol or spirits. –– Do not use any sharp, pointed or metal objects. –– Do not use abrasive cloths or cleaning agents. Notes: –– Clean all parts immediately after use. This will prevent residues from drying on and possibly attacking the plastic (e.g. essential oils in herbs). –– When processing food such as carrots, plastic parts may become discoloured, but this can be removed with a few drops of cooking oil.
In Fig. J you will find a summary of how to clean the individual parts.
Using cleaning programme
For quick and easy precleaning.
■■ Fit the empty blender jug onto the appliance. ■■ Fill with 0.25 litres of warm water and 2 drops of washing-up liquid. Warning! The specified quantity of 0.25 litres must not be exceeded. ■■ Fit the lid and press on firmly. ■■ Close the cap and press down to the stop. ■■ Set the rotary selector to 0. Switch on button. the appliance with ■■ Press button. The symbol lights up. The status display LEDs light up one by one. ■■ The appliance runs through automatic precleaning including a brief vacuum application phase at the start of the programme. The programme ends automatically. ■■ Switch off the appliance using button. Disconnect the mains plug. ■■ Remove the blender jug with the lid. ■■ Grip the vacuum seal at one end and pull it up. Sufficient air has to get inside the blender jug for the lid to be removed. ■■ Rinse all parts thoroughly and clean again if necessary. ■■ To make cleaning the blender jug easier, remove the cover from the handle and replace once dry. ■■ Clean the base unit.
Removing the blade insert
1. Remove the lid. Turn the blender jug over. 2. Fit the lid onto the blade insert. 3. Rotate the lid anticlockwise and remove. 4. Remove the blade insert.
Removing the vacuum valve
X Image sequence H The vacuum valve can be removed for cleaning.
1. Rotate the vacuum valve anticlockwise and remove.
2. Thoroughly clean the cap, the two moisture sensors, the valve and the filter on the valve. 3. Make sure you dry all parts thoroughly. 4. Fit valve as shown. Marking pointing to . Rotate the valve clockwise to the stop. Marking pointing to .
Removing the setting rings
X Image sequence I In order to clean them thoroughly, the setting rings in the lid of the vacuum container can be removed.
1. Insert a small screwdriver into one of the two recesses of the safety ring and carefully lever out the ring by applying slight pressure. 2. Remove the safety ring and setting rings as shown. Thoroughly clean and dry all parts. 3. Insert the setting rings in the order shown. Insert the safety ring by applying slight pressure until it clicks into place.
Accessories and spare parts can be purchased via trade stockists or customer service. As the product range is being constantly extended, it is possible that there are meanwhile other accessories that are not listed here. In this case, go to www.bosch-home.com to see the latest accessories available.
Accessories MMZV0BT1 MMZV0SB0 MMZV0SB1 MMZV0SB2
Start lock-out / automatic cut-out The appliance can only be used with the blender jug it it has been fitted properly with the lid and the cap has been closed completely and properly. The appliance switches off automatically if the cap is opened during use.
The vacuum seal contains two moisture sensors. If moisture gets into the vacuum unit, the vacuum pump switches off automatically. X “Troubleshooting” see page 27
The motor switches off automatically if the appliance overheats. X “Troubleshooting” see page 27
Note: A slightly strange smell may occur if overload protection is activated. This is not a sign of any malfunction.
–– Table K shows further examples of application. –– Clean and chop food before processing. Remove hard components such as cores and peel. –– The recipes and application examples can also be carried out without an automatic programme. To do so, use the rotary selector to increase the speed from to and blend all ingredients until the required consistency is reached.
■■ Place all ingredients in the blender jug.
Fit the lid. Close the cap and press right down. ■■ Press button. The automatic programme applies a vacuum to the blender jug and blends all ingredients automatically. ■■ The automatic programme ends automatically after preparation. Pour the finished fruit smoothie into four glasses and serve. Tip: Depending on the ripeness of the strawberries, lightly sweetened fruit juices or sugar-free coconut water can also be used for making the smoothie.
Pineapple-mango smoothie
300 g peeled pineapple
1/2 mango 150 ml cold coconut water 150 g ice cubes 1 banana Cut the pineapple into small cubes. Peel the mango. Cut the flesh from the stone and chop into small pieces. Peel and dice the banana. ■■ Place all ingredients in the blender jug. Fit the lid. Close the cap and press right down. ■■ Press button. The automatic programme applies a vacuum to the blender jug and blends all ingredients automatically. ■■ The automatic programme ends automatically after preparation. Pour the finished fruit smoothie into four glasses and serve. Tip: Spices such as cinnamon, cardamom, mace or allspice can be used to give this exotic fruit smoothie extra flavour.
6 sprigs mint 300 ml apple juice 100 ml water Wash the strawberries, remove the stalks and cut in half. Wash the mint, shake dry and remove the leaves.
5 kiwis 200 g young spinach leaves 400 ml water 4 tbsp maple syrup Wash, drain and coarsely chop the spinach. Halve the avocado, remove the stone and spoon the flesh out of the shell. Peel and dice the kiwis. ■■ Place all ingredients in the blender jug. Fit the lid. Close the cap and press right down. ■■ Press button. The automatic programme applies a vacuum to the blender jug and blends all ingredients automatically. ■■ The automatic programme ends automatically after preparation. Pour the finished fruit smoothie into four glasses and serve. Tip: Serve the smoothie on crushed ice.
Dispose of packaging in an environ mentallyfriendly manner. This appliance is labelled in accordance with European Directive 2012/19/EU concerning used electrical and electronic appliances (waste electrical and electronic equipment – WEEE).
The guideline determines the frame work for the return and recycling of used appliances as applicable throughout the EU. Please ask your specialist retailer about current disposal facilities.
The guarantee conditions for this appliance are as defined by our representative in the country in which it is sold. Details regarding these conditions can be obtained from the dealer from whom the appliance was purchased. The bill of sale or receipt must be produced when making any claim under the terms of this guarantee.
In the following table you will find solutions for problems or faults which you can easily rectify yourself. If a fault cannot be eliminated, please contact customer service.
Problem Appliance fails to start up or switches off while in use. The symbol lights up.
Vacuum pump not running or switches off while in use. The symbol lights up.
Blender jug is not correctly positioned or has become detached. The cap is not closed properly. Lid or vacuum seal is soiled or damaged. Lid is not fitted properly / completely. The cap is not closed properly. Seal of blade insert is soiled or damaged. Blade insert is not fitted properly / completely. Moisture in vacuum unit Max. capacity exceeded
Appliance fails to start up or switches off while in use.
The overload protection device is activated.
Vacuum pump is running but the preset vacuum level is not reached. The symbol lights up and 2 short signal tones sound.
Fit the blender jug and lid properly.
Press cap right down.
■■ Switch off the appliance. ■■ Check lid, vacuum seal and seal of blade insert for damage. ■■ Clean and dry thoroughly and then replace. ■■ Rotate the blade insert in the blender jug to the stop. Observe the marking. ■■ Fit the lid correctly and press on firmly. Observe the recess on the handle when doing so. ■■ Press cap right down. ■■ Switch on the appliance and try again. Remove vacuum valve. Clean and dry the vacuum valve and cap thoroughly. Depending on the ingredients, do not fill marking on the beyond the relevant blender jug when filling. ■■ Set the rotary selector to 0. Wait until the appliance comes to a standstill. button. ■■ Switch off the appliance using Disconnect the mains plug. ■■ Let the appliance cool down for approx. 15-20 minutes and then switch it on again. ■■ If the appliance still does not start, leave the appliance to cool down further and try it again later.
Conformité d’utilisation
Conformité d’utilisation
Çilekli naneli smoothie
Thank you for buying a
Bosch Home Appliance! Register your new device on MyBosch now and profit directly from: • • • • •
Expert tips & tricks for your appliance
Warranty extension options Discounts for accessories & spare-parts Digital manual and all appliance data at hand Easy access to Bosch Home Appliances Service
Free and easy registration – also on mobile phones: www.bosch-home.com/welcome
You´ll find it here. Expert advice for your Bosch home appliances, need help with problems or a repair from Bosch experts. Find out everything about the many ways Bosch can support you: www.bosch-home.com/service Contact data of all countries are listed in the attached service directory.