
LFP416X - Range hood ELECTROLUX - Free user manual and instructions
Find the device manual for free LFP416X ELECTROLUX in PDF.
 FR
FR
 AR
AR
 BG
BG
 CS
CS
 DA
DA
 DE
DE
 EL
EL
 EN
EN
 ES
ES
 ET
ET
 FI
FI
 HU
HU
 IT
IT
 KK
KK
 LT
LT
 LV
LV
 MK
MK
 NL
NL
 NO
NO
 PL
PL
 PT
PT
 RO
RO
 RU
RU
 SK
SK
 SL
SL
 SQ
SQ
 SR
SR
 SV
SV
 TR
TR
 UK
UK
| Product type | Range hood |
| Brand | ELECTROLUX |
| Model | LFP416X |
| Number of speeds | 3 speeds (1st, 2nd, 3rd) |
| Lighting | Integrated LED, independent control |
| Grease filter type | Washable metal filter (dishwasher safe) |
| Charcoal filter | Optional, replace every 4 months |
| Controls | Touch panel, sliding tray |
| Usage | Pull the tray out more than 5 cm to expose the controls |
| Grease filter maintenance | Monthly cleaning, in dishwasher (short cycle, low temperature) |
| Surface maintenance | Soft cloth, warm water, mild detergent. No abrasive products |
| Safety | Instructions in the separate installation manual |
| Bulb replacement | LED, replacement only by a technician |
| Spare parts | Grease filters, charcoal filter, LED bulb available at electrolux.com/shop |
| Environmental information | Recycling through local channels. Do not dispose of with household waste |
Frequently Asked Questions - LFP416X ELECTROLUX
User questions about LFP416X ELECTROLUX
0 question about this device. Answer the ones you know or ask your own.
Ask a new question about this device
Download the instructions for your Range hood in PDF format for free! Find your manual LFP416X - ELECTROLUX and take your electronic device back in hand. On this page are published all the documents necessary for the use of your device. LFP416X by ELECTROLUX.
USER MANUAL LFP416X ELECTROLUX
3. IMPORTANT USER INFORMATION
3.1 Using the absorber
Check the pre-filter speed according to the table.
The absorber must be set to the low temperature and short cycles. The filter for the oil can lose light CN, but this does not affect the operation of the device.
- To mount the filters back, insert the two pins in the reverse order. Repeat the steps for each filter, if necessary.
5. DISPOSAL OF THE ENVIRONMENT
Recycle the materials with the symbol . Place the packaging in the appropriate recycling containers. Help protect the environment and human health, as well as
4.3 Replacing the filter with activated carbon - (optional)

WARNING!
Depending on the type, the filter may or may not be regenerable. See the leaflet provided with the filter.
To replace the filter:
1. Remove the oil filter from the device. See "Replacing the oil filter" in this chapter. 2. Pull out the divider at the bottom part of the filter.
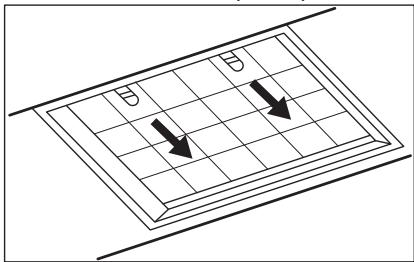
- Tilt the front part of the filter forward, then pull it out.
- To mount the new filter, insert the pins in the reverse order. In any case, it is necessary to replace the filters at least every four months.
4.4 Replacing the lamp
The light source (LED) is not replaceable. This part must only be replaced by a technician. In case of malfunction, see "Service" in the chapter "Safety Instructions".
Recycle materials marked with the symbol. Do not dispose of the product with household waste. Return the product to your local recycling facility or contact your municipal office.
- SAFETY INFORMATION AND INSTALLATION 6
- PRODUCT DESCRIPTION 7
- DAILY USE 7
- CLEANING AND MAINTENANCE 8
- ENVIRONMENTAL PROTECTION NOTES
WE'RE THINKING OF YOU
To operate the appliance:
WE'RE THINKING OF YOU
Thank you for purchasing an Electrolux appliance. You've chosen a product that brings with it decades of professional experience and innovation. Ingenious and stylish, it has been designed with you in mind. So whenever you use it, you can be safe in the knowledge that you'll get great results every time.
Welcome to Electrolux.
Visit our website to:

Get usage advice, brochures, trouble shooter, service and repair information: www.electrolux.com/support

Register your product for better service: www.registerelectrolux.com

Buy Accessories, Consumables and Original spare parts for your appliance: www.electrolux.com/shop
CUSTOMER CARE AND SERVICE
Always use original spare parts.
When contacting our Authorised Service Centre, ensure that you have the following data available: Model, PNC, Serial Number.
The information can be found on the rating plate.
Warning / Caution-Safety information
General information and tips
Environmental information
Subject to change without notice.
1. SAFETY INFORMATION AND INSTALLATION

WARNING!
Refer to the separate
Installation Instructions
booklet for Safety
Information and Installation.
Read carefully the Safety chapters before any use of
maintenance of the
appliance.
2. PRODUCT DESCRIPTION
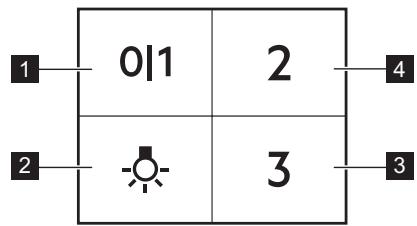
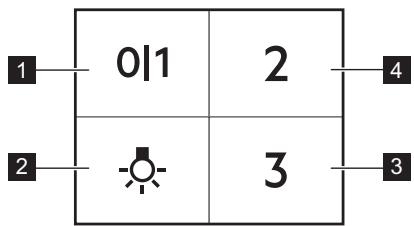
2.1 Control panel overview
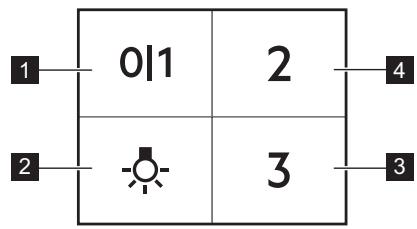
| Function | Description | |
| 1 | First Speed | The fan switches to first speed level. |
| 2 | Lamp | Turns the lights on and off. |
| 3 | Third Speed | The fan switches to third speed level. |
| 4 | Second Speed | The fan switches to second speed level. |
3. DAILY USE
3.1 Using the hood
Check the recommended speed according to the table below.
| 01 | While heating up food, cooking with covered pots. |
| 2 | While cooking with covered pots on multiple cooking zones or burners, gentle frying. |
| 3 | While boiling and frying big quantities of food without a lid, cooking on multiple cooking zones or burners. |
It is recommended to leave the hood operating for approximately 15 minutes after cooking.
To operate the hood:
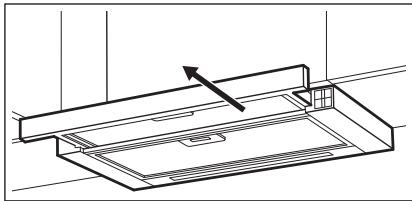
- Pull out the drawer of the hood more than 5 cm.
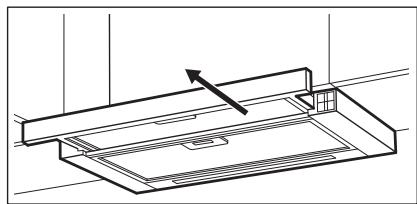
The control panel is exposed.
- To activate the function press the 01 button.
- If needed, change the speed by pressing the desired button.

The hood's light works independently of other hood functions. To illuminate the cooking surface, press the light button. Closing the drawer has no effect on the hood light.

The hood remembers the last fan speed setting when the drawer is closed. The hood will operate at this fan speed level when the drawer is pulled out again.
To turn off the fan, press 0 or close the hood drawer.
4. CARE AND CLEANING
4.1 Notes on cleaning
| Cleaning Agents | Do not use abrasive detergents and brushes. Clean the surface of the appliance with a soft cloth with warm water and a mild detergent. |
| After cooking some parts of appliance can get hot. To avoid stains appliance must be cooled down and dried with clean cloth or paper towels. | |
| Clean stains with a mild detergent. | |
| Keep the hood clean | Clean the appliance and grease filters each month. Clean the interior and grease filters carefully from fat. Fat accumulation or other residue may cause fire. |
| Grease filters can be washed in a dishwasher. The dishwasher must be set to a low temperature and a short cycle. The grease filter may discolour, it has no influence on the performance of the appliance. | |
| Charcoal filter | The time of saturation of the charcoal filter varies depending on the type of cooking and the regularity of cleaning the grease filter. |
4.2 Cleaning the grease filter
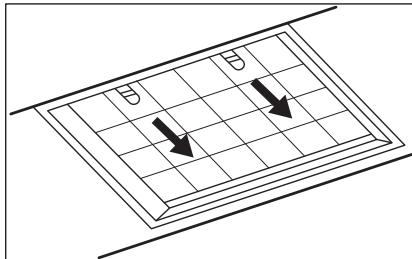
Filters are mounted with the use of clips and pins on the opposite side.
To clean the filter:
- Press the handle of the mounting clip on the filter panel underneath the hood.
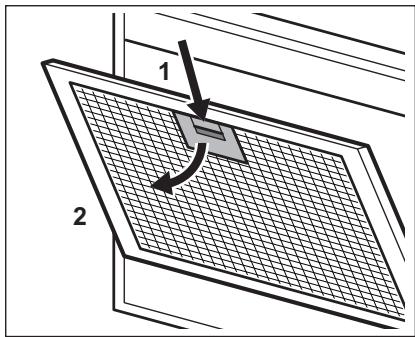
- Slightly tilt the front of the filter downwards, then pull. Repeat the first two steps for all filters.
- Clean the filters using a sponge with non-abrasive detergents or in a dishwasher.

The dishwasher must be set to a low temperature and a short cycle. The grease filter may discolour, but this has no influence on the performance of the appliance.
- To mount the filters back, follow the first two steps in reverse order. Repeat the steps for all filters if applicable. 4.3 Replacing the charcoal filter - optional

WARNING!
Depending on type, filter can be or cannot be regenerated. Refer to the leaflet provided with the filter.
To replace the filter:
- Remove the grease filters from the appliance. Refer to "Cleaning the grease filter" in this chapter.
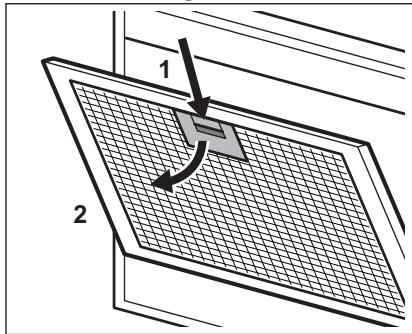
- Pull the tabs towards the bottom part of the filter.
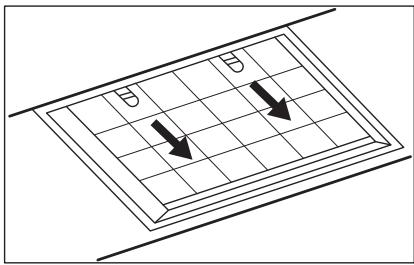
- Slightly tilt the front of the filter downwards, then pull.
- To install a new filter, perform the same steps in reverse order.
In any case, it is necessary to replace the filters at least every four months.
4.4 Replacing the lamp
This appliance is supplied with a LED lamp. This part can be replaced by a technician only. In case of any malfunction refer to "Service" in the "Safety Instructions" chapter.
5. ENVIRONMENTAL CONCERNS
Recycle materials with the symbol
Put the packaging in relevant containers to recycle it. Help protect the environment and human health by recycling waste of electrical and electronic appliances. Do not dispose of
appliances marked with the symbol with the household waste. Return the product to your local recycling facility or contact your municipal office.
- MAINTENANCE AND CLEANING 30
- ENVIRONMENTAL ASPECTS 31
WE THINK OF YOU
3. DAILY USE
3.1 Using the hood
Check the recommended speed according to the table below.
| 0|1 | Prilikom zagrijavanja hrane, kuhanja sPokrivenim posudama. |
| 2 | Prilikom kuhanja sPokrivenim posudama na više zona kuhanja ili plame-nika, lagano prženje. |
| 3 | Prilikom ključanja i prženja velikih količina hrane bezPoklopca, kuhanja na više zona kuhanja ili plamenika. |

It is recommended to leave the hood running for about 15 minutes after cooking.
To operate the hood:
- Pull out the hood drawer more than 5 cm.
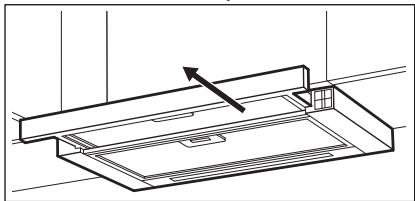
The control panel is exposed.
- To activate the function, press button 01
- If necessary, change the speed by pressing the touch button.


www.electrolux.com/support

Kakcbipak Kb3met any ywiin eHimih3di tipkehi3:
www.registerelectrolux.com

KpybIyfbHbI 3 yihn akceccyapnapbl, bIbIbIH MaTePnaIapbIH XHe KocaIKbl 6eIweKtepdi catbn anblbI3:
www.electrolux.com/shop
TYTbIHyUbIAPFA KOJIaY JXHe Kbl3MET KOPCETY
Opkaaan TynHcyckaJIbIK KocalKbI 6eJIweKtePepi naJaIaNbIbI3.
ÖkiñéTTi Kbl3MeT Kepcety opTaIbIbIMbl3fa xa6apnackaHa, MbHa depeKTePiH 6Olyh KaMTamacbl3 etiH3: YJri, PNC, cepraJIbIK hemip.
BynaknapaattbTexhikalbIKdepeKTep TaKaTaaCbHaH Ta6yfa 60anabl.
EckepTy/caKtbik-Kayinci3dk Typanbla aknapaT ①Жань aknapaT peH KeHeCTep KopwaFaH opTa TypaIbI aknapaT
Ehnpuyi eceptyci3 e3repic hri3y Kykbfbihne.
1. KAYINCI3ДIКKE JXHE OPHATYFA APHAJFAH AKПAPAT

ECKEPTY!
Kayinci3dkke Jxhe ophatyka TaBtcbaKnapaTka apHanfah KITanwadaH Kayinci3 ophaty TypaNbI HcKaynbIKbI KaPAHbI3. KyblfHbI NaJaAnaHy Hemece OFaH KbI3Met Kepcety aIdbIHda Kayinci3dkTypaNbI TapaynapDbMyKnRT OKbIN WbIFbIbI3.
2. B¥IbIM CINATTAMACbI
2.1 Baçkapy nahanıne sojnu
4.1 Table of contents
| ЖеміріWI 春уfliш 3aTTapДы JоHe WәTeKеpeppdi пайдананбаныЗ. КурblIfblHbIH aПдынFы JоФын JоMсak JоYfliш 3aT KOCblFaH Jоblbl cYfa 6aTbIbIbIfah JоMсak шYbepeкпeн ТаЗаланыЗ. |
| Таfram NicirpeHHen KeiH NурblIfblHbIH KeiBip 6eJIkTeperi bICbIg KeTyI МуMKiH. ДaKТы 6oJdIbPmac YшIH NурblIfblHbI cyblTbI, Ta3a шYbepeкпeн Нemecе KaFa3 cUŋrIMeH KурfaTу KepeK. |
| ДaKTapДы JоMсak JоYfliш 3aTпeH Ta3aIaNbI3. |
| Aya tarTkbls Kypalbls ta3a yctahb3 | КурьлгынblжэHe май сузгilepin ai салын ta3ааныз. Курьлгынbliш吉林省 Май сузгilepin Майдан ta3apынbl. Май хиналгда hemece backka kalдьк кинанса, орт kayин Тудьруbl МуMKH. |
| Майы сузгilepin blдьс суьblш машинада жууfa boлады. blдьс жуыш машинаfer Tмeн Temпература жэHe Кыckeц laNKp opnatу kepek. Май сузricinH tyci e3repyi МуMKH, buI Курьлгынblнжуblс icteyihe aceper etneidii. |
| Kemip cy3rici | Kemip cy3riciH TONY yakuBtBi TaFAM nicipydiH Typi MeH MaI cy3riciH KANshaJIbIKTBI JXII TazalaHfAByHa 6aIIaHbICTBI 6OlaDbI. |
It is recommended to let the extract sit for about 15 minutes after preparation.
Turning on the extractor;
- Pull the extractor out more than 5 cm.
The control panel is open.
The washable filters can be washed in a dishwasher.
The dishwasher must be set to a low-temperature cycle with a short cycle. The washable filter may change color; this does not affect the performance of the filter.

Carbon filter
The saturation time of the carbon filter depends on the type of cooking and the frequency of cleaning of the washable filter.
4.2 Cleaning
Washable filters
USER MANUAL AND SERVICE
Always use original spare parts.
When contacting the service center, have the following information ready: model, serial number, service number.
The instructions can be found in the technical characteristics.
Information about safety and instructions for use
All rights reserved.
1. SAFETY INFORMATION FOR INSTALLATION

WARNING!
Read the
brochure with instructions for
installation for
normal
safety
repair information:
www.electrolux.com/support
Register your product for better service:
www.registerelectrolux.com


Press the ventilator button, press or close the damper.
4. Technical data
4.1 Replacing the filter
To prepare for repeated processing of material, mark it with the appropriate
symbol. Dispose of the packaging in appropriate containers for recycling. Help protect the environment and the health of others and ensure recycling.
To replace the filter:
- Remove the dirty filter as described. See section "Cleaning the filter" in this chapter.
- Purchase a new filter from an authorized dealer.
- Gently press the front part of the filter down, then pull it out.
- To install a new filter, repeat the same steps in reverse order.
Replace the filter at least every six months.
4.4 Replacing the lamp
The appliance is supplied with an LED lamp. The lamp may only be replaced by a qualified specialist. In case of any malfunction, contact the service section of the safety instructions.
Recycling of electrical and electronic devices. Do not dispose of them
marked with the symbol together with other household waste.
www.electrolux.com/support
www.registerelectrolux.com
www.electrolux.com/shop


Julll PNC
a0dwl10og120-a/
aui Loglo
jolw jgduy aio
JgK 1


C E

- IMPORTANT USER INFORMATION
- USING THE ABSORBER
- DISPOSAL OF THE ENVIRONMENT
- WARNING
- REPLACING THE LAMP
- WE'RE THINKING OF YOU
- TO OPERATE THE APPLIANCE
- CUSTOMER CARE AND SERVICE
- SAFETY INFORMATION AND INSTALLATION
- PRODUCT DESCRIPTION
- CONTROL PANEL OVERVIEW
- DAILY USE
- USING THE HOOD
- TO OPERATE THE HOOD
- CARE AND CLEANING
- NOTES ON CLEANING
- CLEANING THE GREASE FILTER
- TO CLEAN THE FILTER
- ENVIRONMENTAL CONCERNS
- WE THINK OF YOU
- TYTBIHYUBIAPFA KOJIAY JXHE KBL3MET KOPCETY
- KAYINCI3ДIКKE JXHE OPHATYFA APHAJFAH AKПAPAT
- ECKEPTY
- B¥IBIM CINATTAMACBI
- BAÇKAPY NAHANINE SOJNU
- TABLE OF CONTENTS
- TURNING ON THE EXTRACTOR
- CLEANING
- WASHABLE FILTERS
- USER MANUAL AND SERVICE
- SAFETY INFORMATION FOR INSTALLATION
- TECHNICAL DATA
- REPLACING THE FILTER
- JGK
Brand : ELECTROLUX
Model : LFP416X
Category : Range hood