
TP705R01 - TQ703R07 - - - - - - - TP705R01--B - Coffee maker SIEMENS - Free user manual and instructions
Find the device manual for free TP705R01 - TQ703R07 - - - - - - - TP705R01--B SIEMENS in PDF.
| Product type | Automatic coffee machine |
| Brand | Siemens |
| Model | TP705R01 / TQ703R07 |
| Dimensions (H x W x D) | 38 cm x 30 cm x 46.7 cm |
| Net weight | 9 kg |
| Voltage / Frequency | 220-240 V ~ / 50 Hz |
| Connected power | 1500 W |
| Maximum static pump pressure | 20 bar |
| Water tank capacity | 2.6 L (without filter) |
| Bean hopper capacity | 350 g |
| Grinder type | Adjustable ceramic grinder |
| Main functions | DoubleShot, tripleShot, two-cup preparation, cup warmer, milk system, Home Connect |
| Maintenance | Calc'nClean programs, descaling, cleaning of brewing unit, automatic cleaning of milk system |
| Safety | Child safety lock, permanent magnets (distance 10 cm), adjustable auto-off |
| Accessories | Water filter, descaling/cleaning tablets, milk hose, microfiber cloth |
| After-sales service | Spare parts available for 7 years, consumer service (0892698110) |
Frequently Asked Questions - TP705R01 - TQ703R07 - - - - - - - TP705R01--B SIEMENS
User questions about TP705R01 - TQ703R07 - - - - - - - TP705R01--B SIEMENS
0 question about this device. Answer the ones you know or ask your own.
Ask a new question about this device
Download the instructions for your Coffee maker in PDF format for free! Find your manual TP705R01 - TQ703R07 - - - - - - - TP705R01--B - SIEMENS and take your electronic device back in hand. On this page are published all the documents necessary for the use of your device. TP705R01 - TQ703R07 - - - - - - - TP705R01--B by SIEMENS.
USER MANUAL TP705R01 - TQ703R07 - - - - - - - TP705R01--B SIEMENS
Fully automatic espresso machine
EQ.700 classic TP7....
en User manual
fr Manuel d'utilisation
nl Gebruikershandleiding
pl Instrukcja obslugi
cs Návod k obsslze
ru Руховозво пользователу
uk KepiВицтбо 3 ekспунацii
de Gebrauchsanleitung

Register your product on My Siemens and discover exclusive services and offers. siemens-home.bsh-group.com/welcome
The future moving in.
3
5

7
9
4
6
8
10
11
12
13
14
15
16
17
18
Table of contents
1 Safety 7
1.1 General information 7
1.2 Intended use 7
1.3 Restriction on user group..... 7
1.4 Safety information.. 7
2 Environmental protection and saving energy. 11
2.1 Disposing of packaging 11
2.2 Tips for saving energy 11
3 Installation and connection..... 11
3.1 Scope of delivery 11
3.2 Installing and connecting the appliance 11
4 Familiarising yourself with your appliance. 12
4.1 Appliance 12
4.2 Controls 12
5 Accessories. 13
6 Before using for the first time... 13
6.1 Preparing and cleaning the appliance 13
6.2 Checking the water hardness 13
6.3 Performing initial start-up 14
6.4 General information 14
7 Basic operation 15
7.1 Switching the appliance on or off 15
7.2 Dispensing beverages 15
7.3 doubleShot and tripleShot.....15
7.4 Dispensing a coffee beverage with milk 15
7.5 Dispensing two cups at once... 16
8Grinder 16
8.1 Adjusting the grinding level..... 16
9 Water filter 17
9.1 Inserting the water filter 17
9.2 Changing or removing the water filter 17
10 Childproof lock. 17
10.1 Activating the child-proof lock 17
10.2 Deactivating the childproof lock............ 18
11 Cup heater1 18
11.1 Activating and deactivating the cup heater1 18
12 Favourites. 18
12.1 Saving beverages from the beverage selection 18
12.2 Saving the beverage in the menu 18
12.3 Changing beverage settings 18
12.4 Deleting favourites 18
12.5 Sorting favourites 19
13 Home Connect 19
13.1 Home Connect settings..... 19
13.2 Data protection 20
14 Basic settings 20
14.1 Changing the basic settings 20
14.2 Overview of the basic settings 21
15 Cleaning and servicing 22
15.1 Dishwasher-safe components 22
15.2 Cleaning agent 22
15.3 Cleaning the appliance 23
15.4 Cleaning the drip tray and coffee dregs container 24
15.5 Service programmes 24
en
16 Troubleshooting 26
17 Transportation, storage and disposal 31
17.1 Activating frost protection ...... 31
17.2 Disposing of old appliance .... 31
18 Customer Service. 31
18.1 Product number (E-Nr.), production number (FD) and consecutive numbering (Z-Nr.) 32
18.2 Warranty conditions 32
19 Technical specifications 32
20 Declaration of Conformity 32

1 Safety
Observe the following safety instructions.
1.1 General information
- Read this instruction manual carefully.
- Keep the instruction manual and the product information safe for future reference or for the next owner.
- Do not connect the appliance if it has been damaged in transit.
1.2 Intended use
Only use this appliance:
for preparing hot drinks.
- In private households and in enclosed spaces in a domestic environment.
Up to an altitude of max. 2000 m above sea level.
1.3 Restriction on user group
This appliance may be used by children aged 8 or over and by people who have reduced physical, sensory or mental abilities or inadequate experience and/or knowledge, provided that they are supervised or have been instructed on how to use the appliance safely and have understood the resulting dangers.
Children must not play with the appliance.
Children must not perform cleaning or user maintenance unless they are at least 8 years old and are being supervised.
Keep children under the age of 8 years away from the appliance and power cable.
1.4 Safety information
WARNING - Risk of suffocation!
Children may put packaging material over their heads or wrap themselves up in it and suffocate.
- Keep packaging material away from children.
- Do not let children play with packaging material.
en Safety
Children may breathe in or swallow small parts, causing them to suffocate.
- Keep small parts away from children.
Do not let children play with small parts.
WARNING - Risk of electric shock!
Improper installation is dangerous.
- Connect and operate the appliance only in accordance with the specifications on the rating plate.
- Connect the appliance to a power supply with alternating current only via a properly installed socket with earthing.
The protective conductor system of the domestic electrical installation must be properly installed.
If the appliance or the power cord is damaged, this is dangerous.
- Never operate a damaged appliance.
- Never operate an appliance with a cracked or fractured surface.
- Never pull on the power cord to unplug the appliance. Always unplug the appliance at the mains.
- If the appliance or the power cord is damaged, immediately unplug the power cord or switch off the fuse in the fuse box.
▶ Call customer services. → Page 31
Incorrect repairs are dangerous.
Repairs to the appliance should only be carried out by trained specialist staff.
- Only use genuine spare parts when repairing the appliance.
- If the power cord of this appliance is damaged, it must be replaced by the manufacturer, the manufacturer's Customer Service or a similarly qualified person in order to prevent any risk.
An ingress of moisture can cause an electric shock.
- Never immerse the appliance or the power cord in water.
Liquids must not be spilled on the appliance plug connection.
Only use the appliance in enclosed spaces. - Never expose the appliance to intense heat or humidity.
- Do not use steam- or high-pressure cleaners to clean the appliance.
WARNING - Risk of fire!
The appliance will become hot.
- Ventilate the appliance adequately.
Never operate the appliance in a cupboard.
It is dangerous to use an extended power cord and non-approved adapters.
- Do not use extension cables or multiple socket strips.
If the power cord is too short, contact Customer Service.
Only use adapters approved by the manufacturer.
WARNING - Risk of burns!
Some parts of the appliance become very hot.
- Never touch hot appliance parts.
- Allow hot appliance parts to cool down before touching.
WARNING - Risk of scalding!
Freshly prepared drinks are very hot.
Leave drinks to cool down if necessary.
- Do not let escaping liquids or steam come into contact with your skin.
A remote start via the Home Connect app while the appliance is unattended may cause scalding to third parties.
- Do not reach under the coffee outlet during the dispensing of drinks.
- Keep other persons, in particular children, away from the appliance.
WARNING - Risk of injury!
Improper use of the appliance may endanger the user.
- To avoid injuries, only use the appliance for its intended purpose.
Trapped fingers when closing the appliance door. - Be careful of your fingers when closing the appliance door. The grinder rotates.
- Never reach into the grinder.
WARNING - Danger: Magnetism!
The appliance contains permanent magnets. These may affect electronic implants, e.g. pacemakers or insulin pumps.
People with electronic implants must stand at least 10 cm away from the appliance.
This minimum distance of 10~cm must also be observed for the water tank when removed.
WARNING - Risk of harm to health!
Soiling on the appliance may be harmful to health.
To ensure hygiene, follow the cleaning instructions for the appliance.
2 Environmental protection and saving energy
2.1 Disposing of packaging
The packaging materials are environmentally compatible and can be recycled.
- Sort the individual components by type and dispose of them separately.
2.2 Tips for saving energy
If you follow these instructions, your appliance will use less power.
Set the interval for automatic switchoff to the smallest value.
- If the appliance is not being used, it will switch itself off earlier.
"Basic settings", Page 20
Do not interrupt the dispensing process prematurely.
- The amount of water or milk that is heated is used optimally.
Descale the appliance regularly.
Limescale deposits increase the appliance's energy consumption.
3 Installation and connection
You can find out where and how best to install your appliance here. You will also learn how to connect your appliance to the power supply.
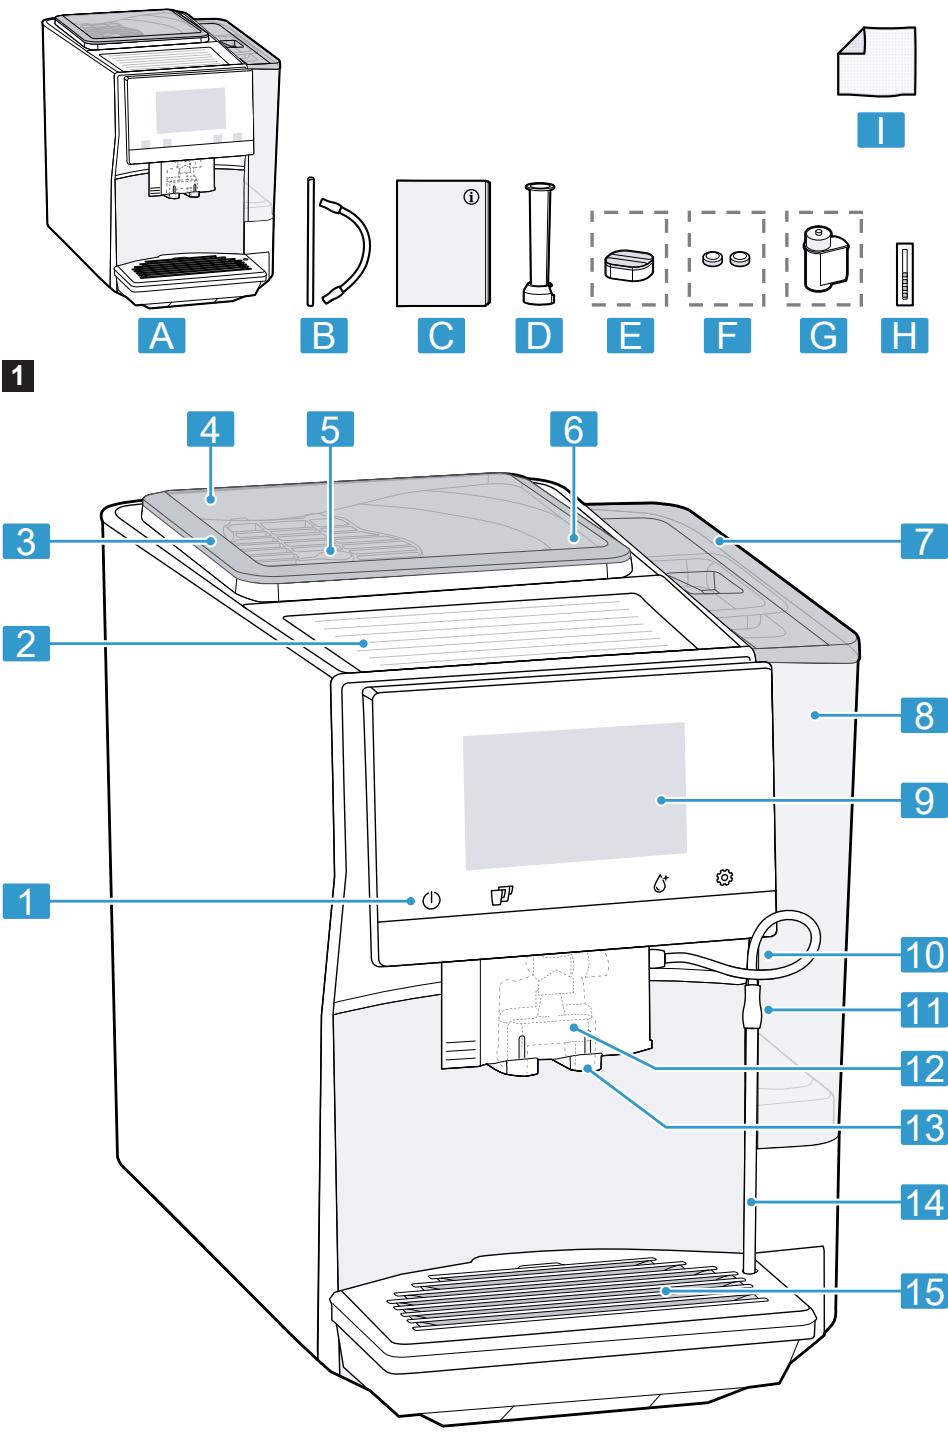
3.1 Scope of delivery
After unpacking all parts, check for any damage in transit and completeness of the delivery.
Note: Different accessories are enclosed depending on the appliance model. This accessory is shown in a frame with a dashed line.
Fig. 1
| A | Fully automatic coffee machine |
| B | Milk tube and suction pipe |
| C | Instruction manual |
| D | Insertion aid for water filter |
| E | D escaling tablets1 |
| F | C l e a n g i n g t a b l e t s1 |
| G | W a r d f i l t e r1 |
| H | W a r d h a r d n e s s t i n g s t r i p |
| I | M i c r o f i b r e c l o o t h |
1 Depending on the appliance specifications
3.2 Installing and connecting the appliance
ATTENTION!
Risk of damage to the appliance. If the appliance is not started up correctly, it may be damaged.
-
Use the appliance in frost-free rooms only.
If the appliance has been transported or stored below 0^ , wait 3 hours at room temperature before starting it up.
After plugging in, always wait approx. 5 seconds. -
Place the appliance on a level, water-resistant surface that is capable of bearing its weight.
- Using the mains plug, connect the appliance to an earthed socket that has been correctly installed.
4 Familiarising yourself with your appliance
4.1 Appliance
You can find an overview of the parts of your appliance here.
Note: Individual details and colours may differ, depending on the appliance model.
Fig. 2
| 1 | Touch fields |
| 2 | Cup heater1 |
| 3 | Aroma lid |
| 4 | Bean container |
| 5 | Rotary selector for grinder setting |
| 6 | Tablet compartment |
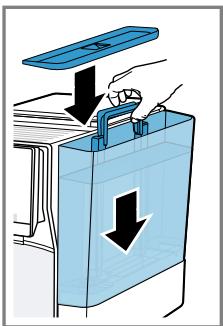
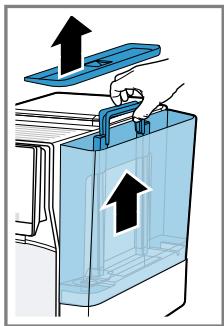
| 7 | Cover for water tank |
| 8 | Water tank |
| 9 | Touch display |
| 10 | Brewing chamber door |
| 11 | Rating plate |
| 12 | Milk system |
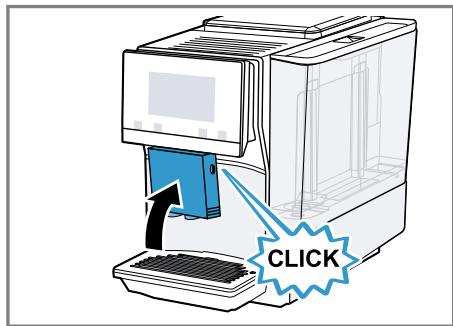
| 13 | Beverage outlet cover |
| 14 | Milk hose and suction pipe |
1 Depending on the appliance specifications
| 15 | Drip tray |
| 1 | Depending on the appliance spec-cifications |
| 4.2 | Controls |
| You can find an overview of the controls for your appliance here. | |
| Touch fields | |
| Here you can find an overview of the symbols that are always visible. | |
| ① | Switch the appliance on or off. |
| ② | Dispense two cups. |
| ③ | Open or close the service programmes. |
| ④ | Open or close the set-tings. |
| Touch display | |
| The touch display functions both as a display and a control. | |
| Favour-ites | Select saved beverages with personal settings.→Page 18 |
| Class-sics | Select standard beverages. |
| coffee-World | Select basic beverages which can be extended in conjunction with Home Connect. |
| ⑤ | Cup warmer is switched on. |
| ⑥ | Appliance is connected to Home Connect. |
| Note: When the appliance is switched on, you have additional operat-ing options with relevant displays and messages, e.g. beverage settings. | |
| ⑦ | Set strength. |
| □ | Set per-cup quantity. |
| □ | Set milk ratio. |
| J | Set aroma. |
| B | Set temperature. |
5 Accessories
Use original accessories. These have been made especially for your appliance.
| Accessories | Retail | Customer service |
| Cleaning tablets | TZ80001A | 00312097 |
| TZ80001B | 00312098 | |
| Descaling tablets | TZ80002A | 00312094 |
| TZ80002B | 00312095 | |
| Water filter | TZ70003 | 00575491 |
| Water filter pack of 3 | TZ70033A | - |
| Microfibre cloth | - | 00460770 |
| Care set | TZ80004A | 00312105 |
| TZ80004B | 00312106 | |
| Adapter for milk contain-ers | TZ70001 | 17006005 |
6 Before using for the first time
Prepare the appliance for use.
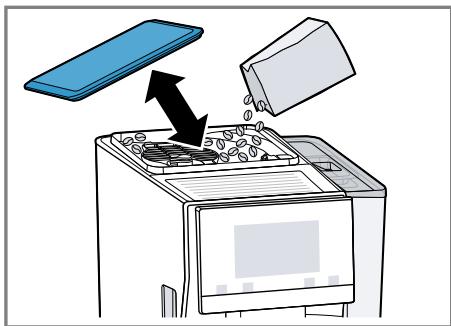
6.1 Preparing and cleaning the appliance
Remove the protective foil and clean the appliance and individual parts.
Note: Fill the water tank each day with fresh, cold, non-carbonated water.
ATTENTION!
Unsuitable beans can block up the grinder.
- Only use pure, roasted bean mixes that are suitable for use in fully automatic coffee or espresso machines.
Do not use glazed coffee beans.
- Do not use caramelised coffee beans.
- Do not use coffee beans that have been treated with additives containing sugar.
Do not add ground coffee.
Tip: To keep the coffee beans at their best, store them in a sealed container in a cool place.
You can keep the coffee beans in the bean container for several days without them losing their aroma.
Fig. 3 - 16
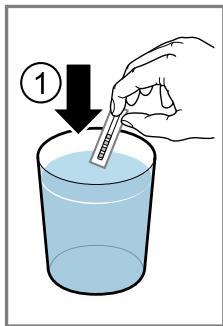
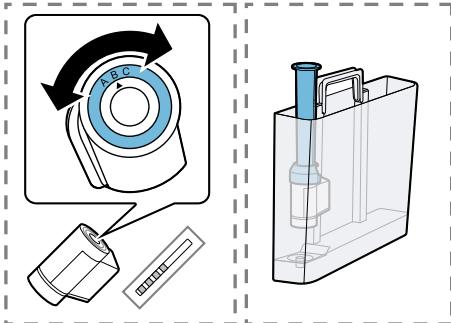
6.2 Checking the water hardness
It is important to set the water hardness correctly so that your appliance indicates in good time that it needs
descaling. You can use the enclosed test strip to check the water hardness or ask your local water company.
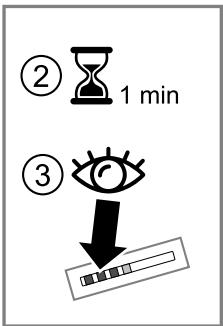
- Briefly dip the test strip in fresh tap water.
- Allow the water to drip off the test strip.
- Read the water hardness off the test strip after 1 minute.
The table shows allocation of the levels to the different degrees of water hardness:
| Level | German degrees in °dH | Total hardness in mmol/ l |
| 1 | 1-7 | 0.18-1.25 |
| 2 | 8-14 | 1.42-2.49 |
| 3 | 15-21 | 2.67-3.74 |
| 4¹ | 22-30 | 3.92-5.34 |
Factory setting
Note: If a water softening system is installed in your house, you can select "Softening device".
Tip: You can change the settings at any time.
"Basic settings", Page 20
6.3 Performing initial start-up
After connecting the appliance to the power supply, configure the settings for initial start-up. Initial start-up only appears when switching on for the first time.
- Press ① to switch the appliance on.
- Follow the instructions on the display.
- The display will guide you through the programme.
Notes
- To set up Home Connect, refer to the documents on Home Connect supplied with the appliance.
If "Demo mode" is selected, only the display screens will work. You can not dispense a beverage or run a programme.
6.4 General information
Please bear this information in mind so that you can get the best out of your appliance.
Notes
The appliance has been programmed at the factory with standard settings for optimum operation.
- The grinder has been factory-set for optimum operation. If coffee is only dispensed drop by drop or is too thin and with too little crema, you can adjust the grinding level when the grinder is running. "Adjusting the grinding level", Page 16
If you do not perform any actions on the appliance for a certain period, it will switch off automatically. You can change the duration in the basic settings. Page 20
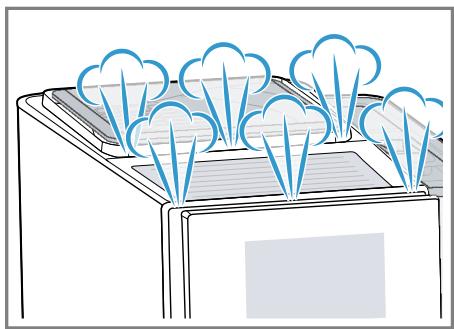
During operation water droplets may form at the ventilation slits and on the lid of the tablet compartment.
- For technical reasons steam can escape from the appliance.
The first beverage will not yet have its full aroma if:
- You are using the appliance for the first time.
- You have run a service programme.
- You have not used the appliance for a long time.
Do not drink the beverage.
Tip: You will get a stable, fine-pored crema after you have started up your appliance and dispensed a few cups.
7 Basic operation
7.1 Switching the appliance on or off
Press ①.
When the appliance switches on, the display shows the Siemens logo. When the appliance is switched on or off, it will rinse itself automatically. When switched off, the appliance will emit steam into the drip tray for cleaning. The appliance does not rinse itself if the appliance is still warm when switched on or if no beverage was dispensed before it was switched off.
7.2 Dispensing beverages
Find out how to prepare a drink of your choice.
WARNING
Risk of scalding!
Freshly prepared drinks are very hot.
- Leave drinks to cool down if necessary.
- Do not let escaping liquids or steam come into contact with your skin.
Notes
- With a number of settings your coffee is prepared in several steps. Wait until the process is fully completed.
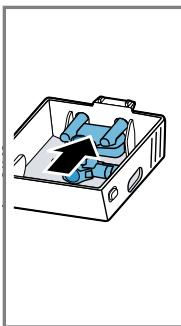
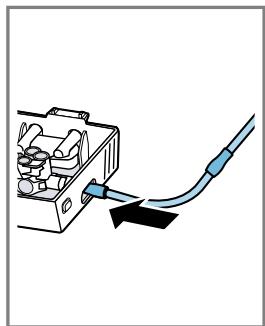
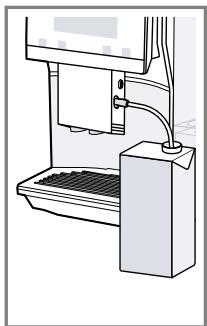
If you are dispensing a beverage with milk, always connect a container filled with milk to the milk hose and suction pipe.
If the milk system has not been cleaned, small amounts of milk may escape when hot water is dispensed.
Tips
- You can also use plant-based alternatives to milk, e.g. soya milk.
- The quality of the milk foam depends on the type of milk or the plant-based alternative used.
7.3 doubleShot and tripleShot
The longer coffee brews, the more bitter substances and undesirable aromas are released. These bitter substances and undesirable aromas affect the taste and digestibility of coffee.
To ensure that only pleasant-tasting and easily digestible aromatic substances are released, coffee beans are freshly ground and brewed by the appliance.
Note: The functions "doubleShot" and "tripleShot" depend on the beverage strength and beverage size selected.
7.4 Dispensing a coffee beverage with milk
An example explains how to make a latte macchiato.
WARNING Risk of burns!
The milk system can become extremely hot.
- Never touch the milk system when it is hot.
- Allow the hot milk system to cool down before touching it.
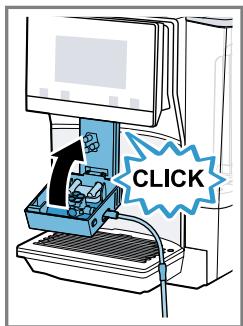
Requirements
-
The milk hose with the suction pipe is connected to the milk system.
The suction pipe is immersed in milk. -
Place a glass underneath the beverage outlet.
- Press "Classics".
-
Select and press the beverage symbol for latte macchiato.
-
To change the strength, press ①.
- To change the per-cup quantity, press .
-
To change the milk ratio, press E.
-
Press "Start" and wait until the process is complete.
-
To completely stop dispensing the beverage, press "Stop".
- To only stop the current dispensing step, press "Skip".
After preparing the beverage, the milk system will automatically clean itself with a short jet of steam.
Notes
If you do not change any settings for approx. 30 seconds, the appliance will exit settings mode.
The appliance saves the settings automatically.
Tip: You can also pre-heat cups before dispensing using hot water or the cup heater.
7.5 Dispensing two cups at once
Depending on the appliance model, you can make two cups at the same time for certain beverages.
Note: If the "doubleShot" or "tripleShot" function is active, the function for dispensing two cups at once is not possible.
- Press the symbol for your desired drink.
- Press .
The setting is shown on the display.
3. Place two cups on the left and right underneath the beverage outlet.
4. Press "Start".
The beverage is prepared in 2 steps. The beans are ground in 2 grinding operations.
- The beverage is brewed and then runs into the cup.
- Wait until the process is complete.
8Grinder
Your appliance has an adjustable grinder, which you can use to customise the grinding level of your coffee beans.
8.1 Adjusting the grinding level
Set the desired grinding level while the coffee beans are being ground.
WARNING Risk of injury!
The grinder rotates.
- Never reach into the grinder.
ATTENTION!
Risk of damage to the grinder. The grinder may be damaged if the grinding level is not set properly.
- Only set the grinding level when the grinder is running.
- Select the grinding level using the rotary selector step by step.
Grinding level Setting
Fine grinding level for dark-roasted beans.
Turn rotary selector counterclockwise.
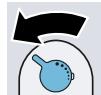
Coarse grinding level for light-roasted beans.
Turn rotary selector clockwise.
The setting only has an effect after the second cup of coffee.
Tip: If the coffee is only dispensed drop by drop, set a coarser grinding level.
If the coffee is too thin with too little crema, set a finer grinding level.
9 Water filter
You can use a water filter to minimise limescale deposits and reduce impurities in the water.
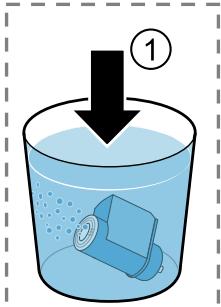
9.1 Inserting the water filter
ATTENTION!
Possible damage to the appliance due to limescale build-up.
Change the water filter in good time.
Change the water filter after 2 months at the latest.
- Press ^ .
- Press "INTENZA filter" and follow the instructions on the display.
9.2 Changing or removing the water filter
You can also operate your appliance without a water filter.
- Press ^ .
- Press "INTENZA filter".
- Press "Replace" or "Remove" and follow the instructions on the display.
Tips
- You should also change your water filter for reasons of hygiene.
- With a water filter you need to descale your appliance less frequently.
If your appliance has not been used for a long time, for example if you were on holiday, you should rinse the water filter before use by dispensing a cup of hot water.
The water filter can be purchased from retailers or customer service. "Accessories", Page 13
10 Childproof lock
You can lock the appliance, to protect children against scalding and burns.
10.1 Activating the childproof lock
Requirement: The appliance is switched on.
Press and hold for at least 3 seconds.
The display shows "Child-proof lock active. To unlock, please press the settings button for 3 seconds."
10.2 Deactivating the childproof lock
Press and hold for at least 3 seconds.
The display shows "Child-proof lock has been deactivated."
11 Cup heater1
You can use the cup heater to preheat your cups.
11.1 Activating and deactivat ing the cup heater

WARNING
Risk of burns!
The cup heater1 can become very hot.
- Never touch the cup heater1 while hot.
- Allow the hot cup heater1 to cool down before touching it.
Tip: Place the cups with their base on the cup heater to heat the cups to optimum effect.
You can activate or deactivate the cup heater in the basic settings. "Overview of the basic settings", Page 21
12 Favourites
Save beverages with your personal settings as a favourite.
You can mark your favourites with a colour. A favourite is a beverage with personal settings. You can change the settings at any time.
Note: To exit the settings, press .
12.1 Saving beverages from the beverage selection
- Select a beverage from "Classics" or "coffeeWorld".
- Select the personal beverage settings.
- Press "Favourite".
- Select the required colour for the beverage.
- Press "Save".
12.2 Saving the beverage in the menu
- Press "Favourites".
-
Press
-
The display shows all available beverages.
- Select the required beverage.
- Select the personal beverage settings.
- Press "Next".
- Select the required colour for the beverage.
- Press "Save".
12.3 Changing beverage settings
- Press "Favourites".
- Select the beverage and press briefly.
- Change the beverage settings.
- Press "Apply".
The new settings are saved.
12.4 Deleting favourites
- Press "Favourites".
- Select the beverage.
- Press "Delete".
- Confirm "Delete".
12.5 Sorting favourites
- Press "Settings".
- Press "Personalisation".
- Press "Sort favourites".
- Sort favourites, e.g. by name or colour.
13 Home Connect
This appliance is network-capable. Connecting your appliance to a mobile device lets you control its functions via the Home Connect app, adjust its basic settings and monitor its operating status. The Home Connect services are not available in every country. The availability of the Home Connect function depends on the availability of Home Connect services in your country. You can find information about this at: www.home-connect.com. To be able to use Home Connect, you must first set up the connection to the WLAN home network (Wi-Fi1) and to the Home Connect app.
The Home Connect app guides you through the entire login process. Follow the instructions in the Home Connect app to configure the settings.
Tips
Please consult the documents supplied by Home Connect.
- Please also follow the instructions in the Home Connect app.
Notes
Please note the safety precautions in this instruction manual and make sure that they are also observed when operating the appliance via the Home Connect app. "Safety", Page 7
- Operating the appliance on the appliance itself always takes priority. During this time it is not possible to operate the appliance using the Home Connect app.
13.1 Home Connect settings
Adapt Home Connect to your needs. You can find the Home Connect settings in the basic settings for your appliance. Which settings the display shows will depend on whether Home Connect has been set up and whether the appliance is connected to your home network.
Overview of the Home Connect settings
Here you can find an overview of the "Home Connect" settings and network settings.
| Basic setting | Selection | Description |
| WiFi connection | On | Switch off the wireless module with prolonged absence or to save energy. |
| Off | ||
| Note: In networked standby mode your appliance requires max. 2 W. | ||
| Remote start | OnOff | Switch remote start on the appliance on and off. Note: With the "Home Connect" app only switch-off is possible. |
| Add mobile device | - | Connect the appliance to "Home Connect" or additional "Home Connect" accounts. |
| Network information | - | Display network information and appliance information. |
| Delete network settings | - | Note: You cannot operate your appliance via the "Home Connect" app without a network connection. |
| Software update | - | Note: This setting is only available with a software update. |
13.2 Data protection
Please see the information on data protection.
The first time your appliance is registered on a home network connected to the Internet, your appliance will transmit the following types of data to the Home Connect server (initial registration):
- Unique appliance identification (consisting of appliance codes as well as the MAC address of the Wi-Fi communication module installed).
Security certificate of the Wi-Fi communication module (to ensure a secure data connection). - The current software and hardware version of your appliance.
- Status of any previous reset to factory settings.
This initial registration prepares the Home Connect functions for use and is only required when you want to use the Home Connect functions for the first time.
Note: Please note that the
Home Connect functions can only be utilised with the Home Connect app. Information on data protection can be retrieved in the Home Connect app.
14 Basic settings
You can configure your appliance to meet your needs and call up additional functions.
14.1 Changing the basic settings
- Press
- The display shows the list of basic settings.
- Select the required basic setting.
- The appliance saves the basic setting automatically.
- To exit the basic settings, press .
14.2 Overview of the basic settings
You can find an overview of the basic settings here.
| Beverage setting | Brewing temperature | Set the brewing temper- ature. |
| Milk sequence | Select the sequence for milk and coffee. | |
| Latte macchiato pause | Select the pause between milk and coffee. | |
| Reset beverage para- meters | Reset the beverage set- tings. | |
| Appliance setting | Cup heater1 | Switch the cup heater1 on or off. |
| Automatic standby | Set the time after which the appliance automatic- ally switches off. | |
| Display brightness | Set the brightness in levels. | |
| Sounds | ■ Switch sounds on and off.■ Set the volume. | |
| Water hardness | Set the water hardness. | |
| Language | Set the language. | |
| Factory settings | Reset the appliance to the factory settings. | |
| Personalisation | Brand logo | Show or hide the brand logo on the display. |
| Operation after switch-on | Set the display screen for "Favourites", "Class- sics" or "coffeeWorld". | |
| Sort favourites | Set the sequence of fa- vourites. | |
| Home Connect | Information on Home Connect | To start, scan the QR code. → "Home Connect set- tings", Page 19 |
| Appliance information | Beverage counter. | Display the number of beverages dispensed. |
| 1 Depending on the appliance specifications | ||
| Cleaning information | Time until the water filter should next be changed or a service programme started. | |
| Version information | Display network information and appliance information. | |
| Licence information | Display FOSS licence text. | |
| Mode | Mode for demonstration purposes | Switch "Demo mode" on or off. |
| 1 Depending on the appliance specifications | ||
15 Cleaning and servicing
To keep your appliance working efficiently for a long time, it is important to clean and maintain it carefully.
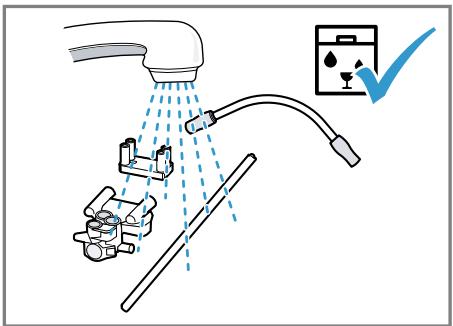
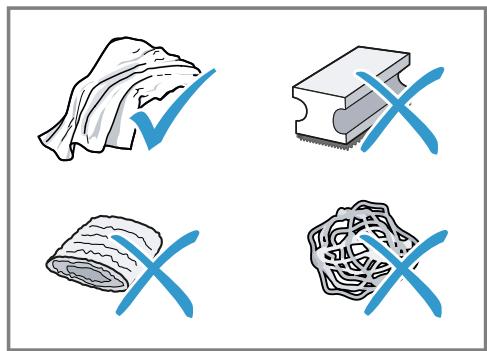
15.1 Dishwasher-safe components
Here you can find an overview of the components you can clean in the dishwasher.
ATTENTION!
Some components are sensitive to heat and may be damaged if they are cleaned in a dishwasher.
-
Follow the operating instructions of the dishwasher.
-
Only put dishwasher-safe components in the dishwasher.
- Only use programmes that do not heat the water above 60^ .
Suitable:
Drip tray
- Drip pan
- Coffee dregs container
- Mechanical fill level indicator
Milk system with adapter
Milk container with lid
Not suitable:
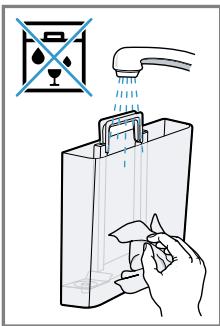
Water tank
Water tank lid
Aroma lid
Brewing unit
- Beverage outlet cover
15.2 Cleaning agent
Only use suitable cleaning agents.
ATTENTION!
Unsuitable cleaning products may damage the surfaces of the appliance.
-
Do not use harsh or abrasive detergents.
-
Do not use cleaning agents containing alcohol or spirits.
- Do not use hard scouring pads or cleaning sponges.
- Do not use citric acid, vinegar or any vinegar-based agents to descale the appliance.
- Only use suitable tablets for cleaning and descaling.
- Do not use descending agent with phosphoric acid.
Tips
Use descending and cleaning tablets that have been specially developed for your appliance. You can buy tablets from our customer service. "Accessories", Page 13
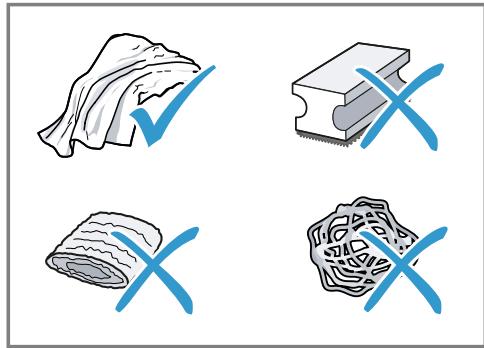
- Wash new sponge clothes thoroughly to remove any salt adhering to them. Salt can cause rust film to develop on stainless steel surfaces.
Always remove any residues of limescale, coffee, milk, cleaning and descaling solutions immediately to prevent corrosion.
15.3 Cleaning the appliance
WARNING
Risk of electric shock!
An ingress of moisture can cause an electric shock.
- Never immerse the appliance or the power cord in water.
- Liquids must not be spilled on the appliance plug connection.
- Do not use steam- or high-pressure cleaners to clean the appliance.
WARNING
Risk of burns!
Some parts of the appliance become very hot.
- Never touch hot appliance parts.
-
Allow hot appliance parts to cool down before touching.
-
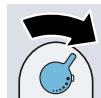
Clean the housing, the high-gloss surfaces and the control panel with the enclosed microfibre cloth.
- Clean the outlet system with a soft, damp cloth after beverages have been dispensed.
- If the appliance has not been used for a long time, for example due to holiday, clean the entire appliance including the outlet system, milk system, trays and brewing unit.
Note: The appliance will rinse itself automatically if you switch it on when it is cold or switch it off after it has dispensed coffee. The system is therefore self-cleaning.
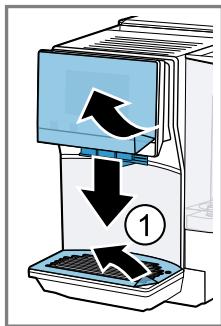
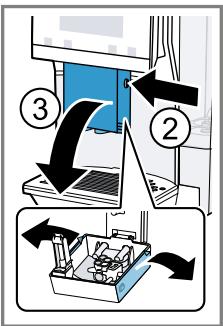
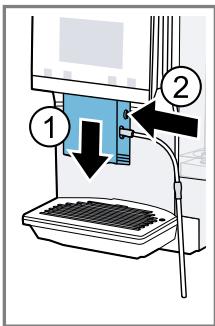
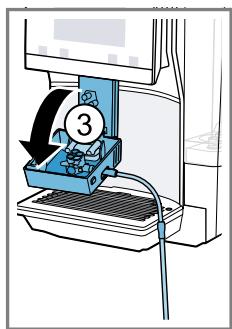
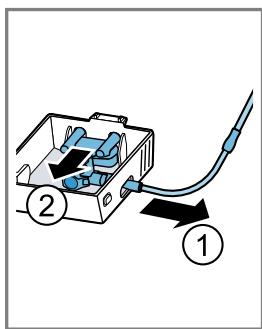
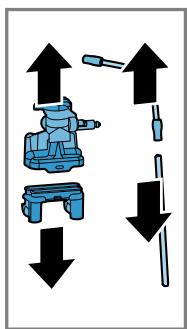
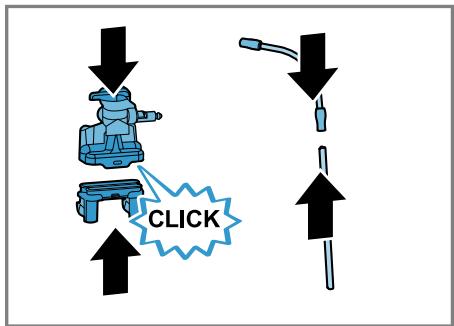
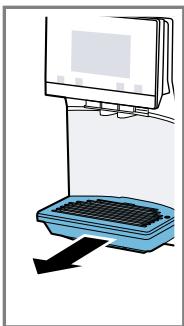
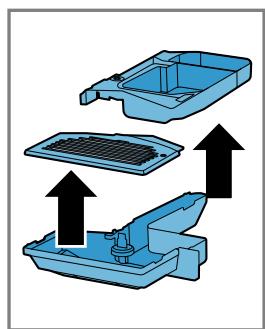
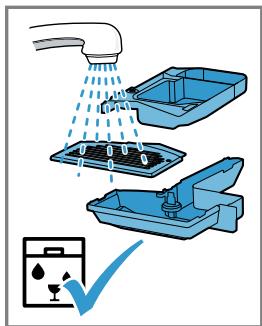
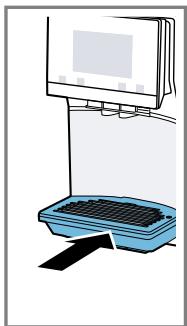
15.4 Cleaning the drip tray and coffee dregs container
Clean and empty the drip tray and coffee dregs container every day to prevent deposits. Follow the illustrated instructions at the beginning of this manual.
Fig. 17 - 18
15.5 Service programmes
Use the service programmes if you insert or remove a water filter or in order to clean your appliance thoroughly.
ATTENTION!
Improper cleaning and descending or a delay in doing so may damage the appliance.
-
Immediately perform the descending process in accordance with the instructions.
-
Only use cleaning tablets in the tablet compartment.
- Do not put descending tablets or other products in the tablet compartment.
Notes
The display indicates the progress of the descending or cleaning process.
If your appliance has been locked, you can only operate it again once the descending process has been carried out.
Using the service programmes
- Press ^ .
- Press the symbol for the required programme.
- The display will guide you through the programme.
Overview of service programmes
You can find an overview of the service programmes here.
Note: The start image shows the remaining number of beverages that can be dispensed until running the programme and the duration.
| BRITA | INTENZA filter | Insert, replace or remove the water fil-ter. |
| Milk system cleaning | Rinse the milk system automatically. | |
| calc'nClean | Combine cleaning and descaling. Re-move residues of limescale and cof-fee from the pipes. | |
| Cleaning | Remove residues of coffee from the pipes. | |
| Descaling | Remove residues of limescale from the pipes. | |
| Brewing unit cleaning | The display shows optimum cleaning of the brewing unit step by step. | |
| Beverage outlet cleaning | The display shows optimum cleaning of the outlet step by step. | |
| Frost protection | Drain the pipes to protect the appliance during transport or storage. | |
| Special rinsing | If a service programme is interrupted, e.g. due to a power failure, it will rinse itself automatically. The appliance is then ready for use again. |
Tips
If you are starting the "Dscaling" or "calc'nClean" programmes, keep a container with a capacity of min. 0.5 I ready.
If you use a water filter, this will prolong the time until you have to run a service programme.
- You can combine "Dscaling" and "Cleaning" with the "calc'nClean" service programme.
16 Troubleshooting
You can rectify minor faults on your appliance yourself. Read the troubleshooting information before contacting after-sales service. This will avoid unnecessary costs.

WARNING
Risk of electric shock!
Incorrect repairs are dangerous.
Repairs to the appliance should only be carried out by trained specialist staff.
- Only use genuine spare parts when repairing the appliance.
- If the power cord of this appliance is damaged, it must be replaced by the manufacturer, the manufacturer's Customer Service or a similarly qualified person in order to prevent any risk.
| Fault | Cause and troubleshooting |
| Appliance no longer responds. | Appliance has a fault. 1. Pull out the mains plug and wait 10 seconds. 2. Re-insert the mains plug. |
| HomeConnect is not working correctly. | Different causes are possible. ► Go to www.home-connect.com. |
| Appliance only dis-penses water, not cof-fee. | Empty bean container is not detected by the appli- ance. ► Pour in coffee beans. |
| Coffee shaft on brewing unit is blocked. ► Clean the brewing unit. | |
| Beans are too oily and are not falling into the grinder. ► Gently tap the bean container. ► Change the coffee variety. Do not use oily beans. ► Clean the empty bean container with a damp cloth. | |
| Brewing unit is not inserted properly. 1. Check whether the brewing unit is inserted correctly and is securely locked. 2. Push the red lever up to the left. 3. Insert the brewing unit cover. | |
| Appliance is not dis-pensing milk froth. | Milk system is soiled. ► Clean the milk system in the dishwasher. |
| Milk tube not immersed in milk. ► Use more milk. | |
| Appliance is not dis-pensing milk froth. | Check whether the milk tube is immersed in the milk. |
| Heavy build-up of limescale in the appliance. Descale the appliance. | |
| No milk intake by the milk system. | The milk system is assembled incorrectly. Assemble the milk system correctly. |
| Milk tube not immersed in milk. Use more milk. Check whether the milk tube is immersed in the milk. | |
| Milk froth is too cold. | Milk is too cold. Use lukewarm milk. |
| Appliance is not dis-pensing hot water. | Milk system is soiled. Clean the milk system in the dishwasher. |
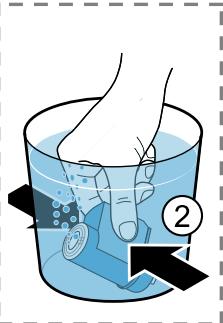
| Appliance is not dis-pensing drinks. | Air is in the water filter. 1. Immerse the water filter in water with the opening facing upwards until no more air bubbles escape. 2. Reinsert the filter. Firmly press the water filter straight down into the tank connection. |
| Residues of limescale remover are blocking the water tank. 1. Remove the water tank. 2. Clean the water tank thoroughly. | |
| There is dripping wa-ter on the inner floor of the appliance. | Drip tray was removed too soon. Wait a few seconds after the last drink was dispensed before removing the drip tray. |
| Brewing unit cannot be removed. | Locking device cannot be released, brewing unit is jammed. Switch the appliance off and back on after 3 minutes. |
| Grinder won't start. | Appliance is too hot. 1. Disconnect the appliance from the mains. 2. Wait 1 hour so the appliance can cool down. |
| Grinder is not grinding any coffee beans despite full bean container. | Beans are too oily and are not falling into the grinder. Gently tap the bean container. Change the coffee variety. Do not use oily beans. Clean the empty bean container with a damp cloth. |
| Coffee or milk froth quality varies widely. | Build-up of limescale in the appliance. ► Descale the appliance. |
| Milk froth quality varies widely. | Milk froth quality depends on the type of milk or plant-based alternative used. ► Optimise the result through the selection of the milk or vegetable-based drink type. |
| Coffee is not dis-pensed or has slowed to a trickle. | Grinding level is set too fine. ► Set a coarser grinding level. → "Adjusting the grinding level", Page 16 |
| Set quantity is not reached. | Heavy build-up of limescale in the appliance. ► Descale the appliance. |
| Air is in the water filter. 1. Immerse the water filter in water with the opening facing upwards until no more air bubbles escape. 2. Reinsert the filter. | |
| Appliance is soiled. ► Clean the brewing unit. ► Descale and clean the appliance. | |
| Coffee has no crema. | Type of coffee is not optimal. ► Use a coffee variety with a higher proportion of Robusta beans. ► Use beans with a darker roast. |
| Beans are no longer fresh. ► Use fresh beans. | |
| Grinding level is not appropriate for coffee beans. ► Adjust the grinder to a finer setting. → "Adjusting the grinding level", Page 16 | |
| Coffee is too acidic. | Grinding level is set too coarse. ► Adjust the grinder to a finer setting. → "Adjusting the grinding level", Page 16 |
| Type of coffee is not optimal. ► Use a coffee variety with a higher proportion of Robusta beans. ► Use beans with a darker roast. | |
| Coffee is too bitter. | Grinding level is set too fine. ► Set a coarser grinding level. → "Adjusting the grinding level", Page 16 |
| Type of coffee is not optimal. ► Change the coffee variety. | |
| Coffee tastes burnt. | Grinding level is set too fine. → Set a coarser grinding level. → "Adjusting the grinding level", Page 16 |
| Type of coffee is not optimal. → Change the coffee variety. | |
| Coffee temperature setting is too high. → Set the coffee temperature lower. | |
| Coffee grounds are not compact and are too wet. | The grinding level is not set optimally. → Adjust the grinder to a coarser or finer setting. → "Adjusting the grinding level", Page 16 |
| Beans are too oily. → Use a different type of bean. | |
| Display shows "Please insert brewing unit". | Cover is wrongly inserted. 1. Check whether the brewing unit is inserted correctly and is securely locked. 2. Push the red lever up to the left. 3. Insert the brewing unit cover. |
| Display shows "Please fill water tank." despite the fact that the water tank is full. | Water tank is wrongly inserted. → Insert the water tank correctly. |
| Carbonated water is in the water tank. → Fill the water tank with fresh tap water. | |
| Float is stuck in the water tank. 1. Remove the water tank. 2. Clean the water tank thoroughly. | |
| New water filter was not rinsed as per instructions. 1. Rinse the water filter according to the instructions. 2. Place the water filter into operation. | |
| Air is in the water filter. 1. Immerse the water filter in water with the opening facing upwards until no more air bubbles escape. 2. Reinsert the filter. | |
| Water filter is old. → Insert a new water filter. | |
| Limescale deposits in the water tank are blocking the system. 1. Clean the water tank thoroughly. 2. Start the descaling programme. | |
| Display shows "Please clean brewing unit". | Brewing unit is soiled. → Clean the brewing unit. |
| Display shows "Please clean brewing unit." | Mechanism of brewing unit is stiff. ► Clean the brewing unit. |
| Display shows "Over-voltage or under-voltage". | There are problems with the power supply. ► Only operate the appliance at 220 - 240 V. |
| Display shows "Error in water system. Please restart appli- ance". | Appliance has a fault. 1. Pull out the mains plug and wait 10 seconds. 2. Re-insert the mains plug. |
| Display very frequently shows "Please run calc'nClean pro- gramme!". | Decalcified water still contains small amounts of lime. 1. Insert a new water filter. 2. Set the corresponding water hardness. |
| Incorrect or too little descending agent used. ► When descending, only use suitable tablets. | |
| Service programme has not been carried out in its en- tiety. ► Start the "Special rinsing" service programme. → "Service programmes", Page 24 |
17 Transportation, storage and disposal
You can find out here how to prepare your appliance for transportation and storage. You will also find out how to dispose of old appliances.
17.1 Activating frost protection
Protect your appliance from frost during transport and storage.
ATTENTION!
Residues of liquid in the appliance may damage it during transport or storage.
- Empty the pipe system before transport or storage.
- Run the "Frost protection" programme. "Basic settings", Page 20
- Disconnect the appliance from the mains power supply.
17.2 Disposing of old appliance
Valuable raw materials can be reused by recycling.
- Unplug the appliance from the mains.
- Cut through the power cord.
- Dispose of the appliance in an environmentally friendly manner.
Information about current disposal methods are available from your specialist dealer or local authority.
This appliance is labelled in accordance with European Directive 2012/19/EU concerning used electrical and elec
tronic appliances (waste electrical and electronic equipment - WEEE). The guideline determines the framework for the return and recycling of used appliances as applicable throughout the EU.
18 Customer Service
If you have any queries, are unable to rectify faults on the appliance yourself or if your appliance needs to be repaired, contact Customer Service. Function-relevant genuine spare parts according to the corresponding Ecodesign Order can be obtained from Customer Service for a period of at least 7 years from the date on which your appliance was placed on the market within the European Economic Area.
Note: Under the terms of the manufacturer's warranty the use of Customer Service is free of charge.
Detailed information on the warranty period and terms of warranty in your country is available from our after-sales service, your retailer or on our website.
If you contact Customer Service, you will require the product number (E-Nr.), the production number (FD) and the consecutive numbering (Z-Nr.) of your appliance.
The contact details for Customer Service can be found in the Customer Service directory at the end of the manual or on our website.
18.1 Product number (E-Nr.), production number (FD) and consecutive numbering (Z-Nr.)
You can find the product number (E-Nr.), the production number (FD) and the consecutive numbering (Z-Nr.) on the appliance's rating plate.
Make a note of your appliance's details and the Customer Service telephone number to find them again quickly.
18.2 Warranty conditions
You can make warranty claims for your appliance under the following conditions.
The guarantee conditions for this appliance are as defined by our representative in the country in which it is sold. Details regarding these conditions can be obtained from the dealer from whom the appliance was purchased. The bill of sale or receipt must be produced when making any claim under the terms of this guarantee.
19 Technical specifications
Facts and figures for your appliance can be found here.
| Voltage | 220-240 V ~ |
| Frequency | 50 Hz |
| Connection rating | 1500 W |
| Maximum static pump pressure | 20 bar |
| Maximum capacity of water tank (without filter) | 1.8 l |
| Maximum capacity of bean container | 350 g |
| Length of the power cable | 100 cm |
| Appliance height | 38.2 cm |
| Appliance width | 24.5 cm |
| Appliance depth | 43.5 cm |
| Weight, empty | 9 kg |
| Type of grinder | Ceramic |
20 Declaration of Conformity
BSH Hausgeräte GmbH hereby declares that the appliance with Home Connect functionality meets the essential requirements and other relevant provisions of the Directive 2014/53/EU.
A detailed RED Declaration of Conformity can be found online at www.siemens-home.bsh-group.com among the additional documents on the product page for your appliance.

2.4 GHz band: 100 mW max.
5 GHz band: 100 mW max.
| BE | BG | CZ | DK | DE | EE | IE | EL |
| ES | FR | HR | IT | CY | LV | LT | LU |
| HU | MT | NL | AT | PL | PT | RO | SI |
| SK | FI | SE | UK | NO | CH | TR |
5 GHz WLAN (Wi-Fi): For indoor use only.
Table des matieres
1 Sécurité 35
WAARSCHUWING - Kans op verstikking!
WAARSCHUWING - Kans op brand!
WAARSCHUWING - Kans op letsel!
7.3 doubleShot i tripleShot
7.3 doubleShot a tripleShot
14 Ba30BbIe yCTaHOBKn 166
14.1 ɪmæhenne 6a30bIX hAcTpoeK ... 166
14.2 063op 6a3OBbIX HacTpoek... 166
15 Ounchka u yxo.. 167
15.1 PnroDnOcTb DnI MbITb B NO-cydomoeyHo MaunHe 167
15.2 Ynctraaee cpeDCTBO 168
15.3 OuicTka npibopa 169
15.4 OuNTka PoiDoHa n eMKocTn IJIa KoFeiHoI rUun 169
15.5 CepBnChIe npoPpAMMbI 169
16 YctpaHHe HeNCpPaBHOCTeI ... 171
17 TpaHcnpTnpoBka, xpaHeHne uynuHa3aunr 176
17.1 AkTbBaunr 3aunrIOT MOp03a....176
17.2 YtHn3aun CTaporo 6bITOBoro np6opa 176
18 CepBnchna cnjx6a. 176
18.1 Hoomep n3deJnna (E-Nr.), 3a-BoDcKoHoomep (FD) n nopAknOBbI Hoomep (Z-Nr.) 177
18.2 TapaHTnHbIe ycIOBnIa 177
19 TexHHueckne XapaKTepeHcTnKn.. 177
20 CeptnФнКAT COOTBeTCTBHA 177

1 Be3onachocTb
Co6IIOaIte cIeIyUOuIe yKa3aHnI IO TexHnke 6e3OnacHocTn.
1.1 O6uzne yka3aHnna
BHHMaTeIbHo npOuHTaIe daHHOe pyKOBoIcTBO.
- CoxpaHnte HnCTpyKcIIO n HhOpMauIO o npIbope dJa daJIbHeJWeTo IcNoJIb3OBAHnI nII dJIa nepeDaun cIeDuOSeMy BlaJeBcy.
Bcnyae o6hapyKeHnIOBpeKDeHn,CBra3aHHbIX C TpaHCnOpTn-POBko,He NOdkIouaHTe npu6op.
He donycka Te deTei MnaIe 8 let K npbOpu I erO ceTeBOMy npoBODy.
1.4 Yka3aHnI NO TexHnke 6e3oNaChOCTn
PPEyIpeJDEHNE-Onacnoctb yduyb!
IeTN MOryT 3aBepHyTbCBy B yPaKOBOuHbI MaTePnaJI nII NaTeTbe erO ce6e Ha rOIOBy n 3aDOxHyTbCra.
He noDnyscaIte deTei K ynaKoBOuHOMy MaTePnAly.
He nO3B0JIaIe Te DeTAM IrgaTb C yNaKOBouHbIM MaTePnaJIOM.
IeTN MOryT BdoXHyTb IIN IpOrlOTnTb MeJKe DeTaJI, B pe3yIbTaTe ueo 3aDOxHyTbcra.
He npdnyckaTe DeTeK MeJkM DeTaIaM.
He nO3BOLJIte DeTAM INrpaTb C MeJIKNIMn DeTaJIaMn.
I P E D U N P E X I D E H N E - O n a c h o c t b: M a r H e T h 3 M!
Прибор сODEржNT NOCTОгньie MaHHTbI. OHI MOryT BO3ДeJcTBOBaTbHa эЛ ekТpoHьie ИМпlaHTaTbI, HApPIMep, Ha KapДиOCTmUЯTOpbl ИлИнЖeKToPbI INCулнHa.
- Пицамсэл ektpoHbIMN HMnlaHTaHTaMn 3aPpeaetcnp6nJxatbcK npnbopy 6nHexe, yem Ha 10 cm.
Co6IIOaIte TaKHe MInHMaJIbHOe pacCTOaHne 10 cm Do BbHyToRo pe3epByapa dJa BObl.
PPEyPExEHE - Pnck HaHeceHnaBpeJa 3DopOBbIo!
3aŋp3HeHn np6opa Moryt npeCTaBnTb ONaCHOCtB dIa 3DopOBbI.
Co6IIOJaTe yKa3aHnI NO OunchTKe npnbopa IJN oBeCneHnI rHnEhbl.
2 3aunTa OkpykaOuSei cpebl N 3KOHOMN
2.1 Ytihn3aunypaKOBKn
YnakoBouHbIe MaTePnaJIbI 3KOJOrnueCkn 6e3OpaChbl N MOrTy INcNoJIb3OBAtbcra IOBTOpHo.
- YtɪnɪnɪʒyɪŋTe oɪdʒeɪbHbIe yæctɪn, npeɪd-BaɪpɪteɪbHo paccopTɪpɒBaB uX.
2.2 3Heproc6epeKeHne
Pn co6JIIOJeHnn 3Tnx yKa3aHn np6Op 6yJeT pacXoJIOBaTb MeHbIe 3JIeKTpO-3Heprn.
YcTaHOBnTe INHTepBaJI DЯ aBTOMaTnueCKOrO OTKJIouChEnHa MInHmAlbHoe 3Ha-ueHne.
Ecni npnbop He nCnoJIb3yETc, OH otKIIIOUaETc paHbIe.
"Ba3OBbIe yCTaHOBKn", CtpaHnua 166
He npepbBaIte npexKeBpeMeHNo npiroTOBJIeHne HAnITka.
HarpeToe KOJInueCTBO BOIbI IIN MOIOKa IcNoIb3YeTcR ONITMaJIbHO.
Perylaepno ouuuaite npnbop ot haknn.
HaKnIb npNBOJNT K NOBbIeHHOMy 3HeprOOnTpe6JIeHIO.
3 YcTaHOBKa N NOdkJIIOUeHHe
3Decb Bby y3Haete, rge n KaK lyuWe BCero yctaHOBnTb np6op. Kpome TOrO, Bby y3HaTe, KaK POnkNIOUHTb np6op K 3JeKTPocetn.
3.1 Komnlektaçaн
Iocne pacnakOBKn npOBepbTe Bce DeTaNN Ha oTCyTCTBHe TpaHCnOpTHbIX NOBpeKdEHH, a TaKKe KOMNJIeKTHOcTb NocTaBKn.
3aMetka: B 3aBnCmOCTn OT Tnna pnp60pa OH nocTaBJIeTcA pa3JIuHbIMn npHaJaJIeKHOCTMa. 3Tu npHaJaJIeKHOCTNo 063NaueHbI WTPNXOBaHHo paMKoI.
→Pnc.1
- YcTaHOBnTe npHbOp Ha poBHyIO BOIoCTOyKOIBePxAHOCTb DOCTaTOUHOI pOuHOCTn.
2.ПодсоeДинITEштencьнувИКу npибopaКpo3eTkeC3aUNTHbIM KOHTaKTOM,yCTaHOBJIeHHOB B COOTBeTCTBnCпpeДинсаHЯМN.
4 3HaKOMCTBO C npH6Opom
4.1 Пибор
3ndeB npuBeHn 63Op coCTaHBbIX qacte npi6opa.
3aMetka: B 3aBnCmOCTN OT TnPa np6o-pa BO3MOXHbI paCXOXJDeHnB U CBTe N HeKOTOpBie He3HaUHTeMbHbI eOKLHOHeHnO T DaHHoro OINCaHnR.
→Pnc. 2
IoproToBbTe np6oR K nCnoJIb3ObaHnIO.
6.1 Побrotовka прибoga и erо ouchnctka
CHMNTe 3aunTHbIe PJIeHKn I OuHCTnTe np6op n ero deTaln.
3aMeTka: EKeJdHeBHO HAnOpHnIte eM-KoCTb dIy BObl CBeKeXOJIOnHO BDoI 6e3 yrIeKnCnOtbl.
BHIMAHNE!
Bo3MoXHa 3a6nBka KoΦeMOnIKN HeNoDxoJaIuIMN KoΦeHbIMN 3epHaMn.
HcnoIb3yIteToJIbKOuIcTbIe CMEcn npOxkapeHHbIX KoΦeHbIX 3epeH dIa npnroTOBJIeHNA 3cnpcecco IIN dIra aBTOMaTHueckNX KoΦemaunH.
He nCnoJIb3yIte KoFeiHbIe 3epHa, no-KpbItIbe rna3ypbHO.
He nCnoB3yIte KapaMeIIN3npoBaHHbIe KoFeIhIbe 3epHa.
He nCnoB3yIte KoFeeHbIe 3epHa, o6pa6oTaHHbIe caxapocOdepKaUIMM Do-6aBkAm.
He 3acbinaTe MoIOTbIKoFe.
PekomeHdaun:YTo6bIcoxpaHntb ONTmMaJIbHOe KaueCTBO,XpaHNTe KoΦeHbIe3epHa B IpoXlaHOM MecTe N B 3aKpbITbIXEMKOCTRX.
B emKoCTn dIy KoFeeHbIX 3epen MoJHo XpaHntb KoFeeHbIe 3epHa B TeueHne HeckOJIbKINx dHei 6e3 nOpEn apomata.
→Pnc.3-16
6.2 OnpeJeIeHne JecTKocTH BOJbl
IpaBnBnaHacTpoKa JecTKoCTN BODbI BaKHa IJI OeCneueHn CBOeBpeMeHHo HAnOMnHaHn O Heo6xOaMnOcTH ydaJeHnHaKnPi. XEcTkoCTb BObl MoXHO ONPeJEniTb Pn NOMoU npNlaRaemOn HnDnKaTOPHo NIOCKN INy 3HaTbe B MeCTHO BODOChaKaIoUeOpraHN3aUN.
- Ha kopotkoe Bpemr norgy3nte HnndkaTophyu nolocky B CBexky BOdo npoBOdhyo BOy.
2.ДаTe Cteчь KaPJIaM C INHdNkaTopHOI NOJIOCKN.
3.CuNTaTe JxecTKoCTb BOJb CnycTb 1 MNHyTa IIO INHdNKaTOPHOI NOLOKe.
B tabnue npedctTabneHo COOTBeCTBnepeKIMOB pa3nHbIM CTeneHJM JKeCT-KOCTN BObl.
| Pe-χнм | Hemeцая шкала Ж畿TKоCTN В °dH | ОвSETS сест- КоCTь в моль/ Л |
| 1 | 1-7 | 0,18-1,25 |
| 2 | 8-14 | 1,42-2,49 |
| 3 | 15-21 | 2,67-3,74 |
| 4¹ | 22-30 | 3,92-5,34 |
1 3aBoDcKaHaCTpOiKa
3aMeKa: EcInB D Ome IMeETcY yCTaHOB Ka IJy YMgYeHn BObl, MOXHO BbINOHNt b HacTpoKy "YMgYnteIb".
PekomeHdauny: Bbl MoKeTe N3MeHnTb yCTaHOBKn BJIIOoe BpeM.
"Ba3OBbIe yCTaHOBKn", CtpaHnua 166
He neTe 3OT HAnITOK.
PekomeHdaun: Cta6nIbHo MeIkoNOpnCTaKoHCnCTeHcIneHbIOCTnIraeTcnoCle BBOda np60paB aKcnnyatauio nPpiroTOBHeHn HeckOJIbKnx qaWeK.
7 CtaHdapThoe ynpaBneHne
7.1 BkJIoueHne nIbBbIKJIOueHne npnbopa
HaKMITE ①.
PnB BKIOUeHnHa DnCnlee NnOBnIeTcNlorOTn Siemens.PnB KIOUeHnN BbIKIOUeHn BbIOJIHReTcA BtOMaTIueCKaI pOmbIBKa np6Opa.PnB bIKIOUeHn Ip6Op BbIyckaet nap BpoDDcElyo OuNCTk.Ecnn Pnp6Op npBkIOUeHn Ee He HarpET nI INpeep BbIKIOUeHnEM KoFe He roTOBnCra, npMbIBKa np6Opa He BbIOJIHOreTc.
7.3 doubleShot u tripleShot
YemdoJIbIe 3aBapnBaetcKoFe,TeM 6oJIbIe rOpbKHX BeIecTB H HeKeJatB- HBIX apOMaTOB IOnaJaET B HAnITOK. TOpb- KHe BeIeCTBa H HeKeJatBHeIbE apOMaTbI OTpUcaTeJBHO BInHOT Ha BKyc N DeJaHT KoFe MeHee npraTHbIM dIy yIOTpe6JeHHA.
Ytobb BbICBOOdbTobkoIeKoycBoreMbleN pniAThBiE Ha BKyc apomatnueckneBeuecTBA, np6Op NOBTOpHO nepMaJIbBaET n 3aBapNBaet KoFeHbIe 3epHa.
3aMeTka:Функци "doubleShot" n "tripleShot" 3aBcT OT BbIbpaHNo KpenoCTn HAnITka n erO obema.
3aMeTka: EcInn aKTHBnPOBaHa fynKcHn "doubleShot" nIn "tripleShot", fynKcHn npiroTOBHeHn DByx cpa3y HeBbI-NOJHMa.
- Haxmnte Ha cIMBOJ HxHHO HoHNTka.
- HauKmTe P
Ha dincnilee oTo6paKaaeTcHacTpoiKa. - NocTaBbTe DBe YauKn CneBa n CnpBaNoI Do3aTOp HAnITKOB.
- HaxmTe "Pync".
HaHTOK npiroTaBnBaETcB 2 3Tana. 3epHa n3MeJbuaOTcR 2 pa3a.
Hannitok 3aBapnBaetc n HannBaetc B yawky.
5.ДоЖДИТЕСБOKOHuaTeIbHOrO3aBepSe-HnI npOcecca.
8 Kofemolka
Pnboop o60pyoBAn perynpmyoKofoeMOnko, KOTOPa N03BOJAEr INDINUYaJIbHO yCTaHaBnBaTb CTeneHb NOMOla KoFeiHbIX 3epeH.
8.1 YcTaHOBKa cTepeHn NOMOJa
B npoecce nomola KofoeHbIX 3epen yctaHOBnTe HxKHyIO CTepeHb NOMOLA.

PNEyPPEKdEHH
OnachocTb TpaBMnPOBaHnI!
KoΦeMonka BpauaeTc.
He npikacaiTecb K BHyTpEHnM qaCTrM KOeMoJKN.
BHIMAHNE!
HnB KOem cnyuae He npKacaiTecb K ropaemy noDorpeBaTeIHO uaWek1.
- Pered KOnTaKToM c rOpAaHm IIOoIrpBeBaTeJeMaWeK' daTte Emy OCTbITb.
PekomeHdaun:IJIr ONTUMaJIbHO rnoDorpeBa yCTaHaBnBaJTe YaUKN dHOM Ha noDorpeBaTeJIb.
IOnOrpeB yaaKeK MoJHo BkIIOuHTb HIN BBkIIIOuHTb B 6a3OBbIX HAcTpoiKaX. "O63op 6a3OBbIX HAcTpoeK", CtpaHnua 166
12 N36paHHoe
CoxpaHnte HaNTKc C nepcoHaJIbHbIMn HaCTpoiKaMn B n36paHHOM. Bbl MoKeTe 06o3HaHTb n36paHHbIe HauNTKN ONpeJeIeHHbIM cBeTOM.Bn3- 6paHHOM coepKHTcra HaHTOK c nepcoHaJIbHbIMn HAcTpoiKaMn.HAcTpoiKn MoKHO n3MeHtB B JIO6oe Bpemr.
3aMeTka:ДЯ ВьIxOda n3 peXmHa HaCTpoEK HAXMITE<.
12.1 CoxpaHeHne HAnNTka N3 Bbl6opa HAnNTKOB
- Быберпту напток уз "Класька" улд "coffeeWorld".
- 3aJaTe nepcoHaJIbHbIe HAcTpoiKN IJI HAITka.
- HaxmTe "I36paHoe".
-
Bb6epnte JKeIaembl CBeT dIra HAnITKa.
-
HaxMMTe "CoXpaHnTb".
12.2 CoxpaHeHne HapNTka B MeHIO
- HaxmTe "I36paHHoe".
- HaKMITE
Ha nscnlee oTo6paKaIOTcBce HMeO-
3. BbIepeHte HUxHbI HAHTOK.
4. 3aДaIte nepcoHaJIbHbIe HAcTpOuKn dIa HAnITka.
5. Haukmite "Jalee".
6. BbIepeHTe JKeHaembI UBeT IJIa HAnNTKa.
7. Haxmnte "CoxpaHntb".
YTo6bI BOCNoJIb3OBAbTcHyHKUnei Home Connect, BHaJaTe yCTaHOBnTe CBJ3b cDOMaUHeN CeTbWLAN (Wi-Fi) nC npInIOxKeHnEM Home Connect.
PpIIOXeHneHomeConnectnOMoXeT Bam pOoiBv Becb npoueepeRncTpaun. IaBbIPOJIHeHnHaCTpoek cJeDuYte yKa3aHmB pIIIOXeHnHome Connect.
PekomEnDaUN
CoOTBcTByUOaIaHΦOpMauncoepKHTcBnPnlaRaEMoDokymeHaunHome Connect.
Takke co6IouaTe yka3aHnI, npBBe-DeHHbIe B npIoXeHn Home Connect.
PpIMeuaHn
Co6IIOdaIte H3LOXKeHHbIe B DaHHOI INCTpyKcII INpaBnla TexHKn 6e3OpanC-HocTn, B TOM YncIe npu ynpaBHeHIN npi6Opom Upe3 npiloxKeHne Home Connect.
"BézônacHocTb", CtpaHua 152
Приноштнын влгетсуnpаьени
неносpeдъевно на самом пибор.
В заю сCityuaе оновременhoe упав-
lienце черешто рпilожени
Home Connect HeBo3MoKHO.
13.1 Home Connect YcTaHOBKN
BbInolHnTe HacTopyKHy Home Connect B COOTBeTcTBn C BaUHMn Ntpe6HoCTaMn.
HactpoiKnHome Connect Bbl haIndete B MeHIO 6a3OBbIX yCTaHOBOK BaWero np6o- pa. IepueeHb HactpoeK, OTObpaKaembIX Ha dncnlee, 3aBNCNT OT TORO, ycTaHOBNeHo li npINOJKeHne Home Connect n noDKNIO- ueHn np6Op K DOMaUHe ne CTn.
O63op HacTpoek Home Connect
3ndeBbI HaJeTe o63Op HacTpoeK "Home Connect" n ceTeBbIX HacTpoeK.
14 Ba3Obblc yCtAHOBKN
BbMOKeTe BbIOnHnTb HacTpOky npu6o-pa corlacho BaUIM nOtpe6HoCTaM N Bbl3BaTb DOnOpHnHTeNbHbIe FyHKun.
14.2 O63op 6a3OBbIX HacTpoeK
3Iecb npnBOJNTcO63Op 6a3OBbIX HAcTpoeK.
Pn HeKbAInHnCnIOBaaHHOM peMOHTe pnp6Op MOxET CTaTb NCTOuyHKoM ONaCHOCTN.
PemOHtnpOBAtbpap3peWaaTcraToIbkoKBAHnHnCInpOBAHHbIM CneuaJIHCTaM.
Для ремонта прибopa можно И сплььовыт Только оригинальные 3ач actN.
Bo n36eKahne onachocTe 3aMeHa NOBpeXdEHHoro cTeBoro Ka6eI daHHoro np60pa MoKeT 6bITb BbIOJIHeHa TOJIbKO IPOIN3BOIDTEJIeM ININ aBOTOp3OBaHHo IM cepBcHON cnyk60JIb6O liuOM, IMeIoUIM aHaIOrnHyIO KBaIIΦNkaUIO.
3 UcTaHOBLeHnR NPiDKNIOueHnR 184
3.1 KomniljeK TnoCTaBkn 184
3.2 YcTaHOBJIeHHN IpiKJIIOueHnI npInaNy 185
4 3HaHOMCTBO. 185
4.1 Pnla.. 185
4.2 EmeHTn KepyBaHHa 185
5 PnnaIaIaI 186
6 Ppei nepiHm BnKOpNCTaHHM 186
6.1ПлгOTOBkaичишенпрладу... 186
6.2 Bn3haeHnTBePdoCTI BOi..187
6.3 Perse BnKopncTaHHn npi- naNy... 187
6.4 3aŋaJIbHI Bkα3iBKn 188
7 OchoBhi BiIOMoCTi npo KopnctyBaHHa 188
7.1 YbIMKHeHHaabo BIMKHeHHn npIaNy 188
7.2 PnirrotyBaHHHaHOIB..... 188
7.3 doubleShot i tripleShot..... 189
1.3 06MeJxHnKoJa KOpNcTyBaayiB
ДiTи BIKOM BiD 8 pOKiB, a TAKOJ OCO6n 3 O6mExeHIMN φi3nUHIMN, CEHCOPHIMN a6o PO3yMOBIMN 3Ii6HOCTaMn U3 6paKOM DOCbIy Ta/a60 3HaHb MOKyTb KOpNCtYBaTINcA ZIM nPpIaNOM TiIbKN iId HaIraIOM a6o NiCJIa OTPImaHHB Bka3iBOK i3 6e3neuHOrO KOpNCTyBaHnR nPpIaNOM i NiCJIaTOr, JK BOHn YCBiIDOMnIn MOnJIbBi NOB'J3aHI 3 ZIM He6e3NeKn.
BepexkiTb npioHi netaI BiD iTei.
He Do3BOLIyTe IITaM rpaTnC3 DiPi6HIMN DeTaIaRM.
YBA!-He6e3neka ypaJKeHHeJIeKTPnHm cTpyMOM!
Mоntаж, Виконаний HehaileхнIMЧИHOM, може CTaHOBuTи Heбe3-пеку Для КОпUCTуВачa.
- Пилад ДОЗВОLEно пдКЛЮЧати Do eLEKТрОмерекій ekсплуа-Tувати Лише BiДПОВИДно Do ДaнХ, 3a3нayeHnx Ha 3aBOДській Ta6личici.
- Пилад можна пдкюаTN Do eileKtpomepeksi 3MiHnOTo ctpуMy Tiьки чepe3 3a3eMlleHy po3etKy, 3MOHTOBaHy 3IДNo 3 YuHHIMN HOpMaMn.
3a3eMnIOBaJIbHn npoBID eIeKtpuHoi CnCTeMn oceli Mae 6yTINpOKlaJeHn 3rIDHO 3 YUHHIMN HOpMaMn.
YCTaHOBIb HaIMeHsU TpINBaIicTb 3aTPmKn aBTOMaTHO GBMKHHeH H.
Kolni npilaJom He 6yIyTb KOpNCTyBaTnCra, BiH BmIKaTUMetbCpaHiwe.
"OcHOBHi npaMeTpN", CToP. 195
He nepeepuBaIte npriroTyBaHHa HanoiB nepeDuacHo.
Harpita kilbkiCTb BOAn a6o MoloKa 6ynde BIKOpncTaHa ONTImaJIbHO.
PergyIaRHO BuaJaIe 3 npilaNy HauKII.
V BiДклади haKiny piДВишуOTb eHeprocnoxINBaHHa.
3 YcTaHOBJIeHNeI niKJIIOUeHHa
Tyt Bn Di3HaETEcA, De HaNlInIeBCTaHOBnHOBaTn npuJa. KpIM TORo, Bn Di3HaETEcA, YK npueDHaTn npuJaDo eNeKTpOmepeXi.
3.1 KomnjeKT NOCTABKN
IicIpaO3naKaYBaHHnepeBipTe, uKOMnJIeKT NOBHN i uH He NIOsKOJINoAkiCb YactHNI pI d uac TpaHCnOpTyBaHHa.
3ayBaJehH: 3aJIeKHO BiI MoJeI npIaNy B KOMNJIeKT BXOJrTb pi3Hi akCecCyapn. IOnaTkoBI akCecCyapn no-3HaueHi NyHKTIrpHOIO paMKoIO.
Man. 1
Y Ta6IiCi HnKYe NOKa3aHo CnIBBiHHOWeHHpaBHBiCtynHeHbTBepoCTi BOHN.
| Pi- Вени | Himezuki rpaДуси ТberдocTi °dH | Загалва ТBERДICTь (MMOль/л) |
| 1 | 1-7 | 0,18-1,25 |
| 2 | 8-14 | 1,42-2,49 |
| 3 | 15-21 | 2,67-3,74 |
| 4¹ | 22-30 | 3,92-5,34 |
1 3aBoIDcbKa HacTpoIka
3ayBaXeHHa:KIOBocJIe YCTaHOBkaIJa NOM'AKUeHHa BOi, TOMOKHa BnOpaTn HalaaHTyBaHHa "POM'AKUyBaU".
Nopada:HaIaIbTyBaHHaMOxHa 3MInHTB6yIb-IAKIMOMeHT. "OChOBHInapaMeTpU",CTOp.195
- YbIMKHiTb npnilaJ KHOHKOIO ①.
- BnKoHyIe Bka3iBKn, IIO 3'YBJIaTnMyTbCnHa IINcPneI.
HaДиСПЛeI 3'ЯВЛТИМУТБСЯHCTpyKUJI 3 BИКОHAHH ПрогамN.
Bka3iBKn
He nIte zboTo hanoIO.
Iopapa: Cta6iBHa Dpi6HOpnOpcTa KpemOBa NiHKa DoCraeTbcr NiCJI npNOrTyBaHHK iNbKOx YauoK BiD NooatKy KopNCtBuHHN PpUlaDom.
7 Ochobhi BiIDomocTi npo KopnCTyBaHHa
7.1 YbIMKHeHHa6o BmKHeHHa npHaNy
- Hatnchitb ①.
Пид уас yBIMKHeHЯ Ha dinCnJIeI 3'YBNTbcr IOROTIN Siemens.Пид уас yBIMKHeHЯ BIMKHeHЯ prinla d aBTOMaTNUHO npOMuBaetbcr. BIMkaIOUncb, prinla d uNCTntbcr. BInyckaIoun napy B nIDOn. RaKIo prinlaHa MOMeHT yBIMKHeHЯ Ze TePnIa aObo nepeD BIMKHeHHa Hanoi He rotYBaJI, prinla d He npOMuBaETbcr.
7.3 doubleShot i tripleShot
YHM DOBWE 3aBapIOEbC Kaba,TM6IbWe rIPKnx peyOBnH I Hebaxahnx apOMATIB BvBilbHAcTbCn. IpKi peyOBnH NHebaxaHI apOMATn NoripSyIOTb CMAk i 3acBOIOBaHcTb KaBN. UoB BViBbHnIcR TIlbKn PnEmHi HaCMak I DoOpe 3acBOIOBaHI apOMATNHi peyOBnH, Ppnilad 3aHOBO MeJe 3epHa N 3aBapIOe Kaby.
3ayBaHexHH:Функцii "doubleShot" i "tripleShot" Залекать Вд ВибранхMiцhocti Ta ob'emу habioI.
YcIbOMy npIKlaJI Mt PO3rJaHEmo,
JAK pIINOTyBaTN IaTe-MaK'HTO.
YBATA!
He6e3neka onikib!
MolouHa CnCTema DyKe CnIbHo Ha-rpiBaetbcr.
Hikon He TopkaTecra rapyoi MOJIOHOI CNTEMN.
- Perш Нж Торкатся мolyочи сиземи, дай Teй Oхонун.
Bumorn
Molouhni IJnAHr 3 YCMOKTyBaJIbHO Tpy6KOIO pIneIHaHNI DO MOLOUHOI CnCTeMI.
YCMOKTyBaJIbHa Tpy6Ka 3aHypeHa BMOJOKO.
- NocTaBTe cKJIaHKy NiД Do3aTop.
- HatnCHiBt "KlaCnka".
-
Bn6epiTb i haTnCHiTb CmB0J IaTeMaK'rTO.
-
Lio6 3miHHTM MiUHICTb, HATNCKaIte ①.
- LlO6 3mIHHTn O6'em HanoIO, HATNCKaIte.
-
Lio6 3miHHTu qactky MoIoka, HATNCKaIte B.
-
Hatncihitb "Po3noatn" i doye-kaHTEc3aBepWeHHn pOcecy.
-
Lio6 noBHCtIO 3yINHnTn npnroTyBaHHaHNO, HATNCHTb "3yINHnTn".
- Lio6 3ynHHTn TiIbKn ITOUHN eTan npnroTyBaHHa,HaTNCHiTb "PpOnyctHTn".
Iicn nprirotyBaHHa MOLOuHa CnCTema aBTOMaTHUHO OUYsAeTbcK KOpOTKIM IMnybCOM napn.
Bka3iBkn
JkuO He 3MiHHTN KOdHOro npaMeTpa IpoTgrom pnp6Jn3HO 30c, npuJaB BnIe 3peKmMy HalaawTyBaHHa.
- Пилад зберіга\'е пapametpn abTomaTnUHO.
Iopapa: Ipeep npriroTyBaHHa Hanaobuawkn MoxHa NiirpiBaTu ra-paOIO BOIO a6o CneiaJbHm NiirpiBaueM.
7.5 Ondohouache npnroToyBaHnHaDBOX YaShO
3aIeJHo Bii MoJeI npuJaMy MoJHa rTOyBaTn DBi YaUkN KABN OndOuacHO.
3ayBaHexHH:KolnakTnBHaФyHKcii "doubleShot"abo "tripleShot", OndHouacHe npriroTyBaHHaDBOX a- WOK He NiIDTpmyEcTBcA.
- Hatnchitb cunboJ 6aKaHOro HanoJ.
2 HATNCiTb
HaДиСплеI NOka3aHOBCTaHOBJIe- HnI npaMeTp.
3. NocTaBTe Dbi yauKn iD Io3aTOp, liBopyu i npabopuy.
4. HatncHtB "Po3nochatu".
ПригOTуВаHHЯ HANOЮ CКладаETьСЗТakоi Kількостi etanib:2.3epHaMeJIOTbCt KaTy KільКICTb pa3iB:2.
Hani 3abapntbca, a notim HalleTbcB yauKy.
5. Дочакайеся заBERшеня поцecу.
8 KaBOMOJIka
Lcien npnilaon o6laHaHo peryIbOBHO KABOMJKOIO, 3a DOnOMOroIO kOoi MOXHa iHnBiyAulbHO KopriyBaTn CTyniNb NOMEny KaBOBx 3epeH.
8.1 Bn6ip cTynHe nOmeJy
"OrrnIO OCHOBHIN NapaMeTpIB", CToP. 195
12 YIIO6JIeHe
Hanoi 3 nepcohaIizOBaHmN Hana- shTyBaHHnM MoKHa 36epiratn Jk yJIIO6JIeHi.
YIIO6JIeHI Hanoi MOXHa I03Haayatn KOJbOpom. YIIO6JIeHNI Hani -Ce Hani 3 nepcoHaji3OBAHmN HanaaHTyBaHHMa. 3MiHNTn HanaaHTyBaHHa HANOIO MOXHa B OyDb-RAKNI MOMENT.
3ayBaXeHHa: LIO6 BnHTn 3 MeHIO HanaTbAHHa, HATNCHiTb
12.1 36epeJHHeHHaHOIO 3 MeHIO Bn6Opy
- BùnépiTb Hàn i₃ 3 pòzǐ nǐy "KlǎncuKa" abo "coffeeWorld".
- PercoHaJI3yIe napametprn HanoIOJ.
-
HatnchItb "YJIIO6JIeHe".
-
Bn6epitb dIa HanoIO 6aKaHn Ko-lip.
- Hatncihitb "36epeertn".
12.2 36epeJHHeHHaHOU B MeHIO
- HatnchItb "YJIIO6JIeHe".
- Hatnchitb
DnCnJIeI noka3ye BcI HaBHi Hanoi.
3. BùbēpiTb ǒaxaHn HānIi.
4. Персанізуне паметри наю.
5. HatncHtB "ДаJI".
6. BnBepiTb IaHaNoI baxKaHn Ko-lip.
7. Hatncihitb "36epeertn".
12.3 3MiHa napaMeTpib HanoHO
- HatnchItb "YJIIO6JIeHe".
- BnBepiH hani i HATNCiTb Ha HbO- ro.
- 3miHiTb npaMeTpn HanoIO.
- HatnCHiTb "3actocyBatn".
Hobi napametpn 36epiraotbcra Ha npnilaidi.
Cnyk6nHome Connectdoctyni He Bycix KpaiaHax.DoctynHicTb yHKuiiHomeConnect3aIeKntbBid doctynHocti Cnyk6Home ConnectyBa- uik KpaaiHi.1NΦopMaciIO npo ue moKHa 3HauiTuT:www.homeconnect.com.
LIO6 MoKHa 6yIIO KOpNCTyBaTn- CnHome Connect, cnepy BCTaHOiTB 3B'3OK i3 DomaunHbOIO MepeKeio WLAN (Wi-Fi1) i MObiNbHOIO nporpaMoIO Home Connect.
3acTocyHokHome Connect daBaTnme iNctpyKuii 0oDo BCix etanib npocecy peectpaui.ДЯн acToIOBaNHHBVKOHnyTe iNctpyKuii, 0o 3'YBnTmMyTbCBy 3acTocyHky Home Connect.
Iopapn
ДоТрИМуЛТecЯВИМOr,HaBeДeEHx y cyIpOBIДиДOKУМЕNTaцii Home Connect.
■ BИКОнуЛte TaKoЖ Bka3iBKN, lo 3'ЯВлЯJOtbcR B 3aCTOCyHky Home Connect.
Bka3iBkn
Iotpmytec npabnl texhikn 6e3neKn, HabeJeHx yui iH-CTpyKci 3 ekCnlyatauii; ci npabnla MaOTb 6yTN DoTpMaHi y Tnx Bn
PanaKax, KOJI N BNI KepyeTe PpIaDOM 3a DOIOMOIO 3aCTOCyHky Home Connect. "Be3neKa", CToP. 180
- YnpabInHnBe3nOcepeHbOHa npinlaDi 3aBxJn Mae npeBaIy. Y cei yac ynpabInHn 3a DOnOMoToIO MOiJIbHOI npo-rpaMn Home Connect hemoxJIVe.
13.1 ПараMeТрн Home Connect
AaantyTe Home Connect do cboix notpe6.
Papametpn Home Connect moxna 3HaHTn B MeHIO OCHOBHX
napametpiB npuIaNy. Rki napametprn BiOobpaKaTuMyTbCra Ha DnCnIe, 3aJeXntb BiD TORO, uN Hala-
WTOBaHO Home Connect i nnPiKnlo- ueHo npuIaD do DomauHbOi Mepexi.
Ornay napametpib Home Connect
Tyt nabeJeHO orIaI npaMeTpB "Home Connect" i MepeXI.
14.1 3MiHa OCHOBnX HaJa-ItyBaHb
- Hatnchitb
Дисплей пokа3у ecncoK OCHOBHNx napaMeTpib.
2. 3aДaIte nOTpi6Hn OCHOBHn npapaMeTp.
Пилад abTomatnUHO 36epiraocHOBnI napaMeTp.
3. Lio6 BnTn 3 OCHOBnX npaMeTpib, HATNCiTb
14.2 OrlaOcHOBnX npaMeTpib
Tyt HabeJeHO OrlJIO OCHOBnIX NapaMeTpIb.
Tyt haBeTeHO OrIaIeI, npuaTHNX Do MHTB NocyOmHi MaunH.
YBARA!
Jeyki deTani cyTnBi do TemnepaTypru MoKyTB 6yTN IOsKoJxHeH BHaCNI-DOK MNTTBA NOCyDOMNHi MaunHi.
IotpmyTeceBMMOr iHCTpyKu3i3 eKcIyatauII NocydomnHOi Maun-HN.
MnIte B nocydomnHi MaunHi TiJIbKn pniDAtHi IJNA CboRo DeTaJI.
BukopncToByte TiIbKn Ti npo- rpaMn, KOTpi He HapriBaIOb BODy noHaD 60 ^ C
PnpdaTHi:
PiDIOH dIgKpaneIb
- PewiTka
- KoHTeINHep dIy KaBOOoi ryui
-MexaHicHyn iHnKaTOp pIBHa
Molouha cnCTema 3 aanTepom
KoHTeINHepIJIaMOJOKa3KpN-
He npndaTHi:
KoHTeINHepIaI BODI
Kpnwka KOHTeHepa DnB BOn
Kpnka dny 36epexehn apomaty
BLOK 3aBapIOBaHHA
Kpnska do3aTopa
15.2 3ac06nДЯ OUnSeHNa
BukopncToByTe InIe CneUaJIbHi 3acO6n DnA YnIeHHN.
YBARA!
HenpiuataHi 3acO6n IJyIuIeHHNMOJxTy NpUKOJxByTaN IOBepXHi npuHa-ny.
He 3acTocOByIte roctpi nn a6pa3nBHI 3acO6n dnn YnIeHHN.
He BnKOpncTOByuTe 3acO6n IJN YIeHHa,IO MICTaTb CnIPT.
He 3actocobynte kopctki a60 metanebi ry6kn.
He BndaIaIYe HauKIn 3a DOIpOMoTIO JIMMOHHOI KINLOTN, OU TY a60 3acO6iB Ha OCHOBI OU TY.
ДлЯВидаLEHнHaKINуМочиЕнНЯСЛДВИКОРИСТОВYВaTиВИКЛIO-ЧноСпeцiaльHi Ta6NeTkn.
He BnKOpNCToBvIe 3acO6n IJN BnJaJIeHnHaKnIpy, IIO MICTaTb focphiHy KNCIoTy.
Iopapn
■BukopincobuyTe Ta6IeTKn IJy BnIaJIeHHHaKIny N OUYIeHHN,AKi P03pO6JIeHi CneUiaJIbHO IJy BaIo- ro npInaNy. Ta6IeTKn MoXHa npIno6aTn B cepBicHomy CEHTpi. "PpInaIaIra",CTop.186
- Petelbno MmTe HObi rYbKn, IIOB BndaIHTNo MoXJIbBi peUeTKn CoJeN. CoJI MOxTy bCnpuHrTn IoRBy HaIbOty ipKi Ha MeTaJIeBnx NOBepxHax.
IIO6 3aONoBITN Kopo03i, 3aBxKn HeBIXKlaIaHNO pnpbpaIte 3aIIuSKn HaKNy, KaBn, MoLOKa, PO3uHIB DnOuNSeHHry N BuJaIeHHra HaKNpy.
15.3 Chuichiennn npnilaNy
YBATA!
He6e3neKa ypaKeHHa eJeKtpnHm cTpymOM!
Piznha, zo BVteKna, MoXe cnpuHnTyn ypaKeHH eJeKtpuHm CTpyMOM.
Hikoln He 3aHypioIte Hi npnila, Hi Ka6eIb XINBLeHnry BOdy.
Ha po3nHmN 3'edHyBauch npuJaHy He Mae NotpaJIaTn piJInHa.
He MoxHa uNCTHTn npUla3a DoIOMOroTO npoBOrO a6o BnCOKOTnCKOBOrO npuJaNy.
YBATA!
He6e3neKa onikib!
16 YcyuHnHa HecnpaBHOCTeI
He3NaHHi HeCnpaBHOCTI npnlaNy moKHa yCyBaTn BlaChOpyu. Nepu HiX 3BeptaTnca Do cepBicHOi Cnyk6n, CKOpNCtaTecr BiIOMOCTAmN IpO yCyHeHHr HeCnpaBHOCTe. TaK MOKHa yHNKHyTN 3aIBNX BVtpaT.
YBAGA!
He6e3neKa ypaXeHH eIeKTpHuHm cTpyMOM!
PemOHTHi pOBoTn, BnKoHaHl HeHaJIeXHHm YInHOM, MoXyTb CTaHOBHTn He6e3IeKy IIN KOpNCTyBaUa.
PemOHtByaTn npuJa Do3BOJeHO tIbKn qaxiBzM.
Для ремоHTу пиlaу Do3BOJIЯETbCЯ BVKOPNCTOByBaTи Лшe opnirHaJIbHi 3anuactHn.
yHnKHyTN He6e3neK, y pa3i nOuKoJKeHHKa6eJIIO KINBHeHHa bOTo npIaNy Ioro 3amHy MaE BnKOHyBaTn BnPo6HnK, cepBicHn CHTp a60 ocOba 3 BiIDNoBIDHOU KBaJIiΦiKauiCiI.
Central Service Contacts
AM AM Armenia, Ruwuunnuu
ZIG ZAG LLC
Charenci str. 25
Yerevan 375025
Tel.: 010 55 60 10
newsletter:service@zigzag.am
www.zigzag.am
www.siemens-home.bsh-group.at
Gate 1, 1555 Centre Road
Clayton, Victoria 3168
Tel.: 1300 167 425
newsletter: aftersales.au@bshg.com
www.siemens-home.bsh-group.com/au
*Mon-Fri 24 hours
BE Belgique, Belgie, Belgium
BSH Home Appliances S.A.-N.V.
Rue Picard 7, box 400, Picardstraat 7, box 400
1000 Bruxelles - Brussels
Tel.: 024757002
mailto:bru-repairs@bshg.com
www.siemens-home.bsh-group.com/be
BY Belarus, Bénapycb
000"5CX BbITOBa TEXHnKa"
ten.: 4957372962
mailto:mok-kdhl@bshg.com
CH Schweiz, Suisse, Svizzera, Switzerland
BSH Hausgeräte AG
www.siemens-home.bsh-group.com/ch
CZ Ceska republika, Czech Republic
Vice informaci (napr. zaručni podminky, prodloužena zaruka aj.) naleznete nawebovych stránkach www.siemens-home.bsh-group.com/cz/ nebo nás kontaktujihe +420 251 095 511
www.siemens-home.bsh-group.fr
GB Great Britain
BSH Home Appliances Ltd.
Grand Union House, Old Wolverton Road,
Wolverton
Milton Keynes MK12 5PT
To arrange an engineer visit, to order spare parts and accessories or for product advice please visit www.siemens-home.bsh-group.com/uk Or call Tel.: 0344 892 8999*
*Calls are charged at the basic rate,
please check with your telephone service
provider for exact charges.
IE Republic of Ireland
BSH Home Appliances Ltd.
M50 Business Park, Ballymount Road Upper, Walkinstown
Dublin 12
To arrange an engineer visit, to order
pare parts and accessories or for
product advice please call Tel.: 01450
2655
www.siemens-home.bsh-group.com/ie
*Calls are charged at the basic rate,
please check with your telephone service
provider for exact charges
IT Italia, Italy
www siemens-home.bsh-group.com/it
LU Luxembourg
www.siemens-home.bsh-group.com/lu
MT Malta
Aplan Limited The Atrium
The Atrium
Mriehel by Pass
BKR3000 Birkirkara
Tel.: 025 495 122
mailto:services@theatrium.com.mt
NL Nederland, Netherlands
www.siemens-home.bsh-group.nl
PL Polska, Poland
www.siemens-home.bsh-group.pl
RU Russia, Pocsn
000 «BxCBБbITOBbIeПиббopы»
CepBnC O T pOn3BODnteTl
Ten.: 8 (800) 200 29 62
mailto:hotlineru@bshg.com
www.siemens-home.bsh-group.ru
UA Ukraine, Ykpaia
TOB "5CX Побутва Тхиka"
Tel.: 0 800 300 153
mailto: BSH-serviceua@bshg.com
www.siemens-home.bsh-group.com/ua
Бекштогн Ифо-Линяп 3 9.00
do 18.00
ZA South Africa
BSH Home Appliances (Pty) Ltd.
96 Fifteenth Road, Randjespark
1685 Midrand - Johannesburg
Tel.: 086 002 6724
mailto:bsh@iopen.co.za
mailto:applianceserviceza@bshg.com
www.siemens-home.bsh-group.com/za
BSH group is a Trademark Licensee of Siemens AG. Manufacturer's Service for Siemens Home Appliances.
BSH Hausgeräte GmbH
Carl-Wery-StraBe 34
81739 München
GERMANY
www.siemens-home.bsh-group.com
Valid within Great Britain:
Imported to Great Britain by
BSH Home Appliances Ltd.
Grand Union House
Old Wolverton Road
Wolverton, Milton Keynes
MK12 5PT
United Kingdom
Manufactured by BSH Hausgeräte GmbH under the trademark licence of Siemens AG
- Fully automatic espresso machine
- Table of contents
- Safety
- General information
- Intended use
- Restriction on user group
- Safety information
- WARNING - Risk of suffocation!
- en Safety
- WARNING - Risk of electric shock!
- WARNING - Risk of fire!
- WARNING - Risk of burns!
- WARNING - Risk of scalding!
- WARNING - Risk of injury!
- WARNING - Danger: Magnetism!
- WARNING - Risk of harm to health!
- Environmental protection and saving energy
- Disposing of packaging
- Tips for saving energy
- Installation and connection
- Scope of delivery
- Installing and connecting the appliance
- ATTENTION!
- Familiarising yourself with your appliance
- Appliance
- Accessories
- Before using for the first time
- Preparing and cleaning the appliance
- Checking the water hardness
- Performing initial start-up
- Notes
- General information
- Basic operation
- Switching the appliance on or off
- Dispensing beverages
- WARNING
- Risk of scalding!
- Tips
- doubleShot and tripleShot
- Dispensing a coffee beverage with milk
- WARNING Risk of burns!
- Requirements
- Dispensing two cups at once
- 8Grinder
- Adjusting the grinding level
- WARNING Risk of injury!
- Grinding level Setting
- Water filter
- Inserting the water filter
- Changing or removing the water filter
- Childproof lock
- Activating the childproof lock
- Deactivating the childproof lock
- Cup heater1
- Activating and deactivat ing the cup heater
- Risk of burns!
- Favourites
- Saving beverages from the beverage selection
- Saving the beverage in the menu
- Changing beverage settings
- Deleting favourites
- Sorting favourites
- Home Connect
- Home Connect settings
- Overview of the Home Connect settings
- Data protection
- Basic settings
- Changing the basic settings
- Overview of the basic settings
- Cleaning and servicing
- Dishwasher-safe components
- Suitable:
- Not suitable:
- Cleaning agent
- Cleaning the appliance
- Risk of electric shock!
- Cleaning the drip tray and coffee dregs container
- Service programmes
- Using the service programmes
- Overview of service programmes
- Troubleshooting
- Transportation, storage and disposal
- Activating frost protection
- Disposing of old appliance
- Customer Service
- Product number (E-Nr.), production number (FD) and consecutive numbering (Z-Nr.)
- Warranty conditions
- Technical specifications
- Declaration of Conformity
- Table des matieres
- WAARSCHUWING - Kans op verstikking!
- WAARSCHUWING - Kans op brand!
- WAARSCHUWING - Kans op letsel!
- doubleShot i tripleShot
- doubleShot a tripleShot
- Be3onachocTb
- O6uzne yka3aHnna
- Yka3aHnI NO TexHnke 6e3oNaChOCTn
- PPEyIpeJDEHNE-Onacnoctb yduyb!
- I P E D U N P E X I D E H N E - O n a c h o c t b: M a r H e T h 3 M!
- PPEyPExEHE - Pnck HaHeceHnaBpeJa 3DopOBbIo!
- 3aunTa OkpykaOuSei cpebl N 3KOHOMN
- Ytihn3aunypaKOBKn
- 3Heproc6epeKeHne
- YcTaHOBKa N NOdkJIIOUeHHe
- Komnlektaçaн
- 3HaKOMCTBO C npH6Opom
- Пибор
- Побrotовka прибoga и erо ouchnctka
- BHIMAHNE!
- OnpeJeIeHne JecTKocTH BOJbl
- CtaHdapThoe ynpaBneHne
- BkJIoueHne nIbBbIKJIOueHne npnbopa
- doubleShot u tripleShot
- Kofemolka
- YcTaHOBKa cTepeHn NOMOJa
- PNEyPPEKdEHH
- N36paHHoe
- CoxpaHeHne HAnNTka N3 Bbl6opa HAnNTKOB
- CoxpaHeHne HapNTka B MeHIO
- PekomEnDaUN
- PpIMeuaHn
- Home Connect YcTaHOBKN
- O63op HacTpoek Home Connect
- Ba3Obblc yCtAHOBKN
- O63op 6a3OBbIX HacTpoeK
- 06MeJxHnKoJa KOpNcTyBaayiB
- YBA!-He6e3neka ypaJKeHHeJIeKTPnHm cTpyMOM!
- YcTaHOBJIeHNeI niKJIIOUeHHa
- KomnjeKT NOCTABKN
- Bka3iBKn
- Ochobhi BiIDomocTi npo KopnCTyBaHHa
- YbIMKHeHHa6o BmKHeHHa npHaNy
- YBATA!
- He6e3neka onikib!
- Bumorn
- Ondohouache npnroToyBaHnHaDBOX YaShO
- KaBOMOJIka
- Bn6ip cTynHe nOmeJy
- YIIO6JIeHe
- 36epeJHHeHHaHOIO 3 MeHIO Bn6Opy
- 36epeJHHeHHaHOU B MeHIO
- 3MiHa napaMeTpib HanoHO
- Iopapn
- ПараMeТрн Home Connect
- Ornay napametpib Home Connect
- 3MiHa OCHOBnX HaJa-ItyBaHb
- OrlaOcHOBnX npaMeTpib
- YBARA!
- PnpdaTHi:
- He npndaTHi:
- 3ac06nДЯ OUnSeHNa
- Chuichiennn npnilaNy
- He6e3neKa ypaKeHHa eJeKtpnHm cTpymOM!
- YcyuHnHa HecnpaBHOCTeI
- YBAGA!
- He6e3neKa ypaXeHH eIeKTpHuHm cTpyMOM!
- Central Service Contacts
Brand : SIEMENS
Model : TP705R01 - TQ703R07 - - - - - - - TP705R01--B
Category : Coffee maker