
TQ703R07 - TQ703R07--B - Coffee maker SIEMENS - Free user manual and instructions
Find the device manual for free TQ703R07 - TQ703R07--B SIEMENS in PDF.
| Product type | Automatic coffee machine |
| Brand | Siemens |
| Model | TQ703R07 / TQ703R07--B |
| Dimensions (H x W x D) | 38 cm x 30 cm x 46.7 cm |
| Empty weight | 9 kg |
| Power supply | 220-240 V ~, 50 Hz, 1500 W |
| Maximum pump pressure | 20 bar |
| Water tank capacity | 2.6 L |
| Bean hopper capacity | 350 g |
| Grinder type | Ceramic, adjustable |
| Touchscreen | Yes, with beverage and settings display |
| Beverage functions | Coffee, espresso, latte macchiato, cappuccino, etc. |
| doubleShot and tripleShot | Yes, for optimal aroma |
| Two-cup preparation | Yes, simultaneously |
| Integrated milk system | Milk tank, frother, automatic cleaning |
| Cup warmer | Yes, adjustable |
| Connectivity | Home Connect via Wi-Fi (2.4 GHz and 5 GHz) |
| Child safety | Yes, screen lock |
| Automatic shut-off | Adjustable |
| Maintenance programs | Cleaning, descaling, calc'nClean, rinsing, frost protection |
| Compatible water filter | INTENZA (optional) |
| Included accessories | Milk tank, hose, adapter, tablets, filter, strip, cloth |
| Warranty / Repairability | Spare parts available for 7 years |
Frequently Asked Questions - TQ703R07 - TQ703R07--B SIEMENS
User questions about TQ703R07 - TQ703R07--B SIEMENS
0 question about this device. Answer the ones you know or ask your own.
Ask a new question about this device
Download the instructions for your Coffee maker in PDF format for free! Find your manual TQ703R07 - TQ703R07--B - SIEMENS and take your electronic device back in hand. On this page are published all the documents necessary for the use of your device. TQ703R07 - TQ703R07--B by SIEMENS.
USER MANUAL TQ703R07 - TQ703R07--B SIEMENS
Fully automatic espresso machine
EQ.7 integral
TQ7....
en User manual
Register your product on My Siemens and discover exclusive services and offers.
siemens-home.bsh-group.com/welcome
The future moving in.
3
5

7
9
4
6
8
10

11
13
15
17
12
14
16
18
19


21
23
25

20
22

24
26
Table of contents
1 Safety 8
1.1 General information 8
1.2 Intended use 8
1.3 Restriction on user group..... 8
1.4 Safety information 8
2 Environmental protection and saving energy 12
2.1 Disposing of packaging 12
2.2 Tips for saving energy 12
3 Installation and connection..... 12
3.1 Scope of delivery 12
3.2 Installing and connecting the appliance 12
4 Familiarising yourself with your appliance. 13
4.1 Appliance 13
4.2 Controls 13
5 Accessories 14
6 Before using for the first time... 14
6.1 Preparing and cleaning the appliance 14
6.2 Checking the water hardness 15
6.3 Performing initial start-up 15
6.4 General information 15
7 Basic operation 16
7.1 Switching the appliance on or off 16
7.2 Dispensing beverages 16
7.3 doubleShot and tripleShot.....17
7.4 Dispensing a coffee beverage with milk 17
7.5 Dispensing two cups at once... 17
8Grinder 18
8.1 Adjusting the grinding level..... 18
9 Water filter 18
9.1 Inserting the water filter 18
9.2 Changing or removing the water filter 18
10 Childproof lock. 19
10.1 Activating the child-proof lock............ 19
10.2 Deactivating the childproof lock............ 19
11 Cup heater1 19
11.1 Activating and deactivating the cup heater1 19
12 Favourites. 19
12.1 Saving beverages from the beverage selection 19
12.2 Saving the beverage in the menu 20
12.3 Changing beverage settings 20
12.4 Deleting favourites 20
12.5 Sorting favourites 20
13 Home Connect 20
13.1 Home Connect settings..... 20
13.2 Data protection 21
14 Basic settings 22
14.1 Changing the basic settings 22
14.2 Overview of the basic settings 22
15 Cleaning and servicing. 23
15.1 Dishwasher-safe components 23
15.2 Cleaning agent 24
15.3 Cleaning the appliance 24
15.4 Cleaning the drip tray and coffee dregs container 25
15.5 Cleaning the milk container ... 25
15.6 Service programmes 25
16 Troubleshooting 27
17 Transportation, storage and disposal 32
17.1 Activating frost protection ...... 32
17.2 Disposing of old appliance .... 32
18 Customer Service 32
18.1 Product number (E-Nr.), production number (FD) and consecutive numbering (Z-Nr.) 33
18.2 Warranty conditions 33
19 Technical specifications 33
20 Declaration of Conformity 33

1 Safety
Observe the following safety instructions.
1.1 General information
- Read this instruction manual carefully.
- Keep the instruction manual and the product information safe for future reference or for the next owner.
- Do not connect the appliance if it has been damaged in transit.
1.2 Intended use
Only use this appliance:
for preparing hot drinks.
- In private households and in enclosed spaces in a domestic environment.
Up to an altitude of max. 2000 m above sea level.
1.3 Restriction on user group
This appliance may be used by children aged 8 or over and by people who have reduced physical, sensory or mental abilities or inadequate experience and/or knowledge, provided that they are supervised or have been instructed on how to use the appliance safely and have understood the resulting dangers.
Children must not play with the appliance.
Children must not perform cleaning or user maintenance unless they are at least 8 years old and are being supervised.
Keep children under the age of 8 years away from the appliance and power cable.
1.4 Safety information
WARNING - Risk of suffocation!
Children may put packaging material over their heads or wrap themselves up in it and suffocate.
- Keep packaging material away from children.
- Do not let children play with packaging material.
Children may breathe in or swallow small parts, causing them to suffocate.
- Keep small parts away from children.
- Do not let children play with small parts.
WARNING - Risk of electric shock!
Improper installation is dangerous.
- Connect and operate the appliance only in accordance with the specifications on the rating plate.
- Connect the appliance to a power supply with alternating current only via a properly installed socket with earthing.
- The protective conductor system of the domestic electrical installation must be properly installed.
If the appliance or the power cord is damaged, this is dangerous.
- Never operate a damaged appliance.
- Never operate an appliance with a cracked or fractured surface.
- Never pull on the power cord to unplug the appliance. Always unplug the appliance at the mains.
- If the appliance or the power cord is damaged, immediately unplug the power cord or switch off the fuse in the fuse box.
▶ Call customer services. → Page 32
Incorrect repairs are dangerous.
- Repairs to the appliance should only be carried out by trained specialist staff.
- Only use genuine spare parts when repairing the appliance.
- If the power cord of this appliance is damaged, it must be replaced by the manufacturer, the manufacturer's Customer Service or a similarly qualified person in order to prevent any risk.
An ingress of moisture can cause an electric shock.
- Never immerse the appliance or the power cord in water.
Liquids must not be spilled on the appliance plug connection. - Only use the appliance in enclosed spaces.
- Never expose the appliance to intense heat or humidity.
- Do not use steam- or high-pressure cleaners to clean the appliance.
WARNING - Risk of fire!
The appliance will become hot.
Ventilate the appliance adequately.
Never operate the appliance in a cupboard.
It is dangerous to use an extended power cord and non-approved adapters.
- Do not use extension cables or multiple socket strips.
If the power cord is too short, contact Customer Service.
Only use adapters approved by the manufacturer.
WARNING - Risk of burns!
Some parts of the appliance become very hot.
- Never touch hot appliance parts.
- Allow hot appliance parts to cool down before touching.
WARNING - Risk of scalding!
Freshly prepared drinks are very hot.
- Leave drinks to cool down if necessary.
- Do not let escaping liquids or steam come into contact with your skin.
A remote start via the Home Connect app while the appliance is unattended may cause scalding to third parties.
- Do not reach under the coffee outlet during the dispensing of drinks.
- Keep other persons, in particular children, away from the appliance.
WARNING - Risk of injury!
Improper use of the appliance may endanger the user.
- To avoid injuries, only use the appliance for its intended purpose.
Trapped fingers when closing the appliance door. - Be careful of your fingers when closing the appliance door. The grinder rotates.
- Never reach into the grinder.
WARNING - Danger: Magnetism!
The appliance contains permanent magnets. These may affect electronic implants, e.g. pacemakers or insulin pumps.
People with electronic implants must stand at least 10 cm away from the appliance.
This minimum distance of 10~cm must also be observed for the water tank when removed.
WARNING - Risk of harm to health!
Soiling on the appliance may be harmful to health.
To ensure hygiene, follow the cleaning instructions for the appliance.
2 Environmental protection and saving energy
2.1 Disposing of packaging
The packaging materials are environmentally compatible and can be recycled.
- Sort the individual components by type and dispose of them separately.
2.2 Tips for saving energy
If you follow these instructions, your appliance will use less power.
Set the interval for automatic switchoff to the smallest value.
If the appliance is not being used, it will switch itself off earlier. "Basic settings", Page 22
Do not interrupt the dispensing process prematurely.
- The amount of water or milk that is heated is used optimally.
Descale the appliance regularly.
- Limescale deposits increase the appliance's energy consumption.
3 Installation and connection
You can find out where and how best to install your appliance here. You will also learn how to connect your appliance to the power supply.
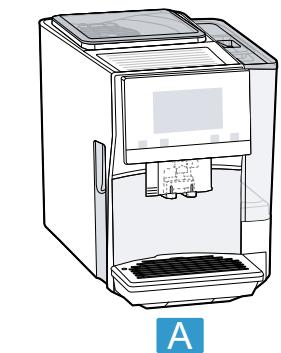
3.1 Scope of delivery
After unpacking all parts, check for any damage in transit and completeness of the delivery.
Note: Different accessories are enclosed depending on the appliance model. This accessory is shown in a frame with a dashed line.
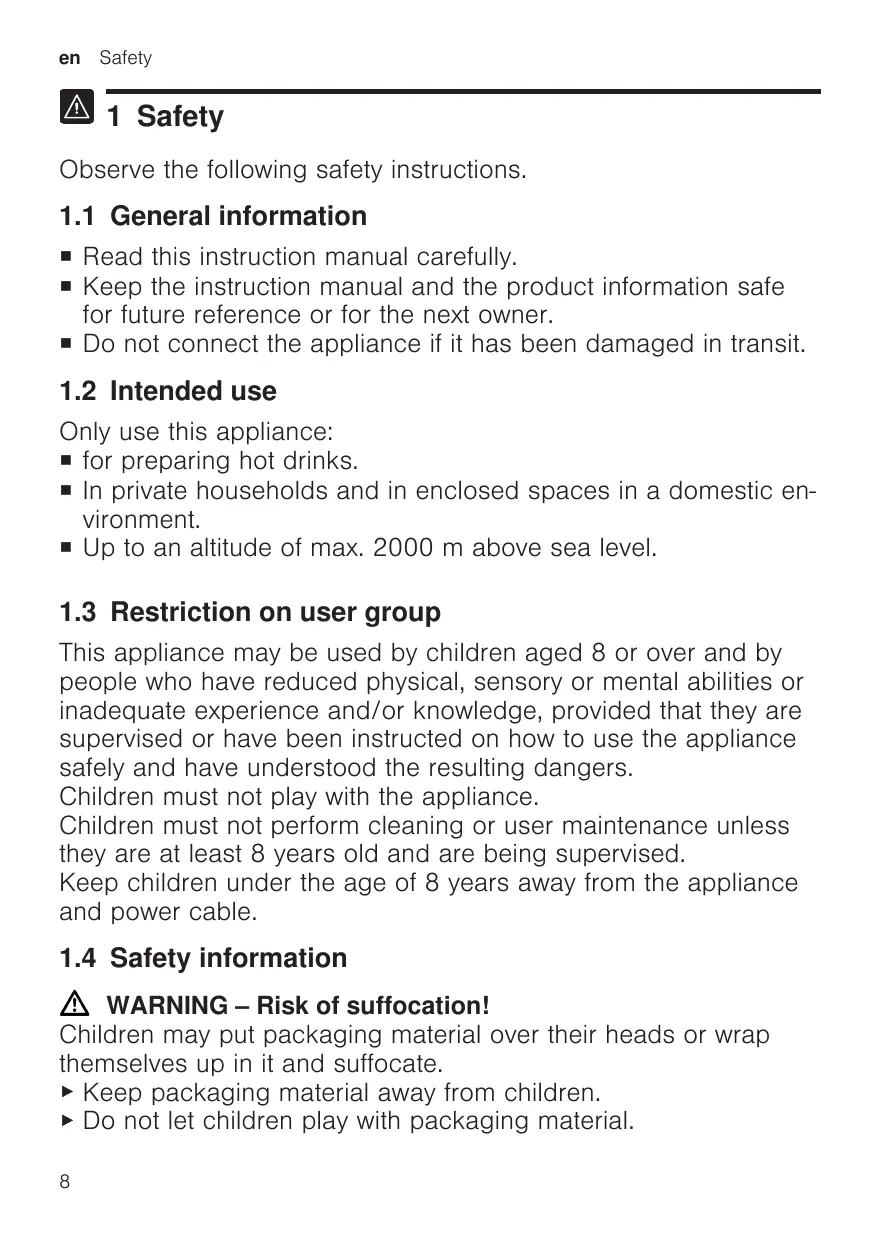
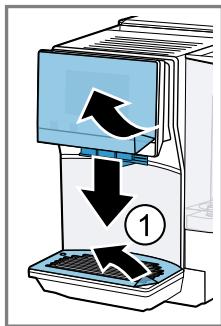
Fig. 1
| A | Fully automatic coffee machine |
| B | Milk container |
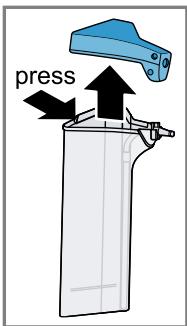
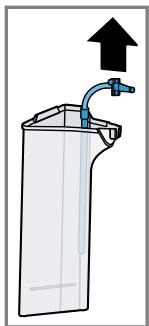
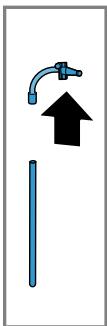
| C | Milk tube and suction pipe |
| D | Adapter for milk containers1 |
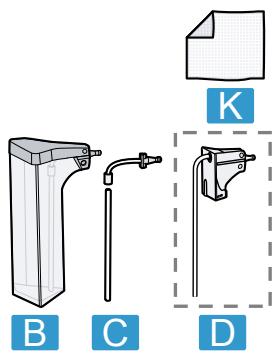
| E | Instruction manual |
| F | Insertion aid for water filter |
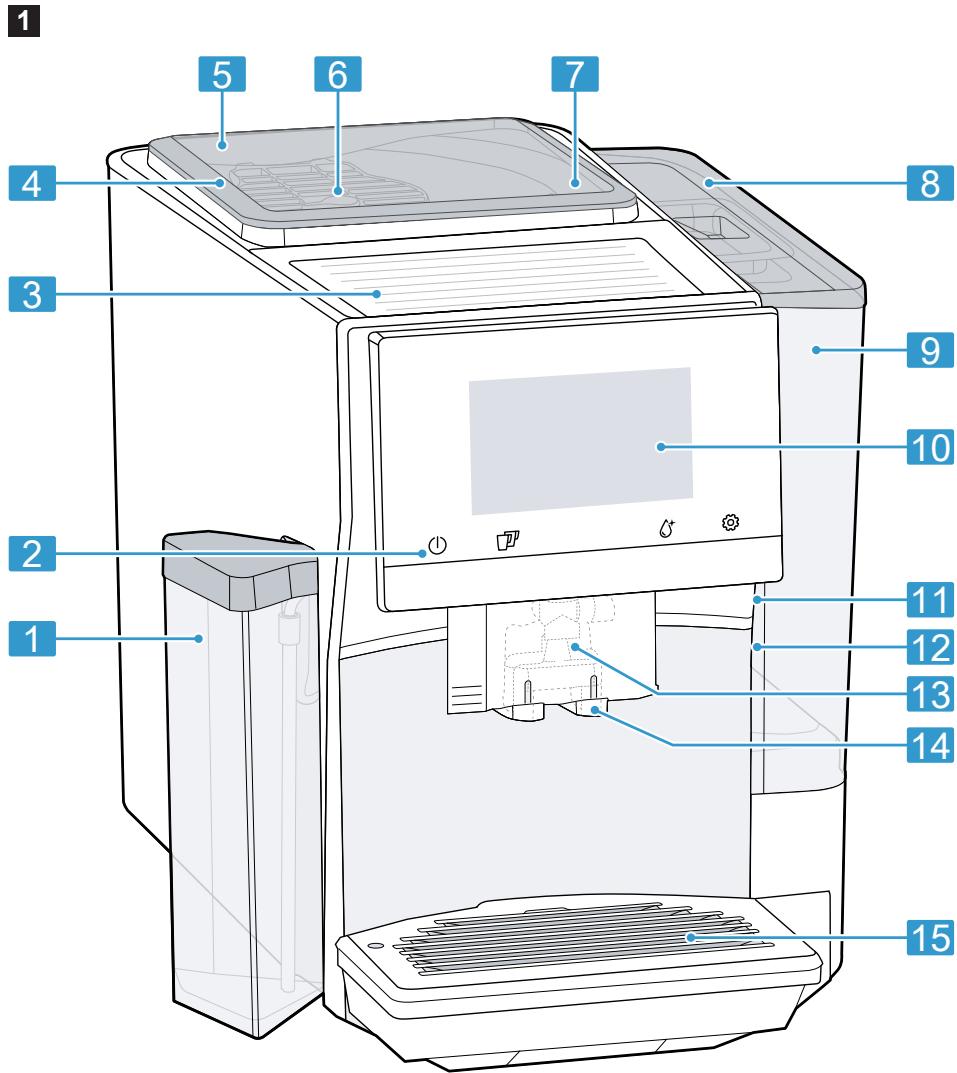
| G | Descaling tablets1 |
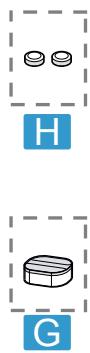
| H | Cleaning tablets1 |
| I | Water filter1 |
| J | Water hardness testing strip |
| K | Microfibre cloth |
1 Depending on the appliance specifications
3.2 Installing and connecting the appliance
ATTENTION!
Risk of damage to the appliance. If the appliance is not started up correctly, it may be damaged.
- Use the appliance in frost-free rooms only.
If the appliance has been transported or stored below 0^ , wait 3 hours at room temperature before starting it up.
After plugging in, always wait approx. 5 seconds.
- Place the appliance on a level, water-resistant surface that is capable of bearing its weight.
- Using the mains plug, connect the appliance to an earthed socket that has been correctly installed.
4 Familiarising yourself with your appliance
4.1 Appliance
You can find an overview of the parts of your appliance here.
Note: Individual details and colours may differ, depending on the appliance model.
Fig. 2
| 1 | Milk container |
| 2 | Touch fields |
| 3 | Cup heater1 |
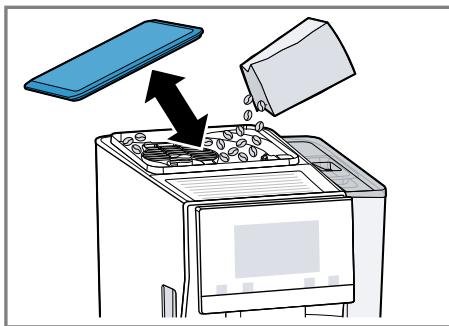
| 4 | Aroma lid |
| 5 | Bean container |
| 6 | Rotary selector for grinder setting |
| 7 | Tablet compartment |
| 8 | Cover for water tank |
| 9 | Water tank |
| 10 | Touch display |
| 11 | Brewing chamber door |
| 12 | Rating plate |
1 Depending on the appliance specifications
| 13 | Milk system |
| 14 | Beverage outlet cover |
| 15 | Drip tray |
1 Depending on the appliance specifications
4.2 Controls
You can find an overview of the controls for your appliance here.
Touch fields
Here you can find an overview of the symbols that are always visible.
| ① | Switch the appliance on or off. |
| ② | Dispense two cups. |
| ③ | Open or close the service programmes. |
| ④ | Open or close the settings. |
Touch display
The touch display functions both as a display and a control.
| Favour- ites | Select saved beverages with personal settings. → Page 19 |
| Clas- sics | Select standard bev- ages. |
| coffee- World | Select basic beverages which can be extended in conjunction with Home Connect. |
| ∑∑∑ | Cup warmer is switched on. |
| ∑ | Appliance is connected to Home Connect. |
Note: When the appliance is switched on, you have additional operating options with relevant displays and messages, e.g. beverage settings.
①
Set strength.
| □ | Set per-cup quantity. |
| □ | Set milk ratio. |
| ∅ | Set aroma. |
| 8 | Set temperature. |
5 Accessories
Use original accessories. These have been made especially for your appliance.
| Accessories | Retail | Customer service |
| Cleaning tablets | TZ80001A | 00312097 |
| TZ80001B | 00312098 | |
| Dscaling tablets | TZ80002A | 00312094 |
| TZ80002B | 00312095 | |
| Water filter | TZ70003 | 00575491 |
| Water filter pack of 3 | TZ70033A | - |
| Microfibre cloth | - | 00460770 |
| Care set | TZ80004A | 00312105 |
| TZ80004B | 00312106 | |
| Adapter for milk contain-ers | TZ70001 | 17006005 |
6 Before using for the first time
Prepare the appliance for use.
6.1 Preparing and cleaning the appliance
Remove the protective foil and clean the appliance and individual parts.
Note: Fill the water tank each day with fresh, cold, non-carbonated water.
ATTENTION!
Unsuitable beans can block up the grinder.
- Only use pure, roasted bean mixes that are suitable for use in fully automatic coffee or espresso machines.
Do not use glazed coffee beans.
Do not use caramelised coffee beans. - Do not use coffee beans that have been treated with additives containing sugar.
Do not add ground coffee.
Tip: To keep the coffee beans at their best, store them in a sealed container in a cool place.
You can keep the coffee beans in the bean container for several days without them losing their aroma.
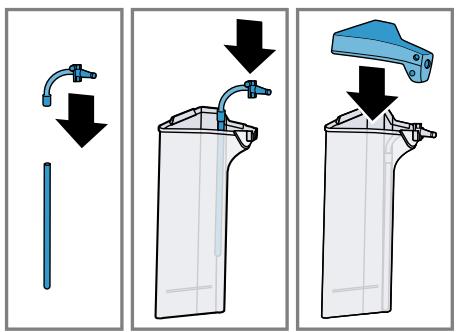
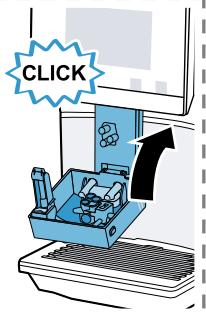
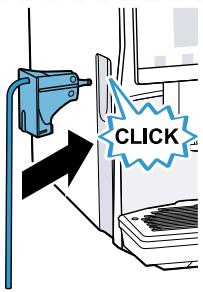
→ Fig. 3 - 24
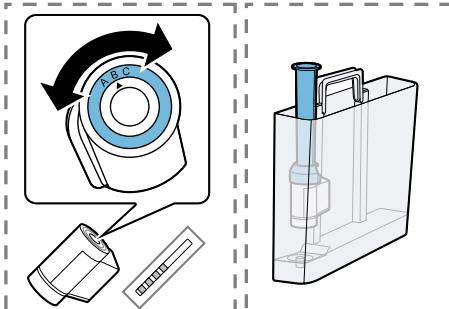
6.2 Checking the water hardness
It is important to set the water hardness correctly so that your appliance indicates in good time that it needs.
descaling. You can use the enclosed test strip to check the water hardness or ask your local water company.
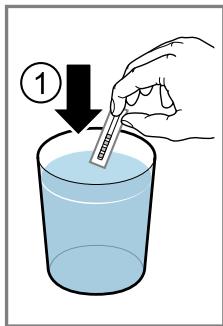
- Briefly dip the test strip in fresh tap water.
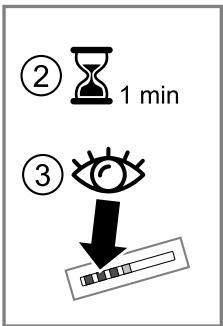
- Allow the water to drip off the test strip.
- Read the water hardness off the test strip after 1 minute.
The table shows allocation of the levels to the different degrees of water hardness:
| Level | German degrees in °dH | Total hardness in mmol/ l |
| 1 | 1-7 | 0.18-1.25 |
| 2 | 8-14 | 1.42-2.49 |
| 3 | 15-21 | 2.67-3.74 |
| 4¹ | 22-30 | 3.92-5.34 |
Factory setting
Note: If a water softening system is installed in your house, you can select "Softening device".
Tip: You can change the settings at any time.
"Basic settings", Page 22
6.3 Performing initial start-up
After connecting the appliance to the power supply, configure the settings for initial start-up. Initial start-up only appears when switching on for the first time.
- Press ① to switch the appliance on.
- Follow the instructions on the display.
- The display will guide you through the programme.
Notes
- To set up Home Connect, refer to the documents on Home Connect supplied with the appliance.
If "Demo mode" is selected, only the display screens will work. You can not dispense a beverage or run a programme.
6.4 General information
Please bear this information in mind so that you can get the best out of your appliance.
Notes
The appliance has been programmed at the factory with standard settings for optimum operation.
- The grinder has been factory-set for optimum operation. If coffee is only dispensed drop by drop or is too thin and with too little crema, you can adjust the grinding level when the grinder is running. "Adjusting the grinding level", Page 18
If you do not perform any actions on the appliance for a certain period, it will switch off automatically. You can change the duration in the basic settings. Page 22
en Basic operation
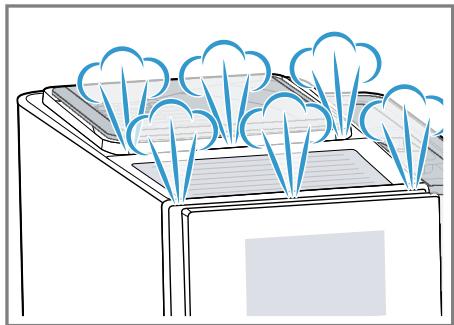
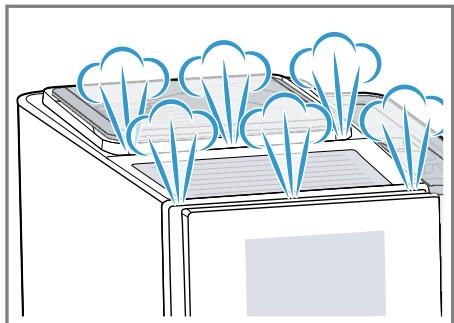
During operation water droplets may form at the ventilation slits and on the lid of the tablet compartment.
- For technical reasons steam can escape from the appliance.
The first beverage will not yet have its full aroma if:
- You are using the appliance for the first time.
- You have run a service programme.
- You have not used the appliance for a long time.
Do not drink the beverage.
Tip: You will get a stable, fine-pored crema after you have started up your appliance and dispensed a few cups.
7 Basic operation
7.1 Switching the appliance on or off
Press ①.
When the appliance switches on, the display shows the Siemens logo. When the appliance is switched on or off, it will rinse itself automatically. When switched off, the appliance will emit steam into the drip tray for cleaning. The appliance does not rinse itself if the appliance is still warm when
switched on or if no beverage was dispensed before it was switched off.
7.2 Dispensing beverages
Find out how to prepare a drink of your choice.
WARNING
Risk of scalding!
Freshly prepared drinks are very hot.
- Leave drinks to cool down if necessary.
- Do not let escaping liquids or steam come into contact with your skin.
Notes
- With a number of settings your coffee is prepared in several steps. Wait until the process is fully completed.
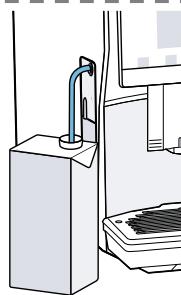
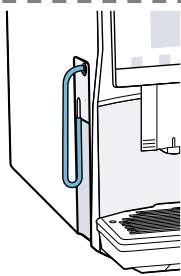
If you are dispensing a beverage with milk, always connect the milk container filled with milk or the milk adapter to a milk carton. - You can only connect the milk container or milk adapter if the milk system is fitted with the adapter and the hose in the beverage outlet cover.
- The milk container is specially designed for this appliance. Only use the milk container in the home and for storing milk in the refrigerator.
If the milk system has not been cleaned, small amounts of milk may escape when hot water is dispensed.
Tips
- You can also use plant-based alternatives to milk, e.g. soya milk.
- The quality of the milk foam depends on the type of milk or the plant-based alternative used.
7.3 doubleShot and tripleShot
The longer coffee brews, the more bitter substances and undesirable aromas are released. These bitter substances and undesirable aromas affect the taste and digestibility of coffee.
To ensure that only pleasant-tasting and easily digestible aromatic substances are released, coffee beans are freshly ground and brewed by the appliance.
Note: The functions "doubleShot" and "tripleShot" depend on the beverage strength and beverage size selected.
7.4 Dispensing a coffee beverage with milk
An example explains how to make a latte macchiato.

WARNING
Risk of burns!
The milk system can become extremely hot.
- Never touch the milk system when it is hot.
- Allow the hot milk system to cool down before touching it.
Requirements
- The milk container or milk adapter is connected.
-
The milk container is filled with milk or the milk adapter hose is immersed in milk.
-
Place a glass underneath the beverage outlet.
- Press "Classics".
-
Select and press the beverage symbol for latte macchiato. - To change the strength, press 0.
-
To change the per-cup quantity, press .
-
To change the milk ratio, press E.
-
Press "Start" and wait until the process is complete.
-
To completely stop dispensing the beverage, press "Stop".
- To only stop the current dispensing step, press "Skip". After preparing the beverage, the milk system will automatically clean itself with a short jet of steam.
Notes
If you do not change any settings for approx. 30 seconds, the appliance will exit settings mode.
The appliance saves the settings automatically.
Tip: You can also pre-heat cups before dispensing using hot water or the cup heater.
7.5 Dispensing two cups at once
Depending on the appliance model, you can make two cups at the same time for certain beverages.
Note: If the "doubleShot" or "tripleShot" function is active, the function for dispensing two cups at once is not possible.
- Press the symbol for your desired drink.
- Press .
The setting is shown on the display.
3. Place two cups on the left and right underneath the beverage outlet.
4. Press "Start".
The beverage is prepared in 2 steps. The beans are ground in 2 grinding operations.
- The beverage is brewed and then runs into the cup.
- Wait until the process is complete.
8Grinder
Your appliance has an adjustable grinder, which you can use to customise the grinding level of your coffee beans.
8.1 Adjusting the grinding level
Set the desired grinding level while the coffee beans are being ground.
WARNING
Risk of injury!
The grinder rotates.
- Never reach into the grinder.
ATTENTION!
Risk of damage to the grinder. The grinder may be damaged if the grinding level is not set properly.
- Only set the grinding level when the grinder is running.
- Select the grinding level using the rotary selector step by step.
Grinding level Setting
Fine grinding level for dark-roasted beans.
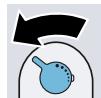
Turn rotary selector counterclockwise.
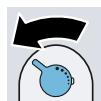
Coarse grinding level for light-roasted beans.
Turn rotary selector clockwise.
Grinding level Setting

The setting only has an effect after the second cup of coffee.
Tip: If the coffee is only dispensed drop by drop, set a coarser grinding level.
If the coffee is too thin with too little crema, set a finer grinding level.
9 Water filter
You can use a water filter to minimise limescale deposits and reduce impurities in the water.
9.1 Inserting the water filter
ATTENTION!
Possible damage to the appliance due to limescale build-up.
Change the water filter in good time.
Change the water filter after 2 months at the latest.
- Press ^ .
- Press "INTENZA filter" and follow the instructions on the display.
9.2 Changing or removing the water filter
You can also operate your appliance without a water filter.
- Press .
- Press "INTENZA filter".
- Press "Replace" or "Remove" and follow the instructions on the display.
Tips
-
You should also change your water filter for reasons of hygiene.
-
With a water filter you need to descale your appliance less frequently.
If your appliance has not been used for a long time, for example if you were on holiday, you should rinse the water filter before use by dispensing a cup of hot water.
The water filter can be purchased from retailers or customer service. "Accessories", Page 14
10 Childproof lock
You can lock the appliance, to protect children against scalding and burns.
10.1 Activating the childproof lock
Requirement: The appliance is switched on.
Press and hold for at least 3 seconds.
The display shows "Child-proof lock active. To unlock, please press the settings button for 3 seconds."
10.2 Deactivating the childproof lock
Press and hold for at least 3 seconds.
The display shows "Child-proof lock has been deactivated."
11 Cup heater1
You can use the cup heater to preheat your cups.
11.1 Activating and deactivat ing the cup heater
WARNING Risk of burns!
The cup heater1 can become very hot.
- Never touch the cup heater1 while hot.
- Allow the hot cup heater1 to cool down before touching it.
Tip: Place the cups with their base on the cup heater to heat the cups to optimum effect.
You can activate or deactivate the cup heater in the basic settings. "Overview of the basic settings", Page 22
12 Favourites
Save beverages with your personal settings as a favourite.
You can mark your favourites with a colour. A favourite is a beverage with personal settings. You can change the settings at any time.
Note: To exit the settings, press .
12.1 Saving beverages from the beverage selection
- Select a beverage from "Classics" or "coffeeWorld".
- Select the personal beverage settings.
- Press "Favourite".
- Select the required colour for the beverage.
- Press "Save".
12.2 Saving the beverage in the menu
-
Press "Favourites".
2 Press -
The display shows all available beverages.
- Select the required beverage.
- Select the personal beverage settings.
- Press "Next".
- Select the required colour for the beverage.
- Press "Save".
12.3 Changing beverage settings
- Press "Favourites".
- Select the beverage and press briefly.
- Change the beverage settings.
- Press "Apply".
The new settings are saved.
12.4 Deleting favourites
- Press "Favourites".
- Select the beverage.
- Press "Delete".
- Confirm "Delete".
12.5 Sorting favourites
- Press "Settings".
- Press "Personalisation".
- Press "Sort favourites".
- Sort favourites, e.g. by name or colour.
13 Home Connect
This appliance is network-capable.
Connecting your appliance to a mobile device lets you control its functions via the Home Connect app, adjust its basic settings and monitor its operating status.
The Home Connect services are not available in every country. The availability of the Home Connect function depends on the availability of Home Connect services in your country. You can find information about this at: www.home-connect.com.
To be able to use Home Connect, you must first set up the connection to the WLAN home network (Wi-Fi1) and to the Home Connect app.
The Home Connect app guides you through the entire login process. Follow the instructions in the Home Connect app to configure the settings.
Tips
Please consult the documents supplied by Home Connect.
- Please also follow the instructions in the Home Connect app.
Notes
Please note the safety precautions in this instruction manual and make sure that they are also observed when operating the appliance via the Home Connect app. "Safety", Page 8
- Operating the appliance on the appliance itself always takes priority. During this time it is not possible to operate the appliance using the Home Connect app.
13.1 Home Connect settings
Adapt Home Connect to your needs.
You can find the Home Connect settings in the basic settings for your appliance. Which settings the display shows will depend on whether
Home Connect has been set up and whether the appliance is connected to your home network.
Overview of the Home Connect settings
Here you can find an overview of the "Home Connect" settings and network settings.
| Basic setting | Selection | Description |
| WiFi connection | OnOff | Switch off the wireless module with prolonged absence or to save energy. Note: In networked standby mode your appliance requires max. 2 W. |
| Remote start | OnOff | Switch remote start on the appliance on and off. Note: With the "Home Connect" app only switch-off is possible. |
| Add mobile device | - | Connect the appliance to "Home Connect" or additional "Home Connect" accounts. |
| Network information | - | Display network information and appliance information. |
| Delete network settings | - | Note: You cannot operate your appliance via the "Home Connect" app without a network connection. |
| Software update | - | Note: This setting is only available with a software update. |
13.2 Data protection
Please see the information on data protection.
The first time your appliance is registered on a home network connected to the Internet, your appliance will transmit the following types of data to the Home Connect server (initial registration):
- Unique appliance identification (consisting of appliance codes as well as the MAC address of the Wi-Fi communication module installed).
Security certificate of the Wi-Fi communication module (to ensure a secure data connection).
- The current software and hardware version of your appliance.
Status of any previous reset to factory settings.
This initial registration prepares the Home Connect functions for use and is only required when you want to use the Home Connect functions for the first time.
Note: Please note that the
Home Connect functions can only be utilised with the Home Connect app. Information on data protection can be retrieved in the Home Connect app.
14 Basic settings
You can configure your appliance to meet your needs and call up additional functions.
14.1 Changing the basic settings
-
Press
-
The display shows the list of basic settings.
- Select the required basic setting.
- The appliance saves the basic setting automatically.
- To exit the basic settings, press .
14.2 Overview of the basic settings
You can find an overview of the basic settings here.
| Beverage setting | Brewing temperature | Set the brewing temper- ature. |
| Milk sequence | Select the sequence for milk and coffee. | |
| Latte macchiato pause | Select the pause between milk and coffee. | |
| Reset beverage para- meters | Reset the beverage set- tings. | |
| Appliance setting | Cup heater1 | Switch the cup heater1 on or off. |
| Automatic standby | Set the time after which the appliance automatic- ally switches off. | |
| Display brightness | Set the brightness in levels. | |
| Sounds | Switch sounds on and off. Set the volume. | |
| Water hardness | Set the water hardness. | |
| Language | Set the language. | |
| Factory settings | Reset the appliance to the factory settings. | |
| Personalisation | Brand logo | Show or hide the brand logo on the display. |
| 1 Depending on the appliance specifications | ||
| Operation after switch-on | Set the display screen for "Favourites", "Class-sics" or "coffeeWorld". | |
| Sort favourites | Set the sequence of favours. | |
| Home Connect | Information on Home Connect | To start, scan the QR code. → "Home Connect settings", Page 20 |
| Appliance information | Beverage counter. | Display the number of beverages dispensed. |
| Cleaning information | Time until the water filter should next be changed or a service programme started. | |
| Version information | Display network information and appliance information. | |
| Licence information | Display FOSS licence text. | |
| Mode | Mode for demonstration purposes | Switch "Demo mode" on or off. |
| 1 Depending on the appliance specifications | ||
15 Cleaning and servicing
To keep your appliance working efficiently for a long time, it is important to clean and maintain it carefully.
15.1 Dishwasher-safe components
Here you can find an overview of the components you can clean in the dishwasher.
ATTENTION!
Some components are sensitive to heat and may be damaged if they are cleaned in a dishwasher.
-
Follow the operating instructions of the dishwasher.
-
Only put dishwasher-safe components in the dishwasher.
- Only use programmes that do not heat the water above 60^ .
Suitable:
Drip tray
- Drip pan
Not suitable:
Water tank
Water tank lid
- Coffee dregs container
- Mechanical fill level indicator
Milk system with adapter
Milk container with lid
Aroma lid
Brewing unit
- Beverage outlet cover
15.2 Cleaning agent
Only use suitable cleaning agents.
ATTENTION!
Unsuitable cleaning products may damage the surfaces of the appliance.
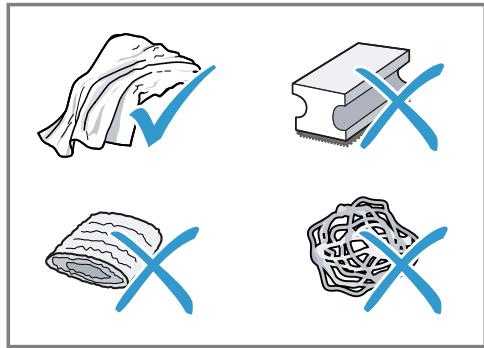
- Do not use harsh or abrasive detergents.
- Do not use cleaning agents containing alcohol or spirits.
- Do not use hard scouring pads or cleaning sponges.
- Do not use citric acid, vinegar or any vinegar-based agents to descale the appliance.
- Only use suitable tablets for cleaning and descaling.
- Do not use descaling agent with phosphoric acid.
Tips
- Use descending and cleaning tablets that have been specially developed for your appliance. You can buy tablets from our customer service.
"Accessories", Page 14
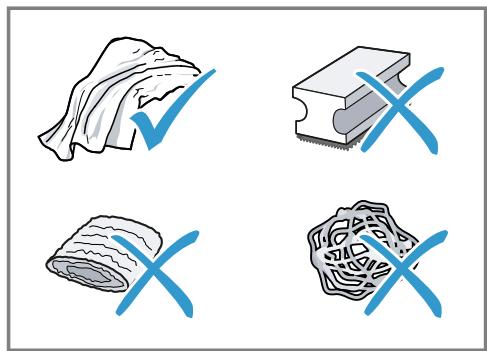
- Wash new sponge clothes thoroughly to remove any salt adhering to them. Salt can cause rust film to develop on stainless steel surfaces.
Always remove any residues of limescale, coffee, milk, cleaning and descaling solutions immediately to prevent corrosion.
15.3 Cleaning the appliance
WARNING
Risk of electric shock!
An ingress of moisture can cause an electric shock.
- Never immerse the appliance or the power cord in water.
- Liquids must not be spilled on the appliance plug connection.
- Do not use steam- or high-pressure cleaners to clean the appliance.
WARNING
Risk of burns!
Some parts of the appliance become very hot.
- Never touch hot appliance parts.
-
Allow hot appliance parts to cool down before touching.
-
Clean the housing, the high-gloss surfaces and the control panel with the enclosed microfibre cloth.
- Clean the outlet system with a soft, damp cloth after beverages have been dispensed.
- If the appliance has not been used for a long time, for example due to holiday, clean the entire appliance including the outlet system, milk system, trays and brewing unit.
Note: The appliance will rinse itself automatically if you switch it on when it is cold or switch it off after it has dispensed coffee. The system is therefore self-cleaning.
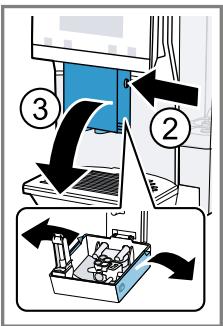
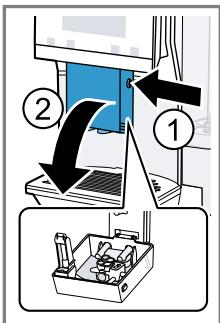
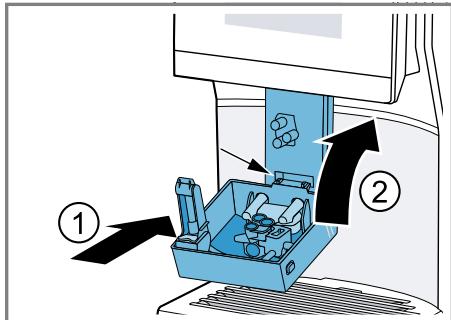
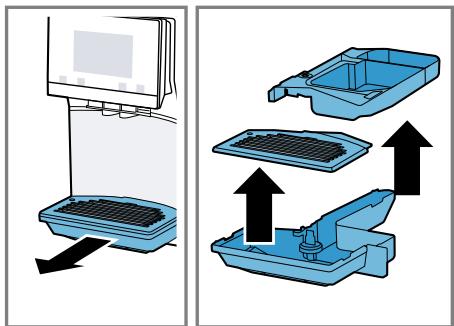
15.4 Cleaning the drip tray and coffee dregs container
Clean and empty the drip tray and coffee dregs container every day to prevent deposits. Follow the illustrated instructions at the beginning of this manual.
Fig. 25 - 26
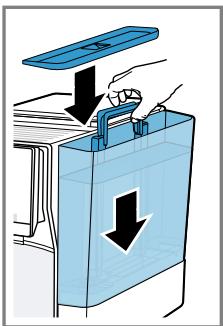
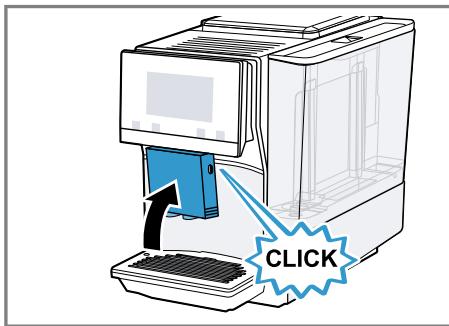
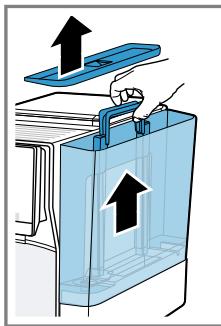
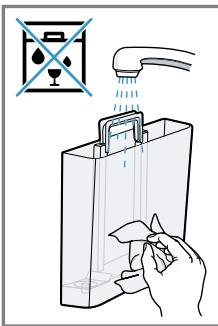
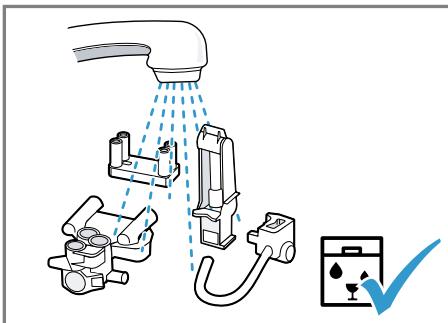
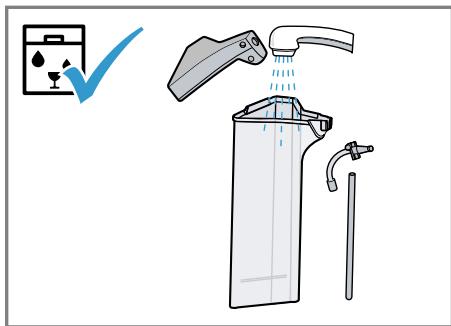
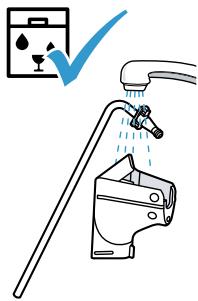
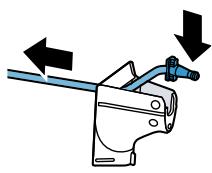
15.5 Cleaning the milk container
Clean the milk container regularly for hygiene reasons. You can clean the milk container in the dishwasher. Follow the illustrated instructions at the beginning of this manual.
Fig. 17 - 18
15.6 Service programmes
Use the service programmes if you insert or remove a water filter or in order to clean your appliance thoroughly.
ATTENTION!
Improper cleaning and descaling or a delay in doing so may damage the appliance.
- Immediately perform the descending process in accordance with the instructions.
- Only use cleaning tablets in the tablet compartment.
- Do not put descending tablets or other products in the tablet compartment.
Notes
- The display indicates the progress of the descending or cleaning process.
If your appliance has been locked, you can only operate it again once the descending process has been carried out.
Using the service programmes
- Press ^ .
- Press the symbol for the required programme.
- The display will guide you through the programme.
Overview of service programmes
You can find an overview of the service programmes here.
Note: The start image shows the remaining number of beverages that can be dispensed until running the programme and the duration.
| BRITA | INTENZA filter | Insert, replace or remove the water fil-ter. |
| Milk system cleaning | Rinse the milk system automatically. | |
| calc'nClean | Combine cleaning and descaling. Remove residues of limescale and cofee from the pipes. | |
| Cleaning | Remove residues of coffee from the pipes. | |
| Descaling | Remove residues of limescale from the pipes. | |
| Brewing unit cleaning | The display shows optimum cleaning of the brewing unit step by step. | |
| Beverage outlet cleaning | The display shows optimum cleaning of the outlet step by step. | |
| Frost protection | Drain the pipes to protect the appliance during transport or storage. | |
| Special rinsing | If a service programme is interrupted, e.g. due to a power failure, it will rinse itself automatically. The appliance is then ready for use again. |
Tips
If you are starting the "Dscaling" or "calc'nClean" programmes, keep a container with a capacity of min. 0.5 I ready.
If you use a water filter, this will prolong the time until you have to run a service programme.
- You can combine "Dscaling" and "Cleaning" with the "calc'nClean" service programme.
16 Troubleshooting
You can rectify minor faults on your appliance yourself. Read the troubleshooting information before contacting after-sales service. This will avoid unnecessary costs.

WARNING
Risk of electric shock!
Incorrect repairs are dangerous.
- Repairs to the appliance should only be carried out by trained specialist staff.
- Only use genuine spare parts when repairing the appliance.
- If the power cord of this appliance is damaged, it must be replaced by the manufacturer, the manufacturer's Customer Service or a similarly qualified person in order to prevent any risk.
| Fault | Cause and troubleshooting |
| Appliance no longer responds. | Appliance has a fault. 1. Pull out the mains plug and wait 10 seconds. 2. Re-insert the mains plug. |
| HomeConnect is not working correctly. | Different causes are possible. ► Go to www.home-connect.com. |
| Appliance only dis-penses water, not cof-fee. | Empty bean container is not detected by the appli- ance. ► Pour in coffee beans. |
| Coffee shaft on brewing unit is blocked. ► Clean the brewing unit. | |
| Beans are too oily and are not falling into the grinder. ► Gently tap the bean container. ► Change the coffee variety. Do not use oily beans. ► Clean the empty bean container with a damp cloth. | |
| Brewing unit is not inserted properly. 1. Check whether the brewing unit is inserted correctly and is securely locked. 2. Push the red lever up to the left. 3. Insert the brewing unit cover. | |
| Appliance is not dis-pensing milk froth. | Milk system is soiled. ► Clean the milk system in the dishwasher. |
| Milk tube not immersed in milk. ► Use more milk. | |
| Appliance is not dis-pensing milk froth. | Check whether the milk tube is immersed in the milk. |
| Heavy build-up of limescale in the appliance. Descale the appliance. | |
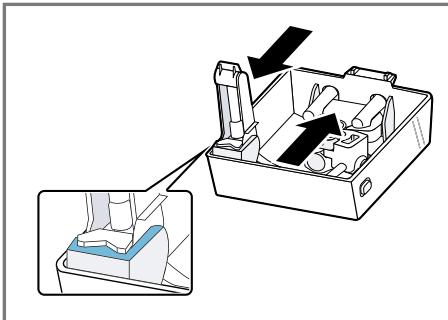
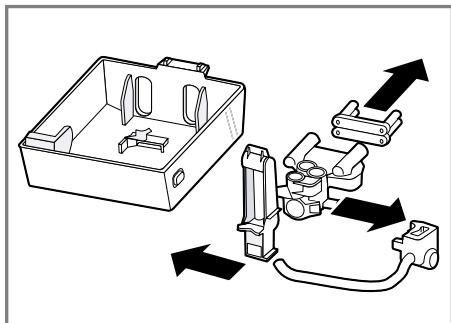
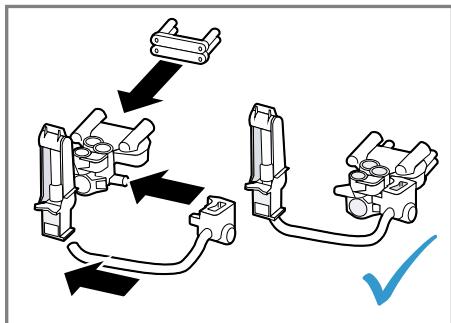
| No milk intake by the milk system. | The milk system is assembled incorrectly. Assemble the milk system correctly. |
| Order for connecting the milk container and milk sys-tem is wrong. First insert the milk system into the outlet and then the milk container. | |
| Milk tube not immersed in milk. Use more milk. Check whether the milk tube is immersed in the milk. | |
| Milk froth is too cold. | Milk is too cold. Use lukewarm milk. |
| Appliance is not dis-pensing hot water. | Milk system is soiled. Clean the milk system in the dishwasher. |
| Milk system cannot be assembled or dis-as-sembled. | Order of assembly is wrong. First connect the milk system and then the milk container. When disassembling, you must first remove the milk container and then the milk system. |
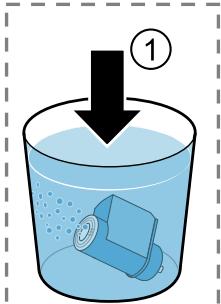
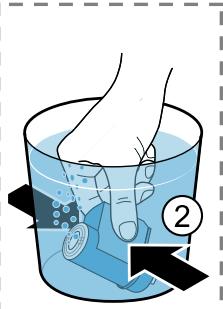
| Appliance is not dis-pensing drinks. | Air is in the water filter. 1. Immerse the water filter in water with the opening facing upwards until no more air bubbles escape. 2. Reinsert the filter. Firmly press the water filter straight down into the tank connection. |
| Residues of limescale remover are blocking the water tank. 1. Remove the water tank. 2. Clean the water tank thoroughly. | |
| There is dripping wa-ter on the inner floor of the appliance. | Drip tray was removed too soon. Wait a few seconds after the last drink was dispensed before removing the drip tray. |
| Brewing unit cannot be removed. | Locking device cannot be released, brewing unit is jammed. Switch the appliance off and back on after 3 minutes. |
| Grinder won't start. | Appliance is too hot. 1. Disconnect the appliance from the mains. 2. Wait 1 hour so the appliance can cool down. |
| Grinder is not grinding any coffee beans despite full bean container. | Beans are too oily and are not falling into the grinder. ►Gently tap the bean container. ►Change the coffee variety. Do not use oily beans. ►Clean the empty bean container with a damp cloth. |
| Coffee or milk froth quality varies widely. | Build-up of limescale in the appliance. ►Descale the appliance. |
| Milk froth quality varies widely. | Milk froth quality depends on the type of milk or plant-based alternative used. ►Optimise the result through the selection of the milk or vegetable-based drink type. |
| Coffee is not dispensed or has slowed to a trickle. | Grinding level is set too fine. ►Set a coarser grinding level. →"Adjusting the grinding level", Page 18 |
| Set quantity is not reached. | Heavy build-up of limescale in the appliance. ►Descale the appliance. |
| Air is in the water filter. 1. Immerse the water filter in water with the opening facing upwards until no more air bubbles escape. 2. Reinsert the filter. | |
| Appliance is soiled. ►Clean the brewing unit. ►Descale and clean the appliance. | |
| Coffee has no crema. | Type of coffee is not optimal. ►Use a coffee variety with a higher proportion of Robusta beans. ►Use beans with a darker roast. |
| Beans are no longer fresh. ►Use fresh beans. | |
| Grinding level is not appropriate for coffee beans. ►Adjust the grinder to a finer setting. →"Adjusting the grinding level", Page 18 | |
| Coffee is too acidic. | Grinding level is set too coarse. ►Adjust the grinder to a finer setting. →"Adjusting the grinding level", Page 18 |
| Type of coffee is not optimal. | |
| Coffee is too acidic. | Use a coffee variety with a higher proportion of Robusta beans. Use beans with a darker roast. |
| Coffee is too bitter. | Grinding level is set too fine. Set a coarser grinding level. → "Adjusting the grinding level", Page 18 |
| Type of coffee is not optimal. → Change the coffee variety. | |
| Coffee tastes burnt. | Grinding level is set too fine. Set a coarser grinding level. → "Adjusting the grinding level", Page 18 |
| Type of coffee is not optimal. → Change the coffee variety. | |
| Coffee temperature setting is too high. → Set the coffee temperature lower. | |
| Coffee grounds are not compact and are too wet. | The grinding level is not set optimally. Adjust the grinder to a coarser or finer setting. → "Adjusting the grinding level", Page 18 |
| Beans are too oily. → Use a different type of bean. | |
| Display shows "Please insert brewing unit"." | Cover is wrongly inserted. 1. Check whether the brewing unit is inserted correctly and is securely locked. 2. Push the red lever up to the left. 3. Insert the brewing unit cover. |
| Display shows "Please fill water tank." despite the fact that the water tank is full. | Water tank is wrongly inserted. Insert the water tank correctly. |
| Carbonated water is in the water tank. Fill the water tank with fresh tap water. | |
| Float is stuck in the water tank. 1. Remove the water tank. 2. Clean the water tank thoroughly. | |
| New water filter was not rinsed as per instructions. 1. Rinse the water filter according to the instructions. 2. Place the water filter into operation. | |
| Air is in the water filter. 1. Immerse the water filter in water with the opening facing upwards until no more air bubbles escape. 2. Reinsert the filter. | |
| Display shows "Please fill water tank." despite the fact that the water tank is full. | Water filter is old. ►Insert a new water filter. |
| Limescale deposits in the water tank are blocking the system. 1. Clean the water tank thoroughly. 2. Start the descaling programme. | |
| Display shows "Please clean brewing unit." | Brewing unit is soiled. ►Clean the brewing unit. |
| Mechanism of brewing unit is stiff. ►Clean the brewing unit. | |
| Display shows "Over-voltage or under-voltage". | There are problems with the power supply. ►Only operate the appliance at 220 - 240 V. |
| Display shows "Error in water system. Please restart appliance.". | Appliance has a fault. 1. Pull out the mains plug and wait 10 seconds. 2. Re-insert the mains plug. |
| Display very frequently shows "Please run calc'nClean pro-gramme!". | Decalcified water still contains small amounts of lime. 1. Insert a new water filter. 2. Set the corresponding water hardness. |
| Incorrect or too little descaling agent used. ►When descaling, only use suitable tablets. | |
| Service programme has not been carried out in its entire. ►Start the "Special rinsing" service programme. → "Service programmes", Page 25 |
17 Transportation, storage and disposal
You can find out here how to prepare your appliance for transportation and storage. You will also find out how to dispose of old appliances.
17.1 Activating frost protection
Protect your appliance from frost during transport and storage.
ATTENTION!
Residues of liquid in the appliance may damage it during transport or storage.
- Empty the pipe system before transport or storage.
- Run the "Frost protection" programme. "Basic settings", Page 22
- Disconnect the appliance from the mains power supply.
17.2 Disposing of old appliance
Valuable raw materials can be reused by recycling.
- Unplug the appliance from the mains.
- Cut through the power cord.
- Dispose of the appliance in an environmentally friendly manner.
Information about current disposal methods are available from your specialist dealer or local authority.
This appliance is labelled in accordance with European Directive 2012/19/EU concerning used electrical and elec
tronic appliances (waste electrical and electronic equipment - WEEE). The guideline determines the framework for the return and recycling of used appliances as applicable throughout the EU.
18 Customer Service
If you have any queries, are unable to rectify faults on the appliance yourself or if your appliance needs to be repaired, contact Customer Service. Function-relevant genuine spare parts according to the corresponding Ecodesign Order can be obtained from Customer Service for a period of at least 7 years from the date on which your appliance was placed on the market within the European Economic Area.
Note: Under the terms of the manufacturer's warranty the use of Customer Service is free of charge.
Detailed information on the warranty period and terms of warranty in your country is available from our after-sales service, your retailer or on our website.
If you contact Customer Service, you will require the product number (E-Nr.), the production number (FD) and the consecutive numbering (Z-Nr.) of your appliance.
The contact details for Customer Service can be found in the Customer Service directory at the end of the manual or on our website.
18.1 Product number (E-Nr.), production number (FD) and consecutive numbering (Z-Nr.)
You can find the product number (E-Nr.), the production number (FD) and the consecutive numbering (Z-Nr.) on the appliance's rating plate.
Make a note of your appliance's details and the Customer Service telephone number to find them again quickly.
18.2 Warranty conditions
You can make warranty claims for your appliance under the following conditions.
The guarantee conditions for this appliance are as defined by our representative in the country in which it is sold. Details regarding these conditions can be obtained from the dealer from whom the appliance was purchased. The bill of sale or receipt must be produced when making any claim under the terms of this guarantee.
19 Technical specifications
Facts and figures for your appliance can be found here.
| Voltage | 220-240 V ~ |
| Frequency | 50 Hz |
| Connection rating | 1500 W |
| Maximum static pump pressure | 20 bar |
| Maximum capacity of water tank (without filter) | 1.8 l |
| Maximum capacity of bean container | 350 g |
| Length of the power cable | 100 cm |
| Appliance height | 38.2 cm |
| Appliance width | 24.5 cm |
| Appliance depth | 43.5 cm |
| Weight, empty | 9 kg |
| Type of grinder | Ceramic |
20 Declaration of Conformity
BSH Hausgeräte GmbH hereby declares that the appliance with Home Connect functionality meets the essential requirements and other relevant provisions of the Directive 2014/53/EU.
A detailed RED Declaration of Conformity can be found online at www.siemens-home.bsh-group.com among the additional documents on the product page for your appliance.
CE
2.4 GHz band: 100 mW max.
5 GHz band: 100 mW max.
| BE | BG | CZ | DK | DE | EE | IE | EL |
| ES | FR | HR | IT | CY | LV | LT | LU |
| HU | MT | NL | AT | PL | PT | RO | SI |
| SK | FI | SE | UK | NO | CH | TR |
5 GHz WLAN (Wi-Fi): For indoor use only.
Table des matieres
1 Sécurité 36
WAARSCHUWING - Kans op verstikking!
WAARSCHUWING - Kans op brand!
7.3 doubleShot i tripleShot
7.3 doubleShot a tripleShot
14 Ba30BbIe yCTaHOBKn 169
14.1 3MeHeHHe 6a3OBbIX HAcTpoEk .. 169
14.2 063op 6a3OBbIX HacTpoek... 169
15 Ounchka u yxo.. 171
15.1 PnroDnOcTb DnI MbITb B NO-cydomoeyHo MaunHe 171
15.2 Ynctraaee cpeDCTBO 171
15.3 Ouchstka npnbopa 172
15.4 OuNTka PoiDoHa n eMKocTn DJIa KoFeiHoH rUsi . 172
ru
15.5 Ouchtska eMKoCTn dJa MoJoka.... 172
15.6 CepBnchIe nporpaMMbl 172
16 YcTpaHHeHHeHcNpaBHoTei ... 175
17 TpaHcnpTnpoBka, XpaHeHne n yTHnHa3aunr. 181
17.1 AkTbBaunr 3aunrIOT MOp03a....181
17.2 YtHnHaCnA CTaporo 6bIToBOrO npN6opa... 181
18 CepBnchna cnjx6a. 181
18.1 Hoomep n3deJnna (E-Nr.), 3a-BoDcKoHoomep (FD) n nopAknOBbI Hoomep (Z-Nr.) 182
18.2 TapaHTnHbIe ycIOBnIa 182
19 Texhnueckne xapaKTepehctnKn.. 182
20 CepTHΦHKAT COOTBeTCTBHA 182

1 Be3onachOcTb
Co6IIOaIte cIeIyUOuIne yKa3aHnI IO TexHnke 6e3OnacHocTn.
1.1 O6uzhe yka3aHnHa
He donycka Te deTei MnaIe 8 let K npbOpy I erO ceTeBOMy npoBODy.
1.4 Yukazannno TeXnke 6e3onacHocTn
PPEyIpeJDEHNE -Onacnoctb yduyb!
IeTN MOryT 3aBepHyTbCBy B yPaKOBoHbI MaTePnaJI nII NaDeTbe erO ce6e Ha rOIOBy n 3aDOxHyTbCra.
He noDnyckaIte deTeK yynakoBOUHOMy MaTePnAly.
He nO3B0JIaIe Te DeTAM HrpaTb C yNaKOBouHbIM MaTePnaJIOM.
IeTN MOryT BdoXHyTb IIN IpOrlOTnTb MeJKe DeTaJI, B pe3yIbTaTe ueo 3aDOxHyTbcra.
He npdnyckaTe DeTeK MeJkM DeTaIaM.
He nO3BOJnTe DeTAM INrpaTb C MeJIKNMn DeTaJAMN.
ПЕДУПЕЖДЕНЕ -Опасноctь поражени злектческIMТOKOM!
I P E D U N P E X J I E H N E - O n a c h o c t b B O3 r o p a n H Y!
Pn6op Haraetca.
ObecneuTyDocTaToUHyBENTnlaunOpnpnbopa.
▶Kateropnueckn 3anpeuheHa 3Kcnnyataaun npnbopaB shkaФy.
IcnoIb3OBAHHe ydInHeHHoro cTeBOro Ka6eJn He nMeIoUx DoynCka aadantepOB onaCHO.
He nCnoJIb3yIte ydJIINHITeJIbHbIe Ka6eJIu INI MHOROMecTHbIe po3ETKU.
Ecnn nnHbI cTeBOrO Ka6eJn He XBaTaet, o6paTntEcB B cepBnCHyO cnYk6y.
IcnoIb3yIte TOnIbKO DOnUySeHHbIe Ipon3BOJnteJeM aJaITepbI.
I PENEUYPENKDEHNE -Onachoctb oxkora!
HekotopbIe qactn npnbopa cnIbHo hArpeBaIOTcra.
He npinkacaiTecsb K ropaym qactm npnbopa.
I P E D U N P E X I D E H N E - O n a c h o c t b: M a r H e T h 3 M!
Прибор сODEржNT NOCTОгньie MaHHTbI. OHI MOryT BO3deiCTBOBaTb Ha эл ekТpoHьie ИМпlaHTaTbI, HApPIMeP, Ha KapДиOCTmUЯTOpbl IIN INHKeTOpbl INCуЛnHa.
- Пицамсэл ektpoHbIMN HMnlaHTaHTaMn 3aPpeaetcnp6nJxatbcK npnbopy 6nHexe, yem Ha 10 cm.
Co6IIOaIte TaKHe MInHMaJIbHOe pacCTOaHne 10 cm Do BbHyToRo pe3epByapa dJa BObl.
IPEyPExEHE - Pnck HaHeceHnaBpeJa 3DopOBbIO!
3aŋp3HeHn np6opamoryntpeDCTaBnTbOnaCHOCtBdIa 3OpOBbI.
Co6IIOJaTe yKa3aHnI NO OunchTKe npnbopa IJRA oBeCneHnI rRnEhbl.
2 3aunTa OkpykaOuSei cpebl N 3KOHOMN
2.1 Ytihn3aunypaKOBKn
YnakoBouHbIe MaTePnaJIbI 3KOJOrnueCkn 6e3OpaChbl N MOrTy INcNoJIb3OBAtbcra IOBTOpHo.
- YtɪnɪnɪʒyɪŋTe oɪdʒeɪbHbIe yæctɪn, npeɪd-BaɪpɪteɪbHo paccopTɪnpoBəB uX.
2.2 3Heproc6epeKeHne
Pn co6JIIOJeHnn 3Tnx yKa3aHn np6Op 6yJeT pacXoJIOBaTb MeHbIe 3JIeKTpO-3Heprn.
YcTaHOBnTe INHTepBaJI DЯ aBTOMaTnueCKOrO OTKJIouChEnHa MInHmAlbHoe 3Ha-ueHne.
Ecni npnbop He nCnoJIb3yETc, OH otKIIIOUaETc paHbIe.
"Ba3OBbIe yCTaHOBKn", CtpaHnua 169
He npepbBaIte npexKeBpeMeHNo npiroTOBJIeHne HAnITka.
HarpeToe KOJInueCTBO BOJbI INI MOnOka IcNoJIb3YeTcR ONITMaJIbHO.
Perylaepno ouuuaaTe npnbop ot haknn.
HaKnIb npBODNT K NOBbIeHHOMy 3Hepronotpe6JIeHIO.
3 YcTaHOBKa N NOdkJIIOUeHne
3decBbIy3Haete,rrnKaknyuwe Bcero yctaHOHTb np6op.Kpome toro,Bbly3Ha- ete,KAKnoKnIOUHTb np6op K 3neKtpocetN.
3.1 Komnlektaця
Iocne paacnakOBKn npOBepbTe BCE deTaNN Ha oTCyTCTBVe TpaHCnOpTHbIX NOBpeKdEHHa taKKe KOMNJIeKTHOcTB NocTaBKn.
3aMetka: B 3aBnCmOCTn OT Tnna pnp60pa OH nocTaBJIeTcA pa3JIuHbIMn npHaJaJIeKHOCTMa. 3Tu npHaJaJIeKHOCTNo 063NaueHbI WTPNXOBaHHo paMKoI.
→Pnc.1
IoproToBbTe np6oB K nCnoJIb3ObAHnIO.
"Ba3OBbIe yCTaHOBKn", CtpaHnua 169
- BkHouHte npH6Op KhoNtKoI ①.
- CnedyTe yKa3aHnIaM Ha dncPiiee.
Инданашина диспee Bedet no nyHK-Tam nporpaMMbl.
PpIMeuaHn
Длн acpoek Home Connect co6nHdaTe yka3aHnI n3 npinaraemK Home Connect DokymeHTaun.
EcnBbIbpaHo "DEmopeKIM",ФyHKUOnHpyeTToJIbKO INdNkaCuaHaДиCnPlee.BbI He MoKeTe pInroTOBHTb HAnITOK NIN BbINOJHNTb npOrpaMMy.
6.4 O6uHe yKa3aHnHa
Co6IIOdaIte yka3aHnI dIJI ONTImaJIbHOrO IcNoJIb3OBAHnI npI6opa.
PpIMeuaHn
Ha 3aBoJe-3rTOBHTeIe 3anpOrpaMMnpOBaHbI cTaHdApTHbIe HAcTPOIKnДЯ ONTImaJIbHO rpeKIMa pa6Otbl np6Opa.
Ha 3aBoJe yCTaHOBJIe ONTImaJIbHbIy peJIM paOBoTI KoΦeMOJKN. EcII N KOΦe BbIXODIT IINb OTdJIbHbIMN KaJIpAMn IIN CINIJKOM XIKDN I CNIJKOM MaIOIeHKN, MOJHO npI paOBoTAUSeI KΦeMOLKe I3MeHHTb CTeNEHb NOMOA. "YCTaHOBKa CTeNEHn IOMOLA", CtrpaHnca 165
EcnBbI He noJIb3yeTebc npn6Opom B TeueHHe ONpeDeJeHHoro BpeMeHN, OH aBTOMaTHUeCKN OTKJIHOuHTcR.ДПNTeJIb-HOCTb MOxHIO N3MeHHTb B 6a3OBbIX yctaHOBkax. CtpaHua 169
Bo Bpempa60bHa BeHTnlaCIOHHbIX OTBepCTnX Ha KpbIuKe OTCeKa Dnla Ta6JIeTOK MOryT 6pa3ObaTbcra KapeJIb- KN BObl.
ItoTexHnuecknMpnuHaMa n3 npnbopa MoKeT BbIXoNDtB nap.
-
PerBbI HAnITOK eUe He o6JIaJaET OJIHbIM apOMaTOM, eCJI:
-
Bbl NcnoJIb3yeTe npI6op B IepBbI pa3;
BbI BbIIOJIHNI IN cepBnCHyO npoPamMy;
BbIДЛNTeJIbHoe BpeM He IcNoJIb3O-BaJI npI6Op.
He neTe 3OT HAnITOK.
PekomeHdaun: Cta6nIbHo MeIkoNOpnCTaKoHCnCTeHcIneHbIOCTnIraeTcnoCle BBOda np60paB aKcnplyaTaunIO npriTOBHeHnHEckOJIbKx qaWeK.
7 CtaHdapThoe ynpaBneHne
7.1 BkJIoueHne nIbBbIKJIOueHne npnbopa
HaKMITE ①.
PnB BKIOUeHn Ha dncnnee nOBnIeTc nOrOtnSiemens.PnB BKIOUeHn N BbIKIOUeHn BbINoNHaETcA bTOMaTHueckan pOmbIBKa np6opa.Pn BblKIOUeHn Pnp6op BbInyckaet nap B noDoH c ceIbIO oOnCTKn.Ecn np6op npBkIOUeHn eIe HarpTe IIN nepeD BbIKIOUeHnEM KoPe He rOtOBnICn, npMbIBKa np6opa He BbINOHNHeTc.
7.3 doubleShot n tripleShot
YemdoJIbIe 3aBapINBaetc KoFe,TeM 6oJIbIe rOpkNx BeIeCTB N HeKeIaTeJIbHbIX apOMaTOB nonaJaET B HAnITOK. TOpKne BeIeCTBa N HeKeIaTeJIbHbIe apOMaTBIOTPiuCaTeJIbHO BnIAJOT Ha BKUC I DeJaOT KoFe MeHee PnIaTHbIM dIy yNoTpe6JeHNII.
Ytobb BbICBO6OaNTb TOnbKOJeKoYcBOReMbIe N pNnTHbIe Ha BKyc apOMaTnueckneBeuecTa, np6Op NOBtOPHOpeMaJIbBaET n 3aBapNBaet KofeHbIe 3epHa.
3aMeTka:Функци "doubleShot" n "tripleShot" 3aBcT OT BbIbpaHNo KpenoCTn HAnITka n erO obema.
3aMeTka: EcInn aKTHBnPOBaHa fynKcHn "doubleShot" nIn "tripleShot", fynKcHn npiroTOBNeHn DByx qAWeK cpa3y HeBbI-IOJIHmMa.
- Haxmnte Ha cIMBOJ HxHHO Ro HAnITka.
- HaxMMTe ^
Ha dincnilee oTo6paKaaeTca HAcTpoKa.
3. NocTaBbTe DBe YauKn CneBa n CnpBaNoI Do3aTOp HAnITKOB.
4. HaxmTe "Pync".
Hannitok nprirotabJnBaETcB 2 3Tana. 3epHa n3MeJbuaOTcR 2 pa3a.
KoΦeMonka Bpauaaetc.
He npikacaiTecb K BHyTpehHm qaCTM KOΦeMOJKN.
BHIMAHNE!
OnachocTb noBpeJdeHn KaOeMOJKN.
Pn He npaBnIbHo yCTaHOBKe CTeNEHn
nomoJa BO3MOxHNo NOBpeJdeHne KoOeMOLKn.
YcTaHaBnBaIte CTepeHb NOMoJa TOnIbKO npu pa6OtaUoSei KofoemJKe.
OoTaIHO yCTaHOBiTe cTeNeHb nOMOla IOBOPOTbIM nepeKJIouCaTeJeM.
CTepeHb NOMO- HacTpoKaJa
MeknionomonJIa3epeH TemHOJoo6kapKn.
IopBepHnTe npeKJIIOuATeNb npOTNB YacoBOB CTpeKN.
CTepeHb NOMO- HacTpoiKaJa
KpynhnI nomoi 3epen CBeTIOI O6kapKn.
IopBepHnTe nepeKluOuTaTeJb no yacoboi cTpeJIke.

YcTaHObKa cTeNeHn NOMOna DeIeCTByET TOnbKO NocJe BToPoR YaUkN KoΦe.
PekomeHdaun: EcnKoFe BbIXOJNT IINb OTdeJIbHbIMn KaJIaMn, yCTaHOBnte 60nee KpyNbI NOM.
Ecπi KoΦe cπiHKOM KπiKn i CπiHKOM MaIIO neHKn, yCTaHOBnte 6OJIe MeIKN IOMOI.
9 ΦильТр Дя BOДы
11 PoiorpeBaTeJIb yauWeK
UaMmOJHNO noIOrpeTb, nol3yrcb noIOrpeBaTeJeM uAWeK.
12.1 CoхpaHeHne HAnNTka N3 Bbl6opa HAnNTKOB
- Bыберп Te habитOK ИЗ "Класка" ИИ "coffeeWorld".
- 3aJaTe nepcoHaJIbHbIe HAcTpoIKn dJIHaNTka.
- HaxmTe "I36paHHee".
- Bb6epnte JKeIaembl CBeT dIra HAnNTKa.
- HaxmTe "CoxpaHnTb".
12.2 CoхpaHEHne HApNTka B MeHIO
- HaxmTe "I36paHHee".
- Haxmnte
Ha nucnlee oTo6paKaHOTcBce HMeHO- Uneec HAnNTkn.
3. BbIepeHte HxHbHnHaHnTOK.
4. 3aJaTe nepcoHaJIbHbIe HAcTpOoiKn IJI HAHTka.
5. Haxmnte "Jaee".
6. BbIepeNTe JKeIaEmbI uBET dIa HAnITKa.
7. Haxmnte "CoxpaHnTb".
12.4 YdaJIeHnE n36paHHoro
-
Haxmnte "I36paHHee".
-
BbIbepeHte HAnITOK.
- Haxmnte "YdaJIntb".
4.ПодтВердпг "Удаинь".
12.5 CoptnpoBka H36paHHoro
- HaxmTe"HactpouKn".
- Haxmite "Pepcohaun3aunia
- HaxmTe "CopTnpoBka n36paHHoro".
- CoptnyTe H36paHoe, HapnMep, no Ha3BaHIO NIN UBeTy.
13 Home Connect
JaHHbI npHbOp MOxHO NOKJIHOuHTb K DoMaUHe cTeN CBr3n. POnKJIIOuHTe npHbOpK MoBnJbHOMy yCTpoiCTBy, UTO6bI ynpaBt b FyHKcIMM npHbOpa che3 npINoKeHne Home Connect, n3MeHbT 6a3OBbie YcTaHObKn IOTcLeXKnBaTb aKTyaJIbHbI CTaTyc CTnPKn.
CepBncHomeConnectdocTypeHHe BO Bcex cTpaHax.Bo3MoJxHocTb NcNoJIb3OBAHnA FyHKuHnHome Connect 3aBNCHT OTHaIynchcepBncaHomeConnectBBaWe CtpaHe.NHΦOpMaUHO63TomBbHaNdTe 3deCb:www.home-connect.com.
YTo6bI BOCNoJIb3OBAbTcHyHKUnei Home Connect, BHaJaTe yCTaHOBInTe CBa3b c DomauHNe CetbTO WLAN (Wi-Fi) nC npInJIOKeHHeM Home Connect.
PpIIOXeHneHomeConnectnOMOxet Bam pOoiTn BeCb npOceC perncTpaun. IaBbIPOJIHeHnHaCTpoE KcJeDyTe yKa3aHmBpIIOXeHnHome Connect.
PekomEnDaUN
CootBeTCTBvUOaIaHΦOpMauncoepKHTcB IIpNlaRaemDOKymeHTaunnHome Connect.
Takke co6IIOdaIte yka3aHnI, npBBe-DeHHbIe B npIoJoxKeHHn Home Connect.
PpIMeuaHn
Co6IJaTe H3NoJKeHHbIe B daHHO IHCTpyKcII npaBnla TexNkn 6e3oNaCHoCTN, B TOM YncIe npu ynpaBJeHN npi6opom Upe3 npInoKeHHe Home Connect. "Be3oNaChocTb", CtpaHua 155
Припорптэн明白япраьени
неносрдевно на самом пиборе.
В зтом слуае одановеременhoe упра-
льени черз рпложени
Home Connect HeBo3MoЖHo.
13.1 Home Connect YcTaHOBKN
BbnoHnTe HacTpoKy Home Connect B COOTBeTCTBmC BaWIMN NOTpe6HocTAMN. HAcTPOKnHome Connect Bbl HaJeTe B MeHIO 6a3OBbIX yCTaHOBOK BaWero np6o- pa.PepeuehB HAcTpoEk, OTo6paXaembx HA DnCnIee, 3aBNCHT OT TORO, ycTaHOBNeHO IIN pInIoXeHne Home Connect n POnKlHo- en IIN pIn6Op K DOMaWHei ceTn.
O63op HacTpoeK Home Connect
3ndeBbI HauTe o63Op HacTpoek "Home Connect" n ceTeBbIX HacTpoek.
14 Ba3ObIe yCTaHOBKN
BbMOKeTe BbINOHHTb HAcTPOHy npH6Opa cornaCHO BaUIM NtPte6HOCTM N Bbl3BaTb DOnOJIHNTeMbHbIe yHKUn.
14.1 Изменинке ба3OBbIX Ha-ctpoek
- HauKMITE
Ha dincnnee oTo6paKaetcnaCncoK 6a30BbIX HacTpoeK. - BbInOpHnTe HxKHyO 6a3oByIO HacTpoi Ky.
ПиборзалOMHaeT6a3OByHnactpoI-Ky aBTOMaTHueCKN.
3.ДЯВыхолаизpeЖIMа6a3OBbIXHa-CTpoeK HaKMnTe←.
14.2 O63op 6a3OBbIX HacTpoeK
3Iecb npnBOJNTcO63Op 6a3OBbIX HactpoeK.
17.1 AKTHBaCnIaIHTbI OT MOp03a
Пптранспортуовке и xpaHeHnnpeDoxpaHnTe Baш пибор OT Bo3deiCTBnHn3Knx TempepaTyp.
BHIMAHNE!
OctaTkn KnDkoCTN B npn6ope MoryT npnBecTN K NOBpeKdEHNIO npn6opa npnTpcaHcnpoTnpOBKe IIN XpaHeHN.
IpeepTpaHcnpTIpOBKoI nnPomeMe-ueHnEM Ha xpaHeHne onOpOxKnTe cnCTeMy nDaun JnKDocTn.
- BbIOnHnTe npoRpaMMy "3aUHTa OT MOp03a". "Ba3OBoIe yCTaHOBKn", CtpaHnua 169
- OToeDInHInTe npHbOp oT 3JIeKTPocetN.
17.2 Ytihn3aunca Staporo 6bI-TOBOro npn6opa
YTNIN3aUNB COOTBETCTBUN C 3KOKIOnyueCKMHN HopMaMn O6ecneuNBaeT BO3MOX-HOCTb BTOPNHOro NCPOJB3OBaHnIeHHbIXCbIPBeBbIX MaTePnaNoB.
- BbInbTe n3 po3eTKn BnIky ceTeBOrO Ka-6eJIa.
- 06peKbTe ceTeBoi Ka6eIb np6opa.
- YtJIn3npyuTe np6Op B COOTBeTCTBnC 3KOJIoRnueCKMn HOpMaMn.
CBeDeHnO Bo3MOxHbIX CnOcO6ax yTINI3aUIM MOJHO NOLyUHTB B CneUmaII-3NPOBaHHOM TOPROBOM PpeIprrTm, a TaKKe B paOHbIX INI rOpOdcknx opraHax ynpaBLeHn.
Данньй пибор Имeel OT-MeTKу O COOTBETCTBn Eвpo-пeнсКIM HopMaM 2012/19/EU yTuIN3aUnn 3JleKTPnuCecknxИЗЛeKTPoHHbIXпибopob (waste electrical and electronic equipment - WEEE).
IaHHbIe HOpMbI oppeJeJIaIOT DeIcTByIOUne Ha TeppINTopn EbpocOIO3a npAInlaBO3Bpata n yTNIIN3aUN cTApbIX npIN6OpOB.
18 CepBnchna CJyX6a
Ecn y Bac HMeHOTc BONpocbl, Bam He ydaetc cAmocTOrTeIbHo yCTpaHnTb HenCnpaBnOCTb pIn6opa nn Tpe6yETc OTpeMOHTPOBaTb PIn6op, 6paTnTeCb B HaSy cepBnCHyO cnJx6y.
BaxkheIgIyHKUHOHPOBaHnI np6bopa opHHaJIbHbIe 3aJuaCTn, COOTBeTCTByOuIue InpEKTINBE EC no 3KoIOnrHuCeKOMy npoeKTHOpOBaHNIOIeKTPoNtpe6JIHOUI npOdyKcH, Bbl MoKeTe 3aKa3aTb BHaWei cepBnCHOn cIyK6e, KaK MInHMym, B TeueHne 7 let C MOMeHTa npOdaXn BaWero np6bopa B npedeJax Ebponeckoro 3KohOMNUeCKOrO pOcTpaHCTBa.
3aMetKa: PnBbIOnHHeHHrapaHTnHBIX yCIOBn IPOIN3BOInTeIra6OtBi BbIOnHIAOTcCEPBCHOH CnyK60B 6ecnlaTHo.
Iopno6Hyu INΦOpMaunIO rapaHTnHOM cpoke u ycNoBnXr rapaHTn B BaWe CTpaHe Bbl MoKeTe 3aPocntb B HaWei cepBnCHOn CnyKoe, y BaWeero npOdaUa IIN HaNTn Ha HaWeM caTte.
Ampc n Telefoh cepBnchOn cnyk6bMoXHO HaHTN B npnilaeraMOM nepeyHe cepBnchbIX cnyK6 B KOHc EHCtpyKcIN nnHa Haawem Be6-caTe.
3 UcTaHOBJIeHHn I nIcklIOueHn 189
3.1 KomnJIeKTI NOcTaBKn 189
3.2 YcTaHOBJIeHHN I niKJIIOueH-NI npINaNy... 190
4 3HaHOMCTBO. 190
4.1 Prnila.. 190
4.2 EmeHTn KepyBaHHra 190
5 PnlaIaI 191
YCTaHOBIb HaIMeHsU TpNBaIcTb 3aTpIMKn aBTOMaTHO BUMKHeH H.
Koln npilaIom He 6yIyb KOpNCTyBaTncra, BiH BIMNKaTUMetbcpaHiue.
"OcHOBHi npaMeTpN", CToP. 200
He nepeepuBaIte npriroTyBaHHa HanoiB nepeDuacHo.
HarpiTa KIbKICTb BOAn a6o MoJOKa 6yJe BnKOpNCTaHa ONTUMaJIbHO.
PergyIaRHO BuaJaIe 3 npilaNy HauKII.
V BiДклади haKiny piДВишуOTb eHeprocnoxINBaHHa.
3 YcTaHOBJIeHNeI niKJIIOUeHHa
Tyt Bn Di3HaETEcA, De HaNlInIeBCTaHOBnIOBaTn npuJa. KpIM TORo, Bn Di3HaETEcA, YK npueDHaTn npuJaDo eNeKTpOMepeXi.
3.1 KomnjeKT NOCTABKN
IicIpaO3naKaYBaHHnepeBipTe, uKOMnJIeKT NOBHN i uH He NIOsKOJINoAkiCb YactHNI pI d uac TpaHCnOpTyBaHHa.
3ayBaJehH: 3aJIeKHO BiI MoJeI npIaNy B KOMNJIeKT BXOJrTb pi3Hi akCecCyapn. IOnaTkoBI akCecCyapn no-3HaueHi NyHKTIrpHOIO paMKoIO.
Man. 1
He nIte zboTo hanoIO.
Iopapa: Cta6iBHa Dpi6HOpnCTa KpemOba NiHKa DoCraeTbcr NiCJI npNOrTyBaHHK iNbKOx YauoK BiD NooatKy KopncTyBaHHn PpnilaDom.
7 Ochobhi BiIDomocTi npo KopnctyBaHHa
7.1 YbIMKHeHHa6o BmKHeHHa npHaNy
- Hatnchitb ①.
Пид уас yBIMKHeHЯ Ha dinCnJIeI 3'YBnTbCЯ IOROTIN Siemens.Пид уас yBIMKHeHЯ BIMKHeHЯ npiJa aBTOMaTNo HO npOMBaetbcra. BIMkaIOuNcB, npiJa a YNCtntbCra. BInyckaIOUHy napy B nIDOn. RaKIo npiJaHa MOMeHT yBIMKHeHЯ Ze TeIJIa aOBo nepeД BIMKHeHHa HanoI He rotYBaJI, npiJa d He npOMBaETbcra.
7.2 Пнготуваима наоов
Tyt Bn Di3HaεTeC8aK pniroTyBaTHBnOpaHn Hani.
YBATA!
He6e3neka oniky!
LioHOn npiroToBaHi hanoi dyxke ra-paui.
Y paizi noTpe6n daBaIte HanoM OXOLOHUTN.
YHnKaIte nOtpaJIaHHHa shkipy piINH i napi, IIO BNXoJrTb i3 npInJaNy.
Bka3iBkn
3a DeKnX npaMeTpIB Kaba roTyetbCBy KijbKa etanIB. 3aueKaJTe, DOKN IpOcE npuRTOyBaHHI NOBHICTU 3aBepuHTbcra.
IIO6 npnroTyBaTn HaniN 3 MoJOKOM,do npnilaNy NtpiHO npneJHaTNI 3aNOBHeHNI MOJOKOM KOHTeINHep aO,3a DOnOMOrOHO aanTepa,MOJOnHNI NaKeT.
■Приедно Контейнел Дд молoka abo aanTep Дл пaketib MOKHa Tlbkn nicn npabunbHOrOBCTaHOBLeHHcNCTeMn IOaui MoIOKa 3 aanTepom i TpykoTo B KpnsuДdo3aTopa HanoivB.
KoHTeHepIJIyMOJOKa po3pOBeHeHcneiaJIbHO nId cEi npUlaI. KoHTeHepIJIyMOJOKa MoXHa BVKOpNCTOByBaTn TIbKn B NOyTOBnx yMOBax i TIbKn IJIy 36epirAHn MOJOKa BXOJOnJIbHNky.
Якшо молоча систema Heпочишина, нал'tа rapяча ВODa MОже МICTИТи He3HaЧNi ДOMiшКИ молoka.
IoparNi
3amictbMOLOKA MOXHa BVKOpnCTOByBaTIn HaIoiPOCSINHHORIOXODJxehHn,HaPnIKlaD COeBeMOJOKO.
■AkiCTbMOLOUHOI NiHKn 3aJIeXuTb BiD TIny BnKOpNCTOBvBaHOrO MoLoKa a6o pocnnHHoro HanoIO.
7.3 doubleShot i tripleShot
YIM DOBWE 3aBapIOeTbCk KabA, TmM BiIbWe rIPKnx peyOBnH i HebaxaHx apOMaTI BnuBilbHReTbC. FipKi peyOBnH n HebaxaHi apOMaTI nOriPiyOTb CMAk i 3acBOIOBaHicTb KabN.
LIOB BnBIJIbHЯIINcT IJIbKn PnpEmHi Ha CMAk i Do6pe 3acBOJOBaHI apOMaTIuHi peOBoHNi, PpNlaD 3aHOBO MeJe 3epHa N 3aBapIOe Kaby.
3ayBaXeHHa:ФyHkuii "doubleShot" i "tripleShot" 3aIexKaTb BiD Bn6paHnx MiUHOCTI Ta o6'Emy HanoIO.
"Orrn OCHOBHnx npaMeTpIB", CToP. 200
12 YIIO6JIeHe
Hanoi 3 nepcoHaJIi3OBAHmN HanaaHTyBaHHaMn MOxHa 36epiratn Jk yIIO6JIeHi.
YIIOJIeHI Hanoi MOXHa I03Haayatn KOIbOpOM. YIIOJIeHNI Hani -Ze Hani 3 IepcoHaiI3OBaHIMn Hala-HTyBaHHMn. 3MiHNTn HalaHTyBaHH HaIOIO MOXHa B OyDb-RAKNI MOMENT.
3ayBaXeHHa: LIO6 BnHTu 3 MeHIO HanaTbAHHa, HATNCiTb
12.1 36epeJHHeHHaHOIO 3 MeHIO Bn6Opy
- Bùbèpiǐt b Hàn pì n 3 pòzīn y "Klacn Ka" a bó "coffeeWorld".
- Персанізуне паметри наю.
- HatnchItb "YJIIO6JIeHe".
- BnbepiTb IaHaNoIbXaHnKo-lip.
- Hatncihitb "36epeertn".
12.2 36epeJHHeHHaHO B MeHIO
- HatnchItb "YJIIO6JIeHe".
- Hatnchitb
DnCnJIeI noka3ye BcI HaBHi Hanoi.
3. BùbēpiTb ǒākαHn HànIi.
4. Персанізуне паметри наю.
5. HatncHtB "ДаJI".
6. BnBepiTb IaI HaNoIO bXaHnI KO-lip.
7. Hatncihitb "36epeTn".
12.3 3miHa napaMeTpib HanoTO
- HatnchItb "YJIIO6JIeHe".
- Bn6epitb Hani i HaTnCHiB Ha Hbo- ro.
- 3miHiTb npaMeTpnu HanoH.
uk Home Connect
- HatnCHItb "3actocybaTn".
Hobi npaMeTp n 36epiraIOTbcn Ha npnilaDi.
14.1 3MiHa OCHOBnX HaJa- StTyBaHb
- Hatnchitb
Дисплей пokа3у ecncoK OCHOBHNx napaMeTpib. - 3aДaIte nOTpiHn OCHOBHn npapaMeTp.
Пилад abTomatnUHO 36epiraocHOBnI napaMeTp. - Lio6 BnTn 3 OCHOBnX npaMeTpib, HATNCiTb
14.2 OrlaO cHOBnX npaMeTpipB
Tyt HabeJeHO OrlnO OCHOBHnX npaMeTpib.
Tyt haBeTeHO Orlnd DeTaIeN, npuaTHNX Do MMTB NocCyOnMnHi MaunH.
YBAGA!
Jeyki deTani cyTnBi do TemnepaTypru MoKyTB 6yTN IOsKoJxHeH BHaCNI-DOK MNTTBA NOCyDOMNHi MaunHi.
DontpmyTeceBVMoI INCTpyKu3eKcIyatauII NOCyDOMnHOI MaHINH.
MnIeB nocydomnHiMaunHi TiJIbKn pniDAtHi IaI yBoRo deTaJI.
BukopncToByte tiIbkn Ti npo-rgpamn, KOTpi He HapriBaIOb BODy noHaJ 60 ^ C
PnpdaTHi:
PiDIOH dIgKpaneIb
- PewiTka
- KoHTeINHeP dIa KaBOOoi rUsi
- MexaHicuHni iHnKkaTOp pIBHa
Molouha cnCTema 3 aanTepom
KoHTeINHepIJIaMOJOKa3KpN-
He npndaTHi:
KoHTeINHepIaI BODI
Kpnska KOHTeHepa DnB BOn
Kpnka dny 36epexehn apomaty
BLOK 3aBapIOBaHHA
Kpnska do3aTopa
15.2 3ac06nДЯ OUnSeHNa
BukopncToByTe InIe CneUaJIbHi 3acO6n DnA YnIeHHN.
YBAGA!
HenpiuataHi 3acO6n IJyIuIeHHNMOJxTy NpUKOJxByTaN IOBepXHi npuHa-ny.
He 3acTocOByIte roctpi nn a6pa3nBHI 3acO6n dnn YnIeHHN.
He BnKOpncTOByuTe 3acO6n IJN YIeHHa,IO MICTaTb CnIPT.
He 3actocobynte kopctki a60 metanebi ry6kn.
He BndaIaIYe HauKIn 3a DOIpOMoTIO JIMMOHHOI KINLOTN, OU TY a60 3acO6iB Ha OCHOBI OU TY.
ДлЯВидаLEHнHaKINуМочиЕнНЯСЛДВИКОРИСТОВYВaTиВИКЛIO-ЧноСпeцiaльHi Ta6NeTkn.
He BnKOpNCToBvIe 3acO6n IJN BnJaJIeHHHaKIny,IO MICTaTb focphiHy KINCIOTy.
Iopadn
■ BinkopincobuyTe Ta6IeTKn IJy BnIaJIeHHHaKIny N OUYIeHHN, KApO3pO6JIeHi CneUiaJIbHO IJy BaIo- ro npInaNy. Ta6IeTKn MoXHa npInoBAtn B cepBicHomy cHTpi. "PpInaDnA",CTop.191
- Petelbno MmTe HObi rYbKn, IIOB BndaIHTNo MoXJIbBi peUeTKn CoJeN. CoJI MOxTy bCnpuHrTn IoRBy HaIbOty ipKi Ha MeTaJIeBnx NOBepxHax.
IIO6 3aONoBITN Kopo03i, 3aBxKn HeBIXKlaIaHNO pnpbpaIte 3aIIuSKn HaKNy, KaBn, MoLOka, po3UnHIB IJRA OUYIeHHN BUNaJIeHHN HaKNIpy.
15.3 Chuichiennn npnilaNy
YBATA!
He6e3neKa ypaKeHHa eJeKtpnHm cTpymOM!
Piznha, zo BVteKna, MoXe cnpuHnTyn ypaKeHH eJeKtpuHm CTpyMOM.
Hikoln He 3aHypioIte Hi npnila, Hi Ka6eIb XINBLeHnry BOdy.
Ha po3nHmN 3'edHyBauch npuJaHy He Mae NotpaJIaTn piJInHa.
He MoxHa uNCTHTn npUla3a DoIOMOroTO napOBOro a6o BnCOKOTnCKOBOro npUlaNy.
YBATA!
He6e3neKa onikib!
CepBicHi npoRpAmn cIiD 3aynckatn DnA BCTaBLeHHN a6O BnMaHHN fIbTpa, a TAKOX dIy peTeJIbHOrO uN- UeHHN npuJaNy.
YBAGA!
HehaIexJhe a6o HeCBOeUache YIeHHa BnJaJIeHHaHKIny MoKytb NtshKOJNTn npJna.
BuaIaIeHaKnOpOpa3yPiCJIPOABN BiIOBIDHOI BkA3IBKn.
Y BiDcIK DnIa Ta6JIeTOK MOKHa Kla-CTN TIlbKn CneUiaJbHi Ta6JIeTKn DnIyUHHeH.
He Klaizb y BiDcik DnT Ta6IeTOK Ta6IeTKn DnT BnDaJIeHHHaKaHpy a6o iHsi 3acO6n.
Bka3iBKn
Ha dincnnei Biioobpaxaetbcepe6ir BIKOHaHH npoceDpyn.
Aku npua3a6nokyBaBCy,TO 3HOBy KOpNCyBaTnCn Hm MoKHa 6yTe TlBKnPiCn BnDaIeHHn HaKnIpy.
KopncTyBaHHcepbichmnporpaamn
- HatnCiHtB 0
- HATnCHITb CnMBOJ nOTpi6HOI npo-rgpAMN.
HaДиспл ei 3'ЯВЛТИМУТьСЯИCTpyKci 3 BIVKOHaHHIpoIgpaMn.
Orna cepbichnx nporpaM
Tyt HabeDeHo Orla CepBicHnx npoPam.
3ayBaHexHH: NoyatKOBn ekpaH noka3yc, ckiIbKn HanoiB ige MoXHa npiroTByaTN Do BVkoHaHH nporpaMn, a TakoX BiIDNoBIDHn Yac.
Central Service Contacts
AM AM Armenia, Ruwuunnuu
ZIG ZAG LLC
Charenci str. 25
Yerevan 375025
Tel.: 010 55 60 10
newsletter:service@zigzag.am
www.zigzag.am
www.siemens-home.bsh-group.at
Gate 1, 1555 Centre Road
Clayton, Victoria 3168
Tel.: 1300 167 425
newsletter: aftersales.au@bshg.com
www.siemens-home.bsh-group.com/au
*Mon-Fri 24 hours
BE Belgique, Belgie, Belgium
BSH Home Appliances S.A.-N.V.
Rue Picard 7, box 400, Picardstraat 7, box 400
1000 Bruxelles - Brussels
Tel.: 02 475 70 02
mailto:bru-repairs@bshg.com
www.siemens-home.bsh-group.com/be
BY Belarus, Bénapycb
000"5CX BbITOBa TEXHnKa"
ten.: 4957372962
mailto:mok-kdhl@bshg.com
CH Schweiz, Suisse, Svizzera, Switzerland
BSH Hausgeräte AG
www.siemens-home.bsh-group.com/ch
CZ Ceska republika, Czech Republic
Vice informaci (napr. zaručni podminky, prodloužena zaruka aj.) naleznete nawebovych stránkach www.siemens-home.bsh-group.com/cz/ nebo nás kontaktujihe +420 251 095 511
www.siemens-home.bsh-group.fr
GB Great Britain
BSH Home Appliances Ltd.
Grand Union House, Old Wolverton Road,
Wolverton
Milton Keynes MK12 5PT
To arrange an engineer visit, to order spare parts and accessories or for product advice please visit www.siemens-home.bsh-group.com/uk Or call Tel.: 0344 892 8999*
*Calls are charged at the basic rate,
please check with your telephone service
provider for exact charges.
IE Republic of Ireland
BSH Home Appliances Ltd.
M50 Business Park, Ballymount Road Upper, Walkinstown
Dublin 12
To arrange an engineer visit, to order
pare parts and accessories or for
product advice please call Tel.: 01450
2655
www.siemens-home.bsh-group.com/ie
*Calls are charged at the basic rate,
please check with your telephone service
provider for exact charges
IT Italia, Italy
www siemens-home.bsh-group.com/it
LU Luxembourg
www.siemens-home.bsh-group.com/lu
MT Malta
Aplan Limited The Atrium
The Atrium
Mriehel by Pass
BKR3000 Birkirkara
Tel.: 025 495 122
mailto:services@theatrium.com.mt
NL Nederland, Netherlands
www.siemens-home.bsh-group.nl
PL Polska, Poland
www.siemens-home.bsh-group.pl
RU Russia, Pocsn
OOO «BxCBБытовыприборы»
CepBnC O T pOn3BODnteTl
Ten.: 8 (800) 200 29 62
mailto:hotlineru@bshg.com
www.siemens-home.bsh-group.ru
UA Ukraine, YkpaHa
TOB "5CX Nóbyroba Texhika"
Ten.: 0 800 300 153*
mailto:BSH-serviceua@bshg.com
www.siemens-home.bsh-group.com/ua
96 Fifteenth Road, Randjespark
1685 Midrand-Johannesburg
Tel.: 086 002 6724
mailto:bsh@iopen.co.za
mailto:applianceserviceza@bshg.com
www.siemens-home.bsh-group.com/za
BSH group is a Trademark Licensee of Siemens AG. Manufacturer's Service for Siemens Home Appliances.
BSH Hausgeräte GmbH
Carl-Wery-StraBe 34
81739 München
GERMANY
www.siemens-home.bsh-group.com
Valid within Great Britain:
Imported to Great Britain by
BSH Home Appliances Ltd.
Grand Union House
Old Wolverton Road
Wolverton, Milton Keynes
MK12 5PT
United Kingdom
Manufactured by BSH Hausgeräte GmbH under the trademark licence of Siemens AG