MBL-26 - Blender MPM - Free user manual and instructions
Find the device manual for free MBL-26 MPM in PDF.



| Product type | High-end blender with vacuum function |
| Brand | MPM |
| Model | MBL-26 |
| Main bowl capacity | 1500 ml |
| Travel cup capacity | 800 ml |
| Speeds | 10 adjustable speeds + Pulse mode |
| Automatic programs | 4 programs (CRUSH, CLEAN, SAUCE, V-JUICE) |
| Vacuum function | Yes, air extraction before or without blending |
| Control type | Touch panel with backlit LCD screen |
| Bowl material | Glass or high-resistance plastic (not specified) |
| Blades | Stainless steel blades, removable |
| Safety | Lock if bowl incorrectly positioned (E1 error), automatic stop after 3 min |
| Max operating time | 3 minutes, then 30 min cooling |
| Noise level | 85 dB(A) |
| Cord length | 1.0 meter |
| Maintenance | Bowl and cup dishwasher-safe; automatic CLEAN program |
| Included accessories | Bowl, travel cup, valve filter, gaskets, rubber valves |
| Power supply | 220-240 V ~ 50/60 Hz (estimated, see rating label) |
Frequently Asked Questions - MBL-26 MPM
User questions about MBL-26 MPM
0 question about this device. Answer the ones you know or ask your own.
Ask a new question about this device
Download the instructions for your Blender in PDF format for free! Find your manual MBL-26 - MPM and take your electronic device back in hand. On this page are published all the documents necessary for the use of your device. MBL-26 by MPM.
USER MANUAL MBL-26 MPM
natural_image
Black MPM blender with digital display and control buttons (no readable text or symbols)BLENDER PRÓŻNIOWY, WYSOKOOBROTOWY MBL-26
High-Speed Vacuum Blender/Высокоскоростной вакуумный блендер/Vakuum-Hochgeschwindigkeitsblender
PL INSTRUKCJA OBSŁUGI....3
GB USER MANUAL....12
RU ИНСТРУКЦИЯ ПО ОБСЛУЖИВАНИЮ....21
natural_image
Diagram of a blender with a circular component being turned, showing internal structure and rotation arrow (no text or symbols)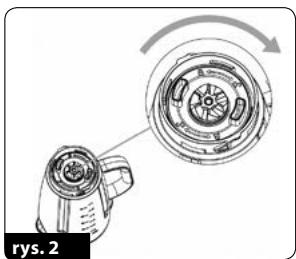
natural_image
Diagram of a hand holding a small electronic device with a circular component, showing rotational motion (no text or symbols)natural_image
Mechanical assembly diagram showing a component with a central pin and two circular parts, no text or symbols present.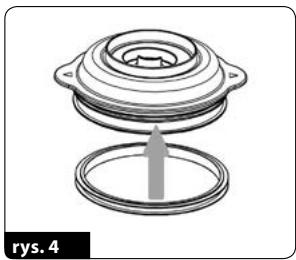
natural_image
Mechanical component diagram showing a cylindrical housing with a base and an arrow indicating assembly (no text or symbols)natural_image
Diagram showing a wheel assembly process with two stages, one before and one after, labeled 'rys. 5' (no text or symbols on the diagram itself)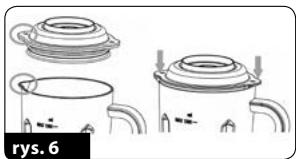
natural_image
Line drawing of three different teapot containers with handles and lids, no text or symbols presentnatural_image
Line drawing of a medical or laboratory device with a hand holding a tool, no text or symbols present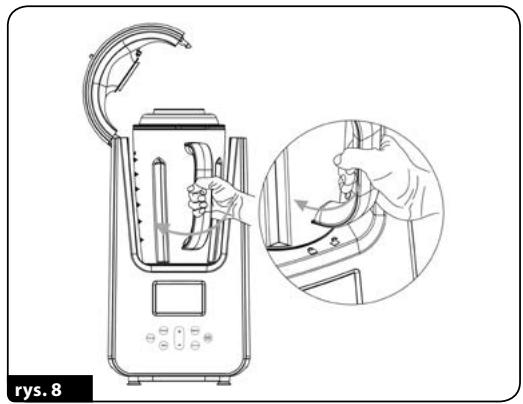
natural_image
Line drawing of a kitchen blender with a hand operating the blade, showing a close-up of the handle (no text or symbols present)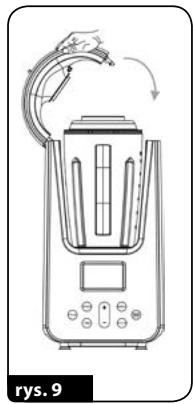
natural_image
Line drawing of a blender with control panel and handle, showing motion arrows (no text or symbols)natural_image
Illustration of a kitchen blender with a hand operating the lid and a close-up inset showing hands cleaning the interior (no text or symbols)Read carefully this manual before using the appliance.
Do not touch the appliance with wet hands.
Do not immerse the appliance, its cord and plug in water or any other liquids.
Do not immerse the appliance, its cord and plug in water or any other liquids.
- Close supervision is necessary when using the appliance near children.
Do not place the cord over sharp edges and keep it away from hot surfaces.
Before use always make sure that no tool (e.g. spoon, spatula) is left in the jug or bottle, because it may cause damage to the appliance or body injury.
Before starting the appliance make sure the jug is properly mounted on the base.
Before disassembly wait until the motor stops completely.
Before cleaning the appliance, unplug it from the power outlet!
Take extreme care when touching cutting blades, especially when removing them for cleaning.
Do not immerse the blender in water or any other liquids.
Do not exceed the maximum capacity indicated on the blender container.
- Wait until hot ingredients cool down before processing them.
- Wash the jug before using the appliance for the first time.
Do not use the appliance if it is damaged, also if the power cord or plug is damaged - return the appliance for repair to an authorized service centre.
Before use always make sure that all parts of the appliance are properly installed.
To avoid the risk of damage, fire or injury, always use the attachments recommended by the manufacturer.
▶ Always unplug the appliance immediately after using it and before cleaning.
Do not leave the operating appliance unattended.
Do not place the appliance on hot surfaces.
Do not use the device outdoors.
Place the appliance on a dry, flat and stable surface.
This appliance has been designed for domestic use only.
During operation keep your hands away from moving parts.
Do not use the appliance for the purposes different than it was designed for.
Do not place the appliance in vicinity of electric and gas cookers, burners, ovens, etc.
Children should be supervised to ensure that they do not play with the appliance.
Do not pull the plug by holding the power cord.
Do not connect the power plug with wet hands.
Do not remove the jug when the appliance is running.
- Store the appliance and its cord out of reach of children under 8 years of age.
This appliance is not intended for use by children under 8 years of age and individuals with reduced physical, sensory or mental capabilities, or lack of experience and knowledge, unless they have been given supervision or instruction concerning use of the appliance in a safe way and if they understand the hazards involved. Cleaning and user maintenance shall not be carried out by children without supervision. - Clean all attachments and containers before using the appliance for the first time.
- Keep your children safe: do not leave any parts of the packaging readily accessible (i.e. plastic bags, cardboard boxes, polystyrene inserts, etc.).
WARNING! Never let children play with plastic film or bags. Choking/asphyxiation hazard!
NOTE: The cutting blades are very sharp, avoid touching them while emptying or cleaning the appliance - it may result in serious injury. WARNING! Do not operate the blender if the lid are not in place.
Vacuum blending is a breakthrough in food processing: it evacuates all oxygen with air from the blender's jug or pitcher and keeps it at vacuum. This way your smoothie, juice or soup is deprived of oxygen to keep its nutritive value and energy for longer. Vacuum eliminates oxidation, a process which inevitably reduces the enzymes and vitamins in food; the blended and vacuum-sealed products do not lose their nutritional value, taste or colour. The juices and smoothies made with the high-speed vacuum blender are not oxidized, do not turn sour, and do not decant; you can keep them safely in a fridge for several days without losing nutrients, taste or an appealing appearance. The high-speed vacuum blender processes food in vacuum and helps storing the food as processed and without air to keep it fresh and full of nutrients for longer. Now you can stock yourself up with smoothies for the whole day or move some of them to the portable pitcher, extract the air from it, and enjoy your drink on the go, be it at work or at your gym.
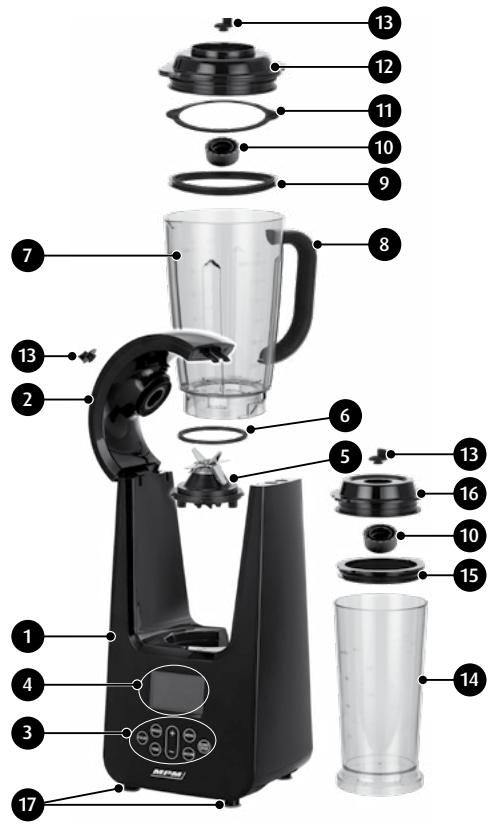
- Blender housing
- Swivel blender top
- Touch control panel
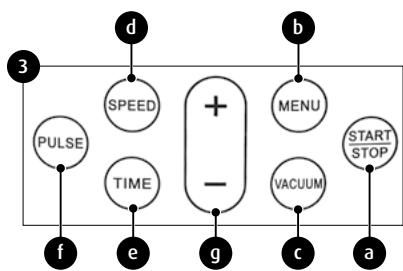
a. START/STOP button
b. Program selector button (MENU)
c. Vacuum level selector button (VACUUM)
d. Blending speed selector button (SPEED)
e. Blending time selector button (TIME)
f. PULSE button
g. Blending time / speed adjustment buttons (+ / -)
- Backlit LCD display
a. Automatic processing program icons
flowchart
graph TD
    A["3"] --> B["PULSE"]
    B --> C["SPEED"]
    C --> D["+"]
    D --> E["TIME"]
    E --> F["-"]
    F --> G["VACUUM"]
    G --> H["START STOP"]
    H --> I["a"]
    I --> J["c"]
    J --> K["vacuum"]
    K --> L["e"]
    L --> M["f"]
    M --> N["d"]
    N --> O["b"]
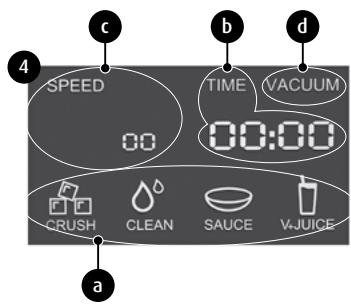
b. Blending time display
c. Blending speed display
d. Manual vacuum level selection display
- Blade rotor
- Blade rotor gasket
- 1500 ml blender jug
- Jug handle
- Jug lid gasket
- Valve filter (2 pcs.)
- Jug lid flat gasket
- Jug lid
- Rubber valve (3 pcs.)
- 800 ml portable pitcher
- Portable pitcher lid gasket
- Portable pitcher lid
- Non-slip feet
BEFORE FIRST USE
- Remove the high-speed vacuum blender from the cardboard box. Remove all stickers, plastic bags and filling materials.
- Check that the high-speed vacuum blender accessories have been delivered as specified for the product. Inspect the high-speed vacuum blender for transport damage. Consult the seller when in doubt.
- Verify that your power mains match the nameplate ratings of the high-speed vacuum blender.
- Clean all parts in contact with food according to the instructions in Section "CLEANING AND MAINTENANCE".
The vacuum levels generated in the blender jug or pitcher and the extremely high blending speed (at over 20,000 rpm) require proper assembly of all components, which must be kept perfectly clean, to achieve good performance of the high-speed vacuum blender and make its operation safe for you.
-
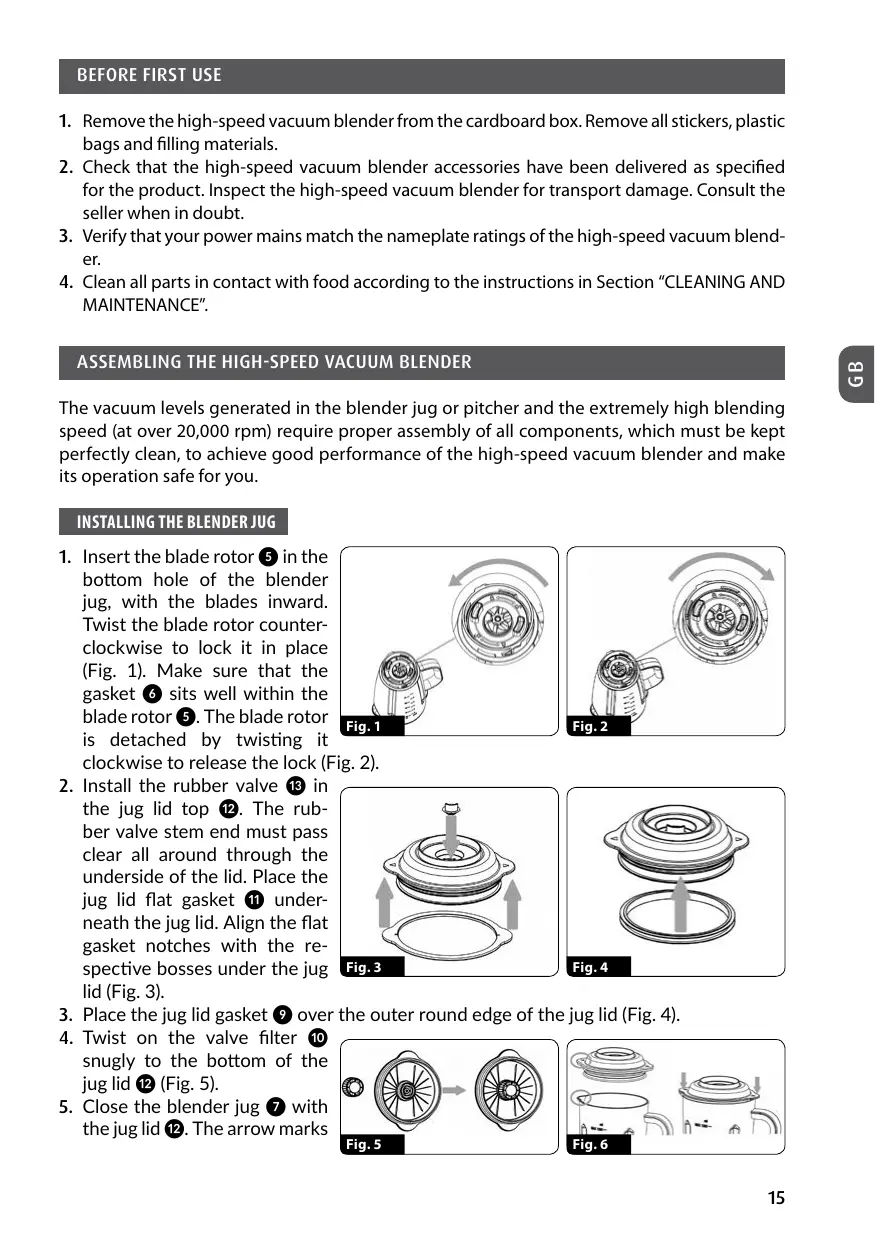
Insert the blade rotor 5 in the bottom hole of the blender jug, with the blades inward. Twist the blade rotor counterclockwise to lock it in place (Fig. 1). Make sure that the gasket 6 sits well within the blade rotor 5. The blade rotor is detached by twisting it clockwise to release the lock (F
-
Install the rubber valve 13 in the jug lid top 12. The rubber valve stem end must pass clear all around through the underside of the lid. Place the jug lid flat gasket 11 underneath the jug lid. Align the flat gasket notches with the respective bosses under the jug lid (Fig. 3).

natural_image
Diagram of a device with a rotating fan and internal components, labeled as Fig. 1 (no text or symbols on the diagram itself)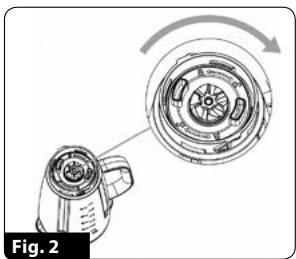
natural_image
Diagram of a blender with a magnified view showing the blade and rotor (no text or symbols)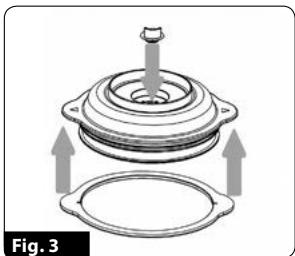
natural_image
Mechanical assembly diagram showing a clamping device with arrows indicating motion (no text or symbols)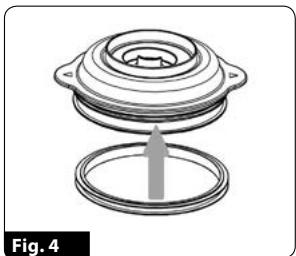
natural_image
Mechanical component diagram showing a housing with a central bore and an arrow indicating direction (no text or symbols)-
Place the jug lid gasket ⑨ over the outer round edge of the jug lid (Fig. 4).
-
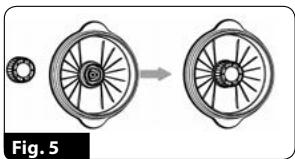
Twist on the valve filter 10 snugly to the bottom of the jug lid 12 (Fig. 5).
-
Close the blender jug ⑦ with the jug lid ⑫. The arrow marks
natural_image
Diagram showing a mechanical component transforming into a circular housing, labeled as Fig. 5 (no text or symbols on the diagram itself)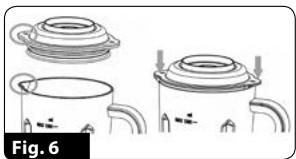
natural_image
Illustration of two containers with lid handles and a handle, labeled Fig. 6 (no text or symbols on the containers themselves)on the jug lid attached to the blender jug must point toward the jug handle and the jug spout, respectively (Fig. 6).
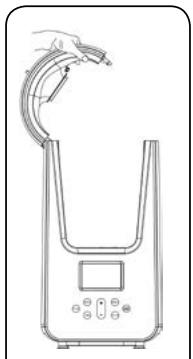
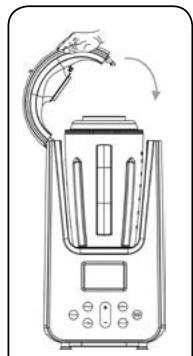
- Grasp the blender housing with one hand. Lift the swivel blender top ② with the other hand into the position shown in Fig. 7.
natural_image
Line drawing of a medical or laboratory device with a curved arm and control panel (no text or symbols)Fig. 7
natural_image
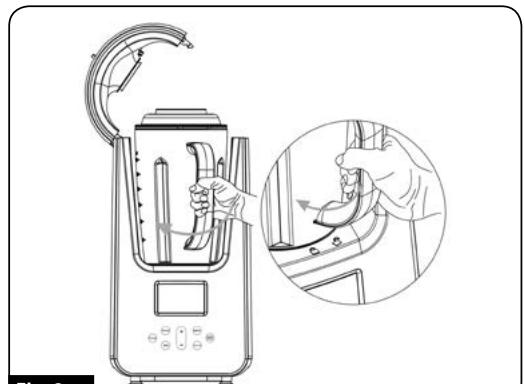
Illustration of a kitchen blender with a hand holding a knife, showing the blade and handle (no text or symbols present)Fig. 8
natural_image
Line drawing of a blender with control panel and scroll (no text or symbols)Fig. 9
-
Put the blender jug ⑦ in the blender housing ① with the jug handle aligned with the open padlock mark. Now, twist the blender jug gently to align the jug handle with the closed padlock mark (Fig. 8). With the blender jug installed, lower and press the swivel blender top to lock it in place (Fig. 9).
-
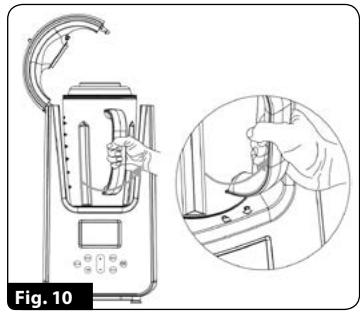
The blender jug is removed from the blender housing in the reverse order of assembly: lift the swivel blender top ②, twist the blender jug to align the jug handle with the open padlock mark, and remove the blender jug from the blender housing (Fig. 10). Remove the blender jug lid and the blade rotor.
natural_image
Illustration of a blender with a hand operating the blade, shown in two views: one close-up and one magnified (no text or symbols)INSTALLING THE PORTABLE PITCHER
- Install the rubber valve ⑬ in the portable pitcher lid top ⑯. The rubber valve stem end must pass clear all around through the underside of the lid. Place
the portable pitcher lid gasket 15 underneath the portable pitcher lid. Align the gasket notches with the respective bosses under the portable pitcher lid.
- Twist on the valve filter ⑩ snugly to the bottom of the portable pitcher lid ⑯.
- Close the portable pitcher 14 with the lid 16.
- Open the swivel blender top ②, place the portable pitcher ⑯ in the blender housing and close the swivel blender top ②. You can only vacuum the portable pitcher. You cannot blend the contents. The blender motor functions are locked out; if you attempt to operate any blending-related control, Error E1 will be displayed.
BLENDER PROGRAMS AND FEATURES
The high-speed vacuum blender has four automatic processing programs. See the table below for details of the programs and settings:
| Program: | Use: | Duration: | Vacuum: | Blending speed level: |
 | Ice cube crushing | 45 s | NO | 0 and 10, alternately |
 | Jug cleaning | 1 min 20 s | NO | 0 and high, alternately |
| [7DBX] | Sauce / porridge / soup | 2 min | NO | 6, 8 and 10, intermittently |
 | Juice vacuuming | 2 min 20 s | YES | 10, intermittently |
OTHER HIGH-SPEED VACUUM BLENDER FEATURES:
PULSE: increases the blending speed to maximum when held depressed. Each time it is activated, the feature works up to 60 seconds only, even if the PULSE button is held depressed further.
VACUUM: evacuate the air from the blender jug or the portable pitcher. The contents are not blended during this process. The vacuum feature takes 45 seconds to evacuate the air. The vacuum feature is activated by pressing the VACUUM button and confirming the activation by pressing the START/STOP button. When active, VACUUM (4d) flashes on the display. When the feature finishes running, the high-speed vacuum blender beeps 10 times. You can interrupt the feature at any time by pressing the START/STOP button again.
SPEED: manually set the blending speed. There are 10 different speed levels to choose from, with 1 being the lowest speed and 10 being the highest speed. The set speed level is shown in (c) of the LCD display with upright bars and a corresponding speed level number. You can modify the value with the +/- button.
TIME: manually set the blending time. You can set the blending time from 1 second to 2 minutes and 30 seconds. You can modify the setting in 1-second increments. Keep the button depressed to increase the increment to 5 seconds. The blending time setting is shown in (b) of the LCD display. You can modify the value with the +/- button (3g).
The LCD display will go dark in 5 minutes from powering on the high-speed vacuum blender. The LCD display is turned on with any button.
- Place the high-speed vacuum blender on a firm, stable, dry and level surface.
- Make sure that the rubber valve 13 is installed in the swivel blender top 2. The rubber valve stem end must pass clear all around through the underside of the swivel blender top.
- Attach the blade rotor to the blender jug, place the products to be blended in the blender jug, and close the blender jug with its lid.
CAUTION! Hot products must cool down before placing them in the blender jug!
CAUTION! Fill the blender jug up to the 1,500 ml mark only.
- Place the blender jug in the blender housing.
- Plug in the high-speed vacuum blender to the mains.
- Select the automatic processing program you need. Do this by pressing the MENU button repeatedly. Start the selected program by pressing the START/STOP button. The selected automatic processing program is indicated with its icon on (4a). When the automatic processing program is done, the high-speed vacuum blender will beep 10 times. You can always interrupt the activated program by pressing the START/STOP button again.
- You can also adjust the blending speed and time and/or turn the vacuum on or off as you need. Set the desired blending speed and time with the SPEED and TIME buttons, and start processing with these settings by pressing START/STOP. If you want to vacuum blend, first evacuate the air by pressing the VACUUM button.
CAUTION! Do not run the high-speed vacuum blender for more than 3 minutes. When done processing, wait approx. 30 minutes for the high-speed vacuum blender to cool down before processing more products.
CAUTION! Do not start the high-speed vacuum blender if the blender jug is empty.
- When done processing, unplug the high-speed vacuum blender from the mains, open the swivel blender top and remove the blender jug. If you were processing with vacuum (or an automatic processing program used vacuum), grasp and gently pull on the boss of the rubber valve 13 on the swivel blender top 2 before opening it. This will depressurize the swivel blender top. Otherwise it will be very difficult to open the swivel blender top 2.
- Open the blender jug lid 12 and move the blended contents as required. If you were processing with vacuum (or an automatic processing program used vacuum), grasp and gently pull on the boss of the rubber valve on the blender jug lid 12 before opening it. This will depressurize the blender jug. Otherwise it will be very difficult to open the blender jug.
CAUTION! Wait for the blade rotor to stop before pouring out the jug contents!
- The portable pitcher 14 can be brought to vacuum. When the portable pitcher is in the blender housing, all blending features are locked out. Evacuate air from the portable pitcher 14 with the VACUUM feature. Now you can take the portable pitcher with the contents with you. Remember to pull on the boss of the rubber valve 13 first, if you want to open the lid of the portable pitcher.
CAUTION! Fill the portable pitcher up to the 800 ml mark only.
- When done processing, clean the high-speed vacuum blender as explained in Section "CLEANING AND MAINTENANCE".
PRACTICAL HINTS & TIPS
- If at vacuum, remember to depressurize the blender jug / portable pitcher before removing the lid. Depressurize by gently pulling on the boss of the rubber valve ⑬. Depressurize the swivel blender top ② in the same way before you open it.
- When blending products for babies or young children, always make sure that all ingredients have been blended thoroughly before serving.
-
If the speed is noticeably reduced during blending, you need to break up the products into smaller chunks before blending.
-
Hard products, including coffee beans, soy beans, chocolate and ice will wear out the blade rotor faster. It is natural for the blade rotor to become dull and require replacement during the operating life of the blender.
- The vacuum generated in the blender jug / portable pitcher will be slowly lost due to the atmospheric pressure.
- Crush ice cubes by operating PULSE repeatedly, or use the CRUSH program. Add a little water to the blender jug to crush ice cubes easier.
- If the blender jug is improperly installed (locked) or with the blender jug lid ② not closed, Error E1 will be displayed with 3 beeps if you attempt to start blending.
- Cut large portions of products into smaller ones before placing them in the blender jug and blending.
- The blender is not designed for the following:
▶ grating potatoes
▶ beating eggs or dairy substitutes
- mincing raw meat
beating or mixing thick dough (as these products tend to form heavy lumps that can damage the blender)
CLEANING AND MAINTENANCE
CAUTION! Before cleaning, always unplug the high-speed vacuum blender from the mains outlet and wait until it has completely cooled down.
CAUTION! Do not immerse the blender housing or the swivel blender top in water or other liquids.
CAUTION! The blades are very sharp. Handle with care to avoid injury.
- Clean the blender housing and the swivel blender top with a soft, damp cloth; next, wipe them dry.
- Wash other parts of the high-speed vacuum blender with warm water and a detergent. Next, rinse clean and leave to dry.
- The blender jug and the portable pitcher are dishwasher safe.
- Always clean the rubber gaskets and valves carefully. They need to be perfectly clean before use to achieve a correct vacuum level.
- Periodically inspect all parts of the high-speed vacuum blender for wear and tear before assembly. If the blender blade rotor stalls or does not rotate smoothly, do not use the high-speed vacuum blender. Make sure that blender blade rotor runs smoothly by rotating it clockwise. Do this carefully, as you may cut yourself. The blade rotor should rotate freely.
- If the blender jug is damaged, leaks, or shows cracks, chipping or scratches, do not use the high-speed vacuum blender. Otherwise the blender jug will burst during blending.
- The motor of the high-speed vacuum blender is maintenance-free. Never use abrasive or corrosive cleaning agents, scrubbing utensils or steel wool (pot scourers) to clean the high-speed vacuum blender; otherwise the high-speed vacuum blender will be damaged.
- You can use the CLEAN program to help remove persistent dirt from the blender jug and the blade rotor with water. The program generates a very strong water vortex in the blender jug to facilitate cleaning. Cleaning with the CLEAN program:
Assemble the blender jug and pour about 300 ml of lukewarm water inside.
Place the blender jug in the blender housing.
Plug in the high-speed vacuum blender to the mains and start the CLEAN program. Repeat CLEAN processing as required.
Unplug the high-speed vacuum blender from the mains, remove the blender jug, and pour the swill out.
TECHNICAL SPECIFICATIONS
See the product's nameplate for technical specifications.
Max. operating time: KB Max = 3 min.
Noise: L_WA = 85 dB
Power cord length: 1.0 m

CAUTION! MPM agd S.A. may change the technical features of the product without notice.
PROPER DISPOSAL OF THE PRODUCT (waste electrical and electronic equipment)

This symbol on the product indicates that the product, after its lifetime, should not be disposed with other household wastes. To avoid harmful influence on the environment and human health due to uncontrolled waste disposal, dispose the waste device to the service point of waste household appliances or report collecting it from home. In order to obtain detailed information about the location and how to dispose the waste electrical and electronic equipment in a safe way, contact your retailer or local Department
of Environmental Protection. Do not dispose the device with other municipal waste.
natural_image
Diagram of a blender with a circular component being turned, showing internal structure and rotation arrow (no text or symbols)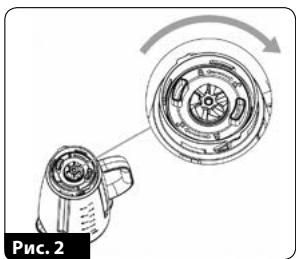
natural_image
Diagram of a hand holding a device with a circular component, showing rotational motion (no text or symbols)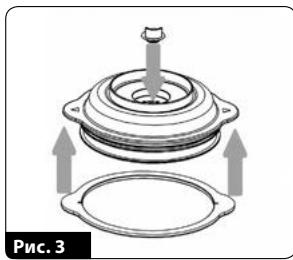
natural_image
Mechanical assembly diagram showing a lid and base with arrows indicating motion (no text or symbols)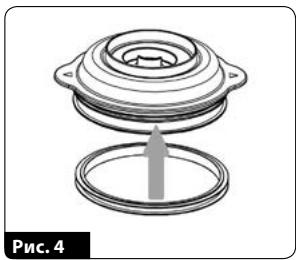
natural_image
Mechanical component diagram showing a piston and housing assembly (no text or symbols)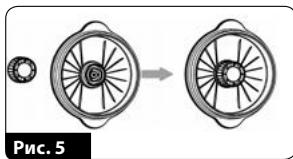
natural_image
Diagram showing a wheel assembly process with two stages of transformation (no text or symbols)
natural_image
Line drawing of three different thermos (no text or symbols)natural_image
Line drawing of a handheld electronic device with a U-shaped body and control panel (no text or symbols)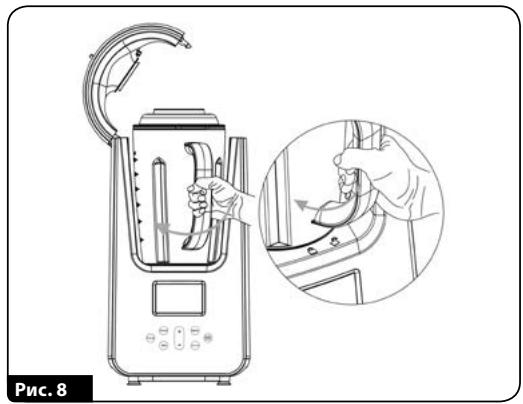
natural_image
Illustration of a kitchen blender with a hand operating the blade, showing a close-up of the handle (no text or symbols present)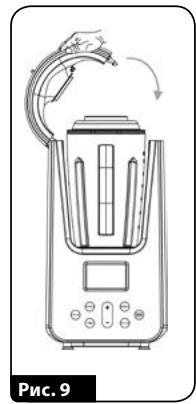
natural_image
Line drawing of a blender with control panel and handle, showing motion arrows (no text or symbols)natural_image
Illustration of a kitchen blender with a hand operating the lid and a close-up inset showing hands cleaning the interior (no text or symbols)natural_image
Technical illustration of a mechanical device with a magnified inset showing internal components (no text or symbols)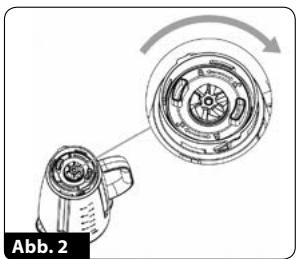
natural_image
Diagram of a kitchen appliance with a magnified view showing internal components (no text or symbols)natural_image
Mechanical assembly diagram showing a clamping device with arrows indicating motion (no text or symbols)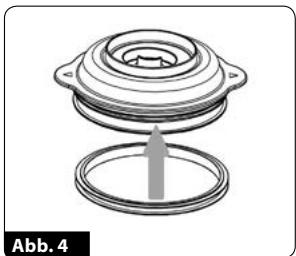
natural_image
Mechanical component diagram showing a housing with a central bore and an arrow indicating direction (no text or symbols)natural_image
Diagram showing a wheel assembly process with two circular components and a directional arrow (no text or symbols)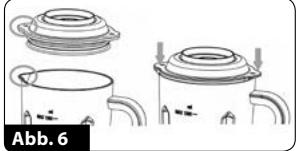
natural_image
Illustration of three different thermos (mugs) with handles and lids, no text or symbols presentnatural_image
Line drawing of a medical or laboratory device with a hand holding a tool, no text or symbols present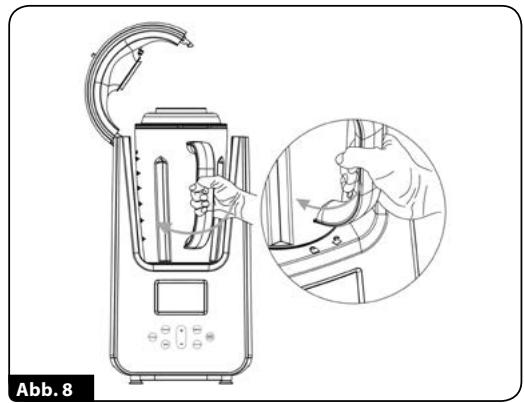
natural_image
Line drawing of a kitchen blender with a hand holding a tool, showing a close-up of the handle (no text or symbols present)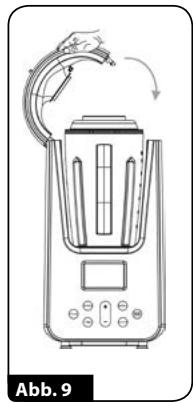
natural_image
Line drawing of a blender with control panel and digital display (no text or symbols)natural_image
Line drawing of a blender with a hand operating the blade, shown in two views: one close-up and one magnified (no text or symbols)We wish you satisfaction from using the product and invite you to check a wide range of other MPM appliances
- BLENDER PRÓŻNIOWY, WYSOKOOBROTOWY MBL-26
- BEFORE FIRST USE
- INSTALLING THE PORTABLE PITCHER
- BLENDER PROGRAMS AND FEATURES
- OTHER HIGH-SPEED VACUUM BLENDER FEATURES:
- CAUTION! Fill the blender jug up to the 1,500 ml mark only.
- CAUTION! Do not start the high-speed vacuum blender if the blender jug is empty.
- CAUTION! Wait for the blade rotor to stop before pouring out the jug contents!
- CAUTION! Fill the portable pitcher up to the 800 ml mark only.
- PRACTICAL HINTS & TIPS
- CLEANING AND MAINTENANCE
- TECHNICAL SPECIFICATIONS
- PROPER DISPOSAL OF THE PRODUCT (waste electrical and electronic equipment)
Brand : MPM
Model : MBL-26
Category : Blender