
STONE - Range hood ELICA - Free user manual and instructions
Find the device manual for free STONE ELICA in PDF.

User questions about STONE ELICA
0 question about this device. Answer the ones you know or ask your own.
Ask a new question about this device
Download the instructions for your Range hood in PDF format for free! Find your manual STONE - ELICA and take your electronic device back in hand. On this page are published all the documents necessary for the use of your device. STONE by ELICA.
USER MANUAL STONE ELICA
EN - Instruction on mounting and use
Consult the designs in the front pages referenced in the text by alphabet letters.
Closely follow the instructions set out in this manual. All responsibility, for any eventual inconveniences, damages or fires caused by not complying with the instructions in this manual, is declined.
Note: the elements marked with the symbol (*) are optional accessories supplied only with some models or elements to purchase, not supplied.

Caution
WARNING! Do not connect the appliance to the mains until the installation is fully complete.
Before any cleaning or maintenance operation, disconnect the hood from the mains by removing the plug or disconnecting the home mains switch.
Always wear work gloves for all installation and maintenance operations.
The appliance is not intended for use by children or persons with impaired physical, sensorial or mental faculties, or if lacking in experience or know-how, unless they are under supervision or have been trained in the use of the appliance by a person responsible for their safety.
Children should be monitored to ensure that they do not play with the appliance.
Never use the hood without effectively mounted grating!
The hood must NEVER be used as a support surface unless specifically indicated.
The premises must be sufficiently ventilated, when the kitchen hood is used together with other gas combustion devices or other fuels.
The suctioned air must not be conveyed into a conduit used for the disposal of the fumes generated by appliances that combust gases or other fuels.
The flaming of foods beneath the hood itself is severely prohibited.
The use of exposed flames is detrimental to the filters and may cause a fire risk, and must therefore be avoided in all circumstances.
Any frying must be done with care in order to make sure that the oil does not overheat and burst into flames.
As regards the technical and safety measures to be adopted for fume discharging it is important to closely follow the relations provided by the competent authorities.
The hood must be regularly cleaned on both the inside and outside (AT LEAST ONCE A MONTH, it is in any event necessary to proceed in accordance with the maintenance instructions provided in this manual)..
Failure to follow the instructions as concerns hood and filter cleaning will lead to the risk of fires.
Do not use or leave the hood without the lamp correctly mounted because of the possible risk of electric shocks.
We decline any responsibility for any problems, damage or fires caused to the appliance as the result of the non-observation of the instructions included in this manual.
This appliance is marked according to the European directive
2002/96/EC on Waste Electrical and Electronic Equipment (WEEE). By ensuring this product is disposed of correctly, you will help prevent potential negative consequences for the environment and human health, which could otherwise be caused by inappropriate waste handling of this product.

The symbol on the product, or on the documents accompanying the product, indicates that this appliance may not be treated as household waste. Instead it should be taken to the appropriate collection point for the recycling of electrical and electronic equipment. Disposal must be carried out in accordance with local environmental regulations for waste disposal.
For more detailed information about treatment, recovery and recycling of this product, please contact your local authority.
Use
The hood is designed to be used either for exhausting or filter version.
Ducting version
The hood is equipped with a top air outlet B for discharge of fumes to the outside (exhaust pipe and pipe fixing clamps not provided). Fig. 6
Attention! If the hood is supplied with carbon filter, then it must be removed.
Filter version
Should it not be possible to discharge cooking fumes and vapour to the outside, the hood can be used in the filter version, fitting an activated carbon filter and the deflector F on the support (bracket) G, fumes and vapours are recycled through the top grille H by means of an exhaust pipe connected to the top air outlet B and the connection ring mounted on the deflector F (exhaust pipe and pipe fixing clamps not provided). Fig. 6
Attention! If the hood is not supplied with carbon filter, then it must be ordered and mounted.
The models with no suction motor only operate in ducting mode, and must be connected to an external suction device (not supplied).
The connecting instructions are supplied with the peripheral suction unit.
Installation
The minimum distance between the supporting surface for the cooking vessels on the hob and the lowest part of the range hood must be not less than 50cm from electric cookers and 65cm from gas or mixed cookers.
If the instructions for installation for the gas hob specify a greater distance, this must be adhered to.

Electrical connection
The mains power supply must correspond to the rating indicated on the plate situated inside the hood. If provided with a plug connect the hood to a socket in compliance with current regulations and positioned in an accessible area. If it not fitted with a plug (direct mains connection) or if the plug is not located in an accessible area apply a double pole switch in accordance with standards which assures the complete disconnection of the mains under conditions relating to overcurrent category III, in accordance with installation instructions.
Warning! Before re-connecting the hood circuit to the mains supply and checking the efficient function, always check that the mains cable is correctly assembled.
Mounting
Before beginning installation:
- Check that the product purchased is of a suitable size for the chosen installation area.
- To facilitate installation, remove the fat filters and the other parts allowed and described here, dismantle and mount it.
To remove see also the relative paragraphs.
- Remove the active carbon (*) filter/s if supplied (see also relative paragraph). This/these is/are to be mounted only if you want to use the hood in the filtering version.
- Check (for transport reasons) that there is no other supplied material inside the hood (e.g. packets with screws (), guarantees (), etc.), eventually removing them and keeping them.
- If possible, disconnect and move freestanding or slide-in range from cabinet opening to provide easier access to rear wall/ceiling. Otherwise put a thick, protective covering over countertop, cooktop or range to protect from damage and debris. Select a flat surface for assembling the unit. Cover that surface with a protective covering and place all canopy hood parts and hardware in it.
- Disconnect the hood during electrical connection, by turning the home mains switch off.
- In addition check whether near the installation area of the hood (in the area accessible also with the hood mounted) an electric socket is available and it is possible to connect a fumes discharge device to the outside (only suction version).
- Carry out all the masonry work necessary (e.g. installation of an electric socket and/or a hole for the passage of the discharge tube).
Attention! The chimney is predisposed for installation of the filter Version.
In certain models where it is required to use the cooker hood in the suction version then it is possible to overturn the upper section of the chimney
and insert it inside the lower section of the chimney so that the air-exit perforations are not visible.
The chimneys in which this operation is possible are recognizable by their bracket fixing points G which are repeated also in the lower side of the upper section of the chimney.
Expansion wall plugs are provided to secure the hood to most types of walls/ceilings. However, a qualified technician must verify suitability of the materials in accordance with the type of wall/ceiling. The wall/ceiling must be strong enough to take the weight of the hood. Do not tile, grout or silicone this appliance to the wall. Surface mounting only.
Fig. 5
- Draw a line on the wall up to the ceiling with a pencil, corresponding to the centre line. It will make the operations easier.
- Apply the drilling template to the wall: the vertical centre line printed on the drilling template should correspond to the centre line drawn on the wall. In addition, the lower edge of the hole drilling template corresponds to the lower edge of the hood.
- Put the lower support bracket on the drilling template, making it coincide with the traced triangle, marking the two external holes and drill.
Note: Always make all the holes indicated on the template.
- Remove the drilling template, insert the wall dowels into all the holes made and fix the support bracket of the hood with two screws.
- Apply flues support bracket G^ to the wall joining the ceiling. Use the support bracket of the hood as a drilling template (if present, the small slot on the support must coincide with the line previously traced on the wall) and mark 2 holes with a pencil. Drill the holes and insert 2 dowels.
- Fix the flues support bracket to the wall with 2 screws.
- Hook the hood to the bracket.
- Adjust the distance of the hood from the wall.
- Adjust the horizontal setting of the hood.
- Fix the hood to the wall definitively (COMPULSORY!!).
- Extract the sliding supports and block them with 2 screws.
- Hook the front panel to the support, adjust the slope and fix it with 4 screws (2 per side).
- Unscrew the sliding supports fixing screws and adjust the depth of the panel.
Fix the panel in the wanted position with the 4 screws.
- Connect a tube (tube and fixing bands not supplied: to be purchased.) for discharging the fumes to the connection ring placed over the suction motor unit.
The other end of the tube must be connected to a fumes expulsion device toward the exterior of the house if using
the suction version. If you want to use the hood in the filtering version, fix flues support bracket G to deflector F and connect the other end of the tube to the connection ring placed on deflector F.
- Connect the electricity.
- Apply the flues and fix the lower part with 4 screws.
- Fix the upper flue to flues support bracket „G“ with 2 screws.
Remount the carbon filter frame and the fat/s filter/s and check the perfect functioning of the hood.
Additional instructions for the montage Front panel characteristics.
Fig. 6
The front structure is preset for installing panels of various materials.
The panels must have the following characteristics:
They must be made of self-tightening material, able to support a maximum working temperature of 80^ .
They must have dimensions similar to the dimensions of the metal support.
They must not weigh more than 10Kg
The panel manufacturer must create a fixing system suitable for the type of material and the weight of the panel, using the 4 passing holes present on the metal support.
We decline any responsibility for possible damage to things and/or people caused by improper use or failure to observe the above instructions.
Description of the hood
Fig. 1
- Control panel
- Grease filter
- Grease filter release handle
- Halogen lamp
- Vapour catcher
- Telescopic chimney
- Air outlet (used for filter version only)
- Light point.
- Front panel.
Operation
Use the high suction speed in cases of concentrated kitchen vapours. It is recommended that the cooker hood suction is switched on for 5 minutes prior to cooking and to leave in operation during cooking and for another 15 minutes approximately after terminating cooking.
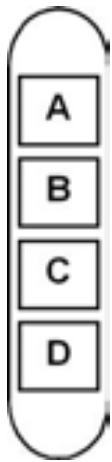
A. on/off light switch.
B. on/off aspiration switch and minimum power selection
B+C.medium power selection aspiration switch
B+D.maximum power selection aspiration switch
Maintenance
ATTENTION! Before performing any maintenance operation, isolate the hood from the electrical supply by switching off at the connector and removing the connector fuse.
Or if the appliance has been connected through a plug and socket, then the plug must be removed from the socket.
Cleaning
The cooker hood should be cleaned regularly (at least with the same frequency with which you carry out maintenance of the fat filters) internally and externally. Clean using the cloth dampened with neutral liquid detergent. Do not use abrasive products. DO NOT USE ALCOHOL!
WARNING: Failure to carry out the basic cleaning recommendations of the cooker hood and replacement of the filters may cause fire risks.
Therefore, we recommend oserving these instructions.
The manufacturer declines all responsibility for any damage to the motor or any fire damage linked to inappropriate maintenance or failure to observe the above safety recommendations.
Grease filter
Fig. 2
This must be cleaned once a month (or when the filter saturation indication system - if envisaged on the model in possession - indicates this necessity) using non aggressive detergents, either by hand or in the dishwasher, which must be set to a low temperature and a short cycle.
When washed in a dishwasher, the grease filter may discolour slightly, but this does not affect its filtering capacity.
To remove the grease filter, pull the spring release handle.
Charcoal filter (filter version only)
Fig. 3
It absorbs unpleasant odours caused by cooking.
The charcoal filter can be washed once every two months (or when the filter saturation indication system - if envisaged on the model in possession - indicates this necessity) using hot water and a suitable detergent, or in a dishwasher at 65^ (if the dishwasher is used, select the full cycle function and leave dishes out).
Eliminate excess water without damaging the filter, then remove the mattress located inside the plastic frame and put it in the oven for 10 minutes at 100^ to dry completely. Replace the mattress every 3 years and when the cloth is damaged.
Remove the filter holder frame by turning the knobs (g) 90^ that affix the chimney to the cooker hood.
Insert the pad (i) of activated carbon into the frame (h) and fit the whole back into its housing (j).
Replacing lamps
Disconnect the hood from the electricity.
Warning! Prior to touching the light bulbs ensure they are cooled down.
Fig. 4
- Using a flat head screwdriver or equivalent tool, carefully pry loose the light cover.
- Remove the damaged light and replace with a new 12 Volt, 20 Watt (Maximum) halogen light made for a G-4 base SUITABLE FOR USE IN OPEN LUMINAires. Follow package directions and do not touch new light with bare hands.
- Reinstall the light cover. (it will snap shut).
If the lights do not work, make sure that the lamps are fitted properly into their housings before you call for technical assistance.
He octabte detei be3 npncmTopa, yto6bI OHn He irpaJIc npi6opom.
He nCnoJIb3yIte BbITaKky, ecIn peWetka HnPaBnIbHo CMOHTnpoBaHa!
Kateropnueckn 3anpeuetaTcNcnoIb3ObaTb BbITaJKy B KaueCTBe ONOpHoiPiocKoCTn,ecn3To CneuaJIbHO He OROBOpEO.
Oe6ceyte HaIeKaun Bo3DyXoo6MeH NomeuHnA, KOrDa Bblncolb3yTe BbITaKky B KxHHe OJHOBpeMeHHo C dpYrMm np6obapmCra30BbIM CkRtaHnEM nNc PntaHnEM dpYrMm ropUqHMn.
BbITrIbAeMbI Bo3DyH He DoJxHe BbI6PcBaTbCn HApkyUpe3 Bo3DyXOBOD,NCIONb3yEmBIM DnBbIbPoCa DmOBOTnpi6OpOB Cra3ObBIM CxNtAHnEM mN C nHTaHnEM dpYrMnTopoymn.
Kateropnueckn 3anpeaetcra roTOBn6bnoa "noi nnamemem", nOCKoJIky CBO6OdHoe nIaMn MOKeT NOBpeINt bФnIbTpbl n CTaT npuHInOH noXapa; n03tOMy, BO3depKJBauitecb OT 3TOR B NIO6om cnyae.
KapeHBe B obuNbHom Macne DoJIXHO pOn3BODnTbCn NOI NOCTOHHbIM KOHTPOJEM, IMeB BVNy, YTO nepePepTeo MACNo MOXET BOCNJAMeHrTBcR.
YTO kacaetc TExHuecknX Mep N yCIOBNI NO TexHKe 6e3oNaChOCTN npn OTBOe DbIMOB, TO npnEepKbAaTEcb cTporo npabIN, npdeyCMOTpeHHbIX pereMaHToM MeCThBIX KOMNETHTbIX BnacteI.
Ipon3BOIDITE NepnoDnueckyO ONUCTKY BbTJKkN KAK BHyTPN, TAK IN Chapykn (IO KPAHNE MEPE PA3 B MECRL, BO BCaKOM Cnyae C coBnHOeHem yCLOBNI, KOtOpBle
CneuHaJIbHo IpeDyCMOTpeHbI B INHCTpyKuaX NO 06cIyKmbAHIO daHHoro pyKOboCTBa).
HecobnOeHne HNCTpyKuI no OuchTe BbITaXKn n no 3aMeHe n OuchTke fInlbTpOB MoKET cTaB npUHHoN NOxapa.
He nCIOJb3OBAt bIIM OCTaBnTb BbITrKg 63 npAboHbHO yCTAHOBJIeHHbIX JAMNOCeK B CBJ3N C BO3MOXHbIM pNCKOM yDapa 3NeKTpUneCKM TOKOM.
Mblchimaem C c6eBcKky OTOBTBCTBEHOCt 3a HeNoIaIKn, yUeep nIiCropaHne pnpbopa BCNECTBne HecobJIOJeHnIHCTpyKlui, pnpBeDEHHbIX B DAHNOM pyKOBOcTBe.
Данhoe Издени有很大Mapкробаги В COOTBETCTBIN CБрпсьско ДИРЕКТВОВ 2002/96/EC NO yTNПИЗАЦИЗЛЕКТРИССКОУ
3IeKpHnHOro 6ObOpyDobAnia (WEEE).
Oe6cnueB npaBnBHy yTnIIN3aIIO daHnHO n3dEIny, Bbl NOMOXETe PneD0TBpATNtB NOTEHuaIbHble HeraTnHBie NocLJeCTBn DnA OKpyKaIOUeI cpeBn 3doPobBry eJIOBeKa, KOTOpIe MOrIN 6bl IMETb MECTo B pnoTnBHOM Cnyae.

CnmboI Ha camom n3dennn nInn cnpobodntelbHOJ DOKyMeHTaun yka3bIAeT, YTO npn yTNIN3aUN daHNOrO n3dennr C HMM HeNs3B O6paATbC KAK C obHybIMn 6bITOBbIMn OTxODAMn Bmcto 3tORo, eero cneDyET cDaBaTb COOTBeCTByUOuN pyHKT pnEEMKn 3NeKtpueckoro n 3NEKTPOHNO 6OpDyOBaHHn dnn NocJeYUOeJ yTNIN3aUN.
CdaHa HcNOM DoJXHa Ipon3BODnTbCBA COOTBETCTBN C MEcTHbIMN PpaBnIaMn No yTIN3aUm OTxOIOB.
3a 6oJIe neIpoIb6HOn HnΦopMaJneO npabInax oBpaJIeHn C TaKIMN I3dJIINMn, INx yTNIIN3aUNn INpepeBaOTKn ObaIaJAEteCB B MeCTHbE OprAHbI BnactN, B Cnyk6y no yTNIIN3aUNn OTXODOB INN B MaraINH, B KOTOpOM Bbl npINO6peJIaDahHOe IN3dJIe.
Пользоваиме
BbIyKa cKoHcTpynOpBaHa nla pa6Otbl B pekIme OTOda Bo3Dxa Hapky nIN peuRkUyAun Bo3Dxa.
IcnoHHeHne COTBOOM BO3Dyxa
BbIyKa Cha6KeHa BepxHMM BbIOHbIM OTBepCTnEM B DnIe Bbl6pOcA DlMOB HapKy (UcNOJIHeHne C OTBOOM BO3dyxa HapKy-BbIOHNA Tpy6a N XOMYtBI KpeIIeHnHE BXoJrT B KOMTIeKT).Puc.6
BHHMaHHe! Ecnn BbITJXka Cha6KeHa yroJIbHbIM ΦIJIbTpOM, to y6epUte erO.
IcnoHHeHcOTBOOM Bo3yxa
EcnI OTBOD IbIMOB I napOB HApyK HeB03MOKeH Bbl MoKeTe NOB3OBAbTcBc BByTtKKnB PeKHMc CpeuPKyJnAeHepn IpN NOMU yRbNbHbX cInbTpoB uYCTAHOBKn dEeNeKToppFa H KaPONHTH G. TaKIM Obpazom OChuEHHbOT bIMOBIX napOB Bo3Dy Bo3BpaaTaC T BOMeJeHme Cheep3 BepxHIOpeWetky H nBbIOHOy Tpy6, pOnCoeHNHeMy K BexPHemy BbIOHDomy OTBePCTHb B, npN NOMOu CoeHNHTeBnHO
KoIbIca, CMOHTnIOBaBauHoro Ha JeΦJIeKTope F (BbIbOHaNa Tpy6a n XOMyTbI KpENIIeHnA He BXOaT B KOMPiEKT NoCTaBKn).
Pnc.6
BHHMaHHe!Ecnn BbITJxKa He Cha6XeHa yroJIbHbIM
fNtIbTpOM,To 3akaxnTe uYctahOBnE ero nepei
NCNoJIb3OBAHnEM.
MoJeIN BbITJKeK 6e3 MOTOPHO 6JIoka MOrY pa6OtaTb B ODHOM peKIMe OTBDA BO3dYxa HApKy, N03TOMy OHI DOnKHbI 6bITb NOCDoeINHeHb K BHeUHei BbITJHKHO yCTAHOBke (HE BXODIT B NOCTABKY).
Hnctpykunno COeHNHeHnM NOCTaBnIOTc nepnepnHbIM BblrKbIM y3lOM.
YctaHOBka
PacctoHne HxKHe IpaHb BByTgXKn HaD OnOPHO nIOCKOCTbIO NOcOyDbHa XyKOHHo PIIITe DOJNXHO 6bITb He Mehee 50cm -IJI3NeKTPuYeCKHXPiINT, H He Mehee 65cm dIra3OBbIX INI KOM6HINHPoBAHHbIX PIINT.
EcnB INHCTpyKUxN no yctaHOBe raoBOI pInTbI orObopeHo 6oJIbuee paCtOraHne,To yHTnte 3TO.

3Jektpnueckoe coeHneHne
HaprjekHe cTeI DOJIJXHO COOTBEcTcBOBaTb HAprrKeHNIO, Yka3aHHOMy Ha TabnUe TExnUeCKIN DaHHbIX, KOtOpAra pa3MeUeHa BHTpy npB6opA. Ecn N BYTjKca Ch6KeHa BInKO, NOkJIIOuHTe ee K IETCeNbHOMy pa3bEmy, OTBeauOuEmy DeIcTBvUoMn PpaBnAM, KOtOpB IOnJKeH 6bITb paCNoLOxEN B IeKo DocTyHOM MeTe. Ecn JKe BYtJKA He Ch6KeHa BInKO (Ibn Iprmoro NoKnUoyehnK CcTeN), INI N STeNCEbHb pa3bEme He paCNOLOxEN B DoCTynHom MecTe, TO NcNoLb3yIte NaDNeKaun DBxNOLIOCHb BYIKIOUaTeNb, OecneYBaIoUnn NOnHOe pa3MbKaHane CETn pRn BO3NHKnHOBeHn YcNOBn NpeHaprjekHnE 3-e KaterOpn, B COOTBEcTbN nHCTpyKlqMaMn No YCTaHOBKe.
BHIMAHHE: npexJe Yem NOKJIIOUHTb K CETn NITaHn 3IeKTpUneCKyUO CNTeMy BbITJAKKN I NPOBepTb NCnPabHOe fHyHKUHOHOpOBaHHe ee yBeIDNTeCB B TOM, YTO Ka6eJIb NITAHN pPABINbHO CMOHTIpOBaH.