PRO 950 - Range hood NOVY - Free user manual and instructions
Find the device manual for free PRO 950 NOVY in PDF.


User questions about PRO 950 NOVY
0 question about this device. Answer the ones you know or ask your own.
Ask a new question about this device
Download the instructions for your Range hood in PDF format for free! Find your manual PRO 950 - NOVY and take your electronic device back in hand. On this page are published all the documents necessary for the use of your device. PRO 950 by NOVY.
USER MANUAL PRO 950 NOVY
706/736/739/906/936/939
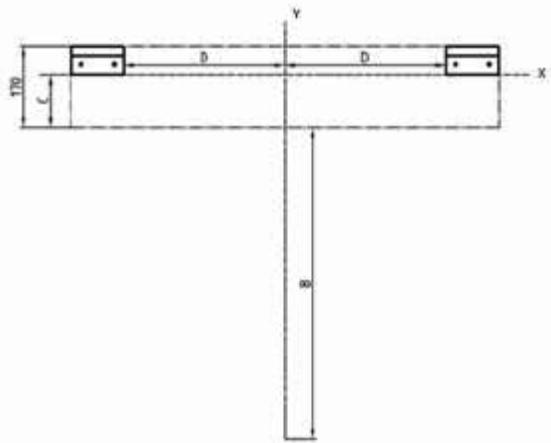
749/750/949/950
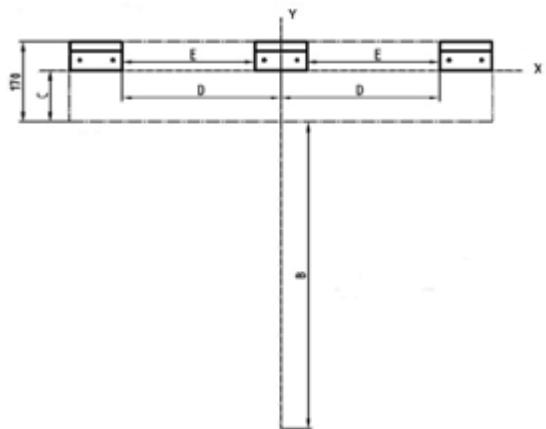
706/736/739/906/936/939
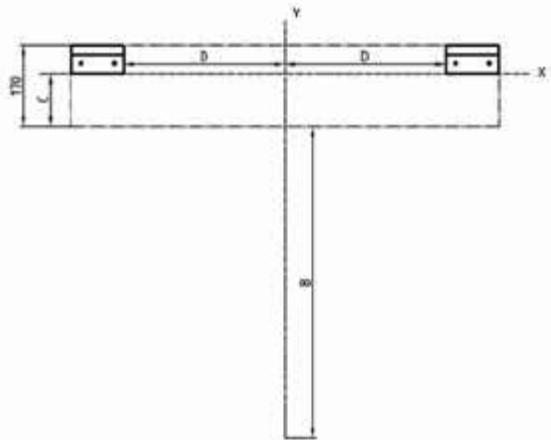
749/750/949/950
706/736/739/906/936/939
749/750/949/950
- Please read these operating instructions carefully. They contain information about installation, operation, safety and maintenance you need to be aware of.
- This hood is for domestic use only.
- Check the condition of the hood and the installation material before installing. Carefully remove the hood out of the packaging. Be careful not to use sharp knives to open the box.
- Please keep these instructions to pass on to future users.
- Disposal of transport packaging and old appliance. Your new appliance was sent to you in protective packaging. All utilised materials are environmentally safe and recyclable. Please help us by disposing of the packaging in an environmentally friendly manner.
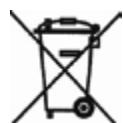
- Old appliances are not worthless rubbish. Valuable raw materials can be reclaimed by recycling old appliances. This appliance is identified according to the European Directive 2002/96/EC on waste electrical and electronic equipment. Please ask your dealer or inquire at your local authority about current means of disposal.
This manual makes use of a number of symbols. The meaning of these symbols are given below.
| Symbol | Meaning | Action |
| Indicatie | Explanation of an indication on the hood | |
| Warning | This symbol indicates an important tip or a dangerous situation. |
Follow this instruction to avoid injury and material damage.
2 SAFETY
2.1 Precautions before using
- Do not change or alter the appliance.
- The appliance must be grounded and connected conforming to local standards.
- Do not use any extension cable to connect it.
2.2 Using the appliance
- When using the hood, there must always be a sufficient, continuous supply of fresh air in the room. Fresh air can be supplied by opening a window or outside door slightly, or by installing an inlet grille. No matter how big the kitchen or the space with the open kitchen, the amount of air that can be extracted is limited to the amount of air that can be fed into it. An insufficient air supply can result in a 50% loss of efficiency or more.
An insufficient air supply can cause repercussions in other existing exhaust channels, such as the flue of a fireplace or other combustion appliances. This causes a risk of poisonous and combustible gases being drawn back into the living space. When using the same energy source, other than electricity, for the hood and devices, the negative pressure in the room must not exceed 4Pa ( = 0.04mbar ).
- Under no circumstances is it allowed to flâbé under the hood
- Deep frying under the hood is only allowed under constant supervision.
In case of fire always switch off the hood. - Never extinguish burning fat or oil with water. Cover the pot with a well fitting lid or a burnblanket.
- This appliance can be used by children aged from 8 years and above and persons with reduced physical, sensory or mental capabilities or lack of experience and knowledge if they have been given supervision or instruction concerning use of the appliance in a safe way and understand the hazards involved
- Activate the hood a few minutes prior to cooking.
- Switch the hood off 10 minutes after cooking is finished.
- Avoid drafts under the hood surface.
- When cooking make sure pots are positioned properly under the hood surface.
- When using induction: adapt the intensity of both hob and hood to the lowest possible level in order to avoid excessive creation of damp fumes.
- Attention, certain accessible parts of the hood can become hot while cooking.
2.3 Precautions not to damage the appliance
- Check the distance between the cooking surface and the hood.
- Never use the hood without the fat filters in order to prevent dirt and fat from further entering the hood, which will eventually affect the performance and functioning of the hood.
Always stay around when you are frying, roasting, grilling of deep-frying. Overheated oil and fat maycatch fire and damage the hood.
3 CONTROLS
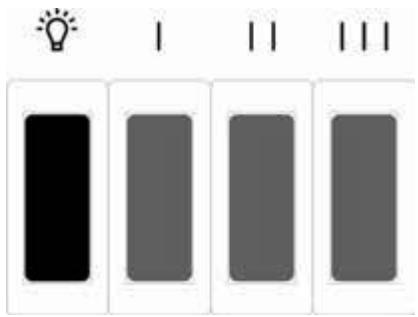

lighting
I position 1
II position 2
III position 3
Turning the fan on and off
Press button I to turn on the motor
Fan speed
Press button II or III to increase the speed.
Lighting
Press button to turn the lighting on or off
4 MAINTENANCE
Maintaining the grease filter
There are 1 or 2 metal grease filters in the extractor hood. Depending on use, cleaning the filters at least once a fortnight is recommended.
Accessing the grease filters
The grease filter can be removed by grasping the bottom panel on the left and right with both hands and pulling it downwards. The grease filter can now be removed by pulling the hook attached to the filter
Cleaning the grease filter
The filter can be cleaned as follows:
- In the dishwasher: after cleaning allow the filter to drain first. Note that when cleaning in the dishwasher the filter may discolour as a result of the salt content. This does not affect its operation.
- Manually: in a hot solution of water and a liquid detergent. Rince and allow to dry completely.

Important! The previous instructions need to be followed. If not an increased fire hazard may occur.
Maintenance of the extractor hood
Allow the lighting to cool before cleaning the extractor hood. The exterior of the extractor hood can be cleaned with a damp cloth and a gentle detergent. Do not use aggressive, abrasive or chlorinated products. Bleach will damage stainless steel.
The previous instructions need to be followed. If not an increased fire hazard may occur.
5 REPLACING THE LIGHTBULBS
Disconnect the power supply to the appliance before any work.
Push the glass along with the frame (rail) up and unscrew the screws completely. Keep hold of the glass as you remove the frame (rail). Slide the glass to the rear in order to remove it.
The lightbulbs are of type 15 Watts for the 60~cm hoods, and a TL lightbulb of 18 Watts for the 90 and 100~cm hoods.
6 INSTALLATION
6.1 Safety
Observe the following mounting and safety tips for mounting:
- The installation and electrical connection of the unit shall be carried out by an authorised expert. The manufacturer does not accept any responsibility for any damage resulting from faulty building in or connection.
- Carefully take the unit from the packaging and check it for damage before mounting. Do not mount the unit in case of any damage.
- Check if all mounting materials have been supplied using the drawings in section 2.2.
- The unit is intended for household use only (preparation of food) excluding any other domestic, commercial or industrial use.
- Position the electrical connection such that it is located in the cabinet in which the cooking unit is mounted
- Safety can only be guaranteed if the unit is connected to an earth wire in accordance with the required regulations.
- Do not use an extension cord for connecting to the electricity grid.
- Replace defective or damaged parts only with original Novy parts.
- Replace a damaged power cable with an original Novy power cable.
- For easier mounting of the wall-mounted chimney hood, it is recommended to do this with at least 2 persons.
- Make sure that the wall has sufficient load bearing capacity.
6.2 Assembly
Recommended installation height with an electric or ceramic hob (H - H)(mm) : 600 - 750
- Installation height with a gas or induction hob (H - H)(mm) : 650-750
With the 700 series the outlet can only be pointed upwards. Install the black plastic spigot(s) on the top.
With the 900 series the outlet can be pointed both upwards and rearwards.
Choice of discharge direction
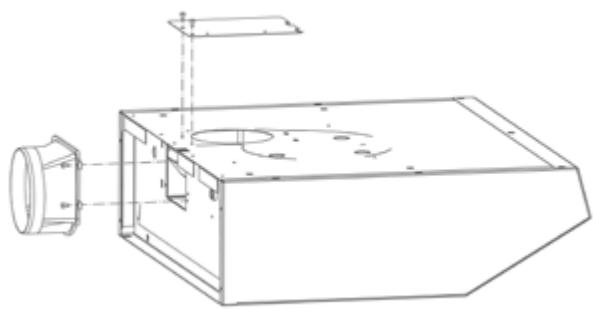
On models 906, 936, 939, 949, 950, the standard discharge direction is rearward. It is also possible to point the discharge direction upwards.
A. Outlet direction rearwards (see drawing below)
Install the plastic spigot on the back of the hood.
Install the flat cover plate on the top of the hood
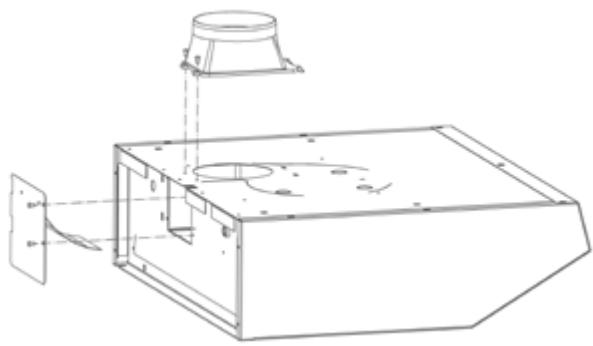
B. Outlet direction upwards (see drawing below)
Install the plastic spigot on the top of the hood.
- Install the cover plate with the air duct on the rear of the hood
Wall-mounted installation
The extractor hood can be attached directly to the wall by means of the metal installation brackets, dowels and screws supplied.
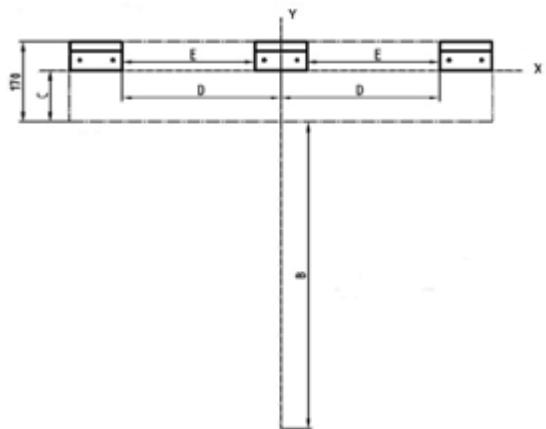
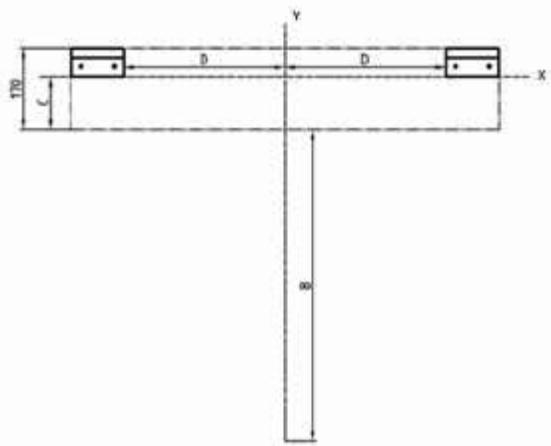
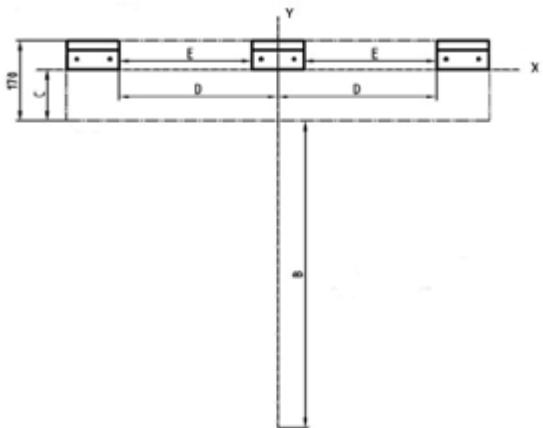
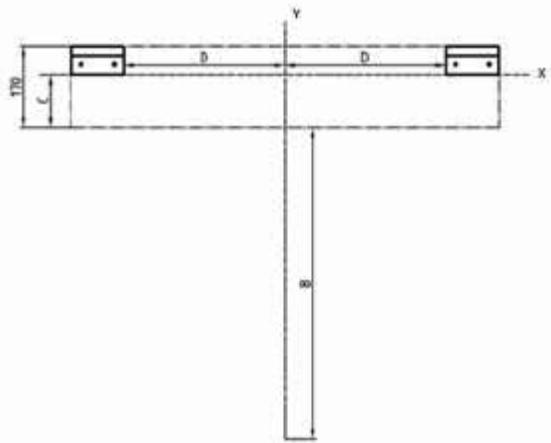
Draw a perpendicular line on the wall (Y) at the level of the vertical centre line of the extractor hood. Determine the height from the hob to the underside of the extractor hood at which the extractor hood is to be installed.
| A | B | C | D | E | E |
| Type | Distance between underside of the extractor hood to the hob | Add up the number of cm to the distance selected (horizontal line) | Distance in cm to the left and right of the perpendicular line up to the bracket | Distance in cm between the centre and left brackets | Distance in cm between the centre and right brackets |
| 706 / 736 | 65 cm tot 70 cm | 11 cm | 16 cm | x | x |
| 739 | 65 cm tot 70 cm | 11 cm | 32 cm | x | x |
| 749 | 65 cm tot 70 cm | 11 cm | 32 cm | 26,5 cm | 26,5 cm |
| 750 | 65 cm tot 70 cm | 11 cm | 37 cm | 29 cm | 34 cm |
| 906 / 936 | 65 cm tot 70 cm | 11 cm | 16 cm | x | x |
| 939 | 65 cm tot 70 cm | 11 cm | 32 cm | x | x |
| 949 | 65 cm tot 70 cm | 11 cm | 35 cm | 38 cm | 18 cm |
| 950 | 65 cm tot 70 cm | 11 cm | 37 cm | 38 cm | 25 cm |
By means of the adjusting screw on the side wall the extraction hood can be mounted flat.
706/736/739/906/936/939
749/750/949/950
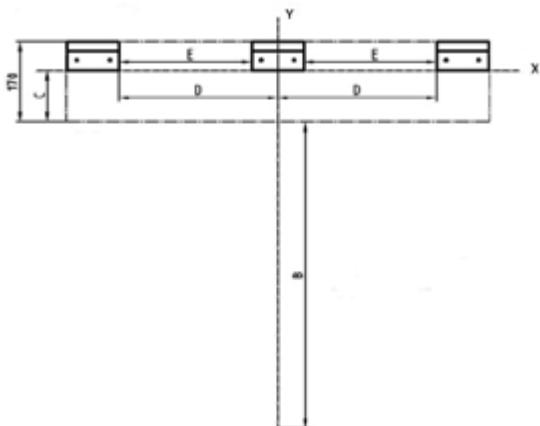
See the table for mounting the attachment brackets. Note the appropriate type number of the extractor hood!
Mark the holes for drilling and drill holes with an 8 mm masonry bit at the points in the wall indicated in the metal attachment brackets. Then insert the dowels and screw on the attachment brackets, ensuring they are horizontal.
The extractor hood can now be hung from the attachment brackets. Hook the edges on the back of the extractor hood into the edges present on the brackets. Ensure that the extractor hood does not tilt forwards. The extractor hood should preferably tilt to the rear. The extractor hood can be levelled using the adjustment screw on the side wall.
Installation under a kitchen cabinet
When installing under a kitchen cabinet, 4 holes have to be drilled (for types 736, 739, 906, 936, 939) and 5 holes (for types 749, 750, 949, 950) with drill bit of 8 mm. Measure off the attachment holes on the extractor hood and mark these on the cabinet
With the D 700 series, a hole must be cut in the underside of the cabinet for the motor housing. With the D 900 series, a hole must be cut in the underside of the cabinet for an outlet pointing upwards. The extractor hood is installed up against the underside of the cabinet. The hood is attached to the cabinet with 4 or 5 bolts.
7 CONNECTING THE ELECTRICITY
The extractor hood is fitted with a connection cable and an earthed plug. Insert the plug in an earthed wall socket. Ensure that the plug is readily accessible if the extractor hood needs to be disconnected from the power supply.
The connection cable must be replaced by a qualified professional. If the electric connection cable is damaged, it must be replaced by an original Novy connection cable.
Amperage and wattage are shown on the specification plate.
NOVY nv reserves the right to change the construction and prices of its products at all times and without notice.
NOVYnv
Noordlaan 6
B-8520 KUURNE
Tel. 056/36.51.00 - Fax 056/35.32.51
E-mail: novy@novy.be
http://www.novy.be
France: Tel: 0320.940662