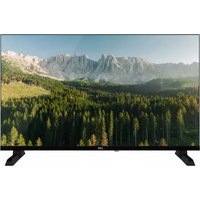
USER MANUAL 32HD843 LISTO
https://eprel.ec.europa.eu/
DESCRIPTION OF THE TV SET 33
FRONTSIDE 33
USING THE CONTROL BUTTON 34
REAR PANEL 34
REMOTE CONTROL 36
CONNECTIONS 40
- CONNECTION TO A TERRESTRIAL ANTENNA 40
- CONNECTION WITH AN HDMI CABLE 41
- CONNECTION WITH A COAXIAL CABLE 41
- CONNECTION WITH A COMPOSITE CABLE 42
- USB PORT USAGE 43
- CONNECTING HEADPHONES 43
- CONNECTING A CI MODULE 44
FIRST INSTALLATION 45
BASICUSE 46
- TURNING THE TV ON OR PUTTING IT IN SLEEP MODE 46
- SOURCE SELECTION 46
- VOLUME CONTROL 46
- PROGRAMME SELECTION 46
- DISPLAYING THE CHANNEL LIST 46
- DISPLAYING PROGRAMME INFORMATION 47
- SELECTING FAVOURITE PROGRAMMES 47
- DISPLAYING SUBTITLES 47
- ACCESSING QUICK MENUS 47
MENU NAVIGATION 47
- USING THE PICTURE MENU 48
- USING THE SOUND MENU 50
- USING THE SETTINGS MENU 51
- USING THE INSTALLATION MENU 52
- USING THE CHANNEL LIST MENU 53
READING USB DRIVES 55
PROGRAMMEGUIDE (EPG) 56
INSTALLING A WALL BRACKET 57
TROUBLESHOOTING 58
EU DECLARATION OF CONFORMITY 59
PACKAGE CONTENTS
- 1 x 32" TV set
- 1 remote control (2 x LR03 batteries included)
- 2 feet (screws supplied)
- 1 user manual
TV DESCRIPTION
FRONTSIDE
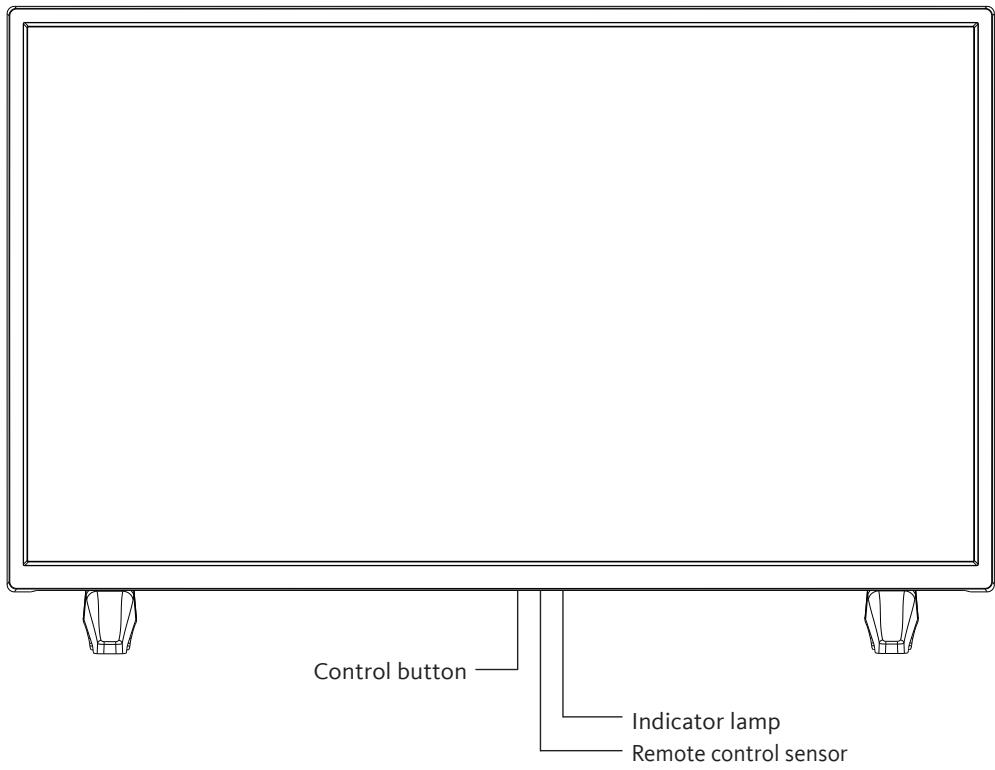
Indicator light: Red when the TV is in sleep mode, off when the TV is on.
Remote control sensor: Receives signals from the remote control. Do not put an obstacle in front of it.
The control button allows you to control your TV without using the remote control.
-
Briefly press the button to bring up the control menu: , , +, -, menu access, source selection, on/off.
-
Briefly press the control button again to navigate through these options from left to right. Then after selecting an option, press and hold the control button for three seconds to access that option.
-
Repeat the operation as many times as necessary (1 short press to navigate, 1 long press to enter the sub-menu of your choice).
BACK PANEL
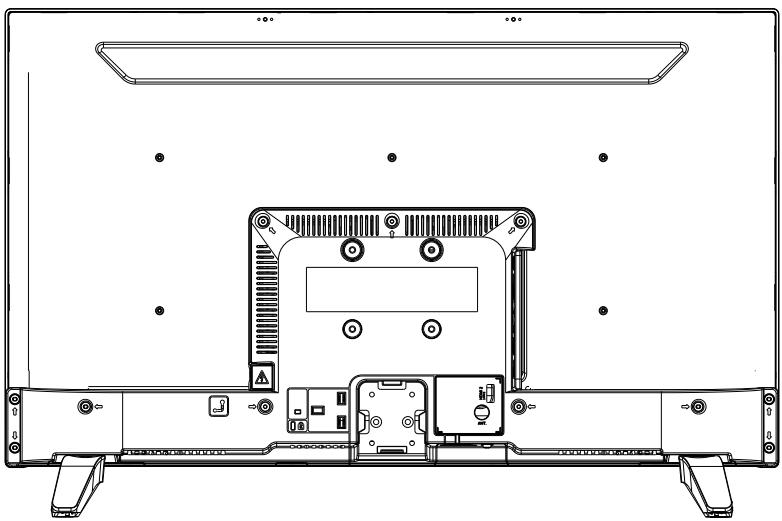
The equipment shown may vary from your TV.
| Connector | Type | Cables | Device |
| HDMI connection (rear & side) | | |
| AV SIDE | AV side connection (Audio/Video) (side) | Video/Audio Side connection Cable Audio/Video Cable | |
| SDPIF | SPDIF connection (Coaxial outlet) (side) | | |
| HEADSET | Headset connection (side) | |
| USB connection (side) | | |
| CI connection (side) | | CAM module |
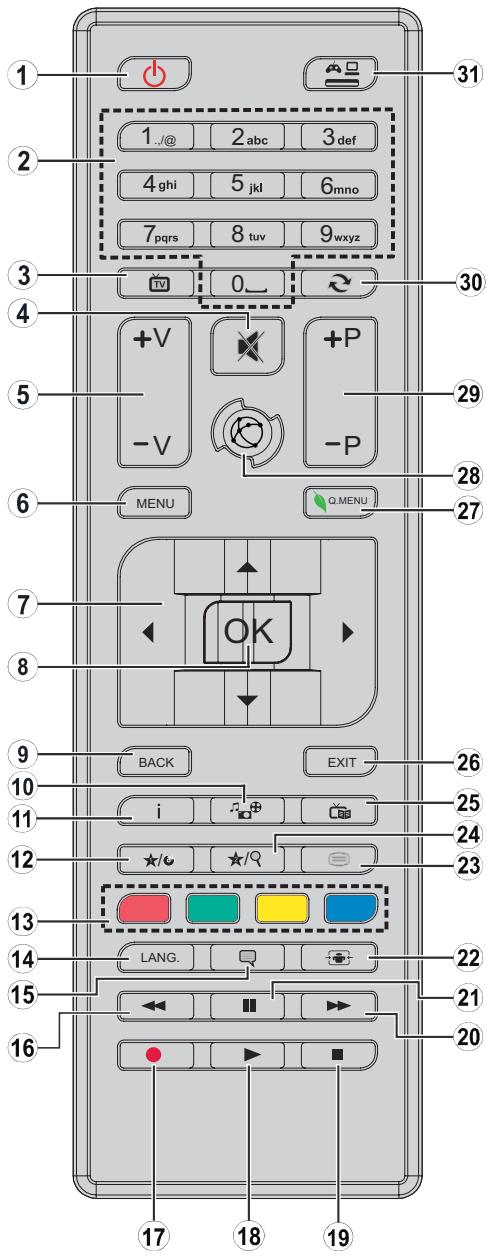
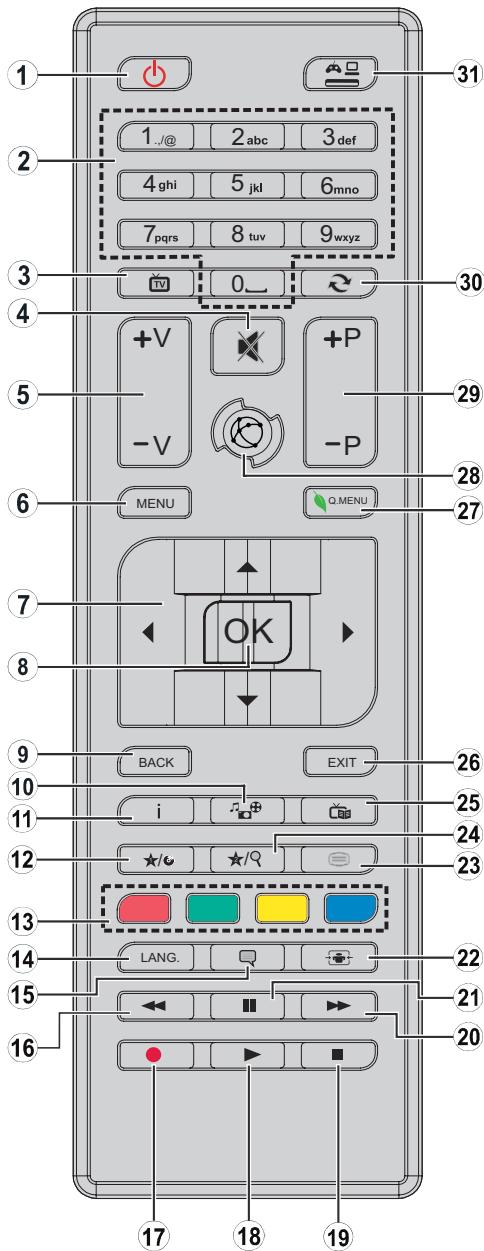
- Turning the TV on or putting it in sleep mode
- Navigating between channels, enter passwords, texts...
- Viewing the channel list / Switching between broadcast types
- Turning off the volume
- Increasing or decreasing the volume
- Displaying the TV menu
- Navigating the menus, content... and displaying sub-pages in TXT mode when you press the right button
- Confirming a selection / Holding the page (in TXT mode) / Displaying the channel list (in DTT mode)
- Returning to the previous screen / Opening the index page (in TXT mode)
- Displaying the media navigation screen
- Displaying on-screen content information / Displaying hidden information (in TXT mode)
- Programmable key 1 (*)
- Colour keys
- Switching between languages (analogue TV), display and change audio language/subtitles (if available) (digital TV)
- Enabling and disabling the subtitles (if available)
- Fast rewind
- Inactive key
- Starting the playback of the selected media
- Permanently suspend playback of the current media
- Fast rewind
- Suspending the playback of a media in progress
- Changing the aspect ratio
- Display teletext (if available). Press again to overlay teletext on a normally broadcast image (mixing).
- Programmable key 2 (*)
- Displays the Electronic Programme Guide (EPG)
- Closing and exiting the displayed menus or returning to the previous screen
- Displaying a list of menus for quick access
- No function
- Going to previous or next programme
- Returning to the previously viewed channel
- Viewing all available sources
Programmable keys 1/2 (*): After selecting a channel or source, press the programmable key 1 or programmable key 2 for five seconds until MY BUTTON IS SET appears on the screen. This message tells you that the function is associated with the selected function.
Inserting the batteries in the remote control
Open the cover on the back of the remote control.
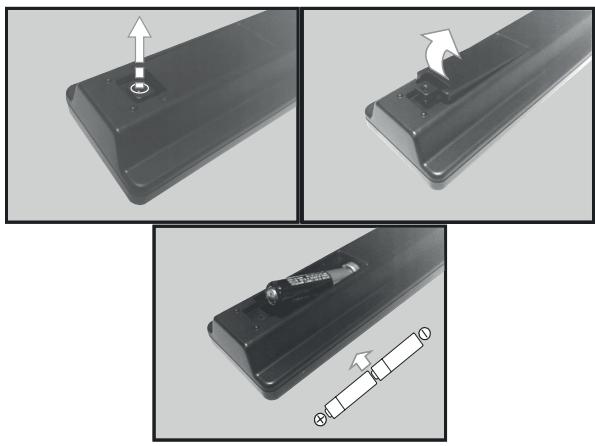
Put the batteries in the remote control, while observing the correct "+" and "-" polarities as shown.
Put the cover back on.
Orientation of the remote control
Aim the remote control at the infrared sensor on the front of the TV at a 60^ angle so that it can receive the transmitted information.
- The remote control has a range of 5 metres.
- Make sure that there are no obstacles between the remote control and the infrared sensor and that no sunlight or other light source is reflected on them.
- The remote control works with two AAA LR03 1.5 V batteries. We recommend using only alkaline batteries. Remove the batteries from the remote control if you are not going to use it for a long time (more than one month).
- Used batteries must be disposed of safely. Place them in specially designated collection bins to protect the environment.
ASSEMBLING THE STAND
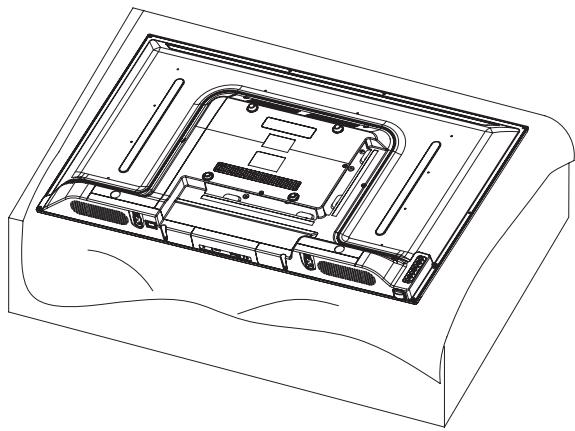
Cover a flat, stable surface with a soft cloth. Lay the appliance, face down, on the cloth.
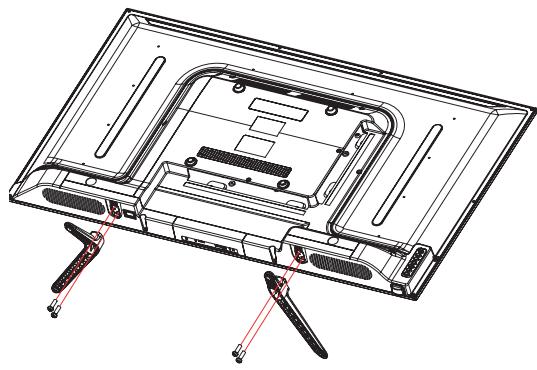
Take both feet out of the packaging and attach them to the lower part on either side of the appliance as shown in the diagram opposite.
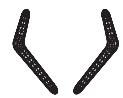
Feet made of plastic (x2)
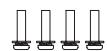
PM4x14 (x4) screws
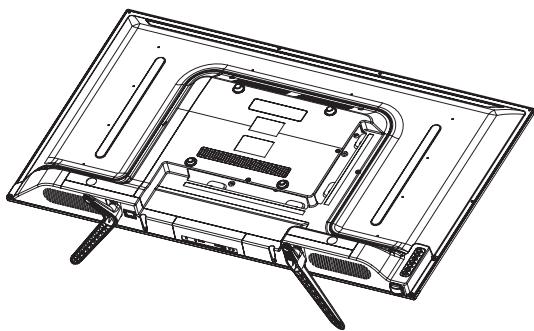
Use a screwdriver to tighten the two sets of screws under each foot. Do not overtighten, to avoid damaging the plastic parts.
CONNECTIONS
Before connecting external devices, make sure that the television and the various devices are not supplied with power.
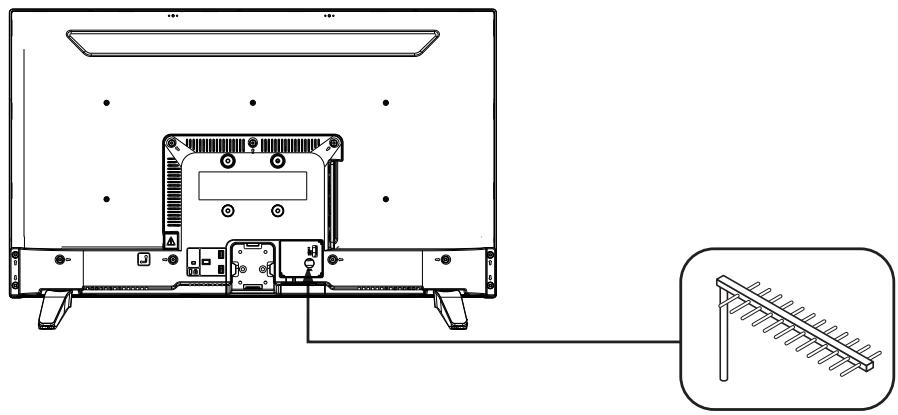
Connection to a terrestrial antenna
In order to obtain the best image quality for terrestrial television, an outdoor antenna is strongly recommended. Connect the antenna to the antenna input jack on the back of the TV. The image quality will vary depending on the quality of your reception.
Connection with an HDMI cable
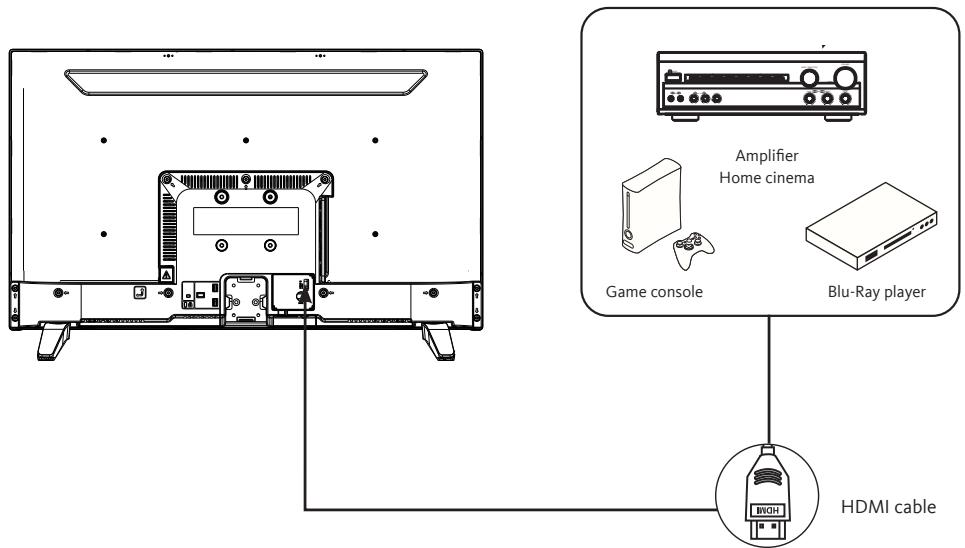
The HDMI connection carries digital signals only. If your device (DVD player, decoding box, etc.) is equipped with an HDMI jack, we recommend that you use this type of connection in order to obtain optimal video quality.
Select the HDMI1 or HDMI2 source by pressing the button on the remote control and confirming with the OK button.
If you are using an HDMI cable, the TV receives video and audio signals simultaneously. No cables are needed to provide the audio connection.
Connection with a coaxial cable
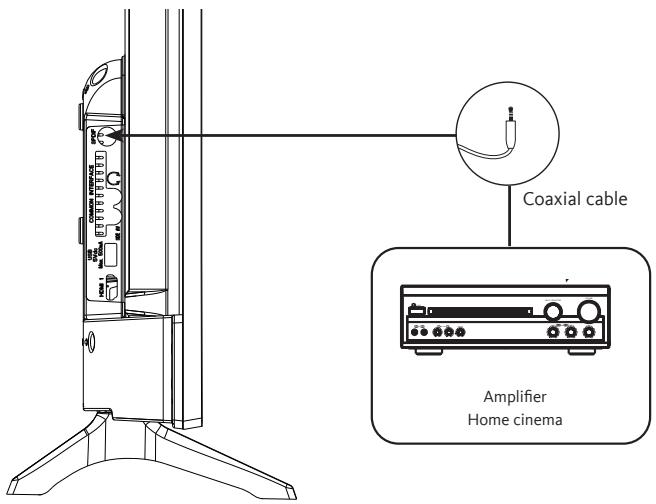
- Connect the coaxial output of the TV to the coaxial input terminal of the audio amplifier with a coaxial cable.
- Press POWER to turn on the TV, then turn on the external equipment.
- Set the audio amplifier to the coaxial input mode. Read the instructions for your audio amplifier.
Connection with a composite cable
You can connect a VCR, DVD player or decoding box to your TV.
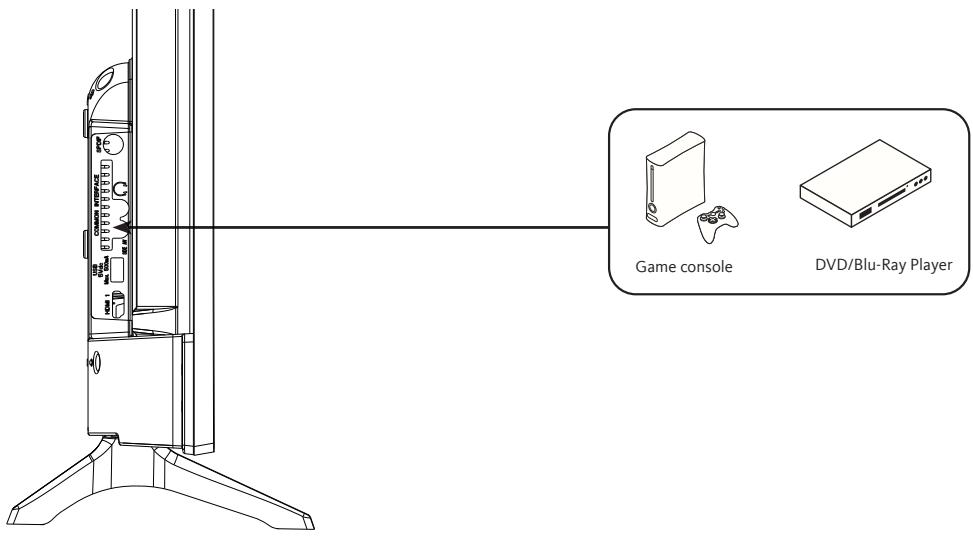
- Insert the supplied AV video cable into the SIDE AV jack on the back of your TV.
- Insert a jack/RCA adapter for composite into the SIDE AV jack on the back of your TV.
- Connect the red and white audio jacks of your device to the corresponding ports of the jack/RCA adapter.
- Select the AV source by pressing the button on the remote control.
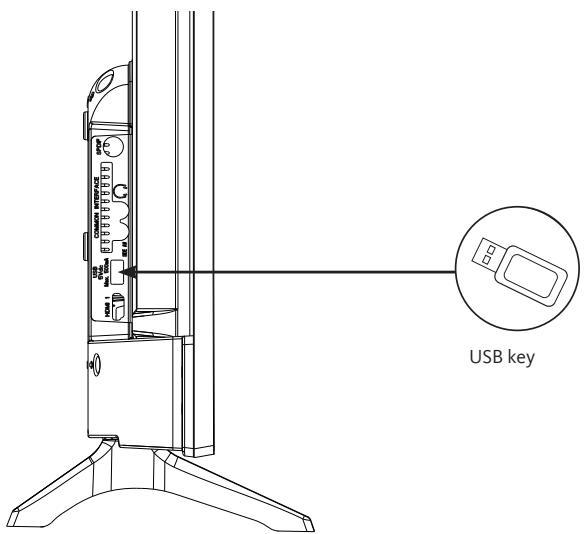
- The TV has a USB socket for playing videos, pictures or music.
- Select the Media source by pressing the button on the remote control and confirming with the OK button.
Connecting headphones
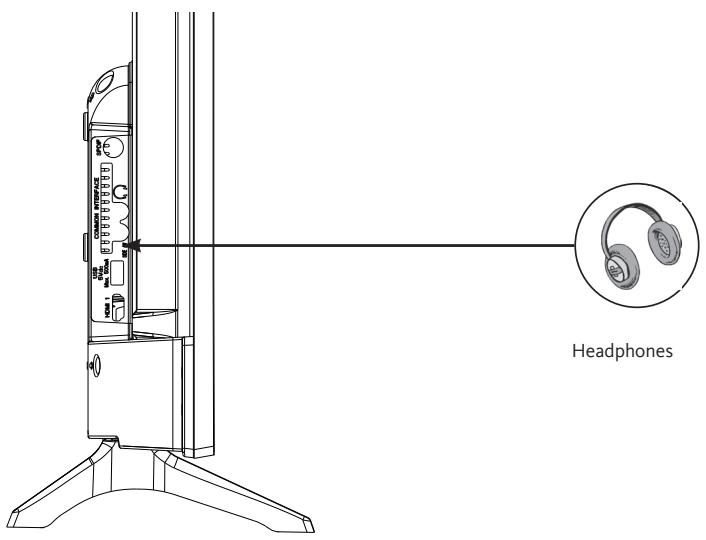
Connect the earphone jack to the port on the back of the TV.
The headphone volume is automatically adjusted according to the volume of the TV.
Connecting a CI module
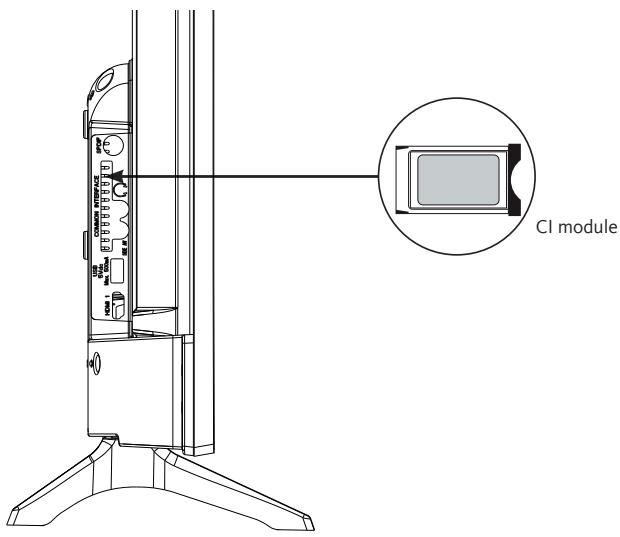
To use the PCMCIA port, turn off your TV and insert your module into the slot.
Then insert your smart card (type I and type II only) into the module.
Read the instruction manual of your module for more details.
FIRST INSTALLATION
Connect the power and antenna to your TV, then turn on the device. The first time you use your TV, the Initial Installation menu appears on the screen.
- Select the desired language with the and buttons and press the OK button.
-
Select your country of residence, then the type of search:
-
Numeric only: the television searches for digital channels.
- Digital and Analogue: the TV set searches for analogue and digital channels.
- Analogue only: the television searches for analogue channels.
Once you have finished your settings, press the OK button to start searching.
- You will then be asked to enter and confirm a PIN code (the selection 0000 is not accepted).
- You can now activate the Store Mode option or the Domestic Mode option. The Store Mode is for in-store use only. We recommend that you select the Home Mode for use in your home. You can access this option from the Settings menu > Other Settings > Store Mode to turn it on or off later.
- Press the OK button on the remote control to start the automatic channel scan, in cable mode or in antenna mode. Do not turn off the TV while initialising the first installation.
- After all the available channels and radio stations have been saved, the channel list will appear on the screen. Select the channel of your choice with the and buttons and press the OK button twice to display this channel in full screen.
BASICUSE
- Turning the TV on or putting it in sleep mode
This television is either on or in sleep mode. It cannot be completely shut down. If you do not plan to use your TV for a long time, unplug the mains plug from the power outlet.
Make sure that the mains plug is connected.
Press the (Power) button on the remote control or directly in the centre of the control button on the bottom of the TV. The power indicator turns off.
- To put the TV in sleep mode
Press the (Power) button on the remote control or briefly press the centre of the control button on the bottom of the TV to display the menu. The power indicator turns red.
Source selection
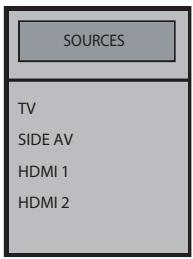
Once the external systems are connected to your television, you can switch between your different input sources: DTT, SIDE AV, HDMI1, HDMI2.
Press the button on the remote control.
Then use the or buttons on the remote control to highlight an entry and press the OK button on the remote control to confirm it.
- Setting the volume
Press the V+ or V- buttons on your remote control to adjust the volume according to preference. If you want to mute the sound, press the × (Mute) button on your remote. Press × again to cancel this function.
Programme selection
Press the P+ or P- keys of the remote control to change channels.
You can go straight to the TV channel you want by pressing the 1, 2, 3... buttons on the remote control. To select channel 12 for example, press the 1 key followed by the 2 key.
- Displaying the channel list
While watching a channel, press the OK button to display the list of stored channels.
When you watch a channel, additional information about the current programme can be consulted (including a programme presentation). Press twice on the key to access it.
When watching a DTT programme, press the button to view information such as programme list, and start and end times.
- Selecting favourite programmes
Press the FAV button to display the list of your favourite channels.
Press , , and to select the favourites list, then the channel, and press OK to view it. Then press EXIT to exit the selection menu.
- Displaying subtitles
Press the button to activate or deactivate subtitles in DVB-T mode. The subtitle display is disabled when OFF is selected.
Press the 0. MENU button to access the quick menus on your TV: Power save mode, Picture mode, Equaliser settings, Favourites or Sleep timer.
After installing the batteries in the remote control, you can set up your TV by navigating through the menus using the , , , , MENU, OK, BACK and EXIT buttons.
Press the MENU button to open the setup menu, then press the button to select the different setup options.
- Press the OK button to enter a menu.
- Press or to select an item.
- Press the OK button to select or adjust a setting.
- If you do not make a selection within a few seconds, the main menu closes automatically.
- Press the BACK button to return to the main menu, or the EXIT button to close the menu.
This menu is used to adjust the contrast, brightness, colour, sharpness, hue, colour temperature, aspect ratio, noise reduction, etc.
MODE
You can change the picture mode according to your preferences or requirements. The picture mode can be set to one of these options: Cinema, Sport, Dynamic and Natural.
CONTRAST
This option adjusts the white balance of the image. Increase the contrast to adjust the white areas of the image or decrease the contrast to adjust the black areas of the image.
BRIGHTNESS
This option is used to adjust the brightness of the image. If you increase the brightness, the dark parts of the image are brightened. If you decrease the brightness, you add more darkness to the pale areas of the image.
DEFINITION
This option is used to adjust the sharpness of the image. Increase the sharpness for sharper images or decrease the sharpness for less defined images.
COLOUR
This option adjusts the saturation of the image.
ENERGY SAVING
This function allows you to set the power save mode to Off, Minimum, Medium, Maximum and Auto. When you have selected Maximum mode, power saving is automatically disabled.
BACKLIGHTING
This setting controls the level of backlighting on your display.
ADVANCED SETTINGS
.DYNAMIC CONTRAST
This option is used to adjust the dynamic contrast ratio.
.NOISE REDUCTION
If the broadcast signal is weak and the image is noisy, use this option to reduce the noise level.
.COLOUR TEMPERATURE
This option sets the required colour temperature value. The Cold, Normal and Hot options are available.
- Cold: This mode is ideal for brightly lit rooms: the brightness, colour and sharpness settings are lower than in the other modes.
- Normal: This mode is generally used when the ambient light is constant.
- Hot: This mode is ideal for dark surroundings. The brightness is higher than in the other modes.
.ZOOM IMAGE
This setting adjusts the aspect ratio and size of the image. The following options are available:
Auto, 16:9, Subtitles, 14:9, 14:9 Zoom, 4:3, Cinema.
.FILM MODE
Films are recorded with a different number of frames per second than conventional television programmes. Enable this function when watching films for superior viewing of accelerated images.
.SKIN TONE
This option can be set to between -5 and 5.
.COLOUR CHANGE
This option is used to customise the levels of red and green.
RESET
This option resets the image settings to the default values.
PC POSITION
This option appears only when the VGA/PC input source is selected.
.AUTOPOSITION
This setting automatically optimises the screen display. Press OK to optimise the display.
.H POSITION
This option moves the image horizontally towards the right or left side of the screen.
.V POSITION
This option moves the image vertically towards the top or bottom of the screen.
PILOT FREQUENCY
The pilot frequency settings correct interference that appears as vertical lines in the image for presentations such as spreadsheets, paragraphs or text in smaller fonts.
.PHASE
Depending on the input source (computer, etc.), you may see a hazy or noisy image appear on the screen. You can use the phase to get a clearer image.
This menu is used to set the sound mode of the soundtrack.
VOLUME
This option adjusts the volume level.
EQUALISER
The equaliser settings can only be changed when the User mode is selected.
BALANCE
This option is used to adjust the balance between the left and right speakers.
HEADPHONE
This option adjusts the headphone volume. Before using headphones, make sure that the volume is set to a low level to prevent any damage to your hearing.
AVL (AUTOMATIC VOLUME LIMITATION)
This function maintains an equal volume level when changing channels to avoid big variations.
HEADPHONE/LINEOUT (LINE OUT)
If you want to connect an external amplifier to your TV using a headphone jack, select the Lineout option. If you have connected headphones to your TV, select the Earphone option.
Make sure before using headphones that this menu item is set to Earphone. If set to Lineout, the output from the headphone port will be set to a maximum level that could damage your hearing.
DYNAMIC BASS
This function enables or disables the Dynamic Bass function.
SURROUND SOUND
You can turn the Surround Sound mode on or off.
DIGITAL OUTPUT
This function allows you to set the type of digital audio output (PCM or Compressed).
- SETTINGS
This menu is used to adjust the various TV settings.
CONDITIONAL ACCESS
This function controls your conditional-access module when it is connected to your TV.
LANGUAGE
This sub-menu is used to select your preferred language (menu language, subtitle language, etc.)
PARENTAL
To prevent certain programmes from being watched, channels and menus can be locked with the Parental Control system.
To display the lock menu options, enter the PIN code. The default PIN code is 1234.
Locking Menu: The Menu lock option activates or deactivates access to the menu.
Child lock: When this option is selected, the TV can only be controlled using the remote control. In this case, the buttons on the control panel will not work.
Entering the PIN code: Defines a new PIN code. The default PIN code is 1234.
TIMERS
This function allows you to set the time after which the TV will go in sleep mode after a certain period of inactivity.
DATE/TIME
This function is used to set the date and time displayed on the screen.
SOURCES
This function enables and disables the selected sources.
OTHER SETTINGS
This option is used to change the dwell time of the menu screens.
.SOFTWARE UPDATE
Select this function to update your TV from a USB removable media.
.VERSION OF THE APP
This function is used to view the software version installed on your TV.
.TV AUTOMATIC SHUTDOWN
This function is used to program the TV to switch off automatically if no action is taken for a certain period of time. (1 to 8 hours). You can also turn off this feature.
-STORE MODE
When Store Mode is enabled (demonstration mode), some menu items are not available.
.POWER-ON MODE
This setting is used to configure the power-on mode preferences. The Last status and Sleep options are available.
.CEC
This feature allows you to control HDMI CEC compatible devices from the TV remote control via the HDMI connection.
This function allows the connected HDMI-CEC compatible device to turn on the TV and automatically switch to its input source. Press the Left or Right button to enable or disable this function.
.SPEAKERS
This option is used to listen to the sound of the TV on a connected compatible audio device. You can use the TV remote control to adjust the volume of the audio device.
.OSS
This option displays free software license information.
This menu allows you to perform a channel search or to restart a complete installation of your TV.
AUTOMATIC CHANNEL SCAN
This option displays the automatic tuning options: Digital Antenna (Search and record DTT channels), Digital Cable (Search and record DTT cable channels), Analogue (Search and record analogue stations), Digital and Analogue Antenna (Search and record analogue and DTT channels), Digital and Analogue Cable (Search and record analogue and DTT cable channels).
MANUAL CHANNEL SEARCH
This function is used to manually add a channel to the previously memorised list.
NETWORK SEARCH
This function is used to search for channels in the selected broadcasting system: Digital Antenna or Digital Cable.
ANALOGUE FINE-TUNING
You can use this setting to fine-tune analogue channels. This option is only available if analogue channels are stored.
INITIAL INSTALLATION
This option deletes all saved channels and settings and restarts the initial installation of the TV (default password 1234).
Your television sorts all the stored stations in the channel list. You can edit this channel list, configure the favourites or active stations to be included in the list using the Channel list menu.
EDITING THE CHANNEL LIST
Press the OK button to change the channel list.
.VIEW A CHANNEL
- Press or to select the channel you wish to view.
- Press the OK button once to select the channel and display it in the background, and a second time to view it in full screen.
.MOVING A CHANNEL
.EDITING THE NAME OF A CHANNEL
- Press or to select the channel whose name you wish to edit.
- Press the OK button, then select the edit name option.
- Enter the new channel name using the number buttons on the remote control.
- Press the OK button to confirm, or Exit to exit.
- LOCKING A CHANNEL
- Press or to select the channel you wish to lock.
- Press the OK button to confirm.
- Press the OK button and select the Lock/Unlock option. You must now enter the PIN code.
- A padlock logo appears on the corresponding row, indicating that the selected channel is locked.
- To unlock the channel, use the same process.
.MANAGING FAVOURITES
- Press or to select the channel you wish to select as your favourite.
- Press the OK button to confirm.
- Press the OK button and select Add/Remove Favourites.
- Now you can distribute the different channels to the four different lists.
-
You can connect 2.5 and 3.5-inch external hard drives (hard drives with external power cable) to your TV via the USB port of your TV.
-
IMPORTANT: Back up the files to your storage devices before connecting them to the TV. Please note that the manufacturer cannot be held liable for file damage or loss of data.
-
Certain types of USB devices (e.g. MP3 players) or hard disk drives may not be compatible with this TV.
-
The TV supports FAT32 and NTFS disk formatting. However, recording will not be possible with NTFS formatted disks.
-
You may experience some problems when formatting USB hard drives with a storage capacity of more than 1TB (Terabyte).
-
Wait a while before plugging in the appliance or unplugging it, as it may not have finished reading the files. If this happens, it can physically damage the USB drive and the USB device itself. Never remove a USB device while playing a file.
-
You can use USB hubs with the TV'S USB port. USB hubs that are equipped with an external power supply are recommended in this case.
-
We recommend connecting USB hard drives directly into the TV's USB port.
-
When playing back image files, the Media Navigation menu can only display 1000 image files saved on the connected USB device.
You can play back photo, music and movie files stored on a USB drive by connecting it to your TV.
Connect a USB drive to one of the USB inputs on the side of the TV. Pressing the Menu button while you are still in Media Navigation mode gives you access to the picture, sound and setup menus. By pressing the Menu button once more the screen will disappear. You can set the preferences of your Media Navigation via your Settings menu.
- The TV is compatible with USB devices formatted with FAT32 or NTFS file systems. Format the USB device using the TV before inserting your data.
- We cannot guarantee compatibility (operation and/or bus power) with all USB storage devices and cannot be held responsible for any data loss that may occur when a device is connected to this appliance.
- When the files are large, it may take time for the system to read them.
- Some USB devices may not be recognised correctly.
- Depending on the content, it may not be possible to play or display certain files, even if they are in a compatible format.
PROGRAMME GUIDE (EPG)
Some, but not all, channels display information about the current and next programme. Press the button to access the EPG menu.

- Red button: Displays next or previous programmes.
- Green button: Displays the list of programmes.
- Yellow button (Zoom): Displays more information about the programme.
- Blue button (Filter): Displays filter options.
- Press to see the menu of the selected genre. Using this feature you can query the programme guide database according to the selected genre. The information available in the programme guide will be searched and the results corresponding to your criteria will be listed.
- Press the i button to display detailed information about the selected programme.
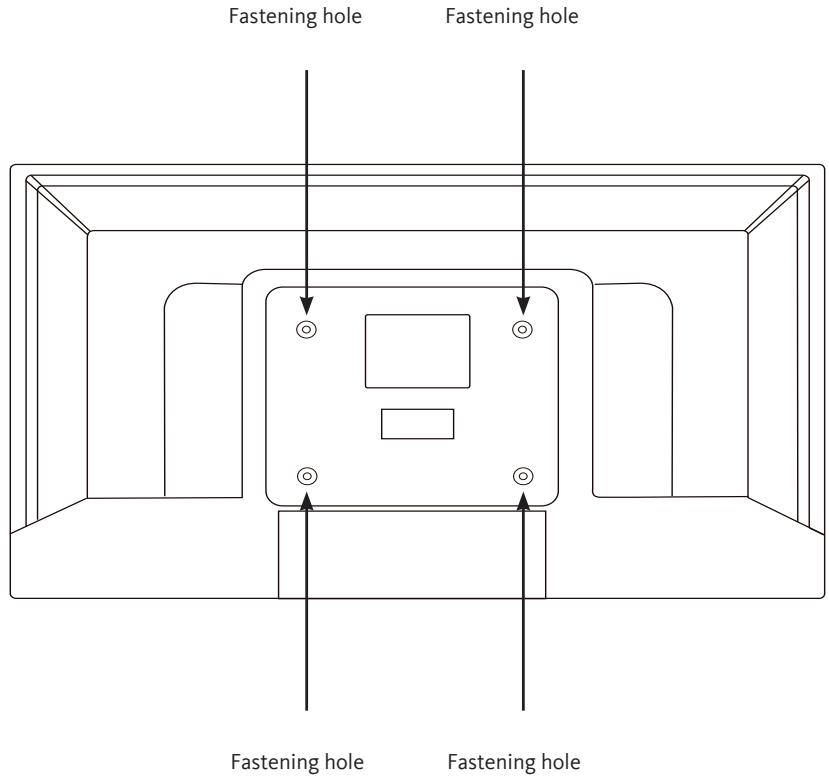
INSTALLING A WALL BRACKET
- Call on a technician to fit the wall bracket. The manufacturer cannot be held liable for damage to property or personal injury resulting from an installation carried out by the customer.
Make sure that the fittings used are suitable for your wall.
Only fit your TV to a brick or cement wall.
- Make sure that children do not hang from the TV and try to climb on it.
- The VESA-type wall bracket is sold separately. During installation, refer to the instructions supplied with your wall bracket.
$$
\begin{array}{l} L = 7 5 \mathrm {m m} \ \mathrm {H} = 7 5 \mathrm {m m} \ \end{array}
$$
TROUBLESHOOTING
Before contacting your after-sales service, carry out the following basic checks.
| Symptoms | Possible causes | Solutions |
| No power. | The power cord is not plugged in. | Make sure the power cord is plugged into the wall outlet. |
| The power point is disconnected from the power supply. | Try plugging the TV into different power outlets to cross-check them. |
| No picture or sound. | The picture settings are poorly adjusted. | Check the image brightness and contrast settings. |
| Sound is off. | Make sure that the Mute mode is not activated |
| The TV is not turned on. | Turn on the TV. |
| There are no HD DTT channels or the image is distorted. | The reception of digital terrestrial television (DTT) channels is only possible in the areas with coverage. Check the proximity of a transmitter. Check the quality and strength of the receiving signal. | Have your installation checked by a professional. |
| The remote control is not working. | There are no batteries in the remote control, or the batteries are dead. | Check that the batteries are correctly inserted in the remote control.
Check the batteries. If they are dead, replace them. |
| The USB removable media cannot be read. | The format is not supported. | Check that the formats used are compatible with this appliance.
Unplug the removable device and plug it back in. Format the USB media, and try again. |
The undersigned, Sourcing & Creation, represents that the TV LISTO 32HD-356 type radio equipment complies with the directive 2014/53/EU.
The full text of the EU declaration of conformity is available at the following address:
You can find information on the models as it is recorded in the product database on the following website by searching for your model ID () , which is specified on the energy label:
https://eprel.ec.europa.eu/
The service life of your appliance is 5 years. During this period, original spare parts will be available to ensure proper operation of the appliance. You will find information on repairing your product at this address : https://www.boulanger.com/info/assistance/
ÍNDICE
INDICE 60
CONTENIDO DEL ENVASE 62
DESCRIPCION DEL TELEVISOR 62
PARTEDELANTERA 62
| Connector | Type | Cables | Device |
| HDMI connection (rear & side) | | |
| AV SIDE | AV side connection (Audio/Video) (side) | Video/Audio Side connection Cable | Audio/Video Cable |
| SDPIF | SPDIF connection (Coaxial outlet) (side) | | |
| HEADSET | Headset connection (side) | |
| USB connection (side) | | |
| CI connection (side) | | |
BUSQUEDA MANUAL DE CANALES
Estamericano.
BUSQUEDA DE RED
https://eprel.ec.europa.eu/
PROGRAMM FuHRER (EPG)
115
| Connector | Type | Cables | Device |
| HDMI connection (rear & side) | | |
| AV SIDE | AV side connection (Audio/Video) (side) | Video/Audio Side connection Cable | Audio/Video Cable |
| SDPIF | SPDIF connection (Coaxial outlet) (side) | | |
| HEADSET | Headset connection (side) | |
| USB connection (side) | |
| CI connection (side) | |
VERSION DER APPLIKATION
https://eprel.ec.europa.eu/
PROBLEEMOPISSING 147
EU-CONFORMITEITSVERKLARING 148
INHOUD VAN DEVERPAKKING
| Connector | Type | Cables | Device |
| HDMI connection (rear & side) | | |
| AV SIDE | AV side connection (Audio/Video) (side) | Video/Audio Side connection Cable | Audio/Video Cable |
| SDPIF | SPDIF connection (Coaxial outlet) (side) | | |
| HEADSET | Headset connection (side) | |
| USB connection (side) | |
| CI connection (side) | |
ANALOGE FIJNAFSTEMMING
https://eprel.ec.europa.eu/
This symbol attached to the product means that it is an appliance whose disposal is subject to the directive on waste from electrical and electronic equipment (WEEE). This appliance may not in any way be treated as household waste and must be subject to a specific type of removal for this type of waste. Recycling and recovery systems are available in your area (waste removal) and by distributors. By taking your appliance at its end of life to a recycling facility, you will contribute to environmental conservation and prevent any harm to your health.
Warranty conditions:
This product is under warranty against any failure resulting from any manufacturing or material defects. This warranty does not cover defects or damage caused by improper set up, incorrect use, or normal wear and tear of this product. The warranty period is specified on the receipt of the purchase.
ATENCIón:
Please behave responsibly towards the environment.
Recycle this product at the end of its life.