
BUTLER 920 - Cordless phone TOPCOM - Free user manual and instructions
Find the device manual for free BUTLER 920 TOPCOM in PDF.
| Product type | DECT cordless telephone |
| Brand | Topcom |
| Model | Butler 920 |
| Base power supply | 220/230 V / 50 Hz |
| Handset batteries | 2 x 1.2 V, 600 mAh, AAA NiMH rechargeable |
| Standby time | 100 hours |
| Talk time | 11 hours |
| Outdoor range | Up to 300 m in open space |
| Indoor range | Up to 50 m |
| Display | Backlit display with battery level and signal strength indicator |
| Caller ID (CLIP) | Yes, up to 20 entries |
| Phonebook | 10 indirect memories (25 digits max) |
| Hands-free function | Yes, dedicated key |
| Redial | Up to 3 last numbers |
| Mute | Yes |
| Call transfer and conference | Yes (between handsets) |
| Intercom | Yes between handsets |
| Max number of handsets | 4 |
| Keypad lock | Yes |
| Ring volume adjustment | 5 levels + off |
| Ring melody | 9 melodies |
| Operating temperature | +5 °C to +45 °C |
| Relative humidity | 25 to 85 % |
| Cleaning | Slightly damp or antistatic cloth, without abrasive detergents |
| Warranty | 24 months (batteries: 6 months) |
Frequently Asked Questions - BUTLER 920 TOPCOM
User questions about BUTLER 920 TOPCOM
0 question about this device. Answer the ones you know or ask your own.
Ask a new question about this device
Download the instructions for your Cordless phone in PDF format for free! Find your manual BUTLER 920 - TOPCOM and take your electronic device back in hand. On this page are published all the documents necessary for the use of your device. BUTLER 920 by TOPCOM.
USER MANUAL BUTLER 920 TOPCOM
natural_image
Close-up of a modern TP50CM printer with black and silver casing (no visible text or symbols on device body)User Guide / Handleiding / Manuel d'utilisateur Bedienungsanleitung / Manuale d'uso
v 1.1
CE
Important
To use ‘Caller ID’ (display caller), this service has to be activated on your phone line. Normally you need a separate subscription from your telephone company to activate this function. If you don’t have the Caller ID function on your phoneline, the incoming telephone numbers will NOT be shown on the display of your telephone.
Belangrijk
natural_image
Line drawing of a ceiling-mounted device with two circular ports and a numbered label (15) on the side (no text or symbols on the device itself)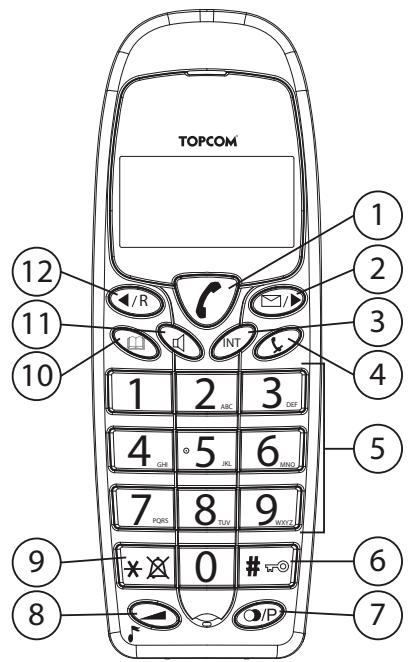
This product is in compliance with the essential requirements and other relevant provisions of the R&TTE directive 1999/5/EC.
The Declaration of conformity can be found on:
http://www.topcom.net/support/cedeclarations.php
UK To be connected to the public analogue telephone network.
UK The features described in this manual are published with reservation to modifications.
UK The CE symbol indicates that the unit complies with the essential requirements of the R&TTE directive.
1 Safety instructions ....7
2 Keys....7
2.1 Handset....7
2.2 Base 8
2.3 Charger 8
3 Display 8
4 Installation....9
4.1 Base 9
4.2 Handset charger 9
4.3 Handset.... 10
5 Battery low indication ....10
6 Operation handset 11
6.1 Outgoing calls.... 11
6.2 Incoming calls 12
6.3 Activate/Deactivate the handsfree function.... 12
6.4 Programming memory numbers.... 12
6.5 Calling a memory number.... 12
6.6 Mute function 13
6.7 Setting the volume.... 13
6.8 Flash key (R) 13
6.9 Setting the ring volume and melody.... 13
6.10Key lock.... 14
6.11 Setting the dialling mode.... 14
7 Caller-ID function (CLIP) 15
7.1 New calls 15
7.2 Consulting the call list.... 15
7.3 Calling a number from the call list.... 16
7.4 Erasing a number from the call list.... 16
7.5 Storing a number from the call list into the memory.... 16
8 Register/de-register a handset....17
8.1 Register a handset to a Topcom Butler 920 base .... 17
8.2 Removing a handset from a Topcom Butler 920 base .... 18
9 Call transfer and intercom between two handsets ....19
9.1 Call transfer and conference call during an external call 19
9.2 Internal call (intercom).... 19
10 Troubleshooting....19
11 Technical data....20
12 Default settings....22
13 Warranty 22
13.1 Warranty period.... 22
13.2 Warranty handling 22
13.3 Warranty exclusions 22
14 Cleaning....23
15 Disposal of the device (environment)....23
Nederlands 24
4 Installation....62
1 Safety instructions
- Only use the charger plug supplied. Do not use other chargers as this may damage the battery cells.
- Only insert rechargeable batteries of the same type. Never use ordinary, non-rechargeable batteries. Insert rechargeable batteries so they connect to the right poles (indicated in the battery compartment of the handset).
- Do not touch the charger and plug contacts with sharp or metal objects.
- The operations of some medical devices may be affected.
- The handset may cause an unpleasant buzzing sound in hearing aids.
- Do not place the basic unit in a damp room or at a distance of less then 1.5m away from a water source. Keep water away from the handset.
- Do not use the telephone in environments where there is a risk of explosions.
- Dispose of the batteries and maintain the telephone in an environment-friendly manner.
- As this telephone cannot be used in case of a power cut, you should use a mains-independent telephone for emergency calls, e.g. a mobile phone.
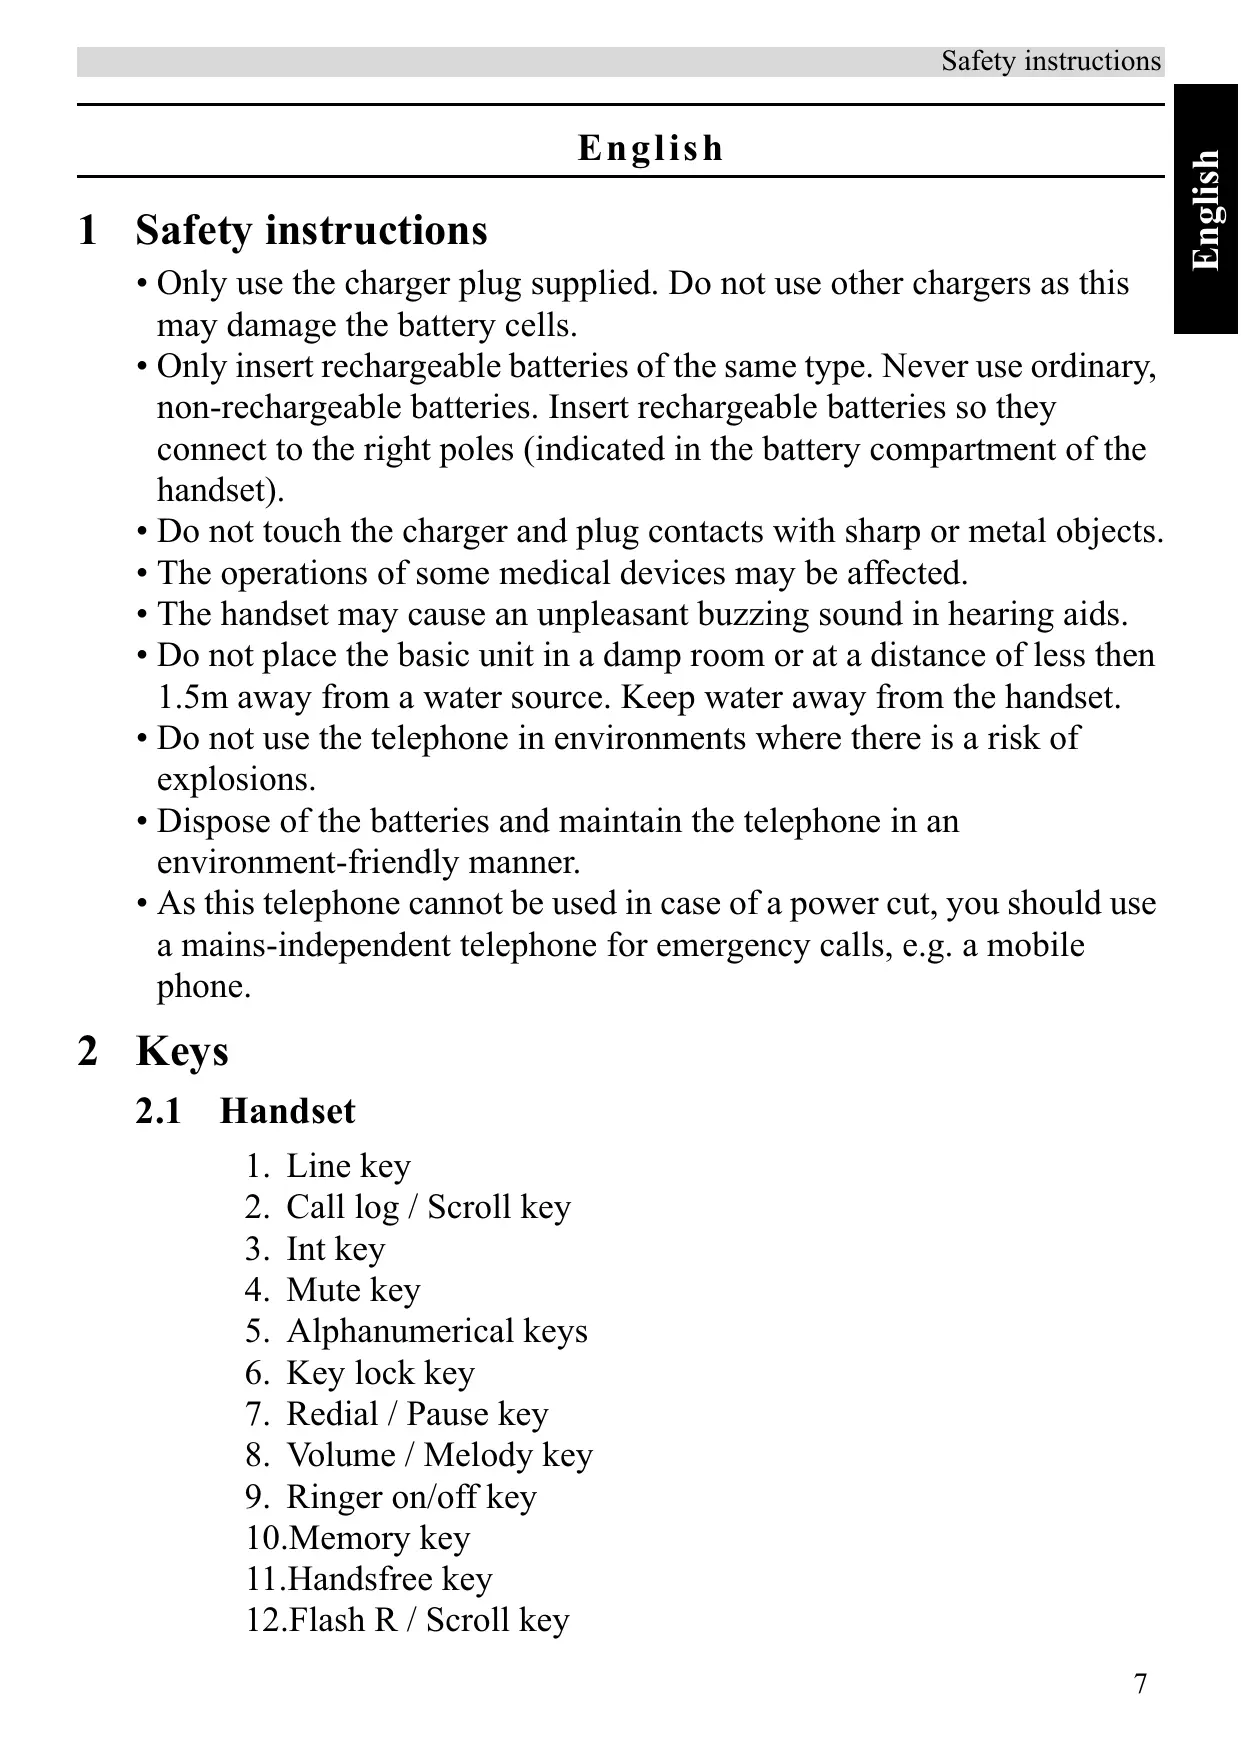
2 Keys
2.1 Handset
- Line key
- Call log / Scroll key
- Int key
- Mute key
- Alphanumerical keys
- Key lock key
- Redial / Pause key
- Volume / Melody key
- Ringer on/off key
10.Memory key
11.Handsfree key - Flash R / Scroll key
2.2 Base
- Visual call / In-use (LED)
- Paging key
2.3 Charger
15.Handset on charger (LED)
3 Display
You are online
New numbers in call list
Rechargeable battery level indicator
The antenna indicates the quality of reception. The antenna blinks when the handset is out of range.
Microphone is muted
Memory records are being retrieved or set up
The keypad is locked
← There are more digits on the left
There are more digits on the right
During handsfree
When ring buzzer is turned off
There are new messages in your voice mail
During internal call
HS-x x = handset number
4 Installation
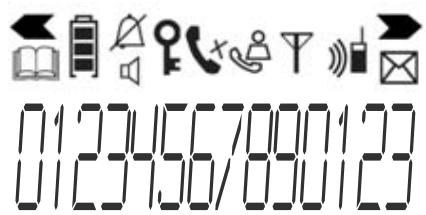
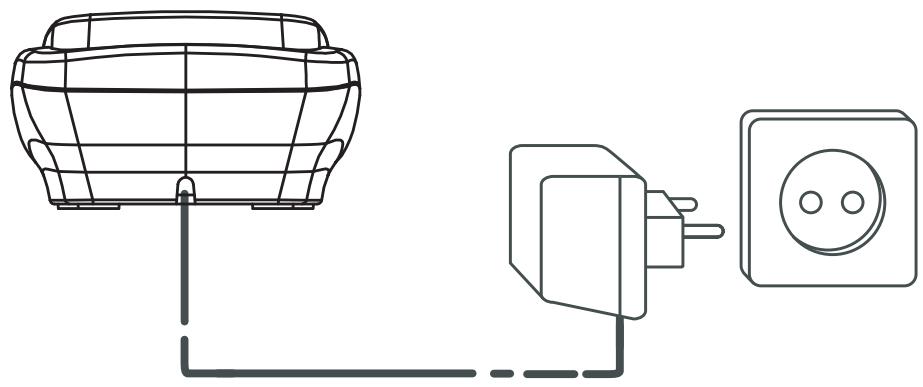
4.1 Base
1 Plug one end of the telephone cable into the phone unit and the other end into the telephone line wall socket.
2 Connect the small plug of the AC adaptor to the phone and the other end of the power cable to the electric socket.
- Back view of base -
A. Telephone wall outlet
B. Power cable
C. Telephone cable
4.2 Handset charger
1 Connect the AC adaptor to the electric socket.
natural_image
Line drawing of a wall-mounted electrical socket connected to a grid-patterned device (no text or symbols)- Back view of charger -
4.3 Handset
1 Insert 2 rechargeable batteries (AAA) inside the battery compartment of the handset.
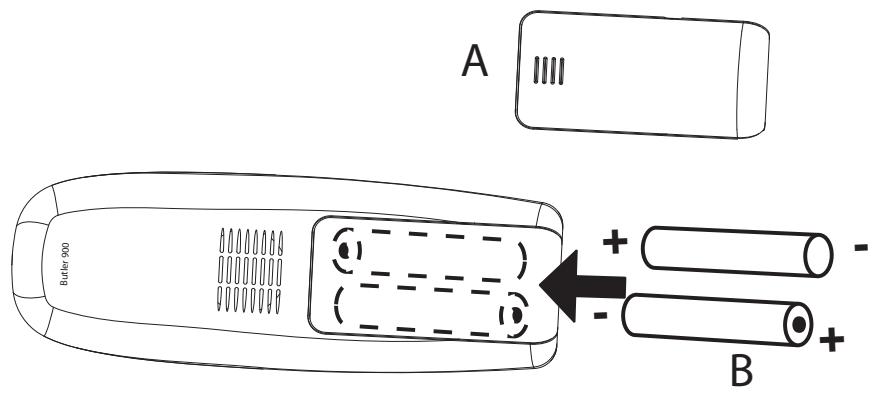
- Back view of handset -
A. Cover
B. Rechargeable batteries
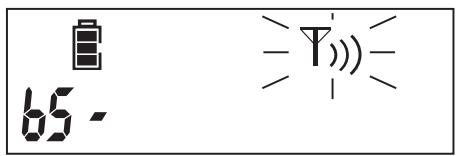
5 Battery low indication
When the battery is empty, the handset no longer carries out operations. When a battery is completely empty and you have put the handset on the base unit for a short period of time, the battery symbol will appear to be fully charged, but this is actually not the case. The battery capacity will decrease rapidly. We advise you to put the handset on the base unit for 12 hours so it can be recharged completely.
Full battery Empty battery
When you are in the middle of a conversation and the battery is almost empty, the handset will emit a warning signal. Place the handset on the base unit to charge.
6 Operation handset
6.1 Outgoing calls
Making a phone call
| r | 1 Press the line key. |
| 4 5 6 | 2 Enter the desired telephone number. |
| r | 3 Press the line key when you want to terminate the call. |
Call setup with dial preparation
| 4 5 6 | 1 Enter the desired telephone number. |
| An incorrect number can be corrected by means of the mute key. When you haven’t pressed a key for 10 seconds, the number will disappear and the handset returns to standby mode. | |
| 2 Press the line key. | |
| The number will be dialled automatically. | |
| 3 Press the line key again when you want to terminate the call. |
Redialling the last number dialled
| ○ | 1 Press the line key. |
| 2 Press the redial key. | |
| The number you last called will be dialled automatically. | |
| ○ | 3 Press the line key again when you want to terminate the call. |
Redial one of the last 3 numbers called
| ○ | 1 Press the redial key.The number you last called appears on the display. |
| ○ | If you would like to dial one of the last 3 numbers, press the redial key a few times until the desired number appears on the display. |
| r | 2 Press the line key.The number will be dialled automatically. |

3 Press the line key again when you want to terminate the call.
6.2 Incoming calls
When a call comes in, the handset and base will start to ring and the visual call LED on the base will blink.

1 Press the line key to answer the incoming call.
2 Press the line key again when you want to terminate the call.

6.3 Activate/Deactivate the handsfree function
This function allows you to communicate without having to pick up the handset when there is an incoming call or when you are on the phone by the handset.

1 Press the handsfree key to activate the function.
2 Press the handsfree key again to switch the conversation back to the handset.

6.4 Programming memory numbers
You can program 10 indirect numbers (each of maximum 25 digits) in the phone.

1 Press and hold the memory key until the icon appears on the display.
2 Enter the telephone number you want to store.
3 Press the memory key again to confirm.
4 Enter the memory location (0-9) where you want to store the number.
You will hear a confirmation tone.


6.5 Calling a memory number


1 Press the memory key, followed by the number of the memory location (0-9).
2 Press the line key.
The number will be dialled automatically.


3 Press the line key again when you want to terminate the call.
6.6 Mute function
It is possible to deactivate the microphone during a conversation. Now you can speak openly without being heard by your correspondent.

1 Press the mute key.
The microphone will be activated.

2 Press the mute key again to deactivate the mute function.
6.7 Setting the volume

1 Press the volume key during the conversation.
You can set the volume alternatively in 5 levels.
6.8 Flash key (R)

When you press the flash key (also called recall), the unit generates a line interruption (100ms of 250ms). It gives you the possibility to use the special services of your telephone provider and/or to transfer calls when you have a telephone exchange.
Setting the flash time

1 Press and hold the redial key for 3 seconds.
The display will show:
“S” for 100ms
“L” for 250ms
The flash time setting will disappear from the display after 2 seconds.
6.9 Setting the ring volume and melody
Handset melody


1 Press and hold the melody key until the current melody is heard.
2 Select the desired melody (1-9) or enter a number (1-9).

3 Press the melody key again to confirm.
Handset ring volume


1 Press the volume key.
The handset will ring in the current volume.
2 Select the desired volume (1-5) or enter a number (1-5).
Press “0” to turn the volume off.
3 Press the volume key again to confirm.

You can turn the ringer volume of each individual handset on or off by simply pressing and holding the ringer on/off key in standby.
6.10 Key lock


When the keypad is locked, pressing any key will have no effect during standby (except holding the key lock key).
1 Press and hold the key lock key.
The icon appears on the display and the keypad is locked.
2 Press and hold the key lock key again to unlock the keypad.
When the keypad is locked and there is an incoming call, you can still answer the call by pressing the line key.
During the call, the keypad functions as normal. When the call is ended, the keypad will be locked again.
6.11 Setting the dialling mode
There are two types of dialling modes:
DTMF/Tone dialling (default and most common used)
Pulse dialling (for older installations)
To change the mode of dialling:
R
1 Press and hold the flash key to toggle between dialling modes.
“P” will appear when set to pulse dialling, “T” will appear when set to tone (DTMF) dialling.
After 5 seconds, the unit returns to standby.

You can change the dial mode of the phone by accident when pressing the flash key for 5 seconds in standby. The wrong dialling mode will cause that the number isn't dialled correctly or isn't dialled at all.
7 Caller-ID function (CLIP)
The Topcom Butler 920 displays the telephone numbers of incoming calls. This function is only possible if you are subscribed to a telephone operator that provides this service. Contact your telephone provider for more information.
When you receive a call, the numbers are saved in a call list. This list can hold up to 20 telephone numbers (each of maximum 25 digits).

If the number is longer then 14 digits, you can scroll further to the right to view the other digits.
7.1 New calls

When you have received a new unanswered call, the CLIP symbol will blink on the display.
7.2 Consulting the call list

1 Press the call log key.
The last received call is displayed. If the list is empty, “NO CLIP” is shown.
The following will appear on the display:
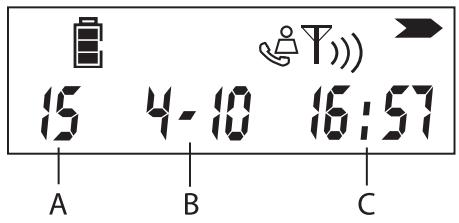
A. Progress number
B. Date (DD-MM)*
C.Time (24h format)*
After 5 seconds, the telephone number will be shown.

2 Press the right key to skip the date and time.
3 Press the left key to scroll to the previous call, press the right key to show the next call.
4 Leave the call list by pressing the mute key.
* Only when the network sends the time/date together with the telephone number! On some networks with Caller ID, time and date will not be displayed.
7.3 Calling a number from the call list
1 Press the call log key.
2 Scroll through the call list until the desired telephone number is displayed.
3 Press the line key to start the call.
The number will be dialled automatically.
4 Press the line key again when you want to terminate the call.


7.4 Erasing a number from the call list

1 Press the call log key.
2 Scroll through the call list until the desired telephone number is displayed.
3 Press and hold the mute key for 3 seconds to erase the number.


7.5 Storing a number from the call list into the memory

1 Press the call log key.
2 Scroll through the call list until the desired telephone number is displayed.
3 Press and hold the memory key for 3 seconds.
4 Enter the memory location (0-9) where you want to store the number.
5 Enter the memory key again to confirm.


8 Register/de-register a handset
8.1 Register a handset to a Topcom Butler 920 base
You can subscribe up to 4 handsets to one base unit. By default, each handset is subscribed on the base unit upon delivery.
You only need to subscribe the handset if:
- the handset subscription has been removed from the base unit (e.g. for reinitialisation)
- you want to subscribe a different handset to this base unit.
The below procedure is only applicable to a Topcom Butler 920 handset and base unit!
●
/
▶
*
1 Press and hold the paging key on the base unit for 10 seconds.
The handset on charger LED on the base unit begins to blink rapidly for 1 minute.
During this minute, the base unit is in register mode and you must do the following to subscribe he handset:
2 Press and hold the right key for 3 seconds.
3 Press and hold the *-key for 3 seconds.
The following will appear on the display:
4 ghi 5 jkl 6 mno
4 Enter the number of the base unit (1-4) you would like to subscribe the handset to.
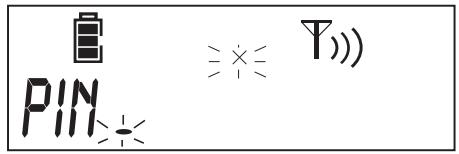
The unit will start searching for the base and when found, it will ask to enter the PIN code (4 digits):
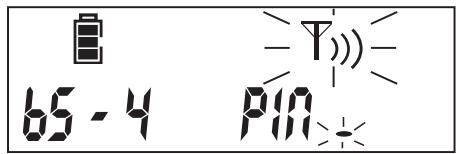
4 ghi 5 jkl 6 mno
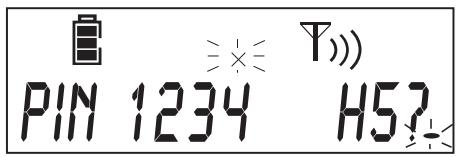
5 Enter the base PIN code (0000 by default). If the PIN is wrong, the handset will restart the searching for the base.
When the handset is registered, it will show “HS” followed by the handset number.
8.2 Removing a handset from a Topcom Butler 920 base
You can remove a handset from a base to allow another handset to be registered.

1 Press and hold the right key for 3 seconds.

2 Press and hold the mute key for 3 seconds.

3 Enter the base PIN code (0000 by default). If the PIN is wrong, the handset will go back to standby.

4 Enter the number of the handset (1-4) you would like to remove.
If the removal is successfully, the handset will go back to standby. If not, it will ask again to enter the handset number.

You can only remove existing handsets other than the one you are using.
9 Call transfer and intercom between two handsets

These functions only work when more then one handset (like a Twin/Triple/Quattro version) is registered to the same base.
9.1 Call transfer and conference call during an external call
| INT | 1 During an external call, press the INT key, followed by the number of the handset (1-4).The other handset will start to ring:When the other handset takes the line you can talk internally. If you hang up, the external line will be connected with the other handset. |
| INT | 2 Press and hold the INT key for 3 seconds. Now you can talk with the second handset and external line at the same time (conference call). |
| INT | 3 Press the INT key again to return to the external call. |
| # | 4 Press the line key when you want to terminate the call. |
9.2 Internal call (intercom)
| INT | 1 In standby, press the INT key, followed by the number of the handset (1-4).The other handset will start to ring. |
| r | 2 Press the line key to pick up the line.Now you can talk internally. |
| r | 3 Press the line key when you want to terminate the call. |
10 Troubleshooting
| Symptom | Possible cause | Solution |
| No display | Batteries uncharged | Check the position of the batteries |
| Recharge the batteries | ||
| Handset turned off | Turn on the handset | |
| No tone | Telephone cord badly connected | Check the telephone cord connection |
| The line is occupied by another handset | Wait until the other handset hangs up | |
| Volume of conversation partner too low | Adjust the volume during the conversation by pressing the volume key | |
| Handset ringer volume too low | Adjust the ringer volume | |
| Not possible to dial a number | Wrong dial mode | see "6.11 Setting the dialling mode" to set the correct dialling mode |
| The icon γ flashes | Handset out of range | Bring the handset closer to the base |
| The base has no power supply | Check the mains connection to the base | |
| The handset is not registered on the base | Register the handset on the base | |
| Handset does not ring | The ringing volume is off or low | Adjust the ringing volume |
| Not possible to transfer a call on PABX | The Flash Time is too short | Set the unit to Long Flash Time |
| Telephone does not react to pressing the keys | Manipulation error | Remove the batteries and put them back in place |
11 Technical data
| Range | up to 300m in open space up to 50m indoors |
| Handset Batteries: | 2 x 1.2V, 600mAh AAA Type NiMh rechargeable |
| Base power supply | 220/230V / 50 Hz |
| Handset autonomy | 100 hours in standby |
| Handset talk time | 11 hours |
| Normal conditions of use | +5 °C to +45 °C |
| Permitted relative air humidity | 25 to 85% |
| Dialling mode | Pulse / DTMF (Tone) |
| Memories | 10 indirect with max. 25 digits |
12 Default settings
| Flash time | 100 ms |
| Dialling mode: | Tone |
| Ring volume | Level 3 |
| Ring melody | Ringer 8 |
| Base PIN | 0000 |
13 Warranty
13.1 Warranty period
The Topcom units have a 24-month warranty period. The warranty period starts on the day the new unit is purchased. The warranty on batteries is limited to 6 months after purchase. Consumables or defects causing a negligible effect on operation or value of the equipment are not covered. The warranty has to be proven by presentation of the original purchase receipt, on which the date of purchase and the unit-model are indicated.
13.2 Warranty handling
A faulty unit needs to be returned to a Topcom service centre including a valid purchase note.
If the unit develops a fault during the warranty period, Topcom or its officially appointed service centre will repair any defects caused by material or manufacturing faults free of charge.
Topcom will at its discretion fulfill its warranty obligations by either repairing or exchanging the faulty units or parts of the faulty units. In case of replacement, colour and model can be different from the original purchased unit.
The initial purchase date shall determine the start of the warranty period. The warranty period is not extended if the unit is exchanged or repaired by Topcom or its appointed service centres.
13.3 Warranty exclusions
Damage or defects caused by incorrect treatment or operation and damage resulting from use of non-original parts or accessories not recommended by Topcom are not covered by the warranty. Topcom cordless phones are designed to work with rechargeable batteries only. The damage caused by the use of non-rechargeable batteries is not covered under warranty.
The warranty does not cover damage caused by outside factors, such as lightning, water and fire, nor any damage caused during transportation.
No warranty can be claimed if the serial number on the units has been changed, removed or rendered illegible.
Any warranty claims will be invalid if the unit has been repaired, altered or modified by the buyer or by unqualified, non-officially appointed Topcom service centres.
14 Cleaning
Clean the telephone with a slightly damp cloth or with an anti-static cloth. Never use cleaning agents or abrasive solvents.
15 Disposal of the device (environment)

At the end of the product lifecycle, you should not throw this product into the normal household garbage but bring the product to a collection point for the recycling of electrical and electronic equipments. The symbol on the product, user guide and/or box indicate this.
Some of the product materials can be re-used if you bring them to a recycling point. By re-using some parts or raw materials from used products you make an important contribution to the protection of the environment.
Please contact your local authorities in case you need more information on the collection points in your area.
Nederlands
natural_image
Line drawing of a wall-mounted electrical outlet connected to a grid-patterned motor (no text or symbols)natural_image
Four abstract line drawings of keys in different orientations (no text or symbols)
natural_image
Line drawing of a wall-mounted power outlet connected to a grid-patterned basket (no text or symbols)B. Piles rechargeables
4 5 6 ghi jkl mno
natural_image
Line drawing of a grid cable and a plug connecting two outlets (no text or symbols)4 ghi 5 jkl 6 mno
Ruftonmelodie Melodie 8
natural_image
Line drawing of a wall-mounted electrical socket connected to a power outlet (no text or symbols)4 ghi 5 jkl 6 mno