
DJA400S - DJA400VI - Camera LEXIBOOK - Free user manual and instructions
Find the device manual for free DJA400S - DJA400VI LEXIBOOK in PDF.
| Product type | Sport digital camera |
| Brand | LEXIBOOK |
| Compatible models | DJA400S, DJA400VI |
| Dimensions | 71.8 x 46.6 x 26 mm |
| Weight | approximately 55 g |
| Power supply | Built-in lithium-ion battery 350 mAh, charging via USB cable |
| Battery life | Varies depending on use (not specified) |
| Screen type | 1.77-inch TFT LCD screen |
| Sensor | 1.3 megapixel CMOS |
| Lens | F/2.8, f=5.3 mm |
| Photo resolution | 5M (2592x1944), 3M (2048x1536), 1.3M (1280x960) |
| Video resolution | HD (1280x720), VGA (640x480) |
| Digital zoom | 4x |
| Storage | Micro SD card up to 32 GB (not included) |
| Main functions | Photo, standard video, video with motion detection, sport mode, waterproof with included housing |
| Waterproof housing | Included, allows underwater use (depth not specified) |
| Connectivity | USB 2.0 (mini USB), AV output (cable not included) |
| Mounts included | Bike mount, 2 helmet mounts, adhesive mounts |
| Care and cleaning | Wipe with a slightly damp soft cloth, avoid detergents, protect from moisture and shocks |
| Safety | Do not disassemble, do not expose to heat, do not throw battery into fire, only use the supplied USB cable for charging |
| Spare parts and repairability | Contact LEXIBOOK customer service at 01 84 88 58 58 for repairs |
| General information | 2-year warranty, designed in Europe, made in China, not intended for children under 3 years |
Frequently Asked Questions - DJA400S - DJA400VI LEXIBOOK
User questions about DJA400S - DJA400VI LEXIBOOK
0 question about this device. Answer the ones you know or ask your own.
Ask a new question about this device
Download the instructions for your Camera in PDF format for free! Find your manual DJA400S - DJA400VI - LEXIBOOK and take your electronic device back in hand. On this page are published all the documents necessary for the use of your device. DJA400S - DJA400VI by LEXIBOOK.
USER MANUAL DJA400S - DJA400VI LEXIBOOK
Please refer to image A:
-
Lens
-
Power button
15.Up button
-
Speaker
-
Down button
3.Shutter button
-
Helmet/bike mount tripod slot
-
Reset hole
-
Microphone
-
AV out jack
-
MENU button
-
MODE button
-
LCD screen
Please refer to image C:
Please refer to image B:
-
Door clip
-
Power CHARGE indicator
-
Waterproof buttons
-
BUSY indicator
-
Waterproof case
-
Mini USB jack
-
Bike mount
-
Micro SD card slot
-
Screw (tightens clamp)
-
Protection cover
-
Screws (adjust camcorder position)
-
Helmet mounts
-
Strap
CONTENTS OF THE PACKAGING
Unpacking the device
When unpacking, ensure that the following elements are included:
1 x DJA400 digital camcorder / 1 x USB cable /
1 x waterproof case / 2 x helmet mount / 1 x bike mount /
2 x stickers / 1 x CD-ROM / 1 x hand strap / 1 x instruction manual
WARNING: All packaging materials, such as tape, plastic sheets, wires and tags are not part of this product and should be discarded.
CHARGING THE BATTERIES
Note: Before using the camcorder for the first time, please remove the protective film of the camcorder's LCD screen.
To recharge the internal lithium battery (350mAh), proceed as follows:
-
Make sure the camcorder is off.
-
Open the rubber cover that protects the mini USB jack.
-
Connect the USB cable to the camcorder (5 pin) and your computer (4 pin). The power indicator (9) lights up red when the batteries are charging and turns off when it is fully charged. It is normal for the camcorder to be warm during charging.
Note: When the low battery icon appears on the LCD screen, recharge the batteries.
The lithium battery is intended for use only with this product. Do not disassemble the battery. Do not dispose of the battery in fire or water. To avoid risk of fire, burns, or damage to your battery, do not allow a metal object to touch the battery contacts. Handle a damaged or leaking battery with extreme care. If it contacts the eye, flush the eye with water for 15 minutes and seek medical attention. Do not charge the lithium battery pack if the ambient temperature exceeds 45^ (113°F). When discarding a battery pack, contact your local waste disposal provider regarding local restrictions on the disposal or recycling of batteries. Only use the supplied USB cable for charging.
WARNING: Malfunction or loss of memory may be caused by strong frequency interference or electrostatic discharge. Should any abnormal function occur, reset the unit and turn it on again.
Press the Power button (1) to turn the camcorder on. The LCD screen lights up to confirm the camcorder is ready for use. Press the Power button (1) once more to turn the camcorder off. A melody will ring and the screen will go blank.
INSTALLING A MEMORY CARD
To store pictures or videos, you need to insert a micro SD card (not included) into your digital camcorder so you can save your files.
To insert the memory card:
- Turn off the camcorder.
- Open the rubber cover that protects the micro SD card slot.
- Insert the micro SD card carefully into the micro SD card slot and push firmly until you hear a "click" sound.
- Turn the camcorder on.
- To remove the card, push it in slightly to release it from the slot.
Notes:
- Always turn the camcorder off when you insert or remove the micro SD card.
- To save your videos, we recommend that you purchase a micro SD card that has good quality and sufficient capacity.
To format the memory card:
If the card is new, unformatted or was previously formatted by another camcorder, format the card so that the file format is compatible with your camcorder.
- Insert the card into the micro SD card slot.
- Turn on the camcorder by pressing the Power button (1).
- Press MENU button (6) until "Setup" menu appears.
- Press Up (15) or Down (16) key to select "Format".
- Press Shutter button (3) to confirm.
- Use Up or Down key to select 'Yes' or 'No'.
- Press on the shutter again to confirm selection.
Notes:
- Do not pull out the card when formatting to avoid any failure of the card.
- Even if the card has been formatted before, we recommend you format it again to ensure that it will work properly.
Caution: Formatting will delete all stored photos and videos. Download important files to your computer before formatting.
CHANGING MODES
This camcorder has four modes:
| Capture mode | For taking still photos. | |
| Video mode 1 | For recording movie clips (default mode). | |
| Video mode 2 | For recording movie clips. | |
| Playback mode | For playing recorded files. |
To change modes, turn the camcorder on and press MODE button repeatedly to select the mode you want.
CAPTURINGVIDEOCLIPS(Videomode1)
HS170NE
Video recording
-
Turn the camcorder on by pressing the Power button (1). You are already in video mode 1 (default mode) and the Video icon appears on the top left of the LCD screen.
-
Press the Shutter button (3) to start recording. The recording length is displayed on the top right of the LCD screen.
- Press the Shutter button (3) again to stop recording and automatically save the video in AVI format. The video storage time remaining on the memory card is displayed in the upper right corner of the screen.
- To zoom in, press and hold Up button (15). To zoom out, press and hold Down button (16).
Notes:
- If the memory is full, the camcorder will stop recording automatically.
- You can use Windows Media player and Quick time to play AVI files on your computer.
- The video clip's length may change according to the memory space available on the micro SD card.
Playing video files (Playback)
- Turn the camcorder on.
- Press MODE button (7) repeatedly until Playback mode is displayed on the top left of the LCD screen.
- Press Up/Down keys to scroll through saved videos.
- Press the shutter button (3) to play the video.
- Press the shutter again to stop the video. Press the shutter once more to resume playback.
- To completely stop the video and go back to the Playback main page, press Up key.
- To exitPlayback mode, press MODE button to select another mode.
Deleting video files
See the section on "Taking Photos (Capture Mode) / Deleting pictures".
SETTINGS MENU (Video mode 1)
Press MODE button to set the device to video mode 1 (if another mode has been previously selected and if the camcorder has not been powered off). The Video icon is displayed in the top left of the LCD screen. Press MENU button to enter "Video" menu.
"Video" menu
- Video Resolution
Changes recording resolution. Select a small size resolution for longer recording time. There are two options: (HD) 1280 x 720 / (VGA) 640 x 480
- Loop Recording Time
Set a time limit for a video recording and when the time is up, it will start another video. Press the shutter to stop the recording. The settings are: 3min / 5min / 10min / OFF.
"Date" menu
For more information about the "Date" menu, please refer to the "Date" menu section.
"Setup" menu
For more information about the "Setup" menu, please consult the "Setup" menu section.
CAPTURINGVIDEOCLIPS (Video mode 2)
In Video mode 2, the camcorder starts recording automatically when it detects motion. When no motion is detected for 10 seconds, the recording stops.
Note: you have to activate the motion detection function first for this to work.
Video recording
- Press the power button (1) to turn the camcorder on.
- Press MODE button repeatedly to select Video mode 2. The video icon is displayed at the top left corner of the LCD screen.
- Use the LCD screen to view your subject.
- Press and hold the Up button to zoom in.
- Press and hold the Down button to zoom out.
NOTE:
- Please refer to the sections "Playing video files (Playback)" to learn how to view your saved videos.
- To learn how to delete video files, please see section "Taking Photos (Capture Mode) / Deleting pictures".
SETTINGSMENU(Video mode 2)
Turn the camcorder on and press MODE button to set the device to video mode 2. The video icon is displayed at the top left corner of the LCD screen. Press MENU button to enter "Video" menu.
"Video" menu
- Video Resolution
Changes recording resolution. Select a small size resolution for longer recording time. There are two options: (HD) 1280 x 720 / (VGA) 640 x 480
- Loop Recording Time
Set a time limit for a video recording and when the time is up, it will start another video. Press the shutter to stop the recording. The settings are: 3min / 5min / 10min / OFF.
- Rotate
Use this function if you have a car mount (not included). Press the shutter to select: On / Off.
Note: when you select "Off", the image is turned upside down for easier viewing.
- Motion Detection
When this function is activated, the camcorder starts recording automatically when it detects motion. The recording automatically stops when no motion is detected for more than 10 seconds.
"Date" menu
For more information about the "Date" menu, please refer to the "Date" menu section.
"Setup" menu
For more information about the "Setup" menu, please consult the "Setup" menu section.
TAKING PHOTOS (Capture mode)
Turn the camcorder on and press MODE button to set the device to capture mode. The Capture icon is displayed on the top left of the LCD screen.
Taking a photo
- Using the LCD screen (8) to frame your subject, hold the camcorder steady.
- Press the Shutter button (3) to take a photo. The image taken will appear briefly on the LCD screen.
Notes:
- In Photo mode, the number of photos that can still be stored on the memory card is displayed in the upper right corner of the screen.
- When the memory is full, "Card Full" will appear on the screen. Make sure you transfer your photos to your computer.
- Do not take the memory card or batteries out when the camcorder is saving the image, otherwise, the image will not be saved completely.
Zoom
- To zoom in, press and hold the Up button (15).
- To zoom out, press and hold the Down button (16).
The Zoom level icon on the right side of the LCD screen shows how much zoom you have selected.
Note: Digital zoom may affect the image's quality. The higher the digital zoom is, the lower the image quality.
Playing pictures (Playback)
- Turn the camcorder on.
- Press MODE button (7) until playback mode is displayed on the top left corner of the LCD screen.
- Press Up/Down keys to display photos or videos one by one.
- To exit Playback mode, press MODE button to select another mode.
Deleting pictures
- To delete pictures, enter Playback mode by pressing MODE button.
- Press MENU button twice to enter "Delete" option.
- Delete One – to delete the picture displayed on the LCD screen.
- Delete All - to delete all pictures
- Cancel - to cancel and exit.
- Press the shutter button, then select "Yes" by using Up/Down keys.
- Press the shutter again to confirm.
SETTINGS MENU (Capture mode)
Press MODE button to set the device to Capture mode. The Capture icon is displayed on the top left of the LCD screen. Press MENU button to enter "Image" menu.
HS170NE
"Image" menu
- Resolution
There are three options: (5M) 2592 x 1944 / (3M) 2048 x 1536 / (1.3M) 1280 x 960
- Image Quality
Adjusts the resolution. Select a lower image quality to decrease image size in order to capture more images: Fine / Normal.
"Date" menu
For more information about the "Date" menu, please refer to the "Date" menu section.
"Setup" menu
For more information about the "Setup" menu, please consult the "Setup" menu section.
DATE MENU (Capture and Video mode)
Capture mode and Video mode have the same "Date" menu.
- Turn the camcorder on.
- Select the desired mode (Capture or Video). To switch between modes, press MODE button repeatedly to select the mode you want.
- Press MENU button until Date menu appears.
- Use Up/Down keys to activate or deactivate the date stamp.
- Select "Set Date" to set date and time. Use Up/Down keys to set year, month, day, hour, minutes and seconds. Press MENU each time to go to the next setting.
- Press the shutter to confirm and exit.
SETUP MENU (Capture and Video mode)
Capture mode and Video mode have the same "Setup" menu.
- Turn the camcorder on.
- Select the desired mode (Capture or Video). To switch between modes, press MODE button repeatedly to select the mode you want.
- Press MENU button repeatedly until Setup menu appears.
- Use Up/Down keys to scroll up or down through the options.
- Press the shutter to select an option.
- Press MODE button once to go back to the previous screen or twice to go back to the main display.
The following settings are available in the "Setup" menu:
- Sound Effect
Sets sound options for the following: Shutter / Start-up / Beep.
- Frequency
A higher frequency increases the camcorder shutter speed so that the effect of light fluctuations from sources such as fluorescent lamps are reduced: 60Hz / 50Hz .
- Language
Changes the language of the camcorder's menus. Eight languages are available: English, Simplified Chinese, Traditional Chinese, French, Spanish, Portuguese, German and Italian.
- TV Mode
To view playback on a TV, set your camcorder to either PAL or NTSC depending on your region.
- Format
Formats the micro SD memory card: Yes / No.
- Default Setting
Resetsthe camcorder to factory default settings:Yes/No.
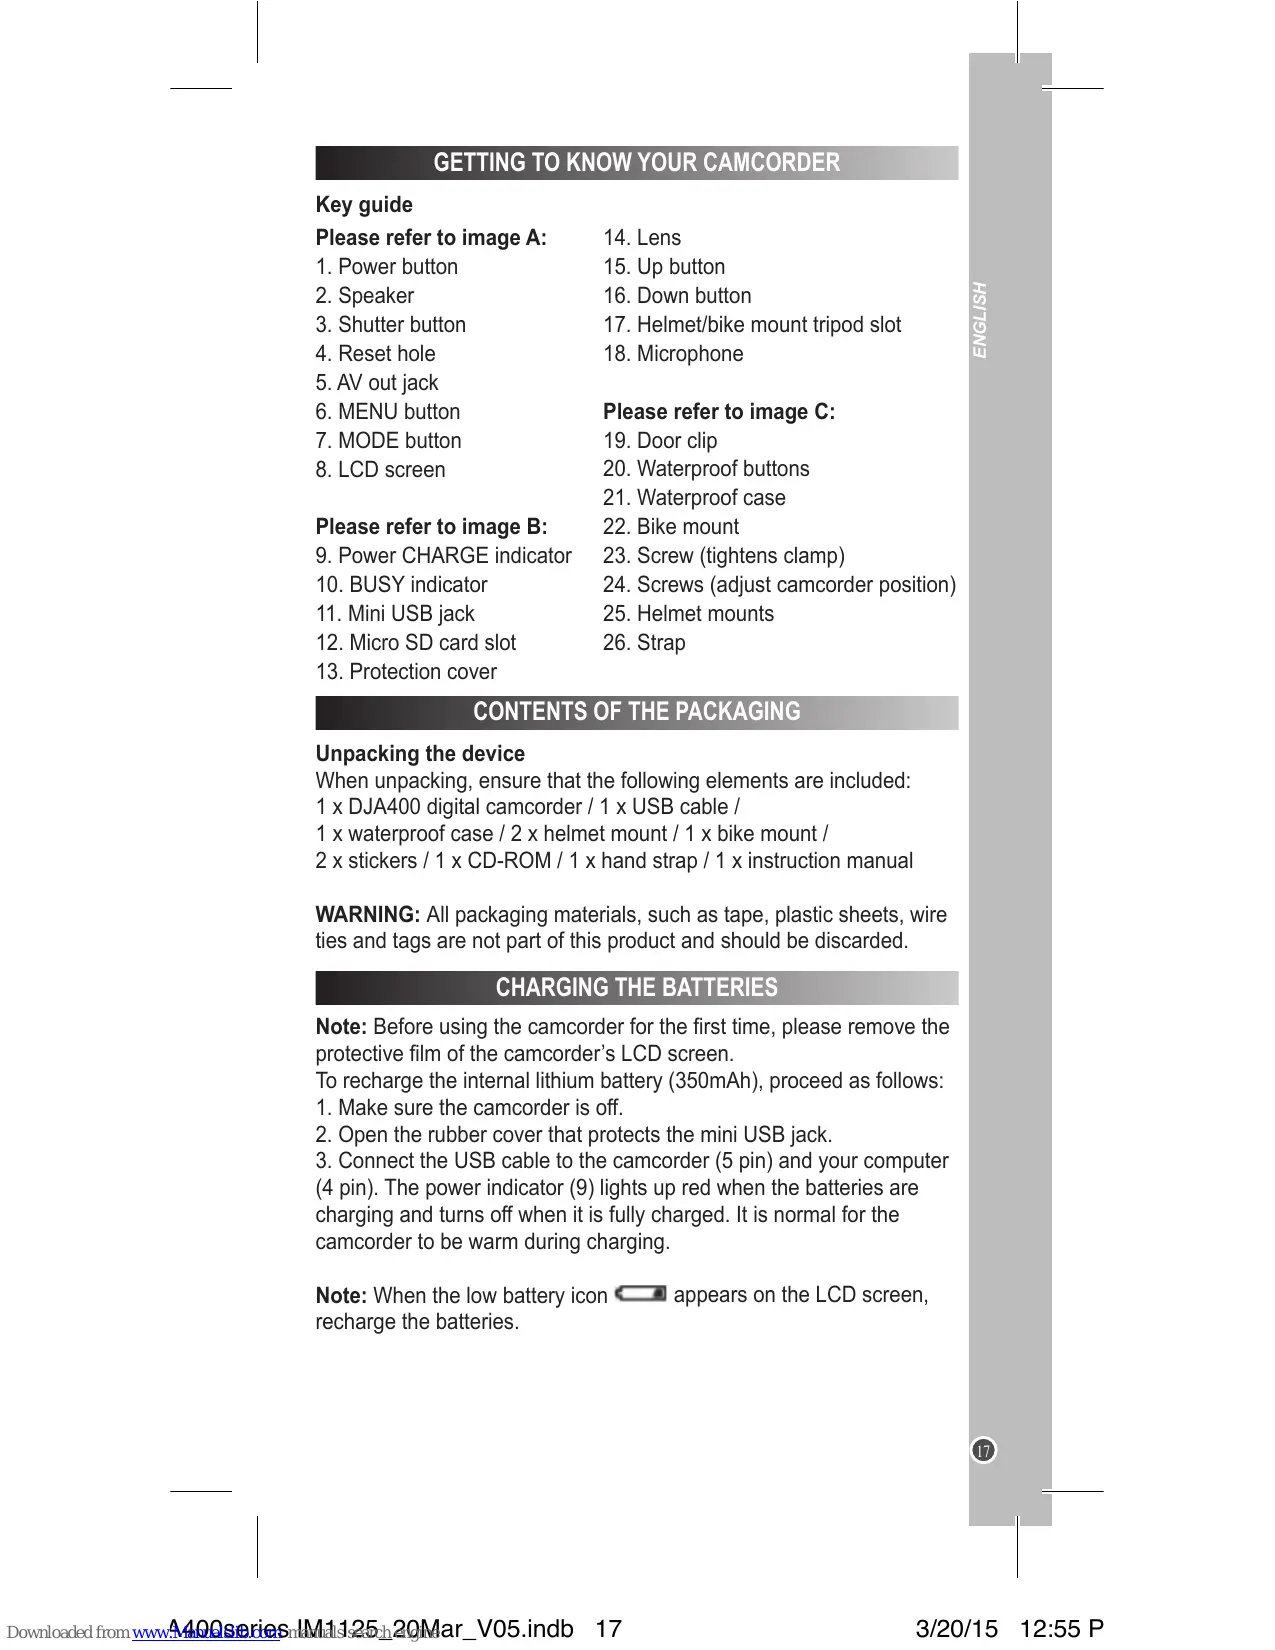
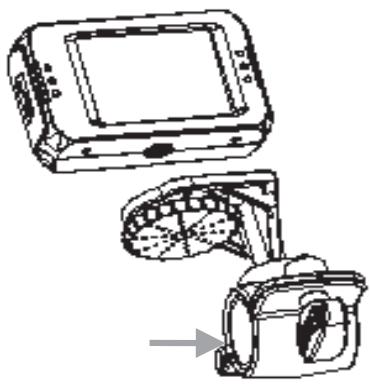
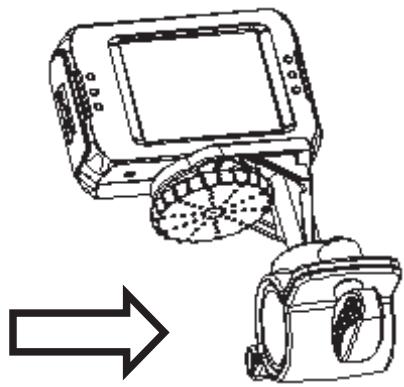
BIKE MOUNT (Assembly)
In order to use the camcorder more conveniently in outdoor sports or in under water situations, we have provided three kinds of main mounts packaged in this camcorder. Mount (A) is used in fixing to a bike, and mounts (B) and (C) are used in fixing to a helmet.
B
C
The operating steps as follows:
Fixing the sportive camcorder to a bike
- Put the camcorder inside the water resistant case and then lock the case or fix the camcorder directly onto the mount.
- Open the ring hole of the mount by loosening the screw.
- Insert the rubber pad inside the hole. Fix the mount to the bike handlebar and tighten the screw.
- Fix the tripod slot of the camcorder to the metal screw of the mount respectively.
- Adjust those screws to make the camcorder steadier and more convenient.
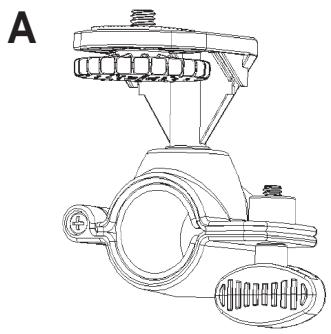
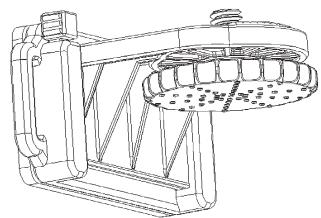
HELMET MOUNT (assembly)
Fixing the sportive camcorder to a helmet
- Put the camcorder inside the water resistant case and then lock the case or fix the camcorder directly onto the mount.
- Fix the tripod slot of the camcorder to the metal screw of the mount respectively.
- Adjust the screw to make the camcorder steadier and more convenient.
- After fixing the camcorder to the mount correctly, use a strap to fix them to the helmet.
- Insert a strap into the two ends of the mount, adjust length according to the helmet's size, and tie the strap up to your helmet.
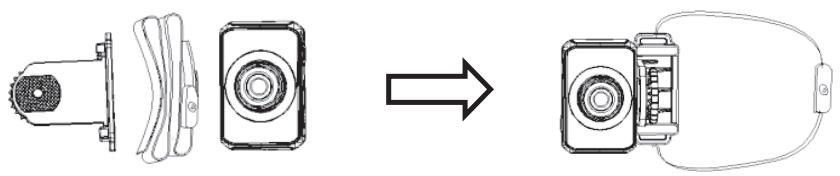
Mount (B)
Mount (C)
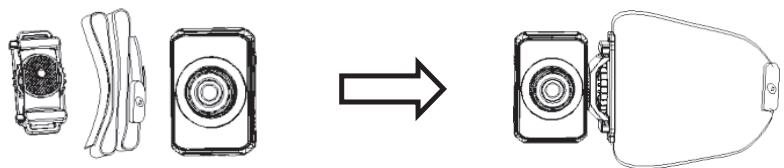
Helmet mount without strap
Attach the rubber sticker onto the back of the waterproof casing and then stick it onto your helmet. Or, attach the camcorder onto the tripod and attach the rubber sticker on the helmet mount and then stick it onto the helmet.
Note: When engaging in extreme sports, it is not recommended to only use the sticker to attach the camera without the additional use of a strap. Alternatively, you can purchase a more durable sticker for such activities.
CONNECTING THE CAMCORDER TO A TV
HSITON
You can play your files on TV by connecting an AV cable (not included).
- Connect the camcorder to the TV using an AV cable (not included)
- Turn on the TV and set it "AV" mode.
Note: Take care to properly match the colour.
- Switch on the camcorder.
- Set the camcorder to "record mode" (i.e. Camera or Video mode) to preview the subject that you want to record on the TV screen.
- Set the camcorder to Playback mode to review your pictures and videos.
Notes:
- Use the supplied AV cable (not included) to connect your camcorder to the TV.
- For a better image quality, set the TV system to PAL or NTSC ("TV Mode" in the "Setup" menu).
- If the image does not display in the center of the TV screen, adjust the TV settings (refer to the TV instruction manual).
- The batteries are also used when the camcorder is connected to the TV.
CONNECTING YOUR CAMCORDER TO A PC
- There are two ways to connect the content of your camcorder to your computer:
a. Connect the USB cable supplied to the PC and the camcorder.
b. Remove the camcorder's micro SD card and put it into a card reader and insert the card reader into your computer. - "Mass storage" will appear on the camcorder's screen.
- Now open either Quick Time Player (you may have to download this software from the internet if you do not already have it) or your computer's photo software and you can import your pictures or videos and edit as you normally would using this software.
- Open "My Computer" or "Windows Explorer" on your computer.
- A "Removable Disk" will appear. Double click on it to view the contents.
- Double click on the "DCIM" folder to view your photos and videos.
- Now you can copy and save your photos and video files to your computer.
DOWNSLOADING YOUR PHOTOS AND YOUR VIDEOS
Using "MAGIX Photo Manager 10":
- Connect the supplied USB cable to the camera and the computer's USB port.
- Turn on the camera. "Mass storage" appears on the screen when connection to the computer has been successfully completed.
- Double click on the shortcut "MAGIX Photo Manager 10". The pictures taken with the camera automatically appear on the home screen.
- Press "Import" button on the main menu (up left).
- You can copy and paste the pictures into any directory you choose.
Publishing your photos on social networking sites:
- Using "Magix Photo Manager 10", select the photo that you wish to publish on Facebook or Flickr.
- The selected image appears in an orange frame.
- In the menu bar, click the "Online" tab and select "Upload media to other web services" and then either "Upload media to Flickr" or "Upload media to Facebook".
- The "Upload" window will be displayed on screen. Fill in the various fields (file name, description, key words, etc.).
- Click "Upload" to confirm.
- Depending on your upload destination, you will either open the Facebook or the Flickr home page.
- Next follow in the instructions displayed on the screen to finish uploading.
SPECIFICATIONS
| Sensor | 1.3 Megapixels CMOS |
| LCD display | 1.77" TFT screen |
| Lens | F/2.8 f=5.3mm |
| Shutter | Electronic shutter: 1/2 ~ 1/800sec |
| Digital zoom | 4x |
| Resolution | Image: [5M 2592*1944] / [3M 2048*1536] / [1.3M 1280*960] |
| Video: [HD] / [VGA] | |
| Storage | External memory: micro SD card (Up to 32GB) |
| Power source | Li-ion battery (built-in) |
| Ambient temperature | Operating: 0°C to 40°C |
| Storage: -20°C to 60°C | |
| Microphone | Built-in |
| Speaker | Built-in |
| Dimension | 71.8 x 46.6 x 26 mm |
| Weight | About 55g |
MAINTENANCE
Only use a soft, slightly damp cloth to clean the unit. Do not use detergent. Do not expose the unit to direct sunlight or any other heat source. Do not immerse the unit in water. Do not dismantle or drop the unit. Do not try to twist or bend the unit.
WARRANTY
This product is covered by our 2-year warranty.
To make use of the warranty or the after-sales service, please contact your retailer and supply proof of purchase. Our warranty covers material or installation-related defects attributable to the manufacturer, with the exception of wear caused by failure to respect the instructions for use or any unauthorised work on the equipment (such as dismantling, exposure to heat or damp, etc). It is recommended to keep the packaging for any further reference.
In a bid to keep improving our services, we could implement modification on the colours and the details of the product shown on the packaging.
NOTE: Please keep this instruction manual, it contains important information.
Reference: DJA400series
Designed in Europe - Made in China
Lexibook®
United Kingdom & Ireland
For any further information, please call our Helpline: 0808 1003015
www.lexibook.com

This product is not a toy.

Environmental Protection:
Unwanted electrical appliances can be recycled and should not be discarded along with regular household waste! Please actively support the conservation of resources and help protect the environment by returning this appliance to a collection centre (if available).
FAMILIARICESE CON SUVIDEOCAMARA
Guía de los botones
Ver ilustración A:
LIGAR A CÁMARA A UMA TV
LIGAR A CÁMARA A UM PC
[3M 20481536]/[1.3M 1280960]
Video: [HD]/[VGA]
Memória externa:
Cartão micro SD (Até 32GB)
Eliminare file video
[3M 20481536]/[1.3M 1280960]
Video: [HD]/[VGA]
Memoria Memoria esterna:
scheda micro SD (fino a 32GB)