
LIT30230C - LIT30230C - Hob ELECTROLUX - Free user manual and instructions
Find the device manual for free LIT30230C - LIT30230C ELECTROLUX in PDF.

User questions about LIT30230C - LIT30230C ELECTROLUX
0 question about this device. Answer the ones you know or ask your own.
Ask a new question about this device
Download the instructions for your Hob in PDF format for free! Find your manual LIT30230C - LIT30230C - ELECTROLUX and take your electronic device back in hand. On this page are published all the documents necessary for the use of your device. LIT30230C - LIT30230C by ELECTROLUX.
USER MANUAL LIT30230C - LIT30230C ELECTROLUX
How to install your Electrolux Domino Hob - Worktop installation

4. PERSHKRIM I PRODUKTIT

4.1 Skema e siperfaques sè gatimit
1 Zone gatimi me induksion
2 Paneli kontrollit
OBCJNYKBAHE HA KJINEHTN
BnHa n3no3BaIe opunHnpe3epBn qactn.
Korato ce cBbP3BaTe c HauHn OToPn3IpaH OTdEn ,O6cnykBaHe", Tp8Ba Da nMaTe pOda PbKa cneHaTa INΦOpMaUaN: MoDen, PNC, cepuH Homep.
HnΦopMaunTa MoKe Da 6bJe OTKpuTa Ha TaBeKkata C OCHOBn DaHHN
Iпгдунрждени /Внимани-Инфорmaцяза 6e3onaCHOCT
①Obua nHΦopMaζηι ΚbBettι
IHHΦopMaun3a OKJHaTa CpeJa
3ana3bame cn npabTo Ha n3MeHeHn.
CbIbPJKAHNE
- INHΦOPMALIJI 3A BE3OPIACHOCT. 20
- INHCTPYKUIN 3A BE3OPIACHOCT 23
3.MOHTAX 25
4.ОПИСАНЕHA UРEDA 28 - BCEKNIHEBHA YIOTPEBA 30
- IPEINOPbKN N CbbETN 32
7.ΓPINAIIOUHCTBAHE 34 - OTCTPAHRAHE HA HEN3INPABHOCTN 34
- TEXHINUECKN DAHHN 36
- EHEPNIHA EΦEKTINBHOCT 37
11.ОПАЗВЕHAOKOLHATA CPEДA 38
1. UNHΦOPMAÇΥA 3A BE3OПАCHOCT
IpeiMoHTnpaHTo uynoTpe6aTa Ha ypeDa BnMaTeJHo npOyeTe IpeIoCTaBeHNTe HNcTpyKcU. Ipon3BODnteJIaT
He e OTROBOpeH 3a HapaHЯBaHnI IIN IOBpeI N B pe3yJITaT Ha He npabuHa IHCTaIauZnI IIN yNOTpe6a. BInarN dpbXTe INCTpyKcIInTe Ha 6e3OpaCHO I IecHO DOCTbPiHO MRCTO 3a CnpabKa B 6bDeIe.
1.1 Безогаст за.Deцату ихоротас орарни cnocoboctn
To3n ypeJ moKe da 6bJe n3noJ3BaH OT deca na 8 roDnUHa Bb3pact, KaKTo n JInuCa C HamaJIeHN fN3nueCKn, CETINBn I yMCTBeHn Bb3MOxHocTn NIn JInuCa 6e3 ONIT IN PO3HaHnA, cAmO aKO Te ca PoJ Na6JIoJDoHne NIn 6bJaT INHCTpyKTIpaHn OTHOCHO 6e3OnaChata yNoTpe6a Ha ypeDa n Bb3MOxHnTE pNCKOBe.
- Deça mejdy 3-и 8-rodiuha Bb3pactи xopa c Tejkn nJiKOMnJIeKCHN yBpejdaHna Tpr6Ba da ce nbpxkat daJeY OTypeDa, oCBen aKO He ca NOd NOCTOaHNo Ha6JIoudeHne.
- Деца под 3-юшна вьз pact Тразва за се дьржат далей от урEDA, освен akо не са под постаянно habл endeонe.
He nO3B0JIaIe Ha deca da cn irpaarT cypeia.
- ДрьжтЕ BCичКи ONaKOBКДаЛeЧ OT Deцa И n3XbРлeTe ONaKOBКИte NO MeCTHITe npaBnla.
BHIMAHHE: Pa3eTe DecaTa n DomaunHe JIO6mCu n daJeU OT ypeDa, Korato pa6OTn IIn KOrato N3CTnBa. DoctbHnTe qactn Ce HargBaT no BpeMe Ha yNoTpe6a.
- Ako ypeiBt nMa yctpoiCtBO 3a DeTcKa 6e30nacHocT, TOrTp8Ba Da ce aKTHBnpa.
- Д ecа He Трябва Да ИЗВьршВаТ почиствае Или подрьжka на урEDA 6e3 надзор.
1.2 OchOBHa 6e3OnaCHOCT
BHIMAHHE: YpeBt n HeROBnTe DoCTbHn qactn Ce HaropeuBaT no BpeMe Ha ynoTpe6a. Tp6Ba Da ce BHIMaBa N da ce N36raBa DOKOCBaHe Ha HarpeBaTeJIte.
BHIMAHHE:Пьржени С мазнина пи олно,бe3 hab3ор, може да e onaCHO ида пpeДИЗВИКА пожар.
- HNKOΓA He ce onntBaIte Da 3aracnte noJapc BODa, a n3KJIouTe ypeDa n CpeD TOBa NOKpIe TpIaMbka HApP. c KaNaK nIIn ORHeynpHO ODeJIo.
- ПЕДУПЕЖДЕНЕ: Урет He Тразьа Да e 3axpaHbaNЧe3 Вншно певкючвацу устpoистBO KaTO TaIMep Илдa e CBbp3an KbM eI. БерURA, KOЯTO NOCTОЯнHO CE BKЛ. ИИЗКЛ. OT UстpoистBO.
- ПЕДУПЕЖДECHNE: Прочьт на rotbehе Тгбвада 6ьдe наблюдаван. Каткят прочьс на rotbehе Тгбвада 6ьдe наблюдаван постаянho.
BHIMAHHE: OnachocT OT noXap: He cxbxpanyBaIte npedMeTN Bbpxy rotBapcknA nnOT.
MeTaJIHn IpeIeMTeN KaTo HOxOBe, BUNuIcN, JbJxUcN IN KanaI, He Tp8Ba Da ce NOCTaBraT BbPxy RotB. NIOt, TbN KaTO MOrat Da ce 3aIprEaT.
He n3noJ3BaIte ypeJa, npeNi Da ro INHCTaIInpaTe BbB BrpaDeHaTa KOHCTpyKcIy.
He nouchTbaIte ypeIa c npoUncTaUka.
Cnei ynoTpe6a, n3KIOUeTe roTB. IJOT OT KJIOny 3a ynpabIeHne i He pa3uHTaIte Ha cyHKcIyTa 3a JOKaJIIN3IpaHe Ha cBIOBe.
Ako cTBKIOKepeamnUHaTApCTbKJIeHaTa NOBbpxHOCT e HanykaHa, n3KIOUcTe ypeDa n rO n3KIOUcTe OT eJeKTPnueckaTa mpeJa. B cIyauaYe ypeDbT e CBbP3aH dIpeKTHO KbM eJeKTPnueckaTa mpeJa C IOMoUcTa Ha cBeiINHTeJHa KytJ, IpemaxHeTe pPeDna3nteJra, 3a da n3KIOUChTe ypeDa OT eJeKTPnueckaTa mpeJa. B npOTnBeH cIyaua Ce CBbPKeTe C OTOpn3npaHn cepBn3eH ueHTbp.
Ako 3axpaHbauIaT Ka6eI e nobpeIeN, ToI Tp86Ba da ce CMeHn OT npOn3BODnteJIa, OToPn3IpaH cepBn3 IIn IInca CbC CXoHa KBaIIΦnKaIaIa, 3a Da Ce n36eHrHe OnaCHOCT.
BHIMAHNE:ИЗползваitecamопразителуза кOTLOHn pa3pa6bOteHn OT пОнЗВODиTeЯ ИЛN yNOMeHaTи OT HeRoВ ИНСТPyкцInTe 3a уNotpe6a,ИЛN пeДпАЗИтELn 3a KOTLOHn BrpaDeHn BуpeDA.ИЗпOLЗВаHeTo Ha
2. INHCTPYKUN 3A BE3OPNACHOCT
2.1 MoHTax

BHIMAHHE!
Cama KbaIINΦnIupaH NJIe MoXe Da I3BbPm MOHTaKa Ha ypeHa.

BHIMAHNE!
OnachocOT HapaHbAne nnn noBpeHa Ha ypeHa.
Maxhete BCnUKN ONAKOBN.
He mONTpaTne Hn H3noJ3BaIte noBpeDeH ypeI.
CneBawte HNCTpyKunTe 3a INHCTaJInpaHe, npINIOKeHN KbM ypeJa.
- Tрябва да спаЗвate минимаЛHOTOPa3CTОнHe Do ДPyги уpeДи uystpoiCTBa.
BInHaRn BInMaBaITe, KOraTo MeCTnTe yPeJa, Tb' KaTo e TeKbK. BInHaRn n3NoJ3BaITe ppeJna3Hn PbKaBnU n 3aTBopeHn O6yBKn.
- YnIbTHeTe cpr3aHnte NOBbpxHOCTN C yIbTHInTe, 3a Da npedOTbpaNTe n3dYBaHe nopadn Bnara.
- Празаьiate Долнata уст на урда от napa и вага.
He montnpaIte ypeia 6n3o do bpaT a nn npd npo3opeu. Taka ue npedotbparnte naaneto Ha ropeu nrotbapckn cbdoBe ot ypeia, koraTo ce OTBOPN Bpataa nn npo3opeuT.
Ako ypeIbTe mOHTnpaH naI shkafoBe, yBepete ce,Ye pa3CToRHeTo Mekdy dbHOHa yPeDa n rOpHnIshkae eoCTaTbUHO 3a UnkylauNHa Bb3dYxa.
-ДьнотоHaуpeMaMOKeДa ceHaropeu.МоNTирайTe pa3dJIteTelenHaHEnПОдуpeДa,ИЗразовTeONtIePnIaT,HerOpIMOДьрВОИЛДугИHerOpIMMaTePmaJIIN,3aДaпeДOTbPaTInTeДOCtБДdoДьНOT.
Pa3dJIaIyIaIaIeIaIIeIaIaIaIaIaIaIaIaIaIaIaIaIaIaIaIaIaIaIaIaIaIaIaIaIaIaIaIaIaIaIaIaIaIaIaIaIaIaIaIaIaIaIaIaIaIaIaIaIaIaIbTaTaaNIO aNIO aNIO aNIO aNIO aNIO aNIO aNIO aNIO aNIO aNIO aNIO aNIO aNIO aNIO aNIO aNIO aNIO aNIO aNIO aNIO aNIO aNIO aNIO aNIO aNIO aNIO aNIO aNIO aNIO aNIO aNIO aNIO aNIO a
- YBepete ce, ye OTbOpjt 3a BeHTnlauniaot 2 mm mexdy paobthata nobbypxhocn
npedHaTa Yact Ha DoJHnMaOyIe CbO6oJen. IapAnzraTa He NOKpBa nOBpei, pniuHHeN O T JInca Ha aDeKBaTHo BEHTnlaZnOHNo pa3CTOJHne.
2.2 Cbbp3BaHe KbM eNeKtpnueckaTa MpeXa

BHIMAHNE!
Pnck OT npoxap nn TOKOB ynap.
BcnuKn en. Bp3kn Tp6Ba da ce HnpaBt OT KbaJInΦuNpuh eNeKtpoTeXnK.
- YpeIbT TpI6Ba Da e 3a3eMeH.
- Прази за ИЗвьршптЕ DeиctВи, увepete ce, Ye ypeДБТ e IN3KЛIOчЕн OT eNEKtpO3axpaHbAHeTo.
- YBepete ce, Ye napameTpnte Ha TabeIkata C TexHnueckn DaHHn Ca CbBmecTUMN C eNEKtpuuecknte DaHHn Ha 3axpaHbauaTa MPeka.
YBepTe ce, ye ypeIbT e nHCTaIIpaH npabuJIHo. Xla6abN i HnPaBUNiH neKtprueckn KaBeJn IInI uenCeJI (aKO ca HaIuHN) MoarTa da DoBeJaTdo npeharpRaHe Ha KJIemnte.
-Използваши правлиен кабел 3a 3axpaнbaHETo.
He no3BovlaBaiTe eIeKtpnuecknte Ka6en Da ce npenlntaT.
- Ybepete ce, ye e MOHTnpaHa 3aunTa oT TOKOB ynap.
3akpenete ka6ena c npitraua cko6a npotNB OIbBaHe.
YBepTe ce, ye Ka6eJIbT 3a eIeKtpo3axpaHbaHeTo n IeIeCena (aKO e HauIueH) He ce DoKocBaT DO HaropeuHnIypeNnIropeuNcBDoBe 3a roTBeHe, KOraTO BkIIOUHTe ypeDa B 6IIn3KInTe KOHTaTn.
He n3no3BaTe pa3KnOHTeIu nn aanTepn C MHOro BXoOBe.
He noBpeKdaiTe 3axpaHbAunia uencen (aKe e hAnuYe) n 3axpaHbAunia Ka6eI. CbByPkeTe ce c hAnuN oToPi3npan
cepBn3eH zentbnpnn eJKeTpoTeXnK 3a CMHaTa Ha NOBpeDeH 3axpaHbAa Ka6eJ.
3aunntata OTOKOB ynap Ha ropeuinte n 301npanu Yactn Tpr6Ba Da 6bJe 3aTeHaTaNt KaBb HauH, Ye da He MOKe Da Ce OTCTpAHn 6e3 INHCTpyMeHTN.
CbpxkeTe Ka6eJa 3a 3axpaHbaHeTo KbM KOHTaTe eINHCTBeHO B KpaHa INHCTaIauTtA. YBepTe Ce, Ye IeNcIbT 3a 3axpaHbaHe e IOCTbIeH CJIeI INHCTaIIpaHeto.
Ako KOHTaKbT e pa3xla6eH, He CBbP3BaIte 3axpaHbAuny IeNceI.
He n3dIbprBaIte 3axpaHbAsnKa6eI,3a da n3KJIouHTe ypeJa. BInHarn n3dIbprBaIte 5eencela Ha 3axpaHbAHeTo.
- I3noI3BaIte caMo npabInHn yctpoiCTBa 3a n3OlaCn: ppeIpa3Hn npekCbCaHu Ha mpeKATA, ppeIpa3HTeI (ppeIpa3HTeIte OT BnHTOB TnT Tp8Ba Da ce N3BaAraT OT facyrata), n3KnIOyBaTeIи KOHTaKTOpN 3a yTeUka Ha 3a3EmBAHeTO.
- EneKtpnueckata nHcTajauqna Tpr6Ba da nHa n30JnpaO yCTpoiCTBO, Koeto Bn PO3BOLraBa da n3KJIouHTe ypeDa ot en. MpeXaTa npn BCNUCKn nonIOscn. H30JnpaOTo yCTpoiCTBO Tpr6Ba da e o shnPnHa Ha OTbaprHe Ha KOHTaKtta MNHNmym 3 MM.
2.3 ynoptpe6a

BHIMAHNE!
PnCK OT hapaHyaBe, n3rapaHnna n TOKOB yap.
MaxheTe BCnKOnaKOBKn, eTNKeTn 3aunTHOTo fOJNO (aKO nMa) npEi npBpBaTa yNtpe6a.
To3n ypei e npedHa3HaueH cAmo 3a. domaunha ynoTpe6a.
He npomehyTe npedHa3NaueHneTo Ha ypeda.
- Ybepete ce, Ye BeHTnlaZnOHHnTe OTBOpn He ca 6nOKnPaHn.
He octabraye ypeda 6e3 nad3op,dokaTo pa6oTu.
CneBcKa yNOpTe6a N3KJIouCbAte 30Hata 3a rotBeHe.
- He pa3uHTaIte Ha deTeKToPa 3a TuraHn.
He noctabaIte npnbopn nn Kanauo ot TnraHn I TeHJkepn Bbpxy 3OnHte 3a rotBeHe. Morat da ce haropeuT.
He n3non3BaIte ypea c MOKpn pIe nn aKO e B KOHTaKT C BOJa.
He n3noJ3BaIte ypeDa KaTo pa6oTHa NOBbpxHocT mN 3a cbxpaHeHne.
Ako NOBbpxHocTtHa ypeDa e HanykaHa, He3a6abHO n3KnHouTe ypeDa OT UeIcena. 3a da ce npedotbpatn TOKOB ydap.
IotpeBnteIN CneimCmeKbP Tp6Ba Da cna3BaT nCTaHnra Hn-MaJIko 30 cm OT INyKUHOHHaTa 3OHa 3a rotBeHe, KOraTo ypeBt pa6OtN.
Korato noctabraye xpaHa B ropeo onno, MOKe da npbcka.

BHIMAHNE!
OnachocT OT noXap nnn ekCnno3n
HaropeuHHTe Ma3HHNn IIN MacNo MORaT Da IpeDn3BnKAT Bb3PiMaHeHmI npA. DpbXTe INaMbCHTe IIN HaropeuHHTe IpeDMeTn DaJeU OT Ma3HHNn IIN MacNO, KORATO rOTBNTe C TAX.
- Papnte, KOINTO ce OCBO6OXdAbat OT MHORO HArOpEeHOTo MaCNo, MORaT da npuHnT CNOHTaHNo 3anaJbHe.
- I3noJI3BaHOTo MaCNo, KoETo CbIbPka XpaHnteHNIOCTaTbU, MoKHe Da npuynHn NOxap Prn PO-HNCKn TempePaTyPi, OTKoJIKOTO MaCNoTO, I3noJI3BaHO PbPBnI PtB.T.
He noctabayTe 3anaJInteHm MaTePnAIn nnI npEdmETn, KOINTo Ca HanoEH CbC 3anaJInteHm MaTePnAIn, Bypeda, B 6bn3OCT Do Hero nnBbpxy Hero.

BHIMAHNE!
OnachocOT noBpea Bypea.
He octabayte ropeu ngTbapcN cbdoBe Bbpxy KOHTpOJIHOTo Ta6no.
He nocTaBraIte ropeu Kaak Ha TnraH Bbpxy CTbKLeHaTaNOBbPxHOCT Ha NIOta.
He octabraye TeuHocTb B roTbapcknTe CbdoBe da N3Bpu HanbJHO.
He no3B0JBAIte Bbpxy ypeDa da naDat npdeMeTn nnr roTbapcKn cboBe. NobbpxHocTTa moKe da ce nobpei.
HeakTbBpaIte30HITe3arotBeHe npn npa3HNrOTrBapCKn CbIOBeNJIaKO HMa roTbapCKn CbIOBe.
He nocTabaIte anymHneBO oonIO Bbpxy ypeJa.
CbdoBe 3a rotBHe OT yUryH, anyMnHn nn C nobpeDeHo DbHO, MORat da naDpaKAT CTbkIIOTo/CTbkNKepePamKaTa. BnHar n NobduraTe Te3n npedmetn harope, Korato Tpr6Ba Da rnpemecTeNo NIOuHaTa 3a rotBHe.
To3n ypeI e npEHa3NaueH cAmo 3a roTBeHe. ToI He Tp8Ba Da 6bJe n3No13BaH 3a HnKaKBr DpyrU CEIN, HapPIMep OToJIeHne Ha NOMEuEHNJ.
2.4 FrpIka n nouchTbahe
Почистваite peIDOBHO ypeda,3a da npeIDOTBpATnTE yBpeKdAne Ha NOBbpxHOCTHnMaTePnAJI.
- N3kJIIOUeTe ypeDa n rO octaBeTe da ce OXJaAn, ppeDn da rO NOuNCTnTe.
He n3no3BaIte BOIOCTpyuKa IIn npa, 3a Da noUcTnTe ypeDa.
- POnucTeTe ypea c Mokpa N Meka KbPna. N3PON3BaIte cAmo HeyTpalHn npenapatN. He n3PON3BaIte a6pa3uBn npOdykTn, rpanabN, nouchTbaUc KbPn, pa3TBOpNTeIN nn MeTaJIHN ppeMeTn.
2.5 O6cIyKBaHe
3a nonpaBka Ha ypea ce cbpKeTe c OTOPUNPAHNA cepBn3eH ueHTbp.
U3no3BaTe cAmo opuHnHaHnpe3epBHN qactn.
- OTHOCHO JAMnata(HTe) BbTpE B TO3n npOdyKT n pe3epBHNte JAMnn, npOdaBaHn OTdEJIHo: Te3n JAMnn ca npPeJHa3NaueHn Da n3IbPjKAT Ha ekCTpeMnHn 0u3NueCKn ycNoBnB DOMaKnHcckn ypeDn, KaTO TemnepaTpya, Bv6paqnn, BLnaxKHOCTn nn Ca npPeJHa3NaueHn Da cunHaJIIN3npat INHOpMaucn 3a pa6oTHOTcBCToRHe Ha ypeDa. Te He ca npPeJHa3NaueHn 3a m3NOJ3BaHe B Dpyr npInIOxKeHn H He ca NODXoJaU 3a OCBeTBaHe Ha NOMeUeHn B DomaKnHCTBOTO.
2.6 N3xBbPJIaHe

BHIMAHHE!
Puck OT HapaHyaBe nIi 3aDywaBaHe.
CbpxTe ce c obuHcknte BnaCTn 3a HOpMaun 3a TOBA kak da n3XBpJIInTe ypeDa npabUNHO.
- N3kJIouTe ypeDa oTe eJekTpOaXpaHbaHeTo.
I3BaTe 3axpaHbau n en. Ka6eB b 6n3ocT do ypea n ro n3XbPneTe.
3. MOHTAX

BHIMAHNE!
Bx. rnaBa "Be3onacnoct".
3.1 Ппеди моттакa
Ipei Da nHCTaJInpaTe pIoUyata, no-dOny 3aIIwete uHΦoPmaCuaTAt O T a6eKkata C daHH. Ta6eKkata C oChOBnTe daHH e pa3noLoXeHa B DoJIHATA YAcT Ha pIoUyata.
MoeJ
HomepHa npOdyKT
(PNC)
CepueH Homep
3.2 Bvpradeeni nloyn
BrpadeHnTe pIoOnMOraT da ce n3noI3BaT cAmO cNeI KaTo Ca MOHTnpaHn B NOxOJaUcBpAdeHn eDInHnIu pa6oTHn PLOTOBe, KOINTOTROBaprHa CTAndapTnte.
3.3 Cbbp3Baau Ka6eI
ПлOTьт echaбен cbc CBbp3Baau Ka6eJ.
3a da noJMeHnte NOBpeHEn 3axpaHbAu Ka6eI, n3no3BaIte Ka6eTn: H05V2V2-F, KoITo n3DbpKaHa TeMnepaTypa oT 90°C nPi No-BnCoka. CbPKeTe ce c MeCTHna cepBn3eH ueHTbp.
3.4 3akpenBaHe Ha ynIbTHHeHneTo - MoNTax OTrope
- Почисте плOTA okоло Изрязанота 3ОHA.
2.ПилeneTe DoCTaBeHata yNbTHnTeHa IeHTa 2x6 MM Bbpxy DoJHnpyb6 Ha IIIOyata, NO BbHnHry p6b Ha CTbKnOkepAMkata.He pa3TgaiTe. YBepete ce, ye KpanuataHa
yIbTHHTeJIHaTaJeHtCaNoCTaBeHN B CpeJATAHa eHata CTpaHa Ha IIOUyata.
3. Добаве Тяковский Млиmetра Кьм Дыжната, korato рекete улътHTHITELHATA ЛЕТА.
3.5 MoHTax
- CbeHHeTe IBaTa KpaHa yIbTHInTeHnHaTaeHt eINH cDpyr.

3.6 Mohtax Ha noBce OTeHa nNoya

YouTube
www.youtube.com/electrolux
www.youtube.com/aeg

4.ОПИSCAHNEHA YPEДА
4.1 Pa3noJoxHeHa nobbpxHocTt 3a rotBeHe
1 INyKUHOHHa 3OHa 3a roTbeHe
2 KoHTpoJIeH naHEn
4.2 OΦopMneHne Ha KOMaHdHOTo Ta6JIo
I3noJI3BaIte ceH3OpHnTe noJeTa, 3a da pa6oTnte c ypeJa. Ioka3aHnra Ta Ha dinCnpe, INHdkaTOPnte n 3ByKOBtne CnHaII NOKa3BaT KOHcHKUIN pa6oTrt.
4.4 OptiHeat Control (3-cTbNKOB INHdNKaTOP 3a OCTaTbUHa TOJIINHa)

BHIMAHNE!
三 /三 / CbuectByba puckOT n3rapaHe, BCJEcdTBne HaOCTaTbHnata TOnJIHa.
INHdkaTopnTe NOKa3BAt HNBOTo Ha OCTaTbUHaTa TOnJIHa 3a 3OHnte 3a rotBeHe,
KoITo I3NoJ3BaTe B MOMeHTa.
Pa3mepnHa roTbapckn cboBe
IHyDyKUHOHHTe 3OHn 3a rotBeHe aBTOMaTmHc Ce npncOco6BaT KbMa pa3Mepa Ha dbHOTo Ha rotBapCKn CbD.
- EfeKTHBHOCTTa Ha 3oHaTa 3a roTBHe 3aBnCn OT dIaMeTbpa Ha roTbapCKn CbD. CbDoBe 3a roTBHe C NO-MaTbK dIaMeTbp OT MNHmAlHnI NOJyBaAT cMo Yact OT MOUHOCTTa, rEhePnpaHa OT 3oHaTa 3a roTBHe.
- Ot cbo6paXeHn 3a cnIpyHocT n 3a onTNMaJIHN pe3yIITaTI npri rotBeHe, He n3noJ3BaIte roTbapCKn CbD, KOJIto e noRorJAM OT NOCUeHOTo B „CneuΦnKauIm Ha 3OHn 3a rotBeHe". IV36raBaiTe n3noJ3BaHETo HA roTbapCKn CbD 6n30 Do KOHTPOJHOTo Ta6No NO BpeMe Ha rotBeHe. Toba MoKeJa noBnIe Bbpxy fynKlunOnHa paHTo Ha KOHTPOJHOTo Ta6No Hnn MoKe CnyauHDo a AKTNBupa fynHKUnTe Ha KOTJHOHa.

BnKTe ,TexHnueckn xapakTepncTNKn".
6.2 WymoBete no Bpeme Ha pa6ota
Ako 4yBaTe:
- NykaustuM: rotBapcknT CbE nHaPpaBeH OT pa3JIuueH MaTePnA1 (KOHCTpyKcIycaHDbV).
CbIpeHe:Bue n3noJI3BaTe 3OHa 3a roTBeHe C BnCOKo HnBO Ha MOUHOCT, a roTbAPCKnA rTcBd e HAnpabeH OT pa3JInuH MaTePnaJI (KOHCTpyKcIra CaHDbvU).
6yuehe:Bue n3noJ3BaTe BnCOKo HnBO Ha MOUHOCT.
- UpaKaHe: eJekTpueecko npeBknHouBaHe.
CBNCTeHe,6pMbMueHe:BeHTnNaTOpbT pa6oTu.
UymoBeTe ca HopMaJIHn I He Noka3BaT HEn3npaBHOCT.
6.3 Пгимери 3a pa3лчни начни 3a rotBeHe
Bp3kata Mekdy CTeneHTa Ha HargpaBaHe i KOHCymaunraHa eHepnHa 3oHaTa He e JIneHb. Korato yBeJIuNte CTeneHTa Ha HargpaBaHe, TRe He e npOnOpzIOHaJHa Ha yBeJIuYabAHeto HA KOHCymaunraHa eHepn. ToBa O3NaHaba, Ye 3oHaTa 3a ROTBeHe CbC cpeHa CTeneH Ha HargpaBaHe n3NoTBA NO-MANKO OT NIOBnHaTa OT CBOrTa eHepn.

ДаннiteВспдьашаТаБица ca opиентуровчИ.
9.1 CnueuФнkaцna Ha 3OHTne 3a roTbeHe
| Зона за говене | Номинална мош-ност (при макши-мална топлини настroduка) [W] | PowerBoost [W] | PowerBoost мak-cимална пордл-jжпелноct [Min]. | Диаметьр на гов- ТварскITE сбдove [MM] |
| Предна среда | 2300 | 3700 | 10 | 180 - 210 |
| Задна среда | 1400 | 2500 | 4 | 125 - 145 |
MoUHocTtHa 30HnTe 3a rotBeHe MoKe Da ce OTKIOHraBa B MaIKI rpaHnCi NT daHHnTE B Ta6nCtA. Tc Ce npOMeHb 3aBnCmOcT OT MaTePnJaN pa3MepHte Ha rotBapckn CbD.
3a onTImaJIHn pe3yIITaTI npI rOTBeHe n3NoI3BaIte roTbapcKn cIIOBE, He no- roIeMn OT dIaMeTbpa, NocOueH B Ta6NIuTa.
How to install your Electrolux Domino Hob - Worktop installation

4. OPIS PROIZVODA
4.1 Raspored povrsine za kuhanje

1 Indukcijska zona kuhanja
2 Upravljacka ploča
5. SVAKODNEVNA UPORABA

UPOZORENJE!
Pogledajte poglavla sa sigurnosnim uputama.
How to install your Electrolux Domino Hob - Worktop installation

4. POPIS SPOTČE
4.1 Usporadani varne plochy
1 Indukcni varna zona
2 Ovladaci panel
4.2 Rozvrženi ovladaciho panelu
WE'RE THINKING OF YOU
Thank you for purchasing an Electrolux appliance. You've chosen a product that brings with it decades of professional experience and innovation. Ingenious and stylish, it has been designed with you in mind. So whenever you use it, you can be safe in the knowledge that you'll get great results every time.
Welcome to Electrolux.
Visit our website to:

Get usage advice, brochures, trouble shooter, service and repair information: www.electrolux.com/support

Register your product for better service: www.registerelectrolux.com

Buy Accessories, Consumables and Original spare parts for your appliance: www.electrolux.com/shop
CUSTOMER CARE AND SERVICE
Always use original spare parts.
When contacting our Authorised Service Centre, ensure that you have the following data available: Model, PNC, Serial Number.
The information can be found on the rating plate.
Warning / Caution-Safety information
① General information and tips
Environmental information
Subject to change without notice.
CONTENTS
1.SAFETY INFORMATION. 74
2.SAFETYINSTRUCTIONS 76
3. INSTALLATION 79
4.PRODUCT DESCRIPTION. 81
5.DAILYUSE. 83
6. HINTS AND TIPS 85
7.CARE AND CLEANING 87
8.TROUBLESHOOTING 87
9. TECHNICAL DATA 89
10. ENERGY EFFICIENCY 90
11. ENVIRONMENTAL CONCERNS 90
1. SAFETY INFORMATION
Before the installation and use of the appliance, carefully read the supplied instructions. The manufacturer is not responsible
for any injuries or damage that are the result of incorrect installation or usage. Always keep the instructions in a safe and accessible location for future reference.
1.1 Children and vulnerable people safety
- This appliance can be used by children aged from 8 years and above and persons with reduced physical, sensory or mental capabilities or lack of experience and knowledge if they have been given supervision or instruction concerning the use of the appliance in a safe way and understand the hazards involved.
- Children between 3 and 8 years of age and persons with very extensive and complex disabilities shall be kept away from the appliance unless continuously supervised.
- Children of less than 3 years of age should be kept away from the appliance unless continuously supervised.
- Do not let children play with the appliance.
- Keep all packaging away from children and dispose of it appropriately.
- WARNING: Keep children and pets away from the appliance when it operates or when it cools down. Accessible parts become hot during use.
- If the appliance has a child safety device, it should be activated.
- Children shall not carry out cleaning and user maintenance of the appliance without supervision.
1.2 General Safety
- WARNING: The appliance and its accessible parts become hot during use. Care should be taken to avoid touching heating elements.
WARNING: Unattended cooking on a hob with fat or oil can be dangerous and may result in fire. -
NEVER try to extinguish a fire with water, but switch off the appliance and then cover flame e.g. with a lid or a fire blanket.
-
CAUTION: The appliance must not be supplied through an external switching device, such as a timer, or connected to a circuit that is regularly switched on and off by a utility.
- CAUTION: The cooking process has to be supervised. A short term cooking process has to be supervised continuously.
- WARNING: Danger of fire: Do not store items on the cooking surfaces.
- Metallic objects such as knives, forks, spoons and lids should not be placed on the hob surface since they can get hot.
- Do not use the appliance before installing it in the built-in structure.
- Do not use a steam cleaner to clean the appliance.
- After use, switch off the hob element by its control and do not rely on the pan detector.
- If the glass ceramic surface / glass surface is cracked, switch off the appliance and unplug it from the mains. In case the appliance is connected to the mains directly using junction box, remove the fuse to disconnect the appliance from power supply. In either case contact the Authorised Service Centre.
- If the supply cord is damaged, it must be replaced by the manufacturer, an authorized Service or similarly qualified persons in order to avoid a hazard.
- WARNING: Use only hob guards designed by the manufacturer of the cooking appliance or indicated by the manufacturer of the appliance in the instructions for use as suitable or hob guards incorporated in the appliance. The use of inappropriate guards can cause accidents.
2. SAFETY INSTRUCTIONS
2.1 Installation

WARNING!
Only a qualified person must install this appliance.

WARNING!
Risk of injury or damage to the appliance.
-
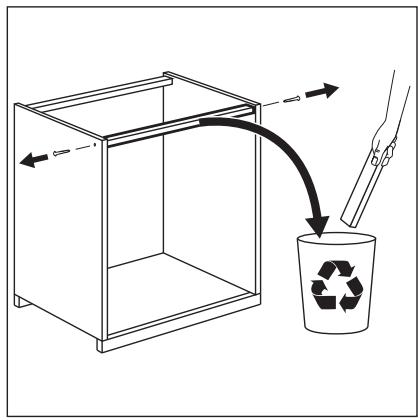
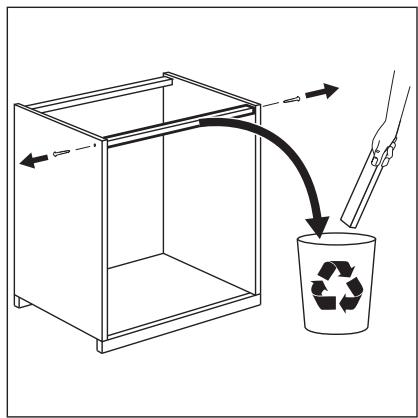
Remove all the packaging.
-
Do not install or use a damaged appliance.
- Follow the installation instructions supplied with the appliance.
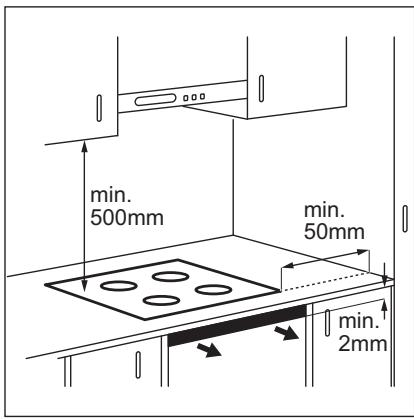
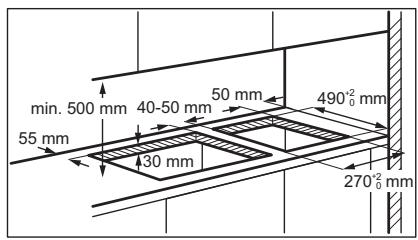
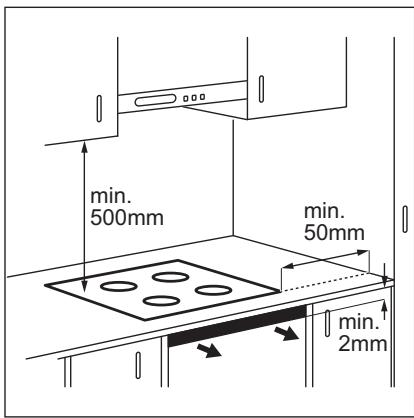
- Keep the minimum distance from other appliances and units.
Always take care when moving the appliance as it is heavy. Always use safety gloves and enclosed footwear. - Seal the cut surfaces with a sealant to prevent moisture from causing swelling.
- Protect the bottom of the appliance from steam and moisture.
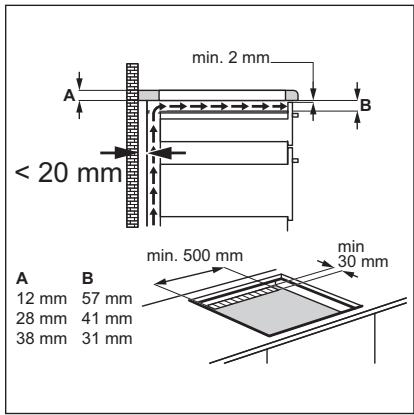
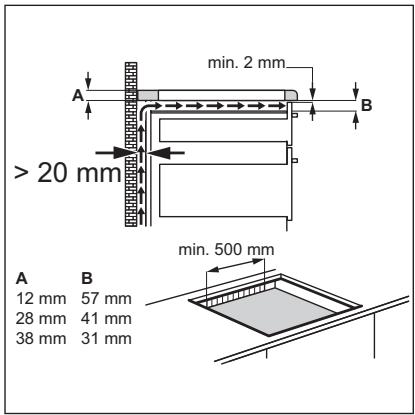
- Do not install the appliance next to a door or under a window. This prevents hot cookware from falling from the appliance when the door or the window is opened.
- If the appliance is installed above drawers make sure that the space, between the bottom of the appliance and the upper drawer is sufficient for air circulation.
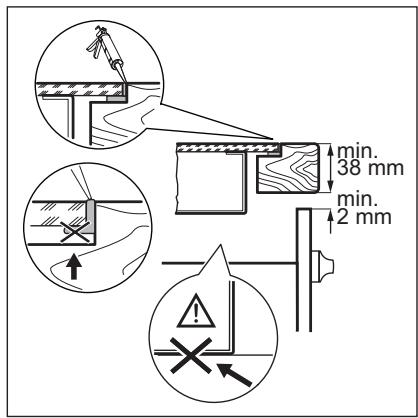
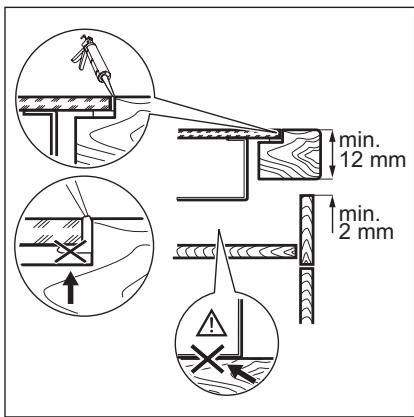
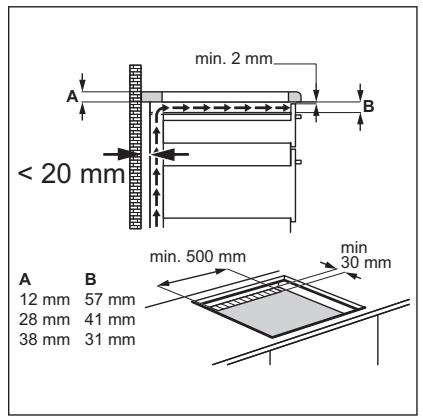
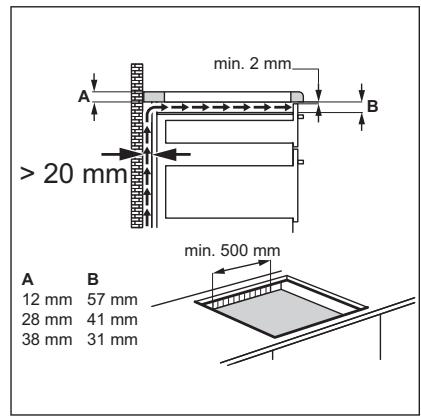
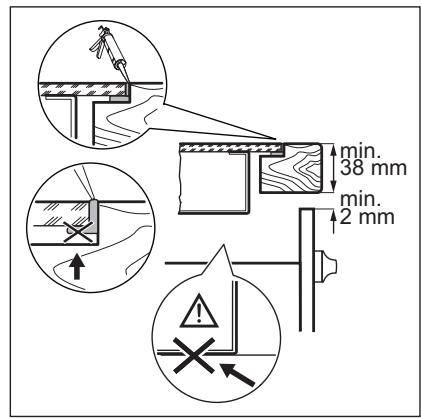
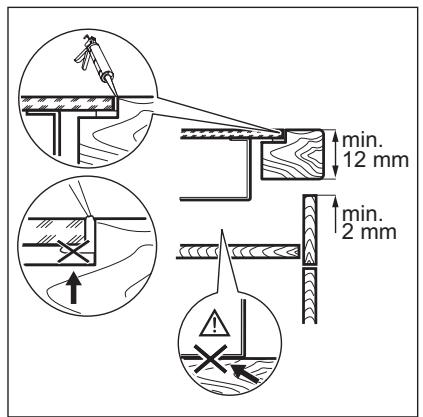
- The bottom of the appliance can get hot. Make sure to install a separation panel made from plywood, kitchen carcass material or other non-flammable materials under the appliance to prevent access to the bottom.
- The separation panel has to cover the area under the hob completely.
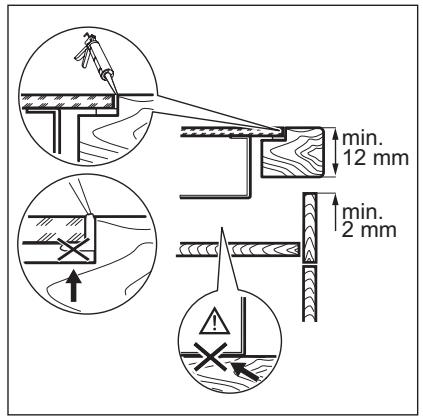
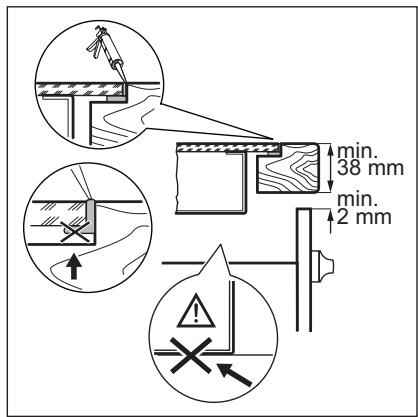
Make sure that the ventilation space of 2 mm, between the worktop and the front of the below unit, is free. The warranty does not cover damages caused by the lack of an adequate ventilation space.
2.2 Electrical Connection

WARNING!
Risk of fire and electric shock.
- All electrical connections should be made by a qualified electrician.
The appliance must be earthed. - Before carrying out any operation make sure that the appliance is disconnected from the power supply.
- Make sure that the parameters on the rating plate are compatible with the electrical ratings of the mains power supply.
- Make sure the appliance is installed correctly. Loose and incorrect electricity mains cable or plug (if applicable) can make the terminal become too hot.
Use the correct electricity mains cable.
- Do not let the electricity mains cable tangle.
Make sure that a shock protection is installed.
- Use the strain relief clamp on the cable.
- Make sure the mains cable or plug (if applicable) does not touch the hot appliance or hot cookware, when you connect the appliance to the near sockets.
- Do not use multi-plug adapters and extension cables.
- Make sure not to cause damage to the mains plug (if applicable) or to the mains cable. Contact our Authorised Service Centre or an electrician to change a damaged mains cable.
- The shock protection of live and insulated parts must be fastened in such a way that it cannot be removed without tools.
- Connect the mains plug to the mains socket only at the end of the installation. Make sure that there is access to the mains plug after the installation.
- If the mains socket is loose, do not connect the mains plug.
- Do not pull the mains cable to disconnect the appliance. Always pull the mains plug.
- Use only correct isolation devices: line protecting cut-outs, fuses (screw type fuses removed from the holder), earth leakage trips and contactors.
- The electrical installation must have an isolation device which lets you disconnect the appliance from the mains at all poles. The isolation device must have a contact opening width of minimum 3 mm.
2.3 Use

WARNING!
Risk of injury, burns and electric shock.
- Remove all the packaging, labelling and protective film (if applicable) before first use.
This appliance is for household use only. - Do not change the specification of this appliance.
Make sure that the ventilation openings are not blocked. -
Do not let the appliance stay unattended during operation.
-
Set the cooking zone to "off" after each use.
- Do not rely on the pan detector.
- Do not put cutlery or saucepan lids on the cooking zones. They can become hot.
- Do not operate the appliance with wet hands or when it has contact with water.
- Do not use the appliance as a work surface or as a storage surface.
- If the surface of the appliance is cracked, disconnect immediately the appliance from the power supply. This to prevent an electrical shock.
- Users with a pacemaker must keep a distance of minimum 30~cm from the induction cooking zones when the appliance is in operation.
- When you place food into hot oil, it may splash.

WARNING!
Risk of fire and explosion
- Fats and oil when heated can release flammable vapours. Keep flames or heated objects away from fats and oils when you cook with them.
- The vapours that very hot oil releases can cause spontaneous combustion.
- Used oil, that can contain food remnants, can cause fire at a lower temperature than oil used for the first time.
- Do not put flammable products or items that are wet with flammable products in, near or on the appliance.

WARNING!
Risk of damage to the appliance.
- Do not keep hot cookware on the control panel.
- Do not put a hot pan cover on the glass surface of the hob.
- Do not let cookware boil dry.
- Be careful not to let objects or cookware fall on the appliance. The surface can be damaged.
- Do not activate the cooking zones with empty cookware or without cookware.
- Do not put aluminium foil on the appliance.
Cookware made of cast iron, aluminium or with a damaged bottom can cause
scratches on the glass / glass ceramic. Always lift these objects up when you have to move them on the cooking surface.
- This appliance is for cooking purposes only. It must not be used for other purposes, for example room heating.
2.4 Care and cleaning
Clean the appliance regularly to prevent the deterioration of the surface material.
- Switch off the appliance and let it cool down before cleaning.
- Do not use water spray and steam to clean the appliance.
- Clean the appliance with a moist soft cloth. Use only neutral detergents. Do not use abrasive products, abrasive cleaning pads, solvents or metal objects.
2.5 Service
To repair the appliance contact the Authorised Service Centre. Use original spare parts only.
- Concerning the lamp(s) inside this product and spare part lamps sold separately: These lamps are intended to withstand extreme physical conditions in household appliances, such as temperature, vibration, humidity, or are intended to signal information about the operational status of the appliance. They are not intended to be used in other applications and are not suitable for household room illumination.
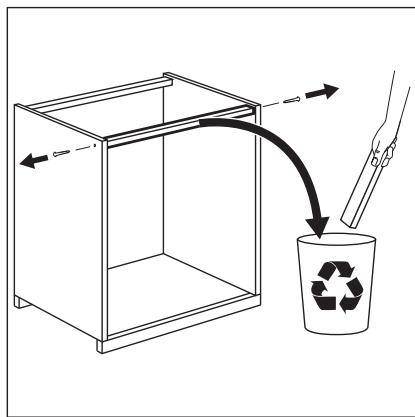
2.6 Disposal

WARNING!
Risk of injury or suffocation.
- Contact your municipal authority for information on how to discard the appliance correctly.
- Disconnect the appliance from the mains supply.
- Cut off the mains electrical cable close to the appliance and dispose of it.
3. INSTALLATION

WARNING!
Refer to Safety chapters.
3.1 Before the installation
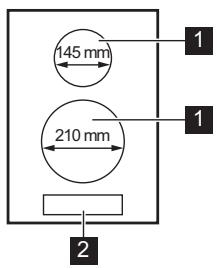
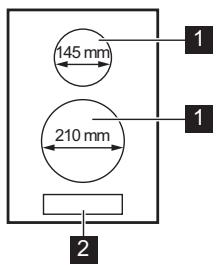
Before you install the hob, write down the information below from the rating plate. The rating plate is on the bottom of the hob.
Model
PNC
Serial number
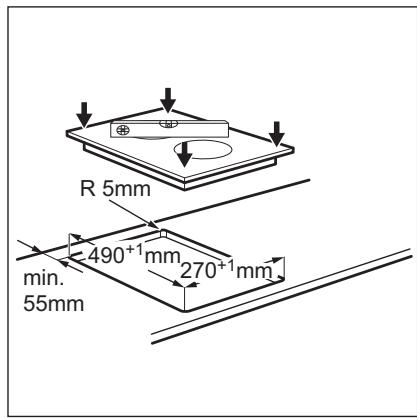
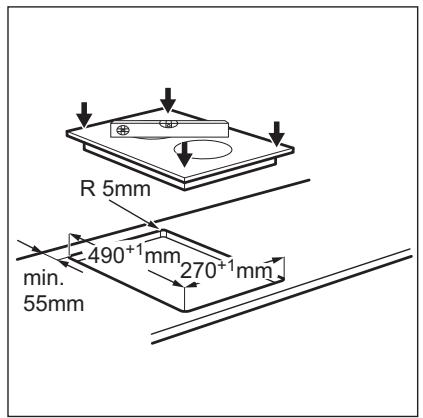
3.2 Built-in hobs
Only use the built-in hobs after you assemble the hob into correct built-in units and work surfaces that align to the standards.
3.3 Connection cable
- The hob is supplied with a connection cable.
3.5 Assembly
To replace the damaged mains cable, use the cable type: H05V2V2-F which withstands a temperature of 90^ or higher. Speak to your local Service Centre.
3.4 Attaching the seal - On-top installation
- Clean the worktop around the cut out area.
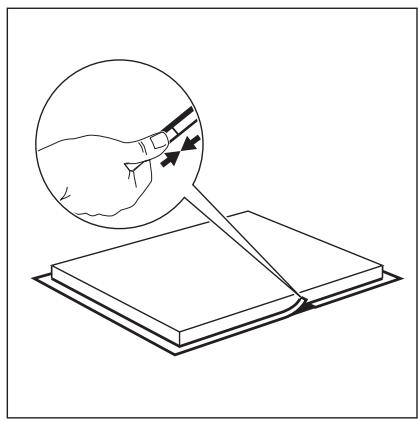
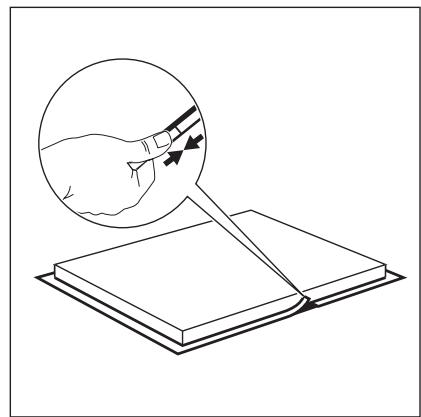
- Attach the supplied 2x6mm seal stripe to the lower edge of the hob, along the outer edge of the glass ceramic. Do not stretch it. Make sure that the ends of the seal stripe are located in the middle of one side of the hob.
- Add some millimetres to the length when you cut the seal stripe.
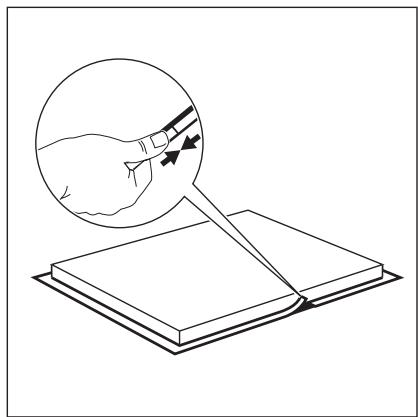
- Join the two ends of the seal stripe together.


3.6 Installation of more than one hob


YouTube
www.youtube.com/electrolux
www.youtube.com/aeg
How to install your Electrolux Domino Hob - Worktop installation

4. PRODUCT DESCRIPTION
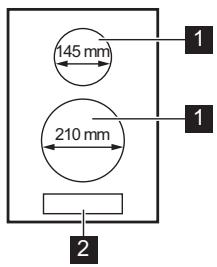
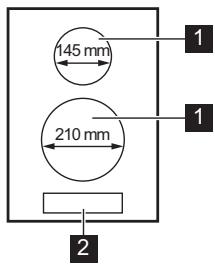
4.1 Cooking surface layout

1 Induction cooking zone
2 Control panel
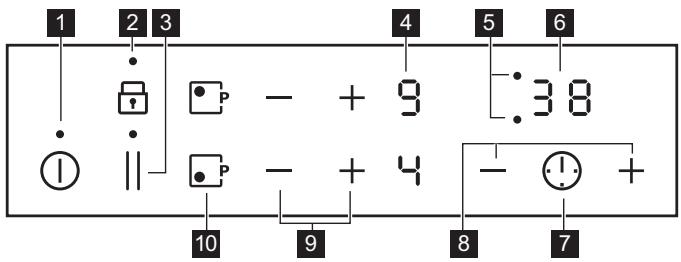
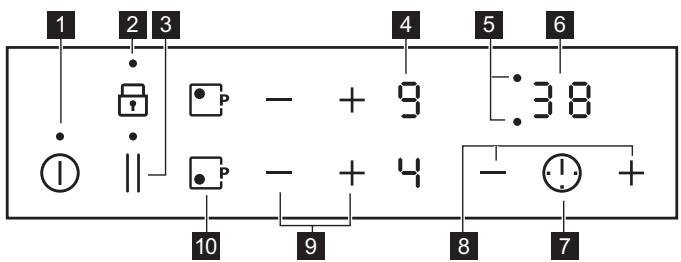
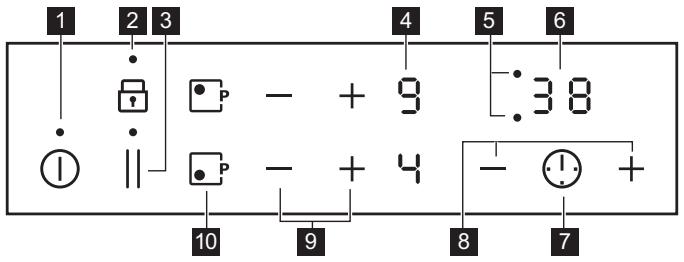
4.2 Control panel layout
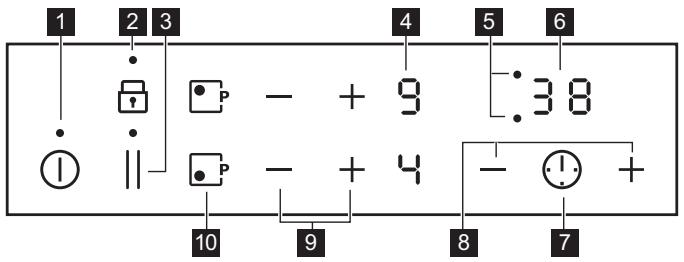
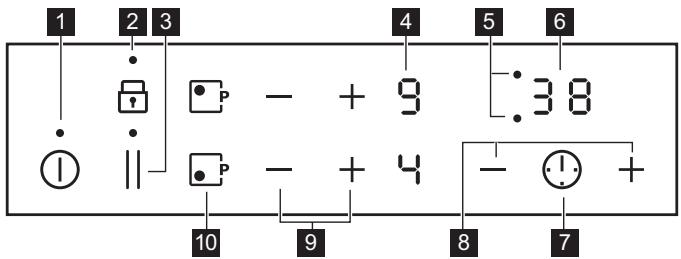
Use the sensor fields to operate the appliance. The displays, indicators and sounds tell which functions operate.
| Sensor field | Function | Comment | |
| 1 | ① | ON / OFF | To activate and deactivate the hob. |
| 2 | Lock / Child Safety Device | To lock / unlock the control panel. | |
| 3 | || | Pause | To activate and deactivate the function. |
| 4 | - | Heat setting display | To show the heat setting. |
| 5 | - | Timer indicators of cooking zones | To show for which zone you set the time. |
| 6 | - | Timer display | To show the time in minutes. |
| 7 | ① | - | To select the cooking zone. |
| 8 | +/- | - | To increase or decrease the time. |
| 9 | +/- | - | To set a heat setting. |
| 10 | PowerBoost | To activate the function. | |
4.3 Heat setting displays
| Display | Description |
| 0 | The cooking zone is deactivated. |
| 1 - 9 | The cooking zone operates. |
| u | Pause operates. |
| P | PowerBoost operates. |
| E + digit | There is a malfunction. |
| 3 / 2 / 1 | OptiHeat Control (3 step Residual heat indicator): continue cooking / keep warm / residual heat. |
| L | Lock / Child Safety Device operates. |
| F | Incorrect or too small cookware or no cookware on the cooking zone. |
| - | Automatic Switch Off operates. |
4.4 OptiHeat Control (3 step Residual heat indicator)

WARNING!
There is a risk of burns from residual heat.
The indicators show the level of the residual heat for the cooking zones you are currently
using. The indicators may also come on for the neighbouring cooking zones even if you are not using them.
The induction cooking zones produce the heat necessary for the cooking process directly in the bottom of the cookware. The glass ceramic is heated by the heat of the cookware.
5. DAILY USE

WARNING!
Refer to Safety chapters.
5.1 Activating and deactivating
Touch ① for 1 second to activate or deactivate the hob.
5.2 Automatic Switch Off
The function deactivates the hob automatically if:
- all cooking zones are deactivated,
- you do not set the heat setting after you activate the hob,
- you spill something or put something on the control panel for more than 10 seconds (a pan, a cloth, etc.). An acoustic signal sounds and the hob deactivates. Remove the object or clean the control panel.
- the hob gets too hot (e.g. when a saucepan boils dry). Let the cooking zone cool down before you use the hob again.
- you use incorrect cookware. The symbol comes on and the cooking zone deactivates automatically after 2 minutes.
- you do not deactivate a cooking zone or change the heat setting. After some time comes on and the hob deactivates.
The relation between the heat setting and the time after which the hob deactivates:
| Heat setting | The hob deactivates after |
| 1 - 2 | 6 hours |
| 3 - 4 | 5 hours |
| Heat setting | The hob deactivates after |
| 5 | 4 hours |
| 6 - 9 | 1.5 hour |
5.3 The heat setting
Touch + to increase the heat setting. Touch - to decrease the heat setting. Touch + and - at the same time to deactivate the cooking zone.
5.4 PowerBoost
This function makes more power available to the induction cooking zones. The function can be activated for the induction cooking zone only for a limited period of time. After this time the induction cooking zone automatically sets back to the highest heat setting.

Refer to "Technical data" chapter.
To activate the function for a cooking
zone: touch . comes on.
To deactivate the function: touch or —.
5.5 Timer
- Count Down Timer
You can use this function to set the length of a single cooking session.
First set the heat setting for the cooking zone, then set the function.
To set the cooking zone: touch ① repeatedly until the indicator of a cooking zone appears.
To activate the function or change the time: touch + or - of the timer to set the time (00 - 99 minutes). When the indicator of the cooking zone starts to flash, the time counts down.
To see the remaining time: touch ① to set the cooking zone. The indicator of the cooking zone starts to flash. The display shows the remaining time.
To deactivate the function: touch ① to set the cooking zone and then touch —. The remaining time counts down to 00. The indicator of the cooking zone disappears.

When the countdown ends, an acoustic signal sounds and 00 flashes. The cooking zone deactivates.
To stop the sound: touch ①.
- Minute Minder
You can use this function when the hob is activated and the cooking zones do not operate. The heat setting display shows 0 .
To activate the function: touch ① and then touch + or - of the timer to set the time. When the time finishes, an acoustic signal sounds and 00 flashes.
To stop the sound: touch ①.
To deactivate the function: touch ① and then touch. The remaining time counts down to 00.

The function has no effect on the operation of the cooking zones.
5.6 Pause
This function sets all cooking zones that operate to the lowest heat setting.
When the function operates, all other symbols on the control panels are locked.
The function does not stop the timer functions.
Touch to activate the function.
comes on. The heat setting is lowered to 1.
To deactivate the function, touch. The previous heat setting comes on.
5.7 Lock
You can lock the control panel while cooking zones operate. It prevents an accidental change of the heat setting.
Set the heat setting first.
To activate the function: touch L comes on for 4 seconds. The Timer stays on.
To deactivate the function: touch. The previous heat setting comes on.

When you deactivate the hob, you also deactivate this function.
5.8 Child Safety Device
This function prevents an accidental operation of the hob.
To activate the function: activate the hob with ① . Do not set any heat setting. Touch for 4 seconds. comes on. Deactivate the hob with ①
To deactivate the function: activate the hob with ①. Do not set any heat setting. Touch for 4 seconds. ② comes on. Deactivate the hob with ①.
To override the function for only one cooking time: activate the hob with ①. ⑤ comes on. Touch ④ for 4 seconds. Set the heat setting in 10 seconds. You can operate the hob. When you deactivate the hob with ① the function operates again.
5.9 OffSound Control (Deactivation and activation of the sounds)
Deactivate the hob. Touch ① for 3 seconds. The display comes on and goes out. Touch ① for 3 seconds. ⑥ or ⑦ comes on. Touch ① of the front left zone to choose one of the following:
- the sounds are off
- the sounds are on
To confirm your selection wait until the hob deactivates automatically.
When the function is set to you can hear the sounds only when:
- you touch ①
- Minute Minder comes down
- Count Down Timer comes down
you put something on the control panel.
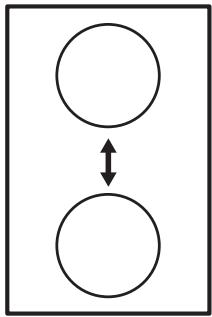
5.10 Power management
- All cooking zones are connected to one phase. See the illustration.
- The function activates when the total electricity loading of the cooking zones
exceeds maximum electricity loading of the phase.
- The function divides the power between cooking zones.
- The function decreases the power to the other cooking zones.
- The heat setting display of the reduced zones alternates between the chosen heat setting and the reduced heat setting. After some time the heat setting display of the reduced zones stays on the reduced heat setting.
6. HINTS AND TIPS

WARNING!
Refer to Safety chapters.
6.1 Cookware

For induction cooking zones a strong electro-magnetic field creates the heat in the cookware very quickly.
Use the induction cooking zones with suitable cookware.
- The bottom of the cookware must be as thick and flat as possible.
- Ensure pan bases are clean and dry before placing on the hob surface.
In order to avoid scratches, do not slide or rub the pot across the ceramic glass.
Cookware material
- correct: cast iron, steel, enamelled steel, stainless steel, multi-layer bottom (with a correct marking from a manufacturer).
not correct: aluminium, copper, brass, glass, ceramic, porcelain.
Cookware is suitable for an induction hob if:
water boils very quickly on a zone set to the highest heat setting.
- a magnet pulls on to the bottom of the cookware.
Cookware dimensions
- Induction cooking zones adapt to the dimension of the bottom of the cookware automatically.
-
The cooking zone efficiency is related to the diameter of the cookware. The cookware with a diameter smaller than the minimum receives only a part of the power generated by the cooking zone.
-
For both safety reasons and optimal cooking results, do not use cookware larger than indicated in "Cooking zones specification". Avoid keeping cookware close to the control panel during the cooking session. This might impact the functioning of the control panel or accidentally activate hob functions.

Refer to "Technical data".
6.2 The noises during operation
If you can hear:
- crack noise: cookware is made of different materials (a sandwich construction).
whistle sound: you use a cooking zone with a high power level and the cookware is made of different materials (a sandwich construction).
humming: you use a high power level.
- clicking: electric switching occurs.
- hissing, buzzing: the fan operates.
The noises are normal and do not indicate any malfunction.
6.3 Examples of cooking applications
The correlation between the heat setting of a zone and its consumption of power is not linear. When you increase the heat setting, it is not proportional to the increase of the consumption of power. It means that a cooking zone with the medium heat setting uses less than a half of its power.

The data in the table is for guidance only.
| Heat setting | Use to: | Time (min) | Hints |
| 1 | Keep cooked food warm. | as neces-sary | Put a lid on the cookware. |
| 1 - 2 | Hollandaise sauce, melt: butter, choco-late, gelatine. | 5 - 25 | Mix from time to time. |
| 1 - 2 | Solidify: fluffy omelettes, baked eggs. | 10 - 40 | Cook with a lid on. |
| 2 - 3 | Simmer rice and milkbased dishes, heat up ready-cooked meals. | 25 - 50 | Add at least twice as much liquid as rice, mix milk dishes halfway through the procedure. |
| 3 - 4 | Steam vegetables, fish, meat. | 20 - 45 | Add a couple of tablespoons of liquid. |
| 4 - 5 | Steam potatoes. | 20 - 60 | Use max. ¼ l of water for 750 g of po-tatoes. |
| 4 - 5 | Cook larger quantities of food, stews and soups. | 60 - 150 | Up to 3 l of liquid plus ingredients. |
| 6 - 7 | Gentle fry: scallope, veal cordon bleu, cutlets, rissoles, sausages, liver, roux, eggs, pancakes, doughnuts. | as neces-sary | Turn halfway through. |
| 7 - 8 | Heavy fry, hash browns, loin steaks, steaks. | 5 - 15 | Turn halfway through. |
| 9 | Boil water, cook pasta, sear meat (goulash, pot roast), deep-fry chips. | ||
| Boil large quantities of water. PowerBoost is activated. | |||
7. CARE AND CLEANING

WARNING!
Refer to Safety chapters.
7.1 General information
Clean the hob after each use.
Always use cookware with a clean base.
- Scratches or dark stains on the surface have no effect on how the hob operates.
- Use a special cleaner suitable for the surface of the hob.
Use a special scraper for the glass.
7.2 Cleaning the hob
- Remove immediately: melted plastic, plastic foil, sugar and food with sugar,
otherwise, the dirt can cause damage to the hob. Take care to avoid burns. Use a special hob scraper on the glass surface at an acute angle and move the blade on the surface.
- Remove when the hob is sufficiently cool: limescale rings, water rings, fat stains, shiny metallic discoloration. Clean the hob with a moist cloth and a non-abrasive detergent. After cleaning, wipe the hob dry with a soft cloth.
- Remove shiny metallic discoloration: use a solution of water with vinegar and clean the glass surface with a cloth.
8. TROUBLESHOOTING

WARNING!
Refer to Safety chapters.
8.1 What to do if...
| Problem | Possible cause | Remedy |
| You cannot activate or operate the hob. | The hob is not connected to an elec-trical supply or it is connected incor-rectly. | Check if the hob is correctly connected to the electrical supply. |
| The fuse is blown. | Make sure that the fuse is the cause of the malfunction. If the fuse is blown again and again, contact a qualified electrician. | |
| You do not set the heat setting for 10 seconds. | Activate the hob again and set the heat setting in less than 10 seconds. | |
| You touched 2 or more sensor fields at the same time. | Touch only one sensor field. | |
| Pause operates. | Refer to "Daily use". | |
| There is water or fat stains on the control panel. | Clean the control panel. | |
| An acoustic signal sounds and the hob deactivates.An acoustic signal sounds when the hob is deactivated. | You put something on one or more sensor fields. | Remove the object from the sensor fields. |
| The hob deactivates. | You put something on the sensor field ①. | Remove the object from the sensor field. |
| Residual heat indicator does not come on. | The zone is not hot because it operated only for a short time or the sensor is damaged. | If the zone operated sufficiently long to be hot, speak to an Authorised Service Centre. |
| The heat setting changes between two levels. | Power management operates. | Refer to "Daily use". |
| The sensor fields become hot. | The cookware is too large or you put it too near to the controls. | Put large cookware on the rear zones, if possible. |
| There is no sound when you touch the panel sensor fields. | The sounds are deactivated. | Activate the sounds. Refer to "Daily use". |
| L comes on. | Child Safety Device or Lock oper- ates. | Refer to "Daily use". |
| F comes on. | There is no cookware on the zone. | Put cookware on the zone. |
| The cookware is unsuitable. | Use suitable cookware. Refer to "Hints and tips". | |
| The diameter of the bottom of the cookware is too small for the zone. | Use cookware with correct dimen-sions. Refer to "Technical data". | |
| E and a number come on. | There is an error in the hob. | Deactivate the hob and activate it again after 30 seconds. If E comes on again, disconnect the hob from the electrical supply. After 30 seconds, connect the hob again. If the problem continues, speak to an Authorised Service Centre. |
| You can hear a constant beep noise. | The electrical connection is incor- rect. | Disconnect the hob from the electrical supply. Ask a qualified electrician to check the installation. |
8.2 If you cannot find a solution...
If you cannot find a solution to the problem yourself, contact your dealer or an Authorised Service Centre. Give the data from the rating plate. Give also three digit letter code for the glass ceramic (it is in the corner of the glass surface) and an error
message that comes on. Make sure, you operated the hob correctly. If not the servicing by a service technician or dealer will not be free of charge, also during the warranty period. The instructions about the Service Centre and conditions of guarantee are in the guarantee booklet.
9. TECHNICAL DATA
9.1 Cooking zones specification
| Cooking zone | Nominal power (maximum heat setting) [W] | PowerBoost [W] | PowerBoost maxi- mum duration [min] | Cookware diamie- ter [mm] |
| Middle front | 2300 | 3700 | 10 | 180 - 210 |
| Middle rear | 1400 | 2500 | 4 | 125 - 145 |
The power of the cooking zones can be different in some small range from the data in the table. It changes with the material and dimensions of the cookware.
For optimal cooking results use cookware no larger than the diameter in the table.
9.2 Labels supplied with the accessories bag
Stick the adhesive labels as indicated below:
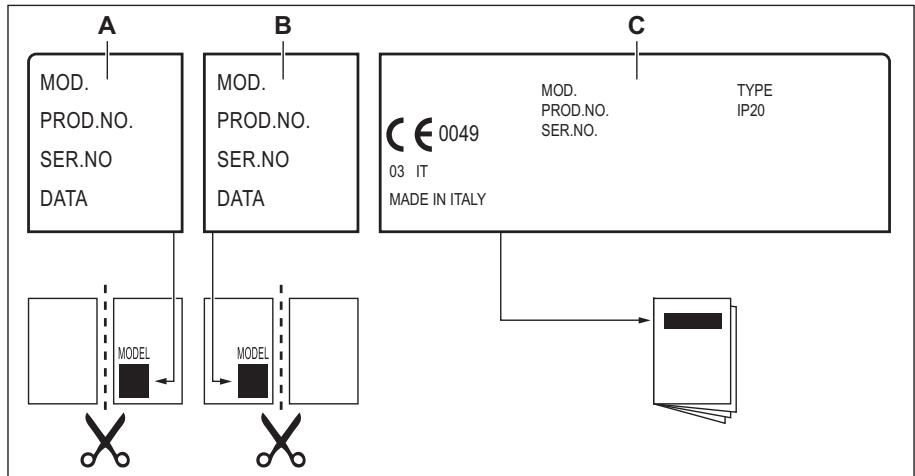
A. Stick it on Guarantee Card and send this part (if applicable).
B. Stick it on Guarantee Card and keep this part (if applicable).
C. Stick it on instruction booklet.
10. ENERGY EFFICIENCY
10.1 Product information according to EU 66/2014 valid for EU market only
| Model identification | LIT30230C | |
| Type of hob | Built-In Hob | |
| Number of cooking zones | 2 | |
| Heating technology | Induction | |
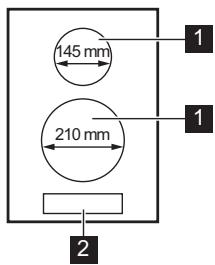
| Diameter of circular cooking zones (Ø) | Middle front | 21.0 cm |
| Middle rear | 14.5 cm | |
| Energy consumption per cooking zone (EC electric cooking) | Middle front | 188.9 Wh / kg |
| Middle rear | 183.4 Wh / kg | |
| Energy consumption of the hob (EC electric hob) | 186.2 Wh / kg | |
EN 60350-2 - Household electric cooking appliances - Part 2: Hobs - Methods for measuring performance
10.2 Energy saving
You can save energy during everyday cooking if you follow below hints.
- When you heat up water, use only the amount you need.
If it is possible, always put the lids on the cookware.
- Before you activate the cooking zone put the cookware on it.
- Put the smaller cookware on the smaller cooking zones.
- Put the cookware directly in the centre of the cooking zone.
Use the residual heat to keep the food warm or to melt it.
11. ENVIRONMENTAL CONCERNS
Recycle materials with the symbol . Put the packaging in relevant containers to recycle it. Help protect the environment and human health by recycling waste of electrical and electronic appliances. Do not dispose of
appliances marked with the symbol with the household waste. Return the product to your local recycling facility or contact your municipal office.
MÖTLEME TEILE
How to install your Electrolux Domino Hob - Worktop installation

4. TOOTE KIRJELDUS
4.1 Keeduala paigutus
1 Induktsionkeeutrala
2 Juhtpaneel
4.2 Juhtpaneeli skeem

How to install your Electrolux Domino Hob - Worktop installation

KataxwpioTe To Tpoiov OaS, WATE VA exe KaLUTepo eepBic
www.registerelectrolux.com

AyopaoTe aEeouap, avawaiq kai yvnaia ataalakia yia t oukeun oac:
www.electrolux.com/shop
EeyHPETHsH IeAATQN KAI ZEPBIZ
Xpnoiopoioeite Tavta mvo yvnoia avtalaktka.
How to install your Electrolux Domino Hob - Worktop installation

How to install your Electrolux Domino Hob - Worktop installation

4. TERMÉKLEÍRÁS
How to install your Electrolux Domino Hob - Worktop installation

4. IZSTRÄDÄJUMA APRAKSTS
How to install your Electrolux Domino Hob - Worktop installation

4. GAMINIO APRAŠYMAS
4.1 Kaitinimo pavirsiu planas

1 Indukciné kaitvieté
2 Valdymo skydelis
4.2 Valdymo skydelio iśděstymas
3.4 CtabaHe Ha neyatoT - MoNTaxaHa roPHNOT deI
1.Исунстете ща горна заюта површно Okony Исухенота обл act.
2. Ctabete ja loctabehaTa JIeHTa 3a 3aneuatybaBe oJ 2x6mm Okony dOJIHHOT pa6 Ha NOBpuHnHaTa 3a rotBeHe IpeKy HADBoPeUHNOT pa6 Ha CTAKNO-KePamkata. PpInToA, ha pacterHybajte ja. BHMImabaje KpaEBnTe Ha JeHTaTa 3a 3aneuYBaHBe da ce CTABEHN BO CpeHNOT DeJ OJ eDHaTa CTpaHa Ha NOBpuHnHaTa 3a rotBeHe.
3. Добаде ТЕ НЕКOLКу мм ДОЛЖИна KORA Ke ja ceчete ЛNTaTa 3a 3aneTuBa№.
4. Повлесуггели за вда Краja на леснтувае.
3.6 MoNTIPAhe Ha NOBeKe OeEHa nloya 3a roTBeHe


YouTube
www.youtube.com/electrolux
www.youtube.com/aeg
How to install your Electrolux Domino Hob - Worktop installation

4.ОПИС HA ПОН3ВОДOT
4.1 ŠeMa ha noBpShnHaTa 3a rotBeHe

1 NHykuncpaHnHa
2 KoHTpOJIHa nIIOUa
4.2 Pacnopeн Ha kontrpoJHa Ta6Ja

Pakybaje co anapatot co nomooh ha ceH3Opcknte noiHa. EkpaHnte, noka3aTeJIte n 3ByuNTe nokaybaaT kon yHKun pa6oTaT.
| Сенистор стол пос нole | Функуда | Комentар | |
| 1 | ① | ВКЛУECHО / ИСКЛУECHО | 3a вклuyваье и在其лuyваье на површината за вог趟е. |
| 2 | Зakлuyваье / Уreed за бezбедост на.Deца | 3a зakлuyваье / оTKлuyваье на Контropolна за. tabla. | |
| 3 | || | Пayза | 3a вклuyваье и在其лuyваье на Функуда. |
| 4 | - | Еран за поставваье на ячината на ТОПлината | 3a рірікожуваье на постав Kota за Temпераразу. |
| 5 | - | Вретенский пokedатели за рингліte | 3a за рірікожата за koja рінгліа го поставваfter Вретето. |
| 6 | - | Еран на тajмерот | 3a рірікожуваье на Вретето BO мінүті. |
| 7 | ① | - | 3a在其бор на рінглі. |
| 8 | +/- | - | 3a为其лійемуваье пілі有很大алуваье на Вретето. |
| 9 | +/- | - | 3a поставваье на поставka за щачина на ТОПлина. |
| 10 | ● | PowerBoost | 3a вклuyваье на Функуда. |
4.3 Ekpanu 3a noctabvbahe Ha jaunHaTa Ha TOnnHaTa
| Екран | Опис |
| 0 | Ринглata e是我国的。 |
| 1-9 | Ринглata e在我国的。 |
| u | Палда e в Куншени. |
| P | PowerBoost e в Куншени. |
| E+6poj | Има Deфekt. |
| 3/4/0 | OptiHeat Control (Показател 3a п reproханatingа толпina в 3 чекор): ушte ce roтв / постраве / п reproханatinga толпina. |
| L | Зakлuyвашиe / Урета з бezбадноct на.Deca e в Вд кшени. |
| F | Садот e несооветен или превал или Нем сад на ринглata. |
| - | АВТOMATСКО ИСКЛUYBAЧЕ E ВО ФУНSHENJa. |
三/三/口NoctOn OnaChOCT Ondn3ropeHnI npaDi npeOCTaHaTa TOnnHa.
Ioka3aTeJIneTo ro pInkaKaxyBaAT HnBOTO Ha npceOCTaHaTa TOnJIInHa 3a pINHJIne KOn
MOMeHTaJIHo Tn KOpIcTnTe. POKa3aTeJIHnTe NCTO Taka MoKe Da Ce BkJIyUaT 3a OKoJIHnTe pINrJIn Dypn aKO He Tn KOpIcTnTe.
Hnykncnte pInrna ja npOn3BeyBaat HeonXoHaTa TOnnHa 3a npOceCOT Ha rotBeHe DnpeKTHo Ha dHOTO Ha caDOnBte 3a rotBeHe. CtakIO-KepaMkata ce 3aTOnnYba Od TOnnHaTa Ha caDOBte 3a rotBeHe.
5. CEKOДHEBHA YNOTPEBA

PNEyPENEYBAHbE!
BnuTe Bo norgnabjata 3a 3awTNTa N cnrgpnoct.
5.1 BknyBaBe n NcknyBaBe
Ioppe ro ① 1 cekyHda 3a da ja ja BKnyuTe IIN da ja ncknyuTe noBpshHaTa 3a rotBeHe.
5.2 ABTomaTcKO NcknyBaHbe
Функидаа abTomatckn ja ncknyyba NOBpshHaTa 3a rotBeHe aKO:
CnTe pInrIin Ce NCKnyeHn,
He cTe ja HameCTnne jeaunHaTa Ha TOnnHaTa OTkako CTe ja BkIyUnne NOBpUnHaTa 3a rotBeHe,
Ke nCTypnTe nnKe CTaBnTe HeWTo Ha KOHTpOHaTa Ta6Ja NOBeKe o1 10 cekyni (TeHpe, TkaeHnHa, nTH.). Ce ORIacBya 3BvyeH CNrHaN I NOBpUnHaTa 3a roTBeHe Ce NCKJyBa. OcTpaHete ro npEmdetOT nn INCnuCTeTe ja KOHTpOHaTa Ta6Ja.
IOBpHnHaTa 3a roTBeHe cTahyBa npemHory Jekska (Ha np. aKo HeKo caJ npEbrpe n ce ncyu).OcTabeTe ja pInrIata da ce onaDi nped da ja KOpNCHTe NOBtOpHO IOBpHnHaTa 3a roTBeHe.
KOPINTE HeCOOdBETHcAIOBn 3a roTBeHe. CmboJOT F ce naHn no 2 MHyTu pIHrIaTa ce nCKnyuBa aBTOMaTCKn.
He NCKnyBajte ja pHHnata n He MeHyBaTe ja noCTabkata 3a jaUnHa ha TOnJIInHata. IOn OndeNo BpeMe ce naH
- n noBpshnHaTa 3a roTbeHbe ce nCKnyuBa.
Bpckata nomery jaunHaTa Ha TOnnHaTa n BpeMeTo nocLe KOe ce NCKnyuBa NOBpUnHaT a 3a rotBeHe:
| Посаввае ТемпераTypea | Плочата 3a ratовende се усклочува посте |
| 1 - 2 | 6 час |
| 3 - 4 | 5 час |
| 5 | 4 час |
| 6 - 9 | 1,5 час |
6.2 3Byu n BO TeKOT Ha pa6oTaTa
Ako cnyuwaTe:
3BykHa NykaHBe: caDOT 3a rotBe he e HaprabEn OJ pa3JIuHn MaTePnjaJI (ceHNDbNc KOHCTpyKUJna).
3Byk Ha CBnPKaHe: ja KopnCTnTe pHrIaTa Ha rOleMa jaUnHa n caOnBnTe 3a rOTBeHe ce HapBaHen Od pa3JIuHm MaTePnJaN (ceHNDbN KoHcTpyKuJja).
SyHeBe: KOpNCTnTe BnCOKo eHepRetcko HnBO.
Klukahe: ce nojabya eIeKtpuHOnppeppnyBaHe.
ПИштelve,брмчelve:ВERTINATOPOT pa60tu.
3ByuTe Ce HopMaHn H He Ce 3HaK 3a HeNCnpaBHOCT.
IeHTnFknaujaHaMoDeJOT
| Вид на површина за roтveсы | В级以上 површина за roтveсы | |
| Б Proj на рингли | 2 | |
| Текhalуогида на грееге | Индану相关信息a | |
| Дијаметар на ктужни рингли (Ø) | Среedingа р tradени | 21,0 cm |
| Среedingа за干嘛a | 14,5 cm | |
| ПOTROSHYBAЧKA на>eнерашина за рингли (EC electric cooking) | Среedingа р tradени | 188.9 Wh / kg |
| Среedingа за干嘛a | 183.4 Wh / kg | |
| ПOTROSHYBAЧKA на>eнерашина на површина за roтveсы (EC electric hob) | 186.2 Wh / kg | |
EN 60350-2 -EneKtpnHn anapatn 3a roTbeHe 3a DomaknHCTBa -Den 2:
Повшини 3а roтveиbe - MeToNi 3a Мереьe nepФормансn
How to install your Electrolux Domino Hob - Worktop installation

4. OPIS URZADZENIA
How to install your Electrolux Domino Hob - Worktop installation

4.DESCRIEREAPRODUSULUI
4.1 Aranjarea suprafetei de gàtire
1 Zona de gătit cu inductie
2 Panou de comanda
5.2 Aytomatcko nckJbuynBaHe
Oba yHKunja ayTomatcKn NCKbuyje nNooyy cneDeHm CnyuajeBMa:
Cbe 30he 3a kyBaHecy DeakTbBpaHe.
Hncte nOdecnnn CTeen TOnIIOte hakoH uTO CTe aKTNBupaannn pNoUy 3a KyBaHe.
- Ppocyni cTe uIn CTabuInn HeuTo Ha KOMaHdHy Tabny uOCTabuNl rA dyXe od 10 cekyHn (nIlex, kprny, nTd.).OrnaaBaCe 3ByuHn CnHaN I NIOUa 3a KyBaHe ce DeakTNBnpa. YKJIoHnTE npEmdet uIn OoHCTnTe KOMaHdHy Tabny.
Ako npooha 3a KyBaHoe nocTahe npetOnna (Ha npimep, Kaia n3 wepne nCnapn CBA TeuhoCT).Iyctnte da ce 30ha 3a KyBaHe oxlaqn ppe Hero WTO NOHOBO KOpNCHTe PIOuy 3a KyBaHoe.
Ako KopinCTne norgpeuHNO nocyhe. Cm60n F ce yKbuyye n 3oHa 3a KyBaHe ce ayTOMaTcN DeaKTnBnpa nocJe 2 MInHyTa.
Ako nocne oDpehEnor BpemeHa He NCKJbUyHrTe Heky Od 3OHa 3a KyBaHbe NnN aKO He npOMEHNTE NOdeWeH CTeEN TOJIote. HAKOH N3BeCHOr BpemeHa ce yKJbUyJe i nnOua 3a KyBaHbe Ce DeaKTINBIPA.
Ondoc n3mehy cTeeneHa tonlote INBpeMeHa HAKOH KOr ce nlocha 3a KyBaHBedeakTnBnpa:
KaandaekTnBnpaTe nnoy 3a KyBaHBe, TaKoHe deakTnBnpaTe n OBy yHKunjy.
5.8 Ypehaj 3a 6e36eHnOCT deCe
ObaФункида спруавсучajно kopишнепоуе за КУВаьe.
ДабистеakTNBnpaNФункunjy:
akTNBnpaJTe nOuy 3a KyBaHe nomohy ① He noDeIeIaBajTe HnjeIaH CTeneH TOnlNote. IOniPnHTe Ha 4 cekyHne. L ce noJaBbye. DeakTNBnpaJTe nOuy 3a KyBaHe nomohy ①
Дабистдемынфункшиу:
akTbnpajTe nOuy 3a KyBaHe nomohy ① He noDeIeIabajTe HnJeIaH CTeneH TOnlNote. IOniPnHTe Ha 4 cekyHne. ce noJaBbyje. DeakTbnpajTe nOuy 3a KyBaHe nomohy ①
Ja 6nCTe DeakTNBpuAn FyHKunjy caMo 3a jean npT: aKTBNpajTe NIOuy 3a KyBaHe ca ① L ce nojaBbyje. OIOnpHnTe Hha 4 cekHyde. y pOky od 10 cekyHnNoDECnTe tonlOty. MoKeTe Da KOpNCtne NIOuy 3a kyBaHe. KaDa DeakTNBpuAte NIOuy 3a KyBaHe ca ① FyHKnJa NOHOBo paAn.
5.9 OffSound Control
(ДeakTNBnpaHbe n akTNBnpaHbe 3ByuHnx CnHaJa)
IeakTnBupajTe nIoUy 3a KyBaHe.
ДоирнITE ①Ha3cekyHne.Дисплесе nojabByjeи Hectaje.ДоирнITE Ha3 cekyHde.По jabByje ce binnb
IodnHnTe +Ha npedBoj IeBoj 3oHn da 6nCTe n3a6pann jeDHy od cneDehnx onuja: -3Bycny NCKbuyehn
- 3BvCn cy yKbUyeHn Да bIcTe pOITbPdIu n36Op caeKajTe dOK ce pIoUa 3a KyBaIbe He DeaekTINBIPA ayTOMaTCKn.
KaJa je cyHkUja noCTabIbeHa ha MoKeTe yTu 3Byk jeDInHO KaJa:
-doOpHete ①
Tajmepce cnyuTa
Tajmep 3a o6pojabahe BpeMeHa ce cnyuSha
CTaBHTe HeITo Ha KOMaHdHy TaBny.
5.10 YnpaBbahe notpoohbom
Cbe 3oHe 3a KyBaHecy noBe3aHe Ha jeDHy a3y. IorIeJajTe nUyctpaunjy.
-Функиja ce akTINBIPA kaJa yKynHO eNeKtpnHOn ONTepeheHe 3OHa 3a KyBaHe npemaun MaKcIMMaHNo eNeKtpnHo onTepeheHee pase.
- ΦύнкциJA pa3дeьуje chary n3meиу 3оHA 3a KyBaHbE.
OBN3ByuCy HopMaHn H He yka3yjHa 6nNo KaKAB KBap.
6.3 Пгимери пгиме за Куваьe
Y3ajamHn Ondoc n3mehy cTepeHa TOnIOTe 3OHe 3a KyBaHbe NOTPOoHBe cTpyje HneJiInHeapan. KaJa NOBeHaTe cTeen HToJIOTe 3OHe 3a KyBaHbe, NtPOoHbA cTpyje Ce He NOBeHaBa npOpOpunOHnHO.To 3Nau Da 3OHa 3a KyBaHbe Ha CpeDhEm CTepeHy TOnIOTe KOpICTMaHBe OD NpOBoHHe CBOJe CHare.
I Pioaun y tabelen cy camo cmepnue.
2. BEZPEČNOSTNÉ POKNY
2.1 Instalácia

VAROVANIE!
Tento spotrebic smie nainstalovat'iba kvalifikovaná osoba.

VAROVANIE!
How to install your Electrolux Domino Hob - Worktop installation

4. POPIS VYROBKA
4.1 Rozlozenie varnej plochy
1 Indukcná varná zona
2 Ovladaci panel
4.2 Rozvrhnutie ovladacieho panela
How to install your Electrolux Domino Hob - Worktop installation

4. OPIS IZDELKA
How to install your Electrolux Domino Hob - Worktop installation

1 induksiyonlu piirme bolgesi
2 Kontrol paneli
4.2 Kontrol paneli duzeni

ELECTROLUX APPLIANCES AB
BUSINESS SECTOR EMA-EMEA (SEE)
ST GÖRANSGATAN 143
SE-105 45 STOCKHOLM
SWEDEN
TEL: +46 (8) 738 60 00
FAX: +46 (8) 738 63 35
www.electrolux.com
Ithalatc: Electrolux Dayanikli Tuketim
Mamulleri San. ve Tic. AS.
TR-34435 Taksim-Beyoglu-Istanbul
Müsteri Hizmetleri: 0 850 250 35 89
musteri_hizmetleri@electrolux.com
WEB: www.electrolux.com.tr