USER MANUAL CS 268 F W701T VALBERG
This product is guaranteed against any failure resulting from a manufacturing or material defect for a period of 2 years from the date of purchase*. The warranty does not cover defects or damage resulting from incorrect installation, improper use or abnormal wear of the product.
- upon presentation of the sales receipt.
CONDITION DE GARANTIE
FR
Thank you for choosing this VALBERG product. Selected, tested and recommended by ELECTRO DEPOT, VALBERG products are synonymous with ease of use, reliable performance and quality.
With every use of this appliance, you can be sure of complete satisfaction.
Welcome to ELECTRO DEPOT.
Visit our website: www.electrodepot.fr
APPLIANCE OVERVIEW
Description of the appliance
B USING THE APPLIANCE
Using the appliance Food storage
C USEFUL INFORMATION
Cleaning and maintenance
Transport and moving the appliance
Before contacting the customer care department
Energy-saving tips
Technical Data
Information for test institutes
Customer service and support
Description of the appliance
This appliance is not intended to be built-in.
The presentation below of the appliance's components is for indicative purposes only. The components can vary depending on the model.
A) Refrigerator compartment
B) Freezer compartment
- Thermostat case
- Wine rack*
- Refrigerator shelves
- Lid of crisper compartment
- Vegetable compartment
- Freezer drawers
- Ice tray
- Plastic scraper*
- Glass shelves in freezer*
- Bottle shelf
- Adjustable door shelf*
- Egg tray
-
Door shelf
-
On some models
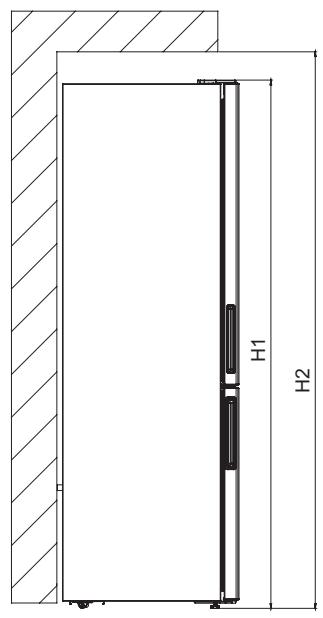
Sizes
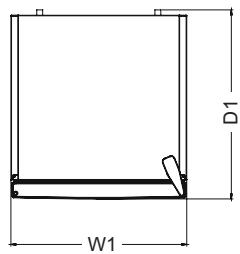
Overall dimensions
| H1 | mm | 1700.0 |
| W1 | mm | 540.0 |
| D1 | mm | 595.0 |
1 the height, width and depth of the appliance without the handle.
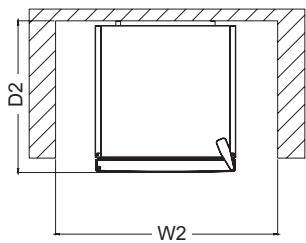
Space required to use the appliance ^2
| H2 | mm | 1850.0 |
| W2 | mm | 640.0 |
| D2 | mm | 692.8 |
2 the height, width and depth of the appliance, including the handle, and the space required for the free circulation of cooling air.
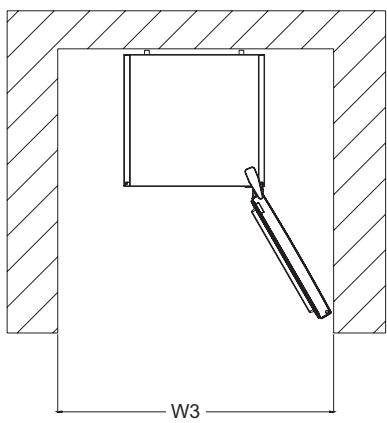
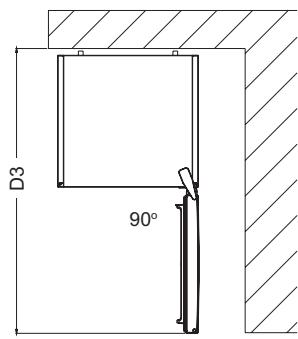
Overall space required to use the appliance3
3 the height, width and depth of the appliance, including the handle, plus the space required for the free flow of cooling air, plus the space required to allow the door to be opened at an angle which allows all internal accessories to be removed.
Using the appliance
LessFrost technology enables more efficient cooling, limited manual de-icing, and more flexible storage space.
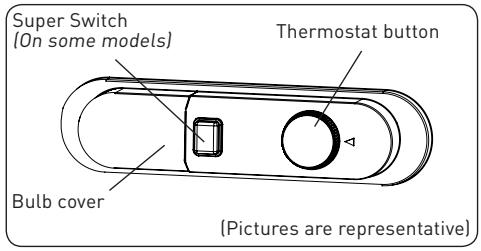
Adjustment of the thermostat
The thermostat automatically controls the temperature inside the refrigerator and freezer compartments. The refrigerator temperature is set by turning the thermostat dial to the numbers at the top; 1 to 3, 1 to 5 or SF (the number of thermostat numbers depends on the product).
IMPORTANT NOTE:
Do not rotate the button to below position 1 as this would stop the appliance.
Thermostat settings:
1-2: For short-term storage of food
3-4: Long-term storage of food
5: Maximum level of refrigeration. The appliance will last longer. If necessary, change the temperature setting.
If the appliance has an SF position:
- Turn the dial to the SF position to freeze fresh food quickly. In this position, the freezer compartment will operate at lower temperatures. Once your food is frozen, return the thermostat dial to its normal use position. If you do not change the thermostat to the SF position, your appliance will automatically reset to the last thermostat position (after the duration indicated in the above note). For normal use, reset the thermostat dial to
the SF position, depending on the duration indicated in the above note. If the thermostat dial is in the SF position when the appliance is first started, the appliance automatically returns to thermostat position 3, after the time indicated in the above note.
Fast freeze: The fast freeze switch is used to deep freeze rapidly. For maximum freezing capacity, switch Fast Freeze to ON, 24 hours before placing fresh food into the freezer. Once fresh food is in the freezer, 24 hours Fast Freeze is usually sufficient. To save energy, turn the Fast Freeze switch to OFF 24 hours after placing fresh food in the freezer.
Winter switch: The winter switch should be used if the ambient temperature is below 16^ . This will maintain your refrigerator above 0^ and the freezer below -18^ .
Temperature parameter warnings
- Your appliance has been designed to operate within the ambient temperature range for the climate class indicated on the rating plate. It is not recommended to operate your refrigerator in geographical locations where the ambient temperature is outside the range of its climate class. This reduces the cooling efficiency of the appliance.
- The thermostat temperature must be adjusted according to how often the door is opened, the amount of food stored in the freezer and the ambient temperature of the room where it is located.
- When the appliance is switched on for the first time, it should be left running for 24 hours to reach the optimum operating temperature. During this period, do not open the door or store a large amount of food in the appliance.
- A 5-minute timer is applied to prevent damage to your appliance's compressor after plugging into or unplugging from the electrical network, or when a power failure occurs. Your appliance will resume normal operation after 5 minutes.
The definition of Climate Class:
T (tropical): This refrigeration appliance is intended for use at ambient temperatures between 16 and 43^ .
ST (subtropical): This refrigeration appliance is intended for use at ambient temperatures between 16 and 38^ .
N (temperate): This refrigeration appliance is intended for use at ambient temperatures between 16 and 32^ .
SN (extended temperate): This refrigeration appliance is intended for use at ambient temperatures between 10 and 32^ .
Temperature indicator
To help you adjust your appliance properly, the refrigerator is equipped with a temperature gauge located in the coldest zone of the appliance.
For best storage conditions, especially in the coldest zone, make sure that the "OK" symbol appears on the temperature gauge. If "OK" does not appear on the temperature gauge, the temperature setting is incorrect.

The temperature gauge is not easy to see if it is poorly lit. It is easier to read if it is properly lit. If the temperature setting is changed, wait for the temperature inside the appliance to stabilise before adjusting again (as necessary). Only adjust the temperature setting by small amounts, and wait at least 12 hours before rechecking and making any changes.
NOTE:
The temperature gauge may not indicate OK for some time after loading the refrigerator with fresh food or after repeated or prolonged opening of the door. If the evaporator in the refrigerator compartment (on the back wall) becomes unusually frosted (refrigerator overloaded, high ambient temperature, frequent door openings), lower the temperature setting until the compressor stops.
Location of coldest food zone
Food can be preserved for longer if it is placed in the appropriate zone within the refrigerator, according to food type. The coldest zone is just above the vegetable crisper.
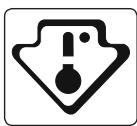
The symbol opposite indicates the coldest zone in your refrigerator.
The coldest zone in the fridge compartment is indicated by stickers on the left side of the inside wall.
The upper boundary of the coldest zone is the lower edge of the sticker, at the tip of the arrow. The upper shelf of the coldest zone must be level with the tip of the arrow. The coldest zone is below this level.
Shelves are removable - make sure that they are always level with the zone limits specified by the stickers, in order to preserve the temperature of each zone.
Accessories
The visual and text descriptions in the accessories section may vary depending on the model of your appliance.
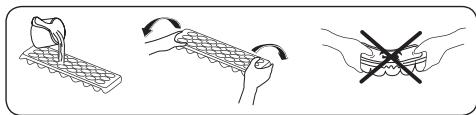
Ice cube tray (on some models)
- Fill the ice cube tray with water and place it in the freezer compartment.
- Once the water has completely frozen, twist the ice cube tray as shown to remove the ice cubes.
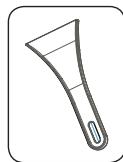
Plastic scraper (on some models)
Frost may build up in certain zones of the freezer. Frost accumulated in the freezer should be removed regularly. Use the plastic scraper provided to this effect. Do not use sharp metal objects to clear away excess frost. This can puncture the refrigeration circuit and cause irreparable damage to the appliance.
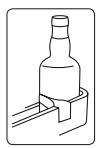
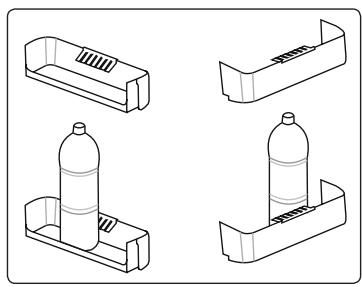
Bottle holder (In some models)
Use the bottle holder to prevent bottles from slipping or falling.
Thumbwheel on fresh food compartment (on some models)
or
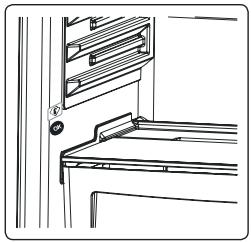
If the crisper is full, open the air vent on the front of the compartment. This allows air into the crisper, controls the humidity level and increases the shelf life of the food.
The circular ventilation slots at the back of the shelf should be opened if condensation appears on the glass shelf.
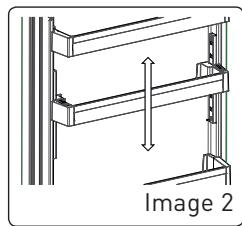
Adjustable door shelf (on some models)
The adjustable shelves have six height settings to form the necessary storage zones.
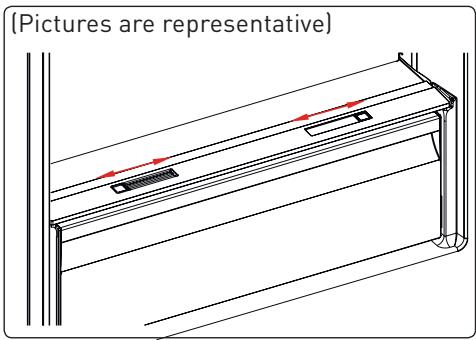
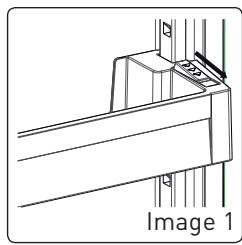
To change the position of the adjustable door shelf:
Hold the bottom of the shelf and pull the tabs located on its sides in the direction of the arrow. (Image 1)
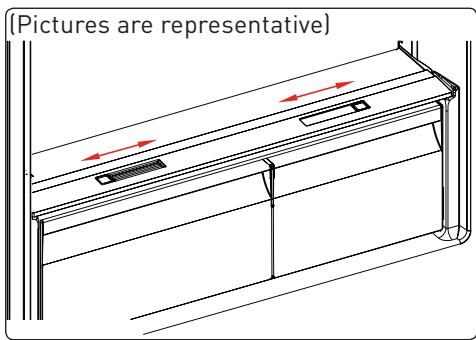
Move the shelf up and down to position it at the right height. When the shelf is in the desired position, release the side tabs (Image 2). Before releasing the shelf, press up and down to make sure it is properly in place.
NOTE:
Before moving, unload the shelf while holding the bottom of the tray. Otherwise, the weight of the shelf might cause it to be pulled out of its rails. This could damage the shelf or rails.
Food storage
Refrigerator compartment
- To decrease the level of humidity and prevent frost from forming, store food in the refrigerator in closed containers. Frost tends to concentrate in the coldest parts where food moisture evaporates, and over time your appliance will require more frequent defrosting.
- All cooked dishes should be covered when stored in the refrigerator. Do not place hot food in the refrigerator. Wait until food has cooled, as the increased temperature and humidity could cause the refrigerator to malfunction.
- Ensure that no items stored in the fridge are in direct contact with the rear wall of the appliance as frost may form and the packaging may stick to the rear wall. Do not open the refrigerator door frequently.
- Meat and gutted fish should be placed in a sealed container on the glass shelf just above the vegetable crisper, where cooler air provides optimal conservation conditions.
- Store loose fruit and vegetables in the crisp.
- Store fruit and vegetables separately to prevent ethylene-sensitive vegetables (greens, broccoli, carrots, etc.) being spoiled by fruits which release ethylene (bananas, peaches, apricots, figs, etc.).
- Do not place vegetables in the refrigerator if they are damp.
- The shelf life of all food items depends on their initial quality and on whether the refrigeration cycle was uninterrupted before they were placed in the refrigerator.
- Water dripping from meat may contaminate other products in the refrigerator. Meat products should be wrapped and any spillage on shelves should be cleaned.
Take care not to place any food which might obstruct the airflow.
- Consume packaged foods before the recommended expiry date.
Avoid touching the temperature sensor in the refrigerator compartment. To maintain an optimal storage temperature inside the refrigerator compartment, do not allow food to come into contact with the temperature sensor.
- In normal conditions, simply set your refrigerator temperature to +4^ .
- The temperature of the refrigerator compartment should be between 0 and 8^ . Fresh foods below 0^ will freeze and rot, bacterial load increases above 8^ and food deteriorates.
-
Do not put hot food in the refrigerator immediately, keep them outside until their temperature drops. Hot food increase the temperature in the refrigerator and can thus cause food poisoning or unnecessary food damage.
-
Meat, fish, etc. should be stored in the coldest food compartment. Store vegetables in the vegetable (crisper) compartment. (if available)
- To avoid cross-contamination, meat should not be stored together with fruit and vegetables.
- Food items placed in the refrigerator should be in closed or covered containers to prevent moisture and odours.
The table below is a quick guide on how to store food in the refrigerator in the most efficient way.
| Food products | Maximum storage time | Storage method and location |
| Fruit and vegetables | 1 week | Vegetable crisper compartment |
| Meat and fish | 2 to 3 days | Pack in film or plastic bag or in a meat box and store on the glass shelf. |
| Cream cheese | 3 to 4 days | On the appropriate door shelf |
| Butter and margarine | 1 week | On the appropriate door shelf |
| Bottled products, e.g. milk and yoghurt | Until the expiry date recommended by the producer | On the appropriate door shelf |
| Eggs | 1 month | On the egg tray indicated |
| Cooked food | 2 days | All shelves |
NOTE:
Potatoes, onions and garlic should not be stored in the refrigerator.
Freezer compartment
- The freezer is designed for storing frozen food, freezing fresh food and making ice cubes.
- Liquids should be frozen in plastic cups. Other items can be frozen in plastic bags or sachets. To freeze fresh produce: package and seal fresh food in leakproof airtight containers. Freezer bags, aluminium-reinforced polyethylene bags, and plastic containers are ideal.
- Do not store fresh foods next to frozen foods as this may melt the frozen foods.
-
Before freezing fresh foods, divide them into portions that can be consumed individually.
-
Consume frozen foods soon after thawing.
- When storing frozen foods, follow the manufacturer's instructions on the food packaging. Do not store food for more than three (3) months from the date of purchase.
- When purchasing frozen food, make sure that it has been stored in proper conditions and that its packaging is not damaged.
- Frozen food should be transported in suitable isothermal containers and placed in the freezer as soon as possible.
- Do not buy frozen food if the packaging shows signs of moisture or abnormal swelling. It is likely that such items have been stored at an inappropriate temperature and that its contents are spoiled.
- The shelf life of frozen food depends on the ambient temperature, the freezer temperature setting, how often the door is opened, the type of food and the length of time required to transport the product from the store to your home. Always follow the instructions on the packaging and do not exceed the storage period.
- If you leave the freezer door open for a long time, ice will appear on the bottom surface of the freezer. This will obstruct proper airflow. To avoid this, first unplug the power cord and wait for the ice to thaw. Clean the freezer once the ice has melted.
- The storage volume indicated on the appliance rating plate does not include drawers, trays, covers, etc.
- Never refreeze food once thawed. This could pose a potential health risk from food poisoning.
PLEASE NOTE:
The freezer door may be difficult to open just after having been closed. This is normal. Once the pressure has equalised, the door will open easily.
- To freeze household food items quickly, use the Fast Freeze shelf. The Fast Freeze shelf is the bottom shelf in the freezer compartment.
- To use the maximum capacity of the freezer, use glass shelves for the upper and middle sections and the drawer for the lower section.
The table below is a quick guide on how to store food efficiently in the refrigerator.
| Meat and fish | Preparation | Maximum storage time (months) |
| Steak | Wrap in aluminium foil | 6 to 8 |
| Lamb | Wrap in aluminium foil | 6 to 8 |
| Veal joint | Wrap in aluminium foil | 6 to 8 |
| Cubed veal | In small portions | 6 to 8 |
| Cubed lamb | In small portions | 4 to 8 |
| Minced meat | In its packaging, without spices | 1 to 3 |
| Offal (pieces) | In small portions | 1 to 3 |
| Cured sausage / salami | Must be kept wrapped, even if it has skin on it | |
| Chicken and turkey | Wrap in aluminium foil | 4 to 6 |
| Goose and duck | Wrap in aluminium foil | 4 to 6 |
| Venison, rabbit, wild boar | In portions of 2.5 kg or as fillets | 6 to 8 |
| Freshwater fish (salmon, carp, trout, catfish) | Wash and dry the fish after gutting and descaling it. If necessary, remove the tail and head | 2 |
| Lean fish (sea bass, turbot, dab) | 4 |
| Oily fish (tuna, mackerel, bluefish, anchovy) | 2 to 4 |
| Shellfish | Clean and place in a bag | 4 to 6 |
| Caviar | In its packaging or in an aluminium or plastic container | 2 to 3 |
| Snails | In its packaging or in an aluminium or plastic container | 3 |
PLEASE NOTE:
Frozen meat (once defrosted) should be cooked in the same way as fresh meat. Meat can only be refrozen if it is cooked after thawing.
| Fruit and vegetables | Preparation | Maximum storage time (months) |
| Green beans | Wash, slice into small pieces and bring to the boil | 10 to 13 |
| Peas | Shell, wash and bring to the boil | 12 |
| Cabbage | Clean and bring to the boil | 6 to 8 |
| Carrots | Wash and slice into small pieces and bring to the boil | 12 |
| Peppers | Remove the stem, cut in half, remove the inside and bring to the boil | 8 to 10 |
| Spinach | Clean and bring to the boil | 6 to 9 |
| Cauliflower | Remove the leaves, cut the heart into pieces and soak for a few minutes in water with a little lemon juice | 10 to 12 |
| Aubergine | Cut into 2 cm pieces after washing | 10 to 12 |
| Fruit and vegetables | Preparation | Maximum storage time (months) |
| Sweetcorn | Wash and wrap with the stalk or as sweetcorn kernels | 12 |
| Apples and pears | Peel and slice | 8 to 10 |
| Apricots and peaches | Peel, cut in half & remove stone | 4 to 6 |
| Strawberries and blackberries | Wash and remove the stalk | 8 to 12 |
| Stewed fruit | Add 10% sugar to the container | 12 |
| Plums, cherries | Wash and remove the stalk | 8 to 12 |
| Maximum storage time (months) | Thawing time at room temperature (hours) | Thawing time in the oven (minutes) |
| Bread | 4 to 6 | 2 to 3 | 4 to 5 (220 to 225°C) |
| Biscuits | 3 to 6 | 1 to 1.5 | 5 to 8 (190 to 200°C) |
| Pasta | 1 to 3 | 2 to 3 | 5-10 (200-225°C) |
| Pie or flan | 1 to 1.5 | 3 to 4 | 5-8 (190-200°C) |
| Puff pastry | 2 to 3 | 1 to 1.5 | 5 to 8 (190 to 200°C) |
| Pizza | 2 to 3 | 2 to 4 | 15 to 20 (200°C) |
| Dairy products | Preparation | Maximum storage time (months) | Storage conditions |
| Milk in carton (homogenised) | In its own packaging | 2 to 3 | Milk, in its packaging |
| Cheese, excluding fromage blanc (yoghurt / cheese) | Sliced | 6 to 8 | The original packaging can be used for short-term storage. Store wrapped in aluminium foil for longer periods |
| Butter and margarine | In its packaging | 6 | |
Cleaning and maintenance

Always disconnect the appliance from the power supply before cleaning it.

Do not pour water onto the refrigerator to clean it.

Do not use abrasive cleaning products or detergents to cleaner to clean the appliance.
After cleaning, rinse with clean water and dry thoroughly. Once finished cleaning, plug the appliance back into the power supply ensuring that your hands are dry.
- Make sure that water does not get into the lamp housing or other electrical components.
- The appliance should be cleaned regularly with a solution of bicarbonate of soda and lukewarm water.
- Clean accessories separately by hand with soap and water. Do not wash the accessories in the dishwasher.
- Clean the condenser with a brush at least twice a year. This saves energy and improves the efficiency of the appliance.

The power outlet must be disconnected during cleaning.
Thawing
Deicing the refrigerator compartment
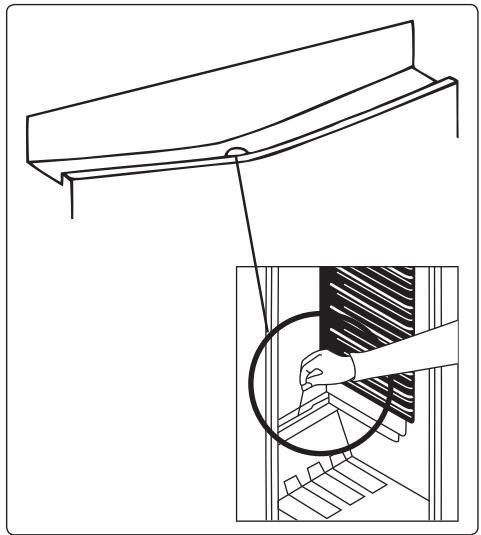
- De-icing automatically starts in the refrigerator compartment when it is in operation. Water is recovered by the evaporation pan and evaporates automatically.
- The evaporation pan and the water outlet should be cleaned periodically using the drain rod, to prevent water from stagnating at the bottom of the refrigerator (instead of running out).
- It is also possible to clean the water outlet by pouring half a glass of water into it.
Deicing the freezer
- Small amounts of frost accumulate inside the freezer, depending on how long the door is left open or how much moisture is introduced. It is important to avoid the formation of frost or ice in zones that may affect the door seal closure mechanism. This could allow air inside the appliance, which will make the compressor run continuously. Thin soft accumulated layers of frost can be removed using a plastic brush or scraper. Do not use metal objects, sharp scrapers, mechanical tools or other appliances to speed up the defrosting process. Remove any frost from the surface of the cabinet. There is no need to stop the appliance to remove thin layers of ice.
- To remove heavy ice, please unplug the appliance. Empty the contents into cardboard boxes packed in thick blankets or layers of paper to keep it cool. De-icing is more effective
if it is done when the freezer is almost empty, and must be done as quickly as possible to avoid an unnecessary increase in the temperature of the contents.
- Do not use metal objects, sharp scrapers, mechanical tools or other appliances to speed up the defrosting process. Increasing the temperature of frozen food items during defrosting shortens their shelf life. Throughout the thawing process, keep the contents of the freezer well packed and in a cool place.
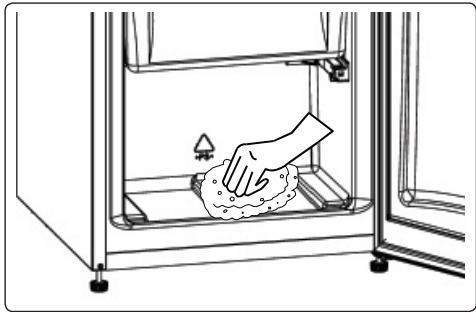
- Wipe the inside of the compartment with a sponge or soft cloth.
- To speed up the defrosting process, place one or two bowls of hot water in the freezer compartment (with the power off).
- Examine the contents of food packages when placing them back in the freezer. If certain foods are thawed, consume them within 24 hours or cook them before refreezing.
- Once defrosting is complete, clean the inside of the appliance with a solution of warm water and a little baking soda and then dry it thoroughly. Wash all removable parts and accessories in the same way and reassemble them. Plug the appliance back into the power supply and let it operate for 2-3 hours on the MAX temperature setting before (re)placing food in it.
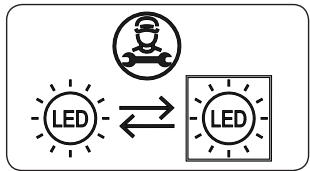
Replacing the LED lighting
- This appliance contains light emitting diodes (LEDs). This type of diode cannot be changed by the user. The lifespan of these LEDs is sufficient so that no changes are made.
- If, however, and despite all the care taken in manufacturing the refrigerator, the LEDs are defective, please contact your after-sales service for any intervention.
Transport and moving the appliance
Transport and change of location
- The original packaging and foam can (optionally) be kept to transport the appliance again.
- Surround the appliance with heavy packaging, strong straps or ropes and follow the instructions for transportation as indicated on the packaging.
- Remove all detachable items and accessories, or fix them in the appliance using adhesive tape to avoid any shocks if you move or transport the appliance.

Always transport the appliance in an upright position.
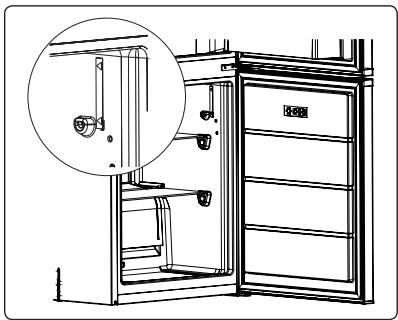
Changing the position of the door
- The direction in which the door opens can only be changed if the handles are mounted on the front of the door.
- It is possible to change the door opening direction on models without handles.
- If the direction in which the door opens on the appliance cannot be changed, contact your nearest authorised service centre to change it.
If you have a problem with your appliance, please check the following before contacting the Customer Care department.
Your appliance is not working. Check if:
- It is plugged into the power supply.
- The plug is correctly plugged into the socket.
- The plug fuse or main fuse has blown.
- The socket is defective. To check this, plug another appliance that works into the same outlet.
The appliance is working l Check if:
- The appliance is overloaded.
- The door of the appliance is properly closed.
There is dust on the condenser.
- The space remaining around the back and on the sides of the appliance is sufficient.
Your appliance makes noise when running
Normal noise
There is a clicking noise:
During automatic defrosting.
- When the appliance is cooling or warming (due to the dilation of the material).
A short cracking noise occurs: This noise is made when the thermostat activates and deactivates the compressor.
Motor noise: This noise indicates that the compressor is operating normally. The compressor may make a noise for a short period after starting.
Bubbling sounds and projections occur: Caused by the flow of coolant through the refrigeration system.
Noises of water flow occur: Caused by water flowing into the evaporation pan. This noise is normal during defrosting.
Air blowing sounds occur: On some models, this is normal system operation due to airflow.
In hot seasons, surfaces in contact with the door seal can become warmer when the compressor is in operation. This is normal.
There is a build-up of moisture inside the appliance
Check if:
- All food is properly packaged. Packaging must be dry before being placed in the refrigerator or freezer.
- The door of the appliance is opened often. Humidity in the room penetrates the appliance when the doors are open. Humidity rapidly increases if the doors are opened frequently, especially if room humidity is high.
The door does not open or close properly
Check if:
- There are foods or packaging preventing the door from closing.
- The door seals are damaged or bent.
- Your appliance is on a flat surface.
- The compressor/refrigerator noise may increase on some models during operation under certain conditions, such as when the product is first plugged in, when room temperature changes, or when there is a change in use. This is normal and the noise automatically decreases when the refrigerator reaches the required temperature.
Recommendations
- If the appliance is turned off or disconnected, wait at least 5 minutes before connecting or restarting the appliance to prevent damage to the compressor.
- If the appliance is not to be used for an extended period (e.g. holiday), disconnect the plug. Defrost and clean the freezer, then leave the door open to prevent mould and odours from forming.
- If the problem persists after following all of the above instructions, consult the nearest authorised technician.
- This appliance is intended for domestic use only. It is not suitable for commercial or public use. If the consumer uses the appliance in a way that does not comply with these instructions, the manufacturer and the seller cannot under any circumstances be held responsible for any repair or failure occurring during the warranty period.
Energy-saving tips
- Install the appliance in a cool, well-ventilated room, but not in direct sunlight or near a heat source (such as a radiator or oven). If the appliance is close to a source of heat, an insulating plate must be used.
- Leave food and drink to cool down before placing them in the appliance.
- Place food being thawed in the refrigerator compartment. The low temperature of frozen foods will cool the refrigerator compartment during thawing. This will save energy. Letting food thaw outside of the appliance results in a waste of energy.
- Food and drink in the appliance should be stored in sealed packaging or containers. If not, humidity increases and, consequently, the appliance uses more energy. Keep drinks and other liquids closed to maintain their aroma and taste.
- Avoid leaving the refrigerator doors open during long periods of time and opening doors too frequently. Hot air penetrating into the appliance can cause unnecessarily frequent use of the compressor.
- Leave the lids of compartments with different temperatures closed (such as vegetable and fresh compartments, if available).
- Door seals must remain clean and flexible. Replaced worn seals.
- The energy consumption of your appliance is estimated without the drawers loaded in the freezer compartment.
- To save energy, please do not use the volume between the load limit line and the door, all along the load limit line. The load limit line is also used in the energy consumption estimate.
Technical data
The above data can be found on the rating plate on the bottom of the appliance and on the packaging label.
The QR code on the energy label supplied with the appliance contains a web link to information regarding the appliance's performance, in the EU EPREL database.
It is recommended to use the energy label for reference with the user manual and other documents supplied with the appliance.
The same information can be found in the EPREL database at https://eprel.ece.europa.eu with the name of the model and product number found on the appliance's rating plate.
The installation and preparation of the appliance to meet eco-design requirements should comply with the EN 62552 standard.
The ventilation requirements, the dimensions of recesses and the minimum rear clearance must correspond to the indications in section 2 of this user manual. Please contact the manufacturer for more information, especially regarding loading plans.
Customer service and support
Always use original spare parts.
When you contact our authorised service centre, make sure you have the following information available: Mode, serial number and service index.
This information can be found on the rating plate. Subject to modification without notice.
Original spare parts for some specific components are available 10 years starting from the availability date of the last unit of the model.
Merci!
INFORMATIONS PRATIQUES
AJ Koelcompartment
B) Diepvriescompartment
Diepvriescompartment