4D 421 E X742C - TV VALBERG - Free user manual and instructions
Find the device manual for free 4D 421 E X742C VALBERG in PDF.
| Product type | Combined fridge-freezer |
| Brand | VALBERG |
| Model | 4D 421 E X742C |
| Climate class | SN, N, ST, T (10°C to 43°C) |
| Refrigerator compartment temperature | Adjustable from 2°C to 8°C, recommended 4°C |
| Freezer compartment temperature | Adjustable from -14°C to -22°C, recommended -18°C |
| Operating modes | ECO, Holiday, Super freeze, User |
| Display | LED with temperature of both compartments |
| Lock | Automatic after 25 s, unlock by long press 3 s |
| Defrost | Automatic (frost-free) |
| Maximum freezing capacity | Indicated on the rating plate (not specified in the manual) |
| Accessories | Vegetable drawer, door shelf, shelves, freezer drawer, sliding tray |
| Crisper/Chiller function | Temperature and humidity adjustment for fruits/vegetables or fish |
| Lighting | LED, energy efficiency class G, replacement by professional |
| Power supply | See rating plate (voltage and frequency suitable for the grid) |
| Warranty | 2 years against manufacturing defects |
| Maintenance and cleaning | Interior cleaning with warm water and neutral soap, automatic defrost |
| Safety | Mandatory earthing, do not use steam cleaner |
| Repairability | Light source replaceable only by qualified professional |
Frequently Asked Questions - 4D 421 E X742C VALBERG
User questions about 4D 421 E X742C VALBERG
0 question about this device. Answer the ones you know or ask your own.
Ask a new question about this device
Download the instructions for your TV in PDF format for free! Find your manual 4D 421 E X742C - VALBERG and take your electronic device back in hand. On this page are published all the documents necessary for the use of your device. 4D 421 E X742C by VALBERG.
USER MANUAL 4D 421 E X742C VALBERG
This product is guaranteed for a period of 2 years from the date of purchase* against any failure resulting from a manufacturing or material defect. This warranty does not cover defects or damage resulting from incorrect installation, improper use or abnormal wear of the product.
*as shown on the sales receipt.
CONDITION DE GARANTIE
FR
Thank you for choosing this VALBERG product.
Chosen, tested and recommended by ELECTRO DEPOT,
VALBERG branded products are easy to use, reliable,
and of an impeccable standard.
With every use of this appliance, you can be sure of
complete satisfaction.
Welcome to ELECTRO DEPOT.
Visit our website: www.electrodepot.fr

Overview of the appliance
Ambient temperature of use Temperature control adjustment Description

Using the appliance
Installation Daily use Useful tips and tricks

Practical information
Cleaning Repair
Ambient temperature of use
Respect the climate classes indicated in the product information on the appliance's rating plate. You can use this to check the recommended temperature range of the room where the appliance is located:
SN: Between 10 and 32^
N: Between 16 and 32^ C
ST: Between 16 and 38^
T: Between 16 and 43^ C
A multi-class appliance can handle the lowest and highest temperature of all classes covered. Using the appliance outside the recommended temperature range will lead to inferior performance and premature ageing.
Temperature control adjustment
For optimal use and energy savings, adjust the temperature control(s) of the appliance according to the ambient temperature of the room, in which it is being used, and respect the climate class.
Refer to the product sheet to find out the climatic class associated with the minimum and maximum recommended ambient temperatures for the appliance as well as the temperature setting recommended for storing food under optimal conditions.
The ambient temperature degrees T^ are given only as a guide.
The set positions can be affected by the location of the appliance in the room, how often the door is opened or the amount of food inside.
The temperature control position(s) may need to be changed to compensate for these factors.
Examples of locations:
- Unheated room in winter like a garage in a cold region.
- Kitchen/lounge area with normal heating.
- Room that is not air-conditioned in summer in a hot region.
Description
1 LED Lamp
Door shelf
3 Fruit and vegetable drawer
Antibacterial and deodorant module
5 Refrigerator shelves
6 Crisper drawer lid
7 Highly perishable food storage drawer
8 Pull-out shelf
9 Freezing tray
10 Adjustable legs
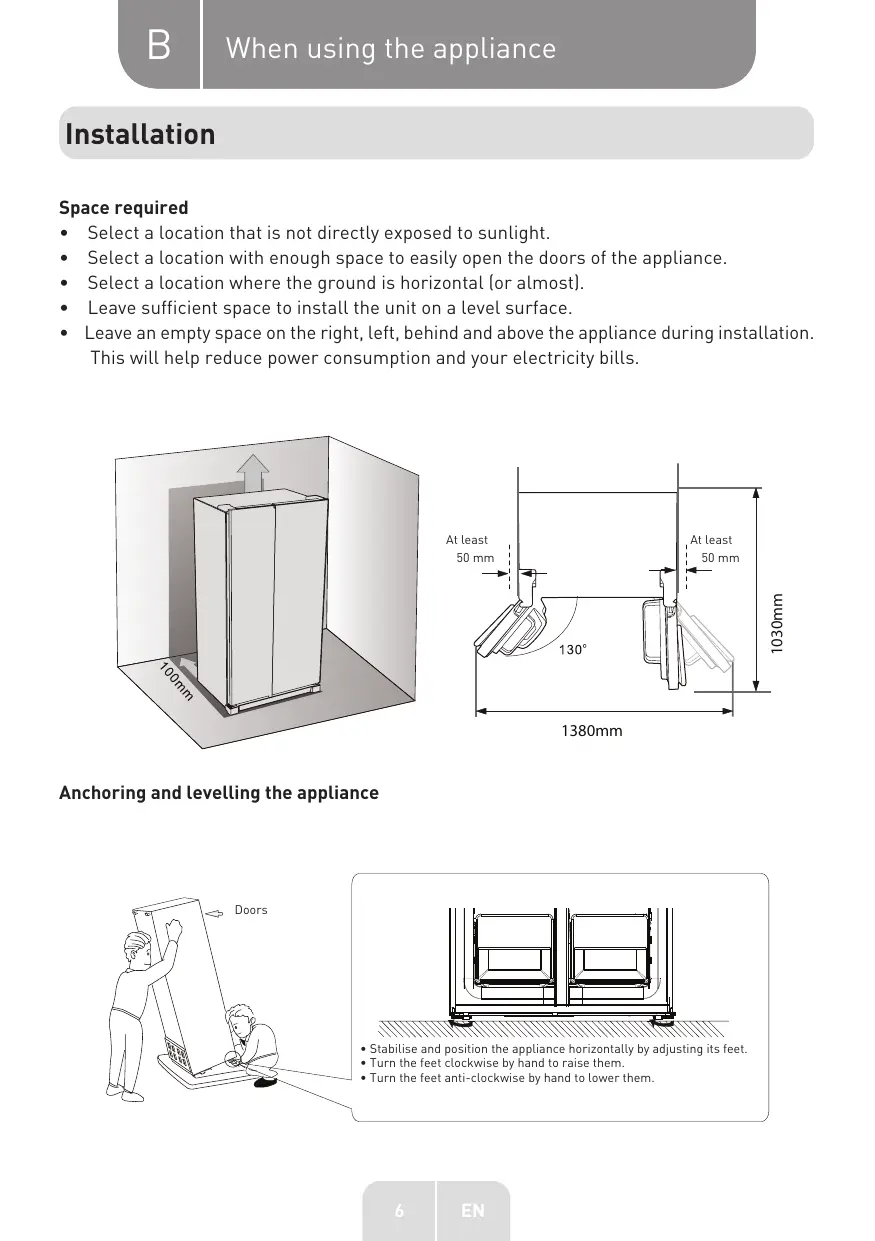
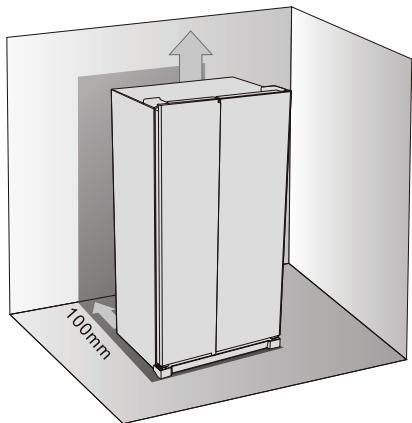
Installation
Space required
- Select a location that is not directly exposed to sunlight.
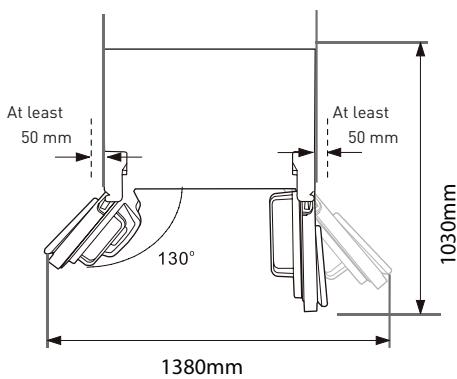
- Select a location with enough space to easily open the doors of the appliance.
- Select a location where the ground is horizontal (or almost).
- Leave sufficient space to install the unit on a level surface.
- Leave an empty space on the right, left, behind and above the appliance during installation. This will help reduce power consumption and your electricity bills.
Anchoring and levelling the appliance

Positioning
Install this appliance at a location where the ambient temperature corresponds to the climate class indicated on the rating plate of the appliance:
Location
The appliance should be installed away from heat sources, e.g. radiators, boilers, direct sunlight, etc. Make sure that air can circulate freely around the back of the appliance. To ensure optimum performance, if the appliance is positioned under a protruding wall unit, the minimum distance between the top of the appliance and the wall unit should be at least 100mm . However, ideally the appliance should not be placed under a protruding wall unit. Precise horizontal alignment is enabled by one or more adjustable feet under the appliance.
WARNING!
It is possible to unplug the appliance from the mains socket. The plug must therefore be easily accessible after installation.
Electrical connection
Before plugging in, ensure that the voltage and frequency shown on the rating plate correspond to your domestic power supply. This appliance must be earthed. The power cord plug has an earthing contact. If the household electrical outlet is not earthed, connect the appliance to a separate earthed circuit conforming to current regulations. For this consult a qualified electrician.
The manufacturer declines all responsibility if the above safety precautions are not observed. This appliance complies with European regulations.
Daily use
Using the control panel
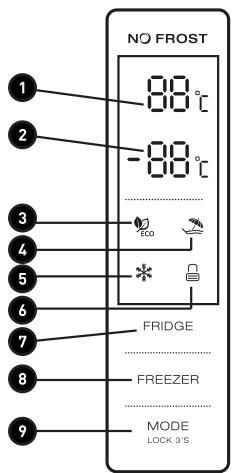
LED display
1 Temperature of the refrigerator compartment
2 Temperature of the freezer compartment
3 ECO mode
Holiday mode
Super mode
6 Locked/Unlocked
Button functions
Temperature button of the refrigerator compartment
8 Temperature button of the freezer compartment
9 Mode / Lock / Unlock
Conditions of use
- The control panel is fully switched on for 3 s, then the appliance operates with the settings (mode and temperature) before it was switched off. The system is automatically locked 25 s after the last operation on a button. After locking, the panel lighting goes out 30 s after the last operation on a button.
- The temperatures of the refrigeration and freezer compartments are shown on the display.
Screen
- The panel lights up for 2 minutes when the refrigerator or freezer compartment door is opened (only one door signal is detected at a time).
- The panel lights up when a button is pressed and turns off 2 minutes after the last operation.
- Display during normal use.
- Temperature button of the refrigerator compartment: Indicates the temperature of the current setting.
- Temperature button of the freezer compartment: Indicates the temperature of the current setting.
Button functions
Temperature button of the refrigerator compartment
- Temperature button of the refrigerator compartment: This button works in User mode and Super mode. After pressing the refrigerator compartment temperature button, it flashes. Press this button several times to successively adjust the temperature in the following order: 2^ C, 3^ C, 4^ C, 5^ C, 6^ C, 7^ C, 8^ C, OFF (stop). After that, the light flashes for 5 s to indicate that the temperature setting is validated.
-
The refrigerator compartment must be set at 4^ for optimal use.
-
Switch off the refrigerator compartment: Press the refrigerator compartment temperature button, select "OFF" (stop). A light flashes for 5s to indicate that the setting is validated and in this case the refrigerator compartment stops refrigeration.
Temperature button of the freezer compartment
Temperature button of the freezer compartment: This button works in User mode and Holiday mode. After pressing the refrigerator compartment temperature button, it flashes. Press this button several times to successively adjust the temperature between -14^ and -22^ . After that, the light flashes for 5 s to indicate that the temperature setting is validated.
The refrigerator compartment must be set at -18^ for optimal use.
Mode / Lock / Unlock
- Press this button several times to select the operating mode of the appliance in the following order: ECO, Holiday, Super, User. The light flashes for 5 s to indicate that the setting is validated.
-
Press and hold to enter / exit lock mode
-
Unlock: In the lock mode, press for 3s. There is a beep and all the buttons are unlocked.
- Lock: In the unlock mode, press for 3s. There is a beep and all the buttons are locked.
Press the buttons
There is a short beep each time a button is pressed.
The buttons are only functional in the unlock mode.
Locking of functions
After 25 s without any action on your part, the display will automatically lock.
ECO mode
Press on the mode button to select ECO mode, the ECO icon stays on after flashing for 5 s. In ECO mode, the temperature is 5^ in the refrigerator compartment and -18^ in the freezer compartment. These temperatures cannot be changed with the refrigerator and freezer compartment temperature buttons, and the ECO icon will flash three times to indicate this.
Exit ECO mode:
Press the mode button again to exit ECO mode. ECO mode is exited 5 s after selecting another mode.
Holiday mode
Press the mode button to select Holiday mode, the icon flashes for 5s, then it stays on, indicating that Holiday mode is activated. The temperature of the refrigerator compartment is fixed at 17^ . The corresponding button does not allow you to modify it and the Holiday icon flashes three times to indicate this.
Exit Holiday mode: Press the mode button again to exit Holiday mode. Holiday mode is exited 5 s after selecting another mode.
Super Freeze Mode
Select this mode. The icon flashes for 5s, then it stays on, indicating that Super Freeze mode is activated.
Super Freeze mode:
The freezer compartment temperature cannot be adjusted with the corresponding button and the corresponding icon flashes three times to indicate this.
Exit Super Freeze mode: depending on one of the following conditions.
- You manually exit Super Freeze mode.
After 50 hours of operation in Super Freeze mode.
The appliance returns to the mode preceding the use of Super Freeze mode.
First use
Cleaning the inside of the appliance Before using the appliance for the first time, wash the inside of the appliance and all internal accessories with lukewarm water and a little neutral soap to remove the odour typical of new appliances / accessories, then dry them completely.
Important! Do not use detergents or abrasive powders, as these will damage the finish.
Daily use
Freezing fresh food
- The freezer compartment is suitable for freezing fresh food and storing frozen and deep-frozen food for a long time.
- Place the fresh food to be frozen in the lower compartment.
- The maximum amount of food that can be frozen in 24 hours is specified on the rating plate.
- The freezing process lasts 24 hours. Do not add any other food to be frozen during this period.
Storing frozen food
When switching on for the first time or after a period of non-use, let the appliance run for at least 2 hours at maximum settings before putting food in its compartments.
Important! In the event of accidental thawing, for example if the power has been turned off for longer than the 'temperature rise' time indicated in the technical specifications, the thawed food should be eaten quickly or cooked immediately and then refrozen (after being cooked).
Thawing
Before eating, frozen or deep-frozen foods can be thawed in the refrigerator compartment or at room temperature depending on the time available for this operation.
Small foods can even be cooked while still frozen and straight out of the freezer. In this case, cooking will take longer.
Description of defrosting
The fridge-freezer combination is automatically defrosted.
Useful tips and tricks
Freezing tips
To get the most out of the freezing process, take note of the following important tips:
- The maximum amount of food that can be frozen in 24 hours is specified on the rating plate.
- The freezing process takes 24 hours. No other food to be frozen should be added during this period.
- Freeze only fresh, excellent quality and perfectly cleaned food.
- Divide the food into small portions that can be quickly and completely frozen, so that only the required quantities can be thawed later.
- Wrap food in aluminium foil or polyethylene film, and check that the packages are airtight.
- Do not leave fresh and thawed food in contact with already frozen food to avoid an increase in the temperature of the frozen food.
- Lean foods keep better and longer than fatty foods. Salt reduces the storage time of food.
- Ice cubes, if consumed immediately after removing from the freezer compartment, can cause skin burn due to the cold.
It is advisable to indicate the date of freezing on each individual package to allow you to know its storage time.
Frozen food storage tips
To obtain the best performance from this appliance, you should:
- Check that frozen foods sold in stores are properly stored by the retailer.
- Be sure to transfer frozen foods from the shop to your freezer as quickly as possible.
- Do not open the door frequently or leave it open longer than absolutely necessary.
- Once defrosted, foods deteriorate rapidly and must not be re-frozen.
- Do not exceed the storage time indicated by the food manufacturers.
Fresh food storage tips
For top performance:
- Do not store hot food or evaporating liquids in the refrigerator.
Cover or wrap foods, especially foods with a strong odour.
Refrigeration tips
Useful tips:
- Preserving food (all types): Wrap it in polythene bags and place it on the glass shelves above the vegetable drawer.
- For your safety, store it for a maximum of one or two days.
Cooked food, cold dishes, etc. : It must be covered and can be placed on any shelf. - Fruit and vegetables: They should be thoroughly cleaned and placed in the special drawers provided.
Butter and cheese: They should be placed in special airtight containers or wrapped in aluminium foil or polythene bags to exclude as much air as possible. - Bottles of milk: They must be closed and placed in the door shelves.
- Bananas, potatoes, onions and garlic: if they are not wrapped, they should not be stored in the refrigerator.
Temperature setting of the Crisper and Chiller drawers
- The temperature in this zone can be set according to the type of food to be stored.
- When the button is set to the "CRISPER" position, this area can be used as a fruit and vegetable drawer and it maintains the correct temperature and humidity.
- When the button is set to the "CHILLER" position, it is suitable for short-term storage of fish or other fresh foods. Food is kept fresh, but not frozen, making it the best choice for keeping food fresh.
- Advice: When you choose the "CHILLER" function, it is recommended to set the temperature of the refrigerator to less than 4^ and not keep the food for more than 3 days in order to preserve its freshness as much as possible.
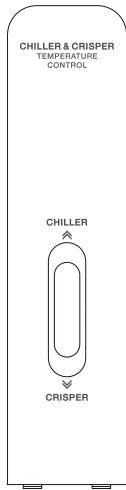
Temperature setting of the Crisper drawer
- When the button is set to the "HIGH" position, the humidity of the crisper drawer is high, which is suitable for storing vegetables.
- When the button is set to the "LOW" position, the humidity in the crisper drawer is lower, which is suitable for storing fruit.

Cleaning
To ensure hygiene, the interior of the appliance and the internal accessories must be cleaned regularly.
Please note!
The appliance should not be plugged into an electrical outlet while cleaning. Danger of electric shock! Before cleaning the appliance, switch it off and unplug it from the outlet, or switch it off and disconnect the fuse or circuit breaker. Never clean the appliance with a steam cleaner. Moisture could build up in the electrical components - Danger of electric shock! Hot steam can damage plastic parts. The appliance must be dry before it is switched back on.
Important!
Essential oils and organic solvents can deteriorate plastic parts, for example lemon juice, juice from orange peels, butyric acid, or cleaners containing acetic acid.
- Make sure that no substance of this type comes into contact with any part of the appliance.
- Do not use any abrasive cleaners.
- Remove the food from the freezer. Store it in a cool, well-covered place.
- Switch the appliance off and unplug it from the outlet, or switch it off and disconnect the fuse or circuit breaker.
- Clean the appliance and the interior accessories with a cloth and lukewarm water. After cleaning them with clean water, dry them with a cloth.
- Once all the parts are dry, switch the appliance back on.
Repair
Please note!
Before repairing, disconnect the appliance from the mains. Only a qualified electrician or a competent person should perform the repair operations not indicated in this user manual. Important! The appliance can make certain noises during normal operation (compressor, refrigerant circulation).
| Problem | Possible cause | Solution |
| The appliance does not work | The electric plug is not connected properly or at all. | Connect the electric plug. |
| The fuse has blown or is defective. | Check the fuse, replace it if necessary. | |
| The mains outlet is defective. | Mains outlet malfunctions are to be repaired by an electrician. | |
| The appliance excessively refrigerates or freezes. | The temperature is set too low or the appliance is operating in SUPER mode. | Temporarily set the temperature to a higher temperature. |
| The food is not frozen enough. | The temperature is not properly set. | See the chapter on the initial temperature setting. |
| The door has been left open for a long time. | Open the door only for the necessary time. | |
| A large quantity of warm food has been placed in the appliance within the last 24 hours. | Temporarily set the temperature to a cooler temperature. | |
| The appliance is near a heat source. | See the chapter on the choice of Installation location. | |
| There is a heavy build-up of frost on the door seal. | The door seal is not airtight. | Carefully warm the leaking areas of the door seal with a hair dryer on the cold setting. At the same time, change the shape of the heated door seal by hand so that it sits properly. |
| Unusual noises | The appliance is not level. | Adjust the feet again. |
| The appliance is touching the wall or other objects. | Move the appliance slightly. | |
| A component (for example a pipe) on the back of the appliance is touching another part of the appliance or the wall. | If necessary, gently bend the component to release it. | |
| There is water on the floor. | The water drainage hole is clogged. | See the "Cleaning and maintenance" chapter. |
If the malfunction reappears, contact a repair centre.
This information is necessary in order to be able to help you quickly and correctly.
Enter the required information here (see rating plate).
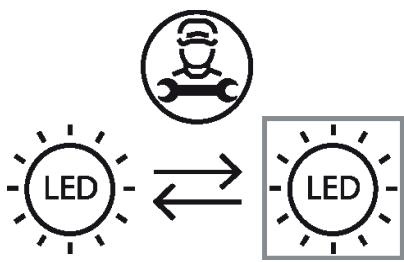
Changing the Light
This product contains a light source of energy efficiency class G.
Light source in this product can only be replaced by qualified professionals.
Please contact after-sales service if the light source fails.
The light source shall be removed at the end of the product's useful life, with sorting and recycling done separately.