M3I - Speaker MISSION - Free user manual and instructions
Find the device manual for free M3I MISSION in PDF.

| Product Type | 2-way passive loudspeaker (model M33i) |
| Brand | Mission |
| Model | M3I (series including M30i, M31i, M32i, M33i, M34i, M35i, M3Ci, M3DSI, M3AS) |
| Dimensions (H x W x D) for M33i | 850 x 200 x 325 mm |
| Weight per speaker (M33i) | 14.7 kg |
| Nominal impedance | 8 ohms (minimum 3.6 ohms) |
| Sensitivity | 90 dB SPL/M @ 2.83V |
| Frequency response | 48 Hz - 20 kHz (±3 dB) |
| Recommended amplifier power | 25 - 100 W per channel |
| Woofer | 1 x 165 mm DiaDrive unit (coated fiberglass cone) |
| Tweeter | Viotex fiber dome unit |
| Connection terminals | Gold-plated, dual pair for bi-wiring or bi-amping |
| Recommended placement | On the floor (with spikes) or on rigid stands |
| Minimum distance from rear wall | 300 mm |
| Maintenance and cleaning | Soft slightly damp cloth; liquid polish for shine; removable grilles for cleaning |
| Safety | Do not expose to water, excessive heat; do not obstruct ventilation openings; disconnect before any connection |
| Spare parts and repairability | No user-serviceable parts; contact authorized dealer for repair |
| Warranty | Manufacturer warranty under conditions (warranty card to be returned within 8 days) |
Frequently Asked Questions - M3I MISSION
User questions about M3I MISSION
0 question about this device. Answer the ones you know or ask your own.
Ask a new question about this device
Download the instructions for your Speaker in PDF format for free! Find your manual M3I - MISSION and take your electronic device back in hand. On this page are published all the documents necessary for the use of your device. M3I by MISSION.
USER MANUAL M3I MISSION
IAG House, Huntingdon
PE29 6XU
England
T: +44 (0) 1480 447700
F: +44 (0) 1480 431767
www.mission.co.uk
info@mission.co.uk
m3i series

www.mission.co.uk
Contents
| English | Cautions & Warranty Conditions | 2 |
| User Instructions | 3 - 8 | |
| Technical Specifications | 9 | |
| François | Précautions et Conditions de Garantie | 10 |
| Manuel d'utilisateur | 11 - 16 | |
| Caracteristiques | 17 | |
| Deutsch | Bitte unbedingt beachten und Garantiebedingungen | 18 |
| Gebrauchsanleitung | 19 - 24 | |
| Technische Daten | 25 | |
| Espanol | Precauciones y Condiciones de garantía | 26 |
| Instrucciones de uso | 27 - 32 | |
| Especillasiones | 33 |
English
Cautions Before installing this product read all these instructions.
Clean only with dry cloth.
When making any connections, switch the amplifier off.
When you switch on your system or change sources, set the volume control at minimum and turn the level up gradually.
DO NOT use your amplifier at full volume.
Avoid extreme settings of tone controls or graphic equalisers. Ideally, they should be set 'flat' or, if possible, bypassed. Ensure that all loudspeakers in the system are correctly wired and are in phase.
DO NOT subject your loudspeakers to excessive cold, heat, humidity or sunlight.
DO NOT install near any heat sources such as radiators, heat registers, stoves, or other apparatus (including amplifiers) that produce heat.
DO NOT place heavy objects on top of loudspeaker cabinets.
m3as important safety instructions
DO NOT block any ventilation openings.
DO NOT defeat the safety purpose of the polarized or grounding-type plug. A polarized plug has two blades with one wider than the other. A grounding type plug has two blades and a third grounding prong. The wide blade or the third prong are provided for your safety. If the provided plug does not fit into your outlet, consult an electrician for replacement of the obsolete outlet.
WARNING: If using spikes make sure that they do not pierce mains cable etc. under/above the carpet.
Protect the power cord from being walked on or pinched particularly at plugs, convenience receptacles, and the point where they exit from the apparatus.
WARNING: To reduce the risk of fire or electric shock, do not expose this apparatus to rain or moisture.
Warranty Conditions
The warranty card enclosed should be completed and returned to Mission or its Distributor within 8 days of purchase.
No Dealer or Distributor may vary the terms of this warranty which is personal to the original purchaser and is not transferable.
Please retain the sales receipt as proof of purchase.
Warranty claims must wherever possible be made through the Dealer from whom the equipment was purchased.
This warranty excludes:
Damage caused through neglect, accident, misuse, wear and tear, or through incorrect installation, adjustment or repair by
DO NOT connect your loudspeakers to the mains supply, except for subwooers.
DO NOT attempt to dismantle the loudspeaker. There are no user serviceable parts inside and you will render the warranty void.
Site hi-fi electronics away from the loudspeakers on a rigid stand or cabinet.
Loudspeakers should not be placed directly facing other hi-fi units, or share the same shelf or cabinet.
Site conventional speakers and subwoofoers at least 0.5m away from TV sets, computers etc. Some manufacturers forbid the placing of objects on top of their TV sets. Check your TV handbook before installing the centre speaker directly on your TV set. Consult your TV dealer if you are in any doubt.
Only use attachments/accessories specified by the manufacturer.
Use only with the cart, stand, tripod, bracket, or table specified by the manufacturer, or sold with the apparatus. When a cart is used, use caution when moving the cart/apparatus combination to avoid injury from tip-over.
DO NOT use this apparatus near water.
The apparatus must not be exposed to dripping or splashing and no objects filled with liquids, such as vases, should be placed on the apparatus. Unplug this apparatus during lightning storms or when unused for long periods of time.
Refer all servicing to qualified service personnel. Servicing is required when the apparatus has been damaged in any way, such as power-supply cord or plug is damaged, liquid has been spilled or objects have fallen into the apparatus, the apparatus has been exposed to rain or moisture, does not operate normally, or has been dropped.

When this symbol is shown there is a risk of electrical shock.

When this symbol is shown extreme caution should be observed.
unauthorised personnel. Any unauthorised servicing will result in loss of warranty.
Liability for damage or loss occurring in transit to or from the purchaser.
Consequent damage, loss or injury, arising from or in conjunction with this equipment.
Equipment for attention under warranty should be considered return carriage paid. If equipment is found to comply with the published specification, Mission reserves the right to raise a charge.
The above conditions do not affect your statutory rights as a consumer.
User Instructions
Welcome to Mission
The m3i series is the latest in a long line of distinguished Mission loudspeakers. These technologically advanced loudspeakers will complement the finest electronics and decor. Bass drivers using DiaDrive cones with pressure balanced, ventilated spiders and advanced Viotex laser trimmed pressure balanced tweeters are used throughout the range. High purity gold-plated binding posts feature on all models. Your Mission m3i loudspeakers will bring you great listening pleasure for many years.
General Information
Please read these instructions carefully before installing your loudspeakers. A few minutes studying this manual will ensure superb performance from your loudspeaker for many years.

Please pay attention to all cautions printed on the pages marked with this symbol.
Unpacking Your Loudspeakers
Carefully unpack each loudspeaker.
Retain all the packing materials so that your loudspeaker can be repacked and shipped without damage.
To ensure that your loudspeakers are protected during transportation, a protective film has been inserted between the grille and the cabinet. Before using your loudspeakers please remove the protective film by gently pulling the grille away from the cabinet and discarding the film.
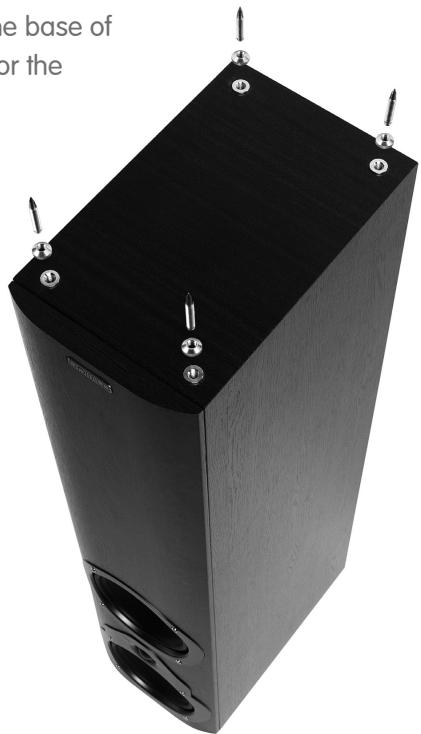
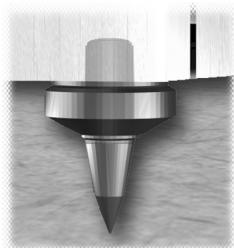
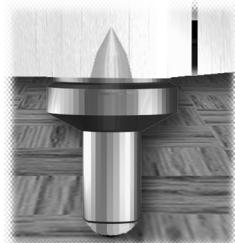
Fitting Spikes m33i, m34i, m35i

Warning: Be careful. Loudspeaker spikes are very sharp. When positioning the speakers avoid piercing any electrical cables.
Invert the loudspeaker and place the top on a soft surface.
Screw a nut on each spike.
Screw the spikes into the bushes fitted in the base of the cabinet. Use the sharp end on carpet, or the domed end on hard floors.
Carefully return the loudspeaker to its normal position.
Ensure that spikes do not pierce cables etc. under the carpet.
Adjust the height by screwing in or out one or more of the spikes until the loudspeaker is stable and level.
Connecting your Loudspeakers
Conventional Loudspeaker Connections
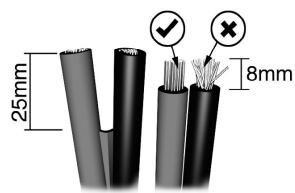
Loudspeaker cable is polarity coded along one edge. Split the cable to a depth of about 25mm (1") and strip 8mm (1/3") of insulation from each wire. If the cable is stranded, twist the strands together.
Terminal Panels
Your loudspeakers use two or four terminals. When single wiring speakers use the connecting links as shown opposite
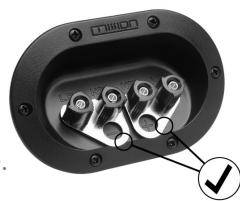
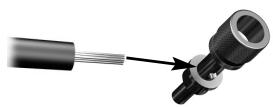
Unscrew each terminal. Thread the bare end of the cable through the cross-hole ensuring there are no loose strands. Tighten securely.
Connect the red, positive (+) terminal of the Left loudspeaker to the corresponding red, positive (+) amplifier terminal. Connect the black, negative (-) terminals similarly. Repeat for the Right Channel.
Power Handling

Warning
When an amplifier is driven beyond its power output capabilities it will produce distorted results which will quickly damage your speakers by overheating. Make sure that your amplifier is not left unattended when playing, for example at parties, and turn the volume control down at the first sign of audible distortion.
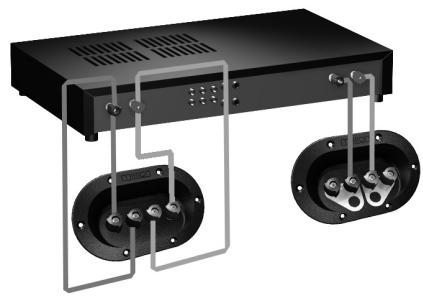
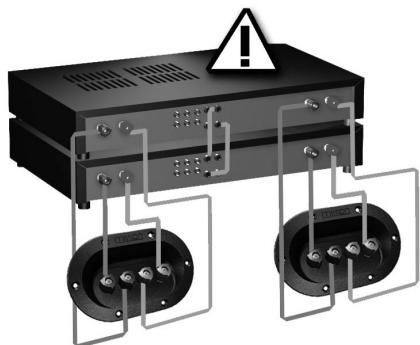
Bi-Wiring
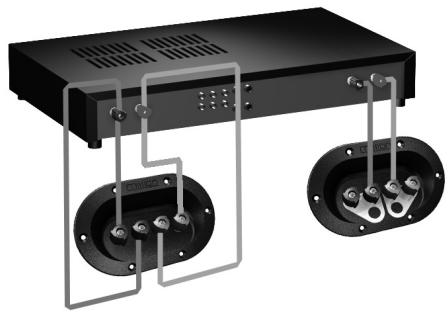
Most models in the Mission m3i series can be bi-wired for improved performance. Remove both pairs of shorting links and connect a cable to each pair of terminals, running them to a common connection at the amplifier output terminals. In the figure to the right, the terminal panel on the left is bi-wired; the panel on the right is conventionally wired. Note the shorting links.
Bi-Amping
By using separate amplifiers for LF and HF drive units you can further improve performance. This is known as bi-amping. The illustration opposite shows one channel of a bi-amped system. Note that the amplifier inputs are linked.
Positioning your Loudspeakers
Mission m33i, m34i and m35i loudspeakers should be placed on the floor (ideally on spikes). Mission m31i and m32i should be mounted on rigid stands, such as Mission 'Stancette', ideally spike coupled to the floor. Mission m30i are designed for shelf or wall mounting, using Mission's wall bracket (not supplied).
Height is important: a stand should place the top of a speaker at ear level to a seated listener. Shelf or bracket mounting is second best.
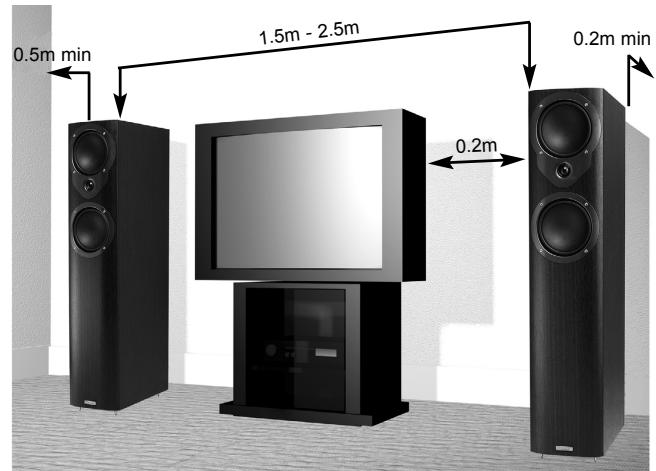
The distance from the rear wall can profoundly affect loudspeakers' sonic performance. If your speakers are too close to the wall the bass will boom and sound coloured. Moving them into the room may increase clarity but tends to reduce bass output. When positioned correctly, the high frequency response is smooth with well-defined, powerful bass.
Start with the speakers about 300mm ( 12'' ) from the wall and 1.8 metres ( 6' ) apart. The distance from each loudspeaker to the side wall should be at least 500mm ( 20'' ). Vary the distance between the two loudspeakers and the distance from the wall until you get a perfect stereo stage.
A few minutes optimising your listening position will be rewarded with a soundstage limited only by the quality of your equipment.
If your loudspeakers are wired correctly, the sound should be full with clean treble and a deep, rich bass.
The Mission m3ci Centre Channel Speaker
The Mission m3ci has been designed to reproduce dialogue in a Home Cinema installation. It is magnetically shielded and may be placed close to a TV set without causing interference. Your Centre loudspeaker will normally be sited on top of the TV monitor, or on a shelf in a console below the TV set.
If you are placing the loudspeaker on top of the TV monitor, ensure that the monitor cabinet can stand the weight and that the assembly is stable.
Some manufacturers forbid the placing of objects on top of their TV sets. Check your TV handbook before installing the m3i series Centre speaker directly on your TV set. Consult your TV dealer if you are in any doubt.
Attaching the Feet
Peel off the backing paper. Firmly attach each foot about 25mm (1") in from the corner of the base of the loudspeaker cabinet.
Connections and Phasing
Your Centre Channel loudspeaker must be connected to the Centre loudspeaker terminals of your AV amplifier or receiver. Follow the instructions in the previous sections for connections.
m3as setup
Retain all packaging materials in case you need to return your subwoofer for servicing.
Fit spikes supplied to the base of the subwoofer, if preferred.
Position subwoofer 300mm (12") or more from room corners.
To connect a stereo hi-fi amplifier use an RCA phono lead (not supplied) from the amplifier's pre-amp output to the m3as line inputs.
or
To connect an AV amplifier in a 5.1 / 6.1 channel home theatre system use an RCA phono lead (not supplied) from the amplifier's LFE OUT to the m3as LOW LEVEL IN (LFE/R).
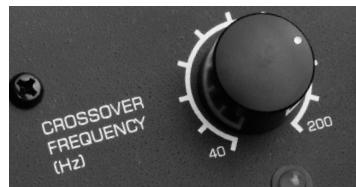
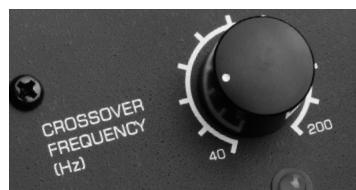
Adjust the crossover control to blend with, but not overlap, your main speakers' bass performance. For small stand-mount or bookshelf speakers set the CROSSOVER FREQUENCY control towards the 200 Hz setting.
For large or floorstanding speakers set the CROSSOVER FREQUENCY control towards the 40 Hz setting.
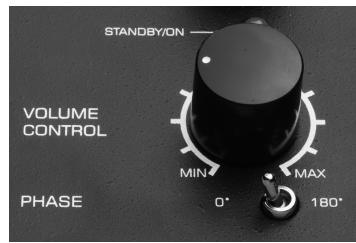
Adjust the VOLUME control to match the m3as bass output to the output level of your main speakers.
Consult your owner's manual for the AV amplifier to access the setup menu for your amplifier's speaker configuration. Set the front, centre and rear channels to SMALL. If you are using the LFE or subwoofer output, and have made the LFE connection to the subwoofer, set SUBWOOFER to ON.
Adjust the control on the rear amplifier panel marked VOLUME to tune the bass impact of Low Frequency Effects when playing Dolby Digital or DTS 5.1 / 6.1 channel sources. Turning the control up will increase the level of bass effects; turn the control down to avoid a boomy bass.
Adjust the control on the rear amplifier panel marked PHASE to tune the blend between the subwoofer and speakers. Depending on your room acoustics the sound will be fuller and more coherent with the switch in 0^ or 180^ position. Use your judgement to set the switch to the best sounding position. If you are unsure, set the switch to the 0^ position.

m3dsi positioning
The m3dsi loudspeakers are supplied for wall mounting, ideally above seated head height, with the Mission badge the correct way up. If you wish to fit the speakers flush to the ceiling you can invert the speakers - a separate set of screw
slots are provided for this. In this case you may fit the supplied self-adhesive Mission logos over the existing badges (see image).
Phase
To check that your loudspeakers are in phase, check the polarity of your speaker wire at the terminal post on the loudspeakers and at the loudspeaker connector on your amplifier.
The marked conductor should always be connected to the positive terminals. If your loudspeakers are connected in the right way, you will hear a full sound with clean midrange and deep and powerful bass.
Setting up Audio Visual Loudspeakers
Sound Level
It is important that the centre, front and rear speakers are set to the same sound level as perceived from the listening position. Follow your AV processor handbook instructions carefully, especially the section concerned with setting up relative loudspeaker levels.
Optional Sand Filling m33i, m34i
Mission m33i and m34i loudspeakers can be sand filled to improve stability and reduce cabinet resonance.
Use dry sand only in a plastic bag.
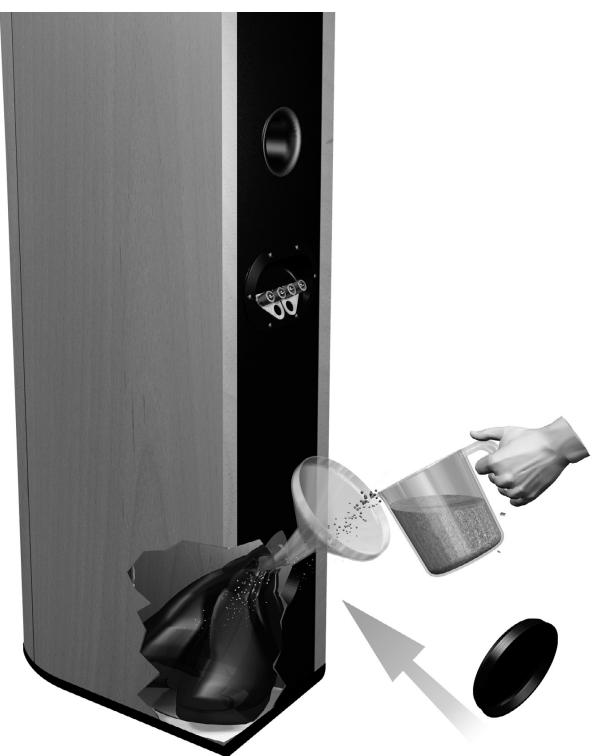
Note: Sand and plastic bag not supplied.
Loudspeaker Maintenance
Use a slightly dampened cloth to clean your cabinets and occasionally, a light spray polish to protect their sheen. If necessary clean grilles carefully with a soft brush.
Product Service
Should a fault occur with your loudspeakers please return them as a pair, even if only one unit appears to be faulty. Please pack them correctly, using the original packing.
Product for service should be returned to the appointed dealer from whom you purchased the product. If you experience difficulties or there is no Mission dealer in your area, contact the Mission distributor for your country or the Main Service Centre for your region.
Technical Specifications
| m30i | m31i | m32i | m33i | m34i | m35i | |
| Recommended Amplifier: (per channel) | 15 - 75 W | 25 - 75 W | 25 - 100 W | 25 - 100 W | 25 - 150 W | 25 - 150 W |
| Enclosure: | 2-way reflex | 2-way reflex | 2-way reflex | 2-way reflex | 2-way reflex | 3-way reflex |
| Effective Volume: | 3.4 litres | 7.0 litres | 12.4 litres | 17.7 litres | 35.7 litres | 47.7 litres |
| Frequency Response ±3dB: | 68 Hz - 20 kHz | 65 Hz - 20 kHz | 52 Hz - 20 kHz | 48 Hz - 20 kHz | 44 Hz - 20 kHz | 40 Hz - 20 kHz |
| Sensitivity SPL/M @ 2.83V: | 86 dB | 88 dB | 90 dB | 90 dB | 92 dB | 92 dB |
| Impedance: | 8 Ohms compatible (minimum 4.0 Ohms) | 8 Ohms compatible (minimum 4.0 Ohms) | 8 Ohms compatible (minimum 4.0 Ohms) | 8 Ohms compatible (minimum 3.6 Ohms) | 8 Ohms compatible (minimum 3.8 Ohms) | 8 Ohms compatible (minimum 3.6 Ohms) |
| Bass: | 1 x 100 mm DiaDrive unit | 1 x 130 mm DiaDrive unit | 1 x 165 mm DiaDrive unit | 1 x 165 mm DiaDrive unit | 2 x 165 mm DiaDrive units | 3 x 165 mm DiaDrive units |
| Treble: | Viotex fabric dome treble unit | Viotex fabric dome treble unit | Viotex fabric dome treble unit | Viotex fabric dome treble unit | Viotex fabric dome treble unit | Viotex fabric dome treble unit |
| Dimensions (H x W x D): mm | 220 x 145 x 190 | 255 x 170 x 280 | 320 x 200 x 325 | 850 x 200 x 325 | 950 x 200 x 330 | 1030 x 260 x 375 |
| Weight (per loudspeaker): | 2.5 kg | 4.3 kg | 7.0 kg | 14.7 kg | 17.8 kg | 22.8 kg |
| m3C1i | m3C2i | m3dsi | m3as | |
| Recommended Amplifier: (per channel) | 25 - 100 W | 25 - 125 W | 25 - 100 W | Integrated 150 W active subwoofer |
| Enclosure: | 2-way reflex | 2-way reflex | 2-way reflex | reflex |
| Effective Volume: | 5.2 litres | 9.7 litres | 4.5 litres | 35.0 litres |
| Frequency Response ±3dB: | 75 Hz - 20 kHz | 56 Hz - 20 kHz | 75 Hz - 20 kHz | 30 Hz - 165 Hz |
| Sensitivity SPL/M @ 2.83V: | 89 dB | 91 dB | 89 dB | n /a |
| Impedance: | 8 Ohms compatible (minimum 4.7 Ohms) | 8 Ohms compatible (minimum 4.2 Ohms) | 8 Ohms compatible (minimum 5.6 Ohms) | n /a |
| Bass: | 2 x 100 mm DiaDrive units | 2 x 100 mm DiaDrive units | 2 x 100 mm Coaxial units | 1 x 250 mm Pulp fibre unit |
| Treble: | Viotex fabric dome treble unit | Viotex fabric dome treble unit | - | - |
| Dimensions (H x W x D): mm | 135 x 500 x 130 | 165 x 430 x 230 | 230 x 360 x 110 | 410 x 280 x 500 |
| Weight (per loudspeaker): | 2.5 kg | 6.7 kg | 2.4 kg | 17.5 kg |
François
I've been working on a new project. I'm working on a new project that will be used to develop a new system for the use of wireless communication in the Internet. This system will allow us to connect to the Internet from any location, including home or office. It's also possible to have a system with a specific connection type and a specific connection speed.