USER MANUAL ESLHP8-2B ESSENTIELB
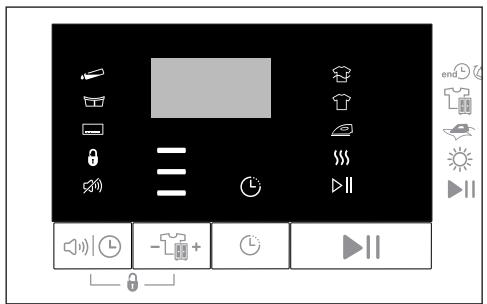
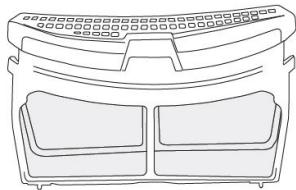
Description of the control panel
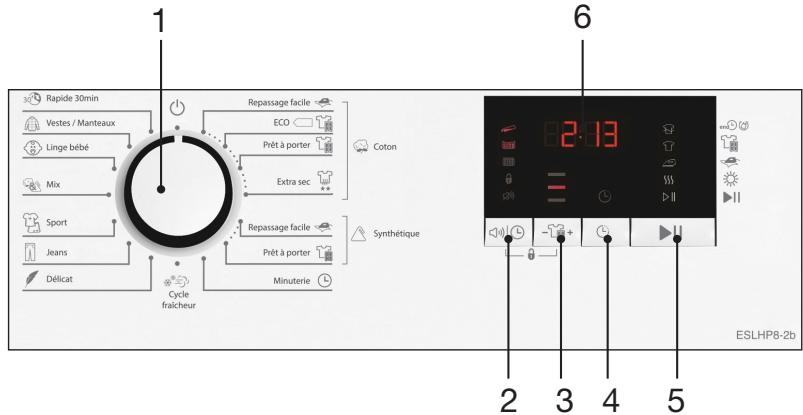
- Dryer on/off and programme selection knob
-
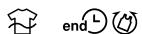
Button to disable the end of cycle acoustic signal and to select the timer
-
Button for selecting the drying level
- Button for selecting a delayed programme end
- Start/Pause button
- Display screen
Description of the display screen
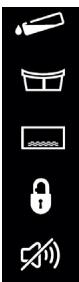
Tank full warning lamp (tank must be emptied)
Lint filter cleaning warning lamp
Condenser filter cleaning warning lamp
Child lock activated (buttons locked)
Indicator lamp lights up = the end of cycle acoustic signal is switched off

Drying level selected (1, 2 or 3 lamps on)
Indicate the desired level of drying depending on the speed at which the laundry was spun beforehand. The drying time will then be increased or shortened.

Delayed end indicator
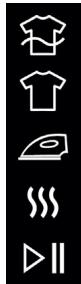
The programme has finished. The 2-hour anti-crease programme is activated.
The laundry has reached the "Ready-to-wear"
The laundry has reached the "Easy iron"
The laundry is being dried
Operation symbol (on)
Pause symbol
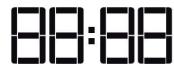
Display of the time remaining*
*The time remaining until the end of the cycle appears on the screen; it varies according to the level of humidity of the laundry.

End/anti-crease

Ready-to-wear

Easy iron

Drying

Start/pause
installation
The customer is responsible for preparing the site and the electrical installation of the appliance.
WARNING!
- Installation and electrical connections must be carried out by qualified persons.
- Before installation, visually check the product for defects. If there are any defects, do not install the product. A damaged appliance may pose a safety hazard.
- Wait 12 hours before operating your dryer.
Suitable installation location
- Install the appliance in an environment where there is no risk of frost (the temperature of the room in which the dryer is installed should be between +5^ and +35^ ), in a stable and level position.
- Use your appliance in a well-ventilated and dust-free environment.
- Do not obstruct the appliance's air ducts.
- Do not place the machine on carpeting or similar surfaces.
- Do not install the appliance behind a hinged or sliding door or one whose hinges are on the opposite side to those of the dryer. You should always be able to fully open the dryer door.
- When the appliance is installed, it must remain in the same place where the connections have been made. When installing the appliance, make sure that the rear wall is not in contact with any objects (tap, wall socket) and also make sure that the appliance is installed in its final location. The rear surface of the dryer should be placed against a wall.
- Do not place the appliance on its power cord.
- Leave at least 1.5 cm clearance between the appliance and adjacent furniture.
Removing the transport safety device
Remove the transport safety device before using the dryer for the first time.
Installation on top of a washing machine
- A mounting device must be used between the two appliances to be able to use the dryer on top of a washing machine.
- The total weight of the washing machine and dryer when fully loaded and placed on top of each other is approximately 180 ~kg . Place the appliance on a strong floor with sufficient load-bearing capacity!
Avoid placing the washing machine on top of the dryer. Pay attention to the above warnings when installing on top of your washing machine.
| Washing machine and dryer installation |
| Washing machine depth |
| Dryer depth | 62 cm | 60 cm | 54 cm | < 50 cm |
| 54 cm | Can be installed | Cannot be installed |
| 60 cm | Can be installed | Cannot be installed |
Connecting the exhaust duct
Figure 1
The water accumulated during the drying cycle is collected in the water collection tank. You must empty the water contained in the water collection tank after each drying cycle.
Figure 2
You also have the option of draining the water through the drain hose provided with the appliance.
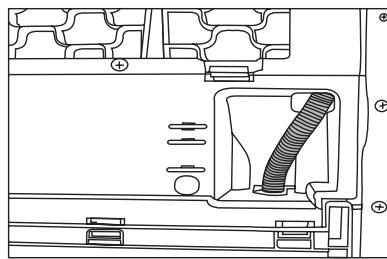
Figure 1
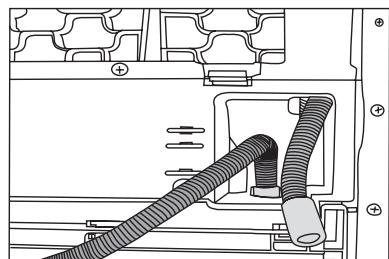
Figure 2
To do this:
- Remove the access hose by hand from the drawer at the back of the appliance (fig.1).
- Connect one end of the drain hose provided separately with the dryer to the connection point as shown in fig.2.
- Connect the other end of the hose to the sewage pipe or washbasin.
In any case, the hose must be secured to prevent it from slipping and water spilling onto the floor.
- The water drain hose must be attached at a maximum height of 80~cm .
- Make sure that the drain hose is not blocked or kinked between the drain and the appliance.
Adjusting the Feet
To ensure that your appliance operates quietly and vibration-free, it must be stable, horizontal and level. Level the dryer by adjusting the adjustable feet.
Turn the feet to the right or left until the appliance is stable.
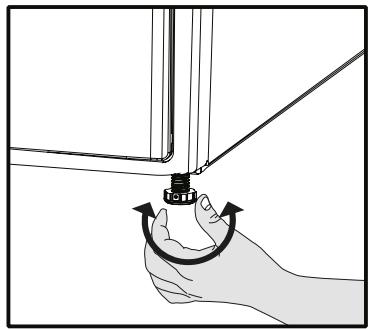
Never unscrew the adjustable feet from their housings.
Switching on the unit for the first time
- To prepare the appliance before the authorised service agent arrives, ensure that the site and electrical installation are suitable. If this is not the case, contact a qualified electrician to make the necessary preparations.
- Make sure that the appliance's connections comply with the instructions provided in the relevant sections of this manual.
DANGER! The dryer contains R290 refrigerant.
R290 is an environmentally friendly but flammable refrigerant.
Make sure that the dryer's air inlet is open and well ventilated.
Keep potential flame sources away from the dryer.
Transport
- Unplug the appliance before transporting it.
- Remove the drain hose (if fitted at the back of the appliance).
- Drain all the water out of the tank.
- We recommend transporting the appliance in an upright position. If it is not possible to transport the appliance in an upright position, it must be transported by tilting it to the right when viewed from the front. After installing the appliance in its new location, wait 12 hours before using it again.
Normal operating noises
It is normal to hear noise from the compressor during operation.
Water accumulated during operation is pumped to the water tank. It is normal to hear a pumping noise during this phase.
Electrical connections
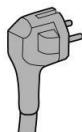
Your appliance can only be plugged into a 230-240 V~ 50 Hz single-phase wall socket.
Before plugging in your dryer, make sure the mains voltage in your home matches that on the appliance's rating plate and that the power cord plug is the right one for the power point.
- Earthing
- This appliance is equipped with an earthed electrical plug.
- It must be plugged into an earthed wall socket that is properly installed and connected to the electrical grid in accordance with current standards.
- This socket must remain unobstructed after installation.
- WARNING: Improper use of the earth connection may pose a risk of electric shock.
Earthing reduces the risk of electric shock by allowing a possible short-circuit current to escape through the earth wire.
- For questions concerning the earthing or electrical connection, please consult a qualified individual.
-
We shall not be held liable in the event of an accident or incident caused by a non-existent or faulty earth connection.
-
If the power cord is damaged, it must be replaced by your retailer, their after-sales service department or a similarly qualified person to avoid potential hazards.
- Do not plug the appliance into an extension cord or multi-way socket.
- If the fuse or circuit breaker in your home is less than 10 amps, have a qualified electrician install a 10-amp fuse.
- A minimum contact distance of 3mm must be maintained between the fuse and the main circuit breaker.
If the appliance is defective, it must not be used until it has been repaired! You would expose yourself to the risk of electrocution!
preparing the laundry
Ways to save energy
- Spin the laundry at the maximum speed appropriate for the type of laundry when washing. This reduces drying time and energy consumption.
- Please follow the instructions in the manual for programme selection.
- Sort your laundry according to its type and thickness. Make sure you dry the same types of laundry together (for example: dishcloths and thinner tablecloths dry faster than thicker bath towels).
- Make sure that there is enough space at the back and front of the appliance for air to circulate.
- Do not open the appliance door during drying unless necessary. If you have to open the door, be careful not to leave it open for too long.
- Do not add wet laundry while drying.
- The lint and fibres that are released from the laundry into the air during the drying cycle are collected by the lint filter. Always clean the lint filter before or after each drying cycle.
- Clean the condenser filter regularly when the condenser filter cleaning warning symbol appears or after 5 drying cycles.
- Ventilate the room where the dryer is located during drying.
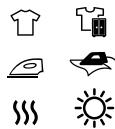
Laundry suitable For machine drying
- Always follow the recommendations on the laundry's labels. Only dry laundry whose label states that it can be dried in a tumble dryer.
| Dry at normal temperature | | Iron at 110°C max |
| Dry at low temperature | | Iron at 150°C max |
| Safe for tumble dryers | | Iron at 200°C max |
| Do not tumble dry | | Do not iron |
| Dry flat | | Hang to dry |
| Drip dry | | |
Laundry not suitable for machine drying
- Clothing with metal parts such as belt buckles and metal buttons can damage the dryer.
- Do not put items such as wool, silk, nylon, delicate embroidered fabrics, garments with metallic accessories or bulky items, such as sleeping bags, in the dryer.
- Delicate fabrics and lace curtains may crease. Do not tumble dry them!
- Do not dry items made of waterproof fibres, such as pillows or quilts, in the dryer.
- Clothing with foam or rubber will become deformed. Do not dry articles containing rubber in the dryer.
- Do not dry clothes that have been exposed to petrol, oil, combustible or explosive agents in the dryer, even if they have been washed beforehand.
- Excessively waterlogged or dripping laundry should not be placed in the appliance.
- Laundry washed or cleaned with diesel, petrol, dry-cleaning solvents and other combustible or explosive materials, as well as laundry contaminated or stained by such materials, must not be dried in the dryer as they give off flammable or explosive vapours.
- Do not dry clothing cleaned with chemicals in the dryer.
- Do not dry unwashed clothes in the dryer.
- Laundry stained with cooking oils, acetone, alcohol, petrol, kerosene, stain removers, turpentine, paraffin wax, paraffin wax stain removers, should be washed in hot water with a large amount of detergent before being placed in the dryer.
Preparing laundry for drying
- The laundry should be spun beforehand in your washing machine at the highest possible speed allowed for the type of fabric.
- The laundry may become tangled after washing. Separate your laundry before putting it in the dryer.
- Turn clothes with metal accessories, such as zips, inside out to dry them.
- Attach zips, hooks, buckles and buttons.
Loading the appliance
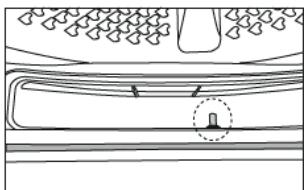
- Please refer to the information contained in the programme table. Do not load beyond the capacities indicated in the table.
- Do not load the dryer with laundry exceeding the level indicated by the dotted line in the diagram opposite. Drying performance will be reduced if the appliance is overloaded. It could also damage the dryer as well as your clothes.
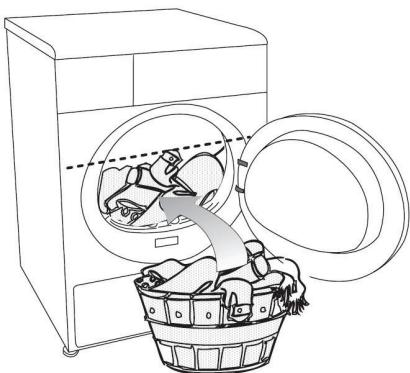
- Place your laundry in the drum unfolded so that it does not get tangled.
- Larger items (e.g. sheets, quilts, tablecloths) may become very tangled. Limit the amount of large pieces of laundry. If the laundry gets tangled, the centre of the laundry may not be fully dried. Unfold the laundry in question and put it back in the dryer for a short time to finish drying it.
The following weights are given as a guide:
| Household linen | Approximate weight (in grams) | Clothing | Approximate weight (in grams) |
| Cotton quilt (double) | 1500 | Blouse | 150 |
| Cotton quilt (single) | 1000 | Cotton shirt | 300 |
| Bedsheet (double) | 500 | Shirt | 200 |
| Bedsheet (single) | 350 | Cotton dress | 500 |
| Large tablecloth | 700 | Dress | 350 |
| Small tablecloth | 250 | Jeans | 700 |
| Napkin | 100 | Tissues (x 10) | 100 |
| Bath towel | 700 | T-shirt | 125 |
| Hand towel | 350 | | |
use
Switching the appliance on/off
To switch on the appliance, turn the programme selection knob to a programme.
To switch the appliance off, turn the programme selection knob to the (off) position.
Selecting programmes
- Select a programme using the programme selector knob.
Select either:
- A main programme depending on the type of fabric (cotton or synthetic) and the desired level of drying,
- A special programme adapted to a type of laundry or,
-
A pre-set drying time with a timed programme (Timer Programme).
-
In addition, you can select an optional function: cancel the end of cycle acoustic signal , select a drying level - and/or select a delayed stop .
- Press the II (Start/Pause) button to start the drying programme.
NOTE: For best drying results, the laundry should be washed beforehand and then spun with a suitable programme.
1) Main programmes:
COTTON

You can dry your clothes made of heavy fabrics with these programmes. It dries at a high temperature. It is recommended for cotton laundry (such as bed linen, towels, etc.).
SYNTHETIC

You can dry your clothes made of less heavy fabrics with these programmes. Drying is done at a lower temperature than the Cotton programme. It is recommended for your clothes made of synthetic fabrics.
ANTI-CREASE

A 2-hour "anti-crease" programme is automatically activated if you do not remove the laundry from the appliance at the end of a cycle. The anti-crease cycle spins the laundry for a few seconds every 10 minutes to prevent creasing.
SELECTING THE DRYING LEVEL
Select a Cotton or Synthetic programme according to the desired drying level based on the table below.
| Extra dry ★★ | Drying at high temperature. Only for thick, multi-layer cotton laundry (e.g.: household linen, towels, jeans, etc.). |
| Ready-to-wear | The laundry will be less dry than with the “Easy iron” programme. Drying at normal temperature. |
| Eco | Energy-saving drying at a normal temperature. |
| Easy iron | The laundry remains slightly damp for ironing. |
2) Special programmes:
Additional programmes are available for special cases:
QUICK

Use this programme to prepare small quantities of delicate laundry for ironing in 30 minutes (e.g. 2 shirts or 4 T-shirts).
JACKETS AND COATS

This programme allows you to dry items filled with synthetic fibre, down or feathers (e.g. duvets) that are compatible with drying in a tumble dryer. Jackets and coats should be dried inside out.
BABY LINEN

Use this program for machine dryable baby clothes.
MIXED

You can dry synthetic and cotton clothes at the same time with this programme.
SPORT

This programme is especially suitable for sportswear that can be tumble-dried.
JEANS

DELICATE
You can dry your delicate laundry (silk blouses, fine lingerie, etc.) that can be tumble-dried, or laundry for which hand washing is recommended, at a low temperature.
COOL CYCLE
The laundry is simply aired out for 10 minutes, without hot air. You can use this programme to air out your clothes that have been left in closed environments for a long period of time and, in this way, eliminate unpleasant odours.
3) Timed programs:
TIMER
Turn the programme selection knob to (Timer) and press the (Buzzer/Timer) button one or more times to select a drying time.
You can select a drying time of 10, 20, 40, 50, 60, 80, 100, 120, 140 or 160 minutes. With this programme, the appliance dries for the selected time regardless of the drying level.
4) Optional functions:
Turning off the audible tone
Your device will emit an audible tone when a cycle ends. If you do not want the tone to sound, press the l (Buzzer/Timer) button. If the indicator lamp is lit, there will be no audible tone at the end of the cycle.
You can select this option before or after starting the cycle.
Selecting the drying level
Press the -L + (Drying level) button before starting a programme to adjust the drying to the desired level. The duration of the selected programme will be adjusted according to your selection.
NOTE: The drying level can only be changed before the start of the programme.
Programming a delayed end
You can program a delayed end of up to 24 hours.
- Open the door and place your laundry in the drum, and then close the door.
- Choose a drying programme.
- Press the (Delayed end) button to select the desired delayed end.
The delayed end indicator lamp lights up.
NOTE: when you press and hold down the (Delayed end) button, the time will scroll quickly.
- Press the II (Start/Pause) button to save the delayed end time. The time countdown starts, the “:” for the countdown flashes. The display shows the time for the drying programme plus the programmed delayed end time.
NOTE: You can add or remove laundry during the countdown.
- At the end of the countdown, the delayed end indicator lamp switches off and the programme starts.
To change or cancel a delayed end before the start of the programme, switch the appliance off by turning the programme selector knob to the (off) position, then switch the appliance back on and repeat the above procedure if you wish to programme a new delayed end.
Indicator lamps
1) "Tank" (water collection tank full):
At the end of the programme, the tank indicator lamp lights up to remind you to empty the water tank. If you forget to empty the tank, the dryer may stop working and go into standby mode. In this case, empty the water tank and press the II (Start/Pause) button to restart the cycle. The warning lamp goes out.
2) "Filter" (cleaning the lint filter):
The filter indicator lamp lights up to remind you to clean the lint filter in the drum at the end of the cycle.
3) "Condenser" (cleaning the condenser filter):
This indicator lamp lights up to remind you to clean the condenser filter.
4) Progress of the cycle:
The progress of a cycle is displayed on the cycle monitoring indicator. At the start of each new stage in the drying process, the corresponding indicator lamp lights up and the one for the previous stage goes out. The progression goes from the bottom to the top.
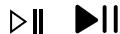
THE (START/PAUSE) LAMP:
The indicator is lit when the dryer is running; it flashes when the appliance is paused.
THE (DRYING) LAMP:
This indicator is lit during the drying process until the drying level reaches the "Easy iron" level.
THE (EASY IRON) LAMP:
This indicator lights up when the drying level reaches the "Easy iron" level and stays on until the "Ready-to-wear" drying level is reached.

(READY-TO-WEAR) LAMP:
This indicator lights up when the drying level reaches the "Ready-to-wear" level and stays on until the next level.

(END/ANTI-CREASE) LAMP:
This indicator lights up when the drying programme is finished and the anti-crease function is activated. The dryer spins the laundry every 10 minutes to prevent creasing.
Changing a programme that is running
- Select another programme by turning the programme selector knob.
- Press the II (Start/Pause) button to start the new programme.
NOTE: The child lock must not be enabled if you wish to change or cancel a programme that is running. If the child lock is enabled, disable it before performing these operations.
Adding/removing laundry during a programme
To add or remove laundry after starting a programme:
- Press the II (Start/pause) button to "pause" the appliance. The drying process will be interrupted.
- Open the door. Add or remove laundry, and then close the door.
-
Press the II (Start/Pause) button to restart the programme.
-
Laundry added during the drying process may cause the laundry already dried in the machine to mix with wet laundry. This will result in the laundry remaining wet at the end of the drying process.
- Laundry can be added or removed as often as you wish during a drying cycle. However, this will cause the drying process to be interrupted repeatedly and will lengthen the duration of the programme, resulting in higher energy consumption. For this reason, we do not recommend adding or removing laundry once the programme has been started.
- If you select a new programme by turning the programme selection knob while the dryer is paused, the current programme will end.
- WARNING: Do not touch the inner surface of the drum when adding or removing laundry during a programme because it is hot.
Child safety
The child lock prevents the programme from being interrupted by locking the buttons while a programme is running.
The dryer door as well as all the buttons, except the appliance stop (by turning the programme selection knob), are disabled when the child lock is activated.
- To activate the child lock:
Simultaneously press and hold down the (Buzzer/Timer) and + (Drying Level) buttons for 3 seconds. An audible tone sounds when the safety is activated and the indicator lamp is lit.

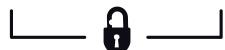
- When you turn the programme selection knob or press a button, you will hear audible signals to inform you that the child lock is activated.
- To start a new programme at the end of the previous one or to interrupt the programme, you must disable the child lock.
- To disable the child lock:
Simultaneously press and hold down the (Buzzer/Timer) and + (Drying Level) buttons for 3 seconds.
The child lock is also disabled when you switch the appliance off and on again by turning the programme selection knob to the (off) position.
Cancelling a programme that is running
To cancel a programme that is running, turn the programme selection knob to the (stop) position.
WARNING: The inside of the appliance is very hot: Start a programme to cool it down.
End of programme
At the end of the programme, the "End/Anti-crease", "Tank Full" and
"Clean Lint Filter indicator lamps light up.
To switch off your dryer, turn the programme selection knob to the (off) position.
NOTE: A 2-hour “anti-crease” programme is automatically activated if you do not remove the laundry from the appliance at the end of a cycle. The laundry spins for a few seconds every 10 minutes to prevent creasing.
- The last part of the drying cycle (cooling cycle) is carried out without heat to ensure that the items are left at a temperature that will not damage them.
- Clean the lint filter after each use (see the "Cleaning the lint filter" section).
- Empty the condensation water collection tank after each drying cycle (see the "Emptying the condensation water collection tank" section).
Table of programmes
| Programmes | Capacity (in kg) | Spin speed of your washing machine (in rpm) | Drying time (in minutes) |
| Cotton/Colour |
| Extra dry | 8 | 1000 | 210 |
| Ready-to-wear | 8 | 1000 | 205 |
| ECO | 8 | 1000 | 197 |
| Easy iron | 8 | 1000 | 145 |
| Quick 30° | 0.5 | 1200 | 30 |
| Jackets and coats | - | 800 | 100 |
| Baby linen | 5 | 800 | 195 |
| Mixed | 4 | 1000 | 125 |
| Sport | 2 | 1000 | 130 |
| Jeans | 4 | 1200 | 140 |
| Delicate | 2 | 1200 | 50 |
| Cool cycle | - | - | 10 |
| Timer | - | - | from 10 to 160 |
| Synthetic |
| Ready-to-wear | 4 | 800 | 70 |
| Easy iron | 4 | 800 | 60 |
The above consumption values may vary depending on the type of laundry, spin speed, room conditions and voltage values.
| Energy consumption values |
| Programmes | Load (kg) | Washing machine Spin speed | Approximate amount of residual moisture | Energy consumption values (kWh) |
| ECO* | 8 | 1000 | 60% | 1,97 |
| Easy iron | 8 | 1000 | 60% | 1,50 |
| Ready-to-wear | 4 | 800 | 40% | 0,75 |
*The "Cottons Eco programme" is the standard drying cycle to which the information on the label refers. This programme is suitable for drying normally damp cotton textiles. It is the most efficient programme in terms of combined energy consumption for cotton.
Technical Features
| Height (Min. / Max.) | 84,6 cm / 86,6 cm* |
| Width | 59,7 cm |
| Depth | 59,9 cm |
| Capacity (max.) | 8 kg ** |
| Net weight (± %10) | 44 kg |
| Voltage | See type label |
| Rated power input |
| Model code |
*Min. height.: Height with adjustable feet not used. Max. height.: Height with adjustable feet in maximum extension.
**Weight of dry laundry before washing.
cleaning and maintenance
The service life of the appliance increases and frequently encountered problems are reduced if it is properly cleaned at regular intervals.
WARNING! Unplug the appliance from the socket before cleaning or servicing it.
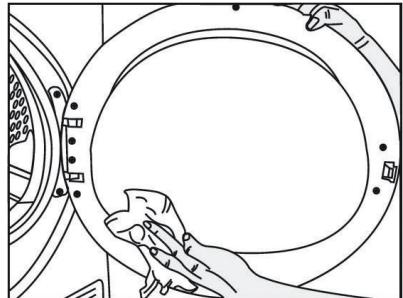
Cleaning the lint filter
The lint and fibres that are released from the laundry into the air during the drying cycle are collected by the "lint filter". These particles usually form as a result of wear and washing.
Always clean the filter after each drying cycle and when the indicator lamp is lit.
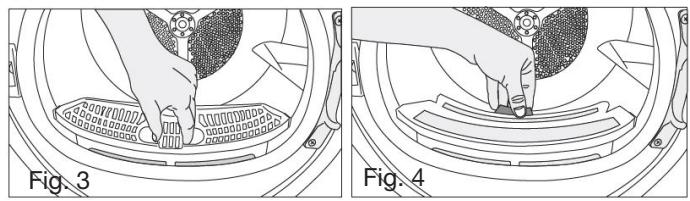
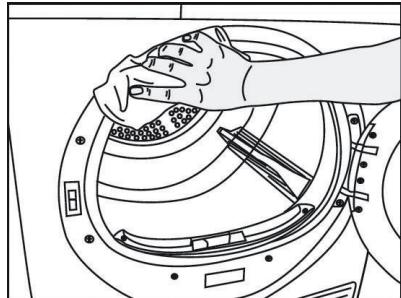
To clean the filter:
- Open the dryer door.
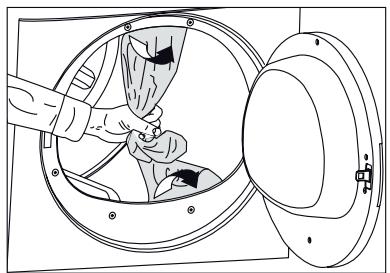
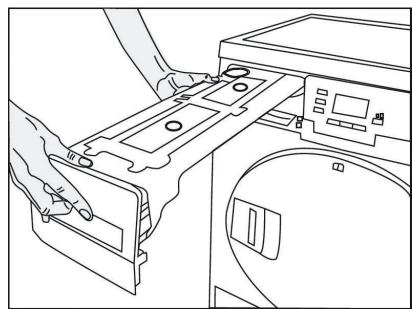
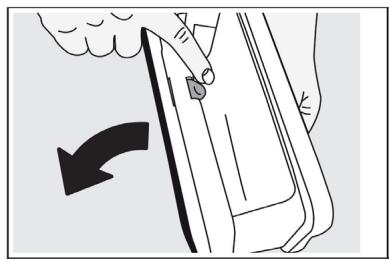
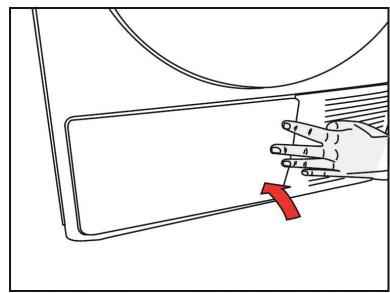
- Lift the lint filter out of its housing (fig.3).
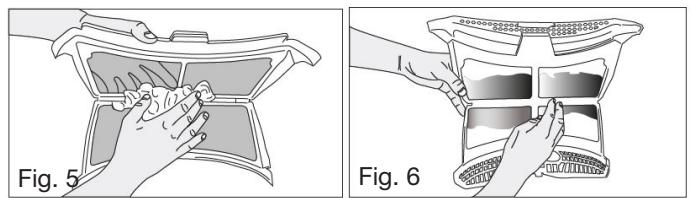
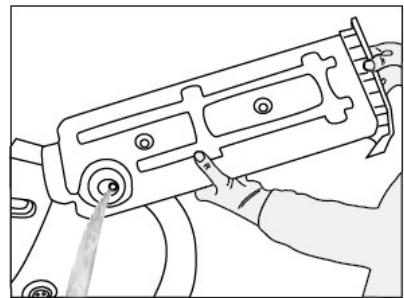
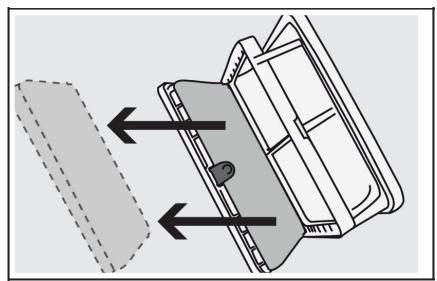
- Open the filter by pressing the tab (see fig.4) to separate the two ends (fig.5).
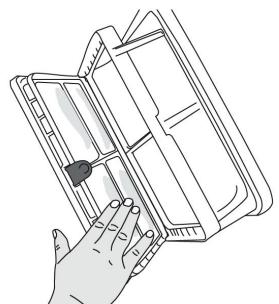
- Remove lint, fibres and cotton residue by hand or with a soft cloth (fig.6).
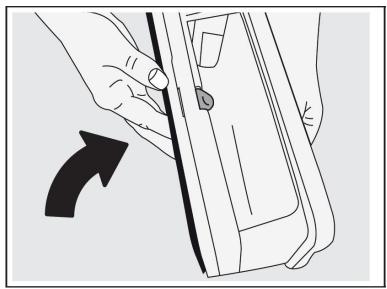
- Close the lint filter and put it back into its housing.
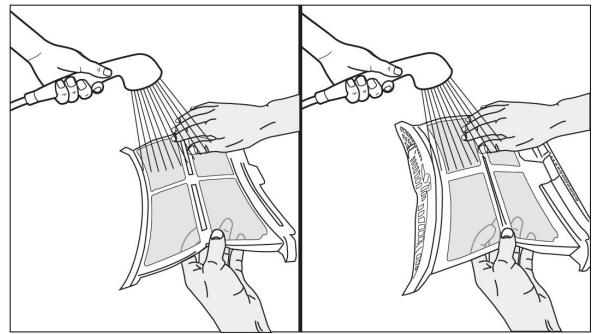
NOTE: Over time, the surface of the filter may become clogged after use. In this case, wash the filter on both sides with water.
IMPORTANT: Make sure that the filter mesh is dry before putting it back in its housing.
Cleaning the inside surface of the door
Wipe the inside surface of the door and the door lock with a soft, dry cloth.
Cleaning the moisture sensors
Your appliance is equipped with moisture sensors that detect whether or not the laundry is dry.
To clean the moisture sensors:
- Open the dryer door.
- Allow the appliance to cool down if it has just finished a drying cycle.
- Clean the metal sensors with a soft cloth soaked in vinegar and then dry them. Clean the metal sensors 4 times a year.
Do not use metal tools to clean the metal surface of the sensors.
Never use solvents or other similar cleaning products for cleaning.
Emptying the condensed water collection tank
Moisture in wet laundry is removed by condensation. You must empty the condensed water collection tank at the end of each cycle or when the "tank full" warning lamp appears in the display.
WARNING: The condensed water is not safe to drink!
Never remove the water tank while a cycle is running. If you forget to empty the water tank, the dryer will stop working and the "Tank full" indicator will light up. Empty the tank and press the Start/Pause button to restart the drying cycle.
To empty the water collection tank:
- Remove the tank from its housing by grasping its handle and pulling it towards you.
- Turn it upside down to empty the water and then put the tank back in its housing.
- If there is an accumulation of lint in the collection tank, rinse it under running water.
NOTE: If you have connected the water drain hose to the rear of the appliance, you do not need to empty the tank.
Cleaning the condenser Filter
Lint and fibres that have not been collected by the lint filter are blocked in the filter drawer located behind the protective hatch. The condenser filter cleaning indicator lamp lights up to remind you to clean it.
Clean the condenser at least once a month or every 5 cycles of dryer use.
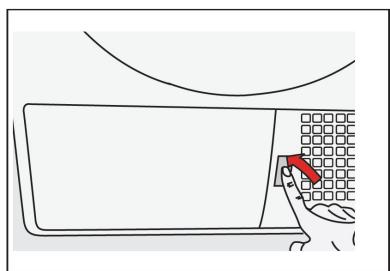
To clean the filter drawer:
- Press the button to open the protective hatch.
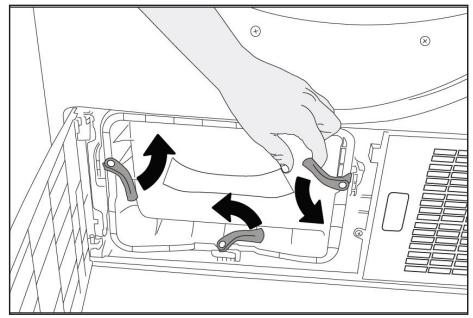
- Unlock the 3 safety devices and then remove the condenser from its housing by grasping it by its handle.

- Open the filter drawer by pressing the button (see diagram below).
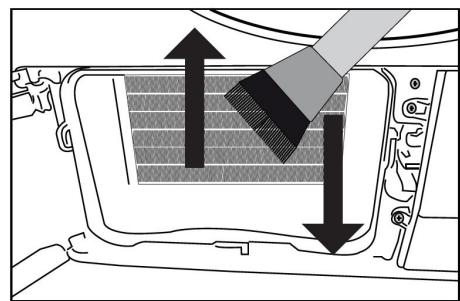
- Remove the foam filter. Remove lint, fibres and cotton residue by hand or with a soft cloth. Do not clean this filter with water as the filter could become clogged.
- Wash the foam filter with water. Wring it out to remove excess water and allow it to dry completely before putting it back in the filter drawer.
- Close the filter drawer by locking it with the button.
- Put the filter drawer back in its housing. Lock the 3 safety locks.
- Close the filter drawer access hatch.
IMPORTANT: Using the dryer without the condenser foam filter could damage the appliance.
NOTE: If the filter in the filter drawer is clogged, this increases the drying time and energy consumption.
Cleaning the condenser
Clean the lint from the condenser fins behind the filter drawer with a vacuum cleaner. You can also clean the condenser by hand if you wear protective gloves.
Do not clean the condenser with your bare hands, as you could injure yourself.
NOTE: cleaning towards the right and left can damage the condenser fins. In this case, there may be a failure to dry.
Replacing the bulb
The drum light switches on when the door is open. If the door is left open for more than 5 minutes and no adjustment is made, the light will go out.
Before replacing the bulb, unplug the power cord or remove the fuse from the electrical circuit.
Bulb specifications: E14 base, 15 W, resistant to 300^
- Open the dryer door.
- Remove the bulb protection cover (this is located in the inside door frame at the top). To do this, unscrew the screw with a Phillips screwdriver.
- Replace the bulb with a bulb that has the same specifications as the original bulb.
- Put the cover back on. Make sure it is perfectly positioned on its support to ensure watertightness, otherwise moisture could penetrate inside and cause a short circuit.
troubleshooting guide
| Problems | Possible causes | Solutions |
| The drying process is excessively long. | Check the condition of the filters (lint filter, condenser foam filter). | Check that they are not clogged. |
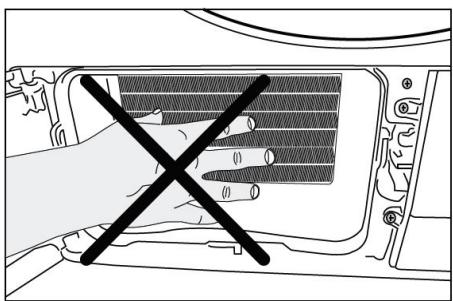
| The ventilation grille at the front of the appliance is blocked. | Remove any objects (if any) blocking the ventilation in front of the grille. |
| The ventilation is not sufficient because the room where the appliance is located is very small. | Open the room's door or window to prevent an excessive rise in room temperature. |
| Limescale has formed on the moisture sensors. | Clean the moisture sensors. |
| You have overloaded the dryer. | Do not overload your dryer. Observe the maximum capacities indicated in the programme table. |
| The laundry was not spun well. | Spin your laundry at a higher speed than the speed at which your washing machine was set to spin. |
| The laundry is wet at the end of the drying process. | After drying, warm clothes appear to be wetter than their actual moisture level. | |
| It is possible that the programme selected was not suitable for the type of laundry. | Check the labels on the clothing; Choose a programme according to the type of laundry and, if necessary, supplement it with a timed programme. |
| Check the condition of the filters (lint filter, condenser foam filter). | Check that they are not clogged. |
| You have overloaded the dryer. | Do not overload your dryer. Observe the maximum capacities indicated in the programme table. |
| The laundry is wet at the end of the drying process (continued). | The laundry was not spun well. | Spin your laundry at a higher speed than the speed at which your washing machine was set to spin. |
| The appliance or programme does not start. | The appliance may not be plugged in. | |
| The dryer door may be ajar. | Make sure that the loading door is properly closed. |
| You have not selected a programme, or you have not pressed the “Start/pause” button to start the programme. | |
| The child lock may be activated. | Disable the child lock. |
| You may have selected a delayed start. | |
| The programme stopped for no reason. | The door may be ajar. | Make sure that the door is properly closed. |
| There may have been a power outage. | Press the “Start/pause” button to restart the programme. |
| The water collection tank is full. | Empty the water collection tank when the symbol appears on the display. |
| The laundry has shrunk or been damaged. | Always select a programme that is suitable for the type of laundry to be dried. | Only dry clothes suitable for tumble drying after checking the labels on your clothes. |
| The drum light does not come on. | You did not switch on the tumble dryer by turning the programme selection knob. | |
| The bulb is defective. | Replace it with a bulb with the same specifications as the original bulb (see the “Replacing the bulb” section). |
| The lint filter cleaning symbol is lit. | The filter is clogged with lint. | Clean the filter. |
| Problems | Possible causes | Solutions |
| The "water collection tank full" symbol is on/flashing. | The water collection tank is full. | Empty the water collection tank. |
| There is a kink in the drain hose. | If the appliance is connected directly to a drain hose, check the drain hose. |
| The condenser filter cleaning symbol flashes. | The condenser filter is clogged. | Clean the condenser foam filter. |
| The symbol appears at most every 5 cycles. | |
| Audible tones sound when pressing the buttons or turning the programme selector knob. | The child lock (locking of the control buttons) is activated. | Disable the child lock. |
| The filters may not be correctly inserted into their housings. | Check that all filters are correctly inserted. |
If the above information does not help you to solve your specific problem, please do not carry out repairs on your own. Contact your store's after-sales service department.

All information, designs, drawings and pictures in this document are the property of SOURCING & CREATION. SOURCING & CREATION reserves all rights to its brands, designs and information. Any copy and reproduction through any means shall be deemed and considered as counterfeiting.


Protection of the environment
This symbol attached to the product means that it is an appliance whose disposal is subject to the directive on waste from electrical and electronic equipment (WEEE). This appliance may not in any way be treated as household waste and must be subject to a specific type of removal for this type of waste. Recycling and recovery systems are available in your area (waste removal) and by distributors. By taking your appliance at its end of life to a recycling facility, you will contribute to environmental conservation and prevent any harm to your health.
* Tested in our laboratories
Warranty valid from the date of purchase (receipt as proof of purchase). This warranty does not cover defects or damage caused by improper set up, incorrect use, or normal wear and tear of this product.


Art. 8009017
Ref. ESLHP8-2b
SERVICE RELATION CLIENTS /
Customer Relations Department
Avenue de la Motte
CS80137
59811 Lesquin cedex
FABRIQUE EN Turquie / Made in Turkey
SOURCING & CREATION
Avenue de la Motte
59810 Lesquin - FRANCE

Please behave responsibly towards the environment. Recycle this product at the end of its life.