
RO3798EA COMPACT POWER CYCLONIC HOME & CAR - Vacuum Cleaner ROWENTA - Free user manual and instructions
Find the device manual for free RO3798EA COMPACT POWER CYCLONIC HOME & CAR ROWENTA in PDF.
| Product type | Cyclonic canister vacuum cleaner |
| Brand | Rowenta |
| Model | RO3798EA COMPACT POWER CYCLONIC HOME & CAR |
| Separation technology | Cyclonic |
| Filtration | Washable HEPA filter (HEPA class) with foam filter and motor protection foam filter |
| Suction power | Variable: electronic control on the appliance and mechanical control on the handle (POWER CONTROL) |
| Included accessories | Hose with ERGO COMFORT handle, telescopic metal tube, 2-position rectangular all-floor nozzle, 2-position Delta nozzle, parquet nozzle, turbo brush, mini turbo brush, crevice tool, upholstery tool, integrated upholstery brush (EASY BRUSH) |
| Usage | Hard floors, carpets, rugs, furniture, corners, cars (HOME & CAR) |
| HEPA filter maintenance | Clean every 3 months, replace annually (ref. ZR902301) |
| Dust container emptying | After each use |
| Power cord | Automatic rewind with pedal |
| Carrying handle | Yes, integrated |
| Safety | HEPA cassette presence detector, automatic stop if absent |
| Power supply | 220-240 V AC |
| Repairability | Repairs exclusively by an authorized Rowenta Service Center |
| Warranty | Manufacturer warranty (see conditions) |
| Country of manufacture | Not specified |
Frequently Asked Questions - RO3798EA COMPACT POWER CYCLONIC HOME & CAR ROWENTA
User questions about RO3798EA COMPACT POWER CYCLONIC HOME & CAR ROWENTA
0 question about this device. Answer the ones you know or ask your own.
Ask a new question about this device
Download the instructions for your Vacuum Cleaner in PDF format for free! Find your manual RO3798EA COMPACT POWER CYCLONIC HOME & CAR - ROWENTA and take your electronic device back in hand. On this page are published all the documents necessary for the use of your device. RO3798EA COMPACT POWER CYCLONIC HOME & CAR by ROWENTA.
USER MANUAL RO3798EA COMPACT POWER CYCLONIC HOME & CAR ROWENTA
text_image
Diagram of a medical or surgical device with numbered parts and directional arrows indicating flow or movement.fig. 1
text_image
Diagram showing a hand holding a hose with labeled parts, including numbered callouts ① and ②.fig. 2
text_image
CLICKfig. 3
natural_image
Illustration showing two hands using a tool to lift a flat surface, no text or symbols presentfig. 4
natural_image
Illustration of hands holding a tool with directional arrows indicating movement (no text or symbols)fig. 5
text_image
Diagram showing a device with an electrical outlet connected to a plug, labeled with number 1 and a smiley face icon.fig. 6
text_image
Diagram showing a hand pressing a button on a device with labeled step ②fig. 7
text_image
080.032 080.041fig. 8
natural_image
Illustration of a hand holding a device with a stylized 'S' logo (no text or symbols present)fig. 9
text_image
Diagram showing a hand holding a device with labeled parts, including a button and a magnified view of the button.fig. 10
natural_image
Line drawing of a car interior with a plug and valve, no text or symbols presentfig. 11
natural_image
Line drawing of a vacuum cleaner with attached circuit board and power plug (no text or symbols)fig. 12
natural_image
Line drawing of a vacuum cleaner with a handle and control panel (no text or symbols)fig. 13
natural_image
Line drawing of a person holding a backpack with legs and feet, no text or symbols presentfig. 14
natural_image
Illustration of a hand pressing down on a curved surface with an upward arrow (no text or symbols)fig. 15
natural_image
Illustration of a person installing or adjusting a car engine compartment with an upward arrow (no text or symbols)fig. 16
text_image
① PUSH ②fig. 17
natural_image
Illustration of a hand inserting a component into a mechanical housing (no text or symbols visible)fig. 18
natural_image
Illustration of a hand pouring liquid from a portable oven onto a round base (no text or symbols)fig. 19
text_image
Diagram showing a hand adjusting a belt buckle with labeled parts ① and ②, indicating step 2 of the motion.fig. 20
text_image
① ② CLICKfig. 21
natural_image
Person applying a bag to a car's hood, showing mechanical components and a downward arrow (no text or symbols)fig. 22
text_image
PUSHfig. 23
natural_image
Illustration of a hand holding a card with an arrow indicating rotation (no text or symbols)fig. 24
natural_image
Illustration of a hand holding a magnifying glass next to a stack of objects (no text or symbols)fig. 25
natural_image
Illustration of a kitchen sink with a showerhead, lamp, and spray bottle (no text or symbols)fig. 26

natural_image
Illustration of a hand cleaning a tray with cleaning items (no text or symbols)fig. 27
text_image
② CLICK ①fig. 28
text_image
Diagram showing a hand holding a device with labeled parts and directional arrows indicating motion or movement.fig. 29
text_image
CLICKfig. 30
natural_image
Illustration of hands holding a device with arrows pointing to the screen (no text or symbols)fig. 31

natural_image
Diagram of a heat exchanger with cooling fins and cooling unit, showing airflow direction (no text or symbols)fig. 32
natural_image
Illustration of hands holding a keyboard and a tablet device, with arrows indicating movement (no text or symbols)fig. 33
natural_image
Illustration of a hand using a grating machine to remove particles from a tray (no text or symbols)fig. 34
natural_image
Illustration of a solar panel installation with a sun icon and '12H' label (no text or symbols on the diagram itself)fig. 35
natural_image
Illustration of a hand washing a water tap into a battery (no text or symbols)fig. 36
natural_image
Illustration of hands holding a tablet and a screen, with arrows indicating direction (no text or symbols)fig. 37

text_image
Diagram showing a car with a grid-like structure and a downward arrow, indicating a process or change.fig. 38
text_image
CLICKfig. 39
natural_image
Illustration of hands holding a laptop with a keyboard (no text or symbols visible)fig. 40
natural_image
Illustration of hands holding a grid device with an upward arrow (no text or symbols)fig. 41
natural_image
Illustration of a hand using a gridded tool to remove or clean a surface from a trash bin (no text or symbols)fig. 42

text_image
NEWfig. 43
text_image
CLICKfig. 44
natural_image
Illustration of a hand using a tool to clean or repair a shoe (no text or symbols visible)fig. 45
| FR | CONSEILS DE SECURITE | 2 |
| DESCRIPTION | 3 | |
| AVANT LA PREMIERE UTILISATION | 3 | |
| UTILISATION | 4 | |
| NETTOYAGE ET MAINTENANCE | 5 | |
| DEPANNAGE | 6 | |
| GARANTIE | 6 | |
| OU ACHETEZ LES ACCESSOIRES | 7 | |
| ENVIRONNEMENT | 7 |
| EN | SAFETY INSTRUCTIONS | 8 |
| DESCRIPTION | 9 | |
| BEFORE FIRST USE | 9 | |
| USE | 10 | |
| CLEANING AND MAINTENANCE | 10 | |
| TROUBLESHOOTING | 12 | |
| GUARANTEE | 12 | |
| WHERE TO BUY ACCESSORIES | 13 | |
| ENVIRONMENT | 13 |
10 a - Parking vertical
b - Parking horizontal
Read these instructions carefully before using your appliance for the first time and keep to hand for future reference: failure to comply with the instructions will release the manufacturer from all responsibility.
- For your safety, this appliance meets applicable standards and regulations (Directives on Low Voltage, Electromagnetic Compatibility, Environment, etc.).
- This appliance is not intended to be used by persons (including children) with reduced physical, sensory or mental capacities or lack of experience and knowledge, unless they are supervised or have been given instructions beforehand concerning use of the appliance by a person responsible for their safety.
• Children should be supervised to ensure that they do not play with the appliance.
- This appliance is suitable for use by children of 8 years and above or by persons without the necessary experience or knowledge or with impaired physical, sensory or mental capacities if they have been trained and are supervised, to ensure that they use the appliance safely and understand the hazards that exist. Children should not be left to play with the
appliance. Children should not attempt to clean or service the appliance unless they are aged at least 8 years or older and supervised.
- Please keep the appliance and its power cord out of the reach of children less than 8 years of age.
1 • Terms and conditions for use
- This appliance is designed for indoor domestic household use only. In case of professional use, inappropriate use or failure to comply with the instructions, the manufacturer accepts no responsibility and the guarantee does not apply.
- It is not intended to be used in the following cases, which are not covered by the guarantee.
- In kitchens reserved for staff use in shops, offices and other professional environments;
- On farms;
- By hotel or motel clients, or on other residential premises;
- In bed and breakfast accommodation and other similar environments.
- Never leave the appliance unattended whilst connected to the power supply, even if for a few moments, especially where children are present.
- Do not place the nozzle or the end of the tube near the eyes or ears.
- Do not vacuum surfaces that are wet with alcohol or any other liquid whatsoever, warm substances, of ultra fine substances (plaster, cement, ashes...), large cutting debris (glass), toxic products (solvents, pickles...), aggressive products (acids, detergents...), or flammable or explosive materials (oil or alcohol based).
- Never immerse the appliance in water or any other liquid and do not store it outside.
- The power cord must never be close to or in contact with sources of heat or resting on sharp edges.
- Inspect the appliance and power cord for signs of wear or damage prior to connecting to the power supply.
- Do not use your appliance if it does not operate correctly, if it has been damaged or if the power cord or plug is damaged. To maintain safety, these parts must be replaced by an Approved Service Centre.
- Any intervention other than normal cleaning and maintenance by the customer must be performed by an Approved Service Centre.
2 • Power supply
- Check that your power supply voltage corresponds to that shown on the appliance (alternating current only). Any error in plugging in your appliance may cause irreversible damage and invalidate the guarantee.
-
The appliance is to be connected to a socket-outlet having an earthing contact.
-
Given the diverse standards in effect, if the appliance is used in a country other than that in which it is purchased, have it checked by an Approved Service Agent.
- Do not use an extension lead. If you accept liability for doing so, only use an extension lead which is in good condition, has a plug with an earth connection and is suited to the power rating of the appliance.
- Completely unwind the power cord before plugging into an earthed socket.
- Switch off and disconnect the appliance by unplugging without pulling the cord:
- immediately after the use,
- before every change of accessories,
DESCRIPTION
1 Lid
2 Lid opening
3 Transport handle
4 Power cord wind pedal
5 ON/OFF pedal
6 Wheel
7 Suction inlet
8 Air outlet
9 Electronic power control
10 a - Vertical parking
b - Horizontal parking
11 Dust box compartment
12 Dust box
a - Handle
b- Lid
c - Dust tray
d- Lid-opening clip
13 a - Dust separator
b - Dust separator casing
c - Opening clip for the dust separator casing
14 HEPA filter case detector*
15 HEPA filter case opening clips
BEFORE FIRST USE
1 • Unpacking
Unpack your appliance and remove all possible labels. keep your guarantee in a safe place and read the instructions carefully before using your appliance for the first time.
2 • Recommendations and precautions
Each time before use, unwind the power cord completely.
Do not jam it or allow it to rub against sharp edges. If you are using an electrical extension, check that it is in perfect condition and that it is suited to the power of your vacuum cleaner. Do not unplug the appliance by pulling on the power cord.
Never use the vacuum cleaner without the dust box (12) or without a filtration system in place (case).
- before every cleanup or maintenance procedure, and before changing the filter.
- Do not use the appliance if the power cord is damaged
- The cord winder and cord for your vacuum cleaner must be replaced by an Approved Service Centre as special tools are required in order to make repairs without incurring in any risks.
3 • Repairs
Repairs should only be performed by specialists using original spare parts. Repairs carried out by the user can pose a risk and invalidate the guarantee.
16 HEPA filter case (ref. ZR9023 01)
a - HEPA filter
b - Foam filter
17 a - Motor protection foam filter (RS-RT3907)
b - Motor protection foam filter accommodation
Accessories
18 Tube with ERGO COMFORT butt
a - Ergonomic ERGO COMFORT butt
b - Mechanical power control (POWER CONTROL)
c - Integrated furniture brush (EASY BRUSH)
19 Telescopic ERGO COMFORT metal tube
a - Butt/tube screw-on system (LOCK SYSTEM)
b - Tube adjustment button (TELESCOPIC SYSTEM)
20 Rectangular nozzle for all floor types, 2 positions*
21 Delta nozzle for all floor types, 2 positions*
22 Parquet nozzle*
23 Turbo-brush*
24 Mini turbo-brush*
25 Crevice nozzle*
26 Upholstery nozzle*
In order to safeguard your appliance, ROWENTA has equipped it with a security system that detects the HEPA filter case.
Do not move the vacuum cleaner by pulling on the power cord, the appliance must be moved using its transport handle. Do not use the power cord to lift the appliance.
Switch off and unplug your vacuum cleaner each time after use. Always switch off and unplug your vacuum cleaner before maintenance or cleaning. Use only original Rowenta filters.
Use only original Rowenta accessories. Check that all the filters are placed properly.
If you have any difficulties in finding accessories or filters for this vacuum cleaner, contact the Rowenta Customer Service.
USE
1 • Assembling the different parts of the appliance
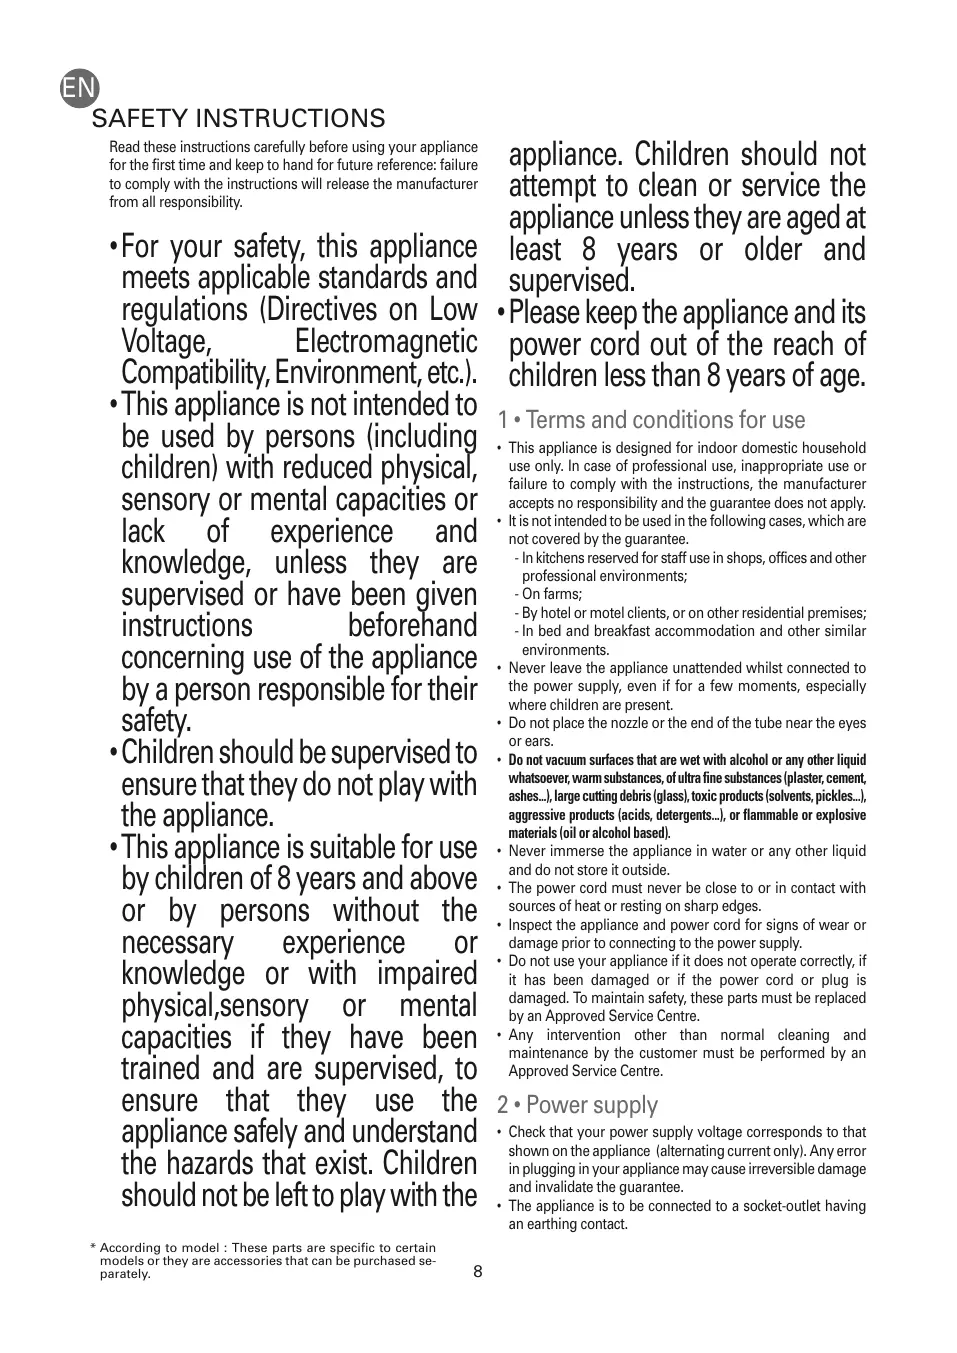
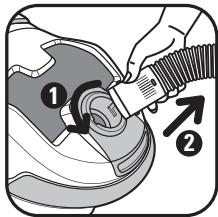
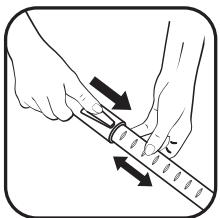
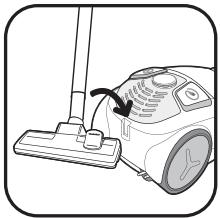
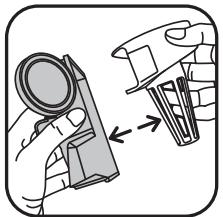
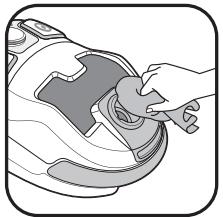
- Place the tube in the vacuum opening (fig. 1) and turn clockwise to lock. To withdraw the tube, turn in the opposite direction and pull (Fig 2).
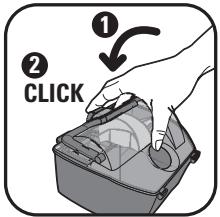
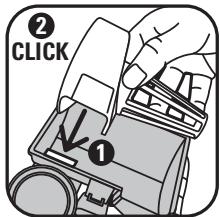
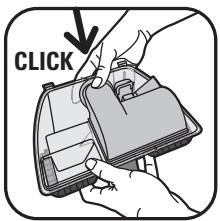
- Fit the telescopic metal tube to the end of the butt until you hear a 'click' (Fig 3) (to dislodge it, press the screwing button on the tube and pull)
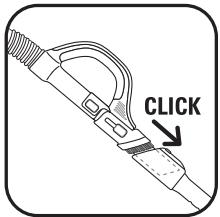
- Fit the nozzle for all floor types (20 or 21)* to the end of the telescopic metal tube (Fig 4)
- Adjust the telescopic metal tube to the desired length using the telescopic system (Fig 5).
Fit the corresponding accessory to the end of the telescopic metal tube or the butt:
WARNING: always switch off and disconnect your vacuum cleaner before changing any accessories.
- For rugs and carpets: use the multi-surface nozzle (20 or 21) in the retracted brush position or the Turbobrush* (fibres and animal hairs).
- For wood and hard floors: use the multi-surface nozzle (20 or 21) in the exterior brush position or, for best results, use the parquet nozzle*.
- For corners and hidden spots: use the crevice nozzle*.
- For upholstery and delicate surfaces: use the upholstery brush integrated to the ERGO COMFORT nozzle (EASY BRUSH) or the upholstery nozzle*.
Never turn your vacuum cleaner on if the dust box (12) and the filtration system (case) are not in place.
2 • Plugging the cord in and turning on the appliance
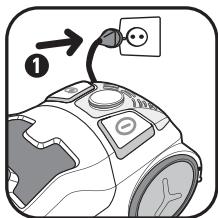
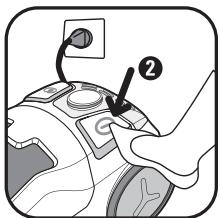
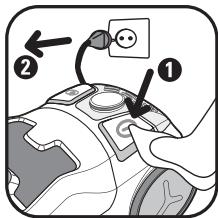
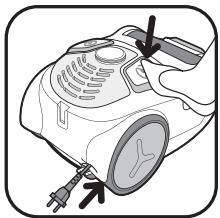
Unwind the power cord completely, plug in your vacuum cleaner (Fig 6) and press the ON/OFF pedal (Fig 7).
Note: you can use your vacuum cleaner in the horizontal position (sleigh) but also in vertical position, especially when vacuuming stairs or curtains.
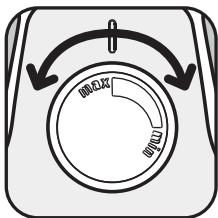
Adjust the vacuuming power:
? with the electronic power control switch (Fig 8)
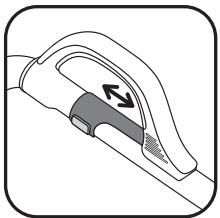
? with the mechanical power control on the butt: open the regulation shutter slider to manually decrease the vacuuming power and thus keep the nozzle from getting stuck to the surface being vacuumed (fig.9) ex: sheer curtains, fragile surfaces...
• (MIN) position for vacuuming delicate fabrics (sheer curtains, textiles)
• (MID) position for daily vacuuming of all floor types and in the event of weak dirt marks
• (MAX) position for vacuuming hard floors, rugs and carpets in the event of strong dirt marks
3 • Storage and transport of the appliance
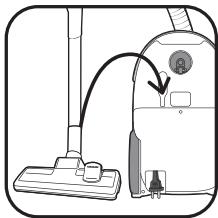
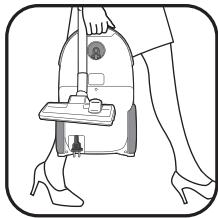
After use, switch off your vacuum cleaner by pressing the ON/OFF pedal and unplug it (fig. 10). Rewind the power cord by pressing the power cord rewind pedal (fig. 11). In vertical position, place the nozzle in the parking position (fig.12). In vertical position, place the nozzle in the parking position (fig.13).
You will thus be able to transport and store your vacuum cleaner in the parking position (fig.14).
CLEANING AND MAINTENANCE
IMPORTANT: Always turn off and disconnect your vacuum cleaner before performing any maintenance procedures.
1 - Empty the dust box
IMPORTANT Empty the dust box after each use.
- Withdraw the tube from the vacuum opening (Fig.2)
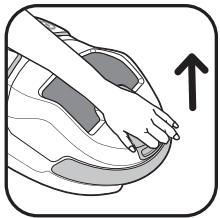
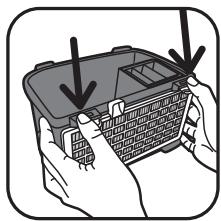
- Open the lid of your vacuum cleaner (fig.15).
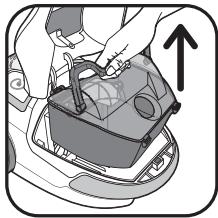
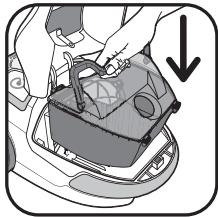
- Remove the dust box (12) from its compartment by using the handle (Fig.16).
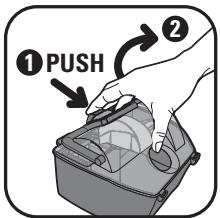
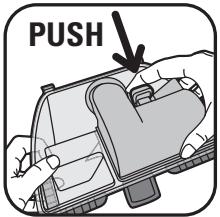
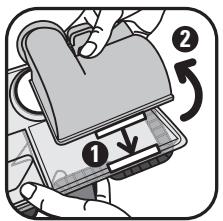
- Lean on the opening button (OPEN) of the dust box lid and then lift the lid (Fig.17) to withdraw it completely (Fig.18).
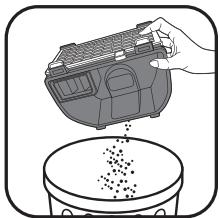
• Empty the dust box over a dustbin (Fig.19)
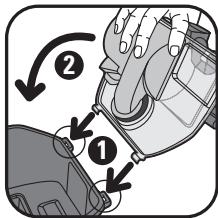
- Place the lid back on the box by putting the corresponding parts on the appropriate notches (Fig.20), then pull it down until you hear a 'CLICK' (Fig.21).
- Place the box back in its casing (Fig.22).
2 - Clean the dust box and the filtration system
The air we breathe contains particles that can be allergenic: larva and dust mite faeces, mould, pollen, smoke and animal waste (hair, skin, saliva, urine). The finest particles can penetrate deep inside the respiratory system or cause inflammation, affecting the entire respiratory function.
CLEANING AND MAINTENANCE
(H)EPA ([High] Efficiency Air Particle Filter) filters retain even the smallest particles.
Thanks to the (H)EPA filter, the air released into the room is cleaner than the air vacuumed.
IMPORTANT In order to improve the performance of your vacuum cleaner, remember to clean the dust box and the filtration system every 3 months.
- Withdraw the tube from the vacuum opening (Fig.2)
- Open the lid of your vacuum cleaner (fig.15).
- Remove the dust box (12) from its compartment by using the handle (Fig.16).
a. Clean the dust box
- Press the opening button (OPEN) of the dust box lid and then lift the lid (Fig.17) to withdraw it completely (Fig.18)
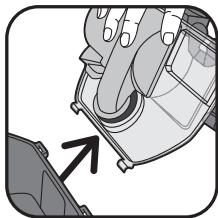
- Then withdraw the casing that contains the separator from the lid by pressing on the OPEN button (Fig.23-24).
- Detach the separator from its casing (Fig.25).
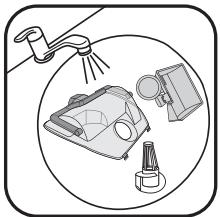
- Rinse the separator (13 a), its casing (13b) and the dust box lid (12b) under clean water. You may use some mild soap (Fig.26).
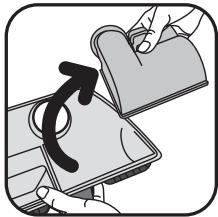
• Dry them with a cloth (Fig 27). - Once they are dry, place the separator back in its casing by using the notch designed for that purpose (Fig.28), then replace the whole assembly (13 a + 13b) inside the dust box lid by using the appropriate notch (Fig.29) until you hear a 'CLICK' (Fig.30)
b. Clean the filtration system
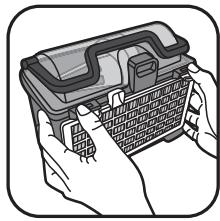
- Press on the opening clips of the HEPA filter case (Fig.31)
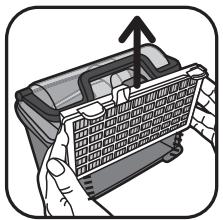
- Withdraw the filter case HEPA (16) from the dust box (12c) (Fig 32)
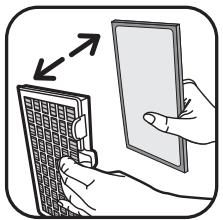
- Separate the foam filter (16b) from the HEPA filter (16a) (Fig.33)
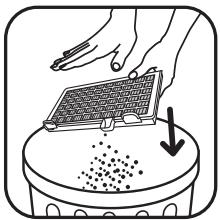
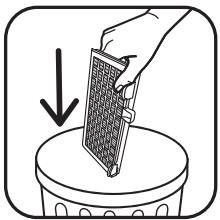
- Tap the HEPA filter over a dustbin (Fig.34)
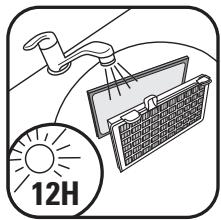
- Wash the foam filter (16b) and the HEPA filter (16a) under clear running water and allow to dry 12 H (Fig.35).
ATTENTION To clean the HEPA filter, wash it under normal running water. In order to not damage it, avoid scraping it with an accessory.
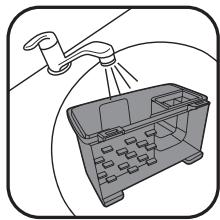
- Wash the dust box (12c) under running water (Fig.36) and dry it with a soft cloth.
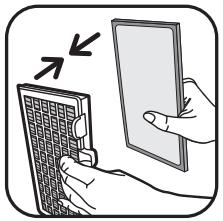
- Once it is dry, reposition the foam filter (16b) on the HEPA filter (16a) (Fig.37)
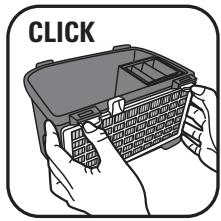
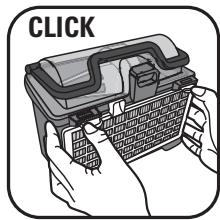
- Replace the filter case (16a + 16b) on the dust box (12c) by using the notches designed for that purpose (Fig.38) until you hear a 'CLICK'. (Fig.39)
- Place the lid back on the box by putting the corresponding parts on the appropriate notches (Fig.20), then pull it down until you hear a 'CLICK' (Fig.21).
- Place the box back in its casing (Fig.22).
IMPORTANT Replace the filtration system once a year.
3 – Replace the filtration system
The HEPA filter* case ref. ZR902301* is available at your local retail store or at one of our Authorised Service Centres.
- Withdraw the tube from the vacuum opening (Fig.2)
- Open the lid of your vacuum cleaner (fig.15).
- Remove the dust box (12) from its compartment by using the handle (Fig.16).
- Press on the opening clips of the HEPA filter case (Fig.40)
- Withdraw the HEPA filter case (16) from the dust box (12c) (Fig.41).
- Throw the filter case (16a + 16b) in a dustbin (Fig.42) and replace it with a new filter case (Fig.43-44).
- Place the box back in its casing (Fig.22).
- Close the lid of your vacuum cleaner.
4 • Cleaning your vacuum cleaner
Wipe the body of the appliance and the accessories with a soft cloth (Fig.45). Do not use any detergents, or corrosive or abrasive products.
TROUBLESHOOTING
IMPORTANT If you notice that your vacuum cleaner is not operating as well, before carrying out any checks, switch it off using the ON/OFF pedal.
If your vacuum cleaner will not start
- The appliance is not plugged in. Check that the appliance is plugged in correctly.
If your vacuum cleaner has no suction power
- Either an accessory or the hose tube is partially blocked: unblock the accessory or the hose tube.
- The lid is not properly closed: check that the dust box is well placed and close the lid.
If your vacuum cleaner has less suction power, is noisy or makes a whistling noise
- Either an accessory or the hose tube is partially blocked: unblock the accessory or the hose tube.
- The dust compartment is full: empty it (see CLEANING AND MAINTENANCE chapter).
• The filtration system is saturated: clean the HEPA filter capsule (16) (see CLEANING AND MAINTENANCE chapter). If the problem persists, change the filtration system (see the CLEANING AND MAINTENANCE chapter).
- Make sure that the dust box (12) is well positioned in the dust tray housing (11).
- The mechanical power regulator (18b) is open: close the mechanical power regulator on the butt.
- The electronic power regulator (9) is set at minimum: increase the power using the electronic power regulator (unless you are cleaning fragile fabrics).
GUARANTEE
- This appliance is designed for indoor domestic household use only. In case of professional use, inappropriate use or failure to comply with the instructions, the manufacturer accepts no responsibility and the guarantee does not apply.
If the lid does not close (detector action 14*)
- Verify that the HEPA filter case (16) is there and that it is correctly positioned.
- Make sure that the dust box (12) is correctly positioned in the dust tray housing (11).
If it is difficult to move the nozzle
- Reduce the power by opening the mechanical power control on the butt (18b) or by moving the electronic power control switch (9) towards the MIN position.
- Make sure that the position of the nozzle (20 or 21) corresponds to the floor being vacuumed:
- for rugs and carpets, use the nozzle in the retracted brush position,
- for parquets and smooth surfaces, use the nozzle in the exterior position.
If the power cord does not wind completely
- The cord slowed down as it was winding up: pull the power cord out again and press the power cord rewind pedal.
If a problem persists, take your vacuum cleaner to your local Rowenta Authorised Service Centre or contact the Rowenta Customer Service.
- Always read the instructions carefully before using your appliance for the first time: use that does not conform to the instructions will release Rowenta from all liability.
| ACCESSORIES* | USE | INSTALLING THE ACCESSORY | PLACES OF PURCHASE |
Upholstery brush (EASY BRUSH) | For cleaning upholstery. | Fix the furniture brush to the end of the butt. | Approved Rowenta Service Centres |
Upholstery nozzle | For cleaning upholstery. | Fix the upholstery nozzle to the end of the butt or the tube | |
Crevice nozzle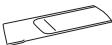 | For corners and hard to reach spots. | Fix the upholstery nozzle to the end of the butt or tube | |
Parquet nozzle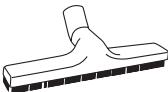 | For delicate floors. | Fit the parquet nozzle to the end of the tube | |
Mini turbo-brush | For deep-cleaning upholstery fabrics. | Fit the mini turbo-brush to the end of the tube. | |
Turbo-brush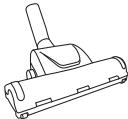 | For removing animal hairs and fibres embedded in rugs and carpets. | Fit the turbo-brush to the end of the tube. |
ENVIRONMENT
- In accordance with current regulations, all appliances to be scrapped must be permanently disabled: unplug the appliance and cut off the power cord before disposing of the appliance.

Think of the environment!
① Your appliance contains valuable materials which can be recovered or recycled.
Leave it at a local civic waste collection point.