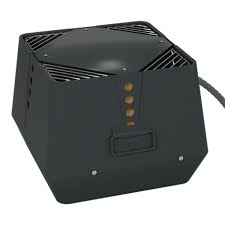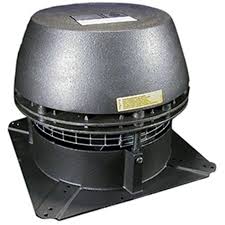
RSV - Smoke extractor EXHAUSTO - Free user manual and instructions
Find the device manual for free RSV EXHAUSTO in PDF.


User questions about RSV EXHAUSTO
0 question about this device. Answer the ones you know or ask your own.
Ask a new question about this device
Download the instructions for your Smoke extractor in PDF format for free! Find your manual RSV - EXHAUSTO and take your electronic device back in hand. On this page are published all the documents necessary for the use of your device. RSV by EXHAUSTO.
USER MANUAL RSV EXHAUSTO
1.1 Construction and design 3
1.2 Installation instructions 4
1.3 Wiring 8
1.4 Service and cleaning 9
1.5 Technical specifications 9
1.6 Warranty 9
- DE - Produktinformation 10
EU declaration of conformity 51
1. GB - Product information
The EXHAUSTO CDT RSV type chimney fan is supplied with location brackets, armoured cable, safety wire and a mineral wool mat, as well as packing to ensure the fan does not vibrate. (Two wing screws are also included, to be used where conditions allow).
Bad lighting habits can result in problems with soot, chimney fires, etc. which might damage the chimney fan. Please see our advice about lighting and maintaining a fire at www.exhausto-cdt.com or www.exhausto.co.uk.
Warning!


- All installations must be carried out by competent personnel in accordance with national laws and regulations
- Avoid chimney fires - ensure that the chimney has been swept before mounting the fan
- The chimney fan should always be switched on when the fireplace or boiler is in use
- Please always read the installation instructions for the EXHAUSTO CDT control unit, before installation of the chimney fan.
- If the EXHAUSTO CDT fan system has been designed for solid fuel/multi fuel installations then please ensure the design meets the requirements of BS EN15287-1. If this can not be achieved, then a smoke alarm must be installed in the same room as the appliance.
- EXHAUSTO CDT would always recommend the use of a smoke alarm when a solid fuel open fire is installed
- Avoid build up of soot and tar use only well seasoned wood (moisture content max 20% )
- Fans serving biomass boilers will inevitably receive a deposit from the appliance. Especially on biomass Boilers IT IS ESSENTIAL THAT A REGULAR INSPECTION AND CLEANING REGIME IS IMPLEMENTED, ESPECIALLY IN THE EARLY DAYS OF USAGE, TO ESTABLISH A PATTERN FOR TIMING OF REGULAR INSPECTIONS AND CLEANING.
1.1 Construction and design
The casing is manufactured in cast aluminium, the RSV fan is designed for vertical discharge. It is available in ten sizes: the RSV 9, 12, 14, 16, 160, 200, 250, 315, 400 and 450. The axial vanes on the RSV 9 – 16 are made of stainless steel; the centrifugal impeller on the RSV 160 – 450 is cast in aluminium. Both types can be opened for service and maintenance.
Weight:
| Fan type | Weight | Fan type | Weight |
| RSV009-4-1 | 13 kg | RSV160-4-1 | 14 kg |
| RSV012-4-1 | 17 kg | RSV200-4-1 | 18 kg |
| RSV250-4-1 | 27 kg | ||
| RSV315-4-1 | 37 kg | ||
| RSV400-4-1 | 47 kg | ||
| RSV014-4-1 | 24 kg | RSV400-4-2 | 58 kg |
| RSV016-4-1 | 33 kg | RSV450-4-2 | 67 kg |
Main components: The RSV has the following main components
| RSV 9-12-14-16 | RSV 160-200-250-315-400-450 | ||
| g* i c a e1 b d1 250°C k l | g h i j k | Safety mesh Handle Armoured cable and connecting cable Mineral wool mat Safety wire Location bracket, bolt and nuts Screws to fasten top and bottom section (Alternatively use supplied wing screw, where conditions allow) | |
| a | Top section | ||
| b | Bottom section | ||
| c | Motor | ||
| d1 | Vane | ||
| d2 | Centrifugal impeller | ||
| e1 | Inlet for axial vane | ||
| e2 | Inlet for centrifugal impeller | ||
| f | Hinge | ||
1.2 Installation instructions
The fan is designed to be fitted directly on top of brick or steel chimneys, as long as these are stable and level.
Before fitting onto a chimney
| If.... | then.. |
| the fan is to be mounted onto a brick chimney | the chimney must have location brackets - see below |
| the fan is to be mounted onto a steel chimney | a flange is required (supplied as an extra) - see below |
| the fan is a RSV 315, 400 or 450 | the impeller is secured with a safety bracket for transportation. Remove the transportation safety bracket located near the impeller and check that the impeller can turn freely. |
Before fitting onto the brickwork of a chimney
| Step | Action | |
| 1 | Measure the inside diameter of the chimney and cut the size of the hole in the mineral wool mat accordingly Note, however, that there must always be a minimum of 20 mm of mat surface at any point around the circumference of the hole. If a temperature sensor is to be installed with the chimney, cut the aluminium foil on the mineral wool mat to make room for the sensor; this also ensures that the mat sits level on the chimney. NB: The side of the mineral wool mat covered in aluminium foil is to be placed uppermost, i.e. facing the fan. | A B A min 20 mm B min 20 mm |
| 2 | Fit the location brackets in the grooves on the underside of the bottom section and fasten using the nuts and bolts supplied. Note that the bolts are to be inserted from beneath the brackets. | |
| 3 | Adjust the distance between the location brackets to fit the inside diameter of the chimney, and then tighten the nuts. Note that there should be a 2-4 mm gap between the brackets and the chimney so as to avoid transmitting vibrations from the fan to the chimney. A and B measurements: please refer to step 1. The chimney fan can now be fitted into place. Place the mineral wool mat on top of the chimney, with the aluminium foil side up, and place the fan on top. | A B A min 40 mm A min 40 mm |
Before fitting onto a steel chimney
| Step | Action | |
| 1 | A flange (D) (supplied as extra) is used, fitted so that the spigot end sits inside the chimney (E). | A — B — C — D — E — |
| 2 | Place the mineral wool mat (B) on the flange (D) with the aluminium foil facing upwards and cut a hole in the mineral wool mat, the hole being the same diameter as the flange hole. | |
| 3 | Cut the corners of the mineral wool mat, so there is room to fit the vibration dampers (C). | |
| If a temperature sensor is to be installed with the chimney fan, cut the aluminium foil on the mineral wool mat to make room for the sensor; this also ensures that the mat sits level on the chimney. | ||
| 4 | Fit the flange to the chimney fan, with the use of the vibration dampers (C). | |
| 5 | The fan can now be fitted onto the chimney. |
Fitting the chimney fan onto the chimney
| Step | Action | |
| 1 | Attach the safety wire to the chimney (1). Use the screw and rawl plug provided in the brickwork of the chimney or the self-cutting screw if working on a steel chimney. Then fit the wire through the hole in the bottom section and into the wire clamp. Gently tighten the safety wire, and crimp (2) the wire clamp so that the fan is held safely in place when opened for servicing or cleaning purposes. The isolation switch (supplied as extra) should be fitted onto the side of the chimney (3), so it is easily accessible when servicing the fan. The armoured cable with connec-ting cable should be mounted into the underside of the isolator and up into the switch through the coupling. | |
| 2 | Prior to use check that: · The fan is closed and the fastening screws/wing screws tightened (4) · The safety wire is taut and the wire clamp crimped (5) · The coupling nut on the armoured cable is tightened (6) · The safety wire is securely attached to the chimney (7) · That the user is aware that the fan must always be switched on whenever the fireplace or boiler is in use · The transportation safety bracket has been removed (RSV315, -400 and -450). |
1.3 Wiring
Fan and motor specifications are provided on the fan's type plate. All the single-phased models are adjustable.
Wires are to be connected as per the wiring diagram. For further details, please see guidelines for the EXHAUSTO CDT control units. All EXHAUSTO CDT fans require extra safeguards in accordance with power current regulations.
Any lightning conductor connected to the fan must respect current applicable legislation.
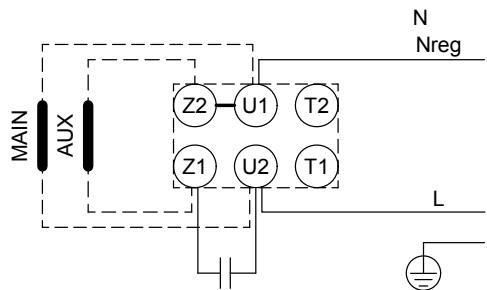
EXHAUSTO CDT Motor
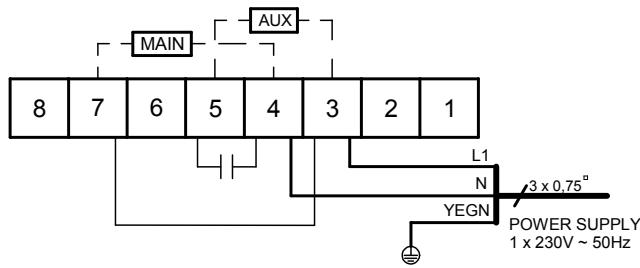
Grundfos Motor
Isolation switch:
In accordance with the provisions of the EU Machinery Directive* a combustion-gas fan must always have an isolation switch fitted. The isolation switch must comply with national wiring standards.
*Please refer to Machine Directive (2006/42/EF/-EEC/-EWG/-CEE) - Appendix 1item 1.6.3 "Separation of the sources of energy
The isolation switch must be ordered separately, as it is not part of the standard EXHAUSTO CDT chimney fan delivery.
| Connecting cable and wiring | Variable adjust-able electronic regulator | Protection | |
| RSV009-4-1 | brown = L | Yes | The motor can be blocked. (impedance-pro-ted) |
| RSV160-4-1 | blue = Nreg. yellow/green = ± | ||
| RSV012-4-1 | brown = L | Yes | The motor requires overload protection |
| RSV014-4-1 | blue = Nreg. yellow/green = ± | ||
| RSV016-4-1 | |||
| RSV200-4-1 | |||
| RSV250-4-1 | |||
| RSV315-4-1 | |||
| RSV400-4-1 | |||
| RSV250-4-3 | brown = L1 | No | |
| RSV315-4-3 | blue = L2 | ||
| RSV400-4-3 | black = L3 yellow/green = ± | ||
| RSV400-4-2 | 1 - L1 | Yes, by frequency converter max. 60Hz | |
| RSV450-4-2 | 2 - L2 | ||
| 3 - L3 | |||
| 4 + 5 Thermocal switch yellow/green= ± | |||
1.4 Service and cleaning
The motor in the RSV fan has special ball bearings that are sealed, lifetime lubricated, and maintenance-free. Any replacement of these bearings should be carried out by qualified professionals.
The fan should be checked and cleaned as required (at least once a year), depending on the fuel being used. Respect the following procedure:
- Use the isolation switch to switch off the fan. Wait until the fan stops rotating
- Loosen the screw and open the top section of the fan so that it hangs on its hinges and the safety wire
- Using a scraper or brush, carefully clean the vane / centrifugal impeller
- Check the path taken by the smoke through the top and bottom sections of the fan for soot deposits, and clean where necessary with a scraper or brush
- When the fan is open it is also possible to sweep the chimney. In the case of the RSV 160-450 it is recommended that the insert in the bottom section be removed prior to sweeping. This allows better access to the chimney
- Check that there is free access for fresh air to the motor through the holes in the top section. Make sure that any weights on the centrifugal impeller are not removed.
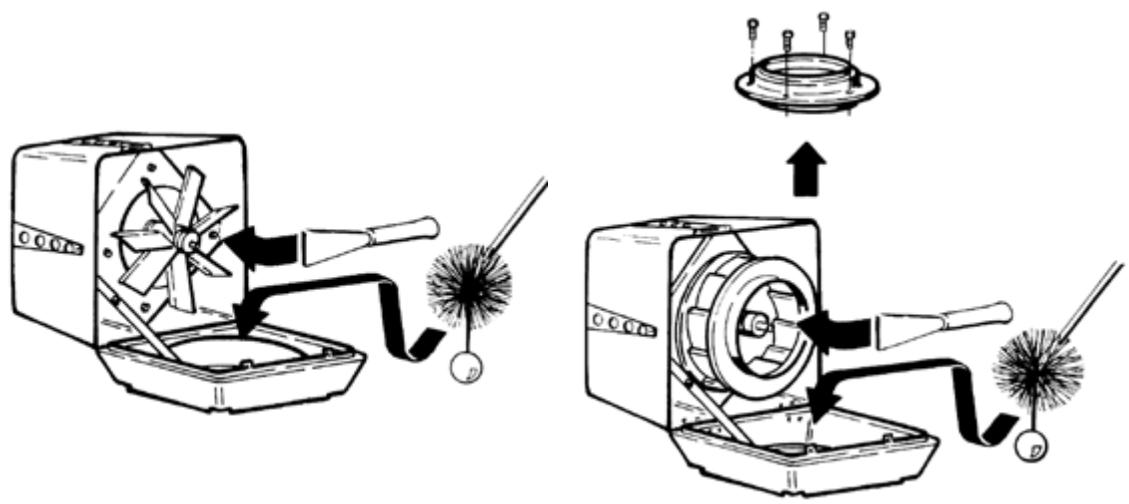
RSV 9-12-14-16
RSV 160-200-250-315-400-450
1.5 Technical specifications
The sound level is below 68 dB at a distance greater than five metres away from the RSV fan when it is correctly fitted. Further information is available in the catalogue.
The standard version of the RSV fan is designed to operate with a maximum flue gas temperature of 250^ . At higher temperatures, though maximum 300^ , the mineral wool mat should be replaced with adjusting screws (type RSD) or vibration dampers (type SVD.-RS) at the flange. See special guidelines for these parts.
1.6 Warranty
EXHAUSTO CDT provides a two-year factory warranty on its flue gas fans, valid from invoice date.
EXHAUSTO CDT fans must be installed by competent personnel.
EXHAUSTO CDT reserves the right to introduce changes to these guidelines without prior notice.
2. DE - Produktinformation
3.2 Mekanism installation
Røgsugeren er beregnet til direkte montage på murrede skorstene samt ståskorstene med stabil og plan aflsutning.
4.2 Mekanism installations
Røyksugeren er beregnet til direkte montering på murte skorsteiner og ståskorsteiner med stabil og plan avslutning.
5.2 Mekanism installation
EU declaration of conformity
| DK: EU-Overensstammelseserkläring GB: Declaration of Conformity DE: EU-Konformitätserkläung FR: Déclaration de conformité de l'Union Européenne NO: EU-Samsvarserklaering PL: EU Deklaracja zgodność | NL: EU-Conformiteits verklaring SE: EU-Överensstämelsdeklaration FI: EU-Vaatimustemukaisuusvakuutus IS: ESS-Samraïssstaßefesting IT: Dichiarazione di Conformità Unione Europea |
| EXHAUSTO CDT A/S C.F. Tietgens Boulevard 41 DK-5220 Odense Sø DANMARK | |
| erkläerer på eget ansvar, at fällendeprodukter: hereby declares that the following products: erklärt hierdurch auf eigene Verantwortung, daß folgende Produktie: déclaré, sous sa propre responsabilité, que les produits suivants: erkläerer på eget ansvar at fällendeprodukter: niniëjszym oswiadză, ze nastepujace produkty | veklaart dat onderstaande producten: declarerar på eget ansvar, att fällendeprodukter: vastaa silită,etty seuraava tuite: Stäfesti à eigin abyrgô, aδ efitifarandi vóur: dichiara con la presente che i seguito prodotti: |
| RSV9, RSV12, RSV14, RSV16, RSV160, RSV200, RSV250, RSV315, RSV400, RSV450 | |
| som er omfeltet af这部分 erkläring, er i overensstemmelse med fällende standards: were manufactured in conformity with the provisions of the following stan- dards: die von dieser Erklärung umfaßt sind, den folgenden Normen: auxquels s'applique cette déclaration sont en conformité avec les normes ci-contre: som er omfeltet av这部分 erkläring, er i samsvar med fällende standarder: zostaly wyprodukowane zgodnie z warunkami okreslonymi w nastepujacych normach: | zijn vervaardig in overeenstemming met de voorschriften uit de hieronder genoemde normen en standards: som omfattas avenna déclaration, overensstämmer m ota tãmãsylvitys koskee, on seuraavien standardien mukainen: sem eru meōtalin i stäfestingu Pessari, eru i fullu smræmi við eftirtalda staðla: sono stati fabbricati in conformità con le norme degli standard seguenti: |
| EN60335-1, EN60332-2-80, DS/EN ISO 12100-1: 2003, DS/EN ISO 12100-2: 2003 | |
| i.h.t bestemmelsei direktiv: in accordance with entsprechen gemäß den Bestimmungen der folgenden Richtlinien: suivant les dispositions prêvues aux directives: i.h.t bestemmelsei direktiv: zgodnie z: | en voldoen aan de volgene richtlijnen: enligt bestammlserma i följande direktiv: seuraavien direktliivien mãåråysten mukaan: med tilvisun til äkvaröana eftirlits: in conformità con le direttive: |
| Maskindirektiv: the Machinery Directive: Richtlinie Maschinen: Directive Machines: Maskindirektiv: Dyrektywą maszynyowa: | de machinerichtlijn: Maskindirektivet Konedirektivi: Vélaeffirtilió: Direttiva Macchinari: |
| 2006/42/EF/-EEC/-EWG/-CEE | |
| Lavspændingsdirektiv: the Low Voltage Directive: Niederspannungsrichtlinie: Directive Basse Tension: Lavspændingsdirektiv: Dyrektywą Niskonapięciowa | de laagspanningsrichtlijn: Lagspanningsdirektiv: Pienjännitedirektivi: Smáspennueftirtió: Direttiva Basso Voltaggio: |
| 2006/95/EC | |
| EMC-direktiv: and the EMC Directive: EMV-Richtlinie: Directive Competibilité Electromagnétique: EMC-direktiv: Dyrektywą EMC - kompatybinoSci elektromagnetycznej | en de EMCrichtlijn: EMC-direktivet: EMC-direktivi: EMC-effirtilió: Direttiva Compatibilità Elettromagnética: |
| 2004/108/EC | |
| Odense, 01.07.2010 Adm. direktör Managing Director Jørgen Andersen | Algemeen directeur Geschäftsführender Direktor Président Direeur Général Dyrektor Zarẑdžajcy Verkeständte direktör Toimitusjohtaja Framkvemdastjori Direttore Generale |
EXHAUSTO CDT
EXHAUSTO CDT A/S
C.F. Tietgens Boulevard 41
DK-5220 Odense SØ
Tel.: +45 7010 2234
Fax: +45 7010 2235
info@exhausto-cdt.dk
www.exhausto-cdt.dk
EXHAUSTO CDT A/S
Unit 3 Lancaster Court
Coronation Road
Cressex Business Park
High Wycombe HP12 3TD
Tel.: +44 1494 465166
Fax: +44 1494 465163
info@exhausto.co.uk
www.exhausto.co.uk
EXHAUSTO CDT A/S
Sverige Filial
Arnäsvagen 25B
SE 432 96 Åskloster
Tel.: +46 (0) 8-5000 1520
Fax: +46 (0) 340-62 64 42
info@exhausto-cdt.se
www.exhausto-cdt.se
EXHAUSTO CDT A/S
Fjordglottveien 11
N-3060 Svelvik