A02-RA240-W54 - Wi-Fi Router ATLANTIS-LAND - Free user manual and instructions
Find the device manual for free A02-RA240-W54 ATLANTIS-LAND in PDF.
| Product Type | ADSL Wi-Fi Router |
| Brand | ATLANTIS-LAND |
| Model | A02-RA240-W54 |
| Dimensions (approx.) | 150 x 100 x 30 mm |
| Weight (approx.) | 300 g |
| Power Supply | 12V/1A power adapter |
| Interfaces | 1 ADSL port (RJ11), 4 LAN ports (RJ-45 10/100 Mbps), Wi-Fi 802.11b/g |
| Wi-Fi Speed | Up to 54 Mbps (802.11g) |
| Supported Standards | PPPoE, PPPoA, RFC1483 (Bridged/Routed), IPoA, DHCP |
| Default Configuration | IP: 192.168.1.254, User: admin, Password: atlantis |
| Default SSID | wlan-ap |
| Default Wi-Fi Channel | 6 |
| Wi-Fi Security | WEP not enabled by default |
| LED Indicators | Power, Sys, WLan, LAN, ADSL |
| Reset Button | Reset (0-3 s) / Factory restore (10 s+) |
| Box Contents | Router, CAT5 network cable, RJ11 cable, power adapter, CD-ROM, installation guide |
| System Requirements | Web browser, Ethernet or Wi-Fi network card |
| Supported Operating Systems | Windows 95/98/ME/NT/2000/XP, others via browser |
| Maintenance and Cleaning | Unplug before cleaning; use a soft dry cloth. Do not use abrasive products. |
| Safety | Use only the supplied adapter. Do not open the device. Avoid humidity and heat sources. |
| Spare Parts and Repairability | Not specified; contact the manufacturer for any replacement. |
| General Information | Wireless ADSL router for shared Internet connection. Configuration via Web interface. |
Frequently Asked Questions - A02-RA240-W54 ATLANTIS-LAND
User questions about A02-RA240-W54 ATLANTIS-LAND
0 question about this device. Answer the ones you know or ask your own.
Ask a new question about this device
Download the instructions for your Wi-Fi Router in PDF format for free! Find your manual A02-RA240-W54 - ATLANTIS-LAND and take your electronic device back in hand. On this page are published all the documents necessary for the use of your device. A02-RA240-W54 by ATLANTIS-LAND.
USER MANUAL A02-RA240-W54 ATLANTIS-LAND
PPPoE routed/PPPoA routed 15
RFC1483 routed / IpoA routed 17
ENGLISH
1.1 Package contents 20
1.2 The Front Panel LEDs. 21
1.3 The Rear Ports 22
1.4 Cabling 23
1.5 Default Settings 23
1.6 IE Configuration 24
1.7 TCP/IP Configuration 25
Configuring PC (Windows 95/98/ME) 25
Configuring PC (Windows NT4.0) 25
Configuring PC (Windows 2000) 26
Configuring PC (WindowsXP) 26
1.8 Browser configuration 29
PPPoE routed/PPPoA routed 31
RFC1483 routed / IpoA routed 33
FRANCAIS
PPPoE Routed /PPPoA Routed 47
RFC1483 routed / IpoA routed 49
DEUTSCH
PPPoE routed/PPPoA routed 61
RFC1483 routed / IpoA routed 63
- In Local Area Connection Status clickcare Properties.
- Status (ADSL, LAN, PPP, VPN connect Status, Learned MAC Table, Routing Table, System Log, Security Log)
Quick Start - Configuration (WAN, LAN, Wireless, System, Firewall, VPN, Virtual Server, Advanced)
- Save Config
PPPoE routed/PPPoA routed
Save settings and reboot
Submit
RFC1483 routed / lpoA routed
| Quick Start | |
| Pvc 0 | |
| Per VC Settings | |
| Virtual Circuit | Enabled |
| Connection | |
| Encapsulation | 1483 Routed IP LLC |
| Bridge | Disabled |
| VPI | 8 |
| VCI | 35 |
| Static IP Settings | |
| IP Address | 0.0.0.0 |
| Subnet Mask | 0.0.0.0 |
| Gateway | 0.0.0.0 |
| Account Setup | |
| Username | |
| Password | |
| Automatic Reconnect | |
| Submit | Reset |
Save settings and reboot
Submit
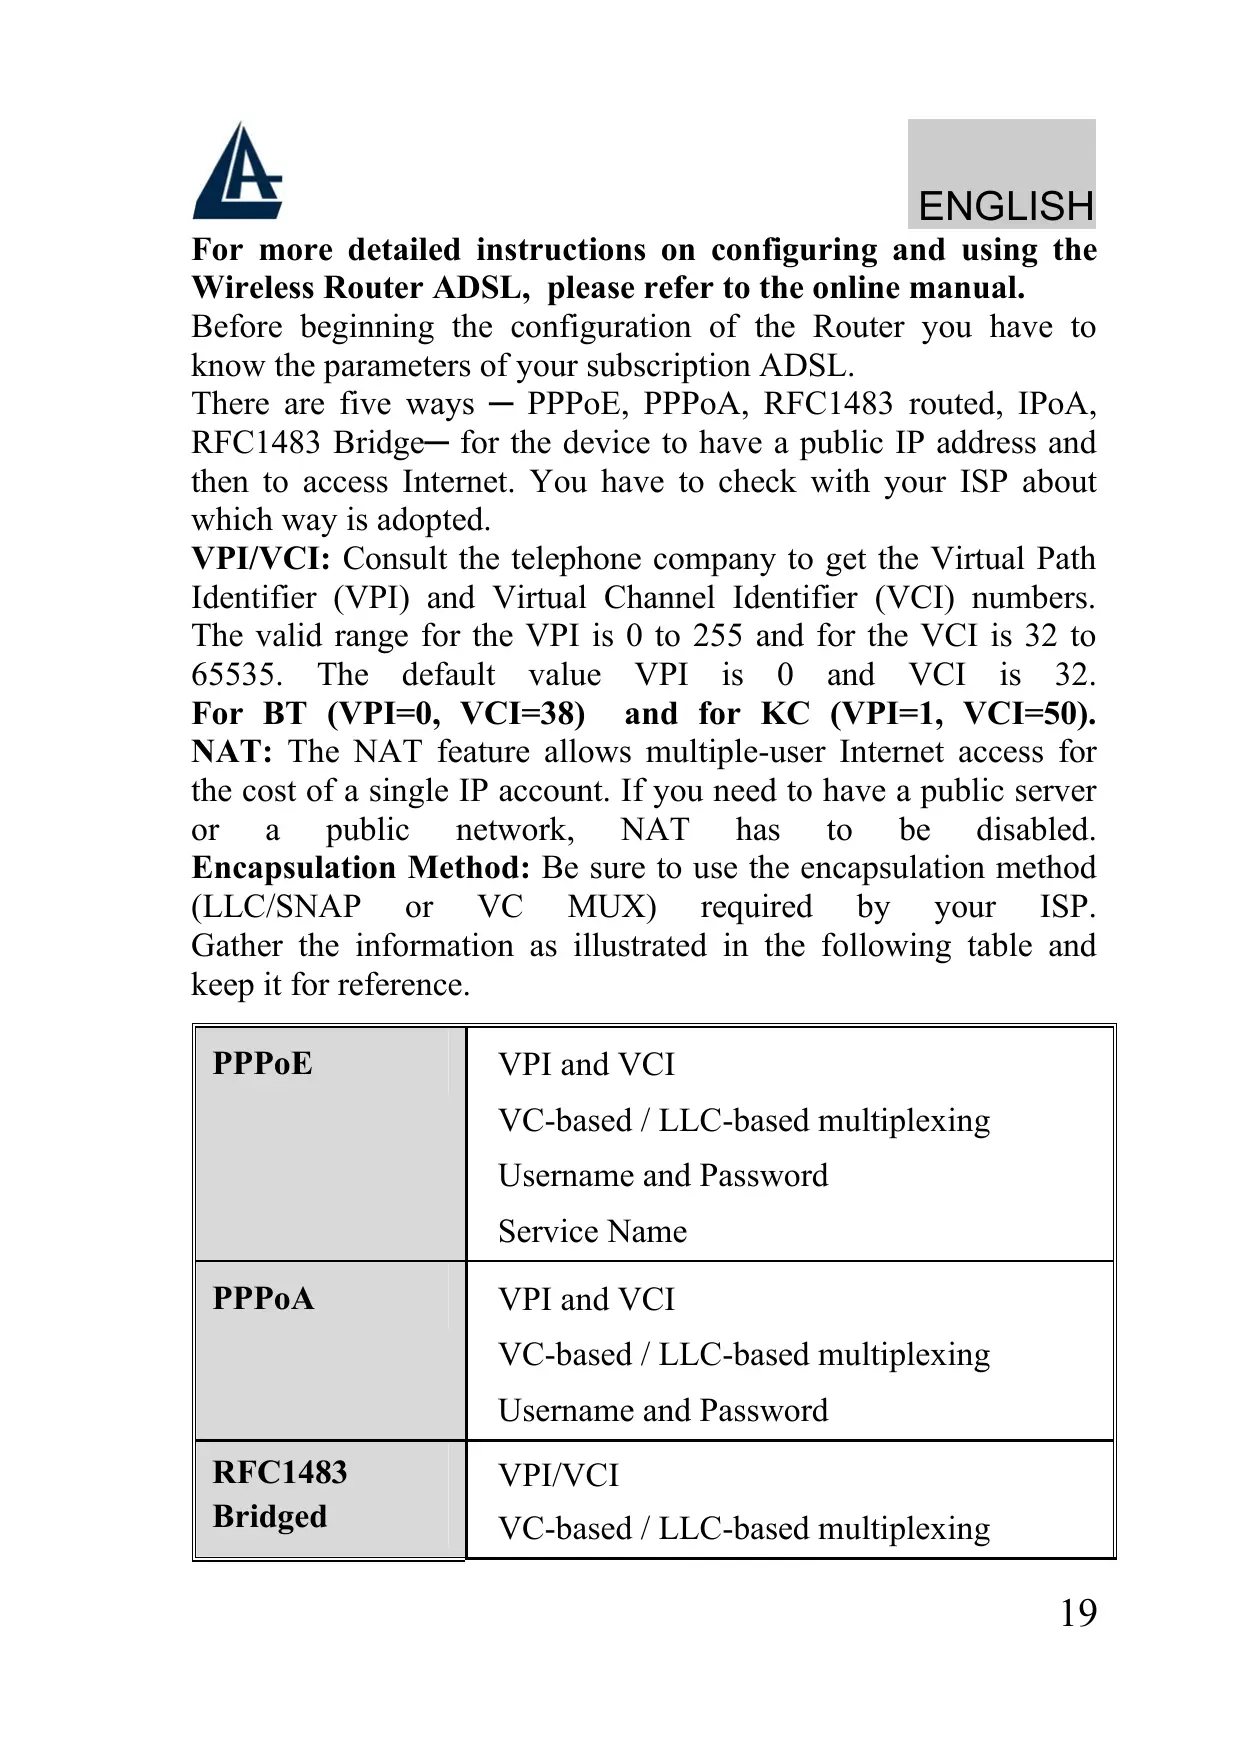
For more detailed instructions on configuring and using the Wireless Router ADSL, please refer to the online manual.
Before beginning the configuration of the Router you have to know the parameters of your subscription ADSL.
There are five ways — PPPoE, PPPoA, RFC1483 routed, IPOA, RFC1483 Bridge— for the device to have a public IP address and then to access Internet. You have to check with your ISP about which way is adopted.
VPI/VCI: Consult the telephone company to get the Virtual Path Identifier (VPI) and Virtual Channel Identifier (VCI) numbers. The valid range for the VPI is 0 to 255 and for the VCI is 32 to 65535. The default value VPI is 0 and VCI is 32. For BT (VPI=0, VCI=38) and for KC (VPI=1, VCI=50). NAT: The NAT feature allows multiple-user Internet access for the cost of a single IP account. If you need to have a public server or a public network, NAT has to be disabled. Encapsulation Method: Be sure to use the encapsulation method (LLC/SNAP or VC MUX) required by your ISP. Gather the information as illustrated in the following table and keep it for reference.
| PPPPOE | VPI and VCI VC-based / LLC-based multiplexing Username and Password Service Name |
| PPPPOA | VPI and VCI VC-based / LLC-based multiplexing Username and Password |
| RFC1483 Bridged | VPI/VCI VC-based / LLC-based multiplexing |
| RFC1483 Routed | VPI/VCI VC-based / LLC-based multiplexing IP address Subnet mask Default Gateway (IP address) IP address (DNS) |
| IPoA | VPI/VCI IP address Subnet mask Default Gateway (IP address) IP address (DNS) |
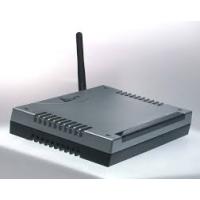
1.1 Package contents
Atlantis Land Wireless Router ADSL, CD-ROM with manual, Quick Start Guide, cable RJ-11 ADSL, cable CAT-5 LAN, Power Adapter AC-DC (12V, 1A).
1.2 The Front Panel LEDs
1 2 3 4 5 6 7 8 9 10 11 12 13
| LED | MEANING |
| Power | Lit when power ON |
| Sys | Blinking when system is ready |
| WLan | Lit green when the wireless connection is established. Flashes when sending/receiving data. |
| Lan | Lit when connected to Ethernet device Green for 100Mbps; Orange for 10Mbps Blinking when data transmit/received |
| ADSL | Lit when successfully connected to an ADSL DSLAM |
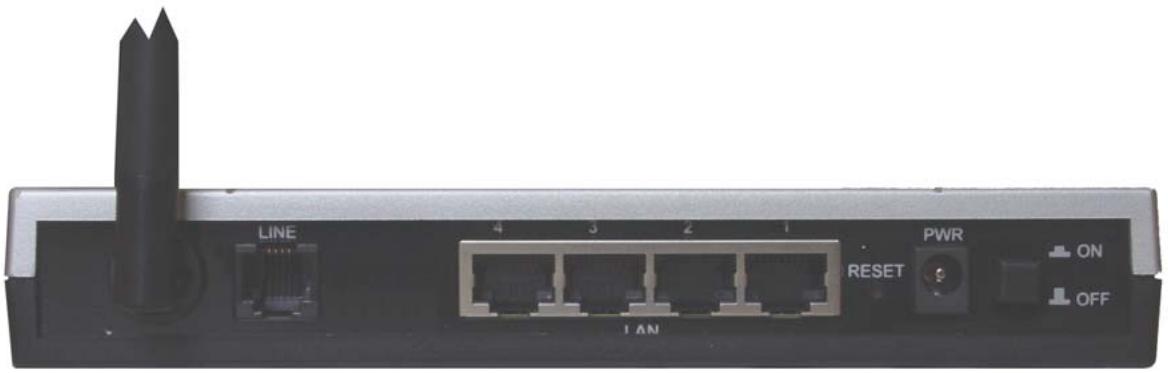
1.3 The Rear Ports
| PORT | MEANING |
| Line (RJ11) | Connect the supplied RJ-11 cable to this port when connecting to the ADSL/telephone network. |
| LAN (1/4 * RJ-45) | Connect an UTP Ethernet cable to one of the four LAN ports when connecting to a PC or an office/home network of 10Mbps or 100Mbps. |
| Reset | After the device has turned on, press it to reset the device or restore to factory default settings. The operation is as below: 0-3 seconds: reset the device 3-6 seconds: no action 10 seconds or above: restore to factory default settings (this is used when you can not login to the router, e.g. forgot the password) |
| POWER (jack) | Connect the supplied power adapter to this jack. |
| POWER Switch | A Power ON/OFF switch |
1.4 Cabling
First you must connect the product to the ADSL line through the RJ11 cable you have in equipment (in the port LINE), then connect to the RJ45 ports the PCs of your Lan or others Switch. You can get to the Router through the different client wireless compatible with the IEEE802.11b & IEEE802.11g standard. In the end connect the feeder to the Wireless Router ADSL and then to the socket. Once you've checked all the connections and you've turned on the Wireless Router ADSL the product will carry on immediately a diagnosis (20 seconds). Finished this the Led POWER and WLAN (eventually even the Led LAN, if connected to PCs) will be fixed green (SYS is blinking when system os ready). The Led ADSL, if suitably connected, at first will be flashing, during the ranging process and then it will remain fixed (necessary condition for using the Internet).
1.5 Default Settings
The Wireless ADSL Router can be configured with your Web browser. The web browser is included as a standard application in following operation systems, UNIX, Linux, Mac OS, Windows 95/98/NT/2000/Me, etc. The product provides a very easy and user-friendly interface for configuration.
Before Configuration
This section describes the configuration required by LAN-attached PCs that communicate with the Wireless ADSL Router, either to configure the device, or for network access. These PCs must have an Ethernet interface installed properly, be connected to the Wireless Router ADSL either directly or through an external repeater hub, and have TCP/IP installed and configured to obtain an IP address through a DHCP server or a fixed IP address that must be in the same subnet of the Wireless ADSL Router. The default IP address of the Wireless ADSL Router is 192.168.1.254 and subnet mask is 255.255.255.0. The best and easy way is to
configure the PC to get an IP address from the Wireless ADSL Router ADSL.
Please follow the steps below for PC's network environment installation. First of all, please check your PC's network components. The TCP/IP protocol stack and Ethernet network adapter must be installed. If not, please refer to MS Windows relative manuals.
Before you configure this Wireless ADSL Router, you need to know the following default settings:
-Username:admin
- Password:atlantis
- IP address (192.168.1.254), Subnet Mask (255.255.255.0)
DHCP Server: enable
SSSID= wlan-ap, Channel=6, WEP=disable
1.6 IE Configuration
Now open IE, go to Instruments menu, select the Connections tab and select one of the following options:
- Never use remote connection
- Use remote connection if another network connection isn’t available
1.7 TCP/IP Configuration
Configuring PC (Windows 95/98/ME)
- Go to Start / Settings / Control Panel. In the Control Panel, double-click on Network and choose the Configuration tab.
- Select TCP / IP -> NIC Compatible, or the name of any Network Interface Card (NIC) in your PC.
- Click Properties.
- Select the IP Address tab. In this page, click the Obtain an IP address automatically radio button.
- Then select the DNS Configuration tab.
- Select the Disable DNS radio button and click “OK” to finish the configuration.
Configuring PC (Windows NT4.0)
- Go to Start / Settings / Control Panel. In the Control Panel, double-click on Network and choose the Protocols tab.
- Select TCP/IP Protocol and click Properties.
- Select the Obtain an IP address from a DHCP server radio button and click OK.
Configuring PC (Windows 2000)
- Go to Start / Settings / Control Panel. In the Control Panel, double-click on Network and Dial-up Connections.
- Double-click LAN Area Connection.
- In the LAN Area Connection Status window, click Properties.
- Select Internet Protocol (TCP/IP) and click Properties.
- Select the Obtain an IP address automatically and the Obtain DNS server address automatically radio buttons.
- Click OK to finish the configuration.
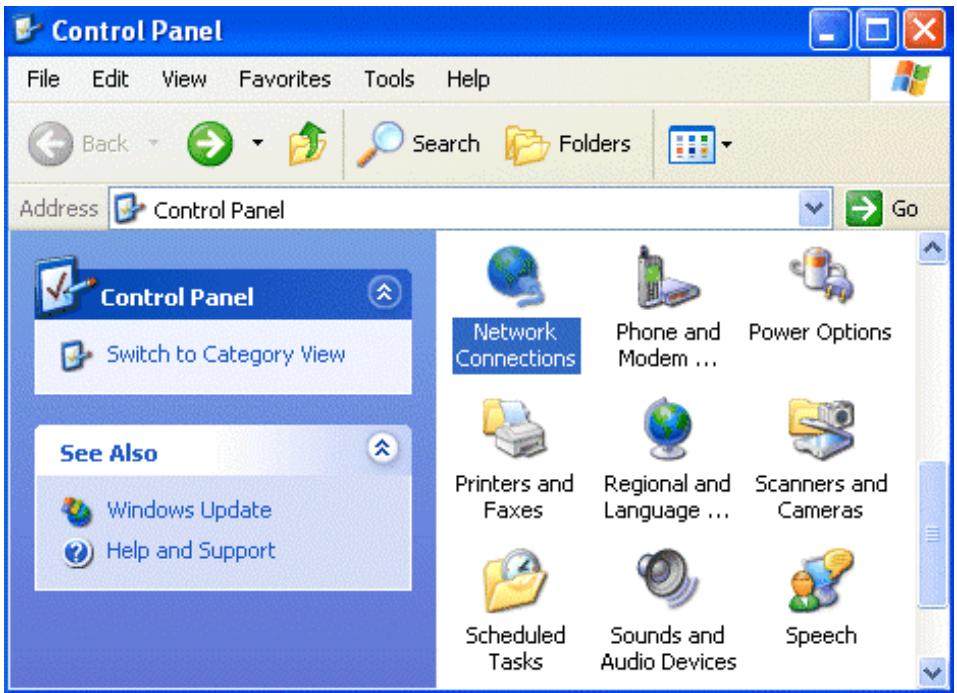
Configuring PC (WindowsXP)
- Go to Start / Control Panel (in Classic View). In the Control Panel, double-click on Network Connections.
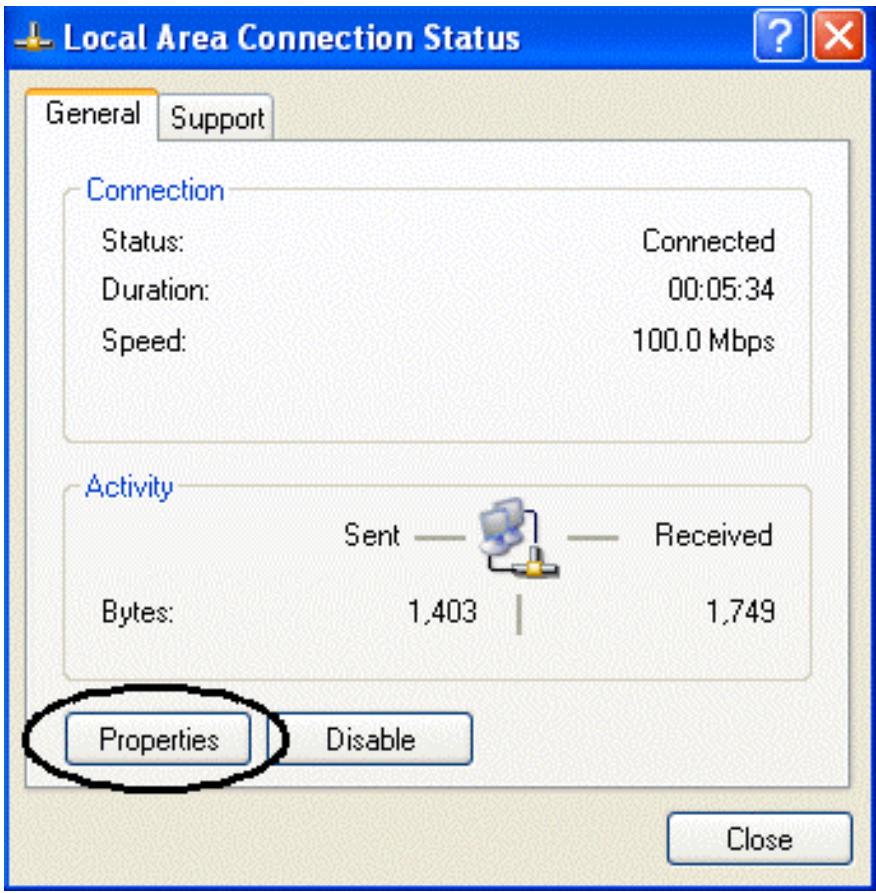
- Double-click Local Area Connection.
- In the LAN Area Connection Status window, click Properties.

- Select Internet Protocol (TCP/IP) and click Properties.
- Select the Obtain an IP address automatically and the Obtain DNS server address automatically radio buttons.
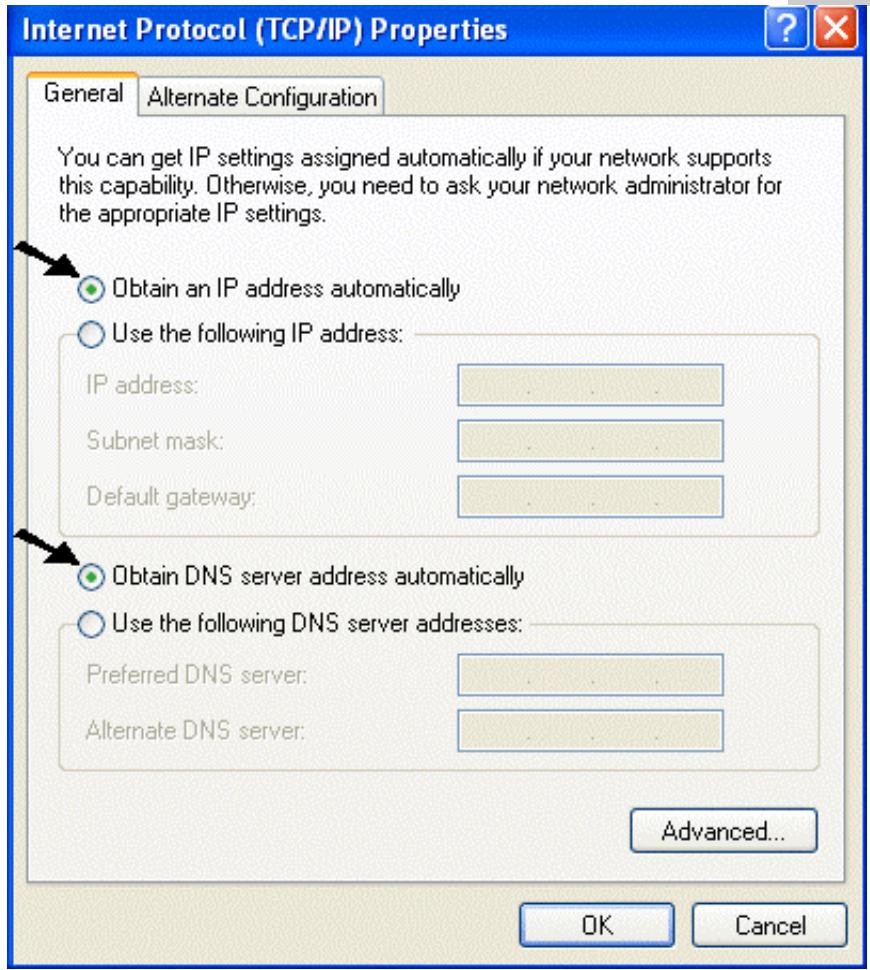
- Click OK to finish the configuration
1.8 Browser configuration
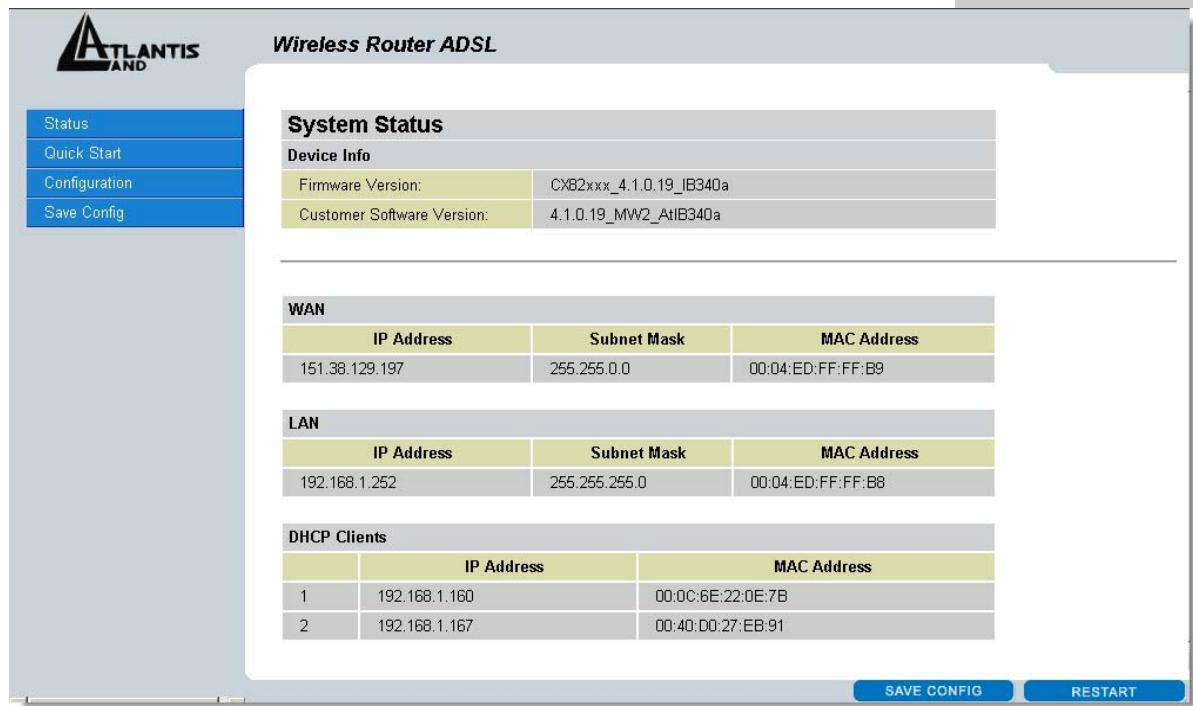
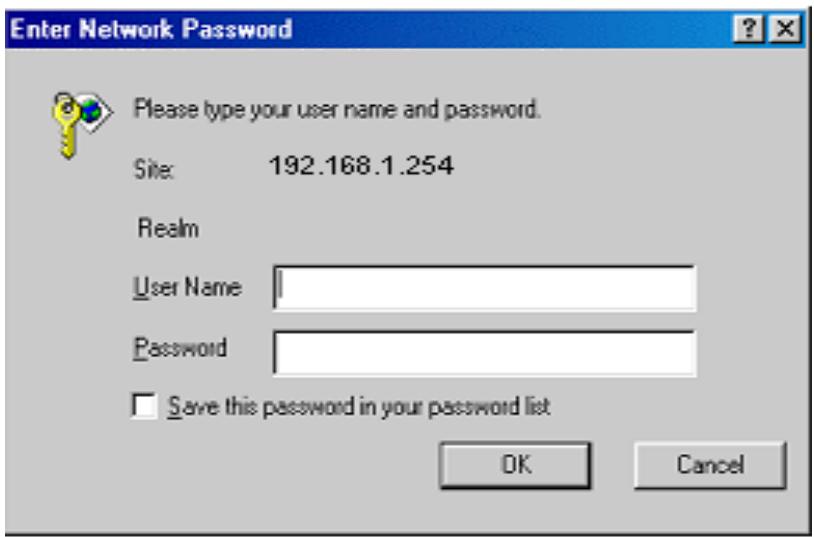
Open the web browser, enter the local port IP address of this Wireless Router ADSL, which default at 192.168.1.254, and click "Go" to get the login page.

The default username is admin, password atlantis and click "OK" to continue.
At the configuration homepage, the left navigation pane where bookmarks are provided links you directly to the desired setup page, including:
- Status (ADSL, LAN, PPP, VPN connect Status, Learned MAC Table, Routing Table, System Log, Security Log)
Quick Start - Configuration (WAN, LAN, Wireless, System, Firewall, VPN, Virtual Server, Advanced)
- Save Config
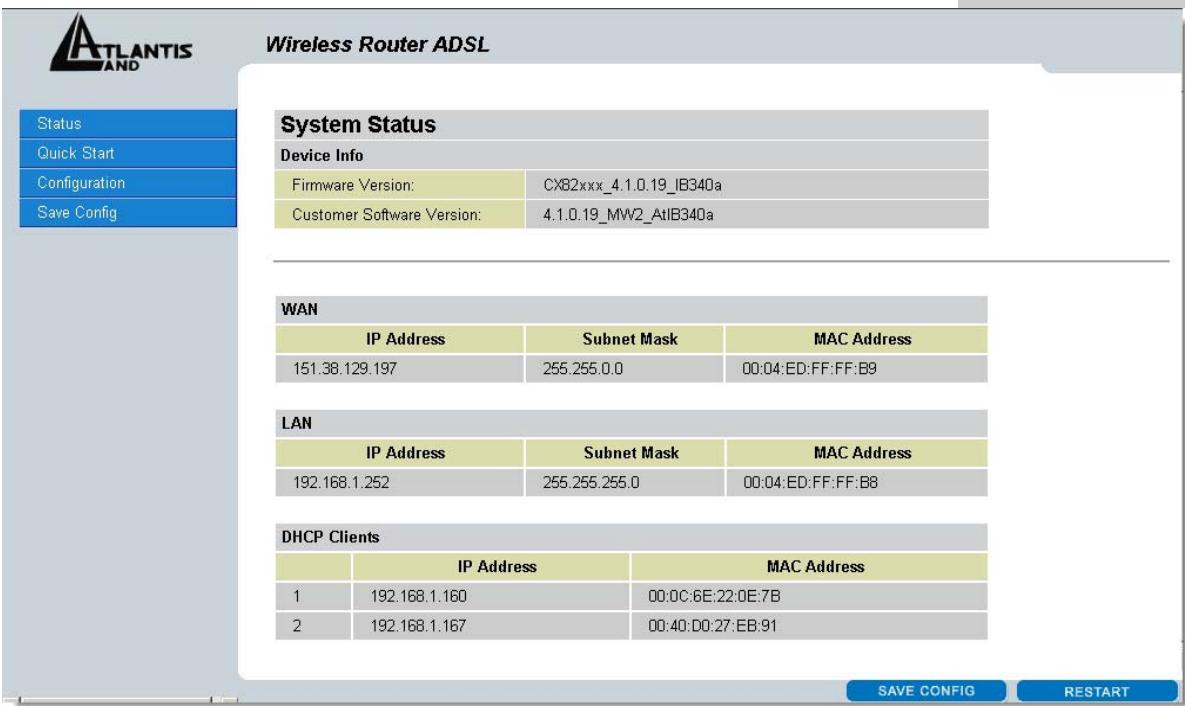
Click on the desired item to expand the page with all settings in the main navigation pane.
Following next steps you can make operating Wireless Router ADSL in short time using PCs in DHCP mode. Refer to manual on Installation CD if you need personalized configuration.
Click on Quick Start to perform an automatic protocol selection.
PPPoE routed/PPPoA routed
PPPoA/PPPoE is known as a dial-up DSL or cable service. It is designed to integrate the broadband services into the current widely deployed, easy-to-use, and low-cost dial-up-access networking infrastructure. Therefore, users can get greater access speed without changing the operation concept, sharing the same ISP account and paying for one access account.
These are configuration parameters:
Virtual Circuit:Enable
- Encapsulation: There are 5 ways :PPPoE VC-Mux, PPPoE LLC, PPPoE None, PPPoA VCMux, and PPPoA LLC. You have to check with your ISP about which way is adopted.
- Bridge: Disable
VPI:0 or 1 (Consult the ISP)
VCI:38 or 50 (Consult the ISP)
IP Adress:0.0.0.0 - Subnet Mask:0.0.0.0
- Gateway:0.0.0.0
-Username: Enter the username provided by your ISP(case sensitive). - Password: Enter the password provided by your ISP (case sensitive).
Automatic Reconnect: Check to enable this device to automatically re-establish the PPPoE session when disconnected by ISP.
Press Submit and then click on Save Config.
Save Config
Save settings and reboot
Submit
Press again Submit. to reboot the Router.
To this point approaching the section Status you will be able to check if connection is up, now you can begin navigation. For every other problem refer to manual on attached cd-rom.
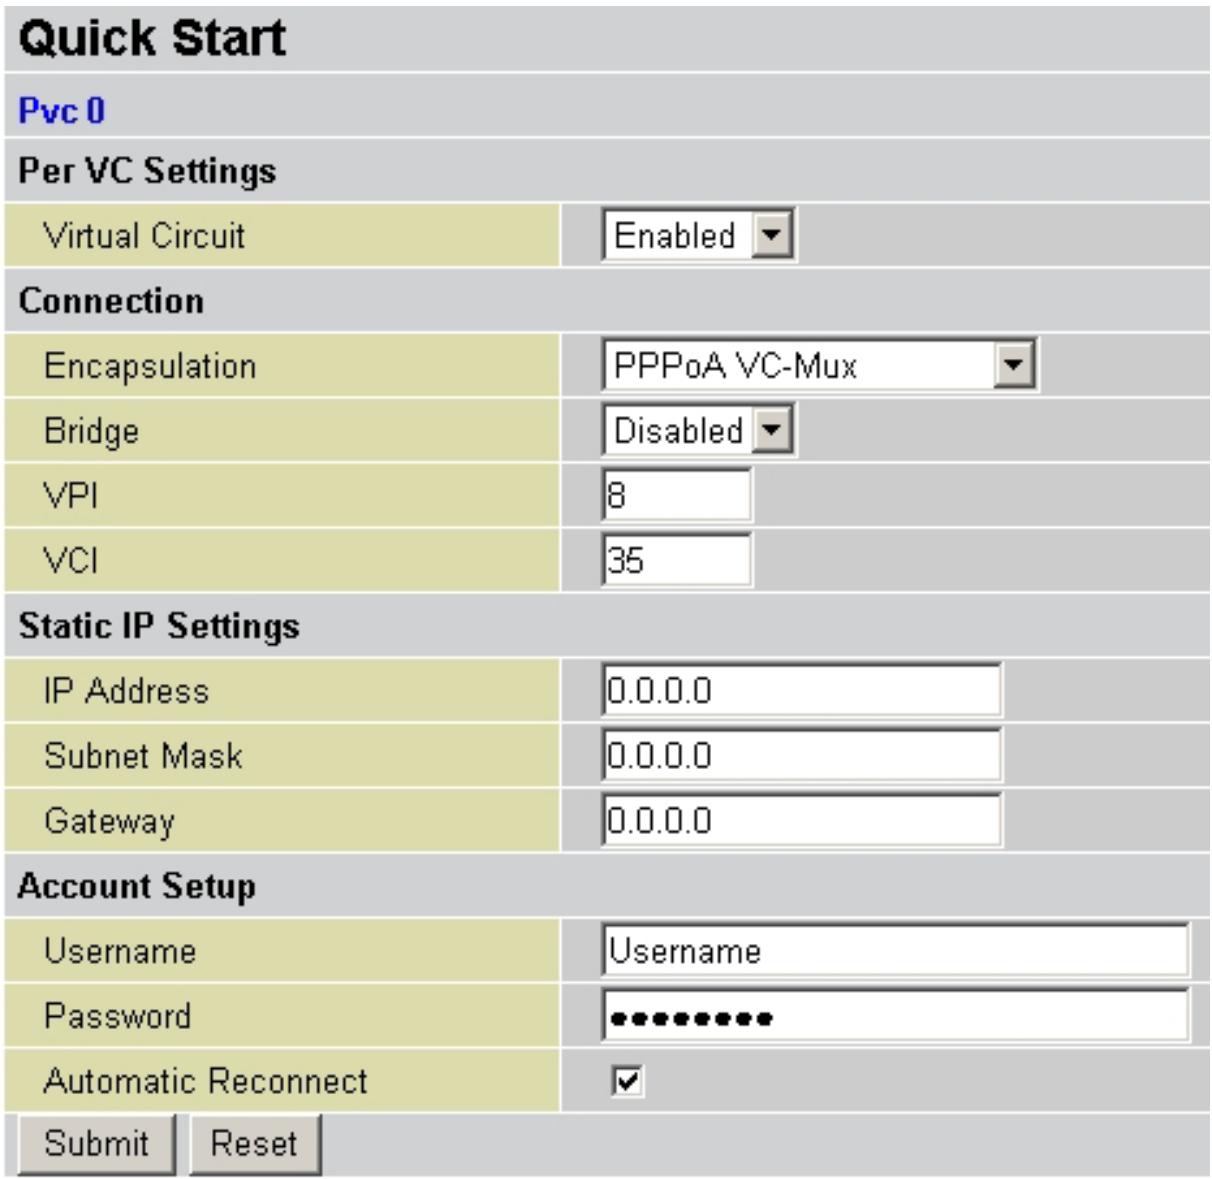
RFC1483 routed / lpoA routed
| Quick Start | ||
| Pvc 0 | ||
| Per VC Settings | ||
| Virtual Circuit | Enabled | |
| Connection | ||
| Encapsulation | PPPoA VC-Mux | |
| Bridge | Disabled | |
| VPI | 8 | |
| VCI | 35 | |
| Static IP Settings | ||
| IP Address | 0.0.0.0 | |
| Subnet Mask | 0.0.0.0 | |
| Gateway | 0.0.0.0 | |
| Account Setup | ||
| Username | Username | |
| Password | ********** | |
| Automatic Reconnect | √ | |
| Submit | Reset | |
These are configuration parameters:
Virtual Circuit:Enable
- Encapsulation: There are 3 ways :1483 Routed IP LLC, 1483 Routed IP VC-MUX or Classical IP over ATM ( RFC 1577). You have to check with your ISP about which way is adopted.
- Bridge:Disable
VPI:0 or 1 (Consult the ISP)
VCI:38 or 50 (Consult the ISP)
IP Adress: Insert your Public IP
- Subnet Mask: Insert Netmask provided by ISP
- Gateway: Insert router Default Gateway
Press Submit and then click on Save Config.
Save Config
Save settings and reboot
Submit
Press again Submit. to reboot the Router.
To this point approaching the section Status you will be able to check if connection is up, now you can begin navigation. For every other problem refer to manual on attached cd-rom.
- Status (ADSL, LAN, PPP, VPN connect Status, Learned MAC Table, Routing Table, System Log, Security Log)
Quick Start - Configuration (WAN, LAN, Wireless, System, Firewall, VPN, Virtual Server, Advanced)
- Save Config

PPPoE Routed /PPPoA Routed
Save settings and reboot
Submit
RFC1483 routed / lpoA routed
| Quick Start | ||
| Pvc 0 | ||
| Per VC Settings | ||
| Virtual Circuit | Enabled | |
| Connection | ||
| Encapsulation | 1483 Routed IP LLC | |
| Bridge | Disabled | |
| VPI | 8 | |
| VCI | 35 | |
| Static IP Settings | ||
| IP Address | 0.0.0.0 | |
| Subnet Mask | 0.0.0.0 | |
| Gateway | 0.0.0.0 | |
| Account Setup | ||
| Username | ||
| Password | ||
| Automatic Reconnect | ||
| Submit | Reset | |
Save settings and reboot
Submit
- Status (ADSL, LAN, PPP, VPN connect Status, Learned MAC Table, Routing Table, System Log, Security Log)
Quick Start - Configuration (WAN, LAN, Wireless, System, Firewall, VPN, Virtual Server, Advanced)
- Save Config

PPPoE routed/PPPoA routed
RFC1483 routed / lpoA routed
| Quick Start | ||
| Pvc 0 | ||
| Per VC Settings | ||
| Virtual Circuit | Enabled | |
| Connection | ||
| Encapsulation | 1483 Routed IP LLC | |
| Bridge | Disabled | |
| VPI | 8 | |
| VCI | 35 | |
| Static IP Settings | ||
| IP Address | 0.0.0.0 | |
| Subnet Mask | 0.0.0.0 | |
| Gateway | 0.0.0.0 | |
| Account Setup | ||
| Username | ||
| Password | ||
| Automatic Reconnect | ||
| Submit | Reset | |